
10
Managing Storage Engines
MongoDB introduced the concept of pluggable storage engines in version 3.0. After the acquisition of WiredTiger, it introduced its storage engine as optional at first, and then as the default storage engine for the current version of MongoDB. In this chapter, we will deep dive into the concept of storage engines, why they matter, and how we can choose the best one according to our workload.
We will also discuss the concept of database locking, why it used to be important, and how it is becoming increasingly less important with the WiredTiger storage engine.
In this chapter, we will cover the following topics:
- Pluggable storage engines
- Locking in MongoDB
Pluggable storage engines
With MongoDB breaking out from the web application paradigm into domains with different requirements, storage has become an increasingly important consideration.
Using multiple storage engines can be seen as an alternative way to using different storage solutions and databases in our infrastructure stack. This way, we can reduce operational complexity and development time to market since the application layer is agnostic of the underlying storage layer.
At the time of writing, MongoDB offers four different storage engines. We will look at these in more detail in the following sections.
WiredTiger
As of version 3.2, WiredTiger is the default storage engine, and also the best choice for most workloads. By providing document-level locking, it overcomes one of the most significant drawbacks earlier versions of MongoDB had – lock contention under high load.
We will explore some of WiredTiger’s benefits in the following sections.
Document-level locking
Locking is so important that we will explain the performance implications that fine-grained locking has in further detail at the end of this section. Having document-level locking as opposed to MMAPv1 collection-level locking can make a huge difference in many real-world use cases. It is one of the main reasons to choose WiredTiger over MMAPv1.
Snapshots and checkpoints
WiredTiger uses Multi-Version Concurrency Control (MVCC). MVCC is based on the concept that the database keeps multiple versions of an object so that readers will be able to view consistent data that doesn’t change during a read.
In a database, if we have multiple readers accessing data at the same time where writers are modifying the data, we can end up with a case where readers view an inconsistent view of this data. The simplest and easiest way to solve this problem is to block all readers until the writers are done modifying data.
This will, of course, cause severe performance degradation. MVCC solves this problem by providing a snapshot of the database for each reader. When the read starts, each reader is guaranteed to view the data exactly as it was when the read started. Any changes made by writers will only be seen by readers after the write has been completed, or, in database terms, after the transaction is committed.
To achieve this goal, when a write is coming in, updated data will be kept in a separate location on disk and MongoDB will mark the affected document as obsolete. MVCC is said to provide point-in-time consistent views. This is equivalent to a read-committed isolation level in traditional RDBMS systems.
For every operation, WiredTiger will snapshot our data at the exact moment that the operation happens and provide a consistent view of application data to the application. When we write data, WiredTiger will create a snapshot for every 2 GB of journal data or every 60 seconds, whichever comes first. WiredTiger relies on its built-in journal to recover any data after the latest checkpoint in case of failure.
Note
We can disable journaling using WiredTiger, but if the server crashes, we will lose any data after the last checkpoint is written.
Journaling
As explained in the Snapshots and checkpoints section, journaling is the cornerstone of WiredTiger crash recovery protection.
WiredTiger compresses the journal using the snappy compression algorithm. We can use the following code to set a different compression algorithm:
storage.wiredTiger.engineConfig.journalCompressor
We can also disable journaling for WiredTiger by setting the following to false:
storage.journal.enabled
Note
If we use a replica set, we may be able to recover our data from a secondary that will get elected as a primary and start taking writes if our primary fails. It is recommended to always use journaling unless we understand and can take the risk of suffering through the consequences of not using it.
Data compression
MongoDB uses the snappy compression algorithm by default to compress data and prefixes for indexes. Index-prefixed compression means that identical index key prefixes are stored only once per page of memory. Compression not only reduces our storage footprint but increases I/O operations per second since less data needs to be stored and moved to and from disk. Using more aggressive compression can lead to performance gains if our workload is I/O bound and not CPU bound.
We can define .zlib compression instead of snappy or no compression by setting the following parameter to false:
storage.wiredTiger.collectionConfig.blockCompressor
Note
Data compression uses less storage at the expense of CPU. .zlib compression achieves better compression at the expense of higher CPU usage, as opposed to the default snappy compression algorithm.
We can disable index prefixes compression by setting the following parameter to false:
storage.wiredTiger.indexConfig.prefixCompression
We can also configure storage per index during creation using the following parameter:
Memory usage
WiredTiger is significantly different from the deprecated MMAPv1 storage system in terms of how it uses RAM. MMAPv1 essentially uses the underlying operating system’s filesystem cache to page data from disk to memory and vice versa.
WiredTiger, on the other hand, introduces the new concept of the WiredTiger internal cache.
The WiredTiger internal cache is, by default, the larger of the following:
- 50% of RAM minus 1 GB
- 256 MB
This means that if our server has 8 GB of RAM, we will get the following:
max(7 GB , 256 MB) = WiredTiger will use 3.5 GB of RAM
If our server has 1,512 MB of RAM, we will get the following:
max(256 MB, 256 MB) = WiredTiger will use 256 MB of RAM
Essentially, for any server that has less than 1,512 MB of RAM, WiredTiger will use 256 MB for its internal cache.
We can change the size of the WiredTiger internal cache by setting the following parameter:
storage.wiredTiger.engineConfig.cacheSizeGB
We can also do this from the command line, like so:
--wiredTigerCacheSizeGB
Apart from the WiredTiger internal cache, which is uncompressed for higher performance, MongoDB uses the filesystem cache, which is compressed, just like MMAPv1, and will end up using all available memory in most cases.
The WiredTiger internal cache can provide similar performance to in-memory storage. As such, it is important to grow it as much as possible.
We can achieve better performance when using WiredTiger with multi-core processors. This is also a big win compared to MMAPv1, which does not scale as well.
Note
We can, and should, use Docker or other containerization technologies to isolate the mongod processes from others and make sure that we know how much memory each process can, and should, use in a production environment. It is not recommended to increase the WiredTiger internal cache above its default value. The filesystem cache should not be less than 20% of the total RAM.
readConcern
WiredTiger supports multiple readConcern levels. Just like writeConcern, which is supported by every storage engine in MongoDB, with readConcern, we can customize how many servers in a replica set must acknowledge the query results for the document to be returned in the result set.
The most notable options for readConcern are as follows:
- local: This is the default option. It will return the most recent data from the server. Data may, or may not, have propagated to the other servers in a replica set, and we run the risk of a rollback.
- linearizable:
- Only applicable for reads from the primary server
- Only applicable in queries that return a single result
- Data returns satisfy two conditions – majority and writeConcern
- Data was acknowledged before the start of the read operation
In addition, if we have set writeConcernMajorityJournalDefault to true, we are guaranteed that the data won’t get rolled back.
If we have set writeConcernMajorityJournalDefault to false, MongoDB will not wait for the majority writes to be durable before acknowledging the write. In this case, our data may be rolled back in the event of losing a member from the replica set. The data that’s been returned has already been propagated and acknowledged by the majority of the servers before the read has started.
Note
We need to use maxTimeMS when using linearizable and majority read concern levels in case we can’t establish majority writeConcern to avoid blocking, which means we wait for the response forever. In this case, the operation will return a timeout error.
MMAPv1 is the older storage engine and is considered, in many aspects, as being deprecated, but many deployments may still use it.
Note
local and linearizable read concerns are available for MMAPv1 as well.
WiredTiger collection-level options
When we create a new collection, we can pass in options to WiredTiger, like this:
> db.createCollection(
"mongo_books",
{ storageEngine: { wiredTiger: { configString: "<key>=<value>" } } })
This helps create our mongo_books collection with a key-value pair from the available ones that WiredTiger exposes through its API. Some of the most widely used key-value pairs are shown in the following table:
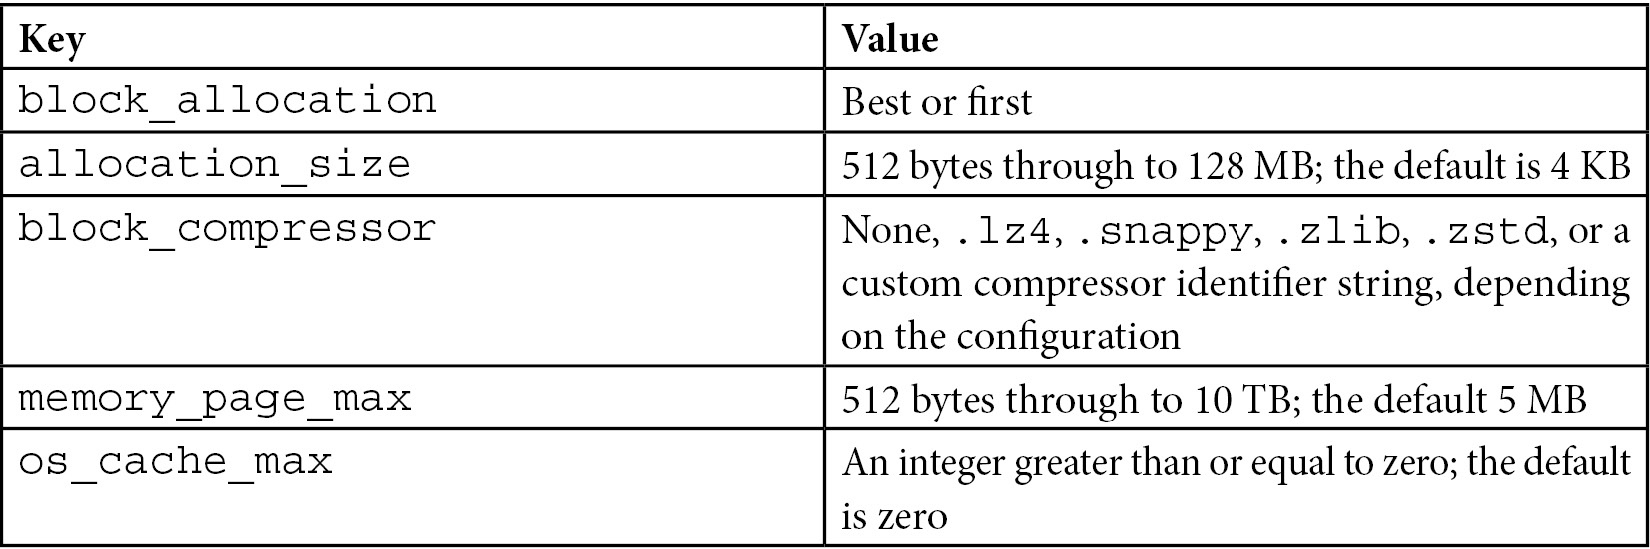
Table 10.1 – WiredTiger key-value pairs
The following has been taken from the definition in the WiredTiger documentation, which is located at http://source.wiredtiger.com/mongodb-6.0/struct_w_t___s_e_s_s_i_o_n.html:
int WT_SESSION::create()
Collection-level options allow for flexibility in configuring storage but should be used with extreme care and after careful testing in development/staging environments.
Note
Collection-level options will be propagated to secondaries if they’re applied to a primary in a replica set. block_compressor can also be configured from the command line globally for the database using the --wiredTigerCollectionBlockCompressor option.
WiredTiger performance strategies
As discussed earlier in this chapter, WiredTiger uses an internal cache to optimize performance. On top of that, there is always the filesystem cache, which the operating system uses to fetch data from disk.
By default, we have 50% of RAM dedicated to the filesystem cache; the remaining 50% is dedicated to WiredTiger’s internal cache.
The filesystem cache will keep data compressed as it is stored on disk. The internal cache will decompress it as follows:
- Strategy 1: Allocate 80% or more to the internal cache. Our goal here is to fit our working set in WiredTiger’s internal cache.
- Strategy 2: Allocate 80% or more to the filesystem cache. Our goal here is to avoid using the internal cache as much as possible and rely on the filesystem cache for our needs.
- Strategy 3: Use an SSD as the underlying storage for fast seek time and keep defaults at 50-50% allocation.
- Strategy 4: Enable compression in our storage layer through MongoDB’s configuration to save on storage, and potentially improve our performance by having a smaller working set size.
Our workload will dictate whether we need to deviate from the default (Strategy 1) to any of the rest. In general, we should use SSDs wherever possible, and with MongoDB’s configurable storage, we can even use SSDs for some of the nodes where we need the best performance and keep HDDs for analytics workloads.
WiredTiger B-tree versus LSM indexes
B-tree is the most common data structure for indexes across different database systems. WiredTiger offers the option to use a log-structured merge (LSM) tree instead of a B-tree for indexing.
An LSM tree can provide better performance when we have a workload of random inserts that would otherwise overflow our page cache and start paging in data from disk to keep our index up to date.
LSM indexes can be selected from the command line, like so:
$ mongod --wiredTigerIndexConfigString "type=lsm,block_compressor=zlib"
The preceding command chooses lsm as type. Here, block_compressor is zlib for indexes in this mongod instance.
Data migration to WiredTiger
As of MongoDB 5.x, there is no straightforward migration path from MMAPv1 to WiredTiger. We need to mongodump or otherwise export our data from MongoDB and then import it into the newly created standalone server, replica set, or sharded cluster using WiredTiger storage.
In the case of a standalone server, we stop and start the server with WTDBPath, as shown here:
$ mongod --storageEngine wiredTiger --dbpath <WTDBPath>
In the case of a replica set, we need to shut down and restart our secondary servers one by one. After that, we must restart our primary server using the same parameters as with the standalone server.
In the case of a sharded cluster, we also have to follow the same procedure that we did for a replica set for each of the shards in our cluster.
Encrypted at rest
The encrypted storage engine was added to support a series of special use cases, mostly revolving around finance, retail, healthcare, education, and the government.
We need to have encryption for the rest of our data if we must comply with a set of regulations, including the following:
- PCI DSS for handling credit card information
- HIPAA for healthcare applications
- NIST for the government
- FISMA for the government
- STIG for the government
This can be done in several ways, and cloud service providers, such as EC2, provide EBS storage volumes with built-in encryption. Encrypted storage supports Intel’s AES-NI-equipped CPUs to accelerate the encryption/decryption process.
The following encryption algorithms are as follows:
- AES-256, CBC (default)
- AES-256, GCM
- FIPS, FIPS-140-2
Encryption is supported at the page level for better performance. When a change is made in a document, instead of re-encrypting/decrypting the entire underlying file, only the page that is affected gets modified.
Encryption key management is a huge aspect of encrypted storage security. Most of the specifications mentioned previously require key rotation at least once per year.
MongoDB’s encrypted storage uses an internal database key per node. This key is wrapped by an external (primary) key that must be used to start the node’s mongod process. By using the underlying operating system’s protection mechanisms, such as mlock or VirtualLock, MongoDB can guarantee that the external key will never be leaked from memory to disk by page faults.
The external (primary) key can be managed either by using the Key Management Interoperability Protocol (KMIP) or by using local key management via a key file.
MongoDB can achieve key rotation by performing rolling restarts of the replica set members. Using KMIP, MongoDB can only rotate the external key and not the underlying database files. This delivers significant performance benefits.
Note
Using KMIP is the recommended approach for encrypted data storage. Encrypted storage is based on WiredTiger, so all its advantages can be enjoyed using encryption as well. Encrypted storage is a part of MongoDB Enterprise Edition, the paid offering by MongoDB.
Using MongoDB’s encrypted storage gives the advantage of increased performance versus encrypted storage volumes. MongoDB’s encrypted storage has an overhead of around 15% compared to 25% or more for third-party encrypted storage solutions.
In most cases, if we need to use encrypted storage, we will know it well in advance from the application design phase, and we can perform benchmarks against different solutions to choose the one that best fits our use case.
Key management, replication, and auditing
MongoDB encryption at rest is only available in MongoDB Enterprise and MongoDB’s cloud offering, MongoDB Atlas.
Key management can be performed either using a third-party server via KMIP or by storing a key file that’s local to the DB server – one for each server.
Using the key file option does not meet most regulatory requirements and is strongly discouraged as it can become the prime attack vector against our system.
Using the KMIP option, we need to configure the following parameters to set up encryption at rest:
- AuditLog.auditEncryptionKeyIdentifier: The unique ID of the KMIP key that’s used for audit log encryption.
- AuditLog.compressionMode: This compresses the audit log files. It defaults to none. If defined, it must go together with the previous option. auditEncryptionKeyIdentifier: At the time of writing, the only compression option is zstd.
- auditEncryptionHeaderMetadataFile: This specifies the path and filename for the header metadata, which we can use to decrypt the audit log file.
- auditEncryptKeyWithKMIPGet: Setting this to true will enable backward compatibility with KMIP servers running v1.0 or v.1.1 of the protocol. The latest version, 3.0, was released in 2021.
Note
While we should use KMIP for staging and production environments, we can also test audit log encryption locally for development by using the auditLog.localAuditKeyFile setting by using our keys in the same storage as the MongoDB server.
Encryption at rest using replica sets or shards is the same as when we use a standalone server. We need to set up encryption at rest in every single node, and as a security precaution, use different keys for each server.
Auditing using encryption at rest is also possible but only when using a KMIP server. In a mixed-use environment where some servers use encryption at rest and others don’t, it’s important to make sure that we don’t leak personally identifiable information (PII) through the logs.
We can achieve this by setting the configuration parameter:
security.redactClientLogData=true
Audit logs cannot output to syslog. They can only output to a file.
Client-side field-level encryption
MongoDB introduced end-to-end client and field-level encryption with MongoDB 4.2.
This can be used in combination with TLS/SSL authentication between each server in the transport layer to avoid man-in-the-middle attacks. MongoDB storage with encryption at rest can also be used to avoid data being accessedfrom when it is stored in the disk.
Client-side field-level encryption encrypts data on the client side, making it impossible for even third-party systems that store our data (such as MongoDB Atlas) or employees working for our organization to read the secured underlying data that’s been stored.
We can encrypt fields by using the automatic approach or by defining our explicit encryption of fields.
We will cover the automatic approach in more detail shortly. Our application needs to create a MongoClient object that conforms with the strict subset of the JSON Schema Draft 4 standard syntax to connect to the database (https://datatracker.ietf.org/doc/html/draft-zyp-json-schema-04).
So, data encryption and decryption are transparent to the client. Data encryption can be either deterministic or randomized.
Deterministic data encryption can be used for read queries, though doing so makes you susceptible to frequency analysis recovery attacks. For example, if we encode a boolean value, it would result in two encrypted values in the database. We only need to know the mapping between one of the DB encrypted values and its unencrypted equivalent to map it to true or false and the other value to false or true, respectively.
Randomized data encryption will overcome this problem by encrypting the entire object instead of the encrypted field. This resolves the frequency analysis attack problem that the per-field deterministic data encryption poses. However, this prevents us from querying the encrypted data effectively. Every query must now decrypt the entire object to compare the data with the query predicate.
We can and should use MongoDB’s built-in JSON schema validation with encrypted fields to make sure that all the clients are submitting encrypted data to the server in the correct shape and format.
In-memory
Utilizing MongoDB’s in-memory storage is a risky task with high rewards. Keeping data in memory can be up to 100,000 times faster than durable storage on disk.
Another advantage of using in-memory storage is that we can achieve predictable latency when we write or read data. Some use cases dictate latency that does not deviate from the norm, no matter what the operation is.
On the other hand, by keeping data in memory, we are open to power loss and application failures, which can result in us losing all of our data. Using a replica set can safeguard us against some classes of errors, but we will always be more exposed to data loss if we store it in memory as opposed to on disk.
For example, we can set up a replica set with two servers using in-memory storage and then set up a third server using WiredTiger storage with {hidden: true, priority:0}. This pair of settings guarantees that the WiredTiger node will never become primary but is otherwise continuously synced with the in-memory nodes.
However, there are some use cases in which we may not care that much about losing older data. For example, in the financial world, we may have the following:
- High-frequency trading/algorithmic trading, where higher latency in the case of high traffic can lead to transactions not being fulfilled.
- In fraud detection systems, we are concerned about real-time detection being as fast as possible and we can safely store only the cases that require further investigation, or the positive ones, in durable storage.
- Credit card authorizations, trade ordering reconciliation, and other high-traffic systems that demand a real-time answer.
In the web applications ecosystem, we have the following:
- In intrusion detection systems, such as fraud detection, we are concerned with detecting intrusion as fast as possible without so much concern for false positive cases
- In the case of the product search cache, losing data is not mission-critical, but rather a small inconvenience from the customer’s perspective
- For real-time personalized product recommendations, there is a low-risk operation in terms of data loss. We can always rebuild the index, even if we suffer data loss
A major disadvantage of an in-memory storage engine is that our dataset has to fit in memory. This means we must know and keep track of our data usage so that we don’t exceed the memory of our server.
At the time of writing, MongoDB 5.x requires the primary server to be using the WiredTiger storage engine if we want to use transactions in a replica set or sharded environment.
Overall, using MongoDB’s in-memory storage engine may be useful in some edge use cases, but lacking durability in a database system can be a blocking factor in terms of its adoption.
Note
In-memory storage is part of MongoDB Enterprise Edition, the paid offering by MongoDB.
Other storage engines
The modular MongoDB architecture allows third parties to develop storage engines.
RocksDB and TokuMX
RocksDB is an embedded database for key-value data. It’s a fork of LevelDB that stores key-value pairs in arbitrary byte arrays. It was started by Facebook in 2012 and now serves as the backend for the interestingly named CockroachDB, the open source database inspired by Google Spanner.
Another widely used MongoDB storage engine was TokuMX by Percona. TokuMX was designed with both MySQL and MongoDB in mind, but since 2016, Percona has focused its efforts on the MySQL version, instead switching over to RocksDB for MongoDB storage support.
MongoRocks is a project backed by Percona and Facebook that aims to bring the RocksDB backend to MongoDB. RocksDB can achieve higher performance than WiredTiger for some workloads and is worth investigating.
MongoRocks was deprecated by Percona in 2018 in favor of WiredTiger and has since been substituted by Percona Server for MongoDB.
Percona Server for MongoDB
Percona Server for MongoDB 5.0 is a drop-in replacement for MongoDB Community Edition. It offers some of the MongoDB Enterprise Edition features for free as source-available software.
Percona Server for MongoDB 5.0 uses the Creative Commons Attribution 4.0 International License. This license allows you to share, copy, and redistribute the material in any medium or format. The license allows you to adapt, remix, transform, and build upon the code for any purpose, even commercial. The only restriction is that attribution and credit must be given to Percona, and you must also provide a link to the license and an indication that you have made changes to the source code.
Licensing aside, Percona Server for MongoDB 5.0 adds the following free additions to MongoDB Enterprise Edition:
- LDAP authentication (simple LDAP authentication and external SASL authentication)
- Kerberos authentication
- Encryption at rest using Hashicorp vault as the key server
- Percona’s in-memory storage engine
- LDAP authorization
- Audit logging
- Log redaction
- Replica set hot backup functionality
- SNMP monitoring
Percona Server for MongoDB 5.0 is based on MongoDB Community Edition 5.0 and as such will not benefit from any features being added to snapshot versions 5.1, 5.2, or 5.3. These snapshot versions are immediately available in MongoDB Atlas, the DBaaS offering from MongoDB Inc.
In this section, we discussed pluggable storage engines and how they can be used to improve performance and consistency with MongoDB. The next section will focus on the database locking concept and all we need to know before choosing or modifying our storage engine.
Locking in MongoDB
Document-level and collection-level locking is mentioned throughout this chapter and also in several other chapters in this book. It is important to understand how locking works and why it is important.
Database systems use the concept of locks to achieve ACID properties. When there are multiple read or write requests coming in parallel, we need to lock our data so that all the readers and writers have consistent and predictable results.
MongoDB uses multi-granularity locking. The available granularity levels, in descending order, are as follows:
- Global
- Database
- Collection
- Document
The locks that MongoDB and other databases use are as follows, in order of granularity:
- IS: Intent shared
- IX: Intent exclusive
- S: Shared
- X: Exclusive
If we use locking at a granularity level with S or X locks, then all the higher levels need to be locked with an intent lock of the same type.
Other rules for locks are as follows:
- A single database can simultaneously be locked in IS and IX mode
- An exclusive (X) lock cannot coexist with any other lock
- A shared (S) lock can only coexist with IS locks
Reads and writes requesting locks are generally queued in first-in, first-out (FIFO) order. The only optimization that MongoDB will do is reorder requests according to the next request in the queue to be serviced.
So, let’s say we have an IS(1) request coming up next and our current queue is IS(1)->IS(2)->X(3)->S(4)->IS(5), as shown here:
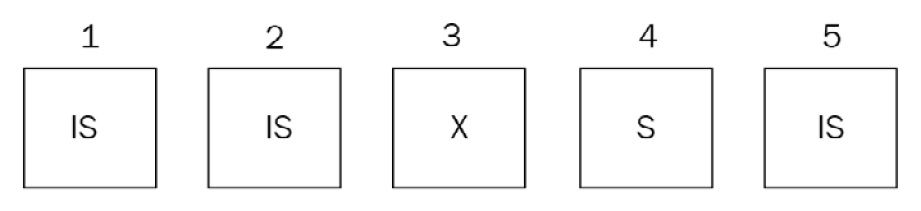
Figure 10.2 – The requests sequence before reordering
Here, MongoDB will reorder the requests as IS(1)->IS(2)->S(4)->IS(5)->X(3), as shown here:
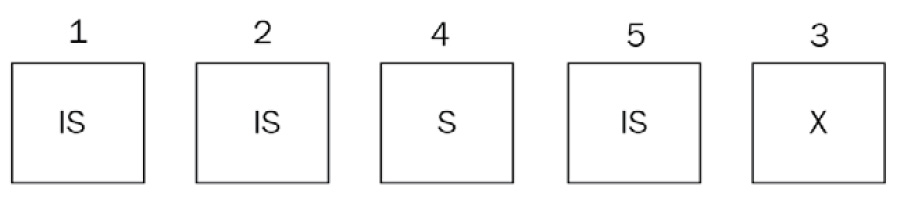
Figure 10.3 – The requests sequence after reordering
If, during servicing, the IS(1) request or new IS or S requests come in, such as IS(6) and S(7), in that order, they will still be added at the end of the queue and won’t be considered until the X(3) request has been dealt with.
Our new queue will now be IS(2)->S(4)->IS(5)->X(3)->IS(6)->S(7):

Figure 10.4 – The final requests sequence
This is done to prevent the starvation of the X(3) request, which would end up getting pushed back in the queue all the time due to new IS and S requests coming in. It is important to understand the difference between intent locks and locks themselves. The WiredTiger storage engine will only use intent locks for global, database, and collection levels.
It uses intent locks at higher levels (that is, collection, database, and global) when a new request comes in and according to the following compatibility matrix:
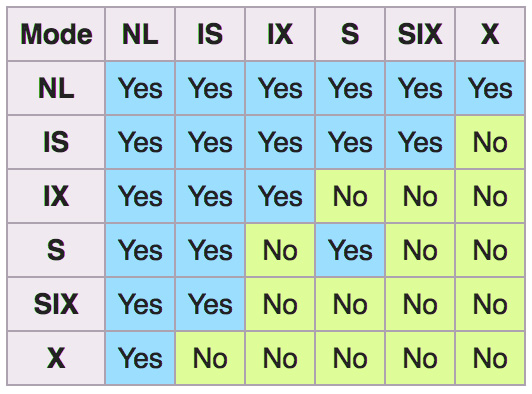
Figure 10.5 – Intent locks compatibility matrix
First, MongoDB will acquire intention locks in all ancestors before acquiring the lock on the document itself. This way, when a new request comes in, it can quickly identify if it cannot be serviced based on less granular locks.
WiredTiger will use S and X locks at the document level. The only exception to that is for typically infrequent and/or short-lived operations involving multiple databases. These will still require a global lock, similar to the behavior MongoDB had in pre 2.x versions.
Note
Administrative operations, such as dropping a collection, still require an exclusive database lock.
MMAPv1, as explained previously, uses collection-level locks. Operations that span a single collection but may or may not be spanning a single document will still lock up the entire collection. This is the main reason why WiredTiger is the preferred storage solution for all new deployments.
Lock reporting
We can inspect the lock status using any of the following tools and commands:
- db.serverStatus() through the locks document
- db.currentOp() through the locks field
- mongotop
- mongostat
- MongoDB Cloud Manager
- MongoDB Ops Manager
Lock contention is a really important metric to keep track of as it can bring our database to its knees if it gets out of control.
Note
If we want to terminate an operation, we must use the db.killOp() shell command.
Lock yield
A database with a database-level lock will not be really useful under stress and will end up being locked up most of the time. A smart solution to this in the early versions of MongoDB was getting operations to yield their locks based on some heuristics.
Any update() commands that affect multiple documents would yield their X lock to improve concurrency.
MMAPv1’s predecessor in earlier versions of MongoDB would use these heuristics to predict whether data was already in memory before performing the requested operation. If it wasn’t, it would yield the lock until the underlying operating system pages data in memory, and then re-acquire the lock to continue servicing the request.
The most notable exceptions to these are index scans, where the operation will not yield its lock and will just block on waiting for the data to get loaded from disk.
Since WiredTiger only uses intent locks at the collection level and above, it doesn’t need these heuristics. This is because intent locks don’t block other readers and writers.
Commonly used commands and locks
The most commonly used commands and locks are shown in the following table:
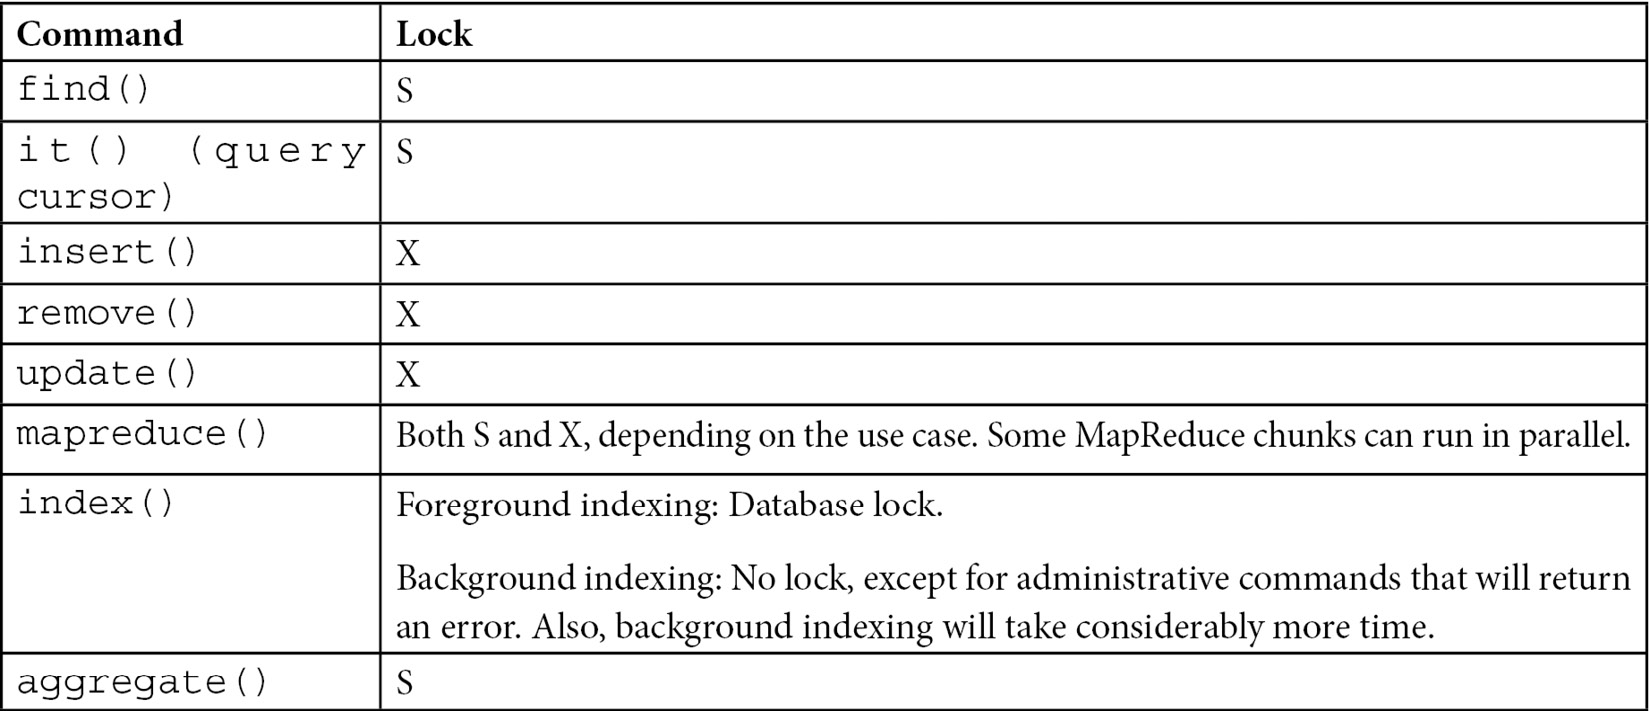
Table 10.2 – Commands and locks for performing locking
Commands requiring a database lock
The following commands require a database lock. We should plan before issuing them in a production environment:
- db.collection.createIndex() in the (default) foreground mode
- reIndex
- compact
- db.repairDatabase()
- db.createCollection() if creating a multiple GB capped collection
- db.collection.validate()
- db.copyDatabase(), which may lock more than one database
We also have some commands that lock the entire database for a short period:
- db.collection.dropIndex()
- db.getLastError()
- db.isPrimary()
- Any rs.status() command
- db.serverStatus()
- db.auth()
- db.addUser()
These commands shouldn’t take more than a few milliseconds to operate, so we shouldn’t worry about this unless we have automated scripts with these commands in place, in which case we must note how often they will occur.
Note
In a sharded environment, each mongod applies locks, thus greatly improving concurrency.
In replica sets, our primary server must take all write operations. For these to be replicated correctly to the secondaries, we must lock the local database that holds the oplog of operations at the same time that we lock our primary document/collection/database. This is usually a short-lived lock that, again, we shouldn’t worry about.
Secondaries in replica sets will fetch write operations from the primary local database’s oplog, apply the appropriate X lock, and apply service reads once the X locks are done with.
From the preceding explanation, it’s evident that locking should be avoided at all costs in MongoDB. We should design our database so that we avoid as many X locks as possible, and when we need to take X locks over one or multiple databases, we should do so in a maintenance window with a backup plan in case operations take longer than expected.
Again, WiredTiger only uses intent locking at the document level and as such has improved dramatically in terms of locking the database up. This section should mostly serve as a reference for troubleshooting legacy deployments using the now deprecated MMAPv1 storage engine.
Further reading
Please refer to the following links for further reference:
- MongoDB concurrency: https://docs.mongodb.com/manual/faq/concurrency/
- MongoDB storage engines: https://docs.mongodb.com/manual/core/storage-engines/
- MongoDB pluggable storage engines blog post: https://www.mongodb.com/blog/post/building-applications-with-mongodbs-pluggable-storage-engines-part-2
- MongoDB WiredTiger: https://docs.mongodb.com/manual/core/wiredtiger/
- MongoDB’s create index and collection options: https://docs.mongodb.com/manual/reference/method/db.collection.createIndex/#createindex-options
- https://docs.mongodb.com/manual/reference/method/db.createCollection/#create-collection-storage-engine-options
- MongoDB deprecated MMAPv1 storage engine documentation: https://docs.mongodb.com/manual/core/mmapv1/
- MongoDB WiredTiger WT Session documentation: http://source.wiredtiger.com/mongodb-6.0/struct_w_t___s_e_s_s_i_o_n.html
- MongoDB with the microservices architecture: https://www.mongodb.com/what-are-microservices
- MongoDB storage engines overview: https://webassets.mongodb.com/storage_engines_adress_wide_range_of_use_cases.pdf
- MongoDB read concern: https://docs.mongodb.com/manual/reference/read-concern/
Summary
In this chapter, we learned about different storage engines in MongoDB. We identified the pros and cons of each and the use cases for choosing each storage engine.
Then, we learned about using multiple storage engines, how we can use them, and the benefits. A big part of this chapter was also dedicated to database locking, how it can happen, why it is bad, and how we can avoid it.
We split our operations by the lock they need. This way, when we design and implement our application, we can make sure that we have a design that locks our database as little as possible.
In the next chapter, we will learn about MongoDB and how we can use its tools on premises or in the cloud to design and develop our applications.