11
MongoDB Tooling
Features, stability, and great driver support are all important; however, there is another area that is key to a software product succeeding, and that is the ecosystem built around it. MongoDB (originally under the name 10gen Inc.) introduced the MongoDB Management Service (MMS) more than 10 years ago, in 2011, and it was seen as an innovation at the time. In this chapter, we will go through the following suite of different tools that are available for MongoDB and explore how they can improve productivity:
- MongoDB Charts
- MongoDB Kubernetes Operator
- MongoDB Atlas Serverless
- MongoDB Realm services
- MongoDB Compass
- MongoDB Cloud and Ops Manager
In particular, we will cover the following topics:
- Introduction to MongoDB tools
- MongoDB Kubernetes Operator
- MongoDB Atlas Serverless
- MongoDB Realm
- MongoDB Charts
- MongoDB Compass
- MongoDB Cloud Manager
Technical requirements
You need to have access to https://www.mongodb.com/ and sign up for a trial account using the website. A free account is enough for most of the examples demonstrated in this chapter, but any paid account is needed for a few of the most advanced examples.
Introduction to MongoDB tools
MongoDB tools fall into two categories: on-premises and cloud-based services. Over time, software-as-a-service (SaaS) tooling has prevailed over on-premises tooling. While a few tools are still available as a standalone download, MongoDB has shifted efforts toward cloud-based tools around their online platform, MongoDB Atlas.
Readers of previous editions of this book will identify the shift in focus throughout the chapters. New readers should be aware that while tools can be available on-premises, there is a possibility that this won’t be the case in the future.
The MongoDB tool we will cover first is the MongoDB Atlas platform.
MongoDB Atlas
MongoDB Atlas is MongoDB’s cross-cloud platform offering. It offers the latest stable version of MongoDB, along with an ecosystem of tooling from the creators, MongoDB Inc. In the next section, we will learn how to initiate a replica set MongoDB cluster in any of the major cloud providers (Amazon Web Services (AWS), Azure, or Google Cloud Platform (GCP)).
Setting up a cluster
MongoDB Atlas is MongoDB’s database-as-a-service (DBaaS) offering. It is available as a multi-cloud offering, supporting AWS, Microsoft Azure, and GCP.
Using DBaaS, patches and minor version upgrades are applied automatically, without any downtime. Using the graphical user interface (GUI), a developer can deploy geographically distributed database instances to avoid having any single point of failure (SPOF). For websites with significant traffic, this can also help by placing database servers closer to the users who are accessing their data. This is a key part of MongoDB’s strategy and offering as they embrace having data close to the user.
Similar to most DBaaS offerings, Atlas allows users to scale deployment using a GUI. Every deployment lives on its own virtual private cloud (VPC) and can leverage MongoDB Enterprise Server features such as encryption key management, Lightweight Directory Access Protocol (LDAP), and auditing features.
The live migration service can be used to migrate datasets from existing deployments on-premises or even relational databases such as Oracle, Microsoft SQL Server, PostgreSQL, and MySQL, as of version 6, with the relational migration tool, in any of the three supported cloud providers or other DBaaS services, such as Compose and ObjectRocket, using the same GUI.
We can query our datasets in MongoDB Atlas using MongoDB Query Language (MQL) or the Structured Query Language (SQL) interface for Atlas. The SQL interface for Atlas uses a SQL-92-compatible dialect that is designed from the ground up for the document model. The Atlas SQL interface can also query across different Atlas clusters and heterogeneous cloud storage such as Simple Storage Service (S3) buckets.
Creating a new cluster
Creating a new cluster using MongoDB Atlas is as simple as clicking and selecting configuration options. In the following screenshot, we can see all the options that are available when creating a new cluster:
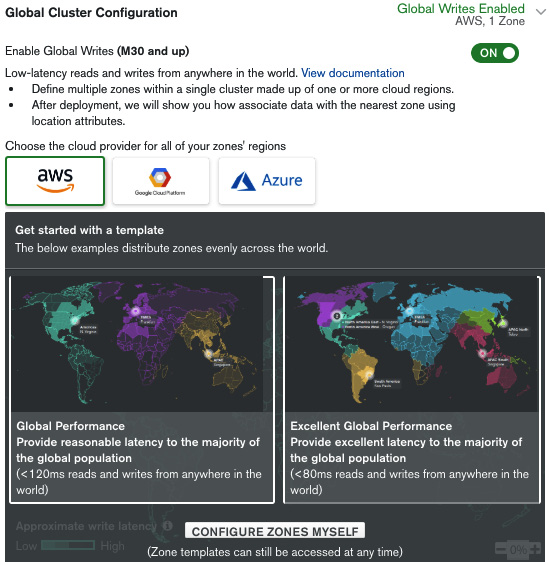
Figure 11.1: Global Cluster Configuration panel
The following screenshot shows the Zone configuration summary panel:
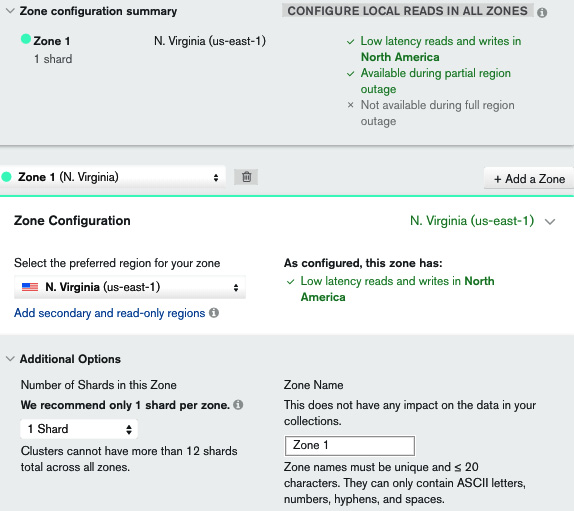
Figure 11.2: Zone configuration summary panel
One of the game-changing features in MongoDB Atlas is the ability to instantly provision geographically distributed servers across different zones and data centers (for all three major cloud providers) with the goal of having our data closest to our users. This can be useful for performance and regulatory reasons (such as General Data Protection Regulation (GDPR), for the European Union (EU)).
By enabling global writes, we can start configuring this setting. Using any of the two templates—Global Performance or Excellent Global Performance—an administrator can create server configurations that will be less than 120 milliseconds or 80 milliseconds, respectively from any user around the world. An administrator can also define their own custom assignments from regions to data centers.
In the Zone configuration summary panel, we can see an overview of how our settings will affect performance. M30 is the shard-enabled MongoDB Atlas plan, and this configuration is creating (under the hood) a shard per zone. We can create more shards per zone but this is not recommended at this time.
Enabling CONFIGURE LOCAL READS IN ALL ZONES will create local read-only replica set nodes in every region other than the zone that is used to write data to. So, if we have three zones (A, B, and C), we end up with writes for A going to A but reads from A happening from a server in either zone A, B, or C, depending on which server is geographically closer to the user. The same goes for zones B and C.
This section is probably the most important for complex, multi-region deployments and should be treated with extreme care.
The next section is for configuring the servers that we want to use for our clusters, as illustrated in the following screenshot:
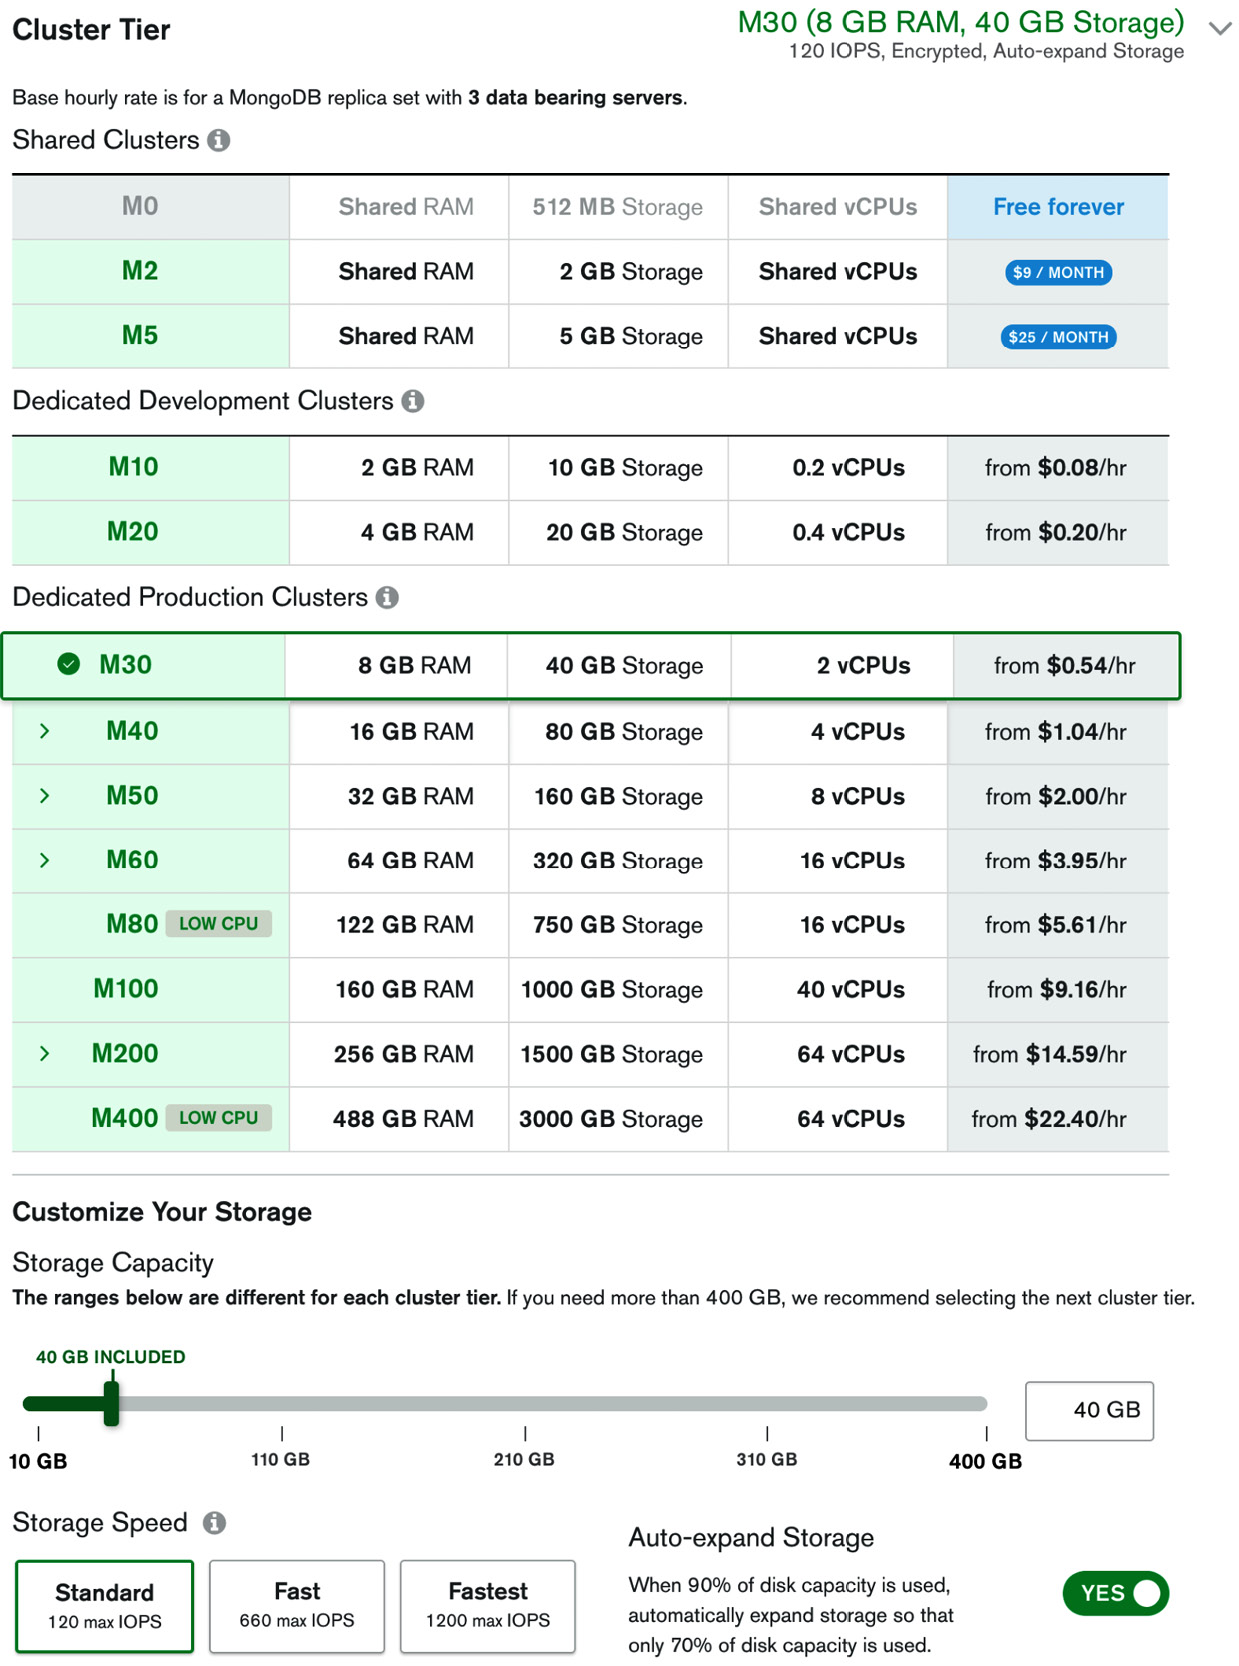
Figure 11.3: Server selection panel
This is similar to how we select servers in Elastic Compute Cloud (EC2) or Microsoft Azure. The main point to note is that we can select custom input/output operations per second (IOPS) performance and that we should select the Auto-expand Storage option to avoid running out of disk capacity. Together with this option, it’s always useful to keep an eye on storage allocation to avoid excessive charges at the end of a billing cycle.
In the next panel, we can configure backup and advanced options for our cluster. The following screenshot shows the Additional Settings panel for continuous backup:

Figure 11.4: Additional Settings panel
The following screenshot shows the Advanced Settings option for enabling BI Connector:
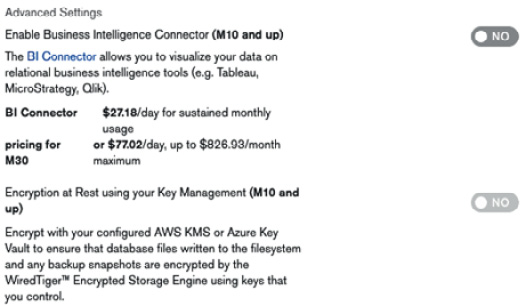
Figure 11.5: Advanced Settings panel
The following screenshot shows the More Configuration Options panel, with options that are available:

Figure 11.6: More Configuration Options panel
Using the steps outlined previously, we can create a new MongoDB replica set cluster using a flexible configuration.
Important notes
MongoDB has provided some useful tips regarding MongoDB Atlas, including the following:
- Use the latest version of MongoDB whenever possible.
- Use the latest Transport Layer Security (TLS) version available, which is 1.3 at the time of writing.
- Encryption at rest cannot be used together with continuous backups. We need to select cloud provider snapshots to be able to use this feature.
- It’s probably a good idea to disable server-side JavaScript unless we know why we need it—for example, when we have legacy MapReduce jobs in place.
- Requiring indexes for all queries can be useful if we have a well-defined business case and requirements for how we will use the database, and/or we expect our dataset to be so large that querying without indexes is practically impossible.
- Finally, we get to select the name of our cluster. This cannot be changed after creation, so it’s important to agree with fellow team members before we click on the Create Cluster button.
After a bit of waiting, our cluster will be up and running, and we will be able to connect to it via the MongoDB Uniform Resource Identifier (URI). In the next section, we will learn how to search our data for keywords and patterns.
MongoDB Atlas Search
MongoDB Atlas offers advanced search capabilities based on Apache Lucene (https://lucene.apache.org/) technology. This is separate and independent from the legacy text search capability that we can use in a self-managed environment with the $text operator.
MongoDB Atlas Search is much more advanced and performant than the legacy text search and should be preferred where possible.
Creating and searching using Atlas indexes
First of all, we need to create indexes that Atlas Search will use to query our database. We can do this by going to our database page and selecting Search from the options at the top of the page.
We can create indexes using the visual editor or the JavaScript Object Notation (JSON) editor. The visual editor guides the user through steps to create a JSON configuration file.
Depending on our use case, we have to choose between dynamic and static field mapping.
Dynamic mapping will index every data type and cross all documents in a collection. This is useful when we have unstructured data for which we can’t know the schema ahead of time (AOT).
Static mapping will only index the fields that we define in the JSON configuration file. We can define top-level fields or nested fields using the . notation, such as address.name.
We can store the full document in the index itself and return it with the query result without querying the underlying database collection. This will avoid an extra query in the database collection but can put a strain on the index size and performance.
To avoid querying the database collection, we need to set returnStoredSource to true at the time of querying.
When we index a string field, we can use one of the built-in index analyzers or define our own. An index analyzer will transform the data field value to the term that will be stored in the index.
The built-in analyzers are listed here:
- Standard (default)
- Simple: Will break input text into tokens separated by any non-letter character.
- Whitespace: Will break input text into tokens separated by any whitespace character.
- Language: Will transform input text using language-specific text analyzers.
- Keyword: Will index input terms as a whole. This is useful, for example, when we need to perform matching only on a whole phrase.
We can also define a custom analyzer if the built-in ones don’t fit our needs. Our custom analyzer must define a tokenizer that will break the input text into tokens. The custom analyzer may define a character or token filter to filter input tokens through and transform them according to the filter.
Similar to the index analyzer, a search analyzer will transform our query to the searchable term that Atlas Search will try to match against the index. Faceted search allows developers to implement narrowing down search results by applying filters based on the classification of items. An example of facets could be searching for a product on a site such as Amazon and then drilling down on results based on category (string), price range (numeric), or prime availability (Boolean). MongoDB supports faceted search using the $facet operator in the aggregation pipeline. While this is fully functional, it does not perform adequately as the number of documents grows. MongoDB Atlas supports faceted search using the underlying Apache Lucene engine, which performs better (up to 100x faster than $facet), and can scale almost linearly with the input size. We can use a facet on String, Number, and Date valued fields.
In this section, we learned about Atlas and Atlas Search functionality. In the next section, we will go through how Kubernetes and MongoDB work together.
MongoDB Kubernetes Operator
In this section, we will learn how to use Kubernetes with MongoDB deployments.
An introduction to Kubernetes
Kubernetes (https://kubernetes.io) is an open source container orchestration system for automating deployment, scaling, and the management of containerized applications. In layman’s terms, we can use Kubernetes (often referred to as K8s) to manage applications deployed via containers. Kubernetes was initially developed at Google and is now maintained by the Cloud Native Computing Foundation (CNCF).
The most widely used container technology is probably Docker. We can download and install Docker on any PC and, through a few commands, install a Docker image that will be isolated from our host system and contain our application code. Docker performs operating system-level virtualization, where all containers are run by the host’s operating system kernel. This results in containers being more lightweight than a full virtual machine (VM).
Multiple Docker containers can be orchestrated using Docker Swarm. This is similar to Kubernetes, and sometimes the two systems are directly compared with each other.
MongoDB provides tools that can help administrators deploy and manage MongoDB clusters using Kubernetes.
Enterprise Kubernetes Operator
Starting from MongoDB 4.0, the MongoDB Enterprise Kubernetes Operator enables a user to deploy and manage MongoDB clusters directly from the Kubernetes application programming interface (API). This circumvents the need to directly connect to Cloud Manager or Ops Manager and simplifies the deployment and management of Kubernetes clusters.
Note
Cloud Manager is, in most aspects, the SaaS equivalent of Ops Manager.
Enterprise Kubernetes Operator can be installed using Helm, the package manager for Kubernetes. First, we have to clone the GitHub repository from MongoDB, located at https://github.com/mongodb/mongodb-enterprise-kubernetes.git.
After we change the directory to our local copy, we can issue the following command:
helm install helm_chart/ --name mongodb-enterprise
We will then have the local copy installed; the next step is to configure it.
By configuring our local installation, we need to apply a Kubernetes ConfigMap file. The configuration settings that we need to copy from Ops Manager or Cloud Manager are listed here:
- Base URL: The Uniform Resource Locator (URL) of your Ops Manager or Cloud Manager service. For Cloud Manager, this will be http://cloud.mongodb.com; for Ops Manager, this should be similar to http://<MY_SERVER_NAME>:8080/.
- Project ID: The identifier (ID) of an Ops Manager project that the Enterprise Kubernetes Operator service will deploy into. This should be created within the Ops Manager or Cloud Manager service and is a unique ID (UID) to organize a MongoDB cluster and provide a security boundary for the project. It should be a 24-digit hexadecimal string.
- User: An existing Ops Manager username. This is the email of a user in Ops Manager that we want the Enterprise Kubernetes Operator service to use when connecting to Ops Manager.
- Public API key: This is used by the Enterprise Kubernetes Operator service to connect to the Ops Manager REpresentational State Transfer (REST) API endpoint.
A public API is created by clicking on the username on the Ops Manager console and selecting Account. On the next screen, we can click on Public API Access, and then click on the Generate key button and provide a description. The next screen will display the public API key that we need.
Note
This is the only chance that we will ever have to view this API key, so we need to write it down; otherwise, we will need to regenerate a new key.
Once we have these values, we can create a Kubernetes ConfigMap file with any name we want, as long as it’s a .yaml file. In our case, we will name it mongodb-project.yaml.
Its structure will look like this:
apiVersion: v1
kind: ConfigMap
metadata:
name:<<any sample name we choose(1)>>
namespace: mongodb
data:
projectId:<<Project ID from above>>
baseUrl: <<BaseURI from above>>
Then, we can apply this file to Kubernetes using the following command:
kubectl apply -f mongodb-project.yaml
The last step we need to take is to create a Kubernetes Secret. This can be done using the following command:
kubectl -n mongodb create secret generic <<any sample name for credentials we choos>> --from-literal=”user=<<User as above>>” --from-literal=”publicApiKey=<<our public api key as above>>”
Note
We need to note down the credential’s name as we will need it in the subsequent steps.
Now, we are ready to deploy our replica set using Kubernetes! We can create a replica-set.yaml file with the following structure:
apiVersion: mongodb.com/v1
kind: MongoDbReplicaSet
metadata:
name: <<any replica set name we choose>>
namespace: mongodb
spec:
members: 3
version: 3.6.5
persistent: false
project: <<the name value (1) that we chose in metadata.name of ConfigMap file above>>
credentials: <<the name of credentials secret that we chose above>>
We apply the new configuration using kubectl apply, as follows:
kubectl apply -f replica-set.yaml
We will be able to see our new replica set in Ops Manager.
Note
To troubleshoot and identify issues in MongoDB using Kubernetes, we can use kubectl logs to inspect logs, and kubectl exec to shell into one of the containers that are running MongoDB.
In this section, we learned how to use Kubernetes with MongoDB. The next section will show why and when to use serverless instances in MongoDB Atlas.
MongoDB Atlas Serverless
Serverless has been quickly gaining traction over the past few years. Serverless computing doesn’t mean that there is no server anywhere—it means that the server infrastructure is completely transparent to the application developer. The cloud infrastructure abstracts any required servers away from the developer.
The developer can write code that executes directly and can access storage and computing resources without the need to think as much about scaling or storage needs.
Connecting to a serverless instance is the same as connecting to a MongoDB Atlas replica set, such as the MongoDB URL.
Serverless computing’s major advantage is that we only pay for the resources that we are using. This can result in cost savings when we have a highly variable load, a load with short bursts, or otherwise cannot fully utilize our servers for most of the time.
Serverless instances are in preview mode as of the time of writing this book (summer 2022) and have some limitations. The limitations are gradually removed but we should check the documentation if we are considering using serverless deployment in Atlas.
Serverless instances require up-to-date versions for application drivers.
Serverless is typically better suited when we want to get started with minimal effort or we have a workload with bursts in traffic that require quick scaling up and down. We can also use serverless if we want to quickly test a workload in the MongoDB Atlas environment.
During the MongoDB Atlas Serverless preview release, we should not use it for production workloads. The next section will introduce us to MongoDB Realm, the integrated environment for cross-platform application development from MongoDB.
MongoDB Realm
MongoDB Realm substitutes and supersedes MongoDB Mobile, Stitch, Sync, and other earlier MongoDB application development services. Realm offers an integrated environment to develop MongoDB-based real-time, offline-first applications across heterogeneous platforms.
Realm offers a mobile database that can run on Android or iOS and can offline/online synchronize with a MongoDB Atlas instance in the backend.
MongoDB’s Realm offering aims to make development faster and easier by abstracting away backend development and common services from application developers.
The following diagram provides an overview of the Realm services stack:

Figure 11.7: Realm services stack
The layered approach in Figure 11.7 shows how a mobile database can interact with the backend Atlas database using the Realm Sync service.
Realm Sync
Realm Sync can abstract a MongoDB Atlas database in a mobile application on an iOS or Android platform. The mobile application uses an embedded database in the device that transparently synchronizes with the backend MongoDB Atlas instance.
Realm Sync is built with the assumption that connectivity to the Atlas instance is intermittent. Data is always saved locally and synced to the server whenever the connection is restored.
Any updates to the local object will be propagated to the backend using a deterministic conflict resolution algorithm. Even if the changes are received by the backend out of their execution order, they will converge to the same final state in the backend and any other subscribing clients. This results in Realm Sync being characterized as a strongly eventual consistent system.
Finally, Realm Sync offers the capability to subscribe to document (object) updates. The concept of live objects allows developers to make sure that the object is always the most up-to-date copy, including any updates that may have occurred in the local mobile client database or the remote MongoDB Atlas database itself.
Realm Sync data model
The data model allows Realm Sync to propagate changes back and forth between the local mobile database and the MongoDB Atlas backend service. We can generate object models using a document schema or let Realm automatically generate language-specific schemas.
Sync object models from a software development kit (SDK) in development mode will automatically generate a document schema and collection in the MongoDB Atlas database. This approach is preferred when we need a client-first approach with custom data modeling baked into our code.
Generating object models from a document schema will automatically generate language-specific object models based on MongoDB Atlas-defined schemas. In a sense, this is the opposite approach: modeling our database first and generating client models out of it. We can generate language-specific models using the MongoDB Atlas Realm Web user interface (UI) or the Realm command-line interface (CLI) in a variety of languages including JavaScript, Kotlin, Java, and others.
Realm Sync mode
The next step after defining a data model is to define the Sync mode between partition-based and flexible sync.
Partition-based sync will partition data in each client database based on a key that naturally exists in the document (such as user_id) or a key that only exists to serve the partitioning purpose (such as _partition). The partition key will segment data values across clients.
Flexible sync allows us to define a query on the client side and dynamically sync the objects that match the query. This method is way more powerful than partition-based as we can sync and match and download only the required documents on each mobile client.
Realm data access rules
Partition-based sync data access can be configured based on the partition strategy and read/write permissions that we can define using a JSON schema.
Flexible sync data access rules are configured per collection using session roles and rules to determine which matching objects from the query can be accessed by the client user.
Enabling Realm Sync and best practices
The last step is enabling Realm Sync between the client(s) and the MongoDB Atlas backend, which can be done via the web UI, the CLI, or the API.
Some best practices for Realm Sync are noted here:
- Enable >=48 hours of operations log (oplog) data in the MongoDB Atlas cluster.
- Avoid breaking changes after enabling sync.
- Configure maximum offline time for each client. If this time period elapses, the client must perform a full data sync.
- Keep the MongoDB data source and the Realm application within the same cloud provider and geographic region.
Realm Sync acts as a bridge between mobile services and the MongoDB Atlas backend infrastructure. We can also use Realm independently with MongoDB Atlas backing services, which is a backend-as-a-service (BaaS) offering. We will learn more about this in the next section.
Realm Application Services
Realm Application Services is MongoDB’s integrated offering for rapid application development. It is based on a serverless environment and offers a suite of services that allow developers to focus on application code instead of backend infrastructure.
We can use one of the existing Realm template apps to get started (https://www.mongodb.com/docs/atlas/app-services/template-apps/) or create our own (https://www.mongodb.com/docs/atlas/app-services/manage-apps/create/create-with-realm-ui/#std-label-create-a-realm-app) from the Realm UI, CLI, or API.
Next, we are going to learn more about the services that bridge application and backend development.
Realm functions
Realm functions are blocks of server-side JavaScript code that execute in the user caller’s context, without the need to stand up a server (serverless model). Functions are typically used for lightweight, time-constrained processing. They can run for up to 120 seconds, using up to 256 megabytes (MB) of memory, open up to five sockets, and process up to 18 MB of input data into the function. In essence, Realm functions are functionally and conceptually similar to AWS Lambda functions.
Realm triggers
Realm triggers are similar to relational database triggers. Each trigger is linked to an event and triggers the execution of a Realm function. An event can be a database event such as a document insert, delete, or update operation. An event can also be an authentication type event such as a user login or logout. Finally, an event can be scheduled AOT, setting—for example—a daily recurrence.
Realm GraphQL
Realm allows users to query underlying data using GraphQL. We need to define a JSON schema for each collection that Realm uses to generate a GraphQL API definition, types, and resolvers. Setting up and accessing data using GraphQL follows the standard, and we can connect using the CLI or any compliant framework such as React-based Apollo.
User authentication
MongoDB Realm supports user authentication out of the box using built-in authentication providers and custom ones.
We can authenticate users using email/password, API keys, Open Authorization 2.0 (OAuth 2.0) using an Apple, Google, or Facebook login, and—finally—anonymous/no authentication.
We can roll our own authentication business logic using a custom JSON Web Token (JWT) or custom function.
Schemas
GraphQL, Realm Sync, and data access rules all use an App Services Binary JSON (BSON) schema to understand the shape of the data that they need to access or transform.
The BSON schema is an extension of the JSON schema (https://json-schema.org/), which is widely used to annotate and validate JSON documents.
The JSON schema defines the types of document fields, as in the following example:
{"title": "trade",
"required": [
"_id",
"consigner",
"consignee",
"commodity_code",
"price",
"description"
],
"properties": { "_id": { "bsonType": "objectId" }, "consigner": { "bsonType": "string" }, "consignee": { "bsonType": "string" }, "commodity_code": { "bsonType": "string" }, "price": { "bsonType": "number" }, "description": {"bsonType":"string"}}
}
The preceding example would pass validation for the following document:
{ "_id": ObjectId("5af712eff26b29dc5c51c60f"),"consigner": "British-exporter-Alex",
"consignee": "France-importer-Bob",
"commodity_code": "HS123445",
"price": 1337
"description": "sale of a gimmick from UK to France"
}
The BSON schema supports any of the following data types:
- Object
- Array
- String
- Number
- Boolean
- Universally unique ID (UUID)
- ObjectId
- Binary data
- Mixed
- Set
- Dictionary
HTTPS endpoints
We can use Hypertext Transfer Protocol Secure (HTTPS) endpoints to execute serverless functions that are invoked using standard HTTPS requests. We can use GET, POST, PUT, PATCH, and DELETE methods to trigger the function execution. We can configure the endpoint to use an email/password, API key, or custom JWT authentication. An HTTPS endpoint executes a Realm function and, as such, can perform a variety of tasks including integrating with external services or calculating complex business logic.
Static file hosting
We can use MongoDB Realm to host static files. These will be accessible at the following URL:
<AppID>.mongodbstitch.com
This can be used to store static files used in our application. We can only store files up to 25 MB in size, up to 1 gigabyte (GB) storage, and 20,000 files per Realm application. The limits imposed mean that we shouldn’t use static file hosting to build a storage service, but they are more than enough to host any static files that we need in our application.
Realm values
Realm values and secrets are similar to HashiCorp Vault’s functionality (https://www.vaultproject.io/). Values can be resolved to a string, array, or JSON object. Values are accessible in the context of functions and rule expressions.
We can define different values per environment that are environment values, similar to Unix environment variables.
We can also define Secrets—secret values that are not exposed to users—and exported applications. We can access Secrets by either linking the Secret to a value or by linking to the Secret by name in the authentication provider and service configuration.
Realm Studio
Realm Studio is a cross-platform GUI tool that allows us to edit Realm database files. It can help us perform administration tasks and export schema as class definitions in C#, Java, JavaScript, Kotlin, Swift, and TypeScript. The source code is available on GitHub at https://github.com/realm/realm-studio/releases.
Realm application services can greatly simplify and speed up application development, enabling us to focus on application code, away from infrastructure setup and maintenance. In the next section, we will learn more about the available GUI-based tools for MongoDB administration and operations.
MongoDB Charts
MongoDB Charts is a tool to generate visualizations from MongoDB data. It enables non-technical people to query a MongoDB database using a GUI and share the results with colleagues.
MongoDB Charts can create a series of charts, including the following:
- A column and bar chart reference
- A line and area chart reference
- Grid charts, such as the following:
- A heatmap reference
- A scatter chart reference
- A donut chart reference
- Text charts: Number chart reference
As with Ops Manager, it’s a standalone executable utilizing Docker that needs to be installed and managed on-premises.
Note
Use replica set secondaries for chart queries. Ideally, use a secondary, hidden, non-electable node as an analytics node in replica sets.
MongoDB Charts is a simple and powerful tool from MongoDB. MongoDB Compass is another tool used for querying and data analysis that we will discuss in the next section.
MongoDB Compass
MongoDB Compass is similar to MongoDB Charts, with less functionality around charting, but more heavily oriented toward running ad hoc queries and connecting to our database without the need for a CLI.
Compass provides the ability to query MongoDB through a GUI and visually construct queries. It can provide rich visualizations of result datasets, and help with constructing aggregation queries through a point-and-click interface.
Compass also provides visualizations for most administrative queries around query and index performance so that it can be used to monitor and troubleshoot clusters from a database administrator perspective. It exposes an API that can be used to import or develop plugins.
A useful feature for non-technical users is the ability to download a read-only edition so that we can limit access to non-destructive operations. There is also an isolated edition of this tool that can be used to restrict connections to a single chosen server. These requests will also be TLS-encrypted.
Compass is available for Windows, macOS X, Red Hat, and Ubuntu as an executable download. MongoDB Compass has a limited free edition, and the full feature set is available via a MongoDB subscription package.
MongoDB Connector for Business Intelligence
MongoDB Connector for Business Intelligence (MongoDB Connector for BI) is one of the most useful tools for non-developers. It is a part of the MongoDB Enterprise Advanced subscription and enables integration with BI tools using standard SQL queries.
It enables MongoDB integrations with enterprise tools such as Tableau, Qlik, Spotfire, Cognos, MicroStrategy, and SAP BusinessObjects.
It is available as an executable download for Amazon Linux, Debian, macOS X, Red Hat, SUSE, Ubuntu, and Windows platforms, and can work with both on-premises databases and MongoDB Atlas. Once installed and configured correctly, it can provide an Open Database Connectivity (ODBC) data source name (DSN) that most BI tools can use to connect to.
The next section will introduce us to the MongoDB monitoring service tools, Cloud Manager and Ops Manager.
MongoDB Cloud Manager
Formerly known as MongoDB Management Service (MMS) and before that as MongoDB Monitoring Service (MMS), Cloud Manager is a managed SaaS for on-premises MongoDB deployments.
Atlas as a DBaaS solution can provide an end-to-end (E2E) solution for database management. For many use cases, this may not be feasible. In this case, it may make sense to use some of the features in a pay-as-you-go fashion.
Cloud Manager has a limited free tier and several paid ones.
Here are some of the key features of Cloud Manager:
- Automated backups
- More than 100 database metrics and key performance indicators (KPIs) that can be used to track MongoDB’s performance
- Customized alerts that integrate with third-party systems such as PagerDuty, email, and Short Message Service (SMS)
- A unified operations view, either via directly querying its JSON API or by integrating it with popular performance-tracking solutions such as New Relic (https://www.newrelic.com)
Premium plans also offer advice around performance and indexing. Cloud Manager’s only requirement is to install the required agents in our application.
MongoDB Ops Manager
Ops Manager is, in many ways, different from Cloud Manager. In contrast to Cloud Manager, it is a downloadable executable for Windows Server, Red Hat Enterprise Linux (RHEL), or Ubuntu.
Following on from this, users need to install and manage the service within their own infrastructure.
Aside from this difference, Ops Manager can also help achieve similar goals to Cloud Manager, as follows:
- Monitoring more than 100 performance metrics
- Automation on installing and upgrading clusters; plus index maintenance can be achieved with zero downtime
- For continuous, incremental backups with point-in-time recovery (PITR)
- Query optimization
- Index suggestions
A sample Ops Manager topology is provided here:

Figure 11.8: Ops Manager topology
Aside from the Ops Manager and the MongoDB nodes, we also need snapshot storage if we have enabled backups.
Ops Manager can be a better alternative to Cloud Manager if we want an on-premises solution for security or other reasons. This is included as part of the MongoDB Enterprise Server paid solution.
Summary
In this chapter, we went through different MongoDB tools and learned how to use them to increase productivity. Starting from MongoDB Atlas, the hosted DBaaS solution, we followed on with Atlas Search and Serverless. Then, we discussed Kubernetes, how it compares to Docker and Docker Swarm, and how we can use Kubernetes with MongoDB Enterprise Kubernetes Operator.
The next section was dedicated to MongoDB Realm for mobile, IoT, and web application development. We detailed the different offerings from MongoDB Atlas around data access, querying, triggers, serverless functions, authentication, hosting, secrets, schemas, values, and static file hosting.
Then, we dived into MongoDB Charts and MongoDB Compass—the GUI-driven MongoDB administration tools. We learned about MongoDB Connector for BI and how it can prove to be useful for our purposes. Finally, we learned about Cloud Manager and Ops Manager and explored how they differ from each other.
In the next chapter, we are going to switch gears and deal with how we can use big data with MongoDB to ingest and process large streaming and batch datasets.