
13
Mastering Replication
Replication has been one of the most useful features of MongoDB since the very early days. In general, replication refers to the process of synchronizing data across different servers. The benefits of replication include protection from data loss and high availability of data. Replication also provides disaster recovery, avoidance of downtime for maintenance, and scaling reads since we can read from the primary and any of the secondary servers. In this chapter, we will cover the following topics:
- Replication
- An architectural overview
- How do elections work?
- What is the use case for a replica set?
- Setting up a replica set
- Connecting to a replica set
- Replica set administration
- Cloud options for a replica set
- Replica set limitations
By the end of this chapter, you will have mastered the underlying theory and concepts as well as the practical implementation of replication using MongoDB.
Technical requirements
To follow along with the code in this chapter, you need to install MongoDB locally or connect to a MongoDB Atlas database. You can download the MongoDB community edition from mongodb.com or use the fully managed DBaaS MongoDB Atlas offering, which provides a free tier as well as seamless upgrades to the latest version.
Replication
There are different approaches to replication. The approach that MongoDB takes is logical replication with a primary-secondary, which we will explain in more detail later in this chapter.
Logical or physical replication
With replication, we synchronize data across multiple servers, providing data availability and redundancy. Even if we lose a server due to a hardware or software failure, by using replication, we will have multiple copies that we can use to restore our data. Another advantage of replication is that we can use one of the servers as a dedicated reporting, or backup, server.
In logical replication, we have our primary server performing operations; the secondary server tails a queue of operations from the primary and applies the same operations in the same order. Using MongoDB as an example, the operations log (oplog) keeps track of operations that have happened on the primary server and applies them in the exact same order on the secondary server.
Logical replication is useful for a wide array of applications, such as information sharing, data analysis, and Online Analytical Processing (OLAP) reporting.
In physical replication, data gets copied on the physical level, at a lower level than database operations. This means that we are not applying the operations but copying the bytes that were affected by these operations. It also means that we can gain better efficiency since we are using low-level structures to transfer data. We can also ensure that the state of the database is exactly the same, since they are identical, byte for byte.
What is typically missing from physical replication is knowledge about the database structure, which means that it is harder (if not impossible) to copy some collections from a database and ignore others.
Physical replication is typically suited for more rare circumstances, such as disaster recovery, wherein a full and exact copy of everything (including data, indexes, the internal state of the database in a journal, and redoing/undoing logs) is of crucial importance to bringing the application back to the exact state it was in.
Different high availability types
In high availability, there are several configurations that we can use. Our primary server is called the hot server as it can process each and every request coming in. A secondary server can be in any of the following states:
- Cold
- Warm
- Hot
A secondary cold server is a server that is there just in case the primary server goes offline, without any expectation of it holding the data and state that the primary server had.
A secondary warm server receives periodic updates of data from the primary server, but typically, it is not entirely up to date with the primary server. It can be used for some non-real-time analytics reporting to offload the main server, but typically, it will not be able to pick up the transactional load of the primary server if it goes down.
A secondary hot server always keeps an up-to-date copy of the data and state from the primary server. It usually waits in a hot standby state, ready to take over when the primary server goes down.
MongoDB has both the hot and warm server types of functionality, as we will explore in the following sections.
Note
Most database systems employ a similar notion of primary/secondary servers, so conceptually, everything from MongoDB gets applied there, too.
An architectural overview
MongoDB’s replication is illustrated in the following diagram:

Figure 13.1 – MongoDB replication conceptual architecture
The primary server is the only one that can take writes at any time. The secondary servers are in a hot standby state, ready to take over if the primary server fails. Once the primary server fails, an election takes place regarding which secondary server will become primary.
We can also have at most one arbiter node. An arbiter node does not hold any data, and its sole purpose is to participate in the election process.
We must always have an odd number of nodes (including the arbiter). Three, five, and seven are all fine so that in the event of the primary (or more servers) failing, we have a majority of votes in the election process.
When the other members of a replica set don’t hear from the primary for more than 10 seconds (configurable), an eligible secondary will start the election process to vote for a new primary. The first secondary to hold the election and win the majority will become the new primary. All remaining servers will now replicate from the new primary server, keeping their roles as secondaries but syncing up from the new primary.
Starting with MongoDB 3.6, client drivers can retry write operations a single time if they detect that the primary is down. A replica set can have up to 50 members, but only up to 7 of them can vote in the election process.
The setup for our replica set after the new election will be as follows:

Figure 13.2 – MongoDB replica set election process
In the following section, we will discuss how elections work.
How do elections work?
All of the servers in a replica set maintain regular communication with every other member via a heartbeat. The heartbeat is a small packet that’s regularly sent to verify that all members are operating normally.
Secondary members also communicate with the primary to get the latest updates from the oplog and apply them to their own data.
Note
The information here refers to the latest replication election protocol, version 1, which is the latest as of MongoDB v6.0.
Schematically, we can see how this works.
When the primary member goes down, all of the secondaries will miss a heartbeat or more. They will be waiting up until the settings.electionTimeoutMillis time passes (the default is 10 seconds), and then the secondaries will start one or more rounds of elections to find the new primary.
For a server to be elected as primary from the secondaries, it must have the following two properties:
- Belong in a group of voters that have 50% + 1 of the votes
- Be the most up-to-date secondary in this group
In a simple example of three servers with one vote each, once we lose the primary, the other two servers will each have one vote (so, in total, two-thirds), and as such, the one with the most up-to-date oplog will be elected as primary.
Now, consider a more complex setup, as follows:
- Seven servers (one primary, six secondaries)
- One vote each
We lose the primary server, and the six remaining servers have network connectivity issues, resulting in a network partition as follows:
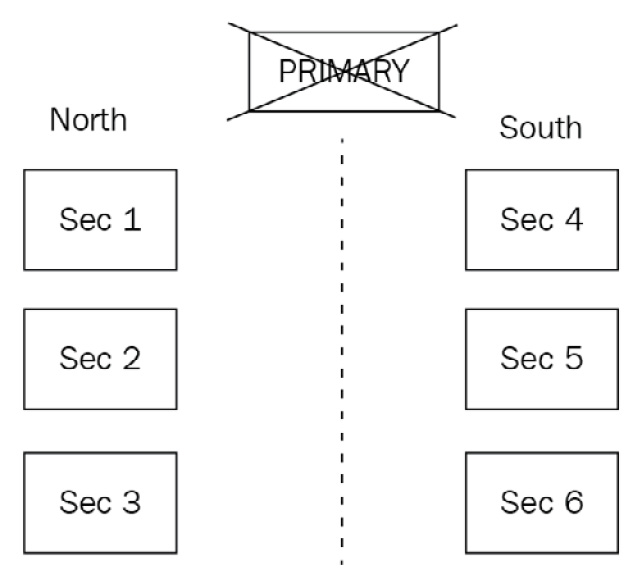
Figure 13.3 – MongoDB replica set network partitioning
These partitions can be described as follows:
- Partition North: Three servers (one vote each)
- Partition South: Three servers (one vote each)
Neither partition has any knowledge of what happened to the rest of the servers. Now, when they hold elections, no partition can establish a majority as they have three out of seven votes. No primary will get elected from either partition. This problem can be overcome by having, for example, one server with three votes.
Now, our overall cluster setup looks as follows:
- Server #1: One vote
- Server #2: One vote
- Server #3: One vote
- Server #4: One vote
- Server #5: One vote
- Server #6: One vote
- Server #7: Three votes
After losing Server #1, our partitions now look as follows:
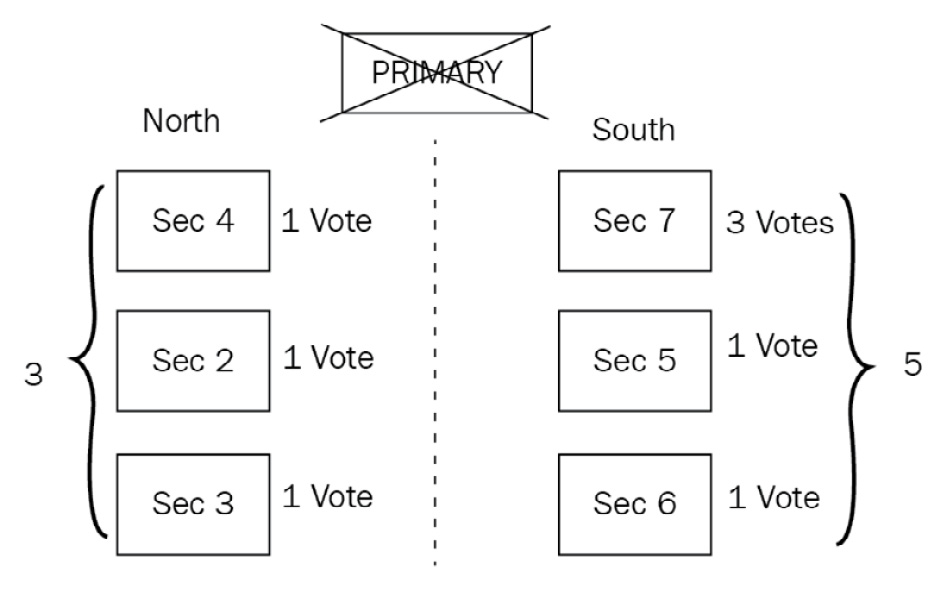
Figure 13.4 – MongoDB replica set network partitioning voting
Partition North is as follows:
- Server #2: One vote
- Server #3: One vote
- Server #4: One vote
Partition South is as follows:
- Server #5: One vote
- Server #6: One vote
- Server #7: Three votes
Partition South has three servers, with a total of five out of nine votes. The secondary among servers #5, #6, and #7 that is most up to date (according to its oplog entries) will be elected as the primary.
After learning the fundamental concepts behind replication architecture, we will discuss when we should use a replica set in the following section.
What is the use case for a replica set?
MongoDB offers most of the advantages of using a replica set, some of which are listed as follows:
- Protection from data loss
- High availability of data
- Disaster recovery
- Avoidance of downtime for maintenance
- Scaling reads since we can read from multiple servers
- Helping to design for geographically dispersed services
- Data privacy
The most notable item that’s missing from the list is scaling writes. This is because, in MongoDB, we can only have one primary, and only this primary can take writes from our application server.
When we want to scale write performance, we typically design and implement sharding, which will be the topic of the following chapter. Two interesting properties of the way that MongoDB replication is implemented are geographically dispersed services and data privacy.
It is not uncommon for our application servers to be located in multiple data centers across the globe. Using replication, we can have a secondary server as close to the application server as possible. What this means is that our reads will be fast, as if they were local, and we will get a latency performance penalty just for our writes. This requires some planning at the application level, of course, so that we can maintain two different pools of connections to our database, which can be easily done by either using the official MongoDB drivers or using higher-level ODMs.
The second interesting property of MongoDB’s replication design is implementing data privacy. When we have servers geographically dispersed across different data centers, we can enable replication per database. By keeping a database out of the replication process, we can make sure that our data stays confined to the data center that we need. We can also set up different replication schemas per database in the same MongoDB server so that we have multiple replication strategies according to our data privacy needs, excluding some servers from our replica sets if they are not allowed by our data privacy regulations.
Setting up a replica set
In this section, we will go over the most common deployment procedures to set up a replica set. These involve either converting a standalone server into a replica set or setting up a replica set from scratch.
Converting a standalone server into a replica set
To convert a standalone server into a replica set, we first need to cleanly shut down the mongo server as follows:
> use admin
> db.shutdownServer()
Then, we start the server with the --replSet configuration option via the command line as follows (or by using a configuration file, as we will explain in the following section):
- First, we connect (via the mongo shell) to the new replica set-enabled instance as follows:
> rs.initiate()
- Now, we have the first server of our replica set. We can add the other servers (which must have also been started with --replSet) by using the mongo shell as follows:
> rs.add("<hostname><:port>")
Note
Double-check the replica set configuration by using rs.conf(). Verify the replica set status by using rs.status().
Creating a replica set
Starting a MongoDB server as a part of a replica set is as easy as setting it in the configuration via the command line as follows:
> mongod --replSet ''xmr_cluster''
This is fine for development purposes. For production environments, it’s recommended that we use a configuration file instead, as follows:
> mongod --config <path-to-config>
Here, <path-to-config> can be as follows:
/etc/mongod.conf
This configuration file has to be in a YAML format.
Note
YAML does not support tabs. Convert tabs to spaces by using your editor of choice.
A simple configuration file sample is as follows:
systemLog:
destination: file
path: “/var/log/mongodb/mongod.log”
logAppend: true
storage:
journal:
enabled: true
processManagement:
fork: true
net:
bindIp: 127.0.0.1
port: 27017
replication:
oplogSizeMB: <int>
replSetName: <string>
Root-level options define the sections that leaf-level options apply to by nesting. Regarding replication, the mandatory options are oplogSizeMB (the oplog size for the member, in MB) and replSetName (the replica set name, such as xmr_cluster).
We can also set the following on the same level as replSetName:
secondaryIndexPrefetch: <string>
This is only available for the MMAPv1 storage engine, and it refers to the indexes on secondaries that will get loaded into memory before applying operations from the oplog.
It defaults to all, and the available options are none and _id_only, in order to load no indexes into memory and only load the default index that was created on _id fields as follows:
enableMajorityReadConcern: <boolean>
This is the configuration setting for enabling the read preference of majority for this member.
After we have started all of the replica set processes on different nodes, we log in to one of the nodes using mongo from the command line with the appropriate host:port. Then, we need to initiate the cluster from one member.
We can use configuration files as follows:
> rs.initiate()
We can also pass in the configurations as a document parameter as follows:
> rs.initiate( {
_id : ''xmr_cluster'',
members: [ { _id : 0, host : ''host:port'' } ]
})
Note
We can verify that the cluster was initiated by using rs.conf() in the shell.
Following that, we add each other member to our replica set by using host:port, which we defined in our networking setup, as follows:
> rs.add(''host2:port2'')
> rs.add(''host3:port3'')
Note
The minimum number of servers that we must use for a high-availability replica set is 3. We could replace one of the servers with an arbiter, but this is not recommended. Once we have added all of the servers and have waited a bit, we can check the status of our cluster by using rs.status(). By default, the oplog will be 5% of the free disk space. If we want to define it when we create our replica set, we can do so by passing the --oplogSizeMB command-line parameteror replication.oplogSizeMB in our configuration file. An oplog size cannot be more than 50 GB.
Read preference
By default, all writes and reads go/come from the primary server. Secondary servers replicate data but are not used for querying.
In some cases, it may be beneficial to change this and start to take reads from secondaries.
The MongoDB official drivers support the following five levels of read preference:

Table 13.1 – Read preference levels
Note
When we use the multi-document transactions and we include at least one read operation in the transaction, then we need to use the primary read preference and route all operations to the same server.
Using any read preference other than primary can be beneficial for asynchronous operations that are not extremely time-sensitive. For example, reporting servers can take reads from secondaries instead of the primary, as we may be fine with a small delay in our aggregation data, with the benefit of incurring more read load on our primary server.
Geographically distributed applications will also benefit from reading from secondaries, as these will have significantly lower latency. Although it’s probably counter-intuitive, just changing the read preference from primary to secondary will not significantly increase the total read capacity of our cluster. This is because all of the members of our cluster are taking the same write load from clients’ writes and replication for the primary and secondaries, respectively.
More importantly, however, reading from a secondary may return stale data, which has to be dealt with at the application level. Reading from different secondaries that may have variable replication lag (compared to our primary writes) may result in reading documents out of their insertion order (non-monotonic reads).
With all of the preceding caveats, it is still a good idea to test reading from secondaries if our application design supports it. An additional configuration option that can help us to avoid reading stale data is maxStalenessSeconds.
Based on a coarse estimation from each secondary as to how far behind the primary it is, we can set this to a value of 90 (seconds) or more to avoid reading stale data. Given that secondaries know how far behind they are from the primary (but don’t accurately or aggressively estimate it), this should be treated as an approximation rather than something we base our design on.
Write concern
By default, the write operations in MongoDB replica sets will be acknowledged once the write has been acknowledged by the majority of servers in the replica set, that is {w:"majority"}. If we want to change this behavior, we can do so in two different ways as follows:
- We can request a different write concern per operation, in cases where we want to make sure that a write has propagated to multiple members of our replica set before marking it as complete, as follows:
> db.mongo_books.insert(
{ name: "Mastering MongoDB", isbn: "1001" },
{ writeConcern: { w: 2, wtimeout: 5000 } }
)
In the preceding example, we are waiting for the write to be confirmed by two servers (the primary, plus any one of the secondaries). We are also setting a timeout of 5000 milliseconds to avoid our write from blocking in cases where the network is slow or we just don’t have enough servers to acknowledge the request.
- We can also change the default write concern across the entire replica set, as follows:
> cfg = rs.conf()
> cfg.settings.getLastErrorDefaults = { w: "majority", wtimeout: 5000 }
> rs.reconfig(cfg)
Here, we set the write concern to majority with a timeout of 5 seconds. The majority write concern makes sure that our writes will propagate to at least n/2+1 servers, where n is the number of replica set members.
Note
The majority write concern is useful if we have a read preference of majority as well, as it ensures that every write with w: "majority" will also be visible with the same read preference. If we set w>1, it’s useful to also set wtimeout: <milliseconds> with it. wtimeout will return from our write operation once the timeout has been reached, thus not blocking our client for an indefinite period of time. It’s recommended to set j: true as well. j: true will wait for our write operation to be written to the journal before acknowledging it. w>1, along with j: true, will wait for the number of servers that we have specified to write to the journal before the acknowledgment.
Custom write concerns
We can also identify our replica set members with different tags (that is, reporting, east coast servers, and HQ servers) and specify a custom write concern per operation, as follows:
- Use the usual procedure to connect to the primary via the mongo shell as follows:
> conf = rs.conf()
> conf.members[0].tags = { "location": "UK", "use": "production", "location_uk":"true" }
> conf.members[1].tags = { "location": "UK", "use": "reporting", "location_uk":"true" }
> conf.members[2].tags = { "location": "Ireland", "use": "production" }
- We can now set a custom write concern as follows:
> conf.settings = { getLastErrorModes: { UKWrites : { "location_uk": 2} } }
- After applying the preceding code, we use the reconfig command as follows:
> rs.reconfig(conf)
- We can now start by setting writeConcern in our writes as follows:
> db.mongo_books.insert({<our insert object>}, { writeConcern: { w: "UKWrites" } })
This means that our write will only be acknowledged if the UKWrites write concern is satisfied, which, in turn, will be satisfied by at least two servers with the location_uk tag verifying it. Since we only have two servers located in the UK, we can make sure that with this custom write concern, we have written our data to all of our UK-based servers.
Priority settings for replica set members
MongoDB allows us to set different priority levels for each member. This allows for some interesting applications and topologies to be implemented.
To change the priority after we have set up our cluster, we have to connect to our primary using the mongo shell and get the configuration object (in this case, cfg) as follows:
> cfg = rs.conf()
Then, we can change the members subdocument's priority attribute to the value of our choice, as follows:
> cfg.members[0].priority = 0.778
> cfg.members[1].priority = 999.9999
Note
The default priority value is 1 for every member. The priority can be set from 0 (never become a primary) to 1000, in floating-point precision.
Higher-priority members will be the first to call an election when the primary steps down, and they are also the most likely to win the election.
Note
Custom priorities should be configured with consideration of the different network partitions. Setting priorities the wrong way may lead to elections not being able to elect a primary, thus stopping all writes to our MongoDB replica set.
If we want to prevent a secondary from becoming a primary, we can set its priority to 0, as we will explain in the following section.
Zero priority replica set members
In some cases (for example, if we have multiple data centers), we will want some of the members to never be able to become a primary server.
In a scenario with multiple data center replications, we may have our primary data center with one primary and one secondary based in the UK, and a secondary server located in Russia. In this case, we don’t want our Russia-based server to become primary, as it would incur latency on our application servers based in the UK. In this case, we will set up our Russia-based server with priority as 0.
Replica set members with priority as 0 also can’t trigger elections. In all other aspects, they are identical to every other member in the replica set. To change the priority value of a replica set member, we must first get the current replica set configuration by connecting (via the mongo shell) to the primary server as follows:
> cfg = rs.conf()
This will provide the config document that contains the configuration for every member in our replica set. In the members subdocument, we can find the priority attribute, which we have to set to 0, as follows:
> cfg.members[2].priority = 0
Finally, we need to reconfigure the replica set with the updated configuration:
rs.reconfig(cfg)
Note
Make sure that you have the same version of MongoDB running in every node, otherwise, there may be unexpected behavior. Avoid reconfiguring the replica set cluster during high-volume periods. Reconfiguring a replica set may force an election for a new primary, which will close all active connections and may lead to a downtime of 10-30 seconds. Try to identify the lowest traffic time window to run maintenance operations such as reconfiguration, and always have a recovery plan in case something goes wrong.
Hidden replica set members
Hidden replica set members are used for special tasks. They are invisible to clients, will not show up in the db.isPrimary() mongo shell command and similar administrative commands, and, for all purposes, will not be taken into account by clients (that is, read preference options).
They can vote for elections but will never become a primary server. A hidden replica set member will only sync up to the primary server and doesn’t take reads from the clients. As such, it has the same write load as the primary server (for replication purposes), but no read load on its own.
Due to the aforementioned characteristics, reporting is the most common application of a hidden member. We can connect directly to this member and use it as the data source of truth for OLAP.
To set up a hidden replica set member, we follow a similar procedure of setting priority to 0. After we have connected to our primary via the mongo shell, we get the configuration object, identify the member in the members subdocument that corresponds to the member we want to set as hidden, and subsequently set priority to 0 and its hidden attribute to true. Finally, we have to apply the new configuration by calling rs.reconfig(config_object) with config_object, which we used as a parameter, as follows:
> cfg = rs.conf()
> cfg.members[0].priority = 0
> cfg.members[0].hidden = true
> rs.reconfig(cfg)
A hidden replica set member can also be used for backup purposes. However, as you will see in the following section, we may want to use other options, either at the physical level or to replicate data at the logical level. In those cases, consider using a delayed replica set instead.
Delayed replica set members
In many cases, we will want to have a node that holds a copy of our data at an earlier point in time. This helps to recover from a big subset of human errors, such as accidentally dropping a collection, or an upgrade going horrendously wrong.
A delayed replica set member must have priority = 0 and hidden = true. A delayed replica set member can vote for elections but will never be visible to clients (hidden = true) and will never become a primary (priority = 0).
An example is as follows:
> cfg = rs.conf()
> cfg.members[0].priority = 0
> cfg.members[0].hidden = true
> cfg.members[0].secondaryDelaySecs = 7200
> rs.reconfig(cfg)
This will set members[0] to a delay of 2 hours. Two important factors for deciding on the delta time period between the primary and delayed secondary server are as follows:
- Enough oplog size in the primary
- Enough time for the maintenance to finish before the delayed member starts picking up data
The current version of MongoDB also supports growing the oplog size over the configured size limit to avoid getting out of sync with the primary. That being said, we should still plan for the right oplog size instead of relying on MongoDB.
The following table shows the delay of the replica set in hours:

Table 13.2 – Replica set delayed, member
Production considerations
Deploy each mongod instance on a separate physical host. If you are using VMs, make sure that they map to different underlying physical hosts. Use the bind_ip option to make sure that your server maps to a specific network interface and port address.
Use firewalls to block access to any other port and/or only allow access between application servers and MongoDB servers. Even better, set up a VPN so that your servers communicate with each other in a secure, encrypted fashion.
We need to ensure that we have enabled authentication in our MongoDB cluster before binding to any IP address other than localhost.
In the following section, we will learn how to connect and perform administration tasks with the replica set configuration.
Connecting to a replica set
Connecting to a replica set is not fundamentally different from connecting to a single server. In this section, we will show some examples that use the official mongo-ruby-driver. We will use the following steps for the replica set:
- First, we need to set our host and options objects as follows:
client_host = ['hostname:port']
client_options = {
database: 'signals',
replica_set: 'xmr_btc'
}
In the preceding example, we are getting ready to connect to hostname:port in the database signals in replica_set xmr_btc.
- Calling the initializer on Mongo::Client will now return a client object that contains a connection to our replica set and database, as follows:
client = Mongo::Client.new(client_host, client_options)
The client object has the same options it has when connecting to a single server.
Note
MongoDB uses auto-discovery after connecting to our client_host to identify the other members of our replica set, regardless of whether they are the primary or secondaries. The client object should be used as a singleton, created once, and reused across our code base.
- Having a singleton client object is a rule that can be overridden in some cases. We should create different client objects if we have different classes of connections to our replica set.
An example would be having a client object for most operations, and then another client object for operations that are fine with only reading from secondaries, as follows:
client_reporting = client.with(:read => { :mode => :secondary })
- This Ruby MongoDB client command will return a copy of the MongoDB:Client object with a read preference secondary that can be used, for example, for reporting purposes.
Some of the most useful options that we can use in our client_options initialization object are as follows:
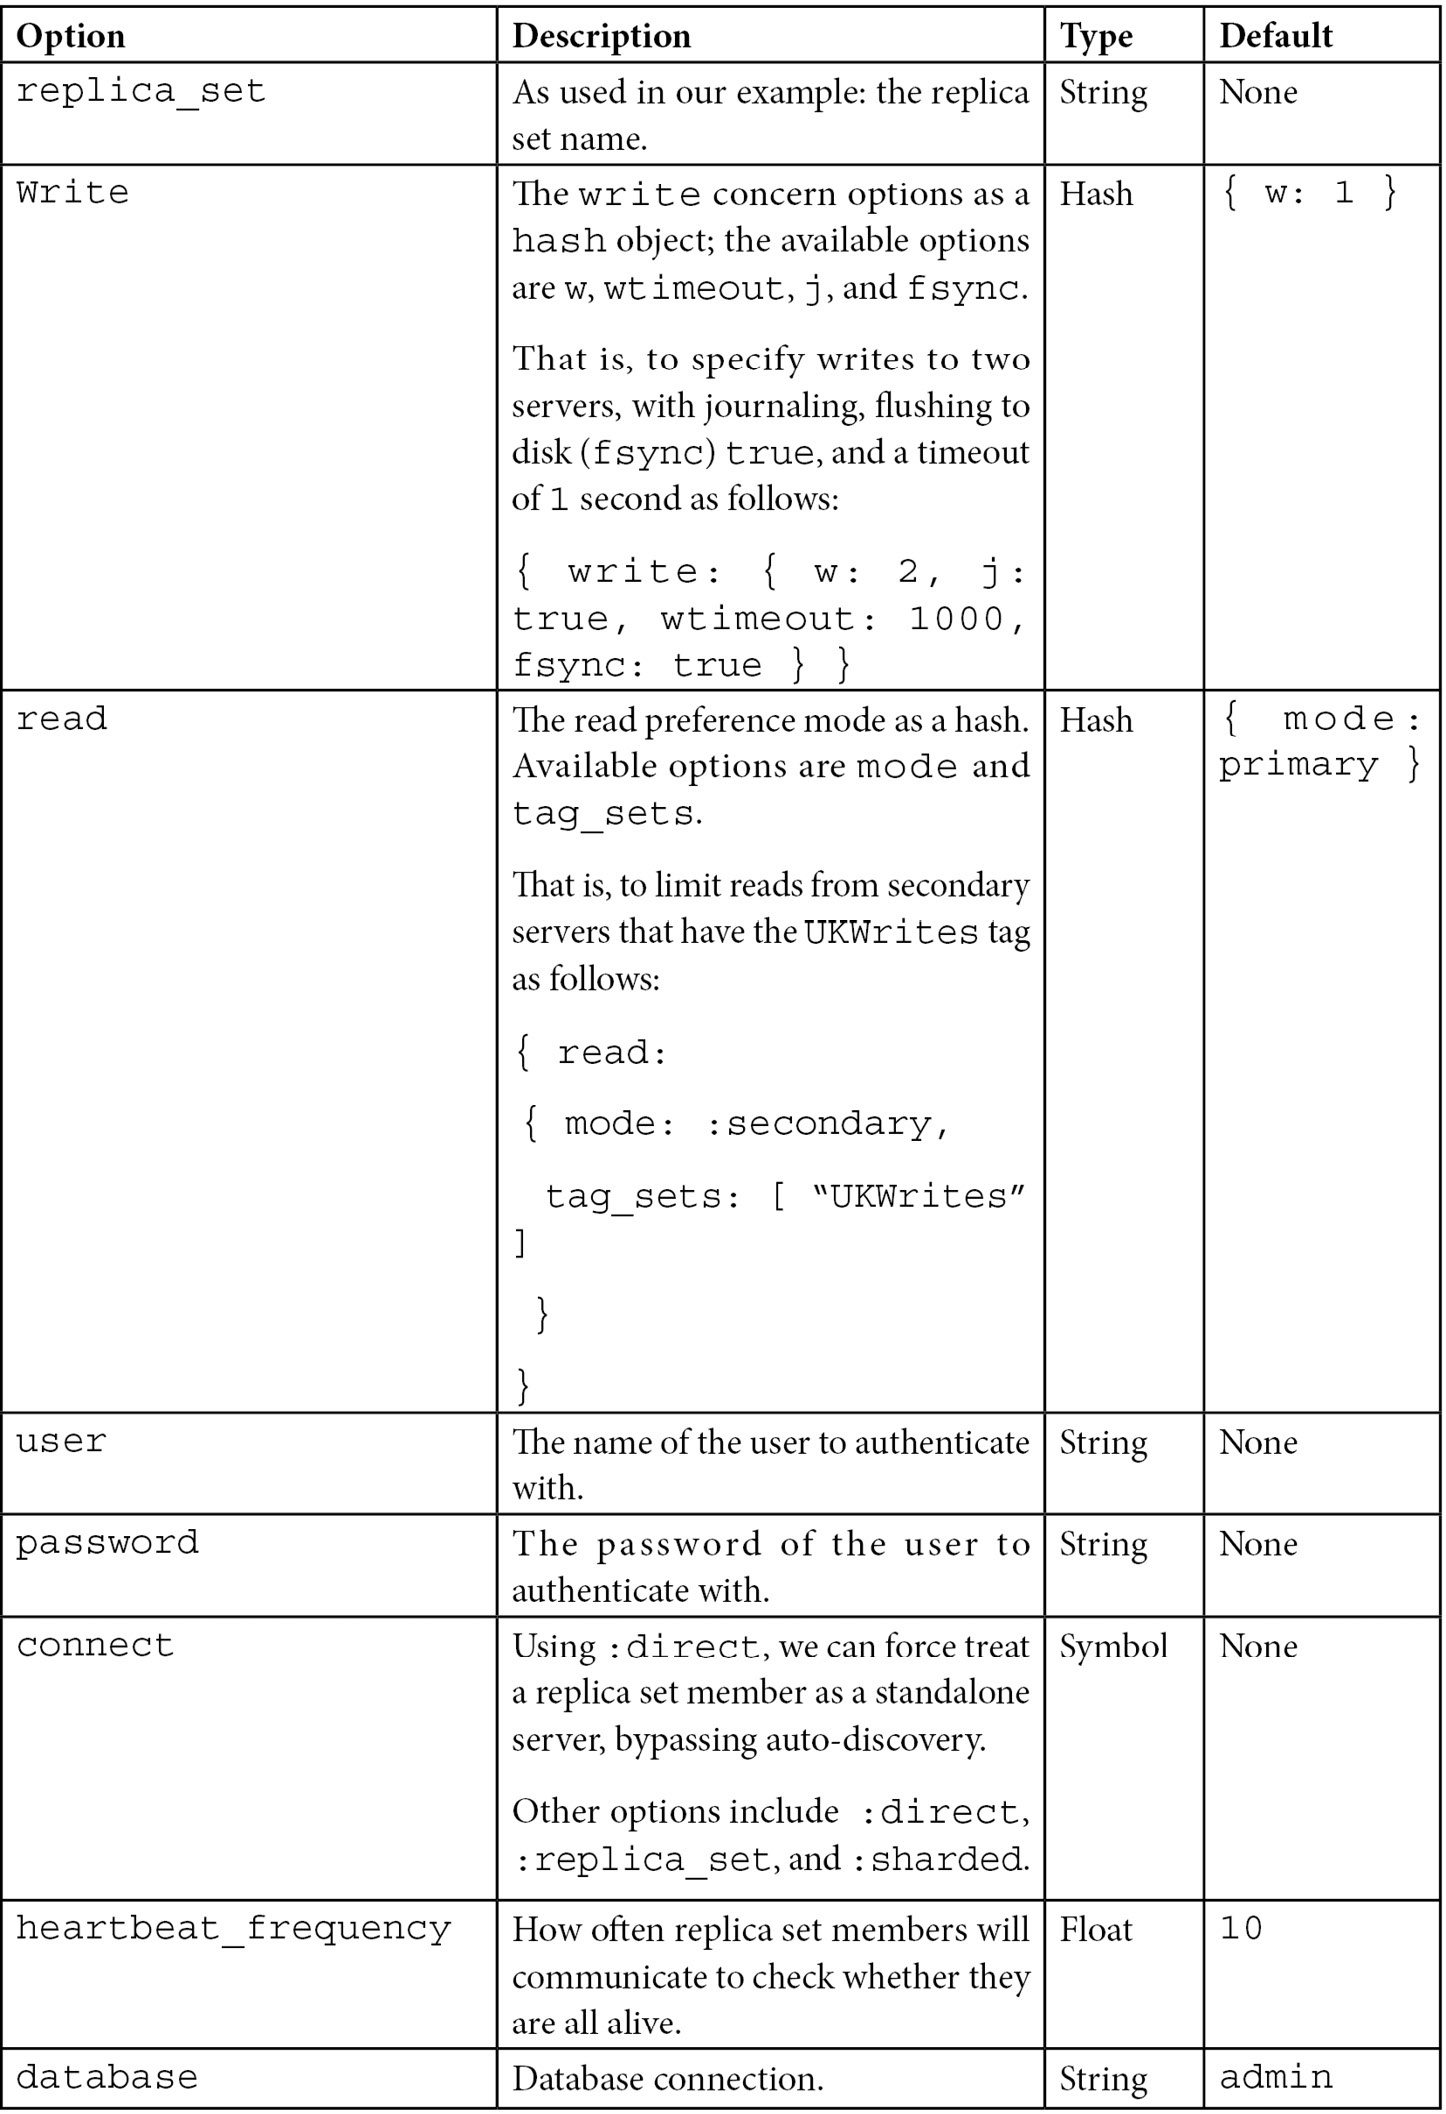
Table 13.3 – MongoDB replica set client options configuration
Similar to connecting to a standalone server, there are also options for SSL and authentication that are used in the same way.
We can also configure the connection pool by setting the following code:
min_size,
max_size(setting this to 0 will create an unbounded connection pool),
wait_queue_timeout(defaults to 1 in seconds).
The MongoDB driver will try to reuse existing connections, if available, or it will open a new connection. Once the pool limit has been reached, the driver will block further connections, waiting for a connection to be released to use it.
Replica set administration
The administration of a replica set can be significantly more complex than what is needed for single-server deployments. In this section, instead of trying to exhaustively cover all of the different cases, we will focus on some of the most common administrative tasks that we will have to perform and how to do them.
How to perform maintenance on replica sets
If we have some maintenance tasks that we have to perform in every member in a replica set, we always start with the secondaries. We perform maintenance by performing the following steps:
- First, we connect to one of the secondaries via the mongo shell. Then, we stop that secondary as follows:
> use admin
> db.shutdownServer()
- Then, using the same user that was connected to the mongo shell in the preceding step, we restart the mongo server as a standalone server in a different port as follows:
> mongod --port 95658 --dbpath <wherever our mongoDB data resides in this host>
- The following step is to connect to this mongod server (which is using dbpath) as follows:
> mongo --port 37017
- At this point, we can safely perform all of the administrative tasks on our standalone server without affecting our replica set operations. When we are done, we shut down the standalone server in the same way that we did in the first step.
- We can then restart our server in the replica set by using the command line or the configuration script that we normally use. The final step is to verify that everything works fine by connecting to the replica set server and getting its replica set status as follows:
> rs.status()
The server should initially be in state: RECOVERING, and, once it has caught up with the secondary, it should be back in state: SECONDARY, like it was before starting the maintenance.
We need to repeat the same process for every secondary server. In the end, we have to perform maintenance on the primary. The only difference in the process for the primary is that we will start by stepping down our primary server into a secondary server before every other step, as follows:
> rs.stepDown(600)
By using the preceding argument, we prevent our secondary from being elected as a primary for 10 minutes. This should be enough time to shut down the server and continue with our maintenance as we did with the secondaries.
Initial sync
Adding a new member to an existing replica set requires copying all data from an existing member to the new member. MongoDB uses initial sync to copy all data in a first pass and then replication using the oplog to continuously keep the members in sync.
MongoDB offers logical initial sync and file copy-based initial sync options.
The logical initial sync will not clone the local database. It uses the oplog to sync from the primary, which means that we need to make sure that we have enough disk space in the target system to temporarily store the oplog records while the sync is ongoing.
File copy-based initial sync, on the other hand, is only available in the MongoDB Enterprise edition and copies the underlying database files directly between the source and target systems. As such, file copy-based initial sync will overwrite the local database in the target system. File copy-based initial sync can be faster than logical-based initial sync with a few limitations, primarily that it does not work at all with encrypted storage.
We can set the initialSyncSourceReadPreference parameter on mongod process startup to select between primary, secondary, or the nearest server as the source that MongoDB will try to sync from.
Resyncing a member of a replica set
Secondaries sync up with the primary by replaying the contents of the oplog. If our oplog is not large enough, or if we encounter network issues (partitioning, an underperforming network, or just an outage of the secondary server) for a period of time larger than the oplog, then MongoDB cannot use the oplog to catch up to the primary anymore.
At this point, we have the following three options:
- The more straightforward option is to delete our dbpath directory and restart the mongod process. In this case, MongoDB will start an initial sync from scratch. This option has the downside of putting a strain on our replica set and our network as well.
- The more complicated (from an operational standpoint) option is to copy data files from another well-behaving member of the replica set. This goes back to the contents of Chapter 9, Monitoring, Backup, and Security. The important thing to keep in mind is that a simple file copy will probably not suffice, as data files will have changed from the time that we started copying to the time that the copying ended.
- Finally, we can resync the member using the initial sync process as described in the preceding section.
Thus, we need to be able to take a snapshot copy of the filesystem under our data directory.
Another point of consideration is that by the time we start our secondary server with the newly copied files, our MongoDB secondary server will try to sync up to the primary using the oplog again. So, if our oplog has fallen so far behind the primary that it can’t find the entry on our primary server, this method will fail, too.
Note
Keep a sufficiently sized oplog. Don’t let data grow out of hand in any replica set member. Design, test, and deploy sharding early on.
Changing the oplog’s size
Hand in hand with the preceding operational tip, we may need to rethink and resize our oplog as our data grows. Operations become more complicated and time-consuming as our data grows, and we need to adjust our oplog size to accommodate it. The steps for changing the oplog’s size are as follows:
- The first step is to restart our MongoDB secondary server as a standalone server, an operation that was described in the How to perform maintenance on replica sets section.
- We then make a backup of our existing oplog as follows:
> mongodump --db local --collection 'oplog.rs' --port 37017
- We keep a copy of this data, just in case. We then connect to our standalone database as follows:
> use local
> db = db.getSiblingDB('local')
> db.temp.drop()
Up until now, we have connected to the local database and deleted the temp collection, just in case it had any leftover documents.
- The following step is to get the last entry of our current oplog and save it in the temp collection as follows:
> db.temp.save( db.oplog.rs.find( { }, { ts: 1, h: 1 } ).sort( {$natural : -1} ).limit(1).next() )
- This following entry will be used when we restart our secondary server in order to track where it has reached in the oplog replication:
> db = db.getSiblingDB('local')
> db.oplog.rs.drop()
- Now, we delete our existing oplog, and in the following step, we will create a new oplog of 4 GB in size as follows:
> db.runCommand( { create: "oplog.rs", capped: true, size: (4 * 1024 * 1024 * 1024) } )
- The following step is to copy the one entry from our temp collection back to our oplog as follows:
> db.oplog.rs.save( db.temp.findOne() )
- Finally, we cleanly shut down our server from the admin database, using the db.shutdownServer() command, and restart our secondary as a member of the replica set.
- We repeat this process for all secondary servers, and as a last step, we repeat the procedure for our primary member, which is done after we step the primary down by using the following command:
Reconfiguring a replica set when we have lost the majority of our servers
This is only intended as an interim solution and a last resort when we are faced with downtime and disrupted cluster operations. When we lose the majority of our servers and we still have enough servers to start a replica set (maybe including some quickly spawned arbiters), we can force a reconfiguration with only the surviving members.
First, we get the replica set configuration document as follows:
> cfg = rs.conf()
Using printjson(cfg), we identify the members that are still operational. Let’s say that these are 1, 2, and 3 as follows:
> cfg.members = [cfg.members[1] , cfg.members[2] , cfg.members[3]]
> rs.reconfig(cfg, {force : true})By using force : true, we are forcing this reconfiguration to happen. Of course, we need to have at least three surviving members in our replica set for this to work.
Note
It’s important to remove the failing servers as soon as possible by killing the processes and/or taking them out of the network to avoid unintended consequences; these servers may believe that they are still a part of a cluster that doesn’t acknowledge them anymore.
Chained replication
Replication in MongoDB usually happens from the primary to the secondaries. In some cases, we may want to replicate from another secondary instead of the primary. Chained replication helps to alleviate the primary from read load, but at the same time, it increases the average replication lag for the secondary that chooses to replicate from a secondary. This makes sense, as replication has to go from the primary to the secondary (1), and then from this server to another secondary (2).
Chained replication can be enabled (and disabled, respectively) with the following cfg command:
> cfg.settings.chainingAllowed = true
In cases where printjson(cfg) doesn’t reveal a settings subdocument, we need to create an empty one first, as follows:
> cfg.settings = { }Note
If there is already a settings document, the preceding command will result in deleting its settings, leading to potential data loss.
Streaming replication
Starting from version 4.4, MongoDB is using streaming to replicate data from one server in a replica set to another. We can set oplogFetcherUsesExhaust to false to revert to the older, batched replication. This is only recommended if we have bandwidth constraints between the source and target or if streaming replication drains the source replication server.
Flow control
Starting from version 4.2, MongoDB is using flow control to keep lag for replica set writes that require a majority committed write concern under the configurable flowControlTargetLagSeconds, with a default value of 10 seconds.
Flow control limits the rate of writes to the primary to make sure secondaries can keep up with the primary writes. If the default value is not optimal, MongoDB recommends decreasing the value to force more aggressive flow control.
Cloud options for a replica set
We can set up and operate a replica set from our own servers, but we can reduce our operational overhead by using a DBaaS provider to do so. The three most widely used MongoDB cloud providers are Amazon’s DocumentDB, Microsoft’s Azure Cosmos DB, and MongoDB Atlas, the native offering from MongoDB, Inc.
In this section, we will go over these options and how they fare in comparison to using our own hardware and data centers.
Amazon DocumentDB
Amazon DocumentDB is a wire protocol-compatible MongoDB offering based on Amazon’s infrastructure. It offers compatibility with versions 3.6 and 4.0 of MongoDB as of summer 2022.
Amazon DocumentDB is offering what is essentially a replica set configuration with one primary for writes and up to 15 secondaries across availability zones in a single region for reads. Sharding is not supported and write scaling can only be achieved by scaling up the primary server instance. We should accordingly scale up secondary instances to avoid replication lag in the case of high contention.
We can also have secondaries spanning multiple regions using global clusters. We can have up to five secondary clusters in different regions that replicate from the primary cluster and serve exclusively read operations. Any one of them can be promoted to be the primary cluster and start taking writes in the event of a region outage. Global clusters allow us to scale reads almost infinitely with typically up to 50 ms replication lag, allowing low-latency reads for users around the globe.
Amazon DocumentDB supports MongoDB ACID transactions as they were introduced in MongoDB version 4.0. It also supports implicit atomicity and consistency for CRUD operations (findAndModify, update, insert, and delete) that span multiple documents. In contrast, MongoDB supports atomicity and consistency for CRUD operations that span multiple subdocuments within one document.
Atomicity in bulk operations such as updateMany and insertMany is not guaranteed in the case of an error. This means that if, for example, insertMany attempts to insert 100 documents and encounters an error in one document, it will still insert the other 99 documents.
Amazon DocumentDB offers 99.9% SLA and high durability by storing six copies of each write across three availability zones in a region. There is no write concern concept in DocumentDB as all writes propagate to the majority of nodes before being acknowledged. The closest equivalent configuration in MongoDB for reference is {w: 3, j: true}.
More information on the Amazon DocumentDB SLA is available at https://aws.amazon.com/documentdb/sla/.
Amazon DocumentDB is not a drop-in replacement for MongoDB. Amazon has chosen to implement a subset of MongoDB features, leaving out, for example, MapReduce, capped collections, GridFS, and text and hashed indexes. If we are migrating from an existing MongoDB deployment, we need to make sure that our code is compatible with Amazon DocumentDB’s feature list.
While DocumentDB can be a great choice within the AWS ecosystem, it cannot be considered a generic replacement for MongoDB Atlas.
Microsoft Azure Cosmos DB
Microsoft offers a MongoDB Query Language (MQL) compatible document-based storage option, Cosmos DB. Cosmos DB is compatible with MongoDB up to version 4.2 as of summer 2022.
Azure Cosmos DB offers a core API that is based on SQL and a number of extensions that offer Cassandra, graph database, or document-oriented database functionality.
Azure Cosmos DB's MongoDB API supports wire protocol compatibility with MongoDB versions 3.2, 3.6, 4.0, and 4.2. It is based on a serverless model; the user only needs to use the Azure connection string to connect to the database, taking away all management and operational maintenance tasks from the user.
Taking away operations using serverless also means that there is no concept of replication or sharding. Data is guaranteed to be available 99.999% of the time. Data durability within a single region is guaranteed, with the exception of an unrecoverable disaster in the region. Data durability across multiple regions depends on the consistency level configured at the account level.
Cosmos DB recommends the core (SQL) API for generic usage and the MongoDB API layer for migrations from MongoDB environments.
While Cosmos DB can be a great choice within the Azure ecosystem, it cannot be considered a generic replacement for MongoDB Atlas.
More information on the Microsoft Azure SLA is available at https://azure.microsoft.com/en-us/support/legal/sla/cosmos-db/v1_4/.
MongoDB Atlas
MongoDB Atlas is a newer offering from MongoDB, Inc., and it was launched in the summer of 2016. MongoDB Atlas offers the deployment of a replica set or sharded clusters in a single region or across multiple regions, all through a web interface or a command-line interface.
It always offers the latest MongoDB version, including quarterly rapid releases. If we want to always have the latest version of MongoDB with MongoDB, Inc. support, Atlas is the only option. If this is not a strict requirement, then we can wait for the annual major release (5.0, 6.0, and so on).
The only storage option is WiredTiger. There are multiple regions for each provider in the United States, Asia Pacific, Europe, Middle East, and Africa across the three biggest cloud platforms, AWS, Azure, and GCP. Most notably, the regions that are missing are the AWS China and AWS GovCloud US regions.
MongoDB Atlas also offers the serverless deployment option in public preview as of summer 2022. A serverless cluster is scaling reads and writes automatically and hides all of the operational complexity of a replica set or a sharded cluster from the MongoDB developer or administrator.
The running costs for cloud-hosted services can be significantly higher than setting them up on our own servers. What we gain in convenience and time to market may have to be repaid in operational costs.
We learned about our cloud hosting options for a replica set in this section. The following and final section will address the limitations of a replica set and when it is not enough to have a replica set topology on its own.
Replica set limitations
A replica set is great when we understand why we need it and what it cannot do. The different limitations for a replica set are as follows:
- It will not scale horizontally; we need sharding for it.
- We will introduce replication issues if our network is flaky.
- We will make debugging issues more complex if we use secondaries for reads, and these have fallen behind our primary server.
On the flip side, as we explained in earlier sections in this chapter, a replica set can be a great choice for replication, data redundancy, conforming with data privacy, backups, and even recovery from errors caused by humans or otherwise.
Summary
In this chapter, we discussed replica sets and how to administer them. Starting with an architectural overview of replica sets and replica set internals involving elections, we dove into setting up and configuring a replica set.
You learned how to perform various administrative tasks with replica sets, and you learned about the main options for outsourcing operations to a cloud DBaaS provider. Finally, we identified some of the limitations that replica sets in MongoDB currently have.
In the following chapter, we will move on to one of the most interesting concepts in MongoDB (which is used to achieve horizontal scaling): sharding.