
3
MongoDB CRUD Operations
In this chapter, we will learn how to use the mongo shell for database administration operations. Starting with simple create, read, update, and delete (CRUD) operations, we will master scripting from the shell. We will also learn how to write MapReduce scripts from the shell and contrast them to the aggregation framework, into which we will dive deeper in Chapter 7, Aggregation. The new mongosh shell, which replaces the legacy mongo shell, is our next learning goal for the chapter. We will learn what the new MongoDB Stable (previously named Versioned) application programming interface (API) means for developers and what are the guarantees it provides. Finally, we will explore authentication and authorization using the MongoDB Community Edition and its paid counterpart, the Enterprise Edition.
In this chapter, we will cover the following topics:
- CRUD using the shell
- Administration
- MapReduce in the mongo shell
- Aggregation framework
- Securing the shell
- Authentication with MongoDB
- The new mongosh shell
- MongoDB Stable API
Technical requirements
To follow along with the code in this chapter, you need to install MongoDB locally or connect to a MongoDB Atlas database. You can download the MongoDB Community Edition from mongodb.com or use the fully managed database-as-a-service (DBaaS) MongoDB Atlas offering, which provides a free tier as well as seamless upgrades to the latest version.
Most examples are compatible with the newest mongosh shell but you may want to use the legacy mongo shell or enable mongosh backwards compatibility using mongosh snippets.
You will also need to download the official drivers for the language of your choice— Ruby, Python, or PHP: Hypertext Preprocessor (PHP). You can find all the code from this chapter in the GitHub repository at https://github.com/PacktPublishing/Mastering-MongoDB-6.x.
CRUD using the shell
The mongo shell is equivalent to the administration console used by relational databases. Connecting to the mongo shell is as easy as typing the following code:
$ mongosh
Type this on the command line for standalone servers or replica sets. Inside the shell, you can view available databases simply by typing the following code:
$ db
Then, you can connect to a database by typing the following code:
> use <database_name>
The mongo shell can be used to query and update data in our databases. Inserting this document into the books collection can be done like so:
> db.books.insertOne({title: 'mastering mongoDB', isbn: '101'})
{
acknowledged: true,
insertedIds: { '0': ObjectId("627f8178d95a9c017a390229") }
We can then find documents from a collection named books by typing the following code:
> db.books.find()
{ "_id" : ObjectId("592033f6141daf984112d07c"), "title" : "mastering mongoDB", "isbn" : "101" }
The result we get back from MongoDB informs us that the write succeeded and inserted one new document in the database.
Deleting this document has similar syntax and results in the following code:
> db.books.removeOne({isbn: '101'})
{ acknowledged: true, deletedCount: 1 }
You can try to update this same document, as shown in the following code block:
> db.books.updateOne({isbn:'101'}, {$set: { price: 30}})
{
acknowledged: true,
insertedId: null,
matchedCount: 1,
modifiedCount: 1,
upsertedCount: 0
}
> db.books.find()
{ "_id" : ObjectId("592034c7141daf984112d07d"), "price" : 30 }
Here, we notice a couple of things, as outlined here:
- The JavaScript Object Notation (JSON)-like formatted field in the updateOne command is our query for searching for documents to update
- The WriteResult object notifies us that the query matched one document and modified one document
- Most importantly, the contents of this document were entirely replaced by the contents of the second JSON-like formatted field but we have lost information on title and isbn
By default, the updateOne command in MongoDB will replace the contents of our document with the document we specify in the second argument. If we want to update the document and add new fields to it, we need to use the $set operator, as follows:
> db.books.updateOne({isbn:'101'}, {$set: {price: 30}})
{
acknowledged: true,
insertedId: null,
matchedCount: 1,
modifiedCount: 1,
upsertedCount: 0
}
Now, our document matches what we would expect, as we can see here:
> db.books.find()
{ "_id" : ObjectId("592035f6141daf984112d07f"), "title" : "mastering mongoDB", "isbn" : "101", "price" : 30 }
However, deleting a document can be done in several ways. The simplest way is through its unique ObjectId value, as illustrated here:
> db.books.deleteOne({_id: ObjectId("592035f6141daf984112d07f")}, justOne: true)
{ acknowledged: true, deletedCount: 1 }
> db.books.find()
>
You can see here that when there are no results, the mongo shell will not return anything other than the shell prompt itself: >.
Scripting for the mongo shell
Administering the database using built-in commands is helpful, but it’s not the main reason for using the shell. The true power of the mongo shell comes from the fact that it is also a JavaScript shell such that we can perform complex administrative tasks that require a set of commands to execute as one.
We can declare and assign variables in the shell, like so:
> var title = 'MongoDB in a nutshell'
> title
MongoDB in a nutshell
> db.books.insertOne({title: title, isbn: 102})
{
acknowledged: true,
insertedIds: { '0': ObjectId("627f8178d95a9c017a390229") }
}> db.books.find()
{ "_id" : ObjectId("59203874141daf984112d080"), "title" : "MongoDB in a nutshell", "isbn" : 102 }
In the previous example, we declared a new title variable as MongoDB in a nutshell and used the variable to insert a new document into our books collection, as shown in the previous code snippet.
As it’s a JavaScript shell, we can use it for functions and scripts that generate complex results from our database, as illustrated here:
> queryBooksByIsbn = function(isbn) { return db.books.find({isbn: isbn})}
With this one-liner, we are creating a new function named queryBooksByIsbn that takes a single argument, which is the isbn value. With the data that we have in our collection, we can use our new function and fetch books by isbn, as shown in the following code snippet:
> queryBooksByIsbn("101")
{ "_id" : ObjectId("592035f6141daf984112d07f"), "title" : "mastering mongoDB", "isbn" : "101", "price" : 30 }
Using the shell, we can write and test these scripts. Once we are satisfied, we can store them in the .js file and invoke them directly from the command line, like so:
$ mongosh <script_name>.js
Here are some useful notes about the default behavior of these scripts:
- Write operations will use a default write concern of w:majority. Majority write concern is calculated as the minimum value between the calculated majority of all nodes and the number of data-bearing nodes. This means that when we have arbiters that are not data-bearing nodes, they will not be included in the calculation of a majority. For example, in a replica set with three servers with one being an arbiter, we would calculate majority as the minimum value between the "calculated majority of all nodes," which is 2 (the closest number to bring the figure to over 50%) and the number of data-bearing nodes, which is—again—2.
- To get results from operations from a script back to standard output (stdout), we must use either JavaScript’s built-in print() function or the Mongo-specific printjson() function, which prints out results formatted in JSON.
In the next section, we will examine the difference between scripting for the mongo shell and using it directly.
Differences between scripting for the mongo shell and using it directly
When writing scripts for the mongo shell, we cannot use shell helpers. MongoDB’s commands—such as use <database_name>, show collections, and other helpers—are built into the shell and so are not available from the JavaScript context where our scripts will get executed. Fortunately, there are equivalents to them that are available from the JavaScript execution context, as shown in the following table:
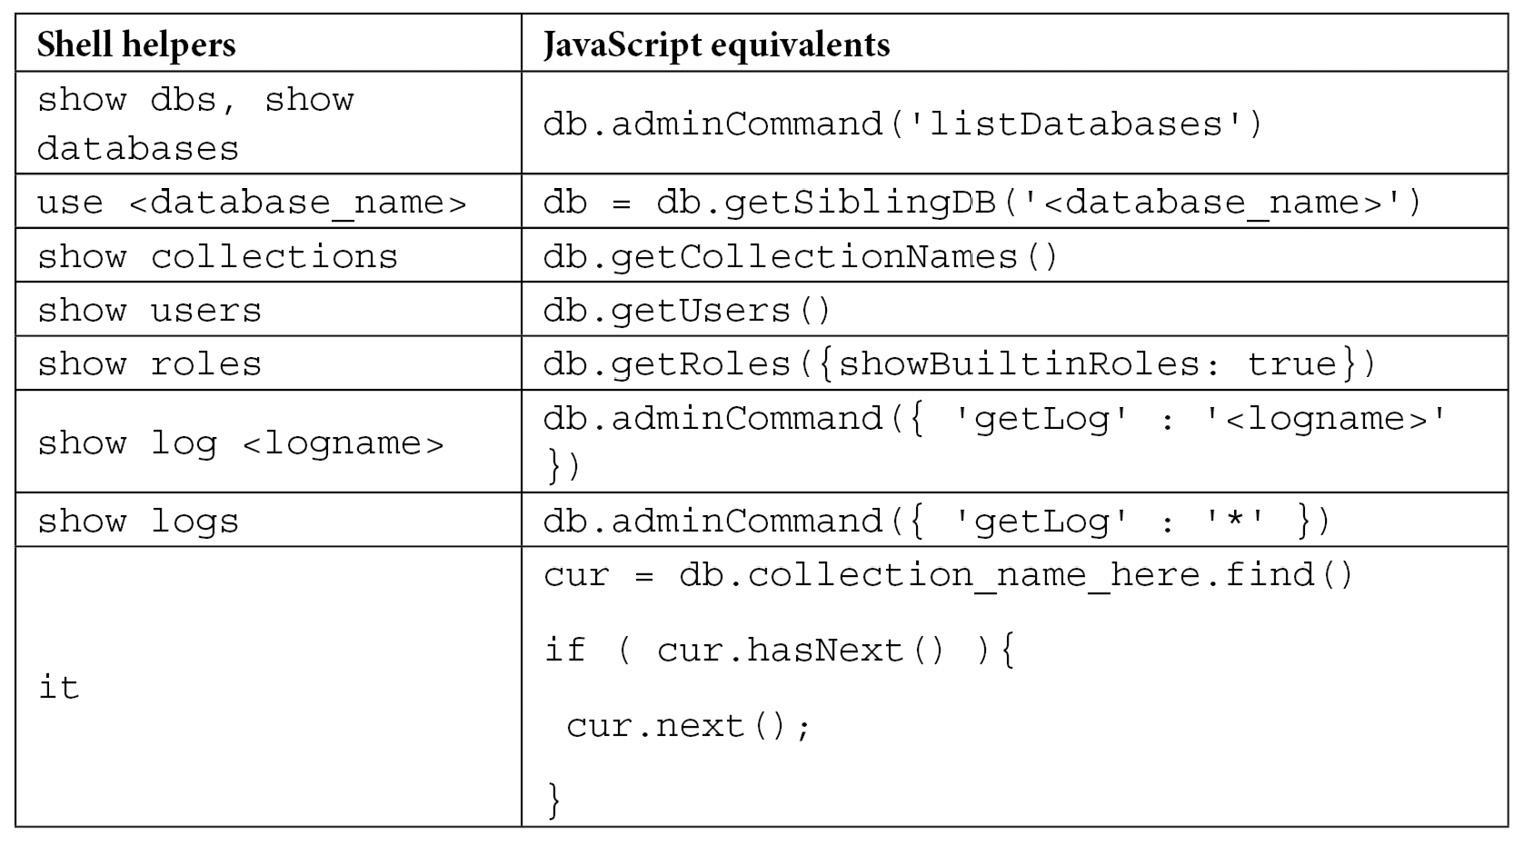
Table 3.1 – Helper functions in JavaScript and MongoDB shell
In the previous table, it is the iteration cursor that the mongo shell returns when we query and get back too many results to show in one batch.
Using the mongo shell, we can script almost anything that we would from a client, meaning that we have a really powerful tool for prototyping and getting quick insights into our data.
Batch inserts using the shell
When using the shell, there will be many times we want to insert a large number of documents programmatically. The most straightforward implementation since we have a JavaScript shell is to iterate through a loop, generating each document along the way, and performing a write operation in every iteration in the loop, as follows:
> authorMongoFactory = function() {for(loop=0;loop<1000;loop++) {db.books.insert({name: "MongoDB factory book" + loop})}}
function () {for(loop=0;loop<1000;loop++) {db.books.insert({name: "MongoDB factory book" + loop})}}
In this simple example, we create an authorMongoFactory() method for an author who writes 1000 books on MongoDB with a slightly different name for each one:
> authorMongoFactory()
This will result in 1000 writes being issued to the database. While it is simple from a development point of view, this method will put a strain on the database.
Instead, using a bulk write, we can issue a single database insert command with the 1000 documents that we have prepared beforehand, as follows:
> fastAuthorMongoFactory = function() {
var bulk = db.books.initializeUnorderedBulkOp();
for(loop=0;loop<1000;loop++) {bulk.insert({name: "MongoDB factory book" + loop})}
bulk.execute();
}
The end result is the same as before, with the 1000 documents being inserted with the following structure in our books collection:
> db.books.find()
{ "_id" : ObjectId("59204251141daf984112d851"), "name" : "MongoDB factory book0" }
{ "_id" : ObjectId("59204251141daf984112d852"), "name" : "MongoDB factory book1" }
{ "_id" : ObjectId("59204251141daf984112d853"), "name" : "MongoDB factory book2" }
…
{ "_id" : ObjectId("59204251141daf984112d853"), "name" : "MongoDB factory book999" }
The difference from the user’s perspective lies in the speed of execution and reduced strain on the database.
In the preceding example, we used initializeUnorderedBulkOp() for the bulk operation builder setup. The reason we did this is that we don’t care about the order of insertions being the same as the order in which we add them to our bulk variable with the bulk.insert() command.
This makes sense when we can make sure that all operations are unrelated to each other or idempotent.
If we care about having the same order of insertions, we can use initializeOrderedBulkOp(); by changing the second line of our function, we get the following code:
var bulk = db.books.initializeOrderedBulkOp();
In the next section, we will see how we can use batch operations using the MongoDB shell to improve operational performance.
Batch operations using the mongo shell
In the case of inserts, we can generally expect that the order of operations doesn’t matter.
The bulk command, however, can be used with many more operations than just inserts. In the following example, we have a single book with isbn : 101 and a name value of Mastering MongoDB in a bookOrders collection with the number of available copies to purchase in the available field, with the 99 books available for purchase:
> db.bookOrders.find()
{ "_id" : ObjectId("59204793141daf984112dc3c"), "isbn" : 101, "name" : "Mastering MongoDB", "available" : 99 }
With the following series of operations in a single bulk operation, we are adding one book to the inventory and then ordering 100 books, for a final total of 0 copies available:
> var bulk = db.bookOrders.initializeOrderedBulkOp();
> bulk.find({isbn: 101}).updateOne({$inc: {available : 1}});
> bulk.find({isbn: 101}).updateOne({$inc: {available : -100}});
> bulk.execute();
With the preceding code, we will get the following output:
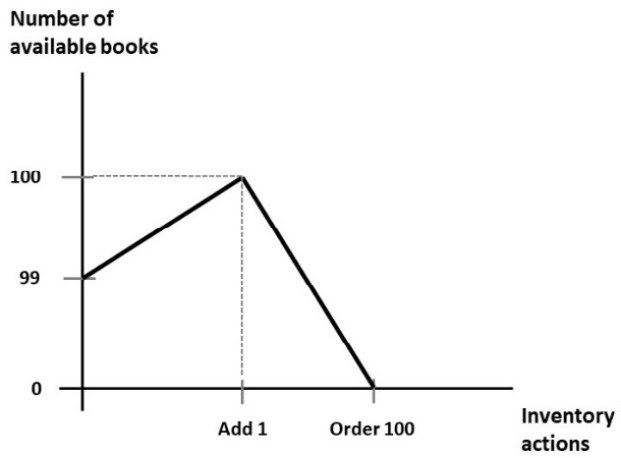
Figure 3.1 – Number of books over time
Using initializeOrderedBulkOp(), we can make sure that we are adding one book before ordering 100 so that we are never out of stock. On the contrary, if we were using initializeUnorderedBulkOp(), we wouldn’t have such a guarantee and we might end up with the 100-book order coming in before the addition of the new book, resulting in an application error as we don’t have that many books to fulfill the order.
When executing through an ordered list of operations, MongoDB will split the operations into batches of 1000 and group these by operation. For example, if we have 1004 inserts, 998 updates, 1004 deletes, and—finally—5 inserts, we will end up with the following:
[1000 inserts]
[4 inserts]
[998 updates]
[1000 deletes]
[4 deletes]
[5 inserts]
The previous code can be explained as follows:
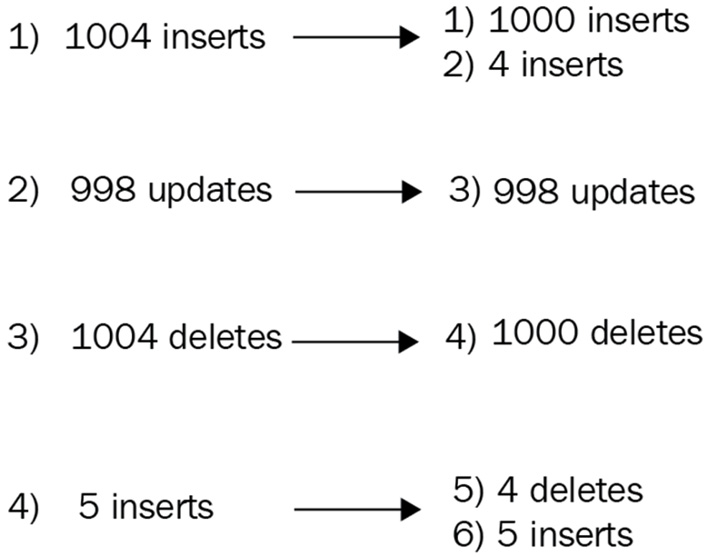
Figure 3.2 – Bulk operations ordering
This doesn’t affect the series of operations, but it implicitly means that our operations will leave the database in batches of 1000. This behavior is not guaranteed to stay in future versions.
If we want to inspect the execution of a bulk.execute() command, we can issue bulk.getOperations() right after we type execute().
Note
Since version 3.2, MongoDB has offered an alternative command for bulk writes: bulkWrite().
bulkWrite arguments, as shown in the following code snippet, are the series of operations we want to execute; WriteConcern (the default is again 1), and if the series of write operations should get applied in the order that they appear in the array (they will be ordered by default):
> db.collection.bulkWrite(
[ <operation 1>, <operation 2>, ... ],
{
writeConcern : <document>,
ordered : <boolean>
}
)
The following operations are the same ones supported by bulk:
- insertOne
- updateOne
- updateMany
- deleteOne
- deleteMany
- replaceOne
updateOne, deleteOne, and replaceOne have matching filters; if they match more than one document, they will only operate on the first one. It’s important to design these queries so that they don’t match more than one document; otherwise, the behavior will be undefined.
In this section, we learned how we can script using the MongoDB shell. In the next section, we will go through administration tasks using the MongoDB shell.
Administration
Using MongoDB should, for the most part, be as transparent as possible to the developer. Since there are no schemas, there is no explicit need for migrations, and generally, developers find themselves spending less time on administrative tasks in the database world.
That said, there are several tasks that an experienced MongoDB developer or architect can perform to keep up the speed and performance of MongoDB.
Administration is generally performed on three different levels, ranging from more generic to more specific: process, collection, and index.
At the process level, there is the shutDown command to shut down the MongoDB server.
At the database level, we have the following commands:
- dropDatabase to drop the entire database
- listCollections to retrieve the collection names in the current database
- copyDB or clone to clone a remote database locally
- repairDatabase for when our database is not in a consistent state due to an unclean shutdown
In comparison, at the collection level, the following commands are used:
- drop: To drop a collection
- create: To create a collection
- renameCollection: To rename a collection
- cloneCollection: To clone a remote collection to our local database
- cloneCollectionAsCapped: To clone a collection into a new capped collection
- convertToCapped: To convert a collection to a capped one
At the index level, we can use the following commands:
- createIndexes: To create new indexes in the current collection
- listIndexes: To list existing indexes in the current collection
- dropIndexes: To drop all indexes from the current collection
- reIndex: To drop and recreate an index in the current collection
In the following sections, we will also go through a few other commands that are more important from an administration standpoint.
compact
MongoDB documents take up a specified amount of space on a disk. If we perform an update that increases the size of a document, this may end up being moved out of sequence to the end of the storage block, creating a hole in storage, resulting in increased execution times for this update, and possibly missing it from running queries. The compact operation will defragment space and result in less space being used.
We can update a document by adding an extra 10 bytes, showing how it will be moved to the end of the storage block, and creating an empty space in the physical storage, as illustrated in the following diagram:
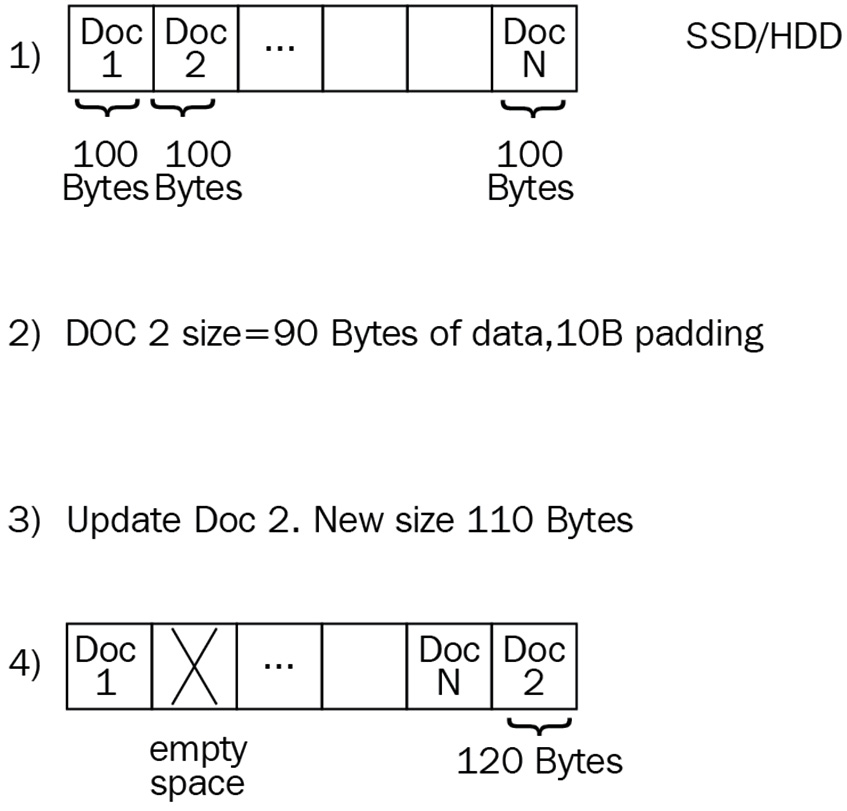
Figure 3.3 – How fragmentation occurs
compact can also take a force argument, as follows:
> db.runCommand ( { compact: '<collection>', force: true } )
The force parameter will force run the compact operation on the primary server of a replica set.
We can similarly add a parameter for a comment, like so:
{ comment: 'any description of the operation that we would like to appear in the logs' }currentOp() and killOp()
db.currentOp() will show us the currently running operation in the database and will attempt to kill it. We need to run the use admin command before running killOp(). Needless to say, using killOp() against internal MongoDB operations is not recommended or advised, as the database may end up in an undefined state. The killOp() command can be used like so:
> db.runCommand( { "killOp": 1, "op": <operationId> } )
collMod
collMod is used to pass flags to a collection by modifying the underlying database’s behavior.
Since version 3.2, the most interesting set of flags that we can pass to a collection is document validation.
Document validation can specify a set of rules to be applied to new updates and inserts into a collection. This means that current documents will be checked if they get modified.
We can only apply validations to documents that are already valid if we set validationLevel to moderate. By specifying validationAction, we can log documents that are invalid by setting it to warn or prevent updates from happening altogether by setting it to error.
For example, with the previous example of bookOrders, we can set validator on the isbn and name fields being present for every insert or update, as demonstrated in the following code snippet:
> db.runCommand( { collMod: "bookOrders",
"validator" : {
"$and" : [
{
"isbn" : {
"$exists" : true
}
},
{
"name" : {
"$exists" : true
}
}
]
}
})
Here, we get back the following code:
{ "ok" : 1 }
Then, if we try to insert a new document with only the isbn field being present, we get an error, as shown here:
> db.bookOrders.insert({isbn: 102})
WriteResult({
"nInserted" : 0,
"writeError" : {
"code" : 121,
"errmsg" : "Document failed validation"
}
})
>
We get an error because our validation has failed. Managing validation from the shell is really useful as we can write scripts to manage it, and also make sure that everything is in place.
After learning how to administer our MongoDB server, in the next section, we will learn about the MapReduce framework.
MapReduce in the mongo shell
MongoDB allows users to write MapReduce scripts straight from the shell. This capability has not been supported as needed throughout the years and, as such, has now fallen behind the much more evolved aggregation framework, which we generally recommend over MapReduce scripting.
Important note
MapReduce has been deprecated in version 5 and should not be used for new development. It is recommended that we rewrite existing MapReduce code using the aggregation framework, which we will visit in Chapter 7, Aggregation.
MapReduce is a data processing method for getting aggregation results from large sets of data. The main advantage of this is that it is inherently parallelizable, as evidenced by frameworks such as Hadoop.
MapReduce is really useful when used to implement a data pipeline. Multiple MapReduce commands can be chained to produce different results. An example of this is aggregating data by using different reporting periods (such as hour, day, week, month, and year) where we use the output of each more granular reporting period to produce a less granular report.
A simple example of MapReduce being given a collection named books with the following data would look like this:
> db.books.find()
{ "_id" : ObjectId("592149c4aabac953a3a1e31e"), "isbn" : "101", "name" : "Mastering MongoDB", "price" : 30 }
{ "_id" : ObjectId("59214bc1aabac954263b24e0"), "isbn" : "102", "name" : "MongoDB in 7 years", "price" : 50 }
{ "_id" : ObjectId("59214bc1aabac954263b24e1"), "isbn" : "103", "name" : "MongoDB for experts", "price" : 40 }
Our map and reduce functions are defined like this:
> var mapper = function() {
emit(this.id, 1);
};
In this mapper variable, we simply output a key of id of each document with a value of 1, as follows:
> var reducer = function(id, count) {
return Array.sum(count);
};
In reducer, we sum across all values (where each one has a value of 1), as follows:
> db.books.mapReduce(mapper, reducer, { out:"books_count" });
{
"result" : "books_count",
"timeMillis" : 16613,
"counts" : {
"input" : 3,
"emit" : 3,
"reduce" : 1,
"output" : 1
},
"ok" : 1
}
> db.books_count.find()
{ "_id" : null, "value" : 3 }
>
Our final output will be a document with no identifier (ID) since we didn’t output any value for ID, and a value of 6, since there are six documents in the input dataset.
Using MapReduce, MongoDB will apply a map to each input document, emitting key-value pairs at the end of the map phase. Then, each reducer will get key-value pairs with the same key as the input, processing all multiple values. The reducer’s output will be a single key-value pair for each key.
Optionally, we can use a finalize function to further process the results of mapper and reducer. MapReduce functions use JavaScript and run within the mongod process. MapReduce can output inline as a single document, subject to the 16 megabyte (MB) document size limit, or as multiple documents in an output collection. Input and output collections can be sharded.
MapReduce concurrency
MapReduce operations will place several short-lived locks that should not affect operations. However, at the end of the reduce phase, if we output the data to an existing collection, then output actions such as merge, reduce, and replace will take an exclusive global write lock for the whole server, blocking all other writes to the db instance. If we want to avoid this, then we should invoke mapReduce in the following way:
> db.collection.mapReduce(
mapper,
reducer,
{
out: { merge/reduce: bookOrders, nonAtomic: true }
})
We can apply nonAtomic only to merge or reduce actions. replace will just replace the contents of documents in bookOrders, which will not take much time anyway.
With the merge action, the new result is merged with the existing result if an output collection already exists. If an existing document has the same key as the new result, then it will overwrite the existing document.
With the reduce action, the new result is processed together with the existing result if an output collection already exists. If an existing document has the same key as the new result, it will apply the reducer function to both the new and existing documents and will overwrite the existing document with the result.
Although MapReduce has been present since the early versions of MongoDB, it hasn’t evolved as much as the rest of the database, resulting in its usage being less than that of specialized MapReduce frameworks such as Hadoop, which we will learn more about in Chapter 12, Harnessing Big Data with MongoDB.
Incremental MapReduce
Incremental MapReduce is a pattern where we use MapReduce to aggregate previously calculated values. An example of this could be counting non-distinct users in a collection for different reporting periods (that is, by hour, day, or month) without the need to recalculate the result every hour.
To set up our data for incremental MapReduce, we need to do the following:
- Output our reduce data to a different collection
- At the end of every hour, query only for the data that got into the collection in the last hour
- With the output of our reduce data, merge our results with the calculated results from the previous hour
Continuing with the previous example, let’s assume that we have a published field in each of the documents with our input dataset, as shown in the following code snippet:
> db.books.find()
{ "_id" : ObjectId("592149c4aabac953a3a1e31e"), "isbn" : "101", "name" : "Mastering MongoDB", "price" : 30, "published" : ISODate("2017-06-25T00:00:00Z") }
{ "_id" : ObjectId("59214bc1aabac954263b24e0"), "isbn" : "102", "name" : "MongoDB in 7 years", "price" : 50, "published" : ISODate("2017-06-26T00:00:00Z") }
Using our previous example of counting books, we will get the following code:
var mapper = function() {
emit(this.id, 1);
};
var reducer = function(id, count) {
return Array.sum(count);
};
> db.books.mapReduce(mapper, reducer, { out: "books_count" })
{
"result" : "books_count",
"timeMillis" : 16700,
"counts" : {
"input" : 2,
"emit" : 2,
"reduce" : 1,
"output" : 1
},
"ok" : 1
}
> db.books_count.find()
{ "_id" : null, "value" : 2 }
Now, we get a third book in our mongo_book collection with a document, as follows:
{ "_id" : ObjectId("59214bc1aabac954263b24e1"), "isbn" : "103", "name" : "MongoDB for experts", "price" : 40, "published" : ISODate("2017-07-01T00:00:00Z") }
> db.books.mapReduce( mapper, reducer, { query: { published: { $gte: ISODate('2017-07-01 00:00:00') } }, out: { reduce: "books_count" } } )
> db.books_count.find()
{ "_id" : null, "value" : 3 }
What happened in the preceding code is that by querying for documents in July 2017, we only got the new document out of the query and then used its value to reduce the value with the already calculated value of 2 in our books_count document, adding 1 to the final sum of 3 documents.
This example, as contrived as it is, shows a powerful attribute of MapReduce: the ability to re-reduce results to incrementally calculate aggregations over time.
Troubleshooting MapReduce
Over the years, one of the major shortcomings of MapReduce frameworks has been the inherent difficulty in troubleshooting, as opposed to simpler non-distributed patterns. Most of the time, the most effective tool is debugging using log statements to verify that output values match our expected values. In the mongo shell, which is a JavaScript shell, it is as simple as providing the output using the console.log() function.
Diving deeper into MapReduce in MongoDB, we can debug both in the map and the reduce phase by overloading the output values.
By debugging the mapper phase, we can overload the emit() function to test what the output key values will be, as follows:
> var emit = function(key, value) {
print("debugging mapper's emit");
print("key: " + key + " value: " + tojson(value));
}
We can then call it manually on a single document to verify that we get back the key-value pair that we expect, as follows:
> var myDoc = db.orders.findOne( { _id: ObjectId("50a8240b927d5d8b5891743c") } );
> mapper.apply(myDoc);
The reducer function is somewhat more complicated. A MapReduce reducer function must meet the following criteria:
- It must be idempotent
- It must be commutative
- The order of values coming from the mapper function should not matter for the reducer’s result
- The reducer function must return the same type of result as the mapper function
We will dissect each of these following requirements to understand what they really mean:
- It must be idempotent: MapReduce, by design, may call the reducer function multiple times for the same key with multiple values from the mapper phase. It also doesn’t need to reduce single instances of a key as it’s just added to the set. The final value should be the same no matter the order of execution. This can be verified by writing our own verifier function and forcing reducer to re-reduce, or by executing reducer many times, as shown in the following code snippet:
reduce( key, [ reduce(key, valuesArray) ] ) == reduce( key, valuesArray )
- It must be commutative: As multiple invocations of the reducer function may happen for the same key value, if it has multiple values, the following code should hold:
reduce(key, [ C, reduce(key, [ A, B ]) ] ) == reduce( key, [ C, A, B ] )
- The order of values coming from the mapper function should not matter for the reducer’s result: We can test that the order of values from mapper doesn’t change the output for reducer by passing in documents to mapper in a different order and verifying that we get the same results out, as follows:
reduce( key, [ A, B ] ) == reduce( key, [ B, A ] )
- The reducer function must return the same type of result as the mapper function: Hand-in-hand with the first requirement, the type of object that the reducer function returns should be the same as the output of the mapper function.
The MapReduce framework is deprecated in version 5 but there is still legacy code that needs to be understood and rewritten. In the next section, we will learn about the recommended way to rewrite it: the aggregation framework.
Aggregation framework
Since version 2.2, MongoDB has provided a better way to work with aggregation—one that has been supported, adopted, and enhanced regularly ever since. The aggregation framework is modeled after data processing pipelines.
In data processing pipelines, there are three main operations: filters that operate like queries, filtering documents, and document transformations that transform documents to get them ready for the next stage. In the following sections, we will discuss how these three methods map to each other on a high level.
SQL to aggregation
An aggregation pipeline can replace and augment querying operations in the shell. A common pattern for development goes like this:
- Verifying that we have the correct data structures and getting quick results using a series of queries in the shell
- Prototyping pipeline results using the aggregation framework
- Refining and refactoring if/when needed, either by extract, transform, load (ETL) processes to get data into a dedicated data warehouse or by more extensive usage of the application layer to get the insights that we need
In the following table, we can see how Structured Query Language (SQL) commands map to aggregation framework operators:
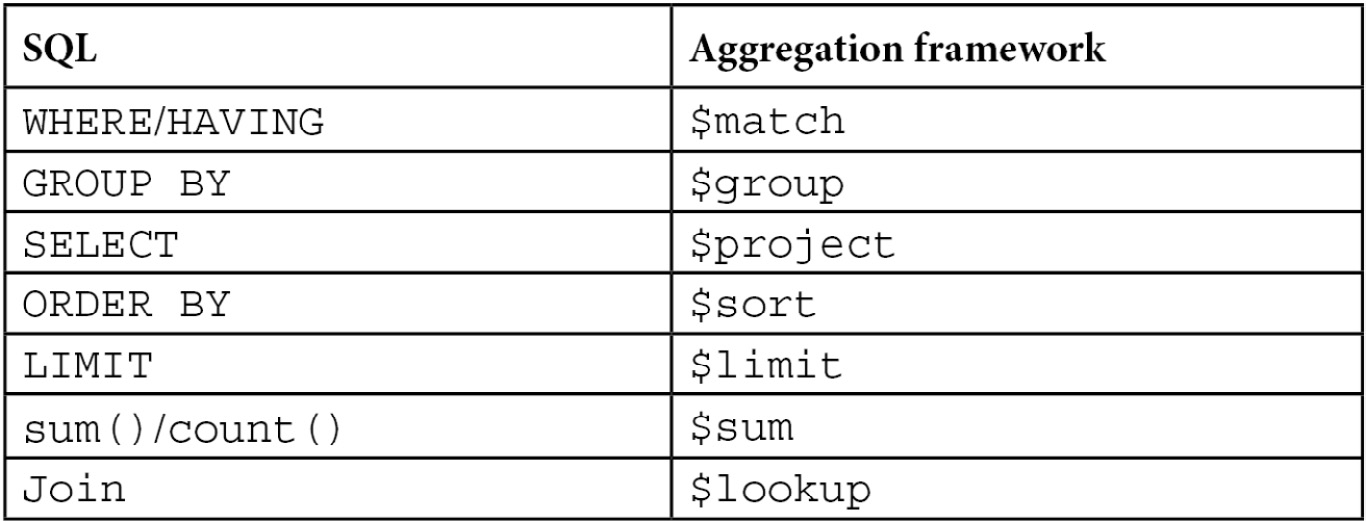
Table 3.2 – SQL to aggregation framework mapping
Aggregation versus MapReduce
In MongoDB, we can essentially get data out of our database by using three methods: querying, the aggregation framework, and MapReduce. All three of them can be chained to each other, and many times it is useful to do so; however, it’s important to understand when we should use aggregation and when MapReduce may be a better alternative.
Note
We can use both aggregation and MapReduce with sharded databases.
Aggregation is based on the concept of a pipeline. As such, it’s important to be able to model our data from the input to the final output, in a series of transformations and processing that can get us there. It’s also mostly useful when our intermediate results can be used on their own, or feed parallel pipelines. Our operations are limited by the operators that we have available from MongoDB, so it’s important to make sure that we can calculate all the results we need by using the available commands.
MapReduce, on the other hand, can be used to construct pipelines by chaining the output of one MapReduce job to the input of the next one via an intermediate collection, but this is not its primary purpose.
MapReduce’s most common use case is to periodically calculate aggregations for large datasets. Having MongoDB’s querying in place, we can incrementally calculate these aggregations without the need to scan through the whole input table every time. In addition, its power comes from its flexibility, as we can define mappers and reducers in JavaScript with the full flexibility of the language when calculating intermediate results. Not having the operators that the aggregation framework provides us with, we have to implement them on our own.
In many cases, the answer is not either/or. We can (and should) use the aggregation framework to construct our ETL pipeline and resort to MapReduce for the parts that are not yet supported sufficiently by it.
A complete use case with aggregation and MapReduce is provided in Chapter 7, Aggregation.
Securing the shell
MongoDB is a database developed with ease of development in mind. As such, security at the database level was not baked in from the beginning, and it was up to the developers and administrators to secure the MongoDB host from accessing outside the application server.
Unfortunately, this means that as far back as 2015, there were 39,890 databases found open to the internet with no security access configured. Many of them were production databases, one belonging to a French telecom operator and containing more than 8 million records from its customers.
Nowadays, there is no excuse for leaving any MongoDB server with the default authentication off settings at any stage of development, from local server deployment to production.
Authentication and authorization
Authentication and authorization are closely connected and sometimes confused. Authentication is about verifying the identity of a user to the database. An example of authentication is Secure Sockets Layer (SSL), where the web server verifies its identity—that it is who it claims to be—to the user.
Authorization is about determining which actions a user can take on a resource. In the next sections, we will discuss authentication and authorization with these definitions in mind. We will also examine some security tips for MongoDB as of the most current version.
Authorization with MongoDB
MongoDB’s most basic authorization relies on the username/password method. By default, MongoDB will not start with authorization enabled. To enable it, we need to start our server with the --auth parameter, as follows:
$ mongod --auth
To set up authorization, we need to start our server without authorization to set up a user. Setting up an admin user is simple, as we can see here:
> use admin
> db.createUser(
{
user: <adminUser>,
pwd: <password>,
roles: [ { role: <adminRole>, db: "admin" } ]
}
)
Here, <adminUser> is the name of the user we want to create, <password> is the password, and <adminRole> can be any of the following values ordered from the most powerful to the least powerful, as shown in the following list:
- root
- dbAdminAnyDatabase
- userAdminAnyDatabase
- readWriteAnyDatabase
- readAnyDatabase
- dbOwner
- dbAdmin
- userAdmin
- readWrite
- read
Of these roles, root is the superuser that allows access to everything. This is not recommended to be used, except for special circumstances.
All the AnyDatabase roles provide access to all databases, of which dbAdminAnyDatabase combines the userAdminAnyDatabase and readWriteAnyDatabase scopes being an adminstrator again in all databases.
The rest of the roles are defined in the database that we want them to apply, by changing the roles subdocument of the preceding db.createUser(); for example, to create a dbAdmin role for our mongo_book database, we would use the following code:
> db.createUser(
{
user: <adminUser>,
pwd: <password>,
roles: [ { role: "dbAdmin", db: "mongo_book" } ]
}
)
Cluster administration has even more roles, which we will cover in more depth in Chapter 13, Mastering Replication.
Finally, when we restart our database with the --auth flag set, we can use either the command line or the connection string (from any driver) to connect as admin and create new users with predefined or custom-defined roles, as follows:
mongodb://[username:password@]host1[:port1][,host2[:port2],...[,hostN[:portN]]][/[database][?options]]
Authentication and authorization are essential prerequisites for any production-level MongoDB system. In the next section, we will establish a baseline of security best practices.
Security tips for MongoDB
Common software system security precautions apply with MongoDB. We will outline some of them in the following sections and learn how to enable them.
Encrypting communication using Transport Layer Security (TLS)/SSL
Communication between the mongod or mongos server and the client mongo shell or applications should be encrypted. This is supported in most MongoDB distributions from version 3.0 onward; however, we need to take care that we download the proper version with SSL support.
After this, we need to get a signed certificate from a trusted certificate authority (CA) or sign our own. Using self-signed certificates is fine for preproduction systems, but in production it will mean that MongoDB servers won’t be able to verify our identity, leaving us susceptible to man-in-the-middle (MitM) attacks; thus, using a proper certificate is highly recommended.
To start our MongoDB server with SSL, we need the following code:
$ mongod --sslMode requireSSL --sslPEMKeyFile <pem> --sslCAFile <ca>
Here, <pem> is our .pem signed certificate file, and <ca> is the .pem root certificate from the CA that contains the root certificate chain.
These options can also be defined in our mongod.conf or mongos.conf configuration file in YAML Ain’t Markup Language (YAML) file format, as follows:
net:
ssl:
mode: requireSSL
PEMKeyFile: /etc/ssl/mongodb.pem
CAFile: /etc/ssl/ca.pem
disabledProtocols: TLS1_0,TLS1_1,TLS1_2
Here, we specified a PEMKeyFile instance, a CAFile instance, and also that we won’t allow the server to start with certificates that follow the TLS1_0, TLS1_1, or TLS1_2 versions. These are the available versions for disabledProtocols at this time.
Encrypting data
Using WiredTiger is highly recommended for encrypting data at rest, as it supports it natively from version 3.2.
For users of the Community Edition version, this can be achieved in the storage selection of their choice; for example, in Amazon Web Services (AWS) using Elastic Block Store (EBS) encrypted storage volumes.
Note
This feature is available only for MongoDB Enterprise Edition.
Limiting network exposure
The oldest security method to secure any server is to disallow it from accepting connections from unknown sources. In MongoDB, this is done in a configuration file with a simple line, as follows:
net:
bindIp: <string>
Here, <string> is a comma-separated list of Internet Protocol (IP) addresses that the MongoDB server will accept connections from.
Firewalls and VPNs
Together with limiting network exposure on the server side, we can use firewalls to prevent access to our network from the outside internet. Virtual private networks (VPNs) can also provide tunneled traffic between our servers, but regardless, they shouldn’t be used as our sole security mechanism.
Auditing
No matter how secure any system is, we need to keep a close eye on the system from an auditing perspective to make sure that we detect possible breaches and stop them as soon as possible.
Note
This feature is available only for MongoDB Enterprise Edition.
For users of the Community Edition version, we have to set up auditing manually by logging changes to documents and collections in the application layer, possibly in a different database altogether. This will be addressed in the next chapter, which covers advanced querying using client drivers.
Using secure configuration options
It goes without saying that the same configuration options should be used. We must use one of the following:
- MapReduce
- The mongo shell group operation or a group operation from our client driver
- $where JavaScript server evaluation
We can use the –noscripting command-line parameter on startup to disable server-side scripting, and it’s a good practice to use it to prevent accidental server-side evaluation when possible. The mongo shell group operation, as mentioned in the previous list, can be a tricky one as many drivers may use MongoDB’s group() command when we issue group commands in the driver. However, given the limitations that group() has in terms of performance and output documents, we should rethink our design to use the aggregation framework or application-side aggregations.
The web interface also has to be disabled by not using any of the following commands:
- net.http.enabled
- net.http.JSONPEnabled
- net.http.RESTInterfaceEnabled
On the contrary, wireObjectCheck needs to remain enabled as it is by default. WireObjectCheck guarantees that every document stored is valid Binary JSON (BSON). After learning how to secure the MongoDB shell, we will learn next about the different authentication methods supported by MongoDB.
Authentication with MongoDB
By default, MongoDB uses Salted Challenge Response Authentication Mechanism secure hashing algorithm 1 (SCRAM-SHA-1) as the default challenge-and-response authentication mechanism. This is an SHA-1 username/password-based mechanism for authentication. All drivers and the mongo shell itself have built-in methods to support it. The Enterprise Edition supports more authentication options, which we will cover in the next sections.
Note
The authentication protocol in MongoDB has changed since version 3.0. In older versions, the less secure MONGODB-CR was used.
Enterprise Edition
MongoDB’s Enterprise Edition is a paid subscription product offering more features around security and administration. The two most famous ones are Kerberos and Lightweight Directory Access Protocol (LDAP) authentication, which we will visit in the next sections.
Kerberos authentication
MongoDB Enterprise Edition also offers Kerberos authentication. Kerberos is named after the three-headed guard dog of the God of the underworld, Hades, in Greek mythology. Kerberos provides mutual authentication between client and server, protecting against eavesdropping and replay attacks.
Kerberos is widely used in Windows systems through integration with Microsoft’s Active Directory (AD). To install Kerberos, we need to start mongod without Kerberos set up, then connect to the $external database (not the adminstrator that we normally use for adminstrator authorization), and create a user with a Kerberos role and permissions, as follows:
use $external
db.createUser(
{user: "[email protected]",
roles: [ { role: "read", db: "mongo_book" } ]}
)
In the preceding example, we authorize the [email protected] user to read our mongo_book database, just as we would do with a user using our admin system.
After that, we need to start our server with Kerberos support by passing in the authenticationMechanisms parameter, as follows:
--setParameter authenticationMechanisms=GSSAPI
Now, we can connect from our server or command line, as follows:
$ mongo.exe --host <mongoserver> --authenticationMechanism=GSSAPI --authenticationDatabase='$external' --username [email protected]
LDAP authentication
Similar to Kerberos authentication, we can also use LDAP in MongoDB Enterprise Edition only. The user setup needs to be done in the $external database and must match the name of the authentication LDAP name. The name may need to pass through a transformation, and this may cause a mismatch between the LDAP name and the user entry in the $external database.
Setting up LDAP authentication is beyond the scope of this book, but the important thing to consider is that any changes in the LDAP server may need tweaks in the MongoDB server, which won’t happen automatically.
The new mongosh shell
Starting from version 5, MongoDB introduced a new shell, mongosh, which we have been using throughout the chapter.
mongosh is the recommended shell going forward. mongosh is backward compatible with the older mongo shell.
Every command of the mongo shell that is implemented in the mongosh shell will have the exact same syntax, but not all commands are implemented yet.
The main advantages of the new shell are set out here:
- Improved syntax highlighting
- Improved command history
- Improved logging
mongosh is a fully functional JavaScript and Node.js 14.x Read-Eval-Print-Loop (REPL) environment that can be used for query and operations testing.
MongoDB Stable API
Starting from version 5, MongoDB introduced the Stable API. The Stable API provides a guarantee that the API will not break for client-server communication. The Stable API is declared when using any driver or the mongosh shell, in a similar fashion to the following mongosh example:
--apiVersion 1
Note
1 is the only API version available as of MongoDB 6.0.
StableAPI guarantees backward compatibility between MongoDB server upgrades.
This means that we can continue upgrading our MongoDB server without any significant risk that our application connected to the MongoDB server will behave differently.
This guarantee holds correct under the following three constraints:
- We need to declare apiVersion in the client
- We need to use a supported version of the official MongoDB client
- We can only use commands and features that are supported in this API version
Following the third constraint, as of apiVersion=1, we can only use any of the following commands:
- abortTransaction: To terminate a multi-document (also known as distributed) transaction and roll back its results.
- aggregate: (with limitations) To execute an aggregation pipeline.
- authenticate: To authenticate a client using the x.509 authentication mechanism.
- count: Introduced in version 6 and available since version 5.0.9, this counts the number of documents in a collection or a view.
- collMod: To modify view definitions or add options to a collection.
- commitTransaction: To commit a multi-document transaction.
- create: (with limitations) To create a collection or view.
- createIndexes: (with limitations) To create one or more indexes in a collection.
- delete: To remove one or more documents from a collection.
- drop: To remove an entire collection.
- dropDatabase: To remove an entire database.
- dropIndexes: To remove one or more indexes from a collection.
- endSessions: To expire specific sessions after waiting for the timeout period.
- explain: (output may change in future versions) To get an execution query plan for MongoDB operations.
- find: (with limitations) To execute a query against a collection.
- findAndModify: To execute a query against a collection and modify one or more documents in the result set.
- getMore: To fetch more documents in commands that use a cursor to return results in batches.
- insert: To insert one or more documents in a collection.
- hello: To return information about the MongoDB server. This may include primary/secondary replica set information as well as authentication method supported and other role-level information.
- killCursors: To delete cursors that are returned from queries that return results in batches.
- listCollections: To list collections in the database.
- listDatabases: To list databases.
- listIndexes: To list indexes in a collection.
- ping: To ping a server, equivalent to the Internet Control Message Protocol (ICMP) echo request/reply.
- refreshSessions: To update the last used time for specified sessions in order to extend their active state.
- update: To update one or more documents in a collection.
The methods mentioned here that have the note (with limitations) are only partially supported by the Stable API guarantee. This should be taken into account when overlaying our code on top of the Stable API. We can also set the apiStrict Boolean flag to True to prohibit clients from using commands that are not whitelisted. MongoDB will return an apiStrictError in such cases.
Note
apiStrict defaults to False.
Finally, we can pass the apiDeprecationErrors Boolean parameter value to True in order to invoke an error when trying to access any functionality that is deprecated.
Summary
In this chapter, we scratched the tip of the iceberg of CRUD operations. Starting from the mongo shell, we learned how to insert, delete, read, and modify documents. We also discussed the differences between one-off inserts and inserting in batches for performance.
Following that, we discussed administration tasks and how to perform them in the mongo shell. MapReduce and its successor, aggregation framework, were also discussed in this chapter, including how they compare, how to use them, and how we can translate SQL queries to aggregation framework pipeline commands.
Finally, we discussed security and authentication with MongoDB, the new versioning scheme, and the new shell, mongosh. Securing our database is of paramount importance; we will learn more about this in Chapter 9, Monitoring, Backup, and Security.
In the next chapter, we will learn more about auditing and MongoDB.