There are many instances where a 3D application will display a great number of similar 3D objects. A school of fish, a crowd of people or a city block could easily be created by drawing a handful of individual 3D objects many times over.
Offscreen rendering can speed up these types of scenes considerably. Consider the city scene in the following screenshot:
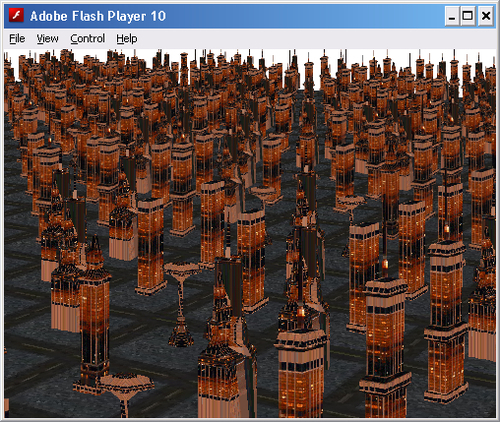
Even though the scene is made up of hundreds of buildings, each building is displayed using one of five different models. Since each building is situated on a single plane, meaning each is being viewed from roughly the same angle, offscreen rendering can be employed in this situation to provide a performance boost.
The idea behind offscreen rendering is that a 3D object is rendered by a view that has not been added to the stage, and is therefore not visible (or "offscreen"). The image of the rendered 3D object is then displayed by a number of Sprite3D objects within the visible scene. Rendering a single 3D object and displaying the result on multiple Sprite3D objects is much faster than rendering the original 3D object multiple times.
To demonstrate how offscreen rendering is implemented in Away3D, we will create an application called OffscreenRenderingDemo.
package
{

  import away3d.cameras.HoverCamera3D;
  import away3d.containers.ObjectContainer3D;
  import away3d.containers.View3D;
  import away3d.core.base.Mesh;
  import away3d.core.clip.RectangleClipping;
  import away3d.core.session.BitmapSession;
  import away3d.core.utils.Cast;
  import away3d.loaders.Max3DS;
  import away3d.materials.BitmapMaterial;
  import away3d.primitives.Plane;
  import away3d.sprites.Sprite3D;

  import flash.display.BitmapData;
  import flash.display.StageQuality;
  import flash.events.Event;
  import flash.events.MouseEvent;

  [SWF(backgroundColor="#FFFFFF")]
  public class OffscreenRenderingDemo extends Away3DTemplate
{The textures that will be applied to the buildings and the ground plane are embedded.
    [Embed(source="building.jpg")]
    protected var BildingTexture:Class;
    [Embed(source="ground.jpg")]
    protected var GroundTexture:Class;
As are the 3DS files that hold the models for our buildings.
    [Embed(source="building1.3ds", mimeType="application/octet-stream")]
    protected var Building1:Class;
    [Embed(source="building2.3ds", mimeType="application/octet-stream")]
    protected var Building2:Class;
    [Embed(source="building3.3ds", mimeType="application/octet-stream")]
    protected var Building3:Class;
    [Embed(source="building4.3ds", mimeType="application/octet-stream")]
    protected var Building4:Class;
    [Embed(source="building5.3ds", mimeType="application/octet-stream")]
    protected var Building5:Class;
Each building will be added to its own view. The buildingViews collection will hold references to these offscreen views.
    protected var buildingViews:Vector.<View3D> =
      new Vector.<View3D>();
Each of the five views will be used to create a BitmapMaterial object, which will later be displayed on a Sprite3D object. The billboardMaterials collection will hold references to these materials.
    protected var billboardMaterials:Vector.<BitmapMaterial> =
      new Vector.<BitmapMaterial>();
The mouseButtonDown, lastStageX, and lastStageY properties are used to rotate the hover camera. Chapter 7, Cameras, covers the hover camera in more detail.
    protected var mouseButtonDown:Boolean = false;
    protected var lastStageX:Number = 0;
    protected var lastStageY:Number = 0;

    public function OffscreenRenderingDemo()
    {
      super();
}The initEngine() function is used to set the stage quality to low, create a hover camera, and to create a number of offscreen views by calling the buildOffscreenView() function.
    protected override function initEngine():void
    {
      super.initEngine();
      stage.quality = StageQuality.LOW;
      view.camera = new HoverCamera3D(
        {
          distance: 1500,
          yfactor:1,
          tiltAngle: 15
        }
      );

      for (var i:int = 0; i < 5; ++i)
        buildingViews.push(buildOffscreenView());
    }
The buildOffscreenView() function is where the offscreen views are created.
    protected function buildOffscreenView():View3D
    {
Creating an offscreen view is no different to a regular view. Both are represented by the View3D class.
var buildingView:View3D = new View3D();
Even though we don't actually add the offscreen view to the stage, we still need to position it as if it were a visible view.
      buildingView.x = stage.stageWidth / 2;
      buildingView.y = stage.stageHeight / 2;
In order to take the output of the view and display it as a material, we need to use the BitmapSession class. Using the bitmap data that the BitmapSession renders to as the source bitmap data for a BitmapMaterial class, we can take the offscreen rendering of a 3D object and display it on a Sprite3D object within the visible scene.
buildingView.session = new BitmapSession(1);
Using the RectangleClipping class is very important, as it reduces the number of pixels that have to be drawn by the Sprite3D objects. The demo would work, for the most part, if there was no clipping done for the offscreen views, because the space around the 3D objects they render would be transparent. However, drawing even completely transparent pixels back in the onscreen view has a performance cost, so it is better to limit the number of pixels that the offscreen views render.
      buildingView.clipping =
        new RectangleClipping(
          {
            minX:-35,
            maxX:35,
            minY: -175,
            maxY: 175
          }
); The offscreen view also gets a hover camera. As the hover camera rotates around in the onscreen view, it will also rotate around in the offscreen views. This matches the angles of both cameras, so the offscreen view of the 3D objects approximates how they would be seen if they had been added directly to the onscreen view.
      buildingView.camera =
        new HoverCamera3D(
          {
            distance:1500,
            yfactor:1,
            tiltAngle: 15
          }
        );
We return the new view, so it can be added to the buildingViews collection by the initObject() function.
Importantly, we have not added these offscreen views to the display list. This means that they will not be visible.
      return buildingView;
    }
In order to move the hover camera around, we need to listen to a number of mouse events. Again all of this code is explained in Chapter 7, Cameras.
    protected override function initListeners():void
    {
      super.initListeners();
      stage.addEventListener(
        MouseEvent.MOUSE_DOWN,
        mouseDown
        );
      stage.addEventListener(
        MouseEvent.MOUSE_UP,
        mouseUp
      );
      stage.addEventListener(
        MouseEvent.MOUSE_MOVE,
        mouseMove
      );
    }

    protected override function onEnterFrame(event:Event):void
    {
      super.onEnterFrame(event);
The position of the hover camera from the on screen view is updated.
      (view.camera as HoverCamera3D).hover();

      for each (var offscreenView:View3D in buildingViews)
{The position of the hover cameras from each of the offscreen views are also updated to match the orientation of the hover camera in the onscreen view.
(offscreenView.camera as HoverCamera3D).hover();
We also need to render each of the offscreen views.
        offscreenView.render();
      }
    }

    protected override function initScene():void
    {
      super.initScene();
Each of the building 3D objects will share the same material, which we create here from the embedded texture.
  var buildingMaterial:BitmapMaterial =
        new BitmapMaterial(Cast.bitmap(BildingTexture));
Each of the building 3D models is then loaded. Loading models from a model file is covered in more detail in Chapter 6, Models and Animations.
      var building1:ObjectContainer3D =
        Max3DS.parse(
          Building1,
          {
            autoLoadTextures: false,
            y: -200
          }
        );
      var building2:ObjectContainer3D =
          Max3DS.parse(
            Building2,
            {
              autoLoadTextures: false,
              y: -200
            }
          );
        var building3:ObjectContainer3D =
        Max3DS.parse(
          Building3,
          {
            autoLoadTextures: false,
            y: -200
          }
        );
      var building4:ObjectContainer3D =
        Max3DS.parse(
          Building4,
          {
            autoLoadTextures: false,
            y: -200
          }
        );
      var building5:ObjectContainer3D =
        Max3DS.parse(
          Building5,
          {
            autoLoadTextures: false,
            y: -200
          }
        );

      for each (var container:ObjectContainer3D in [building1, building2, building3, building4, building5])
        for each (var child:Mesh in container.children)
child.material = buildingMaterial;These building 3D objects are then added to one of the offscreen scenes.
      buildingViews[0].scene.addChild(building1);
      buildingViews[1].scene.addChild(building2);
      buildingViews[2].scene.addChild(building3);
      buildingViews[3].scene.addChild(building4);
      buildingViews[4].scene.addChild(building5);
This application will display each of the buildings in the scene as a Sprite3D object added to a Mesh object. Here we create a new Mesh object and add it to the onscreen scene.
      var sceneMesh:Mesh = new Mesh();
      scene.addChild(sceneMesh);
We loop over each of the five offscreen views.
      var view:View3D;
      var bitmap:BitmapData;
      for (var i:int = 0; i < 5; ++i)
      {
We get a reference to the offscreen view from the buildingViews collection.
view = buildingViews[i];
We then get a reference to the BitmapData object that the views BitmapSession draws in to.
bitmap = (view.session as BitmapSession).getBitmapData(view);
Finally, we create a new BitmapMaterial object, supplying the BitmapData reference we obtained above. This new BitmapMaterial object is then stored in the billboardMaterials collection.
Now, because the view and the BitmapMaterial objects both reference the same BitmapData object, when the offscreen views render a frame it is automatically reflected in the corresponding BitmapMaterial object, and thus also shown by any Sprite3D object displaying the BitmapMaterial object as a material.
        billboardMaterials.push(
          new BitmapMaterial(bitmap)
        );
      }
We add a plane primitive to the scene, which will represent the ground. Notice that we have used the screenZOffset init object parameter to ensure that the ground is always drawn beneath the Mesh that contains the building Sprite3D objects. The screenZOffset init object parameter is covered in Chapter 4, Z-Sorting.
      scene.addChild(
        new Plane(
          {
            material: new BitmapMaterial(Cast.bitmap(GroundTexture)),
            width: 8000,
            height: 8000,
            x: -66,
            z: 66,
            y: -130,
            segments: 20,
            screenZOffset: 1000
          }
        )
      );
This is what everything has been working up to: creating the Sprite3D objects that will display the output of the offscreen views. We use a nested for loop to create 1,600 billboards in a grid on the X/Z plane.
      var randomMaterial:BitmapMaterial;
      var sprite:Sprite3D;
      for (var xPos:int = -4000; xPos < 4000; xPos += 200)
      {
        for (var zPos:int = -4000; zPos < 4000; zPos += 200)
        {
Each billboard will display a random BitmapMaterial object from the billboardMaterials collection.
          randomMaterial =
            billboardMaterials[
              Math.round(Math.random() * 4)
            ];
We then create a new Sprite3D object, supplying the randomly selected material, and then positioning it within the grid.
          sprite = new Sprite3D(randomMaterial);
          sprite.x = xPos;
          sprite.y = 0;
          sprite.z = zPos;
The Sprite3D object is then added to the Mesh object, which will make it visible within the scene.
          sceneMesh.addSprite(sprite);
        }
      }
}The mouseDown() and mouseUp() functions are used to set the properties that control how the hover cameras are moved.
    protected function mouseDown(event:MouseEvent):void
    {
      this.mouseButtonDown = true;
      this.lastStageX = event.stageX;
      this.lastStageY = event.stageY;
    }

    protected function mouseUp(event:MouseEvent):void
    {
      this.mouseButtonDown = false;
    }
The tilt and pan angles of the offscreen and onscreen hover cameras are all updated to reflect any mouse movement over the last frame.
   protected function mouseMove(event:MouseEvent):void
   {
      if (this.mouseButtonDown)
      {
        var pan:int = (event.stageX - lastStageX);
        var tilt:int = (event.stageY - lastStageY);

        (view.camera as HoverCamera3D).panAngle += pan;
        (view.camera as HoverCamera3D).tiltAngle += tilt;

        for each (var offscreenView:View3D in buildingViews)
        {
          (offscreenView.camera as HoverCamera3D).panAngle += pan;
          (offscreenView.camera as HoverCamera3D).tiltAngle += tilt;
        }

        this.lastStageX = event.stageX;
        this.lastStageY = event.stageY;
      }
    }

  }
}
The end result is a mesh with 1,600 Sprite3D elements. Each Sprite3D displays the output of one of five offscreen views, while each offscreen view is rendering a single building 3D object. This creates a scene that would be impossible to render at a reasonable frame rate if each building 3D object has been added to the scene individually.
Offscreen rendering actually achieves a similar result to the DirectionalSprite class, which you can read about in Chapter 9, Special Effects with Sprites. There are three main benefits to using offscreen rendering:
- Each model rendered offscreen can be viewed from any angle, not just the discreet angles defined by a
DirectionalSpriteobject. - The collective size of the hundreds of images it takes to render a
DirectionalSpriteobject from all angles can often far outweigh the size of a single off screen 3D model and its textures. - It is often easier to work with a single 3D object than to pre-render all the images required by a
DirectionalSpriteobject.