
There are many ways of configuring authentication in phpMyAdmin—depending on our goals, the presence of other applications, and the level of security we need. This chapter explores the available possibilities.
When we type in a username and password, although it seems that we are logging in to phpMyAdmin, we are not! We are merely using phpMyAdmin (which is running on the web server) as an interface that sends our username and password information to the MySQL server. Strictly speaking, we do not log in to phpMyAdmin, but through phpMyAdmin.
Note
This is why in user-support forums about phpMyAdmin, people asking for help about authentication are often referred back to their MySQL server's administrator, because a lost MySQL user or password is not a phpMyAdmin problem.
This section explains the various authentication modes offered by phpMyAdmin.
MySQL's default installation leaves a server open to intrusion because it creates a MySQL account named root without a password—unless a password has been set by the MySQL distributor. The recommended remedy for this weakness in security is to set a password for the root account. In the eventuality that we cannot set one or do not want to set one, we will have to make a configuration change to phpMyAdmin. Indeed, a server-specific configuration parameter, $cfg['Servers'][$i]['AllowNoPassword'] exists. Its default value is false, which means that no account is permitted to log in without a password. Generally, this directive should remain false to avoid this kind of access through phpMyAdmin, as hackers are actively probing the web for insecure MySQL servers. Go through the Securing phpMyAdmin section for other ideas about protecting your server.
We might have the need to automatically connect to a MySQL server via phpMyAdmin, using a fixed username and password, without even having been asked for it. This is the precise goal of the config authentication type.
For our first example, we will use this config authentication. However, in the Authenticating multiple users section, we will see more powerful and versatile ways of authenticating.
Note
Using the config authentication type leaves our phpMyAdmin open to intrusion, unless we protect it as explained in the Securing phpMyAdmin section of this chapter.
Here, we ask for config authentication, and enter our username and password for this MySQL server:
$cfg['Servers'][$i]['auth_type'] = 'config';
$cfg['Servers'][$i]['user'] = 'marc';
$cfg['Servers'][$i]['password'] = 'xxx';
We can then save the changes we made in config.inc.php.
Now it's time to start phpMyAdmin and try connecting to it with the values we configured. This will test the following:
- The values we entered in the
configfile or on the web-based setup - The setup of the PHP component inside the web server, if we did a manual configuration
- Communication between web and MySQL servers
We start our browser and point it to the directory where we installed phpMyAdmin, as inhttp://www.mydomain.com/phpMyAdmin/. If this does not work, we tryhttp://www.mydomain.com/phpMyAdmin/index.php. (This would mean that our web server is not configured to interpret index.php as the default starting document.)
If you still get an error, refer to the Appendix A for troubleshooting and support. We should now see phpMyAdmin's home page. Chapter 3 gives an overview of the panels seen now.
We might want to allow a single copy of phpMyAdmin to be used by a group of persons, each having their own MySQL username and password, and seeing only the databases they have rights to. Or we might prefer to avoid having our username and password in clear text in config.inc.php.
Instead of relying on a username and password stored in config.inc.php, phpMyAdmin will communicate with the browser and get authentication data from it. This enables true login for all users defined in a specific MySQL server, without having to define them in the configuration file. There are three modes offered that allow a controlled login to MySQL via phpMyAdmin— http, cookie, and signon. We will have to choose the one that suits our specific situation and environment (more on this in a moment). The http and cookie modes may require that we first define a control user, as covered in Chapter 1.
This mode—http—is the traditional mode offered in HTTP, in which the browser asks for the username and password, sends them to phpMyAdmin, and keeps sending them until all the browser windows are closed.
To enable this mode, we simply use the following line:
$cfg['Servers'][$i]['auth_type'] = 'http';
We can also define the HTTP basic auth realm ( http://en.wikipedia.org/wiki/Basic_access_authentication), which is a message to be displayed to the user at login time, via $cfg['Servers'][$i]['auth_http_realm']. This can help indicate the purpose of this server.
This mode has the following limitations:
- PHP, depending on the version, might not support HTTP authentication for all kinds of web servers.
- If we want to protect phpMyAdmin's directory with a
.htaccessfile (refer to the Securing phpMyAdmin section in this chapter), this will interfere with HTTP authentication type; we cannot use both. - Browsers usually store the authentication information to save retyping credentials but bear in mind that these credentials are saved in an unencrypted format.
- There is no support for proper logout in the HTTP protocol; hence we have to close all browser windows to be able to log in again with the same username.
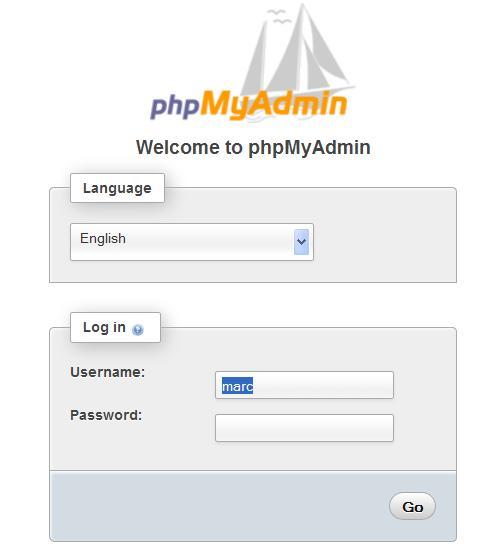
The cookie authentication mode is superior to http in terms of the functionalities it offers. This mode permits true login and logout, and can be used with PHP running on any kind of web server. It presents a login panel (as shown in the following screenshot) from within phpMyAdmin. This can be customized as we have the application source code. However, as you may have guessed, for cookie authentication, the browser must accept cookies coming from the web server—but this is the case for all authentication modes anyway.
This mode stores the username typed in the login screen into a permanent cookie in our browser while the password is stored as a temporary cookie. In a multi-server configuration, the username and password corresponding to each server are stored separately. To protect the username and password secrecy against attack methods that target cookie content, they are encrypted using the Blowfish cipher. So, to use this mode, we have to define (once) in config.inc.php, a secret string that will be used to securely encrypt all passwords stored as cookies from this phpMyAdmin installation.
This string is set via the blowfish_secret directive:
$cfg['blowfish_secret'] = 'jgjgRUD875G%/*';
In the previous example, an arbitrary string of characters was used; this string can be very complex as nobody will ever need to type it on a login panel. If we fail to configure this directive, a random secret string is generated by phpMyAdmin but it will last only for the current working session. Therefore, some features such as recalling the previous username on the login panel won't be available.
Then, for each server-specific section, use the following:
$cfg['Servers'][$i]['auth_type'] = 'cookie';
The next time we start phpMyAdmin, we will see the login panel as shown in the following screenshot:
By default, phpMyAdmin displays (in the login panel) the last username for which a successful login was achieved for this particular server, as retrieved from the permanent cookie. If this behavior is not acceptable (someone else who logs in from the same workstation should not see the previous username), we can set the following parameter to FALSE:
$cfg['LoginCookieRecall'] = FALSE;
There is a security feature to add a specific time limit for the validity of a password. This feature helps to protect the working session. After a successful login, our password is stored (encrypted) in a cookie, along with a timer. Every action in phpMyAdmin resets the timer. If we stay inactive for a certain number of seconds, as defined in $cfg['LoginCookieValidity'], we are disconnected and have to log in again. Increasing this parameter does not work in all cases, because PHP's own session.gc_maxlifetime directive can get in the way. Please refer to http://php.net/manual/en/session.configuration.php for an explanation of this directive. Therefore, if phpMyAdmin detects that the value of session.gc_maxlifetime is less than the configured $cfg['LoginCookieValidity'], a warning is displayed on the main page. The default is 1440 seconds; this matches the php.ini's default value of the session.gc_maxlifetime parameter.
Note
The Blowfish algorithm used to protect the username and password requires many computations. To achieve the best possible speed, the PHP's mcrypt extension and its accompanying library must be installed on our web server.
To help users realize that this extension is really important, a message is displayed on the main page when phpMyAdmin detects its absence. The $cfg['McryptDisableWarning'] directive controls this message. By default, a value of false implies that the message is shown.
During the course of a working session, a user may encounter several requests to authenticate, from different web applications. The reason is these applications don't talk to each other and this situation inconveniences most users.
The signon mode enables us to use the credentials from another application to skip the authentication phase of phpMyAdmin. In order for this to work, this other application has to store the proper credentials into PHP's session data to be retrieved later by phpMyAdmin.
Note
Storing credentials in PHP's session is not guaranteed to be safe, according to the PHP manual: http://php.net/manual/en/session.security.php.
To enable this mode, we start with the following directive:
$cfg['Servers'][$i]['auth_type'] = 'signon';
Let us suppose that the authenticating application has used a session named FirstApp to store the credentials. We tell this to phpMyAdmin by adding the following line of code:
$cfg['Servers'][$i]['SignonSession'] = 'FirstApp';
We must take care of users that would try to access phpMyAdmin before the other application; in this case, phpMyAdmin will redirect users to the authenticating application. This is done with:
$cfg['Servers'][$i]['SignonURL'] = 'http://www.mydomain.com/FirstApp';
How does the authenticating application store credentials in a format that phpMyAdmin can understand? An example is included as scripts/signon.php. In this script, there is a simple HTML form to input the credentials and logic that initializes the session—we would use FirstApp as a session name, and create the user, password, host, and port information into this session, shown as follows:
$_SESSION['PMA_single_signon_user'] = $_POST['user'];
$_SESSION['PMA_single_signon_password'] = $_POST['password'];
$_SESSION['PMA_single_signon_host'] = $_POST['host'];
$_SESSION['PMA_single_signon_port'] = $_POST['port'];
Note
Note that the authenticating first application does not need to ask the MySQL's credentials to the user. These could be hard coded inside the application, as they are secret or there is a known correspondence between the credentials of this application and that of MySQL's.
To pass additional configuration parameters to the signon module, $_SESSION['PMA_single_signon_cfgupdate'] can receive an array containing any additional server parameters that are permitted in $cfg['Servers'][$i].
The authenticating application then uses a way of its choosing—a link or a button—to let its users start phpMyAdmin. If an error happens during the login (for example, a denied access), the signon module saves into $_SESSION['PMA_single_signon_error_message'] the appropriate error message.
In another example, scripts/openid.php shows how to log in using the popular OpenID mechanism.
The config.inc.php file contains at least one server-specific section; however, we can add more, enabling a single copy of phpMyAdmin to manage many MySQL servers. Let us see how to configure more servers.
In the server-specific sections of the config.inc.php file, we see lines referring to $cfg['Servers'][$i] for each server. Here, the variable $i is used so that one can easily cut and paste whole sections of the configuration file to configure more servers. While copying such sections, we should take care that the $i++; instruction, which precedes each section and is crucial to delimit the server sections, is also copied.
Then, at the end of the sections, the following line controls the startup:
$cfg['ServerDefault'] = 1;
The default value, 1, means that phpMyAdmin will use by default the first server defined. We can specify any number, for the corresponding server-specific section. We can also enter the value 0, signifying no default server; in this case a list of available servers will be presented at login time.
This configuration can also be done via web-based setup. Given here is an example of a multi-server definition, with the default server being set to let the user choose:
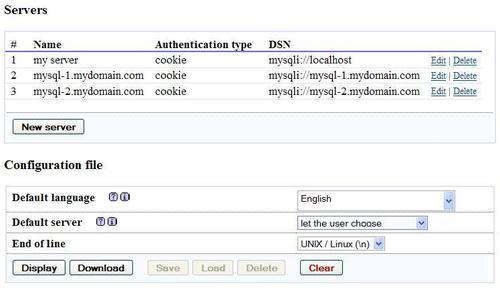
With no default server defined, phpMyAdmin will present a server choice:

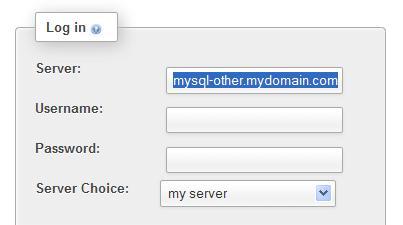
Another mechanism can be used if we want to be able to connect to an undefined MySQL server. First, we have to set the following parameter:
$cfg['AllowArbitraryServer'] = TRUE;
We also have to put back the default value of 1 into $cfg['ServerDefault']. Then, we need to use the cookie authentication type. We will be able to choose the server and enter a username and a password.
Note
Allowing an arbitrary server implies that any MySQL server accessible from our web server could be connected to via phpMyAdmin. Therefore, this feature should be used in conjunction with a reinforced security mechanism (refer to the Securing phpMyAdmin section).
As seen here, we still can choose one of the defined servers in Server Choice. In addition, we can also enter an arbitrary server name, a username, and a password:
A mechanism is available to tell phpMyAdmin which URL it should reach after a user has logged out. This feature eases integration with other applications and works for all authentication types that permit to log out. Here is an example:
$cfg['Servers'][$i]['LogoutURL'] = 'http://www.mydomain.com';
This directive must contain an absolute URL, including the protocol.