
In this recipe, we will learn how to create a sequential workflow. For this recipe, we will model a credit approval process. When a user adds an item to a list, we will let the workflow instantiate automatically on the inserted item and flow through the process of checking the user's requested credit line and approving it based on user's employment and credit history.
You should have a fully functional development machine with SharePoint 2010 installed and configured. You also need Visual Studio 2010 IDE installed on the same development machine. We are using a team site template for our examples.
Use the custom list template and create a list from the SharePoint user interface called Credit Approval. The following table provides information on fields and its properties:
|
Field Name |
Data Type |
Required |
|---|---|---|
|
Credit Requested |
Currency |
Yes |
|
Employment History |
Choice (Choices - Good, Bad, and None Exists) |
Yes |
|
Credit History |
Choice (Choices - Good, Bad, and None Exists) |
Yes |
The following screenshot shows the end result:

- Launch your Visual Studio 2010 IDE as an administrator (right-click on the shortcut and select Run as administrator).
- Select File | New | Project. The new project wizard dialog box as shown will be displayed (make sure to select .NET Framework 3.5 in the top drop-down box).
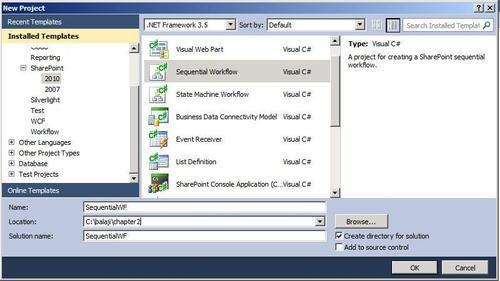
- Select Sequential Workflow under Visual C# | SharePoint | 2010 node from the Installed Templates section on the left-hand side.
- Name the project SequentialWF and provide a directory location where you want to save the project and click on OK to proceed to the next step in the wizard.
- By default, Visual Studio selects the SharePoint site available on the machine. Select Deploy as Farm Solution and click on Next to proceed to the next step in the wizard.
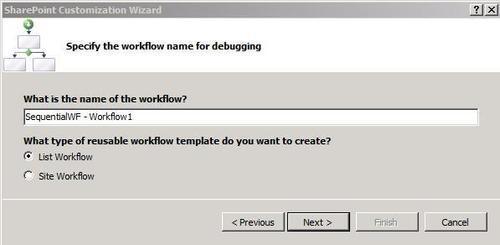
- In here, provide a name for your workflow and make sure to select List Workflow for the workflow template type as shown in the following screenshot:
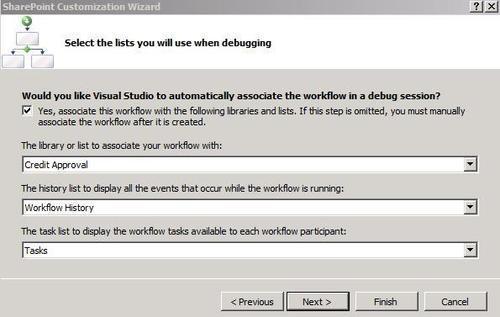
- Click on Next and move on to select the list association and task list and history list selection window. Select Credit Approval list from the drop-down for The library or list to associate your workflow with and take default selections for the rest as shown in the following screenshot:
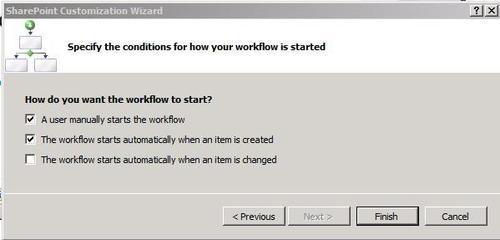
- In the next window, keep the defaults for How do you want the workflow to start? as shown in the following screenshot:
- By selecting Finish the wizard and Visual Studio will generate the necessary files and by default they will open up the workflow designer surface with workflow start and workflow terminator. In between these two items, you should also see the
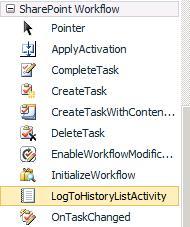
onWorkflowActivatedactivity added. - We will build our workflow flowchart by starting off with LogToHistoryListActivity. The LogToHistoryListActivity is a SharePoint specific activity that can be found in the Toolbox under the SharePoint Workflow section as shown in the following screenshot:
- Add this activity below the
onWorkflowActivateactivity and change the name to logWorkflowStarted from the properties window. Also set the HistoryDescription property to Workflow Started as shown in the following screenshot:
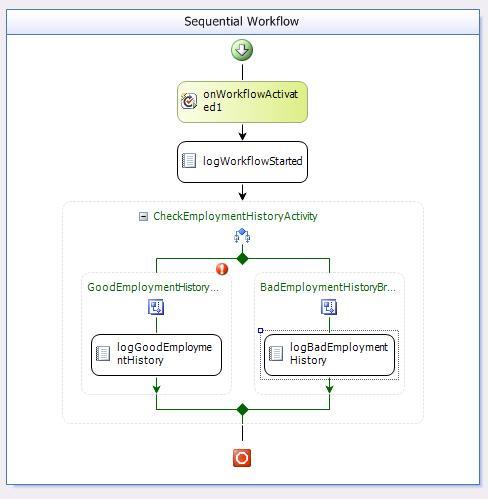
- Drag an IfElse activity and drop it on the designer just below the logWorkflowStarted and name it CheckEmploymentHistoryActivity. The IfElse activity by default adds two branches. One of the branches follows when the condition evaluates to true and the other to false.
- Add LogToHistoryListActivities on both of these branches and name the one in the left as GoodEmploymentHistoryBranch and the one in the right as BadEmploymentHistoryBranch.
- Also change the names of the LogToHistoryListActivities underneath these branches. The one under GoodEmploymentHistoryBranch is called logGoodEmploymentHistory and other as logBadEmploymentHistory.
- Set the HistoryDescription property for logGoodEmploymentHistory to Employment History is good and for the other Employment History is bad.
The following screenshot shows the finished screen:
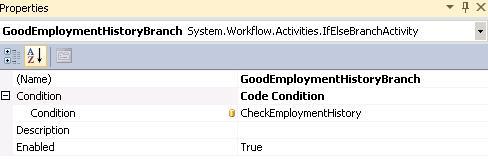
- The exclamation mark on the branch is indicating that the condition evaluation to execute the branch is not set. This is a required action for an IfElse activity. Without this the IfElse, activity does not know which branch to execute. From the properties window of the branch, select the Code Condition and set the Condition property to CheckEmploymentHistory as shown in the following screenshot:
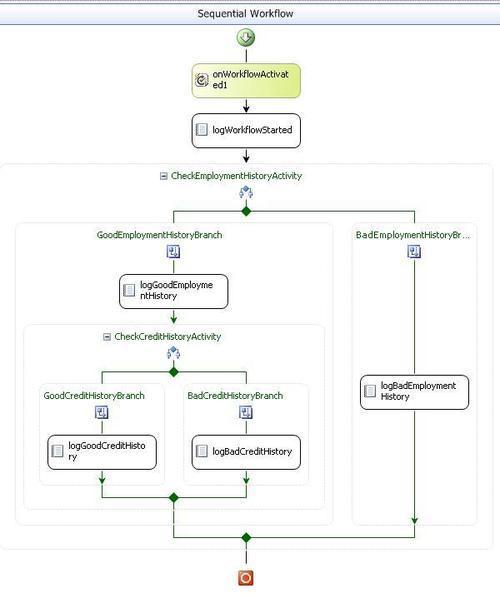
- Follow the same routine and add another IfElse activity under the GoodEmploymentHistoryBranch and name it CheckCreditHistoryActivity and add LogToHistoryListActivity on both of the branches. Here too, set the condition to Code Condition and the Condition property to CheckCreditHistory. The HistoryDescription property on GoodCreditHistoryBranch should be set to Credit History is good and for the other property set it to Credit History is bad. The completed workflow flowchart should look as follows:
- From the code view, add the code to verify the employment history. Since the workflow acts on the item that is inserted into the list, you can verify the item values in the workflow. Your code for
CheckEmploymentHistorymethod should look like the following:private void CheckEmploymentHistory(object sender, ConditionalEventArgs e) { string sEmpHistory = ""; sEmpHistory = workflowProperties.Item["Employment History"].ToString(); if (sEmpHistory.Trim().ToLower() == "good") e.Result = true; else e.Result = false; } - Similarly, add the code to verify the credit history as well. Your code in the
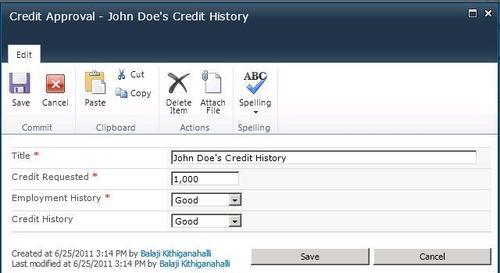
CheckCreditHistorymethod should be as follows:private void CheckCreditHistory(object sender, ConditionalEventArgs e) { string sCrdHistory = ""; sCrdHistory = workflowProperties.Item["Credit History"].ToString(); if (sCrdHistory.Trim().ToLower() == "good") e.Result = true; else e.Result = false; } - Build and run the project by pressing F5. This should bring up the site that you provided during the project creation. The workflow is already associated with the list that we provided during the project creation. Add a new item to the list with all fields filled in as follows:
- As soon as you save the item to the list, the workflow will get initiated and start an instance of it. Since there is no user interaction, the workflow completes and shows the status as shown in the following screenshot:

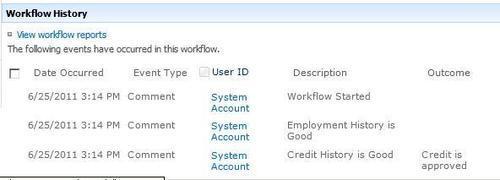
- Click on the Completed status of the workflow to see the history list associated with the workflow. This should list all the history that we logged during the workflow process. The following screenshot shows the history list:
- Add more items to the list with different conditions of employment history and credit history to verify the other conditions of the workflow.
Every SharePoint workflow project starts with an onWorkflowActivated activity. This activity is a mandatory activity and hence Visual Studio added it to the designer automatically. By default, this activity is bound to a variable called workflowProperties of type SPWorkflowActivationProperties. The workflowProperties provides information about the current workflow context, the item that initiated the workflow, the list to which this workflow belongs to, the originator user, and other information. SharePoint workflow runtime fills in all these values for us to make use of. For all the items that workflowProperties provide, refer to: http://msdn.microsoft.com/en-us/library/microsoft.sharepoint.workflow.spworkflowactivationproperties.aspx.
Using the workflowProperties we were able to get access to the list item that initiated the workflow and from this, we were able to access the item information in the code and create the conditions for the IfElse activities. The code is pretty simple such that it checks the values that were put in and makes decision on them.
The logToHistoryListActivity is a SharePoint specific activity that logs information to the history list. This activity behind the scenes calls the method LogToHistoryList from the ISharePointService interface, which is implemented in the assembly Microsoft.SharePoint.Workflow.dll. The following code shows the method signature for this method:
void LogToHistoryList(
Guid workflowId,
SPWorkflowHistoryEventType eventId,
int userId,
TimeSpan duration,
string outcome,
string description,
string otherData
)
In this method, you can specify an event type like the one workflow started, a workflow comment, and others to group your comments to a specific category. For more information on event types that can be passed to this method, refer to MSDN at: http://msdn.microsoft.com/en-us/library/microsoft.sharepoint.workflow.spworkflowhistoryeventtype.aspx.
The ISharePointService interface enables activities to exchange data outside of the workflow instance. In this case, writing to the history list. There are other methods like SendEmail, SetState that are part of this interface as well. Refer to MSDN for more information at: http://msdn.microsoft.com/en-us/library/microsoft.sharepoint.workflow.isharepointservice_members.aspx.
In Visual Studio 2010, all the SharePoint project items like Event Receivers, workflow projects, or content types will have a similar structure such as having a feature, a folder for the project item, and so on. When our workflow project was created, Visual Studio added a feature folder with Feature.xml file and a Workflow1 folder that contains the Elements.xml, Workflow1.cs, and Worlflow1.designer.cs. The last two files make up the activities of the workflow and the code associated with these activities. Like with Event Receivers, the Elements.xml file provides metadata information about the workflow to the SharePoint. You can name this file anything you want. But Visual Studio, always names it Elements.xml for all of the SharePoint templates when you first create the project. In here you set the attributes like the workflow name, the class file, and assembly that contains the code and so on. You can also set the association form, the initiation form, and the task form that are associated with the workflow. Since our workflow did not have any of these resources, we did not make any changes. All the attributes of the Elements.xml are as follows:
<Workflow
Title="Text"
Name="Text"
CodeBesideAssembly="Text"
CodeBesideClass="Text"
Description="Text"
Id="Text"
EngineClass="Text"
EngineAssembly="Text"
AssociationUrl="Text"
InstantiationUrl="Text"
ModificationUrl="Text"
StatusUrl="Text"
TaskListContentTypeId="Text" >
</Workflow>
For more information on the descriptions of all the elements of the workflow Elements.xml file, refer to MSDN at: http://msdn.microsoft.com/en-us/library/aa543564.aspx.
In the project creation wizard, we set our sequential workflow as a list workflow. This information can be found in the .spdata file located in the Workflow1 folder. By default this file is hidden. To list this file in the project explorer, toggle the Show All Files menu item from Project menu. The .spdata file is a SharePoint project metadata information file. This is of XML format. You should not manually change this file as it may get overwritten by Visual Studio when you make changes to the project structure like adding and removing items to and from the project. This file is used during the packaging process. It contains information about the SharePoint project item that is in the solution. You can also verify that property from the properties window of the Workflow1 folder. The other items that we set during the project creation wizard can also be verified in the properties window. You can see the history list and task list associated with the workflow. The target list property specifies the list that the workflow is associated with. This is only for debugging purposes. You can always associate the workflows to different lists after it is built and deployed. You do the association with the target list via SharePoint user interface or through object model code using Feature receivers. You can also associate it to a content type and deploy it.
When we build and deploy a workflow to a production environment, you have a couple of ways to associate the workflow with the content type, the list or with the site:
- Manually by using SharePoint user interface
- During activation of the feature via feature receiver
Here is the manual way to associate a workflow to a list.
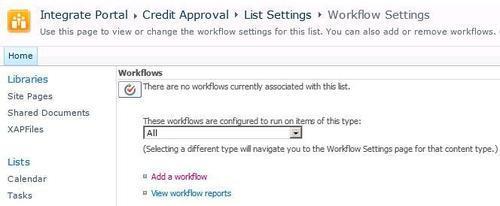
- Navigate to List Settings | Workflow Settings of the list to which you need to associate a workflow as shown in the following screenshot:
- Click on the Add Workflow link to add a new workflow. The following screenshot shows the Add Workflow page:
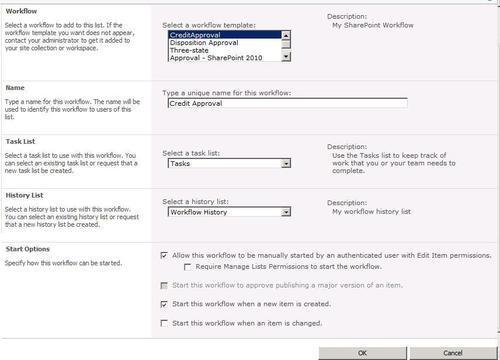
- Provide a unique name to your workflow and select the supporting task list and history list. Start options provide the way to initiate the workflow.