
Let's get started on a simple dashboard application for the Windows Phone 7. For this application, we are going to write a simple panorama application in Windows Phone 7. This panorama application will have two sections named Panorama Items. We'll read data from a shared calendar containing days off for employees and display them on the screen. We'll then add another panel that will display a pie chart showing the overall status of all projects currently being worked on. This data will come from a project task status site in our SharePoint site.
Before we create the calendar, let's create a new site for this chapter. Carry out the following steps to create a new site:
- Open your SharePoint site.
- From the Site Actions menu, select the New Site option.
- In the Create dialog that appears, select Team Site.
- Give the new site a name of Chapter 7
- Give the new site a URL of Chapter07.
- Click on the Create button and SharePoint will create our new site.
The Team Site template includes a calendar that we'll use for this example. Go ahead and enter a few appointments on the calendar, so that we have some data to play with. Your calendar will look similar to the one shown in the following screenshot:

Now that we have a calendar to read data from let's read the data into an application for Windows Phone 7. We need a project before we can read the data from this calendar. To create the project, carry out the following steps:
- Re-open the Chapter 7 solution we created at the beginning of this chapter.
- Right click on the solution Chapter07.
- From the context menu, select Add and then select New Project.
- From the Add New Project dialog, select Windows Phone Application.
- Give this new project a name such as PanoramaData.
- Click on the OK button and Visual Studio will create the new project and open the
MainPage.xamlfile.
Let's work on getting the data first and display the data later. Before we can get data from our SharePoint server, we need to get an authentication token.
For this project, we are going to separate out the authentication code into its own class and call it once. This authentication object will have a property that contains our CookieContainer. We'll inject that authentication token into the classes that will get the calendar data here and the project status data later in the chapter.
For now, let's create our authentication class by carrying out the following instructions:
- Right click on the PanoramaData project.
- In the context menu that appears, select Add and then select Class .
- In the Add New Item dialog that appears, name the class SPAuthentication.cs.
- Click on the Add button and Visual Studio will create the class for us.
Now the fun part, let's write some code. First thing is that Visual Studio thinks we are going to be writing a lot of Windows Phone 7 specific code in this file and has helped us out by adding a lot of using statements that we really don't need. Remove all of them and replace them with the following:
using System;
using System.IO;
using System.Net;
using System.Text;
using System.Xml;
Next, add the following two member variables that we'll use:
private readonly string mUsername = "JQP";
private readonly string mPassword = "P@ssw0rd";
These are the username and password for a user that has read rights to the calendar.
The next line of code we'll add is for the CookieContainer:
public CookieContainer AuthenticationToken { get; private set; }
The final piece of setup code is the class constructor. This initializes the CookieContainer as follows:
public SPAuthentication()
{
AuthenticationToken = new CookieContainer();
}
The rest of this class will take the code that we wrote previously in this chapter to authenticate. Specifically, we'll take the following methods:
- Authenticate(): change this to a public method!
- AuthenticationRequestCallback(IAsyncResult asyncResult)
- AuthenticationResponseCallback(IAsyncResult asyncResult)
There are a few changes we need to make. First, change Authenticate to be a public method. Second, because the name of the CookieContainer is different, replace the instance of cookieJar with AuthenticationToken in the Authenticate method. The third change we need to make is in the AuthenticationResponseCallback method. We no longer need to call LoadFeed() because that method doesn't exist here. Instead, we should let somebody know that we've authenticated. This is where we'll enter the wonderful world of eventing. For this class we'll use the delegate method of eventing that's been around since .NET 1.0 (we'll get fancier later). Outside the class declaration, but within the namespace, add the following line of code:
public delegate void Authenticated();
Then after the AuthenticationResponseCallback method, add the following code:
public event Authenticated AuthenticationTokenSet;
private void OnAuthenticationTokenSet()
{
if (AuthenticationTokenSet != null)
AuthenticationTokenSet();
}
This allows us to register an event handler to listen for when the authentication cookie has been set and then do whatever work needs to be done at that time. How does this code get called though? In the AuthenticationResponseCallback method, replace the LoadFeed(); call with a call to OnAuthenticationTokenSet(); as follows:
private void AuthenticationResponseCallback(IAsyncResult asyncResult)
{
var request = (HttpWebRequest)asyncResult.AsyncState;
     var response = (HttpWebResponse)request.EndGetResponse(asyncResult);
var errorCode = string.Empty;
     using (var responseStream = new StreamReader(response.GetResponseStream()))
{
var xResult = XmlReader.Create(responseStream);
xResult.ReadToDescendant("ErrorCode");
errorCode = xResult.ReadElementContentAsString();
xResult.Close();
responseStream.Close();
}
     if (!string.IsNullOrEmpty(errorCode) && (errorCode.ToLowerInvariant() == "noerror"))
{
OnAuthenticationTokenSet();
}
}
Now that we can authenticate against SharePoint, open the MainPage.xaml.cs file. We want to make sure all the controls have been loaded into the page and then we can start making connections to the server. Modify the Main Page constructor as follows:
public MainPage()
{
InitializeComponents();
this.Loaded += new RoutedEventHandler(MainPage_Loaded);
}
This is where we should authenticate against the SharePoint server. First create a member variable inside MainPage.xaml.cs to hold this authentication object as follows:
private SPAuthentication auth;
Next, add code to the MainPage_Loaded event to initialize this variable, set up the event handler, and make the call to authenticate:
void MainPage_Loaded(object sender, RoutedEventArgs e)
{
auth = new SPAuthentication();
     auth.AuthenticationTokenSet += new Authenticated(auth_AuthenticationTokenSet);
auth.Authenticate();
}
When the application has successfully authenticated against SharePoint, the event handler named auth_AuthenticationTokenSet will be called. It is in this next event handler where we will call the calendar data service to get the data that we will display.
The calendar data service will pass back a lot of information about each event in the SharePoint calendar. We aren't going to display a lot of information in this application; in fact, we are only going to display the title of the event and the start date. Let's create a simple model to hold this data:
- Right click on the PanoramaData project.
- In the context menu that appears, select Add and then the Class option.
- Name the class CalendarItem.cs and click on the Add button.
- Visual Studio will create a blank class for us to use.
Add the following two properties and save the class:
public string Title { get; set; }
public DateTime StartDate { get; set; }
What we'll do next is create a class that will call SharePoint to get the data, parse the data into a collection of CalendarItem objects, and expose an IEnumerable of CalendarItems property that we can use to bind to our UI. We will also use an event to alert us when that property changes, so that we know when to bind the data to the UI.
Create a new class in our project named CalendarOfEvents.cs and add the following using statements:
using System.Collections.Generic;
using System.ComponentModel;
Add a custom initializer that takes a single parameter as follows:
public CalenderOfEvents(CookieContainer authToken)
{
mAuthToken = authToken;
}
We'll also have to create a member variable to contain the authentication token:
private CookieContainer mAuthToken;
In addition to this member variable, we will need four others:
private readonly string mDataServiceUrl = "http://ssps2010/Chapter07/_vti_bin/listdata.svc";
private readonly string mCalendarUri = "/Calendar/";
private HttpWebRequest mWebRequest;
private IEnumerable<CalendarItem> mEventList;
The first one here will have the URL to the SharePoint data service. The second is the URI to the calendar that we need to get data from. As we are using the default calendar, it should be named "Calendar," but it will be different if it is a custom list. We will be modifying this URI shortly to customize the data that is returned from SharePoint.
The third variable is for our web request, and finally the last one will hold the private event list. Why is this private? Well, we are going to modify the class to implement the INotifyPropertyChanged interface:
public class CalendarOfEvents : INotifyPropertyChanged
Then we are going to implement the following interface:
public event PropertyChangedEventHandler PropertyChanged;
public void NotifyPropertyChanged(string propertyName)
{
if (PropertyChanged != null)
     PropertyChanged(this, new PropertyChangedEventArgs(propertyName));
}
Finally, we will add a property that will set the event list and raise the following event:
public IEnumerable<CalendarItem> EventList
{
get { return mEventList; }
private set
{
mEventList = value;
NotifyPropertyChanged("EventList");
}
}
Now that all the setup is complete, we can write the action part of this object. This is similar to what we wrote for the RSS feed and the authentication. First, we initialize the request, wait for a callback with the response, and then parse the response.
First up is the LoadEvents method. We will call this method to get the data from SharePoint:
public void LoadEvents()
{
     mWebRequest = (HttpWebRequest)HttpWebRequest.Create(new Uri(mDataServiceUrl + mCalendarUri));
mWebRequest.CookieContainer = mAuthToken;
mWebRequest.Accept = "application/atom+xml";
     mWebRequest.BeginGetResponse(new AsyncCallback(EventsCallback), mWebRequest);
}
There are a couple of differences to what we saw earlier in this chapter with the RSS feed. The first is that we need to concatenate the data service URL with the calendar URI to build up the full URI for the Web request. The second change is that we are specifying the HTTP header for accept. Here we are telling SharePoint explicitly that we want the response stream to be an ATOM feed. The other choice here would be application/json, but we will just parse the ATOM XML in this example.
When the response comes back, a callback method named EventsCallback is called. This method is almost identical to the one we wrote for the RSS feed earlier. Only the name of the method has changed and instead of binding to a listbox, we are calling a parse method here. Add the following code to the class:
private void EventsCallback(IAsyncResult asyncResult)
{
var request = (HttpWebRequest)asyncResult.AsyncState;
     var response = (HttpWebResponse)request.EndGetResponse(asyncResult);
using (var sr = new StreamReader(response.GetResponseStream()))
{
var result = sr.ReadToEnd();
ParseResults(result);
}
}
Finally, we need to parse the results. This is similar to parsing the RSS feed earlier except this ATOM feed has some XML namespaces that we need to be mindful of. The following is the code for ParseResults:
private void ParseResults(string result)
{
var atomElement = XElement.Parse(result);
XNamespace atom = "http://www.w3.org/2005/Atom";
     XNamespace dataServices = "http://schemas.microsoft.com/ado/2007/08/dataservices";
     XNamespace metaData = "http://schemas.microsoft.com/ado/2007/08/dataservices/metadata";
     var entries = from entry in atomElement.Descendants(atom + "entry")
     let startDate = DateTime.Parse(entry.Element(atom + "content").Element(metaData + "properties").Element(dataServices + "StartTime").Value)
select new CalendarItem
{
Title = entry.Element(atom + "title").Value,
StartDate = startDate
};
EventList = entries;
}
As we use LINQ to XML in here, we need to add a reference to the System.Xml.Linq.dll assembly:
- Right click on the project PanoramaData in Solution Explorer
- From the context menu that appears, select Add Reference .
- Find System.Xml.Linq and click on Add.
Also, we will need to add using statements for both System.Linq and System.Xml.Linq. The code for this method is a little complex. Basically, you need to know the format of the ATOM entries that are coming back from SharePoint. The following is an example of a single calendar event in SharePoint:
<?xml version="1.0" encoding="utf-8" standalone="yes"?>
<feed xml:base="http://ssps2010/Chapter07/_vti_bin/listdata.svc/" xmlns:d="http://schemas.microsoft.com/ado/2007/08/dataservices" xmlns:m="http://schemas.microsoft.com/ado/2007/08/dataservices/metadata" xmlns="http://www.w3.org/2005/Atom">
<title type="text">Calendar</title>
<id>http://ssps2010/Chapter07/_vti_bin/listdata.svc/Calendar/</id>
<updated>2011-02-24T08:57:44Z</updated>
<link rel="self" title="Calendar" href="Calendar" />
<entry m:etag="W/"1"">
<id>http://ssps2010/Chapter07/_vti_bin/listdata.svc/Calendar(1)</id>
<title type="text">Paul's Birthday</title>
<updated>2011-02-23T21:55:19-08:00</updated>
<author>
<name />
</author>
<link rel="edit" title="CalendarItem" href="Calendar(1)" />
<link rel="http://schemas.microsoft.com/ado/2007/08/dataservices/related/CreatedBy" type="application/atom+xml;type=entry" title="CreatedBy" href="Calendar(1)/CreatedBy" />
<link rel="http://schemas.microsoft.com/ado/2007/08/dataservices/related/ModifiedBy" type="application/atom+xml;type=entry" title="ModifiedBy" href="Calendar(1)/ModifiedBy" />
<link rel="http://schemas.microsoft.com/ado/2007/08/dataservices/related/Attachments" type="application/atom+xml;type=feed" title="Attachments" href="Calendar(1)/Attachments" />
<link rel="http://schemas.microsoft.com/ado/2007/08/dataservices/related/Attendees" type="application/atom+xml;type=feed" title="Attendees" href="Calendar(1)/Attendees" />
<link rel="http://schemas.microsoft.com/ado/2007/08/dataservices/related/Category" type="application/atom+xml;type=entry" title="Category" href="Calendar(1)/Category" />
<category term="Microsoft.SharePoint.DataService.CalendarItem" scheme="http://schemas.microsoft.com/ado/2007/08/dataservices/scheme" />
<content type="application/xml">
<m:properties>
<d:Id m:type="Edm.Int32">1</d:Id>
<d:ContentTypeID>0x010200CF3281A43289874FB1F3B18B10D52A5D </d:ContentTypeID>
<d:ContentType>Event</d:ContentType>
<d:Title>Paul's Birthday</d:Title>
<d:Modified m:type="Edm.DateTime">2011-02-23T21:55:19 </d:Modified>
<d:Created m:type="Edm.DateTime">2011-02-23T21:55:19 </d:Created>
<d:CreatedById m:type="Edm.Int32">11</d:CreatedById>
<d:ModifiedById m:type="Edm.Int32">11</d:ModifiedById>
<d:Owshiddenversion m:type="Edm.Int32">1</d:Owshiddenversion>
<d:Version>1.0</d:Version>
<d:Path>/Chapter07/Lists/Calendar</d:Path>
<d:Location m:null="true" />
<d:StartTime m:type="Edm.DateTime">2011-02-27T00:00:00 </d:StartTime>
<d:EndTime m:type="Edm.DateTime">2011-02-27T23:59:00 </d:EndTime>
<d:Description><div></div></d:Description>
<d:AllDayEvent m:type="Edm.Boolean">true</d:AllDayEvent>
<d:Recurrence m:type="Edm.Boolean">false</d:Recurrence>
<d:Workspace m:type="Edm.Boolean">false</d:Workspace>
<d:CategoryValue m:null="true" />
</m:properties>
</content>
</entry>
</feed>
As you can see, there is a lot of information here. The actual StartTime for the event is buried inside a properties element that is inside the content element that is inside the entry element. The d: and the m: are the dataServices and metadata namespaces that we created in the 3rd and 4th lines of the method.
Finally, in this method, we take the entries we get and stuff them into the EventList parameter. The EventList parameter is wired to fire the NotifyPropertyChanged event when it is changed, so we just need to hook up the code in the Main Page.
Go back to the MainPage.xaml.cs file and add a new member variable to hold the calendar of events:
private CalendarOfEvents calendar;
Then either find the event handler auth_AuthenticationTokenSet() and add the following code or write one as follows:
void auth_AuthenticationTokenSet()
{
calendar = new CalendarOfEvents(auth.AuthenticationToken);
     calendar.PropertyChanged += new PropertyChangedEventHandler (propertyChanged);
calendar.LoadEvents();
}
Here we initialize the calendar object by passing in the authentication token. Then we hook up an event handler to listen for a property change event. Finally, we call LoadEvents to kick off the action.
The event handler we will reuse when we are also calling for a project list, so we need to be sure which property was updated. This is a simple process. For now, this is what our event handler code will look like:
void propertyChanged(object sender, PropertyChangedEventArgs e)
{
if (e.PropertyName.ToLowerInvariant() == "eventlist")
     Dispatcher.BeginInvoke(() => { /* code to update our UI */ });
}
As we can see from the comment inside the code, we have reached the end of what we can do without a UI. We will implement that now.
The first thing we need to do is fix the display to show a panorama instead of the default single page application. The panorama controls are in an assembly that isn't included by default in this template. To add these controls, we need to first reference the assembly that contains them. Carry out the following instructions for adding the reference:
- Right click on the project PanoramaData in Solution Explorer.
- From the context menu that appears, select Add Reference .
- Select Browse
and navigate to
C:Program Files (x86)Microsoft SDKsWindows Phonev7.0LibrariesSilverlight. - Select the Microsoft.Phone.Controls.dll assembly and click on Open.
- Finally, click on the Add button in the Add Reference dialog.
At the top of the MainPage.xaml file, there are a series of XML namespace definitions like the following:
xmlns:x="http://schemas.microsoft.com/winfx/2006/xaml"
Add the following line specifying that the namespace controls comes from the Microsoft.Phone.Controls assembly:
xmlns:controls="clr-namespace:Microsoft.Phone.Controls;assembly=Microsoft.Phone.Controls"
Now that we have the namespace that contains the panorama controls, we can replace the LayoutRoot grid with the following code:
<Grid x:Name="LayoutRoot" Background="Transparent">
<controls:Panorama Title="panorama example">
<controls:PanoramaItem Header="calendar">
<Grid>
</Grid>
</controls:PanoramaItem>
</controls:Panorama>
</Grid>
This recreated the LayoutRoot with a panorama control on the inside. We only have on PanoramaItem for now, but we'll add another in the next section. Inside the PanoramaItem is an empty grid that we will use to populate our calendar information.
To populate that calendar information, let's put a ListBox inside the grid element. Add the following code after the <Grid> and before the </Grid>:
<ListBox x:Name="calendarListBox" HorizontalAlignment="Left">
<ListBox.ItemTemplate>
<DataTemplate>
</DataTemplate>
</ListBox.ItemTemplate>
</ListBox>
This is the typical boilerplate for a listbox. Next, we'll populate the DataTemplate element with a StackPanel containing two TextBlocks. Add the following code after <DataTemplate> but before </DataTemplate>:
<StackPanel Orientation="Horizontal" Width="396">
<TextBlock Text="{Binding StartDate}"
VerticalAlignment="Top"
HorizontalAlignment="Center" />
<TextBlock Text="{Binding Title}"
TextWrapping="Wrap"
Width="282"/>
</StackPanel>
The StackPanel allows us to place the two text blocks right next to each other and let the title wrap in its area.
Now, let's bind the data to the UI. Reopen the MainPage.xaml.cs file and look for the method propertyChanged. Replace the comment /* code to update our UI */ with the following code:
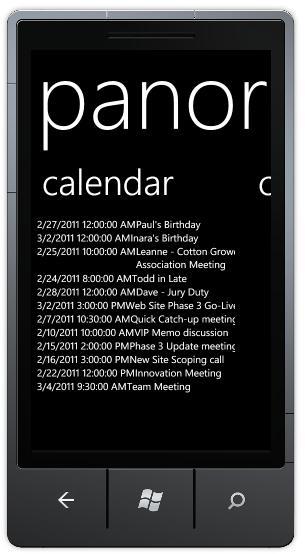
calendarListBox.ItemsSource = calendar.EventList;
Now save the all files, compile, and run the application. It should look something like this:
There's a bit of cleanup we should do to make it more readable. First, let's put the whole list in a box. Surround the ListBox with the following code in the MainPage.xaml:
<Border BorderBrush="{StaticResource PhoneForegroundBrush}"
BorderThickness="{StaticResource PhoneBorderThickness}"
Background="#80808080">
ListBox code...
</Border>
This will put a border around our listbox. The border uses the foreground brush. That means if we are in the dark theme, it will be white and if we are in the light theme it'll be black. Also, we use the phone border thickness static resource because this has been optimized to look best on our phone. Finally, we set the background color to a light gray with partial alpha transparency. If we had an image in the background, it would shine through.
Next, let's look at the start date. For this application, we only want to show the month and day of the event. We could then extend the application to allow the user to tap on an event to see full details. To change the output of the DateTime to a formatted string, we will use a value converter.
Create a new class named DateTimeValueConverter and have it implement the IValueConverter interface. Create the class file by carrying out the following steps:
- Right click on the PanoramaData project.
- In the context menu that appears, select Add and then the Class option.
- Name the class DateTimeValueConverter.cs and click on the Add button.
- Visual Studio will create a blank class for us to use.
In the class that is created, add the following using statement:
using System.Windows.Data;
Then add the following code to the class:
public class DateTimeValueConverter : IValueConverter
{
     public object Convert(object value, Type targetType, object parameter, System.Globalization.CultureInfo culture)
{
throw new NotImplementedException();
}
     public object ConvertBack(object value, Type targetType, object parameter, System.Globalization.CultureInfo culture)
{
throw new NotImplementedException();
}
}
The IValueConverter interface defines two methods for converting and converting back. The second method is useful for TwoWay binding, but we are only using OneTime binding in this book. We will only modify the Convert method.
The following is the code we'll use for the Convert method:
public object Convert(object value, Type targetType, object parameter, System.Globalization.CultureInfo culture)
{
if (value.GetType() == typeof(DateTime))
{
var dt = (DateTime)value;
     return string.Format("{0}/{1}", dt.Month.ToString(), dt.Day.ToString());
}
else
return string.Empty;
}
This first ensures that what was sent in is a DateTime. It then formats the string and returns it. Now let's attach it to the UI.
First, we need to add another XML namespace to our XAML. At the top where we added the controls namespace earlier, add the following line:
xmlns:converter="clr-namespace:PanoramaData"
Next, we have to tell our application about the converter. Add the following code before the opening LayoutRoot grid element:
<UserControl.Resources>
<converter:DateTimeValueConverter x:Key="DateFormatConverter" />
</UserControl.Resources>
This lets the app know that when we call for a static resource named DateFormatConverter that what we mean is our new DateTime Value Converter. Now, let's modify the StartTime binding:
<TextBlock Text="{Binding StartDate,
Converter={StaticResource DateFormatConverter}}"
VerticalAlignment="Top"
HorizontalAlignment="Center"
Style="{StaticResource PhoneTextLargeStyle}"/>
Let's do a little more design on this before moving on. In the preceding code, we also added a style to make this text much larger. Let's also change the style of the title text block:
<TextBlock Text="{Binding Title}"
TextWrapping="Wrap"
Width="282"
Style="{StaticResource PhoneTextTitle2Style}"/>
Finally, let's surround the start time text block with a border much like we did for the whole calendar:
<Border CornerRadius="10"
Background="{StaticResource PhoneAccentBrush}"
Height="45" Width="100"
Margin="7,7,7,7" VerticalAlignment="Top">
StartTime TextBlock
</Border>
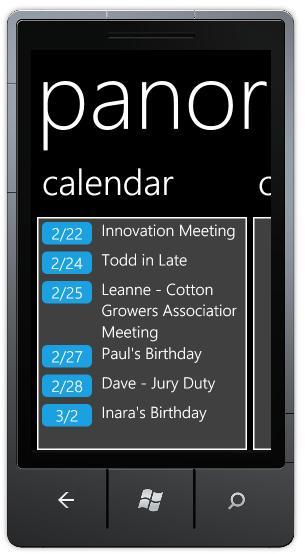
This gives us a box under the start time that has the phone accent color. Saving all these changes and running the app will yield this:

The problem here is that the full day events are listed first and the appointments are listed second. Also, we should probably only show the first six events and we only want events either today or in the future. We can do this very easily by modifying the URI that we pass to the list data service.
Reopen the CalendarOfEvents class file. Modify the member variable mCalendarUri as follows:
private readonly string mCalendarUri = "/Calendar/?$orderby=StartTime&$filter=StartTime%20ge%20DateTime'{0}'&$top=6";
This orders by the StartTime, then gets only items in the future, and finally it only grabs the first six items. The filter for grabbing items greater than or equal to today needs to be formatted when we actually use it. Find the LoadEvents method and change the first line to this:
mWebRequest = (HttpWebRequest)HttpWebRequest.Create(new Uri(mDataServiceUrl + string.Format(mCalendarUri, DateTime.Now.ToString("yyyy-MM-dd"))));
This replaces the {0} with the current date. Save everything, compile, and run. The output should look similar to the one shown in the following screenshot:
In this demo, we saw how to get information from a SharePoint calendar using OData. We then bound it to a ListBox, creating a value converter to display the start time in a specific format, and we updated the UI. A panorama with only one panel isn't very interesting though. In the next demo, we'll add a task status site.
For this example, we are going to take a task status site, count all of the projects in each status and use that information to populate a pie chart which we will put on the first pane of our panorama control from the previous example. As we should be old pros now at doing many of the common tasks, we'll go faster in this section.
The first thing we need is a new task status site, so carry out the following steps:
- Open our Chapter 7 SharePoint site.
- From the quick links menu on the left, select Lists
- At the top, click on the Create link to create a new list.
- This will open the Create dialog.
- Find the Project Tasks template and give it the name ProjectTaskStatus.
- This will create a blank task list. Populate it with some data. Make sure to give tasks status of In Progress, Completed, or Not Started for each task.
Once finished, the task status site should look like the one shown in the following screenshot:

This really is an idealized example, but the point still is valid.
We are only interested in the following three statuses from the task status site:
- In Progress
- Complete
- Not Started
For each of these, we'll need to know how many tasks are in that state. We'll write a really simple class to hold that data.
Carry out the following instructions to create the class:
- Right click on the PanoramaData project.
- In the context menu that appears, select Add and then the Class option.
- Name the class ProjectStatus.cs and click on the Add button.
- Visual Studio will create a blank class for us to use.
Now enter the following code:
public class ProjectStatus
{
public string Status { get; set; }
public int Count { get; set; }
}
Then we'll create another new class named ProjectTaskStatus.
Carry out the following instructions to create the class:
- Right click on the PanoramaData project.
- In the context menu that appears, select Add and then the Class option.
- Name the class ProjectTaskStatus.cs and click on the Add button.
- Visual Studio will create a blank class for us to use.
In the class which is created, add the following using statement:
using System.ComponentModel
This will be where we call SharePoint to get the data. Add the following code to this new class:
public class ProjectTaskStatus : INotifyPropertyChanged
{
private CookieContainer mAuthToken;
private HttpWebRequest mWebRequest;
public ProjectTaskStatus(CookieContainer authToken)
{
mAuthToken = authToken;
}
public event PropertyChangedEventHandler PropertyChanged;
private void NotifyPropertyChanged(string propertyName)
{
if (PropertyChanged != null)
     PropertyChanged(this, new PropertyChangedEventArgs (propertyName));
}
}
Like the CalendarOfEvents class, the ProjectTaskStatus class will implement the INotifyPropertyChanged event, which will let us know when all of the data has been downloaded. We will have a member variable to hold the authentication token that is passed in to the constructor, and we'll have a member variable for the HttpWebRequest.
Next, let's add a variable for the project URL and one for the query URI:
private readonly string mProjectUrl = "http://ssps2010/Chapter07/_vti_bin/listdata.svc";
private readonly string mQueryUri = "/ProjectTaskStatus/?$filter=TaskStatusValue%20eq%20'{0}'&$top=0&$inlinecount=allpages";
The first one is the same as we had in the calendar example. The mQueryUri is a little different. Not only is it looking for data in the ProjectTaskStatus site, but we are looking for specific TaskStatusValues, which we'll cycle through in a minute to get each one.
We don't actually want any of the tasks, so we ask for the system to return the top 0 items. This may sound strange, but if all we want is the number of records then it doesn't make sense to send all the records down to the phone just to count them. We should have SharePoint count them for us. That's exactly what the last part $inlinecount=allpages does for us.
Finally, we'll add a property for our data:
public List<ProjectStatus> Projects { get; set; }
This is a simple generic list of ProjectStatus, but we'll need to initialize it. Add the following line of code to the class constructor:
Projects = new List<ProjectStatus>();
Now we are ready to query the server for data. Let's create a method named LoadData that will call a method named GetCount and pass in the status we are looking for:
public void LoadData()
{
GetCount("In Progress");
GetCount("Completed");
GetCount("Not Started");
}
GetCount will start the actual request to the server with the now familiar three pronged attack:
- Initialize the Web request
- Get the request callback
- Parse the results
Here's the code for GetCount:
private void GetCount(string status)
{
var uri = new Uri(mProjectUrl + string.Format(mQueryUri, status));
mWebRequest = (HttpWebRequest)HttpWebRequest.Create(uri);
mWebRequest.CookieContainer = mAuthToken;
mWebRequest.Accept = "application/atom+xml";
mWebRequest.Headers["TaskStatusValue"] = status;
     mWebRequest.BeginGetResponse(new AsyncCallback(asyncCallback), mWebRequest);
}
This code includes the first of two hacks that I've put in here. We've added a TaskStatusValue header to the request. As we aren't getting any tasks back from the SharePoint server when we are parsing the data, we won't know which of the three statuses we are getting data for. By passing the status in the header, we can just look at the header at the time of parsing and we'll have all the information we need.
The rest of this method is the same as we've used a couple of times in this chapter. Next, let's look at the asyncCallback method.
private void asyncCallback(IAsyncResult asyncResult)
{
var request = (HttpWebRequest)asyncResult.AsyncState;
     var response = (HttpWebResponse)request.EndGetResponse(asyncResult);
using (var sr = new StreamReader(response.GetResponseStream()))
{
var result = sr.ReadToEnd();
ParseResults(result, request.Headers["TaskStatusValue"]);
}
}
You can see here where we pulled the TaskStatusValue out of the request headers, so we can pass it into the ParseResults method. The rest of this is exactly the same as we had in the calendar example. This is a common theme. We are now running into code we've written before several times and it should trigger an indication that we should refactor out the common patterns into their own classes. This three-pronged attack to get data is a prime example of that. We won't do that here, but as we go on, you should see similar patterns.
Finally, let's look at the ParseResults method.
private void ParseResults(string result, string status)
{
var atomElement = XElement.Parse(result);
XNamespace atom = "http://www.w3.org/2005/Atom";
     XNamespace dataServices = "http://schemas.microsoft.com/ado/2007/08/dataservices";
     XNamespace metaData = "http://schemas.microsoft.com/ado/2007/08/dataservices/metadata";
     var countString = atomElement.Descendants(metaData + "count").FirstOrDefault().Value;
int count = 0;
if (!int.TryParse(countString, out count))
count = 0;
     Projects.Add(new ProjectStatus { Status = status, Count = count });
if (Projects.Count > 2)
NotifyPropertyChanged("Projects");
}
This is boilerplate parsing. We initialize the namespaces and then use LINQ to get the value of the count. This value comes out as a string, so we parse it into an integer. Finally, we add a new Project Status to our Projects property and if we have all three ProjectStatus populated, we call NotifyPropertyChanged.
Let's move back to the MainPage.xaml.cs file and hook up this class. Add a member variable to hold our new ProjectTaskStatus object. Then in the auth_AuthenticationTokenSet method, we previously initialized the calendar object. Add in the following lines to initialize, hook up the propertyChanged event, and start the data load after the lines initializing the calendar:
tasks = new ProjectTaskStatus(auth.AuthenticationToken);
tasks.PropertyChanged += new PropertyChangedEventHandler(propertyChanged);
tasks.LoadData();
Now, we are calling the same event handler when the task list is filled as we did for the calendar event. We already have a conditional in the propertyChanged event handler for calendar events; let's add in a new conditional to listen for the tasks:
void propertyChanged(object sender, PropertyChangedEventArgs e)
{
if (e.PropertyName.ToLowerInvariant() == "eventlist")
Dispatcher.BeginInvoke(() => { calendarListBox.ItemsSource = calendar.EventList; });
else if(e.PropertyName.ToLowerInvariant() == "projects")
Dispatcher.BeginInvoke(() => { /* code to update our UI */ });
}
The highlighted code shows the new path and this is as far as we can go without our UI.
Not too long ago, Microsoft bought a charting company and integrated their components into .NET. Those controls have found their way into the Silverlight Toolkit, which is freely distributed at the following URL:
http://silverlight.codeplex.com
In August of 2010, a Microsoft developer named David Anson took those charts and figured out how to make them work in Windows Phone 7. It isn't hard, you just use the two assemblies and go, but the UI was designed for Silverlight on the Web not Silverlight on the phone. David wrote a Resource Dictionary for use with these charts and Windows Phone 7. The following is the URL to the post:
It is worth a read, and his blog is a great resource in general.
For displaying the chart, we are going to follow his instructions. First, download his Windows Phone 7 Data Visualization sample linked to from the preceding blog post. Then unblock it and unzip the package. This is a full solution that will demonstrate his example. We only need the two DLL's that are from the Silverlight Toolkit and the PhoneDataVisualizationResource.xaml. Carry out the following directions to add them to our project:
- Right click on the PanoramaData project and select Add Reference
- In the Add Reference dialog box, select Browse and navigate to where you unzipped the Windows Phone 7 Data Visualization project.
- Select the following two DLL's:
System.Windows.Controls.DataVisualization.Toolkit.dllSystem.Windows.Controls.dll
- Click on the Add button and Visual Studio will add them to our project.
- Right click on the PanoramaData project.
- Select Add and then Existing Item
- Once again navigate to where you unzipped the Windows Phone 7 Data Visualization project.
- Select the resource file PhoneDataVisualizationResources.xaml
- Click on the Add button and Visual Studio will add it to our project.
Next, we have to tell our application to use these tools. To tell the application about the phone data visualization resources, open up App.xaml. This file we haven't touched yet, but when dealing with larger scale applications and different design patterns, we would be in here all the time. Right now it's fairly empty. Locate the Application.Resources section and add the highlighted code:
<Application.Resources>
<ResourceDictionary>
<ResourceDictionary.MergedDictionaries>
     <ResourceDictionary Source="/PanoramaData;component/PhoneDataVisualizationResources.xaml" />
</ResourceDictionary.MergedDictionaries>
</ResourceDictionary>
</Application.Resources>
This will merge the resources we just added to the system, so that we can call them using the same familiar syntax we're used to.
Next, let's add the namespace attribute to our MainPage.xaml. We've done this twice before. At the top, there are a series of XML namespaces. Add this one to the list:
xmlns:charting="clr-namespace:System.Windows.Controls.DataVisualization.Charting;assembly=System.Windows.Controls.DataVisualization.Toolkit"
Next, we'll need a place to put our chart. Let's make the pie chart the first thing that appears in the application. Find the opening controls:Panorama element and add this on the very next line:
<controls:PanoramaItem Header="status chart">
<Grid>
</Grid>
</controls:PanoramaItem>
This creates another PanoramaItem with a title of "status chart". Next, we'll put the chart inside the grid with the following code:
<charting:Chart Name="ProjectStatusChart"
LegendTitle="legend"
Style="{StaticResource PhoneChartStyle}"
Template="{StaticResource PhoneChartPortraitTemplate}">
</charting:Chart>
This sets up the basic chart with a legend title, a style that is from the PhoneDataVisualizationResource and based on a template from the same resource file. Inside this chart, we'll add a pie chart series:
<charting:PieSeries ItemsSource="{Binding}"
DependentValuePath="Count"
IndependentValuePath="Status">
<charting:PieSeries.LegendItemStyle>
<Style TargetType="charting:LegendItem">
<Setter Property="Margin" Value="5 0 5 0" />
</Style>
</charting:PieSeries.LegendItemStyle>
</charting:PieSeries>
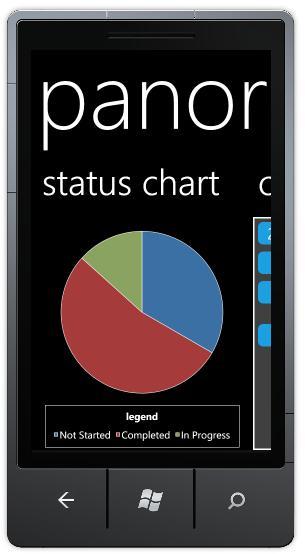
There is a lot going on here. First, we create the pie series and tell it that we will bind to the ItemsSource. The dependent value path is the count or the number of items in each status. The independent value path is the status name. Finally, we add in some style for the legend to supply the margin values.
All of the XAML work is done, now we can hook up the binding. Go back to MainPage.xaml.cs and find the comment /* code to update our UI */ and replace it with the following:
ProjectStatusChart.DataContext = tasks.Projects;
We are giving the chart itself a data context here and the pie series will bind off this data context. Once we've finished doing that save, compile, and run. We should see something like this:
This is just the start of what could be a really useful little application. We could have data flowing in from various metrics such as bug tracking systems, backlog reports, burn down charts, employee productivity, sales quota metrics, and so on. Realistically any data that we have in SharePoint could be pulled out and displayed on the Windows Phone 7 app. Also, a pie chart is only one chart that can be displayed here. We could also use bar charts and line charts. Experiment with each of these different types.