
Let's go back to the application that we are building in Visual Studio. First, change siteUrl in the MainPage.xaml.cs file to the RSS Feed URL that we got from our list.
private string siteUrl = "http://ssps2010/chapter6/_layouts/listfeed.aspx?List=%7BD45848A1%2D12E8%2D4722%2DAB5B%2D511BF802F8D8%7D&Source=http%3A%2F%2Fssps2010%2Fchapter6%2FLists%2FEngineering%2520Notes%2FAllItems%2Easpx";
Now, rerun the application in the emulator and the raw XML from the RSS feed will appear in the text block. Now that we have the XML feed in a string, we should display it in a more meaningful way. To do that, let's do the following:
- Replace the text block display with a listbox
- Create a simple view model for an RSS Item
- Parse the XML
- Create a list of RSS Items
- Bind the list of RSS Items to the listbox
Sounds simple, right? Before we begin though, a quick word about a term we used in step 2. Although we are going to create a view model that will hold each RSS item, we are not following a strict MVVM (Model View ViewModel) pattern here. We are simply utilizing a view model to assist in binding the data to the view. If this application grew up to be a fully featured RSS reader, we would probably want to refactor it to an MVVM pattern, but that is an optimization that we simply don't need right now. Also, it flies in the face of attaining the simplest code that will get the job done here.
The first step here is to replace the text block that we were using to dump the string output with a listbox, where we can display each individual RSS item. To do that, open MainPage.xaml and delete the TextBlock with a name of webClientResults. In its place, enter the following XAML:
<ListBox x:Name="feedListBox">
<ListBox.ItemTemplate>
<DataTemplate>
<StackPanel HorizontalAlignment="Stretch">
<TextBlock Text="{Binding Title}" TextWrapping="Wrap" />
<TextBlock Text="{Binding Date}" />
</StackPanel>
</DataTemplate>
</ListBox.ItemTemplate>
</ListBox>
Working from the inside out, we are going to display each RSS item's title and date. We do this with text blocks and bind the text property to the data for the particular listbox item. As the titles can get long, we've included text wrapping on the title.
These text blocks are placed inside a stack panel. This means that the title will be stacked on top of the date. We have also set the width of the stack panel. Without this width, the title text block won't wrap properly.
This stack panel is placed inside the data template for the listbox item template. This listbox item template is a property of the listbox that we've replaced our text block with.
The name of this listbox is feedListBox. In the code behind, we will bind the RSS item list to the items source for this listbox. Save the progress.
Before we can bind the RSS items list to the listbox, we need to have a list of RSS items. Before we can have a list of RSS items, we need to define what an RSS item is. This is where the view model comes in. Carry out the following steps to create a class that will house our view model:
- Right click on the SimpleRSSReader project in Solution Explorer.
- In the context menu that appears, select Add and then select the Class… option.
- This will open the Add New Item dialog with the Class template already selected.
- In the Name field, name the new class as RSSItem.cs.
- Click on the Add button and Visual Studio will create the class and open it in the main IDE window.
In the class, add the following code:
public string Title { get; set; }
public string Date { get; set; }
public string PostUrl { get; set; }
This creates three public properties that we will use for our RSS feeds. Although RSS items have more fields associated with them, these are the only three that we will need for this exercise.
Something of note in these properties is the Date field. The publish date of a post is DateTime, but we are using it as a string here for the simple fact that we don't really need a DateTime. When we parse the XML in the next step, it will save us from having to convert from string to DateTime and then back to string when we data bind it to the text block. Save the progress.
We've replaced the text block with a listbox and created a simple view model for our RSS items. Next, we will parse the XML string that was returned from the WebClient.
- In Solution Explorer, right click on References for the SimpleRSSReader project.
- In the Add Reference dialog box, find System.Xml.Linq and add it to the project.
- Open the Main Page code behind.
- Add this using statement to the top of the page:
using System.Xml.Linq; - Locate the
client_DownloadStringCompletedevent handler. - Delete this line of code:
webClientResults.Text = e.Result; - Add the following code where the preceding line of code was:
var result = e.Result;
var rssElement = XElement.Parse(result);
- Save the file.
The first thing we did here was to add a reference to Windows Phone 7's LINQ to XML namespace. This contains classes, such as XElement that we use to parse the XML string, as well as the LINQ engine that we will use in the next step to create the list of RSS items.
Next, let's create a list of RSS Items.
Now we have a place to put the RSS items, we have a model of what an RSS item looks like, and we have an XElement with our RSS feed stuffed in it. The next thing to do is take the XElement and perform a LINQ statement to get a list of RSS Items.
In the previous step, we parsed the XML into a variable named rssElement. Immediately after that, add the following statement:
var items = from item in rssElement.Descendants("item")
select new RSSItem
{
Title = item.Element("title").Value,
Date = item.Element("pubDate").Value,
PostUrl = item.Element("link").Value
};
Wow, that is one statement. What we are doing here is searching through the XElement for all item elements. Once we have an item element, we call it an item and use it to create a new RSSItem. Lines 4, 5, and 6 parse the item element further to get the string values for specific elements in the item element.
Again at this point, you'll notice in line 5 that we could have parsed the publish date as a DateTime, but since we will only ever use it as a string, it's easier to just grab the value as a string.
Once the RSSItem has been created, it is added to the list of RSS items in the variable items. We will use this variable to bind to our listbox.
We've come to the point where we take the list of RSS items and actually bind that data to the listbox we created earlier. This is done in a single line of code, as follows:
feedListBox.ItemsSource = items;
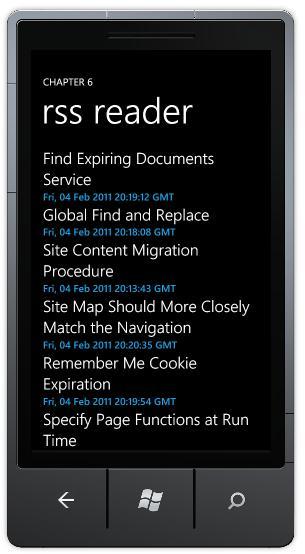
Save the file, build, and then run the application in the Windows Phone 7 Emulator. You will see something similar to the following screenshot:

It's a bit hard to read, so let's go back to the XAML and make some changes to the text blocks.
First, change the Title text block as follows:
<TextBlock Text="{Binding Title}" TextWrapping="Wrap"
Style="{StaticResource PhoneTextTitle2Style}" />
This adds a style from the static resources included with the phone that is more fitting a title.
Next, change the Date text block as follows:
<TextBlock Text="{Binding Date}"
Style="{StaticResource PhoneTextAccentStyle}" />
This adds the accent color from the phone to the date to make it stand out a bit, as shown in the following screenshot:
Windows Phone 7 has customization available to the end user, which allows them to select between 10 different accent colors and an overall theme of dark or light. The advantage of using the built-in Static Resources for Windows Phone 7's styles is that when the end user changes the theme color from dark to light or the accent color to one of the 10 options on the phone, your application will pick it up and look like it's more of a part of the phone.
This works well if that is the goal of your application. If we want to maintain a certain corporate branding though, we should create a custom resource file which contains all of our corporate color schemes and use that resource data. This, of course, is beyond the scope of this book.