We want to take advantage of Silverlight 4 features to work with rich media and perform animations. In this chapter, we will cover many topics related to retrieving digital assets from SharePoint libraries through the SharePoint Silverlight Client Object Model and consuming them in a Silverlight RIA. We will:
- Create and manage asset libraries in SharePoint 2010
- Access the digital assets in a SharePoint library from a Visual Web Part and a Silverlight RIA
- Create a SharePoint Visual Web Part that sends parameters and renders a Silverlight RIA
- Link a SharePoint Visual Web Part to a Silverlight RIA
- Add a SharePoint Visual Web Part in a web page
- Work with multiple interactive animations and effects
- Display and control videos
- Add background music from the assets library
- Change themes in Silverlight and SharePoint
So far, we have been able to interact with data from the SharePoint Server through the SharePoint Silverlight Client Object Model and WCF Data Services. Sometimes, we need to share, manage, and consume rich media, related to data.
SharePoint 2010 improves rich media management by introducing asset libraries and we can take advantage of this new feature by consuming it in a Silverlight RIA through the SharePoint Silverlight Client OM. Silverlight 4 offers outstanding features to create amazing User eXperiences (UX) when combining rich media with effects and animations.
SharePoint Server 2010 introduced a new asset library specially designed for managing and sharing digital assets and rich media files such as images, audio, and video. It is possible to combine workflows, routing, rules, and policies with asset libraries. However, in this case, we will focus on creating simple asset libraries to allow us to store images, videos, and audio files and we will consume them through the SharePoint Silverlight Client Object Model.
We will combine a new SharePoint Visual Web Part with a Silverlight RIA to allow users to select their desired asset library and to browse its images and videos with interactive animations and dazzling effects. The SharePoint Visual Web Part will display a drop-down list with the available asset libraries that store images, videos, or audio files and when the user selects one of them, the Silverlight RIA will use the capabilities offered by the Client OM to retrieve and display the digital assets. This way, with this new composite Web Part, it is going to be possible to create a new asset library and to upload the necessary images and videos to display, and the desired background music as an audio file. The Web Part will allow a user to interact with any asset library.
First, follow these steps to create two asset libraries in a SharePoint site:
- Open your default web browser, view the SharePoint site, and log in with your username and password.
- Click Site Actions | More Options... in the ribbon and the Create dialog box will appear.
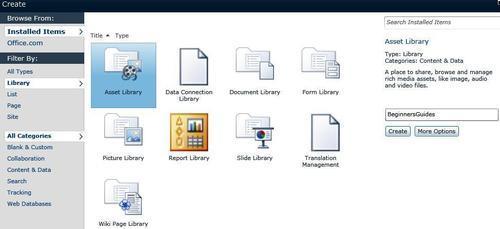
- Select Library under Filter By: and then Asset Library in Installed Items, as shown in the following screenshot:
- Enter
BeginnersGuidesin the Name textbox. - Click on More Options. SharePoint will display a new panel with additional options for the new asset library.
- Enter
Beginner's Guidesin Description and select Yes in Display this list on the Quick Launch? - Click on Create; SharePoint will create the new asset library with no digital assets and it will appear in the Quick Launch for the SharePoint site.
- Now, follow the aforementioned steps (1 to 7) to create another asset library. Use
Cookbooksas the Name and Description for this new asset library.
Follow these steps to prepare and add images, videos, and audio files to the previously created asset libraries.
- Prepare two folders,
BeginnersGuidesandCookbooks. Add many JPG and/or PNG images to these folders. Add a WMV (Windows Media Video) video file and an MP3 audio file to both folders. The following screenshot shows an example of the contents of theBeginnersGuidesfolder with 17 JPG images, a WMV video file, and an MP3 audio file: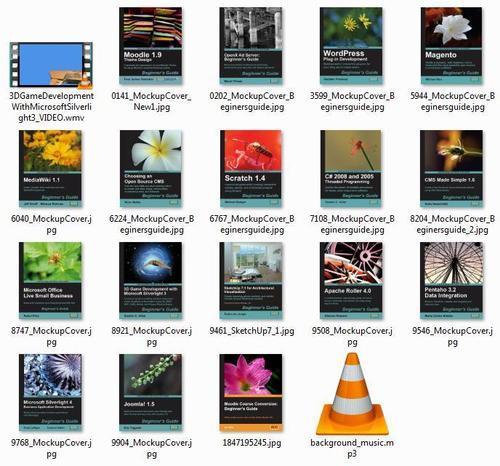
- Click on the hyperlink for the
BeginnersGuidesasset library in the Quick Launch for the SharePoint site. - Click on Add new item. The Upload document dialog box will appear. Click on Upload Multiple files... and a panel to which to drag files and folders will appear.
- Open an Explorer window and navigate to your
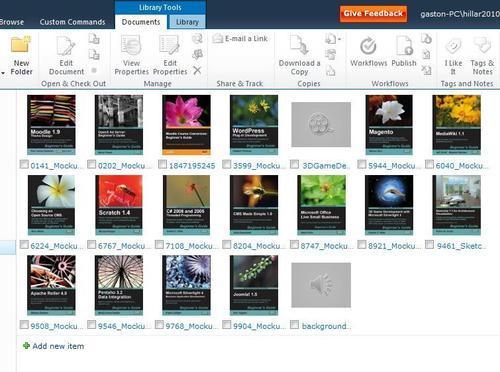
BeginnersGuidesfolder. Select all the files within the folder and drag-and-drop them in the Drag files and folder here panel within the Upload Document dialog box. All the file names will appear in the panel. - Click on OK and SharePoint will upload all the dropped files to the previously created asset library. Click on Done and the new digital assets will appear in the asset library. By default, SharePoint will display a thumbnail preview for the image files:
- Click on one of the thumbnails for the images and a bigger thumbnail will appear with detailed properties for the digital asset:
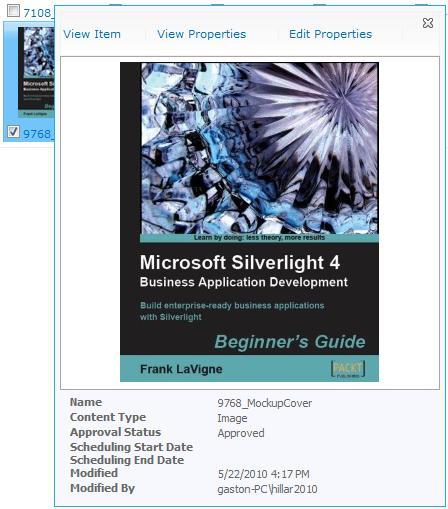
- Click on Edit Properties, located at the top of the bigger thumbnail preview; a new dialog box will appear and you will be able to edit many properties related to the digital asset. The Content Type drop-down list will display Image, because SharePoint automatically recognized the digital asset as an image. As we uploaded many images dragging and dropping them to the panel, SharePoint assigned the name but it didn't set values for
Title, Keywords, Comments, Author, andCopyright. You can use this dialog box to set the values for these properties in order to organize the contents of the asset library. Then, click on Save.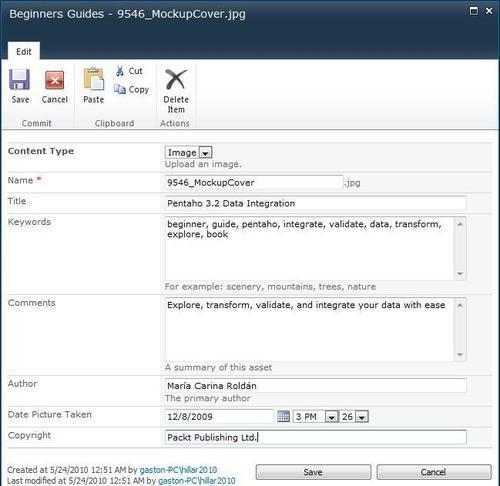
- Now, follow the aforementioned steps (1 to 7) to add an audio file, images, and videos to the other asset library,
Cookbooks. Remember to upload the files stored in theCookbooksfolder.
We added images, videos and audio files to the two asset libraries, BeginnerGuides and Cookbooks, in the SharePoint site. Now, we can browse the asset libraries' structure and then create an interactive Silverlight RIA capable of consuming the uploaded digital assets.
Once we have created the two asset libraries in SharePoint, we can use Server Explorer in Visual Studio to analyze the new asset libraries' structures.
- Start Visual Studio as a system administrator user.
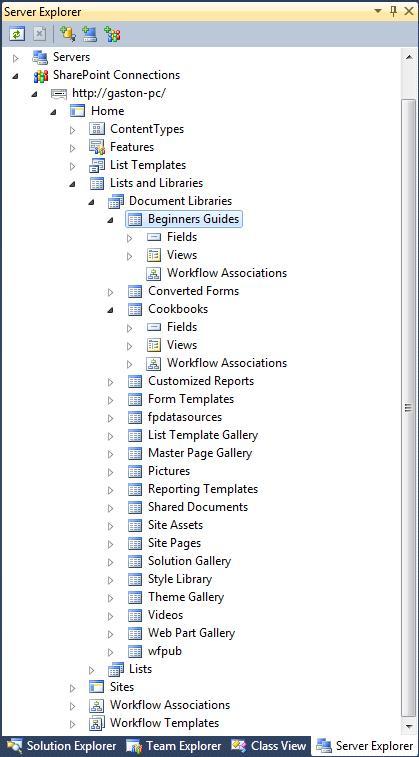
- Activate the Server Explorer palette by clicking on View | Server Explorer.
- Click on the expand button for SharePoint Connections and then on the expand button for the SharePoint server. You will be able to browse its different nodes.
- Expand Lists and Libraries and then Document Libraries for the Site Collection in which you created the new asset libraries. Remember that the default Site Collection is Home. There are asset libraries and document libraries within Document Libraries and therefore, it is going to be necessary to use a smart filter to display the right asset library names in the drop-down list that the user will use to select the desired asset library with pictures, videos, and audio files.
This time, we are going to create a new solution in Visual Studio that will include two new projects:
- A SharePoint 2010 Visual Web Part,
SPAssetsBrowserWebPart - A Silverlight application project,
SLAssetsBrowser
SharePoint is built on top of ASP.NET, and therefore, a Visual Web Part inherits key features from the ASP.NET Web Part architecture. The Visual Web Part will display the available asset libraries with videos, pictures, and/or audio files in a SharePoint site and it will send the selected asset library as a parameter to the Silverlight host control that will render the Silverlight application. We will take advantage of one of the new project templates in Visual Studio 2010, the Visual Web Part project template, which enables us to visually design a Web Part that can be deployed to SharePoint. The necessary steps to display a Silverlight application within the Visual Web Part are a bit complex but the flexibility offered by this combination is worth the effort.
Follow these steps to create the new Visual Web Part that accesses the available asset libraries in a SharePoint site:
- Stay in Visual Studio as a system administrator user.
- Select File | New | Project.... Expand Other Project Types and select Visual Studio Solutions under Installed Templates in the New Project dialog box. Then, select Blank Solution, make sure that .NET Framework 4 version is selected, and enter
AssetsBrowseras the project's name and click OK. Visual Studio will create a blank solution with no projects. - Right-click on the solution's name in Solution Explorer and select Add | New Project… from the context menu. Expand Visual C# and then expand SharePoint and select 2010 under Installed Templates in the Add New Project dialog box. Then, select Visual Web Part, enter
SPAssetsBrowserWebPartas the project's name, and click OK. The SharePoint Customization Wizard dialog box will appear.
- Enter the URL for the SharePoint server and site in What local site do you want to use for debugging?
- Click on Deploy as a farm solution. Sandboxed solutions don't support the Visual Web Parts and therefore, it is necessary to deploy projects that include them as a farm solution. Then, click on Finish and the new
SPAssetsBrowserWebPartempty SharePoint 2010 Visual Web Part project will be added to the solution. The code editor will open the source code for theVisualWebPart1UserControl.ascx UserControl(System.Web.UI.UserControl). ThisUserControldefines the UI for the Visual Web Part and it has a code-behind file,VisualWebPart1UserControl.ascx.cs. - Right-click on the
VisualWebPart1folder in Solution Explorer and select Delete in the context menu. Click OK in the confirmation dialog box. - Now, right-click on the recently added project's name in Solution Explorer,
SPAssetsBrowserWebPart, and select Add | New Item… in the context menu. Expand Visual C# and then expand SharePoint and then select 2010 under Installed Templates in the New Item dialog box. Then, select Visual Web Part, enterAssetsBrowserWebPartin Name, and click OK. The code editor will open the source code for theAssetsBrowserWebPart.ascx UserControl(System.Web.UI.UserControl). Its new code-behind file isAssetsBrowserWebPartUserControl.ascx.cs. Renaming a Visual Web Part can be a very complex process and therefore, it is easier to delete the defaultVisualWebPart1folder and add a new Visual Web Part item with the desired name. This way, Visual Studio will create the container folder and all its related files with the new name.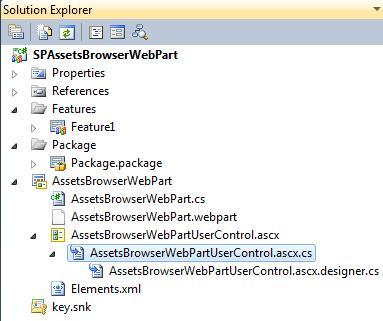
- Switch to the Design view for the
AssetsBrowserWebPart.ascx UserControland use the Toolbox to drag-and-drop the following server controls. The names for the server controls are assigned in theIDproperty in the Properties window.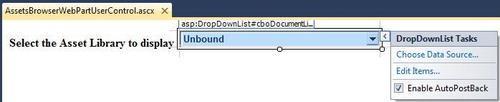
- Now, open the code-behind file for the
AssetsBrowserWebPart.ascx UserControl, AssetsBrowserWebPartUserControl.ascx.csand add the followingusingstatements.using Microsoft.SharePoint; Visual Web Partcreatingusing Microsoft.SharePoint.WebControls;
- Add the following public property for the
AssetsBrowserWebPartUserControlpartial class.public string SelectedList { get; private set; } - Add the following lines to the
Page_Loadevent. This code will run at the server when a user requests the Visual Web Part for the first time and each time a postback occurs. Thus, it is necessary to run different code when it is a postback by checking the Boolean value of theIsPostBackproperty. When the code runs for the first time (IsPostBack == false), it will add the titles for the lists ofSPBaseType.DocumentLibrarytype with at least one item (libraryList.RootFolder.ItemCount> 0)and with content types ofPicture, Image, Audio, orVideo.if (!IsPostBack) { var _context = SPContext.Current; var documentLibraries = _context.Web.GetListsOfType(SPBaseType.DocumentLibrary); foreach (SPList libraryList in documentLibraries) { if ((libraryList.RootFolder.ItemCount > 0) && ((libraryList.ContentTypes[0].Name == "Picture") || (libraryList.ContentTypes[0].Name == "Image") || (libraryList.ContentTypes[0].Name == "Audio") || (libraryList.ContentTypes[0].Name == "Video"))) { // The list has at least 1 element cboDocumentLibraries.Items.Add( new ListItem(libraryList.Title)); } } // Select the first item in the dropdown list cboDocumentLibraries.SelectedIndex = 0; } SelectedList = cboDocumentLibraries.SelectedValue; - Go back to the Design view for
AssetsBrowserWebPartUserControl.ascxand define aSelectedIndexChangedevent handler for thecboDocumentLibraries DropDownListand add the following code in it. This way, when the user selects a different item in the drop-down list, theSelectedListproperty will hold the name for the new list that has been selected.SelectedList = cboDocumentLibraries.SelectedValue;
- Now, open the
AssetsBrowserWebPart.cscode file within theAssetsBrowserWebPartfolder. This file defines theAssetsBrowserWebPartclass as a subclass ofWebPart. Its original code defines a path for theUserControl, AssetsBrowserWebPartUserControl.ascx, that thisWebPartsubclass will load and add to theControls ControlCollection. This way, theWebPartrenders theUserControl. The following lines show the original code for this file.using System; using System.ComponentModel; using System.Web; using System.Web.UI; using System.Web.UI.WebControls; using System.Web.UI.WebControls.WebParts; using Microsoft.SharePoint; using Microsoft.SharePoint.WebControls; namespace SPAssetsBrowserWebPart.AssetsBrowserWebPart { [ToolboxItemAttribute(false)] public class AssetsBrowserWebPart : WebPart { // Visual Studio might automatically update this path when you change the Visual Web Part project item. private const string _ascxPath = @"~/_CONTROLTEMPLATES/SPAssetsBrowserWebPart/AssetsBrowserWebPart/AssetsBrowserWebPartUserControl.ascx"; protected override void CreateChildControls() { Control control = Page.LoadControl(_ascxPath); Controls.Add(control); } } } - Add the following private variable to the
AssetsBrowserWebPartclass. This variable will hold a reference to theControlinstance cast asAssetsBrowserWebPartUserControl. This way, it will be possible to access the value for theSelectedListpublic property to send it as a parameter to the Silverlight host control in theOnPreRendermethod.private AssetsBrowserWebPartUserControl _control;
- Add the following lines in the
CreateChildControlsmethod to save the reference to theAssetsBrowserWebPartUserControlinstance. - Override the
OnPreRenderevent to add the Silverlight host control that will load and display the Silverlight RIA and it will send the selected asset library title as a parameter. The highlighted lines define the.xapfile location and the parameter calledName.protected override void OnPreRender(EventArgs e) eventOnPreRender{ var name = _control.SelectedList; string webUrl = SPContext.Current.Web.Url; string renderHost = @"<div id='silverlightControlHost'> <object data='data:application/x-silverlight-2,' type='application/x-silverlight-2' width='100%' height='100%'> <param name='source' value='/_catalogs/wp/SLAssetsBrowser.xap'/> <param name='background' value='white' /> <param name='minRuntimeVersion' value='4.0.50303.0' /> <param name='autoUpgrade' value='true' /> <param name='initParams' value='Name=" + name.Trim() + @"' /> <a href='http://go.microsoft.com/fwlink/?LinkID=149156&v=4.0.50303.0' style='text-decoration:none'> <img src='http://go.microsoft.com/fwlink/?LinkId=161376' alt='Get Microsoft Silverlight' style='border-style:none'/> </a> </object><iframe id='_sl_historyFrame' style='visibility:hidden;height:0px;width:0px;border:0px'></iframe></div>"; LiteralControl host = new LiteralControl(renderHost); Controls.Add(host); base.OnPreRender(e); }
The values for the renderHost string define a Silverlight control host. You can check the test page generated by Visual Studio for the Silverlight application to find the most up to date definition.
Once you have built your application, click on the Show All Files button in Solution Explorer. Then, expand the BinDebug folder for your Silverlight project. You will find many folders and files; open the HTML file that ends with TestPage.html, in our example, SLAssetsBrowserTestPage.html. You can copy from<div id="silverlightControlHost"> to</div> and you can assign this value to renderHost to create a Silverlight host control. However, you have to change the following line that defines the path for the .xap file:
<param name="source" value="SLAssetsBrowser.xap"/>
It has to be replaced with the path for the .xap file inside the SharePoint _catalogs/wp folder.
<param name='source' value='/_catalogs/wp/SLAssetsBrowser.xap'/>
In this case, then, it was necessary to add a parameter after the last param name, because we want to send a specific value to the Silverlight RIA.
Follow these steps to create the new Silverlight RIA that loads the images, videos, and audio from the asset library selected in the Visual Web Part that renders this application and sends the selected name as a parameter:
- Stay in Visual Studio as a system administrator user.
- Select File | New | Project.... Expand Visual C# and select Silverlight under Installed Templates in the New Project dialog box. Then, select Silverlight Application, enter
SLAssetsBrowseras the project's name, choose Add to Solution in the Solution drop-down list, and click OK. - Deactivate the Host the Silverlight application in a new Web site checkbox in the New Silverlight Application dialog box and select Silverlight 4 in Silverlight Version. Then, click OK. Visual Studio will add the new Silverlight application project to the existing solution.
- Follow the necessary steps to add the following two references to access the SharePoint 2010 Silverlight Client OM:
Microsoft.SharePoint.Client.Silverlight.dllMicrosoft.SharePoint.Client.Silverlight.Runtime.dll
- Open
App.xaml.csand add the followingusingstatement:using Microsoft.SharePoint.Client;
- Replace the code in the
StartUpevent handler with the following lines. The code stores the value for theNameparameter, specified by the Visual Web Part in the string that creates the Silverlight host control, in theparameterNamelocal variable. Then, it creates a new instance ofMainPagesending this value as a parameter to the constructor.private void Application_Startup(object sender, StartupEventArgs e) { string parameterName = e.InitParams["Name"]; this.RootVisual = new MainPage(parameterName); ApplicationContext.Init(e.InitParams, System.Threading.SynchronizationContext.Current); } - Select Start | All Programs | Microsoft Silverlight 4 Toolkit April 2010 | Binaries and Windows will open the folder that contains the Silverlight Toolkit binaries. By default, they are located at
C:Program Files (x86)Microsoft SDKsSilverlightv4.0ToolkitApr10Binin 64-bit Windows versions, and atC:Program FilesMicrosoft SDKsSilverlightv4.0ToolkitApr10Binin 32-bit Windows versions. - Add a reference to
System.Windows.Controls.Toolkit.dll. Remember that it is located in the aforementionedBinsub-folder. This way, we will have access to theWrapPanelcontrol. - Open
MainPage.xamland activate the Toolbox. Right-click on the All Sivlerlight Controls header and select Choose Items... in the context menu. The Choose Toolbox Items dialog box will appear with the Silverlight Components tab activated. Make sure that the checkbox located at the left of the WrapPanel item in the Name column is checked. This way, the Toolbox will display theWrapPanelcontrol and you will be able to add it by dragging and dropping it to the desired location within the design view. - Define a new width and height for the
Grid, 800and600, and add the following controls. The following lines show the XAML that defines all the controls and some effects for thelblLibraryName Labeland thewrapPanel WrapPanel.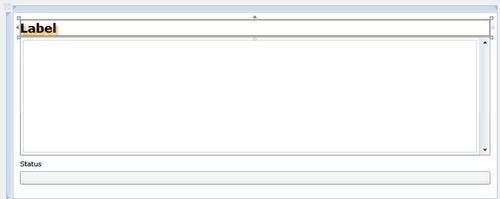
<UserControl x:Class="SLAssetsBrowser.MainPage"
xmlns="http://schemas.microsoft.com/winfx/2006/xaml/presentation"
xmlns:x="http://schemas.microsoft.com/winfx/2006/xaml"
xmlns:d="http://schemas.microsoft.com/expression/blend/2008"
xmlns:toolkit="http://schemas.microsoft.com/winfx/2006/xaml/presentation/toolkit"
xmlns:mc="http://schemas.openxmlformats.org/markup-compatibility/2006"
mc:Ignorable="d"
d:DesignHeight="600" d:DesignWidth="800" xmlns:sdk="http://schemas.microsoft.com/winfx/2006/xaml/presentation/sdk">
<Grid x:Name="LayoutRoot" Loaded="LayoutRoot_Loaded" Width="Auto" Height="Auto">
<sdk:Label Height="28" HorizontalAlignment="Left" Margin="12,12,0,0" Name="lblLibraryName" VerticalAlignment="Top" Width="776" FontSize="20" FontWeight="Bold" >
<sdk:Label.Effect>
<DropShadowEffect ShadowDepth="5" Color="Orange" />
</sdk:Label.Effect>
</sdk:Label>
<ProgressBar Height="22" HorizontalAlignment="Left" Margin="12,554,0,0" Name="pgbLoadingStatus" VerticalAlignment="Top" Width="776" />
<sdk:Label Height="22" HorizontalAlignment="Left" Margin="12,534,0,0" Name="lblStatus" VerticalAlignment="Top" Width="776" Content="Status" />
<ScrollViewer Height="487" HorizontalAlignment="Left" Margin="12,41,0,0" Name="scrollViewer" VerticalAlignment="Top" Width="776">
<toolkit:WrapPanel Name="wrapPanel" Width="Auto" Height="Auto" RenderTransformOrigin="0.497,0.493">
<toolkit:WrapPanel.Effect>
<DropShadowEffect ShadowDepth="10"/>
</toolkit:WrapPanel.Effect>
</toolkit:WrapPanel>
</ScrollViewer>
</Grid>
</UserControl>
- You can also define the effects in Expression Blend without having to edit the XAML code. You can do so by right-clicking on
MainPage.xamland selecting Open in Expression Blend… in the context menu. This way, you will be able to work with the additional effects offered by this tool.
Note
There are many open source projects that provide additional effects that you can use in your RIAs, such as Silverlight.FX, http://projects.nikhilk.net/SilverlightFX.
- Open
MainPage.xaml.cs. Now, it is necessary to add ausingstatement to include theMicrosoft.SharePoint.Clientnamespace, as we want to work with the SharePoint Silverlight Client OM. We also have to work with theBitmapImageclass, included inSystem.Windows.Media.Imaging.Add the following lines of code:
using Microsoft.SharePoint.Client;
using SP = Microsoft.SharePoint.Client;
using System.Windows.Media.Imaging;
- Add the following seven private variables:
private ClientContext _context;
private SP.List _documents;
private string _assetLibraryName;
private int _maxImageWidth = 150;
private int _imageMargin = 5;
// The background music can be added just once
private bool _backgroundMusicAdded = false;
// The current document to load
private int _documentToLoad;
- Replace the
MainPageconstructor with this new constructor that receives the asset library name as a parameter, assigns its value to the_assetLibraryNameprivate variable, and displays it in thelblLibraryName Label.public MainPage(string assetLibraryName) { InitializeComponent(); _assetLibraryName = assetLibraryName; lblLibraryName.Content = assetLibraryName; } - We are going to work with three media file types,
Audio, Video, andPicture. Add the following code to define an enumeration and a method that returns the media file type according to the received file name's extension:private enum MediaFileType { Audio, Video, Picture } private MediaFileType GetMediaFileType(string fileName) { switch (System.IO.Path.GetExtension(fileName).ToUpper()) { // It isn't necessary to add break; // after each line because the code // exits with the return statement case ".JPG": return MediaFileType.Picture; case ".JPEG": return MediaFileType.Picture; case ".GIF": return MediaFileType.Picture; case ".WMA": return MediaFileType.Audio; case ".MP3": return MediaFileType.Audio; case ".AAC": return MediaFileType.Audio; case ".WMV": return MediaFileType.Video; case ".MP4": return MediaFileType.Video; default: return MediaFileType.Picture; } } - Add the following event handlers that will define and start animations when the user right-clicks on a button that displays an image or a video:
private void imageButton_MouseRightButtonDown(object sender, MouseButtonEventArgs e) { // This ensures that Silverlight won't show up // the default Silverlight context menu e.Handled = true; var hlButton = (sender as HyperlinkButton); var image = hlButton.Content as Image; // Add a doubleAnimation for a MaxWidth animation var doubleAnimMaxWidth = new DoubleAnimation(); doubleAnimMaxWidth.Duration = new Duration(TimeSpan.FromSeconds(6)); doubleAnimMaxWidth.From = image.ActualWidth; doubleAnimMaxWidth.To = scrollViewer.ActualWidth - (_imageMargin * 2); doubleAnimMaxWidth.FillBehavior = FillBehavior.HoldEnd; // Create a new Storyboard to handle the MaxWidth animation var storyboardMaxWidth = new Storyboard(); storyboardMaxWidth.Children.Add(doubleAnimMaxWidth); Storyboard.SetTarget(doubleAnimMaxWidth, image); Storyboard.SetTargetProperty(doubleAnimMaxWidth, new PropertyPath("MaxWidth")); storyboardMaxWidth.AutoReverse = true; storyboardMaxWidth.RepeatBehavior = new RepeatBehavior(1); // Add a doubleAnimation for a MaxHeight animation var doubleAnimMaxHeight = new DoubleAnimation(); doubleAnimMaxHeight.Duration = new Duration(TimeSpan.FromSeconds(6)); doubleAnimMaxHeight.From = image.ActualHeight; doubleAnimMaxHeight.To = scrollViewer.ActualHeight - (_imageMargin * 2); doubleAnimMaxHeight.FillBehavior = FillBehavior.HoldEnd; // Create a new Storyboard to handle the MaxHeight animation var storyboardMaxHeight = new Storyboard(); storyboardMaxHeight.Children.Add(doubleAnimMaxHeight); Storyboard.SetTarget(doubleAnimMaxHeight, image); Storyboard.SetTargetProperty(doubleAnimMaxHeight, new PropertyPath("MaxHeight")); storyboardMaxHeight.AutoReverse = true; storyboardMaxHeight.RepeatBehavior = new RepeatBehavior(1); // Start the previously defined storyboards storyboardMaxWidth.Begin(); storyboardMaxHeight.Begin(); } private void videoButton_MouseRightButtonDown(object sender, MouseButtonEventArgs e) { // This ensures that Silverlight won't show up // the default Silverlight context menu e.Handled = true; var hlb = (sender as HyperlinkButton); var element = hlb.Content as MediaElement; // Add a doubleAnimation for a MaxWidth animation var doubleAnimMaxWidth = new DoubleAnimation(); doubleAnimMaxWidth.Duration = new Duration(TimeSpan.FromSeconds(9)); doubleAnimMaxWidth.From = element.ActualWidth; doubleAnimMaxWidth.To = scrollViewer.ActualWidth - (_imageMargin * 2); doubleAnimMaxWidth.FillBehavior = FillBehavior.HoldEnd; // Create a new Storyboard to handle the MaxWidth animation var storyboardMaxWidth = new Storyboard(); storyboardMaxWidth.Children.Add(doubleAnimMaxWidth); Storyboard.SetTarget(doubleAnimMaxWidth, element); Storyboard.SetTargetProperty(doubleAnimMaxWidth, new PropertyPath("MaxWidth")); storyboardMaxWidth.AutoReverse = true; storyboardMaxWidth.RepeatBehavior = new RepeatBehavior(1); // Add a doubleAnimation for a MaxHeight animation var doubleAnimMaxHeight = new DoubleAnimation(); doubleAnimMaxHeight.Duration = new Duration(TimeSpan.FromSeconds(9)); doubleAnimMaxHeight.From = element.ActualHeight; doubleAnimMaxHeight.To = scrollViewer.ActualHeight - (_imageMargin * 2); doubleAnimMaxHeight.FillBehavior = FillBehavior.HoldEnd; // Create a new Storyboard to handle the MaxHeight animation var storyboardMaxHeight = new Storyboard(); storyboardMaxHeight.Children.Add(doubleAnimMaxHeight); Storyboard.SetTarget(doubleAnimMaxHeight, element); Storyboard.SetTargetProperty(doubleAnimMaxHeight, new PropertyPath("MaxHeight")); storyboardMaxHeight.AutoReverse = true; storyboardMaxHeight.RepeatBehavior = new RepeatBehavior(1); // Start the previously defined storyboards storyboardMaxWidth.Begin(); storyboardMaxHeight.Begin(); } - Add the following event handler that will restart the reproduction of a video after it ends:
private void media_MediaEnded(object sender, RoutedEventArgs e) { var media = (sender as MediaElement); // It is necessary to stop it or to set its Position to TimeSpan.Zero media.Stop(); // Play again media.Play(); } - Add the following two methods that add and return a
HyperlinkButtonto thewrapPanel WrapPanelwith an image and a video:private HyperlinkButton AddImage(string url) { var image = new Image(); image.MaxWidth = _maxImageWidth; image.Stretch = Stretch.Uniform; var bitmapImage = new BitmapImage(new Uri(url, UriKind.Absolute)); image.Source = bitmapImage; var imageButton = new HyperlinkButton(); imageButton.Visibility = System.Windows.Visibility.Collapsed; imageButton.Margin = new Thickness(_imageMargin); imageButton.Content = image; imageButton.NavigateUri = new Uri(url); imageButton.MouseRightButtonDown += new MouseButtonEventHandler(imageButton_MouseRightButtonDown); imageButton.TargetName = "_blank"; imageButton.Cursor = Cursors.Hand; // Add the new Hyperlink button with the image // to the WrapPanel wrapPanel wrapPanel.Children.Add(imageButton); return imageButton; } private HyperlinkButton AddVideo(string url) { MediaElement media = new MediaElement(); media.MaxWidth = (_maxImageWidth * 3); media.Stretch = Stretch.UniformToFill; media.Source = new Uri(url, UriKind.Absolute); media.AutoPlay = true; media.MediaEnded += new RoutedEventHandler(media_MediaEnded); var videoButton = new HyperlinkButton(); videoButton.Visibility = System.Windows.Visibility.Collapsed; videoButton.Margin = new Thickness(_imageMargin); videoButton.Content = media; videoButton.NavigateUri = new Uri(url); videoButton.MouseRightButtonDown += new MouseButtonEventHandler(videoButton_MouseRightButtonDown); videoButton.TargetName = "_blank"; videoButton.Cursor = Cursors.Hand; // Add the new Hyperlink button with the video // to the WrapPanel wrapPanel wrapPanel.Children.Add(videoButton); return videoButton; } - Add the following method that defines and starts animations for the
HyperlinkButtonthat displays an image or a video received as a parameter:private void AddImageVideoAnimation(HyperlinkButton hlButton) { // Add a projection to the button var projection = new PlaneProjection(); hlButton.Projection = projection; // Add a doubleAnimation for a Projection's RotationZ animation var doubleAnimProjectionZ = new DoubleAnimation(); doubleAnimProjectionZ.Duration = new Duration(TimeSpan.FromSeconds(5)); doubleAnimProjectionZ.From = 0.0; doubleAnimProjectionZ.To = 360.0; doubleAnimProjectionZ.FillBehavior = FillBehavior.HoldEnd; // Create a new Storyboard to handle the Projection's RotationZ animation var storyboardProjectionZ = new Storyboard(); storyboardProjectionZ.Children.Add(doubleAnimProjectionZ); Storyboard.SetTarget(doubleAnimProjectionZ, projection); Storyboard.SetTargetProperty(doubleAnimProjectionZ, new PropertyPath("RotationZ")); // Add a doubleAnimation for a Projection's RotationY animation var doubleAnimProjectionY = new DoubleAnimation(); doubleAnimProjectionY.Duration = new Duration(TimeSpan.FromSeconds(3)); doubleAnimProjectionY.From = -45.0; doubleAnimProjectionY.To = 45.0; doubleAnimProjectionY.FillBehavior = FillBehavior.HoldEnd; doubleAnimProjectionY.RepeatBehavior = RepeatBehavior.Forever; doubleAnimProjectionY.AutoReverse = true; // Create a new Storyboard to handle the Projection's RotationY animation var storyboardProjectionY = new Storyboard(); storyboardProjectionY.Children.Add(doubleAnimProjectionY); Storyboard.SetTarget(doubleAnimProjectionY, projection); Storyboard.SetTargetProperty(doubleAnimProjectionY, new PropertyPath("RotationY")); // Add a doubleAnimation for an Opacity animation var doubleAnimOpacity = new DoubleAnimation(); doubleAnimOpacity.Duration = new Duration(TimeSpan.FromSeconds(5)); doubleAnimOpacity.From = 0.0; doubleAnimOpacity.To = 1.0; doubleAnimOpacity.FillBehavior = FillBehavior.HoldEnd; // Create a new Storyboard to handle the Opacity animation var storyboardOpacity = new Storyboard(); storyboardOpacity.Children.Add(doubleAnimOpacity); Storyboard.SetTarget(doubleAnimOpacity, hlButton); Storyboard.SetTargetProperty(doubleAnimOpacity, new PropertyPath("Opacity")); // Start the previously defined storyboards storyboardProjectionZ.Begin(); storyboardOpacity.Begin(); storyboardProjectionY.Begin(); hlButton.Visibility = System.Windows.Visibility.Visible; } - Add the following method that plays an audio file as background music for the application. It will just play background music once, no matter the number of times it is called.
private void AddBackgroundMusic(string url) { if (_backgroundMusicAdded) { // Background music already loaded return; } _backgroundMusicAdded = true; MediaElement backgroundMusic = new MediaElement(); LayoutRoot.Children.Add(backgroundMusic); backgroundMusic.Volume = 0.8; backgroundMusic.Source = new Uri(url); backgroundMusic.Play(); } - Now, it is necessary to add code to connect to the SharePoint server, connect to the lists, retrieve data from the assets library name stored in
_assetLibraryName, request its files, and process each picture, video, and audio file to add it to thewrapPanel WrapPanel. These methods will run in the UI thread. Replace"http://gaston-pc"with the SharePoint website's URL.private void Connect() { // Runs in the UI Thread lblStatus.Content = "Started"; // Replace http://gaston-pc with // your SharePoint 2010 Server URL and Site _context = new SP.ClientContext(new Uri("http://gaston-pc", UriKind.Absolute)); _context.Load(_context.Web); _context.ExecuteQueryAsync(OnConnectSucceeded, null); } private void ConnectLists() { // Runs in the UI Thread lblStatus.Content = "Web Connected. Connecting to Lists..."; _context.Load(_context.Web.Lists); _context.ExecuteQueryAsync(OnConnectListsSucceeded, null); } private void GetListData() { // Runs in the UI Thread lblStatus.Content = "Lists Connected. Getting List data..."; _documents = _context.Web.Lists.GetByTitle(_assetLibraryName); _context.Load(_documents); _context.Load(_documents.RootFolder); // Request the files _context.Load(_documents.RootFolder.Files); _context.ExecuteQueryAsync(OnGetListDataSucceeded, null); } private void LoadItems() { // Runs in the UI Thread lblStatus.Content = String.Format("Loading {0} items...", _documents.RootFolder.Files.Count); pgbLoadingStatus.Maximum = _documents.RootFolder.Files.Count; pgbLoadingStatus.Value = 0; _documentToLoad = 0; // Clear the WrapPanel children wrapPanel.Children.Clear(); foreach (File file in _documents.RootFolder.Files) { _context.Load(file); _context.ExecuteQueryAsync( OnLoadItemsSucceeded, OnLoadItemsFailed); } } private void ShowItem() { // Runs in the UI Thread lblStatus.Content = String.Format("Processing item # {0}", _documentToLoad); string fileName = _documents.RootFolder.Files[_documentToLoad].Name; string Url = _context.Url + _documents.RootFolder.Files [_documentToLoad].ServerRelativeUrl; switch (GetMediaFileType(fileName)) { case MediaFileType.Audio: AddBackgroundMusic(Url); break; case MediaFileType.Picture: var imageButton = AddImage(Url); AddImageVideoAnimation(imageButton); break; case MediaFileType.Video: var videoButton = AddVideo(Url); AddImageVideoAnimation(videoButton); break; } // Update the progress bar pgbLoadingStatus.Value++; _documentToLoad++; if (_documentToLoad >= _documents.RootFolder.Files.Count) { // All documents loaded lblStatus.Content = "Displaying animations for all the documents."; } } - Most of the methods added in the previous step execute asynchronous queries to the SharePoint server. Both the successful and failed requests fire asynchronous callbacks that are going to run in another thread, different from the UI thread. Hence, if you have to update the UI, it is necessary to invoke the code to run in the UI thread. The following methods, which are going to be fired as asynchronous callbacks, schedule the execution of other methods to continue with the necessary program flow in the UI thread:
private void ShowErrorInformation(ClientRequestFailedEventArgs args) { MessageBox.Show("Request failed. " + args.Message + " " + args.StackTrace + " " + args.ErrorDetails + " " + args.ErrorValue); } private void OnConnectSucceeded(Object sender, SP.ClientRequestSucceededEventArgs args) { // This callback isn't called on the UI thread Dispatcher.BeginInvoke(ConnectLists); } private void OnConnectListsSucceeded(Object sender, SP.ClientRequestSucceededEventArgs args) { // This callback isn't called on the UI thread Dispatcher.BeginInvoke(GetListData); } private void OnGetListDataSucceeded(Object sender, SP.ClientRequestSucceededEventArgs args) { // This callback isn't called on the UI thread Dispatcher.BeginInvoke(LoadItems); } private void OnLoadItemsFailed(Object sender, SP.ClientRequestFailedEventArgs args) { // This callback isn't called on the UI thread // Invoke a delegate and send the args instance as a parameter Dispatcher.BeginInvoke(() => ShowErrorInformation(args)); } private void OnLoadItemsSucceeded(Object sender, SP.ClientRequestSucceededEventArgs args) { // This callback isn't called on the UI thread Dispatcher.BeginInvoke(ShowItem); } - Add the following line to the
LayoutRoot_Loadedevent:
We created a new Silverlight RIA that receives an asset library name as a parameter from the Visual Web Part that renders this application. When the user selects an asset library from a drop-down list in the Visual Web Part, the Silverlight RIA will load the images, videos, and audio from the chosen asset library. We added the necessary code to create an application that displays the images and videos with many animations and effects.
Follow these steps to link the previously created Visual Web Part, AssetsBrowserWebPart, with this new Silverlight RIA, SLAssetsBrowser. This way, the Silverlight RIA will be part of the package that contains the Visual Web Part.
- Stay in Visual Studio as a system administrator user.
- Expand the SharePoint Visual Web Part folder,
AssetsBrowserWebPart, in the Solution Explorer. - Now, right-click on
AssetsBrowserWebPartand select Properties in the context menu that appears. You will see the values for its properties in the Properties panel. - . In the Properties palette, click the ellipsis (…) button for the Project Output References property. The Project Output References dialog box will appear.
- Click on Add below the Members: list. The SharePoint 2010 Visual Web Part's project name,
SPAssetsBrowserWebPart, will appear as a new member. - Go to its properties, shown on the list located at the right. Select the Silverlight application project's name,
SLAssetsBrowser, in the Project Name drop-down list. - Select
Element Filein the Deployment Type drop-down list. The following value will appear in Deployment Location,{SharePointRoot}TemplateFeatures{FeatureName}AssetsBrowserWebPart. The following screenshot shows the dialog box with the explained values:
- Click OK. The SharePoint Visual Web Part project now includes a reference to the Silverlight application project,
SLTasksViewer. However, it is still necessary to add a line to theElements.xmlfile to make the Silverlight RIA be part of the Visual Web Part. - Open the
Elements.xmlfile. The following lines are the initial contents of this XML file. They describe the elements that compose this SharePoint 2010 Visual Web Part.<?xml version="1.0" encoding="utf-8"?> <Elements xmlns="http://schemas.microsoft.com/sharepoint/" > <Module Name="AssetsBrowserWebPart" List="113" Url="_catalogs/wp"> <File Path="AssetsBrowserWebPartAssetsBrowserWebPart.webpart" Url="AssetsBrowserWebPart.webpart" Type="GhostableInLibrary" > <Property Name="Group" Value="Custom" /> </File> </Module> </Elements>
- Add the highlighted line before
</Module>. The new contents of this XML file will include a reference to the linked Silverlight project.xapfile,SLAssetsBrowser.xap. This is a new element for this SharePoint 2010 Visual Web Part. During the deployment process, theSLAssetsBrowser.xapfile will be located in theAssetsBrowserWebPartfolder in the SharePoint package file, also known as the WSP package, because it has a.wspextension. Thus, the WSP package will also deploy the Silverlight application to the SharePoint server.<?xml version="1.0" encoding="utf-8"?> <Elements xmlns="http://schemas.microsoft.com/sharepoint/" > <Module Name="AssetsBrowserWebPart" List="113" Url="_catalogs/wp"> <File Path="AssetsBrowserWebPartAssetsBrowserWebPart.webpart" Url="AssetsBrowserWebPart.webpart" Type="GhostableInLibrary" > <Property Name="Group" Value="Custom" /> </File> <!-- Added --> <File Path="AssetsBrowserWebPartSLAssetsBrowser.xap" Url="SLAssetsBrowser.xap" /> <!-- EOF Added --> </Module> </Elements> - Remember to enable Silverlight debugging instead of the default script debugging capabilities.
- Right-click on the solution's name in Solution Explorer and select Properties from the context menu that appears. Select Startup Project in the list on the left, activate Single startup project, and choose the SharePoint Visual Web Part project's name in the drop-down list below it,
SPAssetsBrowserWebPart. This way, the solution is going to start with the SharePoint project and not with the Silverlight application. This is very important because it will allow us to debug the Silverlight application when it runs in a SharePoint site. Then, click OK. - Expand Features | Feature1 in Solution Explorer and double-click on
Feature1.feature. Visual Studio will display a new panel with the feature title, description, scope, and its items. The feature will include three files in the Items in the feature list,AssetsBrowserWebPart, AssetsBrowsersWebPartUserControl.ascxandElements.xml.
- Build and deploy the solution.
Now that the WSP package has been deployed to the SharePoint site, follow these steps to create a new web page and add the Visual Web Part that includes and renders the Silverlight RIA. In this case, it isn't necessary to upload the .xap file, because it was already deployed with the WSP package.
- Open your default web browser, view the SharePoint site, and log in with your username and password.
- Click Site Actions | New Page and SharePoint will display a new dialog box requesting a name for the new page. Enter
AssetsBrowserand click on Create. SharePoint will display the editing tools for the new page. - Click Insert | Web Part in the ribbon and a new panel will appear. Select Custom in Categories and then the previously deployed Visual Web Part name,
AssetsBrowserWebPart, in Web Parts.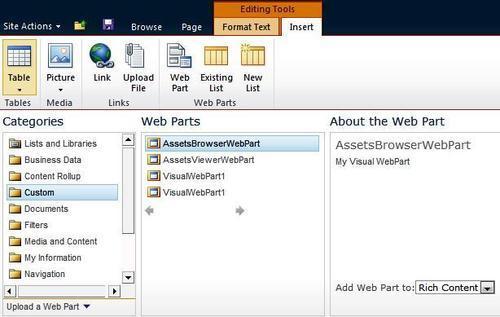
- Click Add. The Select the Asset Library to display legend and the drop-down list will appear. Click on the down arrow, located at the top, and then select Edit Web Part. The AssetsBrowserWebPart pane will appear at the right. It will enable us to define many properties that affect the appearance and behavior for this Visual Web Part that renders a Silverlight RIA.
- Enter
Assets Browserin Title. - Click on Yes in Should the Web Part have a fixed height? and enter
700in Pixels.
- Click on No. Adjust width to fit zone. in Should the Web Part have a fixed width?, and then on OK.
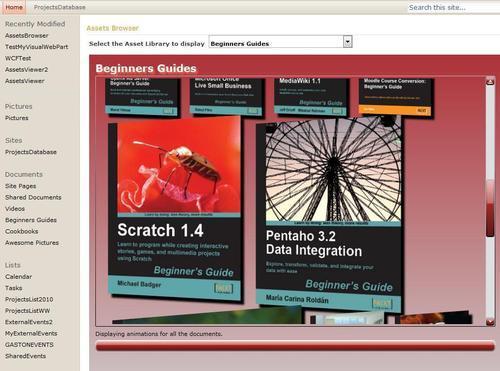
- Click on the Save button in the ribbon. Now, the new page will appear displaying the previously created Visual Web Part. This Web Part is going to display the drop-down list of asset libraries with pictures, videos, and audio files. The Silverlight RIA will appear below the drop-down list displaying the images and videos found in the first asset library in the drop-down list with interactive animations and dazzling effects. It is going to load and then it will display its different status values in the label located at the bottom:
- Started
- Web Connected. Connecting to Lists...
- Lists Connected. Getting List data...
- Loading n items...
- Processing item #x..., where x is the number of picture, video or audio file being processed
- Displaying animations for all the documents. (this should be Bullet end)
The following screenshot shows this value for the label and the Silverlight RIA displaying the images and videos for the chosen asset library.

- Now, go back to Visual Studio and open the code-behind file for
AssetsBrowserWebPartUserControl.ascx, AssetsBrowserWebPartUserControl.ascx.cs. Insert a breakpoint in the first line of thePage_Loadevent handler,if (!IsPostBack). Insert another breakpoint in the line of code of thecboDocumentLibraries_SelectedIndexChangedevent handler,SelectedList = cboDocumentLibraries.SelectedValue;.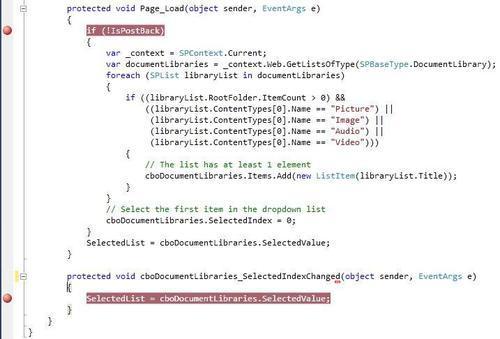
- Open
AssetsBrowserWebPart.csand insert a breakpoint in the first line of theOnPreRenderevent handler. - Select Debug | Start Debugging from the Visual Studio's main menu or press F5 to start debugging the solution.
- Visual Studio will display a new window for your default web browser with the server and Site Collection in which you deployed the WSP package.
- Enter the URL for the previously added page that contains the Visual Web Part in the Web browser. This way, the ASP.NET code for the Visual Web Part will start running and Visual Studio will stop in the breakpoint established in the
Page_Loadevent handler in the code-behind file,AssetsBrowserWebPartUserControl.ascx.cs. - Inspect the value for
IsPostBackand it will befalse, because it is the first time that the Visual Web Part is rendered. Thus, the method will run the code to add the titles of the document libraries that have pictures, images, audio, or video files. The first item for thecboDocumentLibraries DropDownListwill be selected as the default library and theSelectedListproperty is going to save the selected title. Run the code step-by-step to understand the execution flow. - Then, Visual Studio will stop in the breakpoint established in the
OnPreRenderevent handler, inAssetsBrowserWebPart.cs. TherenderHoststring will include a line that defines the value for theNameparameter. This parameter will specify a string with the value stored in theSelectedListpublic property. In this method, the code defines a newLiteralControlinstance initialized with therenderHoststring and adds it to the ControlsControlCollection. - Press F5 and the Web browser will display the Silverlight RIA with the first asset library contents.
- Now, select a different asset library to display in the drop-down list located at the top of the Visual Web Part. This way, the ASP.NET code for the Visual Web Part will start running again, performing a postback, and Visual Studio will stop in the breakpoint established in the
Page_Loadevent handler in the code-behind file,AssetsBrowserWebPartUserControl.ascx.cs.
- Inspect the value for
IsPostBackand it will betruebecause it is a postback for theUserControl. Thus, the method won't run the code to add the titles of the document libraries to the drop-down list. It will just run the line that sets theSelectedListproperty to the selected title. Run the code step-by-step to understand the execution flow. - Then, Visual Studio will stop in the breakpoint established in the
OnPreRenderevent handler, inAssetsBrowserWebPart.cs. TherenderHoststring will include a line that defines the new value for theNameparameter, held in the previously explainedSelectedListpublic property. This way, the newLiteralControlinstance will add a Silverlight RIA with a different parameter value. - Press F5 and the Web browser will display the Silverlight RIA with the new asset library contents. The images and the videos will appear with animations and effects.

We added the SharePoint Visual Web Part to a new Web page in the SharePoint Site Collection. Then, we used Visual Studio to debug the Visual Web Part and we learned how Visual Web Parts renders a Silverlight RIA with parameters. We inserted many breakpoints to analyze the postback performed by the UserControl within the Visual Web Part.
The Silverlight RIA displays a WrapPanel control, wrapPanel, within a ScrollViewer, scrollViewer. The WrapPanel control works as a container and it locates its child elements in sequential positions from left to right, in columns, when its Orientation property is set to Horizontal. At the edge of the containing box, it breaks the content to the next row and therefore, it simplifies the organization of HyperlinkButton controls.
As we don't know the number of rows that will be necessary to display all the pictures and videos in the WrapPanel control, the ScrollViewer control defines a scrollable viewport. When the content of the WrapPanel is not entirely visible, the ScrollViewer will display scrollbars to allow the user to move the content area that is visible. The visible content is known as, viewport and all of the content included in the ScrollViewer is known as the extent.
The XAML markup in MainPage.xaml defines a DropShadowEffect for the WrapPanel control, with its ShadowDepth property set to 10. This way, all the HyperlinkButton controls added as wrapPanel's children will inherit this effect and will drop a shadow with a depth of 10 pixels.
<ScrollViewer Height="487" HorizontalAlignment="Left" Margin="12,41,0,0" Name="scrollViewer" VerticalAlignment="Top" Width="776">
<toolkit:WrapPanel Name="wrapPanel" Width="Auto" Height="Auto" RenderTransformOrigin="0.497,0.493">
<toolkit:WrapPanel.Effect>
<DropShadowEffect ShadowDepth="10"/>
</toolkit:WrapPanel.Effect>
</toolkit:WrapPanel>
</ScrollViewer>
The GetListData method requests the asset library, a special list, specified in _assetLibraryName, and loads it, its RootFolder Folder, and its RootFolder.Files FileCollection.
_documents = _context.Web.Lists.GetByTitle(_assetLibraryName);
_context.Load(_documents);
_context.Load(_documents.RootFolder);
_context.Load(_documents.RootFolder.Files);
After the successful asynchronous execution of the queries, the LoadItems method clears the children for the wrapPanel WrapPanel. Then, it runs an asynchronous query to load each File in the asset library, _documents, RootFolder.Files FileCollection.
wrapPanel.Children.Clear();
foreach (File file in _documents.RootFolder.Files)
{
_context.Load(file);
_context.ExecuteQueryAsync(
OnLoadItemsSucceeded,
OnLoadItemsFailed);
}
Each successful asynchronous query will schedule the ShowItem method to run in the UI thread. The first time this method is called, _documentToLoad is set to 0 and the code in this method will increment _documentToLoad each time it finishes processing a file. The method retrieves the file name, stored in the Name property for the File instance to determine the media file type and saves it in the local fileName string. Then, it computes an absolute Url to access the file, _context.Url concatenated with the ServerRelativeUrl property for the File instance, and saves it in the local Url string.
string fileName = _documents.RootFolder.Files[_documentToLoad].Name;
string Url = _context.Url + _documents.RootFolder.Files[_documentToLoad].ServerRelativeUrl;
A switch statement considers the results of the GetMediaFileType method that receives the fileName string as a parameter. As previously explained this method determines the media file type according to the extension and returns a MediaFileType as a result.
If the file type is MediaFileType.Picture, the method calls the AddImage method with the Url string as a parameter and it saves the HyperlinkButton instance returned by this method in imageButton. Then, it calls the AddImageVideoAnimation with imageButton as a parameter.
case MediaFileType.Picture:
var imageButton = AddImage(Url);
AddImageVideoAnimation(imageButton);
break;
The AddImage method creates a new Image instance, sets values for its MaxWidth and Stretch properties, creates a BitmapImage, bitmapImage, with the absolute Uri from the URL received as a parameter, url, and assigns bitmapImage to the image.Source property.
var image = new Image();
image.MaxWidth = _maxImageWidth;
image.Stretch = Stretch.Uniform;
var bitmapImage = new BitmapImage(new Uri(url, UriKind.Absolute));
image.Source = bitmapImage;
Then, the code creates a new invisible HyperlinkButton, imageButton, and sets its Content property to the previously created Image instance, image. When imageButton becomes visible, it will show the bitmap image. The NavigateUri property for imageButton is set to a new Uri from the URL received as a parameter, url. The TargetName property is set to _blank, and therefore, when the user clicks the HyperlinkButton, the Web browser will open a new window and will display the image from the URL.
The code attaches an event handler to the MouseRightButtonDown event that occurs when the user clicks the right mouse button and the mouse pointer is over the Hyperlinkbutton. It assigns a new MouseButtonEventHandler that will fire the imageButton_MouseRightButtonDown method. This method runs an animation for the Hyperlinkbutton.
var imageButton = new HyperlinkButton();
imageButton.Visibility = System.Windows.Visibility.Collapsed;
imageButton.Margin = new Thickness(_imageMargin);
imageButton.Content = image;
imageButton.NavigateUri = new Uri(url);
imageButton.MouseRightButtonDown += new MouseButtonEventHandler(imageButton_MouseRightButtonDown);
imageButton.TargetName = "_blank";
imageButton.Cursor = Cursors.Hand;
Finally, it is necessary to add the HyperlinkButton as a child to the wrapPanel WrapPanel and return the instance. As previously explained, wrapPanel will take care of organizing the layout of all the HyperlinkButton instances added as children.
wrapPanel.Children.Add(imageButton);
return imageButton;
At this point, the HyperlinkButton is invisible, because its Visibility property was set to System.Windows.Visibility.Collapsed. However, when the AddImage method returns, the AddImageVideoAnimation receives the HyperlinkButton control as a parameter, hlButton, and brings life to the image that it displays.
Firstly, it adds a PlaneProjection instance to the HyperlinkButton, hlButton, by setting its Projection property to a new PlaneProjection instance, projection. PlaneProjection is a subclass of the Projection class. The latter allows describing how to project a 2D object in the 3D space by using perspective transforms. Then, the code will run an animation with the values that define the perspective transform for hlButton.
var projection = new PlaneProjection();
hlButton.Projection = projection;
Tip
The RotationX, RotationY, and RotationZ properties for a PlaneProjection instance specify the number of degrees to rotate the HyperlinkButton in the space. The LocalOffsetX and LocalOffsetY properties specify the distance the HyperlinkButton is translated along each axis of the HyperlinkButton's plane.
Then, the code defines three DoubleAnimation (System.Windows.Media.Animation.DolubleAnimation) instances and adds them as children of their corresponding Storyboard (System.Windows.Media.Animation.Storyboard) instances. A DoubleAnimation instance allows us to animate the value of a Double property between two target values specified by their From and To properties. It uses a linear interpolation over a specified duration, specified by the Duration property. Each Storyboard instance defines a container timeline that provides object and property targeting information for its child DoubleAnimation instance. The code creates the DoubleAnimation and Storyboard instances summarized in the following table:
|
DoubleAnimation instance |
Storyboard instance |
Animates |
From |
To |
Duration (seconds) |
|---|---|---|---|---|---|
|
|
|
|
|
|
|
|
|
|
|
|
|
|
|
|
|
|
|
|
|
The following lines create the doubleAnimProjectionZ DoubleAnimation and set its properties. The FillBehavior property is set to FillBehavior.HoldEnd to specify that the animation must hold its value after it reaches the end of its active period. This way, the target property for this animation will remain at its end value after the animation ends and it won't revert to its non-animated value.
var doubleAnimProjectionZ = new DoubleAnimation();
doubleAnimProjectionZ.Duration = new Duration(TimeSpan.FromSeconds(5));
doubleAnimProjectionZ.From = 0.0;
doubleAnimProjectionZ.To = 360.0;
doubleAnimProjectionZ.FillBehavior = FillBehavior.HoldEnd;
The next lines create the Storyboard instance and add doubleAnimProjectionZ as a child. Then, it is necessary to set the target object and the target property by calling the static methods Storyboard.SetTarget and Storyboard.SetTargetProperty with doubleAnimProjectionZ as its first parameter.
var storyboardProjectionZ = new Storyboard();
storyboardProjectionZ.Children.Add(doubleAnimProjectionZ);
Storyboard.SetTarget(doubleAnimProjectionZ, projection);
Storyboard.SetTargetProperty(doubleAnimProjectionZ, new PropertyPath("RotationZ"));
The animations defined in doubleAnimProjectionZ and doubleAnimOpacity will run just one. However, doubleAnimProjectionY will run forever and it will auto reverse its execution, because its RepeatBehavior is set to RepeatBehavior.Forever and Autoreverse to true. Once it reaches the value specified by To for projection.RotationY, it will start a new animation from this value to the value specified by From, in the reverse direction.
doubleAnimProjectionY.RepeatBehavior = RepeatBehavior.Forever;
doubleAnimProjectionY.AutoReverse = true;
Once the method defines all the properties for the DoubleAnimation and Storyboard instances, it applies the animations associated with each Storyboard to their targets and initiates them by calling the Begin method.
storyboardProjectionZ.Begin();
storyboardOpacity.Begin();
storyboardProjectionY.Begin();
hlButton.Visibility = System.Windows.Visibility.Visible;
Tip
It is also possible for a single Storyboard instance to have many DoubleAnimation or other Animation subclasses as children. In this case, we used an independent Storyboard instance for each animation, because we want to have full control over each one to allow us to start and/or stop each animation to experience different alternatives for the UX in the future. However, if we just need to start all the animations at the same time, we can create a single Storyboard instance, add all the DoubleAnimation instances as their children, set the Target and TargetProperty for each DoubleAnimation, and call the Begin method.
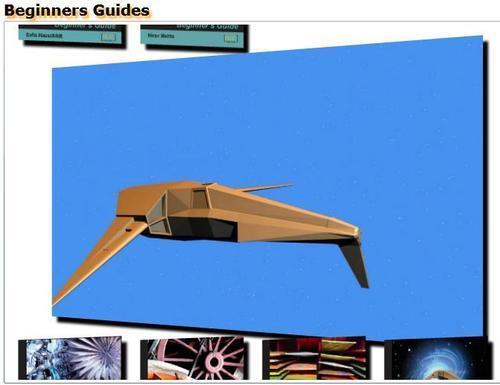
When you open the page that contains the Visual Web Part, the Silverlight RIA will display all the hyperlink buttons that display images and videos with dazzling movements. doubleAnimProjectionY will run forever. The following screenshot shows one of the frames for the animations:

When you click on a dancing image, an animated Hyperlink button, the Web browser will open a new window with the image displayed with its full size. When you right-click on a dancing image, the code in the imageButton_MouseRightButtonDown method will run and the image will go on performing the same animation but it will also grow and then stretch. The container WrapPanel will make sure that the different elements displayed reorganize as the hyperlink button grows and stretches. The following picture shows one of the frames for the animation.
The imageButton_MouseRightButtonDown method receives two parameters, object sender and MouseButtonEventArgs e. The first line sets the Handled property for e to true. This way, it ensures that Silverlight won't show the default Silverlight context menu that appears when the user right-clicks within the Silverlight application area.
e.Handled = true;
As we attached this method as an event handler for the MouseRightButtonDown event for a HyperlinkButton, sender can be cast to HyperlinkButton, hlb and we can access its Content property to access its associated Image and store its reference in image.
var hlButton = (sender as HyperlinkButton);
var image = hlButton.Content as Image;
Then, the code defines two DoubleAnimation instances and adds them as children of their corresponding Storyboard instances. The code creates the DoubleAnimation and Storyboard instances summarized in the following table.
|
DoubleAnimation instance |
Storyboard instance |
Animates |
From |
To |
Duration (seconds) |
|---|---|---|---|---|---|
|
|
|
|
|
|
|
|
|
|
|
|
|
|
Both DoubleAnimation instances have their AutoReverse property set to true and RepeatBehavior set to RepeatBehavior(1). This means that the image will grow and then it will auto-reverse the animation to stretch to its original width and height.
Once the method defines all the properties for the DoubleAnimation and Storyboard instances, it applies the animations associated with each Storyboard to their targets and initiates them by calling the Begin method.
storyboardMaxWidth.Begin();
storyboardMaxHeight.Begin();
You can right-click on many images and the animation will run for all these images. The following screenshot shows one of the frames for the animation.

When the file type is MediaFileType.Video, the ShowItem method calls the AddVideo method with the Url string as a parameter and it saves the HyperlinkButton instance returned by this method in videoButton. Then, it calls the AddImageVideoAnimation with videoButton as a parameter.
case MediaFileType.Video:
var videoButton = AddVideo(Url);
AddImageVideoAnimation(videoButton);
break;
The AddVideo method creates a new MediaElement instance, media, and sets values for its MaxWidth and Stretch properties. Then, it assigns the absolute Uri from the URL received as a parameter, url, to the media.Source property.
MediaElement media = new MediaElement();
media.MaxWidth = (_maxImageWidth * 3);
media.Stretch = Stretch.UniformToFill;
media.Source = new Uri(url, UriKind.Absolute);
Then, the code sets the AutoPlay property to true to automatically start the playback of the video specified in the Source property. The code attaches an event handler to the MediaEnded event that occurs when the video finishes. It assigns a new RoutedEventHandler that will fire the media_MediaEnded method. This method plays the video again from the beginning and therefore, the video is going to play forever while the Silverlight RIA performs all the animations.
media.AutoPlay = true;
media.MediaEnded += new RoutedEventHandler(media_MediaEnded);
Then, the code creates a new invisible HyperlinkButton, videoButton, and sets its Content property to the previously created MediaElement instance, media. When videoButton becomes visible, it will show the video being reproduced. The NavigateUri property for videoButton is set to a new Uri from the URL received as a parameter, url. The TargetName property is set to _blank and therefore, when the user clicks the HyperlinkButton, the Web browser will open the video from the URL in the default player associated with the file extension.
The code attaches an event handler to the MouseRightButtonDown event that occurs when the user clicks the right mouse button and the mouse pointer is over the Hyperlinkbutton. It assigns a new MouseButtonEventHandler that will fire the videoButton_MouseRightButtonDown method. This method runs the previously explained animation for the Hyperlinkbutton. This animation is very similar to the one explained for the imageButton_MouseRightButtonDown method.
var videoButton = new HyperlinkButton();
videoButton.Visibility = System.Windows.Visibility.Collapsed;
videoButton.Margin = new Thickness(_imageMargin);
videoButton.Content = media;
videoButton.NavigateUri = new Uri(url);
videoButton.MouseRightButtonDown += new MouseButtonEventHandler(videoButton_MouseRightButtonDown);
videoButton.TargetName = "_blank";
videoButton.Cursor = Cursors.Hand;
Finally, it is necessary to add the HyperlinkButton as a child to the wrapPanel WrapPanel and return the instance.
wrapPanel.Children.Add(videoButton);
return videoButton;
At this point, the HyperlinkButton is invisible, because its Visibility property was set to System.Windows.Visibility.Collapsed. However, when the AddVideo method returns, the AddImageVideoAnimation receives the HyperlinkButton control as a parameter, hlButton, and brings life to the video that it displays, as explained for the images.
The following screenshot shows one of the frames for the animated HyperlinkButton reproducing the video and growing after the user right-clicked on it:
We defined the horizontal reproduction area for the video to be _maxImageWidth * 3 pixels and we assigned the UniformToFill value to the Stretch property. Thus, the MediaElement resizes the original to fill the container's dimensions while preserving the video's native aspect ratio.
The following screenshot shows the results of using the four possible values in the Stretch property with the same original video:
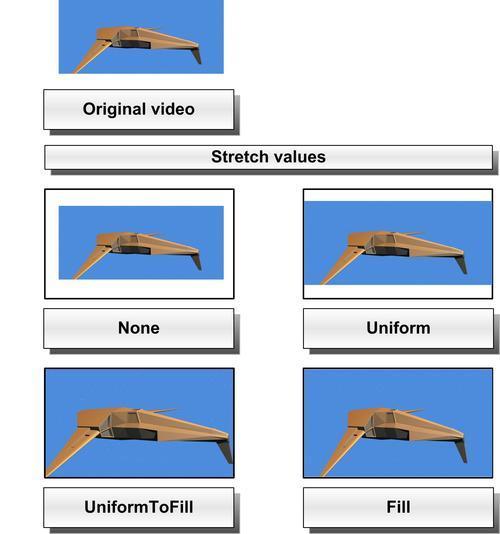
The following table explains the results of using the aforementioned values:
|
Stretch value |
Description |
Aspect ratio |
|---|---|---|
|
|
The video preserves its original size. |
Preserved |
|
|
The video is resized to fit in the destination dimensions. |
Preserved |
|
|
The video is resized to fill the destination dimensions. The video content that does not fit in the destination rectangle is clipped. |
Preserved |
|
|
The video is resized to fill the destination dimensions. |
Not preserved |
Silverlight 4 supports the video encodings shown in the following table:
|
Encoding name |
Description and restrictions |
|---|---|
|
None |
Raw video |
|
YV12 |
YCrCb(4:2:0) |
|
RGBA |
32-bit Red, Green, Blue, and Alpha |
|
WMV1 |
Windows Media Video 7 |
|
WMV2 |
Windows Media Video 8 |
|
WMV3 |
Windows Media Video 9 |
|
WMVA |
Windows Media Video Advanced Profile (non-VC-1) |
|
WMVC1 |
Windows Media Video Advanced Profile (VC-1) |
|
H.264 (ITU-T H.264 / ISO MPEG-4 AVC) |
H.264 and MP43 codecs; base main and high profiles; only progressive (non-interlaced) content and only 4:2:0 chroma sub-sampling profiles |
If we want to use a video with an encoding that does not appear in the previously shown table in a Silverlight RIA, we will have to convert it to one of the supported formats before uploading it to a SharePoint assets library.
When the file type is MediaFileType.Audio, the ShowItem method calls the AddBackgroundMusic method with the Url string as a parameter.
case MediaFileType.Audio:
AddBackgroundMusic(Url);
break;
The AddBackgroundMusic method checks whether it was called before (_backgroundMusicAdded == true) before running the rest of the code, because it doesn't want to reproduce two audio files as the background music. If _backgroundMusicAdded is true, it assigns true to _backgroundMusicAdded.
The code creates a new MediaElement instance, backgroundMusic, adds it to a parent container, LayoutRoot, and sets its Volume property to 80% (0.8). The Volume ranges from 0 to 1. It uses a linear scale.
_backgroundMusicAdded = true;
MediaElement backgroundMusic = new MediaElement();
LayoutRoot.Children.Add(backgroundMusic);
Then, it assigns the absolute Uri from the URL received as a parameter, url, to the backgroundMusic.Source property and calls the Play method to start reproducing the audio file with the specified volume level. The background music will be reproduced just once.
backgroundMusic.Volume = 0.8;
backgroundMusic.Source = new Uri(url);
backgroundMusic.Play();
Silverlight 4 supports the audio encodings shown in the following table:
|
Encoding name |
Description and restrictions |
|---|---|
|
LPCM |
Linear 8 or 16-bit Pulse Code Modulation. |
|
WMA Standard |
Windows Media Audio 7, 8, and 9 Standard. |
|
WMA Professional |
Windows Media Audio 9 and 10 Professional; Multichannel (5.1 and 7.1 surround) is automatically mixed down to stereo. It supports neither 24-bit audio nor sampling rates beyond 48 kHz. |
|
MP3 |
ISO MPEG-1 Layer III. |
|
AAC |
ISO Advanced Audio Coding; AAC-LC (Low Complexity) is supported at full fidelity (up to 48 kHz). HE-AAC (High Efficiency) will decode only at half fidelity (up to 24 kHz); Multichannel (5.1) audio content is not supported. |
If we want to use an audio file with an encoding that does not appear in the previously shown table, we will have to convert it to one of the supported formats before uploading it to a SharePoint assets library.
The Visual Web Part is a great candidate for applying the themes included in Silverlight's Toolkit to offer the user a more exciting UI.
- Stay in Visual Studio as a system administrator user.
- Add a reference to
System.Windows.Controls.Theming.Toolkit.dll. Remember that it is located in theBinsub-folder - Add a reference to the DLL for
System.Windows.Controls.Theming.ShinyRedin theThemessub-folder. This way, we are going to be able to apply theShinyRedtheme. - Add the following line to include the namespace that defines the theme in the
UserControldefined inMainPage.xaml:xmlns:shinyRed="clr-namespace:System.Windows.Controls.Theming;assembly=System.Windows.Controls.Theming.ShinyRed"
- Add the following line before the definition of the main
Grid, LayoutRoot:<shinyRed:ShinyRedTheme>
- Add the following line after the definition of the main
Grid, LayoutRoot:</shinyRed:ShinyRedTheme>
- This way, the
ShinyRedtheme will be applied to the mainGrid, LayoutRoot, and all its child controls. Build and deploy the solution and open the page that displays the Visual Web Part. The Silverlight RIA looks really more attractive. However, the colors displayed by the rest of the SharePoint UI don't match theShinyRedtheme colors.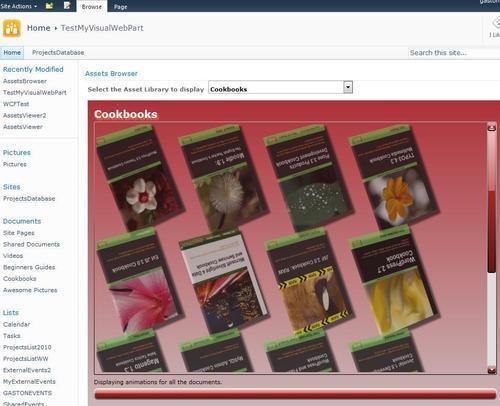
- Click Site Actions | Site Settings and a list of customization options organized by categories will appear.
- Click on Site theme under Look and Feel. A page that allows us to change the fonts and color scheme for our site will appear.
- Select the
Municipaltheme in the list located at the right. This theme uses a color scheme that is appropriate for Silverlight applications that use theShinyRedtheme.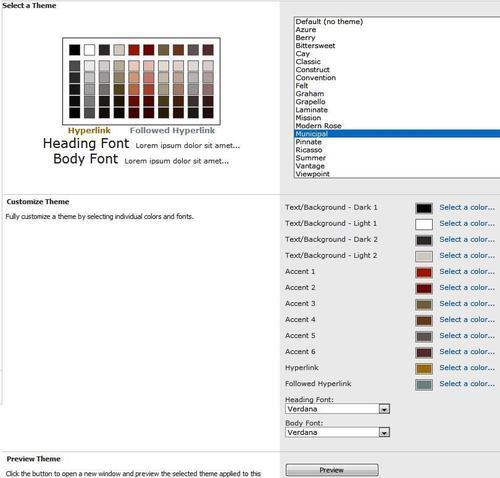
- Click on Preview and the Web browser will open a new window with your site's home page with the new color schemes and fonts that the selected theme defines.
- Close this window and click on Apply. SharePoint will apply the new theme to the pages that haven't been individually themed. The new theme won't affect the site's layout.
- Now, refresh the page that displays the Visual Web Part and the combination of a new SharePoint theme with the theme applied to the Silverlight RIA will look really nice.