
In this recipe, we will recreate the previous recipe to use InfoPath forms for initiation form.
This recipe assumes that you are familiar with creating InfoPath forms using InfoPath designer 2010. Your SharePoint server should be configured to use form services. Refer to MSDN at: http://technet.microsoft.com/en-us/library/cc262263.aspx for more information on configuring the form services.
- Using InfoPath designer, create a browser compatible form template.
- Add a textbox control and name it txtCreditRequested. Also add a Submit button.
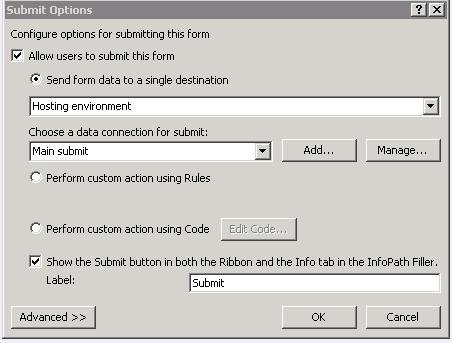
- Go to the Submit Options of the button and add a new data connection to submit to the Hosting environment as shown in the following screenshot:
- From the File tab, click on the Form options button to open the options dialog box.
- Uncheck the Automatically determine security level (recommended) and select Domain (the form can access content from the domain in which it is located) security as shown in the following screenshot:

- From the File tab, select Publish menu and click on Network Location to start the publishing wizard.
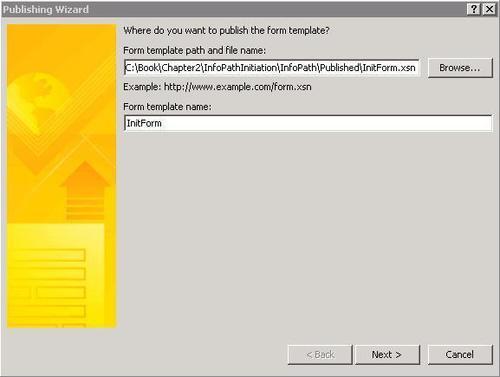
- Provide the path and name of the template for the published form in the wizard's first step as shown in the following screenshot:
- Make sure to delete the access path that is added by default by the designer in the next step of the wizard as it only applies to the forms that can be opened from a network location using the InfoPath client application. Ignore the warning and move on to the next step.
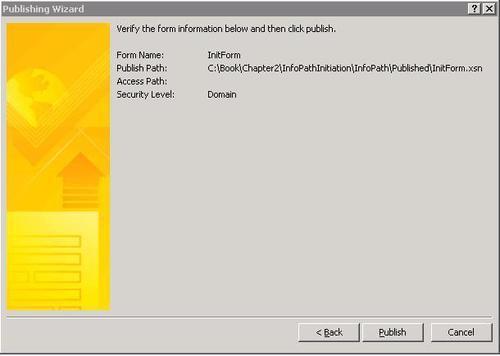
- The final step of the wizard shows the summary of your selection in the previous steps as shown in the following screenshot:
- After we are done with publishing, from the File tab, select Publish and select the Export Source files option. Provide a location to store the source files of the InfoPath form. This will also save the XSD (XML Schema Definition) of the form. By default this is always named
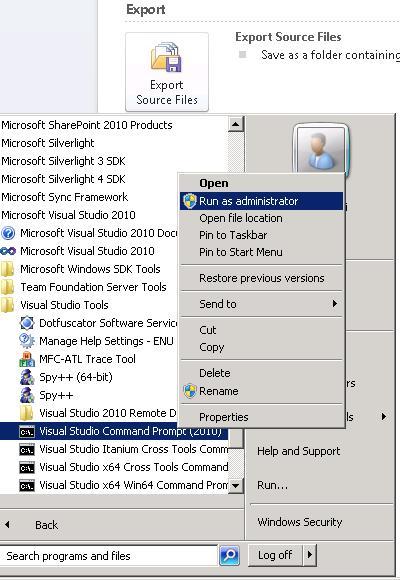
myschema.xsd. There are situations when you use controls like people picker on the form, the export option may also create another XSD file namedBuiltInActiveXControls.xsd. - Open Visual Studio Command Prompt (2010) from Start | All Programs | Microsoft Visual Studio 2010 | Visual Studio Tools as an administrator as shown in the following screenshot:
- From the command prompt, navigate to the location where you saved the source files and type in the following command to generate the class file from the schema file using XSD tool:
Xsd.exe myschema.xsd /c /l:cs - This will generate the C# class file of the InfoPath form. By default this is named
myschema.cs. To generate the VB.Net class file, change the switch/l:csto/l:vb. In case you hadBuiltInActiveXControls.xsdfile, provide that too in the preceding command. The command in this case would be as follows:Xsd.exe myschema.xsd BuiltInActiveXControls.xsd /c /l:cs - Add this C# class file to your workflow project. Also add a new module and name it IPForms to your workflow project. This module is used to upload the InfoPath forms that are associated with the workflow to the server.
- Module is just a folder with two files
Sample.txtandElements.xml. TheElements.xmlis used by the project feature to deploy the contents of the module. Delete theSamples.txtfile as it is just a placeholder to show that files can be deployed using modules. Visual Studio automatically makes the necessary changes toElements.xmlwhenever you add and delete files from the module. - Add the published InfoPath form to this module and Visual Studio automatically updates the
Elements.xmlfile in the module. The following code shows theElements.xmlfile contents:<?xml version="1.0" encoding="utf-8"?> <Elements xmlns="http://schemas.microsoft.com/sharepoint/"> <Module Name="IPForms"> <File Path="IPFormsInitForm.xsn" Url="IPForms/InitForm.xsn" /> </Module> </Elements>
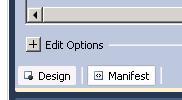
- Open the feature that deploys the module and click the Manifest link as shown in the following screenshot:

- Click the Edit Options link to open the manifest editor as shown in the following screenshot:
- Open the manifest editor and add a new property
RegisterFormsand provide the path of your module that contains the InfoPath forms for the value of the property. This will register the forms in the module when the feature is activated. Your end result of the manifest changes should be similar to the following code:<?xml version="1.0" encoding="utf-8" ?> <Feature xmlns="http://schemas.microsoft.com/sharepoint/"> <Properties> <Property Key="GloballyAvailable" Value="true" /> <Property Key="RegisterForms" Value="IPForms*.xsn" /> </Properties> </Feature>
- From the feature's property window, set the
Receiver AssemblyandReceiver Classproperties to the following values:Receiver Assembly = Microsoft.Office.Workflow.Feature, Version=14.0.0.0, Culture=neutral, PublicKeyToken=71e9bce111e9429c Receiver Class = Microsoft.Office.Workflow.Feature.WorkflowFeatureReceiver
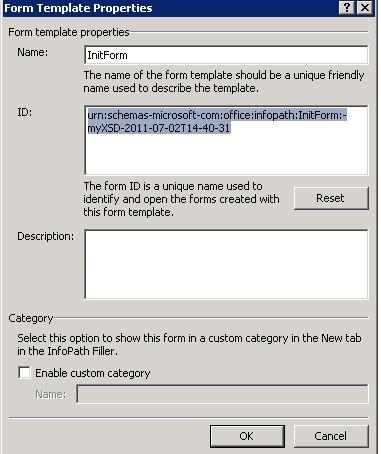
The WorkflowFeatureReceiverclass processes the manifest file changes that we did in the previous step. This class will manage the registration of the InfoPath files for use withWorkflow. Until now we created the form and we created the necessary source files that can be used in the workflow and also we made changes to the feature to register the forms for workflow. The last step is to associate this form with the workflow. To do this, we will open theElements.xmlfile of the workflow and add the URN (Uniform Resource Name) of the InfoPath form.- To get the URN of the InfoPath Form, go to File tab in the InfoPath Designer of your form and click the button Form template properties. This should bring up the form properties as shown in the following screenshot. From this window, copy the ID element of the form. The URN may be different for you than what is shown:
- Open the
Elements.xmlfile of the workflow and add theInstantiation_FormURNproperty underMetaDataelement and also make changes toInstantiationUrlproperty.InstantiationUrlrefers to an ASPX page that hosts the InfoPath form. Yourelements.xmlfile should look like following:<?xml version="1.0" encoding="utf-8" ?> <Elements xmlns="http://schemas.microsoft.com/sharepoint/"> <Workflow Name="InfoPathInitiation - Workflow1" Description="My SharePoint Workflow" Id="d1b973a0-9f8b-4abd-befa-0113641cfb34" CodeBesideClass="InfoPathInitiation.Workflow1.Workflow1" CodeBesideAssembly="$assemblyname$" InstantiationUrl="_layouts/IniWrkflIP.aspx"> <Categories/> <MetaData> <AssociationCategories>Site</AssociationCategories> <Instantiation_FormURN>urn:schemas-microsoft-com:office:infopath:InitForm:-myXSD-2011-07-02T14-40-31</Instantiation_FormURN> <StatusPageUrl>_layouts/WrkStat.aspx</StatusPageUrl> </MetaData> </Workflow> </Elements>
- Now on to the workflow code, where we will use the
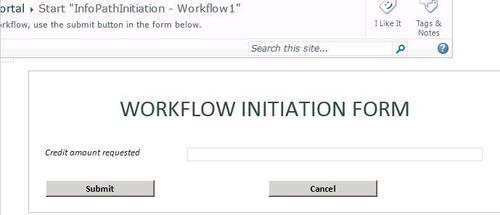
XmlSerializerto deserialize the string initiation data (in the XML format) from our form to.NETobject. ThemyFieldsobject is in themyschema.csfile that we created via the XSD tool. Make changes to theCheckCreditAmountmethod as follows:private void CheckCreditAmount(object sender, ConditionalEventArgs e) { string sInitData = workflowProperties.InitiationData; XmlSerializer ser = new XmlSerializer(typeof(myFields)); XmlTextReader reader = new XmlTextReader( new System.IO.StringReader(sInitData)); myFields ipInitForm = (myFields)ser.Deserialize(reader); string sCreditRequested = ipInitForm.txtCreditRequested; double initAmount = 0; double.TryParse(sCreditRequested, out initAmount); if (initAmount <= 1000) e.Result = true; else e.Result = false; } - Build and run the project and when you manually invoke the site workflow, you should see the InfoPath form as shown in the following screenshot:
As usual, we get the initiation data from the WorkflowProperties object like we did in the previous recipe. The difference in here is that we get XML string for the initiation data as InfoPath forms are XML files. To read values from this XML string, we cast the string into a .NET class that was generated from the form's schema definition file. This is the reason why we used the XSD generator to create the .NET class for our initiation form. The XSD generator when created the .NET class from the schema file, each of the control in the form is mapped to a property. Hence we can just use the dot notation to read the values of the form's controls. The XmlSerializer is used in the CheckCreditAmount method to cast the XML string to the .NET class.
To make use of the InfoPath forms in the workflow, we need to deploy it to the form server of the SharePoint and make it workflow enabled. This is the reason, why we used a feature to deploy our InfoPath form. Just using feature would not deploy it to the forms server. We need to instruct the feature to do that task, for this purpose, we made use of the event receiver. We made use of the built-in event receiver Microsoft.Office.Workflow.Feature.WorkflowFeatureReceiver for this task.
Apart from deploying InfoPath forms to the form server, we need to hook this form to the workflow so it opens it at the initiation stage. Since InfoPath forms are XML files, it needs to be hosted on some page. SharePoint provides IniWrkflIP.aspx that resides in the _layout root directory in the SharePoint server. This ASPX page can host InfoPath forms. Apart from that we need to notify the workflow what form to open. This is done providing the form's URN (Uniform Resource Name). We made these changes to the workflow's Elements.xml file.