
This chapter will demonstrate many of the custom application paradigms that we encounter as we build enterprise applications for SharePoint 2010 and Windows Phone 7. We will build a simple dashboard that will demonstrate the display of important data and a graph to present information about key performance indicators for a fake company. To get to the data, we will introduce programming against SharePoint 2010 using the client-side API's. This includes using REST and WCF Data Services. We begin this chapter, with a brief look at security. This chapter will cover the following topics:
- Forms-based authentication
- Managed Client Object Model on the desktop
- WCF Data Services to the rescue
- Dashboard
Earlier in this book, we set up our development environment with SharePoint, Visual Studio, and all the Windows Phone 7 development tools all on one Windows 7 machine. It is at this point in the book where we should leave that behind and move to the more recommended approach of development. That is to say, we should have a SharePoint server separate from our development Windows 7 machine.
Let's start by taking a look at forms-based authentication.
Earlier we opened our SharePoint site up for anonymous access. We did that so that we could look at the programming of an RSS feed reader against feeds found in SharePoint without having to discuss authentication. In the real world, this isn't a practical solution because our IT administrators would panic at the thought of having corporate data exposed without any authentication.
When building applications for Windows Phone 7 that use data from a SharePoint server, some form of authentication is required. Though, NTLM or Kerberos authentication are not supported in the current version of the phone. Another mechanism must be employed to authenticate to SharePoint.
This is where we will use forms-based authentication (FBA) using claims-based authentication. Back in SharePoint 2003, setting up a site for forms-based authentication was a difficult job, and the end result was a very fragile site. This got better in 2007 and with 2010 the steps required for enabling forms-based authentication are very well documented. You can read the instructions here:
These instructions do the following:
- Create a new site using claims-based authentication
- Configure the central administration site's
web.configfile for both an LDAP connection string and a membership provider - Configure the Web application's
web.configfile for both an LDAP connection string and a membership provider - Configure the Security Token Service Application's (STS)
web.configfile for both an LDAP connection and a membership provider - Configure the Web application to use the specified membership provider
The trickiest thing in this whole exercise is getting the LDAP URI correct for the Active Directory domain that we need to authenticate against.
These instructions work great if we are just setting up a site for the first time. However, if a site already exists that we want to continue using, we'll need some way to convert an existing web application from classic mode to claims mode.
Obviously, the first step in doing this type of thing is to backup the SharePoint environment. Next, follow the instructions from the TechNet website:
http://technet.microsoft.com/en-us/library/gg251985.aspx
The decision of what mode we use for authentication should ideally be made before creating the Web application. Earlier in this book, it didn't matter because we were using a web interface and our browser could authenticate using NTLM. At this point in our development of Windows Phone 7 applications that get data from SharePoint, we must use the forms-based mode of authentication.
Windows Phone 7 doesn't exactly make it easy for us to connect to SharePoint using forms-based authentication. We have to build all the plumbing ourselves. We also have to leave behind the comfort of the WebClient. In .NET and in Silverlight, the WebClient has the mechanisms needed to pass authentication information along with the requests. Windows Phone 7's implementation of WebClient does not provide that luxury. Instead, we have to build up the authentication requests manually using HttpWebRequest.
HttpWebRequest allows us to have a fine grained control over our request to the server. This allows us to add in whatever headers and cookies we want. This means that we can build a request to the authentication web service for SharePoint and send it off. SharePoint will authenticate the user using forms-based authentication and then provide an authorization cookie that we can pass back to SharePoint on every request. With this authorization cookie, we can access SharePoint securely and our IT teams can sleep at night.
In simple RSS example instead of communicating to the RSS feed using an anonymous connection, let's connect to the RSS feed that is protected by forms-based authentication.
We will be doing a couple of examples in this chapter, so a generic solution to contain all of these samples will be good.
- Open Visual Studio 2010.
- From the File menu, select New Project .
- In the Installed Templates list, select Other Project Types.
- Under Other Project Types, select Visual Studio Solutions, as shown in the following screenshot:
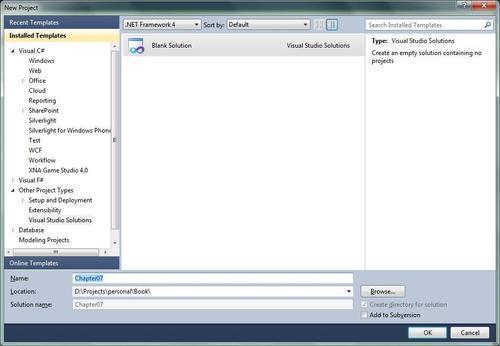
- Give the solution the name Chapter07
- Click on the OK button and Visual Studio will create an empty solution for us.
Next, we'll need a project in this solution. The following steps show how to add the copy of this project into this solution:
- In Solution Explorer in Visual Studio, right click on the solution name.
- In the context menu that appears, select Add and then Existing Project .
- Navigate to the location of the SimpleRSSReader folder.
- Select the SimpleRSSReader.csproj file and click on the Open button.
The WebClient way of getting the RSS feed involved an event handler that was added to our client to listen for the DownloadStringCompleted event. Once the string was downloaded, we parsed the result into an XElement and then used LINQ to XML to get a list of RSSItem that we then data bound to the feedListBox.
We can reuse the part of the event handler that parses the RSS feed and does the data binding by pulling that part out into its own method:
private void ResultsToListBox(string result)
{
var rssElement = XElement.Parse(result);
var items = from item in rssElement.Descendants("item")
select new RSSItem
{
Title = item.Element("title").Value,
Date = item.Element("pubDate").Value,
PostUrl = item.Element("link").Value
};
feedListBox.ItemsSource = items;
}
Now, we could update the client_DownloadStringCompleted event handler to use this method, but we aren't going to be using the WebClient anymore. Instead, delete the rest of the client_DownloadStringCompleted event handler method.
As we aren't using the WebClient in this version, remove the client parameter at the top of the class and replace it with a new HttpWebRequest parameter:
private HttpWebRequest webRequest;
Next, remove the initialization code for the WebClient from the MainPage_Loaded event handler. That is to say, remove the following two lines of code:
client.DownloadStringCompleted += new DownloadStringCompletedEventHandler(client_DownloadStringCompleted);
client.DownloadStringAsync(new Uri(siteUrl));
In its place, add the new initialization code for the HttpWebRequest. This is what the MainPage_Loaded event handler should look like with the new lines highlighted:
private void MainPage_Loaded(object sender, RoutedEventArgs e)
{
     webRequest = (HttpWebRequest)HttpWebRequest.Create(new Uri(siteUrl));
     webRequest.BeginGetResponse(new AsyncCallback(BlogCallBack), webRequest);
     feedListBox.SelectionChanged += new SelectionChangedEventHandler(feedListBox_SelectionChanged);
}
HttpWebRequest handles calls backs a little different to WebClient. They are both asynchronous, which is good because we don't want to block the UI thread, but the HttpWebRequest uses a dependency injection to tell it explicitly what to do when the response comes back. The WebClient doesn't need an event handler. We could just call DownloadStringAsync and the call would go through. With HttpWebRequest, we must pass in a method for it to call when the request goes through.
In this case, we have called that method BlogCallBack. The following is the code for that method:
private void BlogCallBack(IAsyncResult asyncResult)
{
var request = (HttpWebRequest)asyncResult.AsyncState;
     var response = (HttpWebResponse)request.EndGetResponse(asyncResult);
using (var sr = new StreamReader(response.GetResponseStream()))
{
var result = sr.ReadToEnd();
Dispatcher.BeginInvoke(() => ResultsToListBox(result));
}
}
This code speaks for itself to a certain extent. First, we get the request object from the result. From the request we can get the response from the server. This will come in the form of a stream, so we'll have to add the following line to the top of our file:
using System.IO;
Next, by framing our StreamReader inside a using statement we are assured that dispose will be called on it, thus freeing up the memory allocation that comes along with a stream.
We read the result and pass that result into the ResultsToListBox method that we extracted earlier. In order to do that though we need to think about one very important thing: At this point in the code, we are not working on the UI thread. The background processor thread cannot interrupt the UI thread. To get around this, we call Dispatcher.BeginInvoke.
Nice and tidy.

Next, let's turn off anonymous access to our SharePoint site. Make sure you've configured it for forms authentication and setup a user account because we'll need it when we try to get access to the RSS feed.
Before we can make a request to our RSS feed that is protected by forms authentication, we need to authenticate against SharePoint. This will return an authorization cookie that we must return with every request to the server. To get this authorization cookie, we make a request to the authentication web service on SharePoint. Its address is: http://<your server>/_vti_bin/authentication.asmx. Looking at this path in a browser shows that the authentication.asmx web service request needs to be a SOAP POST with a specific format:
POST /_vti_bin/authentication.asmx HTTP/1.1
Host: SharePointServer
Content-Type: text/xml; charset=utf-8
Content-Length: length
SOAPAction: "http://schemas.microsoft.com/sharepoint/soap/Login"
<?xml version="1.0" encoding="utf-8"?>
<soap:Envelope xmlns:xsi="http://www.w3.org/2001/XMLSchema-instance" xmlns:xsd="http://www.w3.org/2001/XMLSchema" xmlns:soap="http://schemas.xmlsoap.org/soap/envelope/">
<soap:Body>
<Login xmlns="http://schemas.microsoft.com/sharepoint/soap/">
<username>string</username>
<password>string</password>
</Login>
</soap:Body>
</soap:Envelope>
This is a very basic SOAP message. SOAP messages are XML documents sent in the body of a POST to the server. The message itself is contained within an envelope that describes the schema of the message. The message body is contained within a SOAP body. The element name within the body describes the action that we want to take. In this case, we want to login. This element has a payload of the username and password.
In this SOAP message header, we need to specify the Content-Length based on the actual length of the message body that we are sending to the server. That length really depends on the length of the username and password string that we need to supply. Thankfully, HttpWebRequest will add in the Content-Length header for us. We will also add our CookieContainer to the headers for our requests for data. This is how SharePoint will know that we are authenticated.
The response to this web service call will be in the following form:
HTTP/1.1 200 OK
Content-Type: text/xml; charset=utf-8
Content-Length: length
<?xml version="1.0" encoding="utf-8"?>
<soap:Envelope xmlns:xsi="http://www.w3.org/2001/XMLSchema-instance" xmlns:xsd="http://www.w3.org/2001/XMLSchema" xmlns:soap="http://schemas.xmlsoap.org/soap/envelope/">
<soap:Body>
     <LoginResponse xmlns="http://schemas.microsoft.com/sharepoint/soap/">
<LoginResult>
<CookieName>string</CookieName>
     <ErrorCode>NoError or NotInFormsAuthenticationMode or PasswordNotMatch</ErrorCode>
<TimeoutSeconds>int</TimeoutSeconds>
</LoginResult>
</LoginResponse>
</soap:Body>
</soap:Envelope>
With this result, we first need to check the ErrorCode. If the ErrorCode is NoError then we know that the cookieJar has been populated with our authentication token.
Enough theory, let's look at an example. We know that we really can't do anything in our application until we authenticate against SharePoint. So, let's open our MainPage.xaml.cs file and rewrite the MainPage_Loaded method.
First though let's hardcode our username and password into class member variables. In a real application, we would have a settings page where the user would enter their credentials, but hardcoding this information for now will demonstrate the concepts that we need to learn. Add the following code inside the class outside of any methods:
private string mUsername = "JQP";
private string mPassword = "P@ssw0rd";
We will also need a variable to hold our cookie when we get it from SharePoint. Add the following class member variable right after the username and password variables:
private CookieContainer cookieJar = new CookieContainer();
So all of the code that we previously had in our MainPage_Loaded method is still important, we just can't run it until we have an authentication token. Let's change the name of this method to LoadFeed:
private void LoadFeed()
{
     webRequest = (HttpWebRequest)HttpWebRequest.Create(new Uri(siteUrl));
     webRequest.BeginGetResponse(new AsyncCallback(BlogCallBack), webRequest);
     feedListBox.SelectionChanged += new SelectionChangedEventHandler(feedListBox_SelectionChanged);
}
Now once we have our authentication token set, we can make a call to this method. Next, make a new blank MainPage_Loaded event handler. This is where we will start our call to the authentication service. Let's make a call to a new method that we'll call Authenticate. Then create a new method called Authenticate.
private void MainPage_Loaded(object sender, RoutedEventArgs e)
{
Authenticate();
}
private void Authenticate()
{
}
The Authenticate method will create an HttpWebRequest, set the Web request headers, and then make a call to the asynchronous BeginGetRequestStream method FBA:BeginGetRequestStream method. Add code to the Authenticate method to appear like this:
private void Authenticate()
{
     var authWebService = "http://ssps2010/_vti_bin/authentication.asmx";
     var authWebRequest = (HttpWebRequest)HttpWebRequest.Create(authWebService);
authWebRequest.Method = "POST";
authWebRequest.ContentType = "text/xml; charset=utf-8";
     authWebRequest.Headers["SOAPAction"] = "http://schemas.microsoft.com/sharepoint/soap/Login";
authWebRequest.CookieContainer = cookieJar;
     authWebRequest.BeginGetRequestStream(new AsyncCallback(AuthenticationRequestCallback), authWebRequest);
}
Let's look at this code line by line. In the First line we instantiate a string that contains the URL for the authentication web service. Be sure to update the URL to point to the appropriate server.
The second line uses a factory to create an HttpWebRequest object for us taking in the authentication web service string we initialized in the first line. Next, we explicitly set the request method to POST. After we set the request method, we set the ContentType header to text/xml; charset=utf-8 to let the Web Service know that what we are sending should be treated as xml encoded in UTF-8.
The next header we add isn't a typical request header, so we have to specify the key explicitly as SOAPAction. This lets the Web Service know that we are sending an action inside of a SOAP envelope. The value for this header specifies which SOAP action should be called. In this case, it's the Login action at the Web Service endpoint that we are calling.
Next, we add the empty cookie container to the request. Upon success, this container will be filled with our authentication token. Finally, we tell the Web request to begin an asynchronous stream and call the method AuthenticationRequestCallback, so that we can fill the body of the request. Let's look at that code now:
private void AuthenticationRequestCallback(IAsyncResult asyncResult)
{
var request = (HttpWebRequest)asyncResult.AsyncState;
var soapEnvelope = string.Format(@"<?xml version=""1.0"" encoding=""utf-8""?>
<soap:Envelope xmlns:xsi=""http://www.w3.org/2001/XMLSchema-instance""
xmlns:xsd=""http://www.w3.org/2001/XMLSchema""
xmlns:soap=""http://schemas.xmlsoap.org/soap/envelope/"">
<soap:Body>
<Login xmlns=""http://schemas.microsoft.com/sharepoint/soap/"">
<username>{0}</username>
<password>{1}</password>
</Login>
</soap:Body>
</soap:Envelope>", mUsername, mPassword);
var encoder = new UTF8Encoding();
using (var reqStream = request.EndGetRequestStream(asyncResult))
{
var body = encoder.GetBytes(soapEnvelope);
reqStream.Write(body, 0, body.Length);
reqStream.Close();
}
request.BeginGetResponse(new AsyncCallback(AuthenticationResponseCallback), request);
}
This isn't as much code as it looks because there's a lot of XML in there. First, we get a reference to the HttpWebRequest from the IAsyncResult that was passed in. Then, we set up the SOAP Envelope. The XML for this SOAP envelope can be found at the following address (modifying the URL for your own SharePoint server):
http://ssps20110/_vti_bin/authentication.asmx?op=Login
We replaced the username and password with the hardcoded values that we set at the top of the class and then created a new text encoder. We'll see why we did this in a minute, but in order for this to work, we'll have to add a using statement at the top of the file:
using System.Text;
Next, we open a stream to enter the body of the message. This is where the encoder comes in use. We pass the SOAP envelope string into the UTF-8 encoder and from that encoder we get an array of bytes. This array of bytes then gets sent into the body of the request. Finally, we close the request stream.
The last thing we do in this method is let the system know what to do when the response starts coming back. In this case, we want it to call a method named AuthenticationResponseCallback.
private void AuthenticationResponseCallback(IAsyncResult asyncResult)
{
var request = (HttpWebRequest)asyncResult.AsyncState;
     var response = (HttpWebResponse)request.EndGetResponse(asyncResult);
var errorCode = string.Empty;
     using (var responseStream = new StreamReader(response.GetResponseStream()))
{
var xResult = XmlReader.Create(responseStream);
xResult.ReadToDescendant("ErrorCode");
errorCode = xResult.ReadElementContentAsString();
xResult.Close();
responseStream.Close();
}
     if (!string.IsNullOrEmpty(errorCode) && (errorCode.ToLowerInvariant() == "noerror"))
{
LoadFeed();
}
}
This is the AuthenticationResponseCallback. It looks a lot like the BlogCallBack function we discussed earlier. We start out by getting a reference to the request object and from the request object we get a reference to the response object. We then initialize a variable that will hold the error code. The error code, as we saw from the SOAP definition page, will have one of following three values:
- NoError
- NotInFormsAuthenticationMode
- PasswordNotMatch
In this example, we are only looking for the successful calls and in a production environment, we should handle the error situations by letting the user know that their password was wrong, the server isn't configured properly, or that there was an internal server error.
Note
In a production environment, we would also be interested in making sure the HTTP response code we get back is 200 OK. If it is anything else, we would need to handle it appropriately and in my experience the most common error is 500 Internal Server Error as I mentioned briefly earlier. As mentioned earlier, we will only look for the successful case. The error handling should be dealt with in a production environment though.
The way we get the error code is a little different than the way we get the RSS feed items. In this case, we are using a forward moving XML reader. We use it to read to the element containing the error code and then read the contents of that element into our error code variable. To do this, we need to add a using reference to System.Xml at the top of our file.
using System.Xml;
This is a very convenient way of handling this response because we don't need to create another heavy object in memory that holds all of the values in the XML just to read in one value. The XMLReader and StreamReaders are destroyed almost as soon as they are created and all that is left is a single string.
Finally, once we check that there were no errors we make the call to LoadFeed. We have to modify LoadFeed though to pass our cookie container with its HttpWebRequest as can be seen in the highlighted line of the following code:
private void LoadFeed()
{
     webRequest = (HttpWebRequest)HttpWebRequest.Create(new Uri(siteUrl));
webRequest.CookieContainer = cookieJar;
     webRequest.BeginGetResponse(new AsyncCallback(BlogCallBack), webRequest);
     feedListBox.SelectionChanged += new SelectionChangedEventHandler(feedListBox_SelectionChanged);
}
Compile and run the application and you should see the exact same result as before:
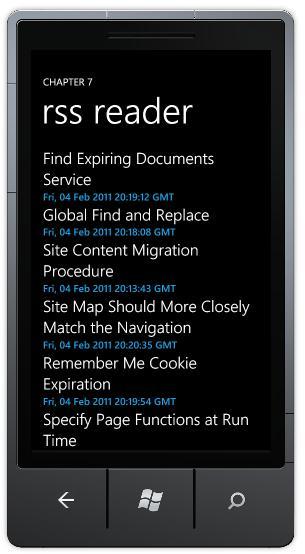
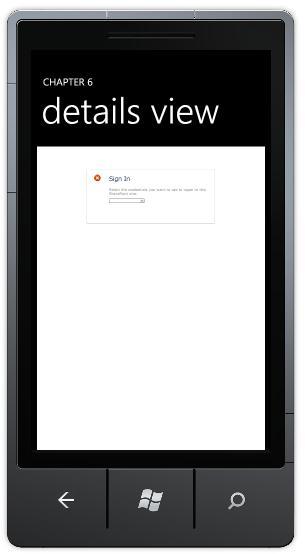
The difference is that now the RSS reader is making a call into an authenticated feed. This can be seen by tapping on an item. We haven't passed the authentication cookie on to the Web browser, so we see the login page as shown in the following screenshot:
We won't continue down the path of how to display the contents of the RSS Item in this book. Instead, now that we are authenticated into the SharePoint site, let's look at getting data from other sources in SharePoint.