
Let's consider a scenario where a person lives in a neighborhood that is not so well lit. In winter, the temperatures are usually extreme in cities such as Chicago and the sun usually sets around 5 p.m. The poorly lit neighborhood along with the cold weather makes it difficult for a person to enter their home.
We will build a simple solution that turns on a light (that can be either an outdoor or indoor hallway light) that speeds up the process of entering a building.
In this example, we will make use of PowerSwitch Tail 2 (sold by Adafruit Industries: http://www.adafruit.com/product/268) to turn on/off the lights.
The Powerswitch tail is rated to control appliances rated to operate at 110V and it can switch resistive loads up to 15A. The PowerSwitch Tail 2 can switch on/off appliances when it is activated by a 3-12V DC signal.
One main advantage of using the PowerSwitch Tail 2 is that it is opto-isolated (opto-isolation ensures that Raspberry Pi is protected from any transient voltages while turning on/off the lights) and provides a safe alternative to interfacing electrical appliances to Raspberry Pi. The image below shows a PowerSwitch Tail 2 available from http://www.adafruit.com.
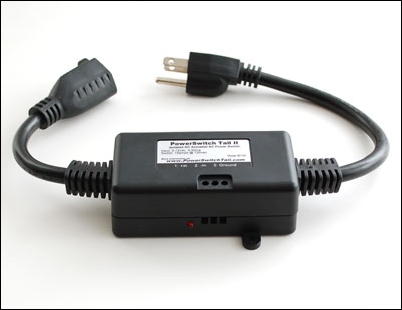
Power tail switch II – Photo courtesy: adafruit.com
- PowerSwitch Tail 2's datasheet (http://www.adafruit.com/datasheets/PST%20II%20product%20insert.pdf) provides a schematic description of the internal circuitry of PowerSwitch Tail 2.
- PowerSwitch Tail 2 is connected to Raspberry Pi as shown in the following figure. The in+ terminal of the switch is connected to the GPIO #17 of Raspberry Pi, while the in- terminal is connected to the ground pin of Raspberry Pi.
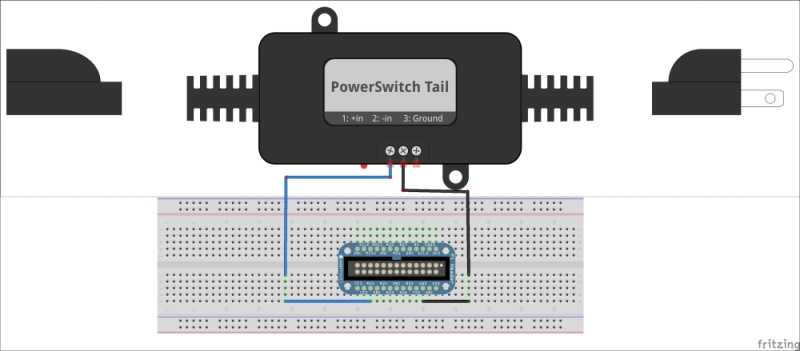
PowerSwitch Tail 2's interface to Raspberry Pi
- The power cord to the lighting equipment needs to be connected to PowerSwitch Tail 2.
- PowerSwitch Tail 2 is connected to Raspberry Pi as shown in the following figure. The in+ terminal of the switch is connected to the GPIO #17 of Raspberry Pi, while the in- terminal is connected to the ground pin of Raspberry Pi.
- Let's review the code for an example where the lights need to be turned on between 5:30 p.m. and 10:45 p.m. everyday.
- We get started by creating Unix timestamps for the start and end times (Unix timestamps refers to the time elapsed since January 1, 1970 in seconds. More information is available at http://en.wikipedia.org/wiki/Unix_time):
#Get current time now = datetime.datetime.now() #Create datetime objects startTime = datetime.datetime(now.year,now.month,now.day,17,30,0) endTime = datetime.datetime(now.year, now.month,now.day,22,45,0) #Create unix time stamps unixStart = (startTime - datetime.datetime(1970,1,1)).total_seconds() unixEnd = (endTime - datetime.datetime(1970,1,1)).total_seconds() unixNow = (now - datetime.datetime(1970,1,1)).total_seconds() - The Unix timestamps are used to check whether it is time to turn on/off the appliances:
if ( unixStart <= unixNow <= unixEnd):
  GPIO.output(25,GPIO.HIGH)
  while ( unixStart <= unixNow <= unixEnd):
    now = datetime.datetime.now()
    unixNow = (now - datetime.datetime(1970,1,1,0,0,0)).total_seconds()
    print "Triggered", now.hour,":",now.minute,":",now.second
    sleep(1)
    GPIO.output(25,GPIO.LOW)
- We get started by creating Unix timestamps for the start and end times (Unix timestamps refers to the time elapsed since January 1, 1970 in seconds. More information is available at http://en.wikipedia.org/wiki/Unix_time):
Yay! We are done with a simple automation task of keeping the lights on at a given time period everyday.
- If it is not possible to install Raspberry Pi right next to the power tail switch, it is possible to interface the PowerSwitch Tail 2 to an Arduino Ethernet board and controlled by Raspberry Pi using the Twisted framework example (hint: refer to the examples from the previous project, Project 10, Raspberry Pi Personal Health Monitor). This enables you to control a network of devices using Raspberry Pi.
- One alternative to consider if it is not possible to purchase a PowerSwitch Tail 2—SparkFun has an excellent tutorial on building a controllable AC power outlet (https://www.sparkfun.com/tutorials/119).
- In this example, we assumed that the lights will be turned on between the selected time slots. It is also possible to turn on the lights by determining the sunset time. NOAA provides information on calculating sunset times, which is available at http://www.esrl.noaa.gov/gmd/grad/solcalc/calcdetails.html.
- Another alternative to turning/off lighting appliances—it would be a great idea to make coffee everyday using PowerSwitch Tail 2. If the coffee maker is filled with water and the coffee pods/filter are replaced, the coffee maker will be turned on at the chosen time! We will have our coffee ready right after getting out of bed.