 Programming the Arduino using the Raspberry Pi
by Sai Yamanoor, Srihari Yamanoor
Raspberry Pi Mechatronics Projects HOTSHOT
Programming the Arduino using the Raspberry Pi
by Sai Yamanoor, Srihari Yamanoor
Raspberry Pi Mechatronics Projects HOTSHOT
- Raspberry Pi Mechatronics Projects HOTSHOT
- Table of Contents
- Raspberry Pi Mechatronics Projects HOTSHOT
- Credits
- About the Authors
- About the Reviewers
- www.PacktPub.com
- Preface
- 1. Hello World
- A quick introduction to the Raspberry Pi
- Where can I buy a Raspberry Pi?
- Mission briefing
- Hunting and gathering
- Setting up the GPIO
- GPIO programming using Python
- Electrical output of our program
- Mission accomplished
- Hotshot challenge
- 2. A Raspberry WebIDE Example
- Mission briefing
- Installation, features, and usage of the Occidentalis operating system from Adafruit
- Setup of a remote login into the Raspberry Pi
- Installation of the Raspberry Pi WebIDE
- Python development on the WebIDE
- Test and debugging examples using the WebIDE
- Mission accomplished
- Hotshot challenge
- 3. The Arduino Raspberry Pi Interface
- Mission briefing
- Installing the Arduino IDE
- Programming the Arduino using the Raspberry Pi
- Raspberry Pi AlaMode
- The Weasley weather clock
- Controlling the stepper using the Arduino
- Controlling the RGB LED Strip using the Arduino
- I2C Communication using the Arduino (optional)
- Serial port communication with the Raspberry Pi
- Mission accomplished
- Hotshot challenge
- 4. Christmas Light Sequencer
- 5. Internet of Things Example – An E-mail Alert Water Fountain
- 6. Raspberry Pi as a Personal Assistant
- 7. Raspberry Pi-based Line Following Robot
- Mission briefing
- Assembly of the Pi Plate for the line following robot
- Sensor selection, interface, and data interpretation
- Implementation of line following logic based on sensor data
- Testing the motor driver circuit
- Preparation of the line following course
- Designing the chassis for the line following robot
- A step-by-step assembly of the robot
- Mission accomplished
- Hotshot challenge
- 8. Connect Four Desktop Game using Raspberry Pi
- Mission briefing
- Hello world example with the pygame
- Getting started with the Connect Four game (UI and sound effects)
- Interfacing game inputs using the PiFace module
- A brief description of the Connect Four Game AI
- Marquee design and control (optional)
- Setup of the switches using a cardboard box
- Mission accomplished
- Hotshot challenge
- 9. The Raspberry Pi-enabled Pet/Wildlife Monitor
- 10. Raspberry Pi Personal Health Monitor
- Mission briefing
- Setting up a web server to record health parameters
- A simple exercise tool using the Raspberry Pi
- Setting up an e-mail feed parser to refill a prescription as well as remind the user about an upcoming doctor's appointment
- A simple tool that reminds a person to take his/her pills
- Mission accomplished
- Hotshot challenge
- 11. Home Automation using Raspberry Pi
- 12. Using a Raspberry Pi for Science and Education
- 13. Tips and Tricks
- Mission briefing
- Setting up Raspberry Pi as a development platform
- Remotely logging in the Raspberry Pi from anywhere on the Internet
- Problems that might be encountered while using Raspberry Pi
- Cool add-on hardware sources developed for the Raspberry Pi platform
- Project ideas that can be implemented over a weekend
- Useful resources for the Raspberry Pi
- Mission accomplished
- Index
We will introduce ourselves to the Arduino IDE with an LED blinking example.
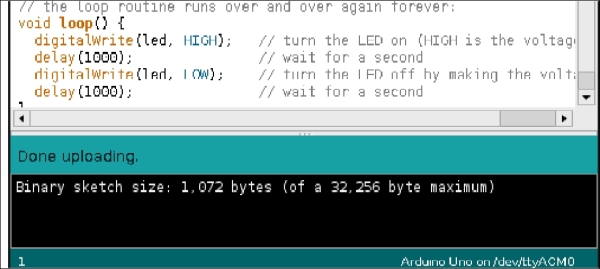
There are several examples for the Arduino and it takes less than a minute to execute the first program. Let's get started with the traditional LED blinking example. The LED blinking example can be found at File | Examples | 01
.
Basics | Blink.
- We get started by identifying the Arduino's serial port enumerated on the Raspberry Pi.
- The serial port is identified from Tools | Serial Port. Usually there is only one serial port as shown in the following screenshot. If there is more than one serial port device connected, it is recommended that you proceed with caution.
- We can program the Arduino by clicking on the Upload button.
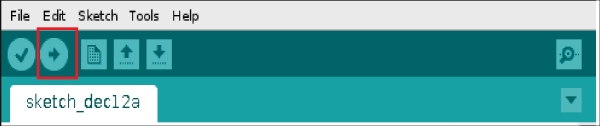
The Arduino IDE interface
-
No Comment
..................Content has been hidden....................
You can't read the all page of ebook, please click here login for view all page.