
What all developers want is to do their job as fast as they can without sacrificing the quality of their work. IntelliJ has a large range of features that will reduce the time spent in development. But, to achieve the best performance that IntelliJ can offer, it is important that you understand the IDE and adapt some of your habits.
In this chapter, we will navigate through the features that can help you do your job even faster. You will understand IntelliJ's main elements and how they work, and beyond this, learn how IntelliJ can help you organize your activities and the files you are working on. To further harness IntelliJ's abilities, you will also learn how to manage plugins and see a short list of plugins that can help you.
Before we start showing you techniques you can use to improve your performance using IntelliJ, you need to identify and understand the visual elements present in the main window of the IDE. Knowing these elements will help you find what you want faster. The following screenshot shows the IntelliJ main window:
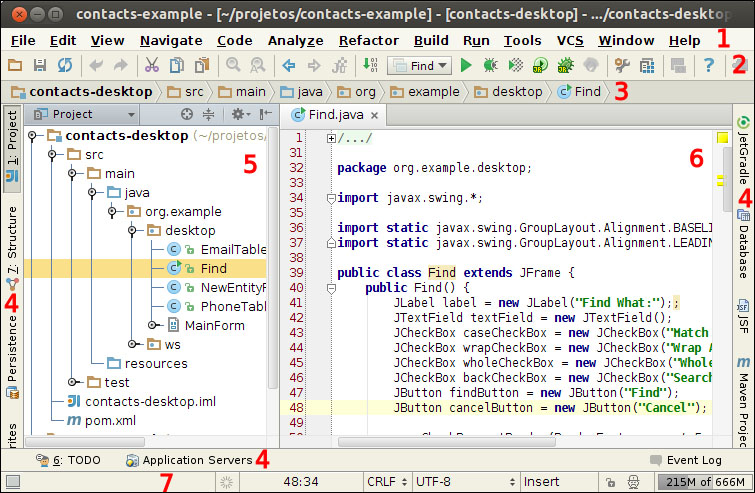
The main window can be divided into seven parts as shown in the previous screenshot:
- The main menu contains options that you can use to do tasks such as creating projects, refactoring, managing files in version control, and more.
- The main toolbar element contains some essential options. Some buttons are shown or hidden depending on the configuration of the project; version control buttons are an example of this.
- The Navigation Bar is sometimes a quick and good alternative to navigate easily and fast through the project files.
- Tool tabs are shown on both sides of the screen and at the bottom of IntelliJ. They represent the tools that are available for the project. Some tabs are available only when facets are enabled in the project (e.g. the Persistence tab).
- When the developer clicks on a tool tab, a window appears. These windows will present the project in different perspectives. The options available in each tool window will provide the developer with a wide range of development tasks.
- The editor is where you can write your code; it will be better covered in the next section.
- The Status Bar indicates the current IDE state and provides some options to manipulate the environment. For example, you can hide the tool tabs by clicking on the icon at the bottom-left of the window.
In almost all elements, there are context menus available. These menus will provide extra options that may complement and ease your work. For example, the context menu, available in the tool bar, provides an option to hide itself and another to customize the menu and toolbars.
You will notice that some tool tabs have numbers. These numbers are used in conjunction with the Alt key to access the tool window you want quickly, Alt + 1, for example, will open the Project tool window.
Each tool window will have different options; some will present search facilities, others will show specific options. They use a common structure: a title bar, a toolbar, and the content pane. Some tool windows don't have a toolbar and, in others, the options in the title bar may vary. However, all of them will have at least two buttons in the rightmost part of the title bar: a gear and a small bar with an arrow. The first button is used to configure some properties of the tool and the second will just minimize the window. The following screenshot shows some options in the Database tool:
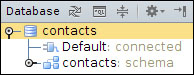
The options available under the gear button icon generally differ from tool to tool. However, in the drop-down list, you will find four common options: Pinned, Docked, Floating, and Split modes. As you may have already imagined, these options are used to define how the tool window will be shown. The Pinned mode is very useful when it is unmarked; using this, when you focus on code editor you don't lose time minimizing the tool window.