
To help you understand how to use the facilities in IntelliJ and identify its tricks, we will develop a simple Java Server Faces (JSF)-based application in the course of this chapter. JSF is an MVC framework used to construct web interfaces using components; this technology evolved from the experiences the community had with JSP/servlet and Struts. The application will simply expose the data we stored in the contacts database and provide a web service that permits the creation of a new contact.
First of all, we need to make our contacts-web module compatible with JSF; the smart reader you are, you probably know that we will add the JSF facet to our module now.
Open the Project Structure window and select the option Modules. Then, expand the contacts-web node, select Web and click on the Add button (Alt + Insert). When you select JSF, you will see that the panel at the right changes and permits you to select if facelets will be supported; select enabled. (Facelets is the default view declaration since JSF version 2.0.). At the bottom of this panel, a warning message about the missing libraries in JSF will be shown; click on the Fix button to select which JSF library you want to use. In the new window that will appear, select the option Download and click on the Configure button. As you can see in the new window, we can select which version of JSF we want to download and use. We will indicate that we want to use JSF 2.0 and then just close this window. Click on the OK button to start the download of the libraries.
After the download, a red message will appear at the bottom telling us that the library is missing in the artifact; just click on the red lamp and select the option Add 'jsf-2.0.1-FCS' to the artifact to solve the problem. As we don't want to create all the functionalities using default JSF tags or implement all the behavior, we will use Primefaces to ease our job. (Primefaces is a component suite for JSF, http://primefaces.org/). Fortunately, IntelliJ provides some useful facets to use with the JSF facet. Select the JSF node, click on the Add button, and then select Primefaces; the new window that will appear will ask us which version of Primefaces we will use—just check the Download radio and click on OK.
Again, a message will appear telling us that the library is missing in the artifact. Click on the icon with the red lamp and select the first choice to fix the problem. Finally, click on the OK button to save our changes and close the project structure window. Now our project is configured for JSF and a new tool window called JSF is available to the right of the IDE.
As we won't use JSP pages, delete the file index.jsp that is inside the web folder of contacts-web module. After this is done, copy the file web.xml that is available in the chapter 4 folder in this book and override the existing web.xml that is in the web/WEB-INF folder of the module. This new web.xml file configures the application to use the Faces servlet, XHTML as the default suffix, and home.xhtml as the default page.
As you may have noticed, we still don't have the home.xhtml file; to create it, right-click on the web folder and go toNew | JavaEE Web Page. A new window will appear asking for the name of the file and the type. Name the file home.xhtml and in the Kind combobox, select the option Facelets Page. IntelliJ will create and open the home.xhtml file with the basic structure of the page. Just to see if the application is working correctly, change the text in the title tag to The contacts and add h:outputText to the body tag with Hello contacts as the value, as follows:
<h:head>
<title>The contacts</title>
</h:head>
<h:body>
<h:outputText value="Hello contacts"/>
</h:body>
Click on the Run button to execute the application and IntelliJ will automatically open your default web browser where you will see the page of the application.
Our application will just show the user the contacts that are stored in the database. To add new contacts, we will provide a web service that will be covered in the next chapter. Despite being a very simple application, we need to do some work to get things working. As it could be confusing to perform a step-by-step process from the actual state of the application, I will provide you some code to jump-start this part.
In the Chapter 4 folder of the book, you will see two folders. The first is called contacts-web and comprises two other folders. Despite it being possible to do all the following steps in IntelliJ, it is easier and less error-prone if you do it on your own operation system. Copy the folder called java to the src folder in your contacts-web module folder. After doing this, replace the contents of the folder web that exists in the root folder of this module. When your OS asks, override all files. Open the chapter 4 folder again; there is a folder called entities; copy the src folder inside it to the entities module folder and override the content when asked. As we won't use the view EntityPersonAndEmail, navigate to the src/org/example/entities folder in the entities module and delete it.
Back at IntelliJ, you will see that a balloon will appear telling you that IntelliJ has detected the Spring framework; click on the Configure link and, at the new window that will appear, just click on OK. Every time IntelliJ detects a framework or something it knows how to work it will show you a message, sometimes ask you to perform an action, and finally add the corresponding facet in the project.
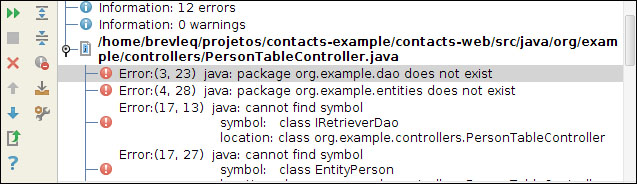
Theoretically, when you click on the Run button, mark the option Redeploy and click on OK—everything should work; however, some errors will appear in the messages tool window. The messages the IDE shows us say that it can't find the classes of the module entities. This happens because we didn't add entities to the contatcts-web folder which is what we will do now. The following screenshot shows error messages:
Position the cursor over any word in red and press Ctrl + Enter; this will show the intentions menu. Select the first option Add dependency on module 'entities' and, after doing this, you will see that all the red words become black again. This indicates that IntelliJ didn't find any problems in your code. Even if you try to run the module again, you will still receive error messages. This time it will be because some external libraries are missing.
Open the Project Structure window again and you will see a message telling you that the module entities is missing in the contacts-web module; click on the red light bulb and select the first option. After this, you will see a message asking about the Hibernate library; do that, click on the red lamp icon, and select the first option. Now select the facets option and then the end node Spring (contacts-web). You will see that IntelliJ can't find the Spring library in the module; click on the Fix button, then click on Download, and then click on OK to solve it. When the new red message appears, click on the red lamp icon and select Add 'Spring-3.2.2' to the artifact.
Unfortunately, IntelliJ won't detect that some libraries are missing so, in these cases, we need to identify which library is missing and provide it to the module. This time what is missing is the Spring Web library; an easy way to find it is by adding the Spring MVC facet to the module contacts-web. Select the Modules option in the Project Structure window, then select the contacts-web module, click on the add button (Alt + Insert) and, finally, select the Spring MVC option. You will probably need to download the library, so do it. Again, a red message will be shown telling you that the library is missing from the artifact; click on the red lamp and select the first option.
Now we need to add the MySQL JDBC driver to our project. As we have already downloaded MySQL Connector in Chapter 3, Working with Databases, we just need to add it to the project. Select the option Libraries in the Project Structure window, click on New Project Library (Alt + Insert), and select Java. At the Select Library Files window, navigate through the tree and select the file mysql-connector-java-x.x.xx-bin.jar, then click on the OK button. Another window will ask us which module will receive the library; select contacts-web and click on OK. By now, I don't think I need to tell you that a red message will appear; click on the red lamp and select the first option.
The last library that is missing is the AspectJ weaver; in this project, AspectJ is used by Spring to manage the database transactions. You will find an AspectJ facet in the Project Structure window; however, you will see that it won't download any libraries. Despite this not being a Maven project, we can use the power of this tool in IntelliJ. Click on New Project Library (Alt + Insert) again and, this time, select the From Maven… option. In the new window that will appear, type org.aspectj.weaver in the first input field, then click on the Search button (Shift + Enter). After some searching, you will see that it found one entry; click on the down arrow at the end of the input field and select the option org.aspectj:com.springsource.org.aspectj.weaver:1.6.2.RELEASE. Now, just click on OK to download the file using Maven. After the download ends, select the contacts-web module in the next dialog and fix the problem by clicking on the red lamp. Finally, we can click on OK to save our changes.
Before we finally run the application, we need do a simple task. We will use Spring AOP (Aspect Oriented Programming
) to manage the interfaces that will use Spring's transaction manager, as it is a good practice to develop code based in the interfaces we will use them. As no interface exists in org.example.dao, we will extract an interface from RetrieverDao; so, open this class file and go to Refactor | Extract | Interface...in the main menu. A new window will enable you to configure the new interface; in the Interface Name field, enter IRetrieverDao, check all members, and click on the Refactor button. After refactoring, IntelliJ will ask if you want to substitute all usages of RetrieverDao in the source code, so you need to confirm whether or not you do. As the preview option is checked in that window, we need to open the find tool window to see the changes before refactoring them; after looking at the changes, click on the Do Refactor button to proceed.
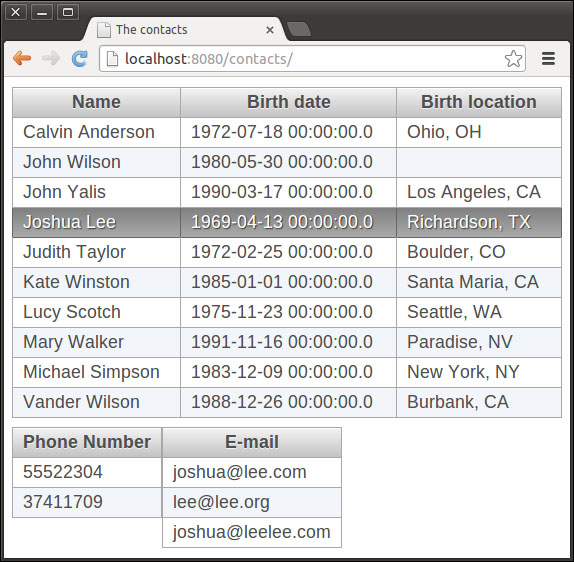
You can now press the Run button to see the application running. If you have problems connecting to the database, check these two files: hibernate.cfg.xml and appContext.xml, and check the connection properties. The following screenshot shows the running application:
Now that our application is running well, we will create a filter to search the database for the results that will be shown in the contacts table; it will help you understand some of IntelliJ's features. First of all, add the following piece of code to the <h:form> tag:
<h:panelGroup layout="block">
<h:outputLabel value="Filter:" for="filterInput" style="margin-right: 5px;"/>
<p:inputText id="filterInput" value="#{personTableController.filterValue}"/>
</h:panelGroup>
As you may notice, the filterValue property doesn't exist in the PersonTableController class. Let's create this field with the setter and getter methods using the simplest and fastest way IntelliJ provides—using intentions. As you know, when we position the cursor over some place in the code that presents some possibility of improvement, a small icon representing some intention will appear. So, position the cursor at #{personTableController.filterValue} and click on the yellow bulb icon (or simply press Ctrl+Enter). In the menu that will appear, select the option Create getter, setter and field for filterValue and you will see that a field the with the setter and getter methods will be created in the class.
At this time, the input field can't filter anything because it doesn't have the necessary code to do the filter. To do this, change the code filterInput as follows:
<p:inputText id="filterInput" value="#{personTableController.filterValue}">
<p:ajax event="keyup" listener="#{personTableController.filter}"update=":form:personTable"/>
</p:inputText>
Again, we've used a method that doesn't exist in the class PersonTableController; so, position the cursor at #{personTableController.filter} and press Ctrl + Enter. Again, you will see the three options that were shown earlier; however, the listener method is a simple method, so it won't use any field. As a shortcut, we will select the option Create getter for filter. Once you've done that, press Ctrl + B to go to the method declaration. Once you are in the method declaration, position the cursor over getFilter() sentence and press Shift + F6 to rename the method as filter(). As this method won't return anything, change the string type return to void and remove the return statement; notice that if this method is being used anywhere in the code, we can navigate to Refactor | Change signature (Ctrl + F6) to change the return type and add parameters to all usages. After the changes, your method should look as follows:
public void filter() {
}
I don't know about you, but I like to organize my code positioning all getters and setters at the bottom of the class file. We can move the filter method to the top of the class using Ctrl + Shift + Up, so use this shortcut and position the method as the second one in the class.
The code still doesn't do any filter, so go to the filter method and change it to look as follows:
public void filter() {
  setPersons(retriever.retrieveByFilter(filterValue,1));
}
If you run the application, you will see that when you try to filter the contacts you receive java.lang.UnsupportedOperationException; this happens because the default implementation has just returned this exception. Let's create a class that implements this method. Expand the tree of entities module until you see the package dao; right-click on this node and click on New and then click on Java Class. The dialog that appears is used to create classes, interfaces, enums, and more; you just need to select the type. In our case, select the class and type in the name field PersonDao, then click on the OK button.
As we want to implement just the method retrieveByFilter, we need to extend the class RetrieverDao. Make your class declaration look as follows:
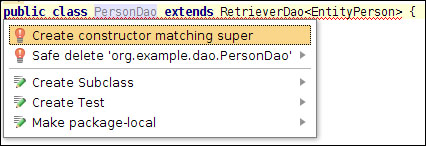
public class PersonDao extends RetrieverDao<EntityPerson> {
}
You will see that the declaration will be underlined in red. Position the cursor over the class declaration, press Ctrl + Enter, and select the first option Create constructor matching super, as shown in the following figure:
It will create a constructor compatible with the super class but, at this time, we have better knowledge about the entity that will be manipulated, so remove the second constructor parameter and pass EntityPerson.class as the second parameter to the super constructor. Your code should now look as follows:
public class PersonDao extends RetrieverDao<EntityPerson> {
  protected PersonDao(SessionFactory sessionFactory) {
    super(sessionFactory,EntityPerson.class);
  }
}
Finally, we will override the method we wanted; so press Alt + Insert (in Mac, use Ctrl + Enter) anywhere in the class and select Override methods.... In the new window that will be shown, select the method retrieveByFilter(value:Object, filter:int):List<T> and click on OK. IntelliJ will create a default implementation for this just by calling the super method. As we don't want to use the default implementation, change the implementation of the retrieveByFilter method as follows:
 @Override
 public List<EntityPerson> retrieveByFilter(Object value, int filter) {
  switch (filter){
case 1:return retrieveByName((String)value);
    default:return new ArrayList<EntityPerson>();
  }
}
Again, we've used a method that doesn't exist, so position the cursor at the retrieveByName usage, type Alt + Enter, and select the unique choice available. It will focus on the return type declaration; as we don't want to change anything, just press the Esc key twice. Now change the implementation of retrieveByName as follows:
private List<EntityPerson> retrieveByName(String name) {
  Query query = sessionFactory.getCurrentSession()
.createQuery("select e from EntityPerson e where
e.completeName like :name order by e.completeName");
  query.setParameter("name", createSearchParameter(name));
  limitTuplesQuantity(query);
  return query.list();
}
You probably noticed that in the switch at retrieveByFilter we are using 1 as the filter value as we know that using a value instead of a constant will impair the readability of the code. Fortunately, IntelliJ provides an easy way to refactor this kind of source. Position the cursor at 1 character present in case:1 sentence, then go to the Refactor | Extract | Constant menu (or use the shortcut Ctrl + Alt + C) to create a constant. When you do this, the value 1 changes to INT and the focus is on this declaration; type NAME_FILTER and press enter—a new constant is created at the top of the class.
Now, we need to declare a Spring bean that uses this new class. Open the file appContext.xml in the contacts-web module and locate the bean with the ID personDao. Remove the content in the class attribute and type PersonDao. Then press Ctrl + Space bar and select the unique option. You will see that IntelliJ shows an error telling us that the constructor argument doesn't exist, so remove the constructor argument that has its name in red. Your bean declaration should look like the following code:
<bean id="personDao" class="org.example.dao.PersonDao"scope="request">
<constructor-arg name="sessionFactory" ref="sessionFactory"/>
</bean>
Redeploy the application to see if everything is running well.
Even with our application running as expected, we can make some modifications that would improve it. You've probably noted that the PersonTableController is performing the role of the controller and model (http://en.wikipedia.org/wiki/Model%E2%80%93view%E2%80%93controller). Fortunately, IntelliJ provides some refactoring tools that will help us extract the model from the PersonTableController class.
First of all, open the class file PersonTableController. After doing this, go to Refactor | Extract | Class.... At the Extract Class window, enter PersonTableModel as the name of the new class and select the properties: selected, persons, and filterValue; notice that when you select a property, its getter and setter methods are selected as well. Finally, click on the Refactor button.
The created PersonTableModel property was constructed as expected. However, the PersonTableController still remains with the getters and setters of the properties that are now at the model class, so remove all getters and setters that are related to the model properties. Notice that refactoring created the personTableModel property in the controller class as final. As we are using Spring, we prefer to pass an instance of the model using a setter. Change the declaration of personTableModel by removing the instantiation sentence and final clause, then create a setter for personTableModel using Alt + Insert as we did before. After this, change the updateTable and filter methods in the code as follows:
public void updateTable(){
  personTableModel.setPersons(retriever.retrieveAll());
}

public void filter(){
personTableModel.setPersons(retriever
.retrieveByFilter(personTableModel.getFilterValue(), 1));
}
At this time, we've decided that model will be a better name for the PersonTableModel variable. Position the cursor over the personTableModel variable anywhere in the code and press Shift + F6; change the name to model and press Enter. When asked, answer yes to rename the respective setter.
We've noticed that we have two methods that do almost the same thing. As the filter method is the most powerful, we will remove the updateTable method; but before that, we should note that the updateTable method is used as init-method in Spring. Near the updateTable declaration, there is a green icon with a light red circle with an m inside, as shown in the following screenshot:
Click on that mark to navigate to the bean declaration. IntelliJ will open the appContext.xml file and will position the cursor at the init-method parameter; change this parameter to a filter, then press Ctrl + B to come back to the PersonTableController class. Now you can remove the updateTable method and your class should look like the following code:
public class PersonTableController {
  private PersonTableModel model;
  private IRetrieverDao<EntityPerson> retriever;

  public void filter() {
 model.setPersons(retriever.retrieveByFilter(model.getFilterValue(), 1));
  }

  public void setModel(PersonTableModel model) {
    this.model = model;
  }

  public void setRetriever(IRetrieverDao<EntityPerson> retriever) {
    this.retriever = retriever;
  }
}
We still need to do some work. Open the appContext.xml file and create a PersonTableModel bean declaration as follows:
<bean id="personTableModel"class="org.example.controllers.PersonTableModel"scope="request"/>
Now add the model bean we just created to the controller bean. Your personTableController should look like the following code:
<bean id="personTableController"class="org.example.controllers.PersonTableController"scope="request" init-method="filter">
<property name="model" ref="personTableModel"/>
<property name="retriever" ref="personDao"/>
</bean>
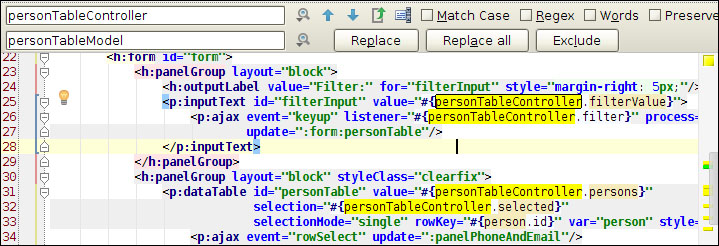
In the end, we need to change some values in home.xhtml. As you know, we moved the properties that were in PersonTableController to PersonTableModel. Open the home.xhtml file and change all thepersonTableController usages (except the ones that are in thep:ajax tag) to personTableModel. You can do this easily using find and replace (Ctrl + R). Use the blue arrows to navigate through the entries IDE found and the Replace button to replace the selected entry. You will notice that you can do a more powerful search and replace using regex, preserving case, and so on. The following image shows search and replace in home.xhtml:
Finally, open the PersonTableModel class and instantiate an empty string in the filterValue variable. This way, all existing values in Person table will be retrieved when you run the application using the following command:
String filterValue="";
Now you can run the application to see the final result.