
The great advantage in using IntelliJ is the possibility to make your job faster; however, it will only be possible if you know there are some tricks you can use.
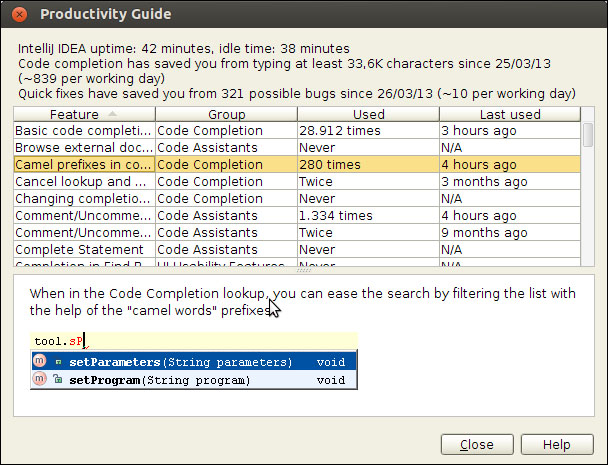
IntelliJ provides a good way to show you what can be done in the IDE to improve your performance. In the Help menu, you will find an option called Productivity Guide; as you may notice, this is a guide that will help you improve your productivity.
The guide analyzes the usage of IntelliJ and identifies the features you use a lot and the ones you practically don't use, so it can create statistics and configure the Tip of the Day window, showing the most relevant tips for when the developer is performing time-consuming operations.
In the productivity guide dialog, as shown in the following screenshot, you will see the quantity of time for which you used a feature and a description of the feature. The description is the same as that used in the Tip of the Day dialog and is very useful when you search for features you never used. Even knowing you can identify unused features in this guide is, for a new user, important to keep the Show Tips on Startup option (in the Tips of the Day window) checked; this is the simplest way to discover the abilities of IntelliJ.
The faster you navigate through the source code of your project, the sooner you can get things done. I have already presented, in Chapter 1, Getting Started with IntelliJ IDEA 12, two ways to navigate the source code: using the Project tool window and the Navigation bar; however, there are better ways to navigate directly to what you want.
A faster way to execute some actions in every application is using shortcuts. IntelliJ has a lot of them to make the most different things and some of them are used to navigate:
- Ctrl + B (or Command + B in Mac) directs the developer to the declaration of methods, fields, constructors, and so on. To use this shortcut correctly, the developer needs to hover the cursor over the element being used.
- Ctrl + N and Ctrl + Shift + N (or Command + N and Command + Shift + N in Mac) are used to navigate to a class and a file, respectively; you just need to type the name of the resource you want.
- Ctrl + Alt + B (or Command + Option + B in Mac) directs the developer to the implementation of an element (class, interface, method, and such). In case the element has more than one implementation, a list with all implementations will appear.
- Ctrl + E (or Command + E in Mac) can be used so the developer can see the recently opened files, allowing him/her to reopen them easily and fast.
- Ctrl + Tab will display a simple dialog with opened files and available tool tabs.
- Ctrl + F (or Command + F in Mac) shows a find text field to run a search for sentences in the current file. You can configure regex to find things and use other options available in the find bar.
- Ctrl + Shift + F will open a dialog that will allow you to run a search for a sentence through all the files in the project. The developer can filter where the search will be done and define some other options.
The small list of shortcuts above is intended to show you some features directed to navigation; a complete list of shortcuts for your preferred operational system can be downloaded from http://www.jetbrains.com/idea/documentation/index.jsp.
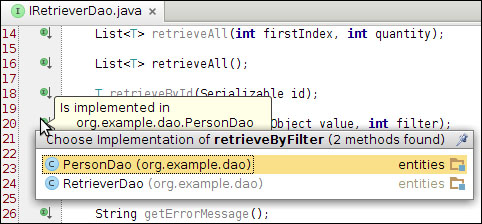
In conjunction with shortcuts, IntelliJ provides visual elements that can be used to navigate through and understand the real state of the code. Some of these visual elements can be observed in the gutter area confirming that you are changing your source code. There will be different icons according to the type of code you are editing; these icons are important for two reasons: you can use them to navigate and they will show you if you have correctly done what you wanted. For example, if the Spring icon appears next to a setter, you know the bean property declaration in the XML file worked correctly. As with the gutter area, the marker bar can be used to navigate the source code; however, the marks here just navigate the content of the current file. The following image shows a list of the implementations of a method of an interface when the developer clicks on the Implementation icon:
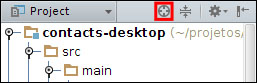
Sometimes, you will need to see the current file open in the Project tool tab and perhaps you will see the source tree collapsed. Depending on the quantity of hierarchies and files, it can take some time. To minimize the time spent on this task, you can use the scroll from source button available in the title bar in the Project window; this way IntelliJ can expand the source tree and select the current file in use, as you can see in the following screenshot:
IntelliJ provides good code facilities; however, sometimes you could under-utilize some of them, probably because you don't know they exist. Generally, the code completion feature is activated when the developer is typing; however, sometimes, the developer should actively force the code completion feature. The following list presents some useful shortcuts when working directly with the code:
- Ctrl + space bar key: In the rare case that code completion isn't activated automatically, use this shortcut to active it.
- Ctrl + Shift + space bar key: Advanced features of code completion are only activated when the developer uses this shortcut. In the case of chained code completion (this improved code completion can suggest code of expected type traversing the method chain), it is only available if you use the last shortcut twice.
- Shift + Delete: This shortcut is used to cut the entire line; just position the cursor in the line you want cut and it will cut the content to the clipboard.
- Ctrl + D: Use this shortcut when you need to duplicate a line; position the cursor in the line you want duplicated and use it.
- Ctrl + / and Ctrl + Shift + /: Use these when you want to comment on the entire line or a selection, respectively; to uncomment, just do the same action.
- Ctrl + Alt + L: This shortcut can be used to reformat your code; however, if you are using Ubuntu, this shortcut will lock your screen. Don't forget that you can change the shortcuts in the Settings dialog.
- Ctrl + Alt + O: This shortcut will optimize the imports.
- Ctrl + Shift + up arrow key and Ctrl + Shift + down arrow key: Use these shortcuts when you want to reposition lines, methods, and sentences to a position higher or lower in the code. If the cursor is hovering over a line or selection, these shortcuts will only move it up or down. To move methods, just position the cursor in the method declaration and use the shortcut; you can move a sentence in the same way. In all cases, IntelliJ will analyze if the move is permitted; it won't permit you to move a line from inside a method to the outside, for example.
- Ctrl + O: This shortcut can be used to override the methods of the superclass, including methods of an interface that aren't implemented. IntelliJ will create a default method body, generally calling the super method.
- Ctrl + I: This shortcut can be used to implement the methods of interfaces that aren't already implemented.
- Alt + Insert: If you need to generate constructors, getters, setters or both, or implement, override or delegate methods, and so on, use this shortcut.
- Ctrl + Q: Are you in doubt about some functionality in the code? This shortcut will open JavaDoc for the element with the cursor.
- Ctrl + P: Using this shortcut, you can easily see which parameters a method expects. As you can see in the following image, for each method overloading, it will show a line:

- Ctrl + Shift + V: Generally, the applications and the operating system only provide one memory slot to copy and paste. This shortcut will open a dialog with the last five items copied.
You will notice that you can select a suggestion IntelliJ made using the enter key; however, the suggestion will expand and won't override the sentence already present in the line (if this is the case). You may lose some time deleting the characters after the expanded sentence. To avoid this, you can select the suggestion using the tab key and this way the previous sentence will be swapped and the expanded sentence will occupy its space.
To speed up your development even more, IntelliJ provides live templates. They are predefined code fragments to help you insert frequently-used or custom code in your source. Live templates can be of three types, listed as follows:
- Simple template: It provides a fixed abbreviation that expands into plain text. The code present in the template is automatically inserted in the source code, replacing the template abbreviation. As an example, the
psvmabbreviation in the body of a class will create the default main method. - Parameterized template: It has the ability to use variables when the template is expanded. The places where a variable is needed will show an input field where the user may fill the value or accept the one proposed by the IDE. For example, the
foriabbreviation will create aforsentence and position the cursor in places where it needs a variable or parameter. - Surround template: It surrounds the selected text with code before and after it. It is commonly used to surround the selected text with a
try/catchblock.
Live templates can be activated using the Ctrl + J shortcut and selecting the desired option from the list or typing the abbreviation and clicking on the template invocation key (by default, it is Tab). If you look carefully, the abbreviations follow a pattern; for example, iteration templates start with it, followed by the abbreviation of the group that will be iterated.
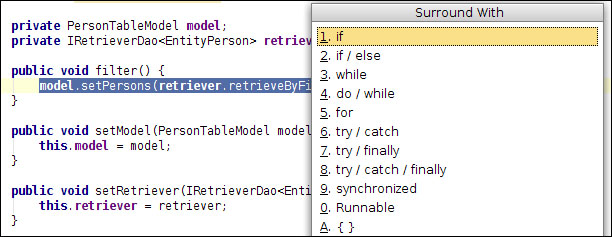
To use the Surround template, you first need to select a sentence in the source file; after this, you should use the Ctrl + Alt + T shortcut. When you do this, a dialog appears asking which type of surrounding you want; just select one and press enter as shown in the following screenshot:
IntelliJ comes with a default list of live templates; this list covers a lot of possibilities but, if you need one specific template, you can create your own in the Settings dialog. By default, the list of live templates will be shown only when you use the Ctrl + J shortcut. This way, if you type for in the code editor, the fori live template won't be suggested. However, we can change this behavior.
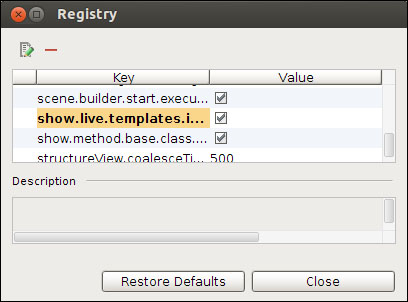
Go to Help | Find Action (or simply press Ctrl + Shift + A) and type Registry in the search field; make sure that the option Include non-menu actions is checked. When you select the registry result, the Registry dialog will appear. Find the optionshow.live.templates.in.completion and check it. In the following figure, you will see live templates in the completion list even if you didn't ask for them:
As you already know, refactoring is a sensitive task that should be performed with extreme care; a simple mistake in a refactoring could generate lots of bugs. IntelliJ provides a large range of facilities to help you in the refactoring process. Even with IntelliJ being so smart, it could make some mistakes and it is your responsibility to avoid this. In the Refactor menu, you will find all possible refactor options, some of which will be disabled depending on the position of the cursor. The shortcuts have an important role here as in other parts of the IDE. However, you will notice that the Refactor menu has a bunch of submenus that don't have any shortcut; because of this, there is a shortcut that will help you a lot when you don't want to lift your hands off the keyboard—Ctrl + Alt + Shift + T. This shortcut will open a pop-up that will show all the refactoring options available for the piece of code that the cursor is hovering over.
Even with that shortcut helping a lot, there are other shortcuts that help the developer and Shift + F6 is one of them. This shortcut permits us to rename the element that the cursor is hovering over and changes all usages of this element. I should alert you about the usage of the Rename refactor in JSF files—this approach runs a search in other JSF files and changes sentences in places that you didn't want to modify. For example, you are using the var element in the datatable of an XHTML file and, coincidently, another XHTML datatable has the same value in the var element. If you proceed with the refactoring, all usages of that name in other XHTML files will change too. There is a worse side-effect; if you use primefaces datatables, you will notice that some usages of the var element in the same datatable won't change (for example, the rowKey option). But don't worry, this is the only casein which I had problems using the Rename refactor and, in this case, I used the replace action (Ctrl + R).
Even though it is bad practice, sometimes we need to copy a class to use some code that has already been implemented to solve a similar problem. The approach of "copy a class and paste a class" was taking up too much of my time because I needed to use the mouse to select the class file in the project tree. After some time, I discovered that IntelliJ provides a simple utility to do this job; basically, you just need to press F5 and enter the name of the new class in the dialog that will appear. If you prefer, in this dialog, you can specify where the new file will be stored.
Another important facility is the move refactor; using F6 you can move a file to another place, even as an inner class. To change the signature of a method, just use Ctrl + F6 and the options available to add and remove parameters in the change Signature dialog that will appear. If you need to migrate a type of method, variable, or parameter, just position the cursor over the element and press Ctrl + Shift + F6 and a new dialog will be shown to help you change the type of the element.
Delegation is the simple concept of handing a task over to another part of the program. IntelliJ provides an easy way of doing this. First of all, call the delegate option available using Alt + Insert, then by clicking on an option under Generate or the option Code | Generate... in the main menu. In the pop up that appears, select the delegate methods, then the object to be delegated, and click on OK in the next dialog. Finally, a new dialog will be displayed to permit you to select the methods you want to delegate.
If you need to transform an element to static, the Make Static refactor will do it in a simple way. The option convert to an instance method does the reverse job when a class is passed as parameter. There are other refactor options available that you can use in specific cases, such as Invert Boolean and Remove Middleman. Invert Boolean will simply invert the return of a method that returns Boolean. Remove Middleman is helpful when you have a class that forwards many of its method calls to objects of other classes; using this option, you can simplify your design.
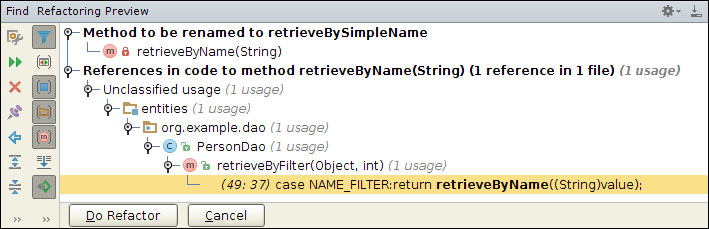
If you are an attentive user, you will notice that, in the majority of dialogs used to manipulate your code, there exists a preview button. It is good practice to analyze all the changes IntelliJ will automatically apply in your code before they take effect, so use the preview button all the time, unless you really trust what IntelliJ will do. After you click on the Preview button, the find tool will appear (sometimes it won't, but the results will be there) with all usages it found of the element that will be changed. For example, if you want to rename a method, IntelliJ will find every usage of this method and show them in a list so you can review the changes before you proceed. With this tool, you can include or exclude a usage from participating in the refactoring process and decide whether you will proceed with the refactoring or it will be canceled as shown in the following screenshot:
Perhaps you made a modification that didn't please you; for such cases, you have the Local History option. Local history is a kind of version control system that is independent of other VCSs, so you don't need any VCS configured to use it and it is active all the time. Different from general VCSs, local history is for personal use only, so you can't share access with other users. It facilitates the development once you can revert your modifications any time you want using the difference window.
To call history to a file, just right-click anywhere in editor (or use the Alt + ~ shortcut) and you will see the Local History option; in that option, you will see three suboptions: Show History, Show History for Selection, and Put Label. The first two options are similar as they show a dialog where the user can see the differences between the versions; however, the Show History for Selection option will show only the selected content in the difference dialog. The option Put Label is used to define a label to a revision; this way, you will have a more organized history.
In some cases, the local history can be cleared, such as when you install a new version of IntelliJ and when the cache is invalidated. The invalidation of the cache can occur when the cache is overloaded or manually by the user using the option invalidate cache in the file menu. Local history stores a good range of modifications that happen in your code; however, it isn't a full-blown VCS, so if you need real version control, it is better to use a distributed VCS like Git or Subversion.