
Our web application only retrieves the data from the database. However, we will create a web service that can insert data into database. This web service will be consumed by a desktop application we will create in Chapter 5, Desktop Development.
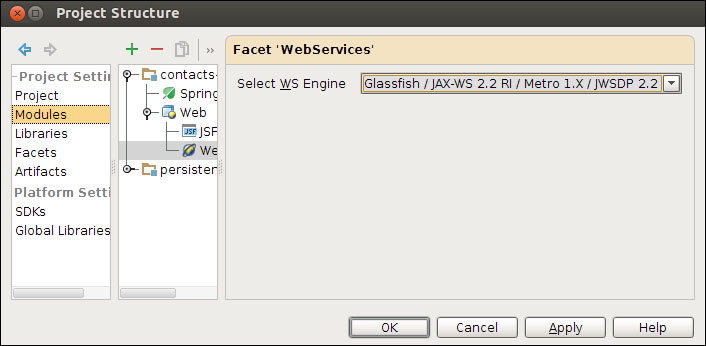
To create a web service, the first thing we need is to add a web service facet to our project. Open the Project Structure window and select the Facets option, then click on the Add button (Alt + Insert) and select the option WebServices. In the Select Parent Facet window, select Web and click on OK. After you add the facet, the panel will permit you to change the web service engine used; we will use the already selected engine (as in the following figure), so just click on the OK button to save the changes. IntelliJ will ask you if you want to download and install the SoapUI plugin—click on the No button. SoapUI (http://www.soapui.org/) is a great tool you can use to test your web service; however, if you like to use SoapUI, it is preferable that you use it as an external tool as it is more stable than the plugin version.
Before we create the web service, we need to create a package to organize the code. Right-click on theorg.example.controllers package and select New and then click on Package (Alt + Insert). In the New Package window, type ws as the name of the package and click on OK. You will see that IntelliJ creates the ws package as a child of theorg.example.controllers package, but we want to move it to the org.example package. Right-click on the ws package and select Refactor and then click on Move, or simply press F6. In the Select Refactoring window, select the first option: Move package 'org.example.controllers.ws' to another package and click on OK. In the Move window, change the To package value to org.example and click on the Refactor button.
Now that our package is in the correct place, right-click on it and go to New | Web Service. In the New web service window, enter the name of the web service as ContactsPersister and click on the OK button. You will see that IntelliJ will create an example method and a main method. As we won't use any code that is generated here, delete any method and create the methods specified in the following code:
@WebService()
public class ContactsPersister {
  @WebMethod
  public boolean create(EntityPerson person) {
    return false;
  }
}
Let's run the application to see if the web service is being deployed correctly. You will probably receive this exception: java.lang.ClassNotFoundException: com.sun.xml.ws.transport.http.servlet.WSServletContextListener. This happens because the JAX-WS (http://jax-ws.java.net/) dependency library jaxws-rt.jar is missing. To solve it, copy all the jar files that are available under chapter 4|dependencies folder and paste them in the Tomcat library folder {$TOMCAT}/lib.
Now that we've solved this problem, restart the server and access the address http://localhost:8080/services/ContactsPersister. Here, you will find more information about the deployed service and a link to his WSDL.
Unit tests are an important tool in agile methodology; this way, any modern IDE integrates unit test tools. Normally, the correct approach (TDD, http://www.agiledata.org/essays/tdd.html) to working with unit tests is by creating a test and implementing the method to pass the test, then creating another test and modifying the method to pass the new test and repeating this process until all the needs are implemented. However, here I will only show you how to execute your test codes in IntelliJ.
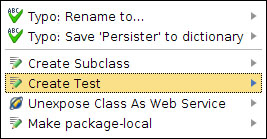
One thing I noticed when I began using IntelliJ is that it is difficult to find any indicator of unit test creation. I didn't find any menu named something like: create unit test code. After some searching, I finally noticed that there exists an intention you can use to create the test code. Basically, you only need to position the cursor anywhere in the class body, press Ctrl + Shift + T, and select the Create Test option. This is the default IntelliJ way to create a test code; however, we will use the GenerateTestCases (Generate test case requires that IntelliJ is running in JDK 7) plugin we talked about in the Chapter 2, Improving Your Development Speed. The following screenshot shows the creation of test with IntelliJ intention:
As you know, our web service will persist in the database entities passed to it; this way, we need guarantee that the EntityPerson object passed to be persisted is valid. Let's create a method that verifies whether or not the entity is valid in the ContactsPersister class:
protected boolean checkPersonIsValid(EntityPerson person){
return false;
}
Before we create the test code, we will add some comments in this method. You're probably asking, "why do we need to create comments before creating the test code?"—Simple; the GenerateTestCases plugin will look for @should clauses in comments to create the test code for us. So, create comments in the method using the following code:
/**
  * This method will check if a EntityPerson is valid
  * @param person
  * @return
  * @should return false if person is null
  * @should return false if person's email or phone list are null
  * @should return false if person's email and phone list are empty
  * @should return false if any person's properties are null or empty
  * @should return true if all person's properties have some value and email or phone list has at least one value
*/
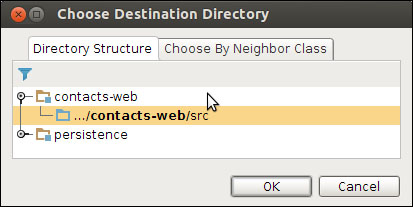
To generate the test code, click on the button Generate Test Methods that is available in the main toolbar near the Build button. In the Generate Test Cases window, it will ask which test framework we want to use; select JUnit 4 and click on OK. A new window will ask if we want to add the test library to the module. Of course we want to, so click on OK. This time, a new window will ask which @should annotations we want to use—select all of them; you can use Ctrl + click or Shift + click to select the items. When you click on OK, a new window will expect you to inform it where the test code will be created; select the node available in the contacts-web module and click on OK. The following screenshot shows the Choose Destination Directory dialog:
The generated test class file will present five methods, all of which follow a pattern: methodName_shouldCommentsAfterShouldAnnotation(). As our time is really short, I've provided the test code for you. Replace the class ContactsPersisterTest that exists in your project with the one that exists in the Chapter 4 folder.
Even though we still haven't implemented anything in our web service class, we can run the test case. Right-click on the class declaration and select the Run'ContactsPersisterTes...' option or simply use the Ctrl + Shift + F10 shortcut; you will see that ContactsPersisterTest is available in the Select Run/Debug Configuration combobox, the tests will run, and, at this time, only one test fails.
At this time, nothing is implemented in the service class and, as we are not following the correct approach to unit tests, you can use the following code to pass all the tests:
protected boolean checkPersonIsValid(EntityPerson person){
  return person!=null &&
  person.getBirthDate()!=null &&
  person.getCompleteName()!=null &&
 !person.getCompleteName().isEmpty() &&
  person.getPlaceOfBirth()!=null &&
  !person.getPlaceOfBirth().isEmpty()&&
  person.getEmailsById()!=null &&
  !person.getEmailsById().isEmpty() &&
  person.getPhonesById()!=null &&
  !person.getPhonesById().isEmpty();
}Our web service still doesn't do anything. We need to make it persist the entities passed by the client. Just to finalize our web service, copy the files IPersisterDao and PersisterDao that are in the C
hapter 4 folder to the org.example.dao package that exists in the entities module. After you've done that, open the PersonDao class and make it extend PersisterDao instead of RetrieverDao; then press Alt + Insert, select override, select the method mentioned above, and click on OK. The new create method should look like the following code:
@Override
public void create(EntityPerson entity) throws Exception {
  configurePhonesAndEmails(entity);
  super.create(entity);
}

private void configurePhonesAndEmails(EntityPerson person) {
  for(EntityPhone phone:person.getPhonesById())
  phone.setPersonByPersonId(person);
  for(EntityEmail email: person.getEmailsById())
  email.setPersonByPersonId(person);
}
Now create a IPersisterDao variable and implement the methods create, edit, and delete as they are presented in the following code:
@WebService
public class ContactsPersister {
  private IPersisterDao<EntityPerson> personDao;

  @WebMethod
  public boolean create(EntityPerson person) {
  if(checkPersonIsValid(person)){
    try {
      personDao.create(person);
      return true;
   }
catch (Exception e) {
throw e;
    }
  }
  return false;
  }
…
}
We need to create a setter for the personDao variable; press Alt + Insert, choose setter, select applicationContext, and click on OK. After IntelliJ creates the setter, annotate it using @WebMethod(exclude = true); this way, you will avoid a situation where JAX-WS interprets the setter as a web service method.
As we are using Spring Framework, we need to integrate JAX-WS with Spring; this can be done using the jaxws-spring.jar and xbean-spring.jar files that are available in the Chapter 4 folder. I imagine you already know how to add an external library to the contacts-web modul—do it. After you've added the library, we need to create the beans used to run the service as follows:
<wss:binding url="/services/ContactsPersister">
<wss:service>
<ws:service bean="#{serviceBean}"/>
</wss:service>
</wss:binding>

<bean id="serviceBean" class="org.example.ws.ContactsPersister">
<property name="personDao" ref="personDao"/>
</bean>
Add the previous code into the appContext.xml file. You will see that the wss and ws prefixes will be in red; this happens because the XML file hasn't declared the necessary namespaces. Fortunately, intentions can help us again. Instead of searching over the web to find the correct namespaces, you can position the cursor over the red wss sentence, press Alt + Enter, and select the namespace ending with servlet. On the red ws sentence, you only need to press Alt + Enter as it only comprises one option.
We need to change the servlet used to expose the web service. Open the web.xml file and change the servlet-class content of WSServlet to com.sun.xml.ws.transport.http.servlet.WSSpringServlet, and then look for the following listener and remove it:
<listener>
<listener-class>com.sun.xml.ws.transport.http.servlet.WSServletContextListener</listener-class>
</listener>
Just delete the file /WEB-INF/sun-jaxws.xml and you can run the application and test it with external tools (like SoapUI).