
When you are developing, it is important to organize the activities necessary to do your work. Know which tasks should be done and mark something less essential for later. This could help you focus and, consequently, make things easy and fast. IntelliJ provides tools that can be used to organize your activities.
IntelliJ provides facilities that can coordinate your work in the IDE; it can be done in accordance with your preferred issue tracker or by creating your own task in the IDE. Before we continue, you need to understand what a task is and a context in IntelliJ.
A task is an activity that needs to be performed; for example, improving search facilities. It has a name, which is an identifier, and can be correlated in an issue tracker system.
Context is a group of files opened in the editor that are vinculated with a task.
Task and context have a close relationship; the act of creating a task will make the IDE clean the workspace, create a change list and a new context. With the workspace clean, all files you open will be part of the context of the task; this is useful, for example, to filter the files that will participate in the commit process. Even with this strong relationship, it is possible save and clear a context independently of any task. In case you open and edit a file that is bound in another context, IntelliJ will open a dialog asking how you want to resolve the conflict in the change list.
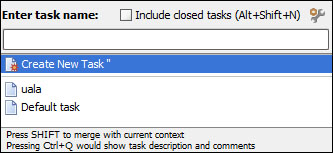
By default, you won't see the task combobox in the main window; to use it, you should create your first task. To create a new task, in the main menu, you can navigate to Tools | Tasks & Contexts | Open Task or simply use the shortcut Alt + Shift + N. Type a name for your task and choose the option Create New Task. A new window will ask if you want to clear the current context. When you click on OK, your task will be created and the context combobox, along with your created task, will be visible at the end of the main toolbar.
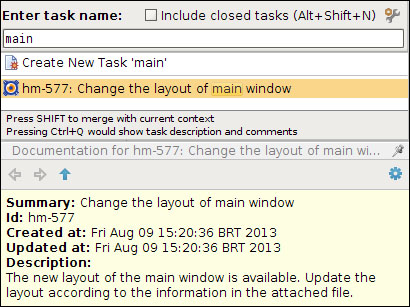
The pop up used to create a new task can also be used to select a task; you will see a list of available tasks below the text field where only the open tasks will be available unless you mark the check box, include closed tasks, or press Alt + Shift + N again. In case you need more information about a task, you can use Ctrl + Q (notice that this same shortcut will open JavaDocs when the focus is on the code); it will open a box to supply this need. It is possible to merge the contexts of the tasks, selecting them with the Shift key pressed, as shown in the following screenshot:
To switch between existing tasks, you can use the combobox or Alt + Shift + T;a pop-up will appear with a list of existing tasks and an option to open a task.
Issue tracker system (ITS) is a kind of system that is used to manage a list of issues and tasks. It is generally used to report bugs and the new features required by a developer, for example. It is possible to use the tasks available in your favorite issue tracker; you just need configure IntelliJ to use it. You can do this configuration in the Settings dialog (Section Tasks then Server) or use the icon (gear with a wrench) available in the Open Task pop up. No matter which path you choose, in the end you will see a panel with an Add button on the right-hand side; when you click on the Add button, a list of supported issue trackers will appear to you—select what you want use.
The information asked may vary depending on the issue tracker you are using (e.g. Jira, Youtrack, and so on), but, generally, it is the server URL, user name, and password. If you need, you can configure proxy options using the button Proxy Settings. Once you configured the options, you can click on the button Test to know if it is configured correctly. To allow access to the specified server for other members of your team, select the Share URL check box. To configure how IntelliJ should synchronize with the issue tracker, go to the Tasks section in Settings dialog.
After the issue tracker is configured in IntelliJ, you will see that when you type in the input text in the open task pop up, the IDE will run a search for the issues synchronized. If it doesn't find anything in the synchronized list, it will synchronize again to search for the task you want. Of course, if the task doesn't exist in the issue tracker, no result will be retrieved, as shown in the following screenshot:
Sometimes you will need to postpone some code that isn't so important; however, you know that the code needs to be implemented. To help you remember what you should do but didn't, you can mark your code with the TODO clause.
TODO is a special comment that IntelliJ tracks and processes in a different way. The default pattern is a comment comprising a line with a double slash, and after that, write TODO, followed by anything you want:
private void showMessage(Status status) {
  //TODO: something should be done here.
}
Differently than with a normal comment, the line with the TODO clause will be shown in a dark blue color, or according to your color and fonts settings. IntelliJ comes with the built-in FIXME clause; its behavior is the same as that of the TODO clause and is useful when you need to filter by type. If you prefer, you can create any patterns you want to be treated as a TODO clause. To do this, open the Settings dialog and go to the TODO section. There, you will find two divisions; in the first, you can manage the patterns used to identify a sentence as a TODO clause and the second is used to filter the TODO comments when you see them on the TODO tool.
If your TODO window isn't visible in the main dialog, you can open it by going to View | Tool Windows | TODO in the main menu. When you open it, you will see the marks organized in different ways; you just need to choose the tab at the top of the tool to see the marks in different groups.
Another useful feature of TODO is in avoiding a situation where a code marked with this clause is committed. When you try committing a code, a dialog will appear showing some information about changed files and in this dialog exists a check box called Check TODO—if any TODO clause is found in the files, it will ask you if you want review the files with TODO. This way, you always be sureno code with TODO marks will be committed without your knowledge, as shown in the following screenshot:
