
With AWT and SWT, Swing is one of the most used technologies for developing stable GUI desktop applications in the Java world. Support for Swing components is found in practically all IDEs that work with Java; however, good integration with third-party libraries focused on Swing, such as JGoodies (http://www.jgoodies.com/), isn't common in IDEs, which can make the developer's job harder.
In this chapter, you will see how to work with Swing applications in IntelliJ. Specifically, we will use, the JGoodies library to manage the position of the elements, do some work with Maven, and create the client for the web service of Chapter 4, Web Development.
Like we did in the last chapter, we will develop an application. The goal here is to show you how to work with Maven modules and Swing applications in IntelliJ. If you've never used Maven or Swing before, don't worry; all the steps described in this chapter can be executed by anyone and the hardest tasks and configurations will use files that are available in the Chapter 5 folder.
First of all, we need to create a new module called contacts-desktop. Navigate to File | New Module and, in the New Module window, select Maven Module, type contacts-desktop in the name text field, and then click on the Next button. As we won't change anything in the new window, just click on the Finish button to create the module. After creating the module, the first file that is opened is the pom.xml file that is created based on the information we provided in the New Module window.
If you expand the contacts-desktop node, you will see that it contains a structure that is different from that of the modules created without the Maven facet. Notice that Java and the resources folders are using different icons too. Perhaps, for instance you right-click, on the src/main/java folder, try to create a new class, and don't see any option available; this happens because IntelliJ interprets this folder as a simple folder instead of a source folder. To correct this, right-click on the src/main/java folder and click on Mark Directory As | Source Root; now you can create Java files and other related files.
Let's create a package in the src/main/java folder. Right-click on this folder, click on New | Package, and type org.examp.le.desktop in the name text field for the package. Now we can finally create our main window.
When you are working with Swing applications, you probably will prefer to use a visual tool to create your pane and dialogs instead of hardcoding the visual elements. IntelliJ provides a good WYSIWYG (What you see is what you get) tool that will ease and improve your development performance, so make sure that the UI Designer plugin is enabled. To create a new pane, right-click on the org.example.desktop package, then click on New, and then GUI Form. In the New GUI Form dialog, you can make initial configurations to the form that will be created, such as the Base layout manager. The following figure shows you how to create a new GUI form:
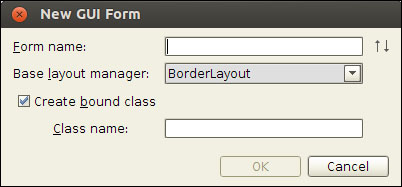
In the Form name: text field, enter the name MainForm; in the Base layout manager: combobox, select FormLayout (JGoodies) and then click on the OK button to create the form. When you create the form, you will see that IntelliJ opens two tool windows: UI Designer, which will show the properties of the element you are working with, and Palette, which will enable you to drag-and-drop the components in the pane. To the center of the screen, the file MainForm.form will be shown as a pane that you can manipulate.
We are going to develop a pane that permits the user to store a new contact in the database, calling the web service we created in Chapter 4, Web Development. As we know, a contact is composed of a person's information, phone numbers, and e-mail addresses. In this way, we will provide three fields that the user will enter: the complete name, the birth date, and the place of birth of the person; two editable tables will be available to manage the phone and e-mail values.
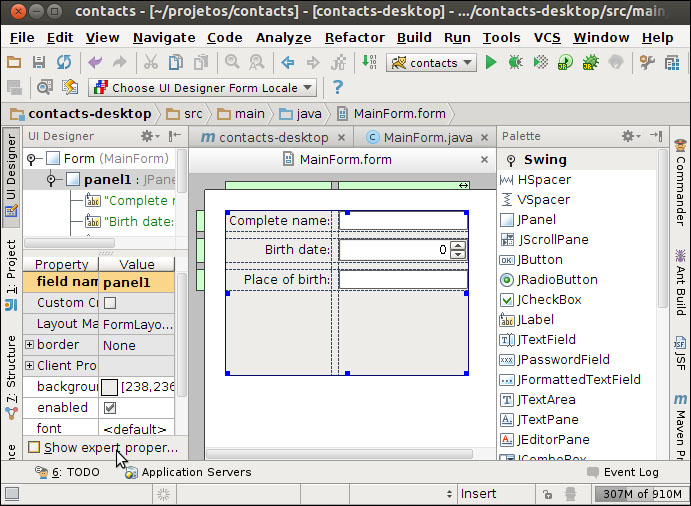
As we now have a pane we will use to show the user, let's add three labels and three input fields there. Go to the Palette tool window, drag-and-drop the JLabel component into the pane, and position it to the top left of the pane. Now add two more JLabel components next to the first JLabel component we added. Double-click on the first label and insert the text Complete name:. Do that for the second and third labels as well and enter Birth date: and Place of birth: respectively. Select the three labels simultaneously, using Ctrl + click; when you're done, look at the UI Designer tool window for the property Horizontal Align and change the value to Right.
Now that the labels are positioned, we need to add the fields that will receive the values to send to the server. In the Palette tool window, click on the JTextField component and drag-and-drop it to the right of the first label. Drag-and-drop a JSpinner component to the right of the second label and finally, drag-and-drop another JTextField component to the right of the third label component, as shown in the following screenshot:
If you select an input and position the mouse over it, you will see a yellow lamp; the intention proposed by IntelliJ this time is to assign the label to the left of the selected input, so click on the lamp and choose the unique option available. Do this for all inputs.
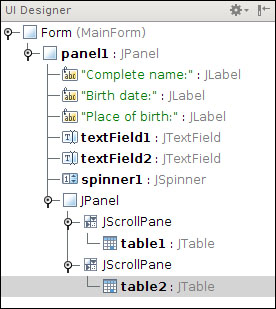
At this time, we have created three inputs for the EntityPerson object. Now we need to create two tables: one for phones and another for e-mails. So, drag-and-drop a JPanel component to the top of the last input field; you will see that it will occupy just a part of the available width, so position the mouse at any corner and expand it until it covers all the width available. Even if you try, you can't expand the height of the new panel—no problem; it will expand based on the components you put inside it. Now drag-and-drop two JTable components to the new panel and position them side-by-side; notice that you can drag a component directly to the UI Designer tree.
When you click on each of the added tables, IntelliJ will show a yellow lamp with an option to surround them with a JScrollPane component. It is a good idea, to select the two JTable component and accept the intention surround with JScrollPane. When you've done this, you will notice that now the tables are using all the height available. Your tree should look like that shown in following screenshot:
If you look at the existing columns in the tables, you will notice that the columns present static data in the column's' shape and color. However, if you preview the form by clicking on the Preview button, you will see that nothing is shown in the space reserved for the tables. The configuration of the columns can be done only in code.
Before we configure the tables, we need to specify better names for the JTable components we instanced. Select the left-hand side JTable component and change the field name property value to phoneTable; then select the right-hand side JTable component and change the field name property to emailTable.
We still need to create the action buttons to add and remove the phone and e-mail address values in a person's contact details; one button will save the contact in the server and another will clean the form so that we can create another contact. We want to insert the add and remove buttons for each table below, but we don't want to put the buttons inside JScrollPane; in this way, we need to wrap the scroll panel with a simple JPanel component. Right-click on the first JScrollPane in the UI Designer tool window and select the option Surround With | JPanel; then do this for the other JScrollPanel. Now, the two JScrollPanel components are surrounded with Jpanel.
We now need to add two buttons in each JPanel we just added. So, drag-and-drop one button into the panel which is on the left-hand side. Notice that the button will fill the entire horizontal space available; as we want to position the two buttons side-by-side, this is unacceptable. Before you add the other button to this panel, select the button we already added and change the property Horizontal Align value to Left; this time, the button is using just a small part of the available horizontal space.
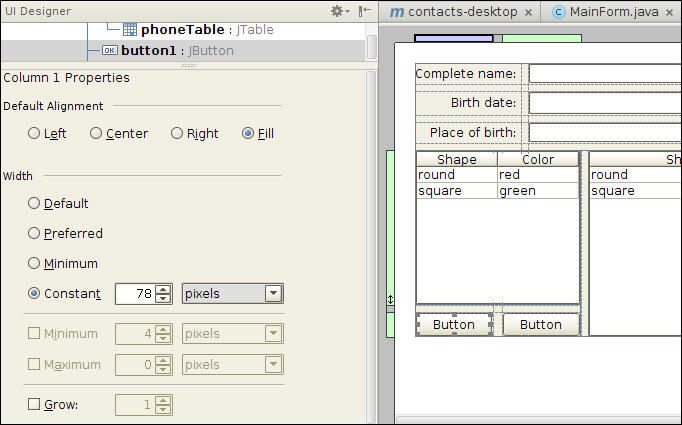
You may imagine, that now you can drag-and-drop a new button to the right side of the first and it will be positioned exactly where you want it to. Do this now and you will see that there is a big empty space between the two buttons; but we don't want so much space. If you are an attentive developer, you will notice that to the top and to the left of the visual editor exist green bars of the same size as the panel in which we are placing the buttons. Click on the first green bar at the top of the window, and you will see that the panel with the properties will change; this will help us set the correct size for each column in the panel.
Let's change some properties for the first green column. Select the checkbox Grow, set its value to 1 and Width to Minimum, and uncheck the Minimum checkbox. Now select the second green bar at the top and follow the same process we did for the first column. The following screenshot shows the visual editor with the green bars and their properties:
Now the two columns are of the same size; however, the first button isn't filling the entire space available. Select the left-hand side button and change the value of the property Horizontal Align to Fill. Now that you know how to add the buttons and position them, do this for the second panel.
Our buttons still don't have the correct labels and names, so do this as follows: change the label of the left-hand side button to Add and the label of the right-hand side button to Remove. Then change the name field for each button, in accordance with the label and the table that the button will manipulate, to addPhoneButton, removePhoneButton, addEmailButton, and removeEmailButton.
Finally, we need to create the save button and the clear button. Drag-and-drop a button component to the pane1 component; notice that it will be positioned to the bottom of the panel. Then place a new button to the right of the recently added button. As you can see, the second button fills almost all the horizontal space in the panel. Again, you will notice two green bars at the top of the panel; select the first one and set the Width to Minimum, uncheck the Minimum checkbox, check the Grow checkbox and set its value to 1, and follow the same process for the second green bar.
We want to position these buttons to the right corner of the panel, so we will use an HSpacer component to do this. Drag-and-drop an HSpacer component to the left of the first button and you will see that a column that covers the entire panel will fill a smaller space and push the components to the right. Now, drag the first button and drop it into the small rectangle that separates it from the second one, and then drag the HSpacer component you positioned into the panel to the rectangle where the first button was positioned. Click on the middle green bar at the top of the panel and perform the same process you did for the others.
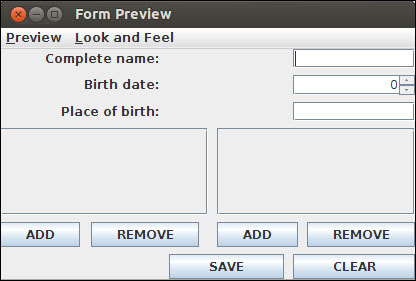
Rename the label of the left-hand side button to &Save and the label of the second button to &Clear. Notice that the & symbol at the beginning of the label will create a shortcut for this button which, in this case, will be Alt + C for the clear button. Finally, change the field name of the buttons to saveButton and clearButton in accordance with the label of the button. If you did everything correctly, you can click on the Preview button, which is shown in the following screenshot:
On clicking the Preview button available in the main toolbar or in the context menu, you will see a dialog like that shown in the following screenshot:
As we already have our user interface ready, we can now create the web service client that will, in fact, create the contact and send it to the database. To create a web service client, we will use a Web Service Description Language (WSDL) file—this is nothing more than an XML file that defines the methods, parameters, and other characteristics of a web service. Using this definition, IntelliJ can identify what is needed to consume the web service and will generate the necessary classes to access it.
To create web services, first of all we need our web service running, so if the contacts-web module isn't running, select it in the Run/Debug Configuration combobox and click on the RUN button. Once Tomcat is running, open the Project Structure tool window, expand the contacts-desktop node until you get to the package org.example.desktop, then right-click on the package and select WebServices | Generate Java Code From WSDL. If you followed the steps in Chapter 4, Web Development without changing anything, you can insert in the field Web service wsdl URL of the window that will appear, the value: http://localhost:8080/services/ContactsPersister?wsdl. However, if you did change something, you will need to find the URL of the WSDL in the web service.
The previous step was shown to you just to highlight the fact that you can work with web services with different technologies (Axis 2, JAX-WS, and so on) in IntelliJ with ease; however, we will generate the client using Apache CXF with Maven. As we need to configure some complex things in pom.xml, it is easier for those new to Maven to just override the pom.xml file of the module; so, open the Chapter 5 folder and override the pom.xml file in the contacts-desktop module to the one in the folder. In the following code, you can see the cxf-codegen-plugin configuration:
<plugin>
     <groupId>org.apache.cxf</groupId>
     <artifactId>cxf-codegen-plugin</artifactId>
     <version>${cxf.version}</version>
     <executions>
          <execution>
               <id>generate-sources</id>
               <phase>generate-sources</phase>
               <configuration>
                    <sourceRoot>src/main/java</sourceRoot>
                    <wsdlOptions>
                         <wsdlOption>
                                    <wsdl>http://localhost:8080/services/ContactsPersister?wsdl</wsdl>
                         </wsdlOption>
                    </wsdlOptions>
               </configuration>
               <goals>
                    <goal>wsdl2java</goal>
               </goals>
           </execution>
       </executions>
</plugin>
After overriding the pom.xml file, you will see that IntelliJ will start background tasks to meet the modifications made, such as downloading the cxf-codegen-plugin. Notice in the previous code that I'm considering that the location of the WSDL is http://localhost:8080/services/ContactsPersister?wsdl; if your WSDL is located in another place (for example, if your server is running in another port), change it based on your configurations. You can download the WSDL file and specify the path in the <wsdl> tag. If you need to change something in pom.xml to adapt to the changes you've made, don't forget that you can use Ctrl + Space bar for code completion and Alt + Enter to use intentions—perhaps you will need to use them. As you probably know, the code will only be generated when we build the project using Maven; but we still haven't created any configuration for Maven in this module.
Navigate to Run | Run/Debug, and click on the Edit Configurations... option. Now, click on the Add New Configuration button (Alt + Insert) and select Maven. In the Name text field, change Unnamed to contacts-desktop. In the Parameters tab, you will see the Command line text field; type in this text field the value clean install. Notice that IntelliJ will propose the values as you are typing. At this time, we won't change any thing else, so click on the OK button.
The configuration we've already created is selected; click on the Run button to build the module using Maven. Once Maven is running, you will notice that new classes and interfaces are present in the org.example.ws package. Now we finally have the classes necessary to bind the GUI with the data structure.
Data binding is a set of techniques that permits two data sources to maintain synchronicity. At this time, we need to bind our visual elements to the data structure of the web service. Before we start binding the data, we need to make some adjustments. As you have seen, we've used a JSpinner component to provide the birth date of the person. However, by default, JSpinner doesn't know how to work with java.util.Date objects, so we need a way to configure the spinner without compromising the code generated by the UI Designer.
Click on the birthDateSpinner element and check the option Custom create; when IntelliJ focuses on the method createUIComponents, enter the following content in the method:
private void createUIComponents() {
        Date date = new Date();
        SpinnerDateModel dateModel = new SpinnerDateModel();
        dateModel.setValue(date);
        birthDateSpinner = new JSpinner(dateModel);
}
What we did is make the JSpinner component use SpinnerDateModel—now this spinner can work with dates. Notice that the createUIComponents method is generated by IntelliJ as a way for you to modify the instantiation of the components without compromising the auto-generated code. So, if you've checked the Custom create option of a component, IntelliJ won't instantiate this element; it is your responsibility to do it now.
To see if it worked, we need to run our application. If you open the MainForm.java class file, you will notice that the generated class doesn't extend any Swing component; this way, we probably need to configure the MainForm class based in the main panel. Fortunately, IntelliJ can create all the code we need to run the application. Press Alt + Insert anywhere inside the MainForm class declaration and select the option Form main. It will create a new main method and create and configure a MainForm object. To run the application, we can simply use Ctrl + Shift + F10. However, we will receive an exception that JGoodies libraries are missing. We can simply add the following dependency in the pom.xml file and run the application again:
<dependencies>
        <dependency>
            <groupId>com.jgoodies</groupId>
            <artifactId>jgoodies-forms</artifactId>
            <version>1.6.0</version>
        </dependency>
</dependencies>
Now, we can finally do the data bind. If it isn't open, open the file MainForm.form, then click on the button Data Binding Wizard. The icon for the Data Binding Wizard is shown in the following screenshot:
The wizard window will appear with the first radio button selected; as we won't create a new bean, select the second radio button: Bind to existing bean. Once you've done it, click on the button with suspension points and a new window will appear to help you find the class we will use. On the text field in the tab Search by Name, type EntityPerson. Two results will appear; select the one that is located in the package org.example.ws and click on OK. You can now click on Next to go to the next window.
A table with two rows will appear to select the Bean Property option and bind it to the Form Field. You can select the two properties according to the name of the field; in other words, select the property placeOfBirth for placeOfBirthTextField and completeName for completeNameTextField, then uncheck the checkbox isModified(), and then can click on the Finish button. The code created is, really simply, just a getter and a setter; however, it can save us some time.
Unfortunately, the bind wizard doesn't help us so much; there are two tables and a spinner that do not get binded. You can manually bind the birthDateSpinner element by simply adding a line in the setter and getter of the class. However, with the JTable components, we need to do some more work as we still haven't configured their models.
As we need to implement so many things, I will provide you with some ready code, so, this way we can focus on specific parts of implementation. In the Chapter 5 folder, there are three files: MainForm.java, EmailTableModel.java, and PhoneTableModel.java; copy these files to the org.example.desktop package and override if necessary. Theoretically, the application can run correctly just by adding these files; however, we need to make some little changes that will guarantee that it will run well.
It's not the best idea to use a WS object directly in the data binding process; however, as this code is just an example, we can ignore that. Open the class EntityPerson that is located in the package org.example.ws; notice that the variables emailsById and phonesById have getters, but don't have setters. We could implement a setter for each variable or instantiate the variables and use the getters; however, this code is generated automatically, so it will be overridden every time you build the module with Maven. The simplest way to solve this problem is by creating a class that extends EntityPerson just to initialize these variables.
Right-click on the org.example.desktop package and create a new class named WrappedEntityPerson. Then, make it extend EntityPerson, press Alt + Insert, and select Constructor. In the following constructor type, position the cursor anywhere and press Ctrl + D to duplicate the line:
this.phonesById=new ArrayList<EntityPhone>();
Now that we have a copy of the phonesById instantiation sentence, change phonesById in the second sentence to emailsById (don't forget that you can use Tab to select the propositions IntelliJ will make). You will see that the second sentence will be underlined in red; press Alt + Enter and select the intention Change "new ArrayList<EntityPhone>()" to "new ArrayList<EntityEmail>()", and then click on Enter. Unfortunately, it will create ArrayList with nothing inside <>; but, if you position the cursor inside <>, you will see that a yellow lamp appears and a new intention helps us. Click on the lamp icon (or use Alt + Enter) and select Replace "<>" with explicit type argument.
Now that we've created our extended class, we need to make sure that only this class will be instantiated by our code instead of the original class EntityPerson. I didn't find any refactoring option that could do it in an easy way, so we will use the Replace in Path dialog just to show you this approach. This isn't a safe way of doing this, mainly because it searches and replaces simple text and no code analysis is done when working this way—the probability that things will go wrong here is high. A safer approach would be to use the Rename refactoring and then change the class name back without refactoring; anyway, this project is really simple and it is a good thing to know that this tool exists.
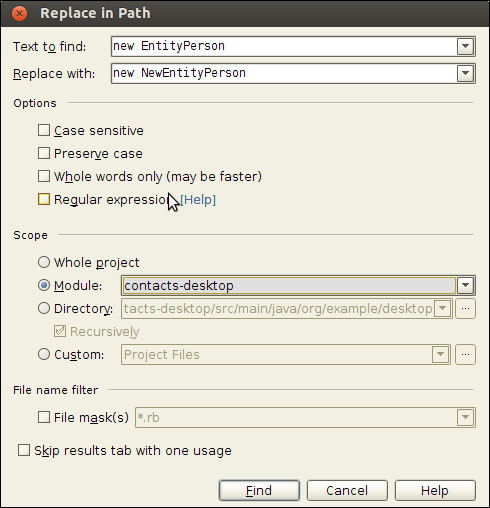
While on any screen, press Ctrl + Shift + R to open the Replace in Path dialog. In the Text to find input field, enter new EntityPerson and in the Replace with input field, type new WrappedEntityPerson. To make sure we won't change the instantiations in other modules, on Scope session, select the Module option and then select the contacts-desktop module in the combobox that will be enabled. Your Replace in Path dialog should look as shown in the following figure:
Click on Find to start the search. After the search is done, it will find two entries as we still don't know if we can change everything; it is more secure to use the Replace button instead of the other options. The first entry found was in the MainForm class, so we can replace it securely. The second one was found in the ObjectFactory class; click on the Skip button as we don't want to replace this.
Our code, at this time, has a problem that will make the user suffer while using the program—the data edited in the tables are only submitted to the object when the user presses Enter after editing a cell. To solve this, we need to simply check a checkbox. Open the MainForm.form file and select the two JTable component that are in the panel, then expand the Client Properties node, and check the checkbox terminateEditOnFocusLost.
At this time, we can run the application and add new contacts calling the web service. To finalize our program, we need to implement a clear action. Click on clearButton, press Ctrl + O, and select the first option: ActionListener. In the new window that will appear, select the method actionPerformed and click on OK. IntelliJ will create the listener code in the MainForm constructor.
The code needed to clear the panel is really simple; basically, we just need to set a new instance to the person variable. So, enter the following code in the listener:
clearButton.addActionListener(new ActionListener() {
    @Override
    public void actionPerformed(ActionEvent e) {
        setData(new WrappedEntityPerson());
    }
});