
Databases are used all the time, in practically all software, directly or indirectly. In this chapter we will learn and understand how to use the tools that IntelliJ provides to ease our work with databases, such as generating tables, managing the data, and even creating ORM entities for JPA or Hibernate.
As the tools used to manage the databases have some specific details, this chapter presents a more practical approach; I hope this way you can improve your abilities in a faster way.
One of the more important activities in a project is the modeling and creation of database structures. Depending on the philosophy of the enterprise you work with, each project can adopt a different database; this can make the job of the Database Administrator (DBA) difficult because he needs to use different tools for each database.
IntelliJ provides a powerful database tool you can use to model and manage any database you want. The only thing you need to configure to use all the power of the tool is the dialect of your database. Generally, it is really simple once IntelliJ suggests a dialect based on the characteristics of the database you are using.
In this chapter, we will work in a more practical way, giving us the knowledge to use the tools correctly and to better establish the concepts.
In the course of this chapter, all activities will be performed using MySQL Version 5.5, so I recommend you to install this version of MySQL to correctly follow the instructions in this chapter. Of course, you can use any database you want; however, it will be your responsibility to understand and adapt the information present here to your favorite database. This is not a big deal as you just need to use a slightly different connection string and syntax.
I'm assuming you already have an instance of MySQL installed and running. As you would know, information about installing and configuring the database server is outside of the scope of this book, especially because this is a simple task that you can do upon running a search for instructions over the internet. Once you have a MySQL installed, let's create a database and see how you can connect with that database using IntelliJ.
To begin, we need to create the database using the MySQL console. To create a database in MySQL, just open Command Prompt on Windows or Terminal on GNU/Linux and connect with the server using the following code:
mysql -u root -p
When asked, type the superuser password used in MySQL installation. The MySQL console will open. We are going create the contacts database, so type the following code in the MySQL console:
create database contacts;
Once the database is created, let's come back to IntelliJ. Assuming you still haven't created any project in IntelliJ, we will see the welcome window when IntelliJ is opened. To do anything in IntelliJ, we need to use a project; so, create one by clicking on the option Create New Project available in the Quick Start panel. In the New Project window that will appear, you will see a list of the possible types of projects. This list may be different depending on the plugins that are enabled or disabled; for example, if you disable the Android plugin, no option of the Android project will be available. As we will only work with database in this part, we use the Empty Project option; so, select this option and type database in the project name input field. In the project location, use any path you prefer and then click on the Finish button.
After you click on the Finish button, a new window will appear to help you configure the environment of the project; at this time, nothing is necessary to be configured, so close this window by clicking on the Cancel button. Finally, the main window of IntelliJ is opened and now you can select the database tool available in the right tool tab pane. If the database tool isn't available in the tool tab pane, go to View | Tool Windows | Database in the main menu and open it. The following screenshot shows the Database tool:
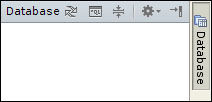
The first impression I had when I saw this tool like it is now was: this tool is totally irrelevant. After some time, I noticed it was a really wrong impression. Looking at the five buttons in the title bar, we can't see anything that might help us use this tool; there is just the Synchronize button, the Console button, the Collapse button, and the other two buttons—the Hide button and the Gear button—and they are common in all tool windows. So, you are now probably asking yourself, "how do I use this tool?"—context menus are the answer.
To create a data source connection, right-click anywhere in the content panel of the database tool and go to New | Data Source
; a new window will appear asking you for information about the data source connection. In the Data source name text field, insert the text contacts. At the right-hand side of this text field, you will see a combobox named scope; by default, the selected option is Project which means that this data source is available only in this project as opposed to using this data source in other projects and changing it to the IDE option. This is a useful option when we need to share the same database with multiple projects.
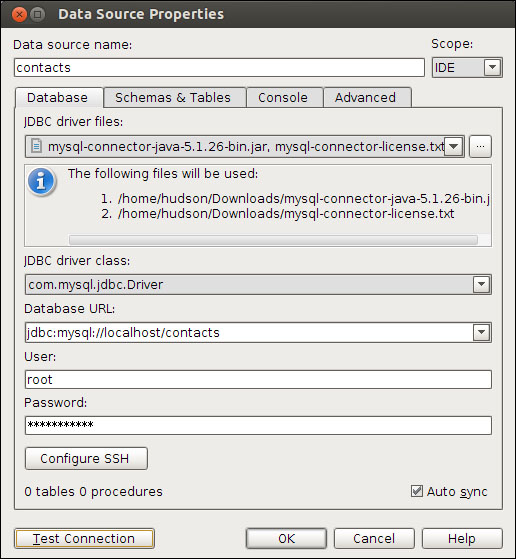
Below the Data source name field, you will see some tabs; in the first tab, we will configure the connection; so in the JDBC driver files combobox, click on the MySQL Connector/J-5.1.22 (download) option. A message asking for download will appear; click on the Click here link to download the files needed, select a directory to save the files, and click on OK. After the download of the files, the JDBC driver class: combobox will be selected with the correct driver.
If you are in doubt about how to write the jdbc URL, click on the arrow in the combobox and you will see some templates; you can select one of them and substitute the values but, in our case, just type in the database URL text field the value jdbc:mysql://localhost/contacts. Enter the username (commonly: root) and the password in the corresponding text fields and click on the Test Connection button to see if the connection is correctly configured.
If everything looks okay, open the Schemas & Tables tab. On this tab, you can see all the schemas available in the data source and select the ones you want to work with. We want to use only one of them to search for tables, so mark the check boxes Scan for Tables and Make Default for the schema contacts.
Now, the tool needs to understand the database dialect it is working with; this information will enable autocomplete and syntax correction when you are typing SQL commands. Open the Console tab and select MySQL as the default SQL dialect. Now you can click on the OK button and see that the new data source is available in the Database tool. The following screenshot shows the Data Source Properties window:
As you know, our database doesn't have any tables; this is the reason you won't see anything beyond the schema and the status of the connection when you expand the contacts root node. To create a table, right-click on the contacts schema node and select New and, after this, click on the Table option. The Create New Table window will open. The name of our table will be person, so type it in the table's text field.
This table will have only four columns: id, complete_name, birth_date, and place_of_birth, and we need to create them now. To create a column, just click on the + icon and, once the column is added, a pane will be visible to set the properties for the column. The following are the properties you should enter in each column:
id: Its data type isINT—don't forget to ensure that the primary key option is presentcomplete_name: Its data type isvarchar (250)birth_date: Its data type isdateplace_of_birth: Its data type isvarchar (250)Once you've created all the columns, click on the OK button to create the table and you will see the table in the Database tool. The following screenshot shows the dialog used to create
persontable: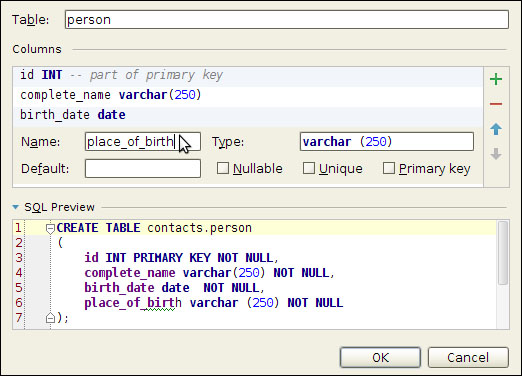
We are going create two other tables but, this time we will use the query console. To open the console, just click on the Console button available in the title bar of the tool. When the query console is opened, insert the following SQL query:
CREATE TABLE email (
  id int(11) NOT NULL,
  email varchar(256) NOT NULL,
  PRIMARY KEY (id)
);
To execute the sentence, click on the Execute button located at the top-left corner of the query editor or simply use the Ctrl + Enter shortcut (Command key + Enter in Mac). If everything is okay, you will see the table
e-mailin the database tool. Now let's create thephonetable:CREATE TABLE phone ( id int(11) NOT NULL, number varchar(13) NOT NULL, PRIMARY KEY (id) );
Type this query in the query console and execute it. Now, we have three tables in our little project, but they don't have any relationship between them; it's time to create these relationships. In this example, we assume that a person can have more than one e-mail account and more than one phone. We also assume that an
e-mailorphonewill correspond to only one person; this way, we have two 1:n relationships: one betweenpersonande-mail, and another betweenpersonandphone. So, it's time to create these relationships.To create these relationships, we need to create a foreign key in
phoneand ine-mail. Right-click on the table e-mail, click on New , and then click on Column. In the Add new column dialog, enterperson_idas the name of the column andintas the type, then click on the OK button. Now do the same for thephonetable.After doing this, you will see the
person_idcolumn in thee-mailandphonetables; however, we haven't created a foreign key yet. To do this, right-click on the person_id column in thephonetable, click on New, and then click on Foreign key. In the Add foreign key window, you need to specify the referenced table; in our case, the table isperson. Note that, while you are typing, IntelliJ will suggest some options based on the information in our database. Click on OK when you are finished and do the same thing for thee-mailtable. If everything is executed well, you will see a light blue key on the icon of theperson_idcolumn. Finally, we have a database with the referenced column.If you are attentive, you will notice that none of the
idcolumns use theauto_incrementapproach to generate the id automatically. Looking at the visual tools, I didn't find a way to addauto_incrementin a column, so, we will do it using the query console:ALTER TABLE email MODIFY COLUMN id INT NOT NULL AUTO_INCREMENT; ALTER TABLE person MODIFY COLUMN id INT NOT NULL AUTO_INCREMENT; ALTER TABLE phone MODIFY COLUMN id INT NOT NULL AUTO_INCREMENT;
If you just position the cursor anywhere in the console, it will execute only the query that the cursor is hovering over. A better approach is to select all the sentences and click on the Run button; this way, all the selected sentences will be executed in the order they are selected.
Now that everything looks good, let see the diagram of the database so we can identify the relationships and characteristics of each table better. When creating a diagram, IntelliJ only uses the table you've selected and any other table related to it so, if you select only the phone table, the diagram will show just the
phoneand thepersontables. If you want to see all the tables, go to the Database tool and select all the three tables; you can do this as you do in your OS, for example, holding Shift and selecting the first and last tables. Once you've selected the tables, right-click on the selection and choose Diagrams and select one of the two subsequent options: Show visualization or Show visualization popup. The Show visualization popup will only show the diagram in a pop up, without any other option. The Show visualization option will show the diagram and some options available on the toolbar, such as the button to show or hide the columns and refactor options. The following diagram shows the database: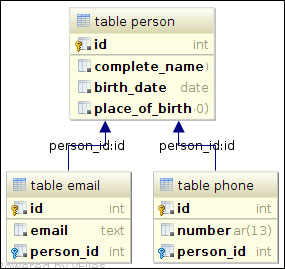
Now that we have a database and the tables correctly configured, what we need at this time is to populate our tables. If you are working with a low quantity of data, a visual approach could probably be better than using SQL sentences, so let's insert some data in the tables using Table editor. Just right-click on the person table and select the Table editor option. When Table editor appears, you will see a new tab with options to manage the data in the table and, at the bottom of it, you will see two other tabs: Data and Text. The Data tab is used to manage the table using visual controls such as buttons and tables. The Text tab is used like a query console, however, with fewer options.
We will add a contact using the visual approach, so make sure the Data tab is active and click on the Add new row button (Alt + Insert). When you insert a row, the first column of the new row is focused; in our case it is the id column in the person table. You could try to force this column to lose focus using the mouse; however, you won't have success with it. To lose focus in this cell, you will need to insert a value (for example, null) or simply press the Esc key. As we want to use auto_number of this column, make this cell assume a null value. Focus on the complete_name cell, insert the text John Wilson, and press Enter (or Tab) to go to the birth_date field. If you haven't noticed, in each cell you observe a button with … available. Depending on the type of the column, different things will appear when you click on this button; in the case of the date type a calendar will show. Click on that button and select the date 1980- 05-30 then press Tab, insert New York, NY in the last column, and press Enter. In the following screenshot, you can see the table editor in action:

As we have lot of things to do, you can use the files available in this book to load the data in our database. Click on the File menu and choose Open...; in the dialog that appears, select the file email.sql and click on the OK button. The file will be opened in a new tab. You will notice that at the top of the tab is a yellow bar asking about the SQL dialect; click on the link at the right called Change dialect to.... In the SQL Dialects window, select the line project and click on the cell in the column SQL Dialect. A list of available dialects will appear, so, select MySQL and press the OK button.
You've probably noticed that this file wasn't opened in the query console and that there isn't any button available to execute the script. Differently from the query console, when you open a SQL script directly with IntelliJ, you don't need to put the cursor over a line you want to execute; the whole script will be executed, and that is what we want. To execute it, right-click anywhere in the script and select Run "email.sql"; now, if you use the Refresh button in the table editor in the person table, you will see that the data was inserted into the table. Now you can do the same for phone.sql and person.sql files.
Once the data is loaded in all the tables, we can work with them; so, if it isn't open, open the person table in the table editor. As you can see, some data is loaded by default, but this is limited to 52 records—you can see this when you click on the Query button. Despite being a tool that will sometimes help you, the table editor doesn't permit changes in the query used to retrieve data and doesn't have some visual facilities that are available in tools like Microsoft Access; so, if you want to see two or more tables together, you need to write the query in a query console.
We will now create a simple database view that permits us to see the data from the person table joined with the data from the e-mail table; so, open the query console and type the following query:
create view person_and_email as
select person_id,email.id as
email_id,
complete_name,
birth_date,
place_of_birth,
email
from person
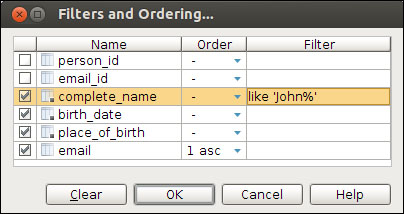
left join email on person.id=email.person_idAfter inserting the query, click on the Execute button (or use Ctrl + Enter); you will see a new entry in the database tool with an icon with a magnifier named person_and_email—right-click on it and select the View editor option. As you probably know, view editor won't let you change the data as it is only a view, but you can use filters to limit the results. This time, we want to see only the rows in which the name of the person starts with John ordered by email address and we don't want to see any ID, so click on the Filter button to open the Filter window. In the Filter window, uncheck the person_id and email_id check boxes, then in the Order column in the email row, select 1 asc. Finally, at the filter column of complete_name row, insert the sentence like 'John%'
, as shown in the following screenshot:
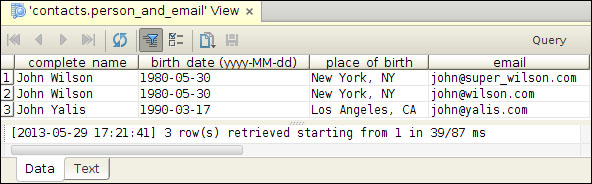
The following image shows data presented in view editor:
If we want to send this data to someone using another format, we need to export it. At the toolbar in table view exists a button called Copy data as; when you click on it, a menu will be shown in this menu. Select the option Save all to file and, finally, select HTML Table. In the Save dialog, select any location you want and a name for the file; you can now open it in your favorite browser and see that the data is correctly inserted in the HTML table.
As you've seen, you can export the data to various formats, from comma-separated values to the JSON format, allowing you to decide which one will best meet your needs. You can open these kinds of tools in IntelliJ too, for example, if you open a CSV file in the IDE, you will see a text and a Data tab in the bottom and clicking on the Data tab will permit you to see the data in the file in a tabular format. I should remind you that only the SQL formats can be used to load data using IntelliJ; so, if you want to export the data to load it using the IDE, only export to SQL formats.