
The great majority of the time, you will only generate a WAR file when the project is ready for production. Other times, we will use the exploded version running in a local application server so we can test the application in a faster way. It's time to configure and run a web application using IntelliJ.
If you haven't already noticed, in the main toolbar there is an empty combobox beside the Make Project button (as you can see in the following figure). This combobox permits the selection of the configuration you want run. The configuration can be of different kinds, from a simple Java application to Maven and application servers. To run our web application, we need to create a new configuration that enables the execution of an application server, as shown in the following screenshot:
In this example, we will use a Java servlet container called Apache Tomcat 7 (http://tomcat.apache.org/download-70.cgi); so, if you haven't already installed it, do it now. As you can imagine, the installation and configuration of Apache Tomcat is outside of the scope of this book. The installation is really simple and you can find good directions on how to do it at the Apache website http://tomcat.apache.org/tomcat-7.0-doc/setup.html and over the web.
After you've installed the Apache Tomcat server, we can create a configuration to use it. Click on the Select Run/Debug Configuration combobox and select the option Edit Configurations.... After you do that, a new window called Run/Debug Configuration will be shown. In this window, click on the Add button and select the Tomcat option. At least in my case, I couldn't see any option called Tomcat or Apache Tomcat. If, like me, you can't find this option, close this window right now.
This kind of problem generally happens when something in IntelliJ is disabled, in this case, the Tomcat plugin. Open the configuration Settings window (Ctrl + Alt + S) and, in the search textfield, type tomcat. You will see that only two options will be available; click on the Plugins option and you will see that the plugins are filtered by the search content. Check the plugin Tomcat and TomEE Integration. Click on the OK button and IntelliJ will ask if you want to restart the application—do it.
Now that the Tomcat plugin is enabled, we don't have excuses for not yet having found the Tomcat option. Open the Run/Debug Configuration window and expand the Default node. We don't need to configure anything at the default node to run Tomcat or any other configuration; however, when we configure the elements in the default node, we reduce the time that would be spent in other projects that need similar configurations. For example, let's suppose you're using the same server in four different projects and, on a beautiful day, you decided to change the port that Tomcat was running from 8080 to 80. If you configured the default node, you need to change it just once. The same occurs in the other configurations available here, such as TestNG.
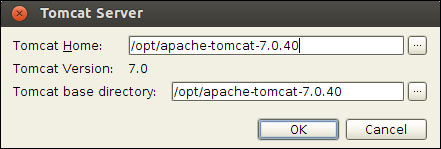
To configure the default configuration of Tomcat, expand the Tomcat Server node and click on the Local option. To the right-hand side of the window, the panel will show some tabs, and in the Server tab we can, configure the Tomcat Sever. In the Application Server combobox, we need to select which installation of Tomcat we want to use; however, at this time, nothing is available, so click on the button Configure... which is positioned to the right-hand side of this combobox. A new window will appear asking about the path where Tomcat is installed so, in the first input field, enter the name of the path where you've installed Tomcat. If IntelliJ recognizes Tomcat in the selected directory, it will fill in the other input field and detect the Tomcat version. If everything is fine, click on the OK button. The following screenshot shows how the path of the Tomcat server is defined; note that this configuration may vary depending on the place where you've installed Tomcat.
At least for now, there isn't anything more we want to set in the default configuration of Tomcat, so click on the Apply button to save the changes. Even after modifying the default Tomcat configuration, we still need to add a specific configuration for this project; so, click on the Add New Configuration (Alt + Insert) button, select Tomcat Server, and then click on Local. A new node called Unnamed will be created inside the Tomcat Server node and the panel to the right will show similar options as does the default configuration. At the top, there is a text field called Name: with Unnamed as its value (as you can see it in the screenshot below)—change this to Tomcat.
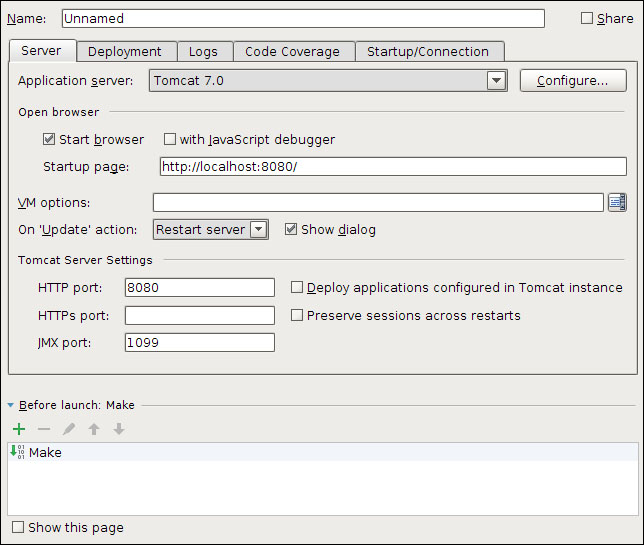
The great majority of the time, IntelliJ is capable of identifying problems and proposing solutions. One important thing you should never forget to define when adding the configuration of an application server is the artifact that you want to deploy. As we haven't declared this, IntelliJ shows a message at the bottom of the window indicating the problem and providing a button to solve the problem. Click on the Fix button and you will see that IntelliJ will configure the war artifact we created to be deployed in Tomcat. As we don't want to change anything more here, click on the OK button to save and close the changes. The following screenshot shows that IntelliJ knows something is missing. Now, the Tomcat configuration is selected in the Select Run/Debug Configuration combobox and a
Now that we have the application server configured, let's run our application to see if everything is alright. If it is not selected, select Tomcat in the Select Run/Debug Configuration combobox, then press the Run button (Shift + F10) to start the application server and deploy our application. After making the project, IntelliJ will open a new tool window called Run
; this tool is used to monitor the execution of the module we selected to run, which in our case is the contacts-web module running on Tomcat. At this moment, as our project doesn't have any content on the JSP page, a blank page will be shown in your default web browser.