Chapter 9. Dynamic double combo
This chapter covers
- The client-side JavaScript
- The server side in VB .NET
- Data exchange format
- Refactoring into a reusable component
- Dynamic select boxes
If you have ever shopped for a new shirt online, you may have run into the following problem. You pick the shirt size from one drop-down list, and from the next drop-down list you select the color. You then submit the form and get the message in giant red letters: “Sorry, that item is not in stock.” Frustration sets in as you have to hit the back button or click a link to select a new color.
With Ajax we can eliminate that frustration. We can link the selection lists together, and when our user selects the size option from the first list, all of the available colors for that shirt can be populated to the second list directly from the database—without the user having to refresh the whole page. People have been linking two or more selection lists together to perform this action with either hard-coded JavaScript arrays or server-side postbacks, but now with Ajax we have a better way.
9.1. A double-combo script
In a double-combination linked list, the contents of one selection list are dependent on another selection list’s selected option. When the user selects a value from the first list, all of the items in the second list update dynamically. This functionality is typically called a double-combo script.
There are two traditional solutions for implementing the dynamic filling of the second selection list: one is implemented on the client and the other on the server. Let’s review how they work in order to understand the concepts behind these strategies and the concerns developers have with them.
9.1.1. Limitations of a client-side solution
The first option a developer traditionally had was to use a client-side-only solution. It uses a JavaScript method in which the values for the selection lists are hard-coded into JavaScript arrays on the web page. As soon as you pick a shirt size, the script seamlessly fills in the next selection list by selecting the values from the array. This solution is shown in figure 9.1.
Figure 9.1. The client-side solution
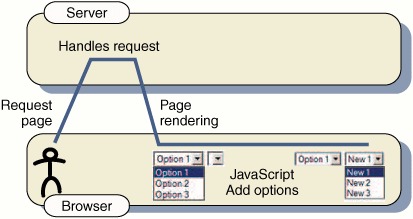
One problem with this client-side method is that, because it does not communicate with the server, it lacks the ability to grab up-to-date data at the moment the user’s first selection is made. Another problem is the initial page-loading time, which scales poorly as the number of possible options in the two lists grows. Imagine a store with a thousand items; values for each item would have to be placed in a JavaScript array. Since the code to represent this array would be part of the page’s content, the user might face a long wait when first loading the page. There is no efficient way to transmit all of that information to the client up-front.
On the other hand, the JavaScript method has one benefit: after the initial load time, it is fast. There is no major lag between selecting an option from the first selection list and the second list being populated. So this method is only usable if you have just a few double-combination options that will not impact the page-loading time significantly.
9.1.2. Limitations of a server-side solution
The next traditional solution is the submission of a form back to the server, which is known as a page postback. In this method, the onchange event handler in the first selection list triggers a postback to the server, via the submit() method of the form’s JavaScript representation. This submits the form to the server, transmitting the user’s choice from the first select element. The server, in turn, queries a database based on the value that the user selected, and dynamically fills in the new values for the second list, as it re-renders the page. You can see the process of the server-side method in figure 9.2.
Figure 9.2. The server-side postback method
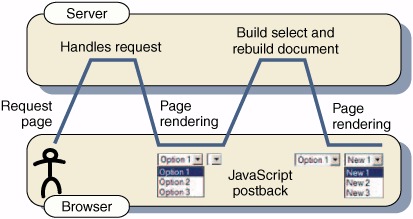
A drawback to the server-side method is the number of round-trips to the server; each time the page is reloaded, there is a time delay, since the entire page has to re-render. Figure 9.2 shows all of the extra processing required. Additional server-side code is also needed to reselect the user’s choice on the first select element of the re-rendered page. Moreover, if the page was scrolled to a particular spot before the form was submitted, the user will have to scroll back to that location after the page reloads.
9.1.3. Ajax-based solution
We can avoid the problems of the JavaScript and server-side solutions by using Ajax to transfer data to the server and obtain the desired information for the second selection list. This allows the database to be queried and the form element to be filled in dynamically with only a slight pause. Compared with the JavaScript method, we are saving the extra page-loading time that was required to load all of the available options into the arrays. Compared with the server-side postback solution, we are eliminating the need to post the entire page back to the server; instead, we are passing only the information necessary. The page is not reloaded, so you do not have to worry about the scroll position of the page or what option was selected in the first drop-down field. The initial page loading time is also shortened since the JavaScript arrays do not have to be included in the page.
This example will involve two selection lists. The first selection list contains the sales regions for a company. The second selection list displays the related territories for the selected region, as shown in figure 9.3.
Figure 9.3. The Ajax solution
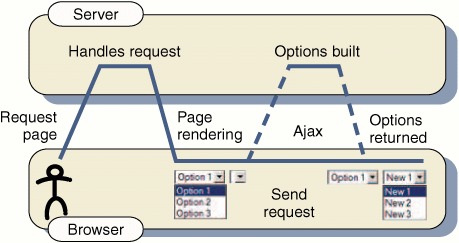
When the user selects a region from the first selection list, the client sends a request to the server containing only the necessary information to identify both the selected region, and the form control to populate with the list of territories. The server queries the database and returns an XML document containing the names of the territories in the selected region, and also the names of the form and the control that the client needs to update. Let’s see how this works.
The first step in building the Ajax solution takes place on the client.
9.2. The client-side architecture
The client-side architecture is foreign territory to most developers who normally write server-side code. In this case, it is not that scary since we need to take only a few steps to get the options into our second selection list. If you have implemented the JavaScript or server-side solutions for a double combo before, then you have already have experience with part of the processes involved.
As you can see in figure 9.4, this application’s client-side interaction does not require many steps. The first step is to build the initial form. The user then selects an item from the form’s first select. This initiates the second step of the client-side architecture, which is to create an XMLHttpRequest object to interact with the server. This transmits the user’s selection to the server, along with the names of the form and the control that will be updated when the server’s response is received. The third part requires us to add the contents of the server’s XML response to the second select element. JavaScript’s XML DOM methods are used to parse the XML response.
Figure 9.4. Client-side architecture, showing the Ajax interaction

Let’s go over the first two steps, which happen before the Ajax request is sent to the server. We’ll explain the third step (the DOM interaction with the server’s XML response document) in more detail in section 9.4, since we need to talk about the server before we can implement the client-side architecture completely.
9.2.1. Designing the form
The form in this example involves two select elements. The first select element will initially contain values, while the second selection list will be empty. Figure 9.5 shows the form.
Figure 9.5. Available options in the first select element

The first form element can be filled in three separate ways initially, as shown in table 9.1.
Table 9.1. Three ways to populate a form element
|
Method |
Advantages |
Disadvantages |
|---|---|---|
| Hard-code the values into the select element. | No server-side processing. | Options cannot be dynamic. |
| Fill in the values by using a server-side script. | Options can be dynamic and pulled from the database. | Requires extra processing on the server. |
| Use Ajax to fill in the values; this method posts back to the server to retrieve the values. | Can be linked to other values on the page. | Requires extra processing on the server. |
The first method is to hard-code the values into the select element. This method is good when you have a few options that are not going to change. The second method is to fill in the values by using a server-side script. This approach fills in the options as the page is rendered, which allows them to be pulled from a database or XML file. The third method is to use Ajax to fill in the values; this method posts back to the server to retrieve the values but does not re-render the entire page.
In this example, we are hard-coding the values into the selection list since there are only four options and they are not dynamic. The best solution for dynamically loading values into the first selection list is to use a server-side script that fills the list as the page is loaded. Ajax should not be used to populate the first selection list unless its contents depend on other values the user selects on the form.
The first selection list needs to have an onchange event handler added to its select element, as shown in listing 9.1. This event handler calls the JavaScript function FillTerritory(), which initiates the process of filling the second selection list by sending a request to the server.
Listing 9.1. The double-combo form
<form name="Form1">
  <select name="ddlRegion"
  onchange="FillTerritory(this,document.Form1.ddlTerritory)">
    <option value="-1">Pick A Region</option>
    <option value="1">Eastern</option>
    <option value="2">Western</option>
    <option value="3">Northern</option>
    <option value="4">Southern</option>
  </select>
  <select name="ddlTerritory"></select>
</form>
The code in listing 9.1 creates a form that initiates the FillTerritory() process when an item is chosen in the first selection list. We pass two element object references to the FillTerritory() function. The first is the selection list object that the event handler is attached to, and the second is the selection list that is to be filled in. The next step for us is to develop the client-side code for FillTerritory(), which submits our request to the server.
9.2.2. Designing the client/server interactions
The FillTerritory() function’s main purpose is to gather the information that is needed to send a request to the server. This information includes the selected option from the first list, the name of the form, and the name of the second selection list. With this information we can use the Ajax functions in our JavaScript library to send a request to the server. The first thing we need to do is add our Ajax functionality. The code needed to link to the external JavaScript file, net.js, which defines the ContentLoader object, is trivial. Just add this between the head tags of your HTML document:
<script type="text/javascript" src="net.js"></script>
The ContentLoader object does all of the work of determining how to send a request to the server, hiding any browser-specific code behind the easy-to-use wrapper object that we introduced in chapter 3. It allows us to send and retrieve the data from the server without refreshing the page.
With the Ajax functionality added, we are able to build the function FillTerritory(), shown in listing 9.2, which we also add between the head tags of our document.
Listing 9.2. The function FillTerritory() initializes the Ajax request.
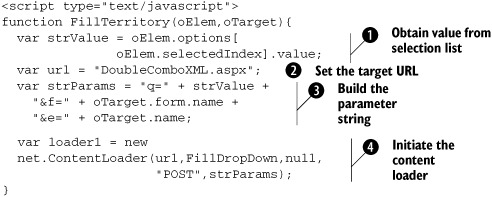
The FillTerritory() function accepts two parameters, passed in this case from the onchange event handler on the first selection list. These are references to the first and second select elements. ![]() We access the value that the user selected in the first list.
We access the value that the user selected in the first list. ![]() We set the URL of our target server-side script.
We set the URL of our target server-side script. ![]() We then build the parameters to be sent to the server by creating a string that has the same type of syntax as a querystring,
using an ampersand to separate each name-value pair. For this example we are sending the value representing the selected region
as q, the name of the form as f, and the name of the second select as e. The server-side code will use the selected region value to query the database, and it will send the names of the form and
the select element back to the client in its XML response document. The client will use that information to determine which form and
control to update. Once the parameter string is built, the only thing left is to initiate the Ajax process.
We then build the parameters to be sent to the server by creating a string that has the same type of syntax as a querystring,
using an ampersand to separate each name-value pair. For this example we are sending the value representing the selected region
as q, the name of the form as f, and the name of the second select as e. The server-side code will use the selected region value to query the database, and it will send the names of the form and
the select element back to the client in its XML response document. The client will use that information to determine which form and
control to update. Once the parameter string is built, the only thing left is to initiate the Ajax process.
![]() To start the process, we call the ContentLoader() constructor, and pass in the target URL, the function to be called when the server’s response is received, the error-handler
function, the HTTP method to use, and the parameters to be sent. In this case, the FillDropDown() function will be called when the data is returned from the server, we will rely on ContentLoader’s default error-handler
function, and we are using a POST request.
To start the process, we call the ContentLoader() constructor, and pass in the target URL, the function to be called when the server’s response is received, the error-handler
function, the HTTP method to use, and the parameters to be sent. In this case, the FillDropDown() function will be called when the data is returned from the server, we will rely on ContentLoader’s default error-handler
function, and we are using a POST request.
At this point, the ContentLoader will wait for the server to return an XML document. The client-side code continues in section 9.4, but first, the server has some work to do.
9.3. Implementing the server: VB .NET
The server-side code needs to retrieve the territories belonging to the user’s selected region from the database, and return them to the client in an XML document. The result set from the SQL query is used to create an XML document that is returned to the client side. Figure 9.6 shows the flow of the server-side process.
Figure 9.6. Server-side process flow diagram

The server-side code is invoked by the request sent from the client-side ContentLoader object. The server-side code first retrieves the value of the request parameter q, representing the selected region. The value of q is used to create a dynamic SQL query statement, which is run against the database to find the text/value pairs for the second drop-down list. The data that is returned by the database query is then formatted as XML and returned to the client. Before we write the code to do this, we need to define the basic XML document structure.
9.3.1. Defining the XML response format
We need to create a simple XML document to return the results of our database query to the client. It will contain the options to populate the second selection list. A pair of elements is needed to represent each option, one to contain the option text, and one to contain the option value.
The XML document in our example has a root element named selectChoice, containing a single element named selectElement, followed by one or more entry elements. selectElement contains the names of the HTML form and selection list that the results will populate on the client. Each entry element has two child elements, optionText and optionValue, which hold values representing each territory’s description and ID. Listing 9.3 shows this structure.
Listing 9.3. Example of the XML response format
<?xml version="1.0" ?>
<selectChoice>
  <selectElement>
    <formName>Form1</formName>
    <formElem>ddlTerritory</formElem>
  </selectElement>
  <entry>
    <optionText>Select A Territory</optionText>
    <optionValue>-1</optionValue>
  </entry>
  <entry>
    <optionText>TerritoryDescription</optionText>
    <optionValue>TerritoryID</optionValue>
  </entry>
</selectChoice>
Notice in the example XML document in listing 9.3 that there is an entry containing the option text “Select A Territory”. This is the first option shown in the selection list, prompting the user to choose a value. The server-side code includes this value at the start of every response document, before the dynamic options are obtained from the database.
Now that we have our response document defined, we can develop the code that dynamically creates the XML and returns it to the client.
9.3.2. Writing the server-side code
The VB .NET server-side code is straightforward. We perform a query on a database, which returns a record set. We then loop through the record set to create our XML document and send the XML back to the client. If we do not find any records, then we do not create any entry elements, also omitting the static “Select A Territory” option. As you can see in listing 9.4, the server-side code is not very complicated. It simply contains statements to retrieve the form values posted to the server, set the content type, perform a search, and output the XML document.
This example uses the Northwind sample database from Microsoft’s SQL Server.
Listing 9.4. DoubleComboXML.aspx.vb: Server-side creation of the XML response
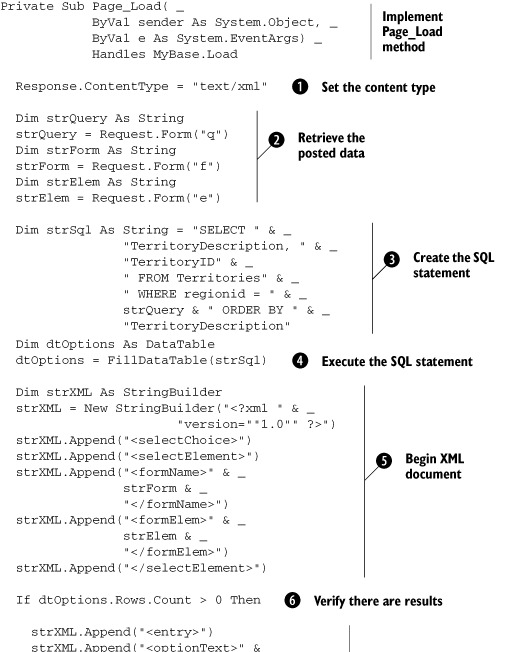
Setting the page’s content type ![]() to text/xml ensures that the XMLHttpRequest will parse the server response correctly on the client.
to text/xml ensures that the XMLHttpRequest will parse the server response correctly on the client.
We obtain the value of the selected region, the HTML form name, and the element name from the request parameters ![]() received from the client. For added safety, we could add a check here to make sure that these values are not null. If the
check does not find a value for each, the script could return an error response. We should also add checks for SQL injection
before the application enters a production environment. This would ensure that the database is protected from malicious requests
sent by attackers.
received from the client. For added safety, we could add a check here to make sure that these values are not null. If the
check does not find a value for each, the script could return an error response. We should also add checks for SQL injection
before the application enters a production environment. This would ensure that the database is protected from malicious requests
sent by attackers.
Having obtained the selected region’s value, the next step is to generate a SQL string so we can retrieve the corresponding
territories from the database ![]() . The two columns we are interested in are TerritoryDescription and TerritoryID, from the database table Territories. We insert the region value into the SQL statement’s WHERE clause. To ensure that the results appear in alphabetical order in our selection list, we also set the SQL ORDER BY clause to TerritoryDescription. Next, we must execute the SQL statement
. The two columns we are interested in are TerritoryDescription and TerritoryID, from the database table Territories. We insert the region value into the SQL statement’s WHERE clause. To ensure that the results appear in alphabetical order in our selection list, we also set the SQL ORDER BY clause to TerritoryDescription. Next, we must execute the SQL statement ![]() . In this case, we call the function FillDataTable() to create a connection to the database server, perform the query, and return the results in a data table.
. In this case, we call the function FillDataTable() to create a connection to the database server, perform the query, and return the results in a data table.
Now that we have obtained the result of the SQL query, we need to create the first part of the XML document ![]() , which was discussed in listing 9.2. We begin the document and add the selectElement, containing the values of formName and formElem obtained from the request parameters.
, which was discussed in listing 9.2. We begin the document and add the selectElement, containing the values of formName and formElem obtained from the request parameters.
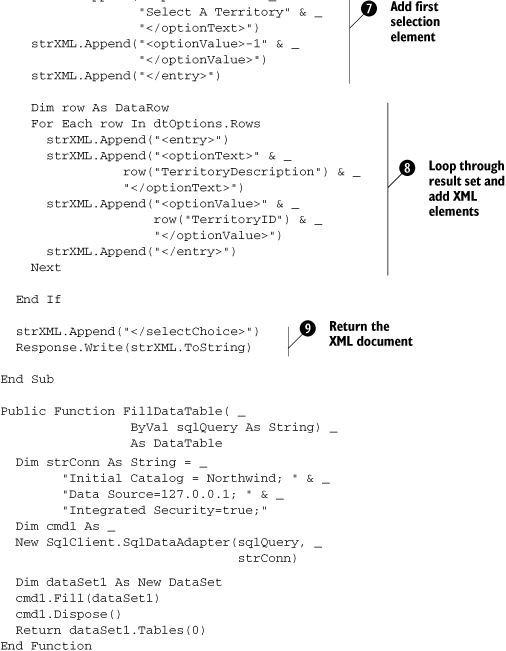
A check is needed to verify if any results were returned by the SQL query ![]() . If there are results, we add the preliminary “Select A Territory” option
. If there are results, we add the preliminary “Select A Territory” option ![]() to the XML.
to the XML.
Next we loop through the results represented in the DataTable ![]() , populating the value of the TerritoryDescription column into the optionText tag and the value of the TerritoryID column into the optionValue tag. By nesting each description/ID pair inside an entry tag, we provide an easier means to loop through the values on the client, with JavaScript’s XML DOM methods. After we finish
populating our results into the XML document, we need to close the root selectChoice element and write the response to the output page
, populating the value of the TerritoryDescription column into the optionText tag and the value of the TerritoryID column into the optionValue tag. By nesting each description/ID pair inside an entry tag, we provide an easier means to loop through the values on the client, with JavaScript’s XML DOM methods. After we finish
populating our results into the XML document, we need to close the root selectChoice element and write the response to the output page ![]() . The XML response document is returned to the client, and the ContentLoader object is notified that the server-side process
is complete. The ContentLoader calls the function FillDropDown() on the client, which will process the XML that we just created.
. The XML response document is returned to the client, and the ContentLoader object is notified that the server-side process
is complete. The ContentLoader calls the function FillDropDown() on the client, which will process the XML that we just created.
Let’s recap what we’ve done on the server. We have taken the value from a selected item in a selection list and have run a query against a database without posting back the entire page to the server. We have then generated an XML document and returned it to the client. The next step in the process takes us back to the client side, where we must now convert the XML elements into options for our second selection list.
9.4. Presenting the results
We now have the results of our database query in an XML document, and we are going to navigate through its elements using JavaScript’s DOM API. We can easily jump to a particular element in the document using a function called getElementsByTagName(). This function uses the element’s name to look it up in the DOM, somewhat like the alphabetical tabs that stick out in an old-fashioned Rolodex. Since many elements in an XML document can have the same name, getElementsByTagName() actually returns an array of elements, in the order that they appear in the document.
9.4.1. Navigating the XML document
Now we will finish the client-side script that adds the options to the selection list. The names of the form and the selection element that we are going to populate are specified in the XML document along with all of the available options for the list. We need to traverse the document’s elements in order to locate the options and insert them into our select element.
Once the ContentLoader receives the XML document from the server, it will call the FillDropDown() function that appears in listing 9.2. In FillDropDown(), we navigate the entry elements of the XML document, and create a new Option object for each. These Option objects represent the text and value pairs that will be added to the selection list. Listing 9.5 shows the FillDropDown() function in full.
Listing 9.5. Updating the page with data from the XML response
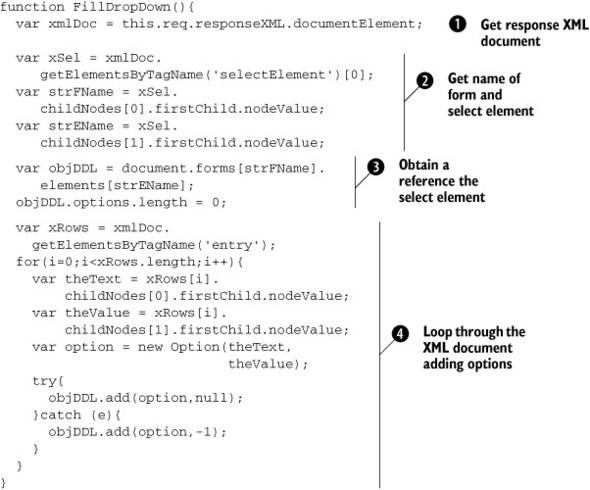
The FillDropDown() function is called by the ContentLoader once it has received and parsed the server’s XML response. The ContentLoader object
is accessible within FillDropDown() through the this reference, and we use it to obtain the response document, responseXML. Once we have a reference to the response’s documentElement ![]() , we can begin using JavaScript’s DOM functions to navigate its nodes. The first information we want to obtain is the target
select list to which we will add the new options. We look up the element named selectElement using getElementsByTagName(), taking the first item from the array it returns. We can then navigate to its child nodes
, we can begin using JavaScript’s DOM functions to navigate its nodes. The first information we want to obtain is the target
select list to which we will add the new options. We look up the element named selectElement using getElementsByTagName(), taking the first item from the array it returns. We can then navigate to its child nodes ![]() . The first child contains the form’s name and the second child the select list’s name.
. The first child contains the form’s name and the second child the select list’s name.
Using these two values, we reference the target selection list itself ![]() , and clear any existing options by setting the length of its options array to 0. Now we can add the new options to the list.
We need to access the XML’s document entry elements, so we call on getElementsByTagName() once again. This time we need to loop through the array of elements it returns, and obtain the text and value pairs from
each
, and clear any existing options by setting the length of its options array to 0. Now we can add the new options to the list.
We need to access the XML’s document entry elements, so we call on getElementsByTagName() once again. This time we need to loop through the array of elements it returns, and obtain the text and value pairs from
each ![]() . The first child node of each entry is the option text that is to be displayed to the user, and the second child node is the value. Once these two values are
obtained, we create a new Option object, passing the option text as the first constructor parameter and the option value as
the second. The new option is then added to the target select element, and the process is repeated until all the new options have been added. The method signature for select.add() varies between browsers, so we use a try...catch statement to find one that works. This completes the coding for our double combo box. We can now load up our HTML page, select
a region, and see the second drop-down populated directly from the database.
. The first child node of each entry is the option text that is to be displayed to the user, and the second child node is the value. Once these two values are
obtained, we create a new Option object, passing the option text as the first constructor parameter and the option value as
the second. The new option is then added to the target select element, and the process is repeated until all the new options have been added. The method signature for select.add() varies between browsers, so we use a try...catch statement to find one that works. This completes the coding for our double combo box. We can now load up our HTML page, select
a region, and see the second drop-down populated directly from the database.
Figure 9.7 shows the double-combo list in action. In this example, the Eastern region is selected from the first list, and the corresponding territories are retrieved from the database and displayed in the second list. The Southern region is then selected from the first list, and its corresponding territories fill in the second list.
Figure 9.7. The double-combo list in action
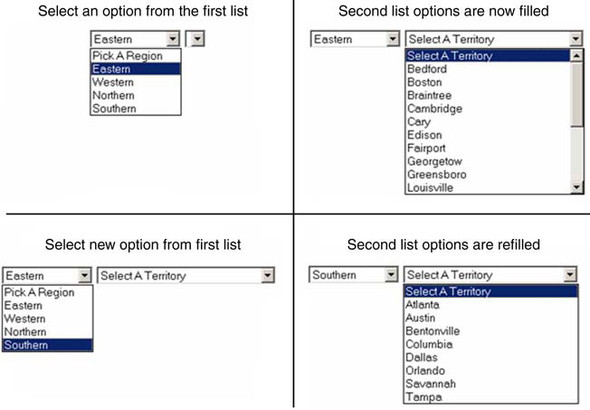
As you can see in figure 9.7, we still have one job left: changing the selection list’s appearance to make it more appealing. The second selection list’s size expands as it is populated with options. We can fix this shift in size by applying a Cascading Style Sheet (CSS) rule to the element.
9.4.2. Applying Cascading Style Sheets
Cascading Style Sheets allow for changes in the visual properties of the selection element. We can change the font color, the font family, the width of the element, and so on. In figure 9.7 we saw that our second select element is initially only a few pixels wide since it contains no options. When the Eastern region is chosen from the first selection list, our second select element expands. This change of size is visually jarring and creates an unpleasant user experience.
The way to fix this issue is to set a width for the selection list:
<select name="ddlTerritory" style="width:200px"></select>
However, there may still be a problem if one of the displayed values is longer than the width we set. In Firefox, when the element is in focus the options under the drop-down list expand to display their entire text. However, in Microsoft Internet Explorer, the text is chopped off and is not visible to the user, as shown in figure 9.8.
Figure 9.8. Cross-browser differences in how a select element is rendered
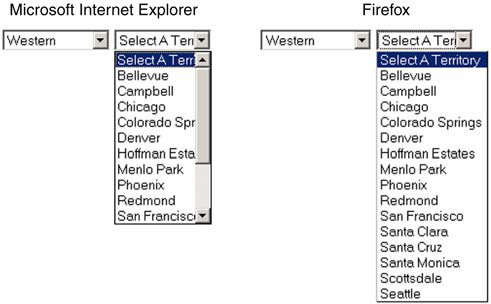
To avoid the problem with Internet Explorer, we need to set the width of the selection list to the width of the longest option. Most of the time the only way to determine the number of pixels required to show the content is by trial and error.
Some developers use browser-specific hacks in their CSS only to set the width wider for IE:
style="width:100px;_width:250px"
Internet Explorer recognizes the width with the underscore, while other browsers ignore it. Therefore, IE’s selection box will be 250 pixels wide, while the other browsers’ selection width will be 100 pixels wide. However, it’s inadvisable to rely on browser bugs such as this one, as they may be fixed in a future version of the browser and break the way your page is displayed.
Let’s look now at ways to add more advanced features to our double-combo script.
9.5. Advanced issues
In this chapter, we have built a simplified version of a double-combo script. We send a single parameter to the server, and we return a set of results for the single selected item. You may find that you need to change the way that this application works. You may want to add another element to the form so that you have a triple combo. You may even want to allow the user to select multiple items in the first list. If this is the case, then the following sections will give you ideas on how to implement them.
9.5.1. Allowing multiple-select queries
The code we have discussed so far is a simple example, allowing a user to select only one option from each selection list. In some cases, a user may be required to select more than one option from the first list. That means the second list in our combination will be populated with values corresponding to each selected option in the first list. With some simple changes to our client-side and server-side code, we can make this happen.
The first thing to do is to set up the first selection list to allow multiple items to be chosen. To do this, we need to add the multiple attribute to the select tag. To specify how many options to display, we can add the size attribute. If size is smaller than the number of options, the selection list will be scrollable to reveal those that are not visible.
<select name="ddlRegion" multiple size="4"
  onchange="FillTerritory(this,document.Form1.ddlTerritory)">
  <option value="1">Eastern</option>
  <option value="2">Western</option>
  <option value="3">Northern</option>
  <option value="4">Southern</option>
</select>
The next step is to change the FillTerritory() function. Instead of just referencing the selected index of the select element, we need to loop through all the options and find each of the selected values. We add the value of each selected option to the parameter string:
function FillTerritory(oElem,oTarget){
  var url = 'DoubleComboMultiple.aspx';
  var strParams = "f=" + oTarget.form.name +
     "&e=" + oTarget.name;
  for(var i=0;i<oElem.options.length;i++){
    if(oElem.options[i].selected){
      strParams += "&q=" + oElem.options[i].value;
    }
  }

  var loader1 = new
  net.ContentLoader(url,FillDropDown,null,"POST",strParams);
}
The last thing to do is change the code of the server-side script to handle the multiple values passed in the request. In .NET, the multiple values are represented in a single string, separated by commas. In order to get each item individually, we need to split the string into an array. We can then build our WHERE clause for the SQL statement by looping through the array.
Dim strQuery As String = Request.Form("q")
Dim strWhere As String = ""
Dim arrayStr() As String = strQuery.Split(",")
Dim i As Integer
For Each i In arrayStr
  If strWhere.Length > 0 Then
    strWhere = strWhere & " OR "
  End If
  strWhere = strWhere & " regionid = " & i
Next

Dim strSql As String = "SELECT " & _
           " TerritoryDescription, " & _
           " TerritoryID" & _
           " FROM Territories" & _
           " WHERE " & strWhere & _
           " ORDER BY TerritoryDescription"
With these changes, a user to can select multiple regions from the first selection list, and the territories corresponding with every selected region will appear in the second list.
9.5.2. Moving from a double combo to a triple combo
Moving to a double combo to a triple combo requires only a small number of changes, depending on how we want to handle the logic on the server. The first option is to move our logic into multiple server-side pages so that we can run a different query in each. That would mean adding another parameter to each selection list’s onchange handler, representing the URL of the server-side script to call.
The other option can be as simple as adding an if-else or a switch-case statement to the server-side code. The if-else structure needs a way to determine which query to execute in order to return the appropriate values. The simplest check is to decide which SQL query to use based on the name of the select element to be populated. So, when we are performing a triple combo, we can check that the value of the strElem variable. This way, we do not need to make any changes to the onchange event handlers in the client-side code.
Dim strSql As String
If strElem = "ddlTerritory" Then
    strSql = "SELECT TerritoryDescription, " & _
             " TerritoryID" & _
             " FROM Territories" & _
             " WHERE " & strWhere & _
             " ORDER BY TerritoryDescription"
Else
    strSql = "SELECT Column1, Column2" & _
             " FROM TableName" & _
             " WHERE " & strWhere & _
             " ORDER BY Column2"
End If
With this solution, as long as the drop-down lists have unique names, you will be able to have multiple combination elements on the page without having to separate all of the logic into different server-side pages.
9.6. Refactoring
So what do you think is lacking at this point? I suspect I know what you’re thinking—generality. This is an extremely cool, jazzed-up technique for implementing double combos, but it needs a little polish to be a generalized component. We’ll get there, so hang tight. But first, let’s address something even more fundamental: encapsulation of some of the Ajax plumbing itself. The net.ContentLoader introduced briefly in chapter 3, and more thoroughly in chapter 5, is a good start. Let’s build on this object to make our handling of AJAX even more seamless. Ideally we should be able to think of this entity as an Ajax “helper” object that does all the heavy lifting associated with Ajax processing. This will allow our component to focus on double combo–specific behaviors and reduce the amount of code required by the rest of our components as well. Our improved net.ContentLoader object should ideally encapsulate the state and behavior required to perform the following tasks:
- Creation of the XMLHttpRequest object in a cross-browser fashion, and as an independent behavior from sending requests. This will allow callers to use the creation method independently from the rest of the object. This is useful if the caller is using another idiom, framework, or mechanism for request/response activities.
- Provide a more convenient API for dealing with request parameters. Ideally the caller should just be able to pass state from the application and let the net.ContentLoader “helper” worry about creating querystrings.
- Routing the response back to a component that knows how to handle it and performing appropriate error handling.
So let’s start our refactoring of net.ContentLoader, and then we’ll move on to repackaging our double combo as a component.
9.6.1. New and improved net.ContentLoader
Let’s start by thinking about how the constructor should be changed. Consider the following constructor:

The constructor shown here is called with four arguments. The first, component, designates the object that is using the services of this helper. The helper object will assume that component has an ajaxUpdate() method to handle responses and a handleError() method to handle error conditions. More about that later. Second, as before, url designates the URL that is invoked by this helper to asynchronously get data from the server. The method parameter designates the HTTP request method. Valid values are GET and POST. Finally, the requestParameters argument is an array of strings of the form key=value, which designate the request parameters to pass to the request. This allows the caller to specify a set of request parameters that do not change between requests. These will be appended to any additional request parameters passed into the sendRequest method discussed below. So our helper can now be constructed by a client as follows:
var str = "Eastern";
var aComp = new SomeCoolComponent(...);
var ajaxHelper = new net.ContentLoader( aComp,
                 "getRefreshData.aspx", "POST",
                 [ "query=" + str, "ignore_case=true" ] );
Now let’s consider the rest of the API. One thing I should mention at this point is the stylistic nature of the code sample. The methods of this object are scoped to the prototype object attached to the constructor function. This is a common technique when writing object-oriented JavaScript, as it applies the method definitions to all instances of the object. However, there are several ways of syntactically specifying this. One of my favorites (a pattern I picked up from the prototype.js library packaged within Ruby On Rails) is to create the prototype object literally, as shown here:
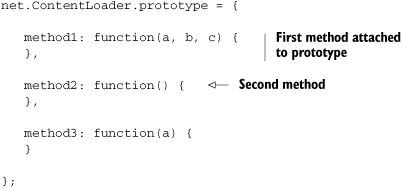
The thing we like about this syntactically is that it is expressed minimally. The way to read this is that the outermost open and close curly braces represent an object literal, and the content is a comma-delimited list of property-value pairs within the object. In this case our properties are methods. The property-value pairs are specified as the name of the property, followed by a colon, followed by the value of the property. In this case the values (or definitions if you prefer) are function literals. Piece of cake, huh? Just bear in mind that the methods shown from here on out are assumed to be contained within the prototype object literal as shown here. Also, note that the last property doesn’t need—indeed can’t have—a comma after it. Now let’s go back to the task at hand: refactoring the API.
The API should address the requirements that we mentioned above, so let’s take each one in turn. The first thing we need is an independent behavior to handle the creation of the XMLHttpRequest object in a cross-browser fashion. That sounds like a method. Fortunately, we’ve implemented this one a few times already. All we need to do is create it as a method of our helper, as shown in listing 9.6, and we’ll never have to write it again.
Listing 9.6. The getTransport method
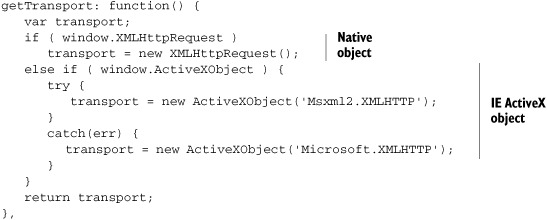
There’s not much explanation required here, since we’ve covered this ground many times, but now we have a cleanly packaged method to provide a cross-browser Ajax data transport object for handling our asynchronous communications.
The second requirement we mentioned was to provide a more convenient API for dealing with request parameters. In order for it to be used across a wide variety of applications, it is almost certain that the request being sent will need runtime values as parameters. We’ve already stored some initial state that represents request parameters that are constant across requests, but we’ll also need runtime values. Let’s decide on supporting a usage such as the following code:

So given this usage requirement, sendRequest is defined as shown in listing 9.7.
Listing 9.7. The sendRequest method

This method splits the process of sending a request into four steps. Let’s look at each step of the process in detail:
| This step takes advantage of the fact that JavaScript creates a pseudo-array named arguments that is scoped to the function. As the name suggests, arguments holds the arguments that were passed to the function. In this case the arguments are expected to be strings of the form key=value. We just copy them into a first-class array for now. Also, note that all variables created in this method are preceded by the keyword var. Although JavaScript is perfectly happy if we leave the var keyword off, it’s very important that we don’t. Why? Because, if we omit the var keyword, the variable is created at a global scope—visible to all the code in your JavaScript universe! This could cause unexpected interactions with other code (for example, someone names a variable with the same name in a third-party script you have included). In short, it’s a debugging nightmare waiting to happen. Do yourself a favor and get accustomed to the discipline of using locally scoped variables whenever possible. | |
| Here our method uses the getTransport method we defined in listing 9.6 to create an instance of an XMLHttpRequest object. Then the request is opened and its Content-Type header is initialized as in previous examples. The object reference is held in a local variable named request. | |
| This step takes care of the response-handling task. I’ll bet you’re wondering why the variable oThis was created. You’ll note that the following line—an anonymous function that responds to the onreadystatechange of our request object—references oThis. The name for what’s going on here is a closure. By virtue of the inner function referencing the local variable, an implicit execution context or scope is created to allow the reference to be maintained after the enclosing function exits. (See appendix B for more on closures.) This lets us implement handling of the Ajax response by calling a first-class method on our ajaxHelper object. | |
| Finally, we send the Ajax request. Note that the array we created in step 1 is passed to a method named queryString that converts it to a single string. That string becomes the body of the Ajax request. The queryString method isn’t really part of the public contract we discussed earlier, but it’s a helper method that keeps the code clean and readable. Let’s take a look at it in listing 9.8. |
Listing 9.8. The queryString method
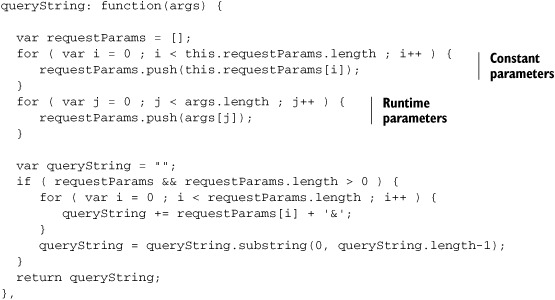
This method takes the request parameters that our net.ContentLoader was constructed with, along with the additional runtime parameters that were passed into the sendRequest method, and places them into a single array. It then iterates over the array and converts it into a querystring. An example of what this achieves is shown here:
var helper = new net.ContentLoader( someObj, someUrl,
                             "POST", ["a=one", "b=two"] );
var str = ajaxHelper.queryString( ["c=three", "d=four"] );

str => "a=one&b=two&c=three&d=four"
The last thing we need to do to have a fully functional helper object is to collaborate with a component to handle the response that comes back from Ajax. If you’ve been paying attention, you probably already know what this method will be named. Our sendRequest method already specified how it will handle the response from the onreadystatechange property of the request:
request.onreadystatechange = function(){
  oThis.handleAjaxResponse(request)
}
That’s right, kids; all we need to do is implement a method named handleAjaxResponse. Listing 9.9 contains the implementation.
Listing 9.9. The Ajax response handler methods
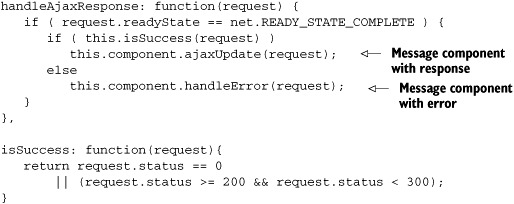
All the method does is check for the appropriate readyState of 4 (indicating completion) and notifies the this.component that the response is available. But we’re not quite finished yet. The other requirement we said we would address is to handle errors appropriately. But what is appropriate? The point is, we don’t know what’s appropriate. How to handle the error is a decision that should be deferred to another entity. Therefore we assume that our client, this.component, has a handleError method that takes appropriate action when the Ajax response comes back in a way we didn’t expect. The component may in turn delegate the decision to yet another entity, but that’s beyond the scope of what we care about as a helper object. We’ve provided the mechanism; we’ll let another entity provide the semantics. As mentioned earlier, we’re assuming that this.component has an ajaxUpdate and a handleError method. This is an implicit contract that we’ve created, since JavaScript isn’t a strongly typed language that can enforce such constraints.
Congratulations! You’ve morphed net.ContentLoader into a flexible helper to do all the Ajax heavy lifting for your Ajax-enabled DHTML components. And if you have a DHTML component that’s not yet Ajax-enabled, now it’ll be easier! Speaking of which, we have a double-combo component to write.
9.6.2. Creating a double-combo component
We’ve laid some groundwork with our net.ContentLoader to make our task here much easier, so let’s get started. Let’s assume that our assignment as a rock-star status developer is to create a double-combo script that can be reused in many contexts across an application, or many applications for that matter. We need to consider several features in order to meet this requirement:
- Let’s assume that we may not be able or want to directly change the HTML markup for the select boxes. This could be the case if we are not responsible for producing the markup. Perhaps the select is generated by a JSP or other server-language-specific tag. Or perhaps a designer is writing the HTML, and we want to keep it as pristine as possible to avoid major reworks caused by a round or two of page redesigns.
- We want a combo script that is able to use different URLs and request parameters to return the option data. We also want the design to accommodate further customization.
- We want to be able to apply this double-combo behavior potentially across multiple sets of select tags on the same page, also potentially setting up triple or quadruple combos, as discussed earlier.
Starting from the perspective of our first task, keeping the HTML markup as pristine as possible, let’s assume the markup shown in listing 9.10 is representative of the HTML on which we will be operating.
Listing 9.10. Double-combo HTML markup listing
<html>
<body>

<form name="Form1">
   <select  id="region" name="region" >
      <options...>
   </select>
   <select id="territory" name="territory" />
</form>
</body>
</html>
What we need is a DoubleCombo component that we can attach to our document to perform all of the double-combo magic. So let’s work backwards and consider what we would want our markup to look like; then we’ll figure out how to implement it. Let’s change the markup to look something like listing 9.11.
Listing 9.11. Double-combo HTML modified markup listing
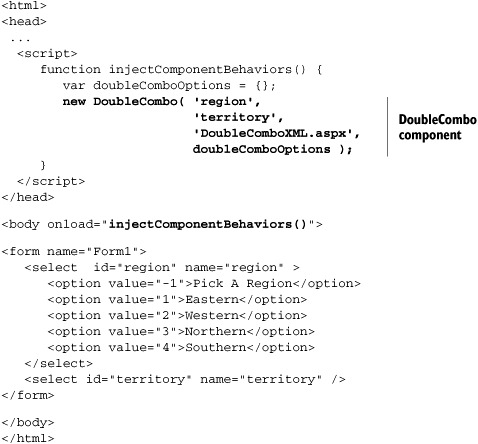
The markup has now changed in the following ways:
- A function has been created that injects all desired component behaviors into our document.
- An onload handler has been added to the body element that calls this function.
Note that nothing within the body section of the page has been modified. As stated earlier, this is a good thing. We’ve already satisfied our first requirement. But, looking at our injectComponentBehaviors() function, it’s apparent that we have some more work to do. Namely, we need to create a JavaScript object named DoubleCombo that, when constructed, provides all the behaviors we need to support double-combo functionality.
DoubleCombo component logic
Let’s start by looking more closely at the semantics of our component creation. Our injectComponentBehaviors() function creates a DoubleCombo object by calling its constructor. The constructor is defined in listing 9.12.
Listing 9.12. DoubleCombo constructor

This should be a familiar construct at this point; our constructor function initializes the state of our DoubleCombo. A description of the arguments that should be passed to the constructor is shown in table 9.2.
Table 9.2. Description of arguments
|
Argument |
Description |
|---|---|
| masterId | The ID of the element in the markup corresponding to the master select element. The selection made in this element determines the values displayed by a second select element. |
| slaveId | The ID of the element in the markup corresponding to the slave select element. This is the element whose values will be changed when the user makes a choice from the master select. |
| options | A generic object that provides other data required by the double combo. |
Consider the nature of the state maintained by the DoubleCombo object—particularly the URL and options. These two pieces of state satisfy the second functional requirement mentioned earlier. That is, our component can accommodate any URL for data retrieval and is customizable via the options parameter. Currently the only thing we assume we’ll find within the options object is a requestParameters property. But, because the options parameter is just a general object, we could set any property on it needed to facilitate further customizations down the road. The most obvious kinds of properties we could place in our options object are such things as CSS class stylings and the like. However, the style and function of the double combo are fairly independent concepts, so we’ll leave the styling to the page designer.
To many of you, we’re sure, the more interesting part of the constructor comes in the last two lines. Let’s look at each in turn:
this.ajaxHelper = new net.ContentLoader( this, url, "POST",
                             options.requestParameters || [] );
Obviously, we know that our component requires Ajax capabilities. As fortune and a little planning would have it, we already have an object to perform the lion’s share of our Ajax-related work—that is, the net.ContentLoader we cleverly refactored earlier. The DoubleCombo simply passes itself (via this) as the component parameter to the ContentLoader helper. The url parameter is also passed through to the helper as the target URL of Ajax requests, and the HTTP request method is specified with the string "POST". Finally, the requestParameters property of the options object, or an empty array if none was defined, is passed as the “constant” parameter array to send with every Ajax request. Also recall that because we passed this as a component argument, the DoubleCombo object is obligated to implement the implied contract with the net.ContentLoader object we discussed earlier. That is, we must implement an ajaxUpdate() and a handleError() method. We’ll get to that in a bit, but first let’s look at the last line of our constructor:
this.initializeBehavior();
Finally our constructor is doing something that looks like behavior. Yes, the moment we’ve all been waiting for: the behavior implementation. Everything we’ll do from here on out is directly related to providing double-combo functionality. So without further ado, let’s take a look at this method along with all the other DoubleCombo methods that will be required. Thanks to all of the infrastructure we’ve put in place, our task is far from daunting at this point. Keep in mind that all the methods that appear throughout the rest of the example are assumed to be embedded within a prototype literal object, exactly as we did for the net.ContentLoader implementation.
DoubleCombo.prototype = {
     // all of the methods....
};
So, let’s peek under the hood. First, the initializeBehavior() method is shown here:
initializeBehavior: function() {
   var oThis = this;
   this.master.onchange = function() { oThis.masterComboChanged(); };
},
Short and sweet. This method puts an onchange event handler on the master select element (formerly done in the HTML markup itself). When triggered, the event handler invokes another method on our object, masterComboChanged():
masterComboChanged: function() {
   var query = this.master.options[
               this.master.selectedIndex].value;
   this.ajaxHelper.sendRequest( 'q=' + query );
},
Wow, also short and sweet. All this method has to do is create a request parameter and send our Ajax request. Since the Ajax-specific work has been factored out into another object, this is a single line of code. Recall that sendRequest() will create and send an XMLHttpRequest, then route the response back to our ajaxUpdate() method. So let’s write that:
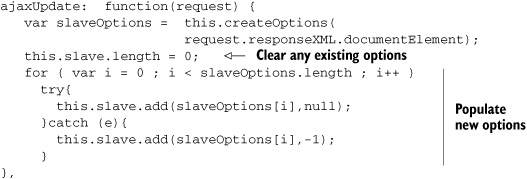
This method takes the response XML from the request object and passes it to a method named createOptions(), which creates our slave select’s option elements. The method then simply clears and repopulates the slave select element. The createOptions() method, although not part of any public contract, is a helper method that makes the code cleaner and more readable. Its implementation, along with another helper method, getElementContent(), is shown in listing 9.13.
Listing 9.13. Combo population methods
createOptions: function(ajaxResponse) {
   var newOptions = [];
   var entries = ajaxResponse.getElementsByTagName('entry'),
   for ( var i = 0 ; i < entries.length ; i++ ) {
      var text  = this.getElementContent(entries[i],
                  'optionText'),
      var value = this.getElementContent(entries[i],
                  'optionValue'),
      newOptions.push( new Option( text, value ) );
   }
   return newOptions;
},

getElementContent: function(element,tagName) {
  var childElement = element.getElementsByTagName(tagName)[0];
  return (childElement.text != undefined) ? childElement.text :
                                          childElement.textContent;
},
These methods perform the hard work of actually fetching values from the XML response document, and creating options objects from them. To recap, the XML structure of the response is as follows:
<?xml version="1.0" ?>
<selectChoice>
  ...
  <entry>
    <optionText>Select A Territory</optionText>
    <optionValue>-1</optionValue>
  </entry>
  <entry>
    <optionText>TerritoryDescription</optionText>
    <optionValue>TerritoryID</optionValue>
  </entry>
</selectChoice>
The createOptions() method iterates over each entry element in the XML and gets the text out of the optionText and optionValue elements via the getElementContent() helper method. The only thing particularly noteworthy about the getElementContent() method is that it uses the IE-specific text attribute of the XML element if it exists; otherwise it uses the W3C-standardized textContent attribute.
Error handling
We’re all finished. Almost. We’ve implemented all the behaviors needed to make this component fully operational. But, dang, we said we’d handle error conditions, too. You will recall that we have to implement a handleError() method in order to play nicely with the net.ContentLoader. So let’s implement that, and then we’ll really be finished. So what’s the appropriate recovery action if an error occurs? At this point we still can’t really say. The application using our Double-Combo component ultimately should decide. Sounds like a job for our options object—remember the one we passed to the constructor? Let’s think about that contract for a second. What if we constructed our double-combo component with code that looks something like this?
function myApplicationErrorHandler(request) {
   // Application function that knows how
   // to handle an error condition
}

var comboOptions = { requestParameters: [
                  "param1=one", "param2=two" ],
                  errorHandler: myApplicationErrorHandler };

var doubleCombo = new DoubleCombo( 'region',
                                   'territory',
                                   'DoubleComboXML.aspx',
                                    comboOptions );
In this scenario, we’ve let the application define a function called myApplicationErrorHandler(). The implementation of this method is finally where we can put application-specific logic to handle the error condition. This could be an alert. Or it could be a much less intrusive “oops” message a la GMail. The point is we’ve deferred this decision to the application that’s using our component. Again, we’ve provided the mechanism and allowed someone else to provide the semantics. So now we have to write the DoubleCombo object’s handleError() method:
handleError: function(request) {
   if ( this.options.errorHandler )
      this.options.errorHandler(request);
}
Component bliss
Congratulations are in order! We’re finally all done. We have a general component that we can construct with the IDs of any two select elements and some configuration information, and we have instant double-combo capability. And it’s just so ... door slams open!
Enter pointy-haired manager, 2:45 P.M. Friday. “Johnson,” he says. “We have to support subterritories! ... And we need it by Monday morning!” Dramatic pause. “Ouch!” you finally retort. Then you regain your composure and say, “I’ll make it happen, sir. Even if I have to work all weekend.” He hands you the new page design:
<form>
  <select id="region"       name="region"><select>
  <select id="territory"    name="territory"></select>
  <select id="subTerritory" name="subTerritory"></select>
</form>
Pointy-hair retreats. You open the HTML page in Emacs, because that’s the way you roll. You go directly to the head section. The cursor blinks. You begin to type:
<script>
   function injectComponentBehaviors() {
      var opts1 = { requestParameters: "master=region" };
      var opts2 = { requestParameters: "master=territory" };

      new DoubleCombo( 'region',
                       'territory',
                       'DoubleComboXML.aspx', opts1 );
      new DoubleCombo( 'territory',
                       'subTerritory',
                       'DoubleComboXML.aspx', opts2 );
</script>
You press a key that runs a macro to nicely format your code. You save. You exclaim over your shoulder, “I’ll be working from home,” as you pass by Pointy’s office at 2:57. You plop down on the sofa and think to yourself, “Boy, I am a rock star!” Okay, already. Enough of the fantasy. Let’s tie a bow around this thing and call it a day.
9.7. Summary
The double combination select element is an efficient method to create dynamic form elements for the user. We can use JavaScript event handlers to detect changes in one select element and trigger a process to update the values in the second element. By using Ajax, we are able to avoid the long page-loading time that you would see using a JavaScript-only solution. Using Ajax, we can make a database query without the entire page being posted back to the server and disrupting the user’s interaction with the form. Ajax makes it easy for your web application to act more like a client application.
With this code, you should be able to develop more sophisticated forms without having to worry about the normal problems of posting pages back to the server. With the ability to extend this script to act on multiple combinations of selection lists, your users can drill down more precisely through several layers of options to obtain the information or products they are looking for.
Finally, we did some refactoring of the code to build ourselves an industrial-strength component to facilitate reuse and customization down the road. From our perspective, we’ve encapsulated this functionality in a reusable component and won’t ever need to write it again. From our users’ perspective, they won’t be getting that screen that says the product is not available when buying items from our online store. Everybody’s happy.
