Chapter 11. The enhanced Ajax web portal
This chapter covers
- Constructing an Ajax portal
- Implementing a login framework
- Creating dynamic windows
- Remembering window state
- Adapting library code
More and more companies have been adopting a portal-based intranet. Portals give users an easy gateway for obtaining large quantities of information on one page. This eliminates the need for the user to go to multiple locations to get the information they need. Online portals such as Yahoo! allow us to obtain news, weather, sports scores, mail, games, and so much more on just one page. Another portal is Amazon’s A9.com search portal, which lets us do searches on multiple areas without going to separate pages. We can search for web pages, books, images, and much more on one page. A9.com utilizes Ajax to display the information on the screen. This allows for a great user experience since the user does not have to sit and wait for page re-rendering when new search results are displayed.
In this chapter, we are incorporating Ajax into a portal to improve the user’s experience: specifically, how he logs into the system and how the system remembers his details. The portal project will allow the user to customize the layout of the portal with a minimum amount of effort. The user will not even realize that his actions are sending information back to the server to remember the exact location of the objects on the page. This means that his personal settings are the same every time he logs into the system. We first take a low-level approach to building the portal. We implement a basic portal framework in a less-structured manner to shed light on the concept behind the portal. We then look at the portal in a more advanced light using an object-oriented approach. Before we implement the portal, let’s examine some current portals and see how adding Ajax can improve the user’s experience.
11.1. The evolving portal
Over time, portals have evolved from simple sites that let us check our mail and do a search to elaborate setups that allow us to obtain a large amount of information in little time and with little effort. By comparison, in the past we had to check one site for news, another for weather, another for comics, another for a search, and so on. Either we had tons of bookmarks for the sites that we checked daily, or we just memorized our routine of what addresses to type into the browser.
11.1.1. The classic portal
We are all accustomed to classic portals—we’ve been using them for years—and a lot of company intranets are using them to improve company performance by having everything in one place. The classic portal is one that allows a user to log into the system and have the content personalized to her tastes. For example, a company portal can have one setup for a salesperson and another setup for a computer programmer. Both of these employees may need to have a window to the company calendar, but they both may not need to see the sales figures or the bug report for the applications. By limiting what they can see, we increase company security and improve the employees’ performance since they do not have to search for information all over the company intranet.
Another example of a classic portal is Yahoo!. When we log into Yahoo!, we can check mail, change the weather to fit our current location, change the look, and so much more. As you can see in figure 11.1, Yahoo!’s portal is customized to the needs of the user.
Figure 11.1. Yahoo!’s portal shows customized information.
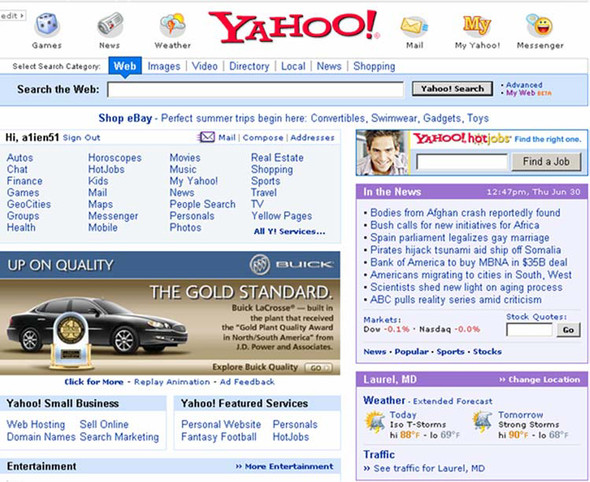
Yahoo! accomplishes this by sending us to maintenance screens to alter the information. One example of the maintenance page allows us to select the city that we live in so that the weather forecast is for our area. In figure 11.1, you can see that the weather is customized to Laurel, Maryland. While it is great that we can customize the information we want to see, we can enhance the user experience even more by incorporating Ajax into the portal in the same way that Amazon did with the A9.com portal.
11.1.2. The rich user interface portal
With an Ajax portal, the rich user interface is more dynamic than a classic portal while positively impacting the user’s experience. We can add new content and change the way the content is displayed in a seamless manner. A great example of this seamless interaction is in Amazon’s A9.com search portal. Let’s look at how that works. In figure 11.2, a search has been performed for Eric Pascarello with only the Web checkbox selected.
Figure 11.2. A9.com’s portal with the web results for Eric Pascarello
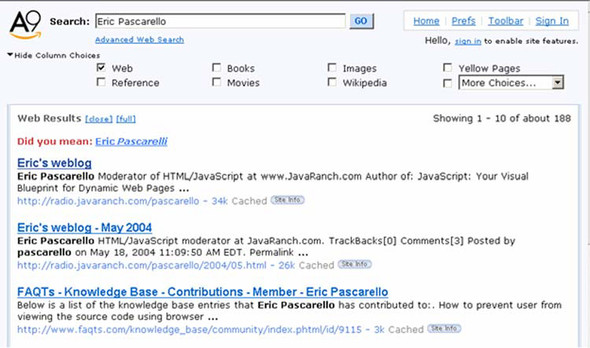
Now let’s narrow the search results. We know that we are looking for a book that Pascarello has written, so we click the Books checkbox. The Book Results pane is inserted into the right-hand side of the page. The search results for Eric Pascarello’s books are displayed without posting the entire page back to the server to obtain them, as shown in figure 11.3.
Figure 11.3. A9.com’s portal showing the search results with the Book Results column
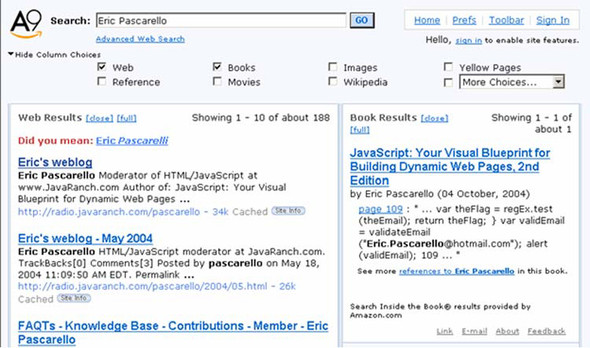
Another example of using Ajax to enhance the portal experience is in the configuration of the portal. Ajax allows the user interface to become part of the configuration-management tools by having the user click on objects in the window instead of going to another web page to configure the setup. The user can dynamically resize and position the elements on the screen, thus customizing his portal to fit his needs exactly.
Now that we’ve seen some of the advantages of an Ajax portal, let’s look at the architecture of the portal we will be building.
11.2. The Ajax portal architecture using Java
To provide a highly customizable Ajax portal for multiple users, we need client-side code, server-side code, and a database. The client side handles the users’ interactions with the windows, such as dragging, dropping, and sending data back to the server with Ajax. The server, in return, handles our users’ sessions, data transfer back to the client, and interaction with the database. The database holds our users’ logins and passwords in one table, and a second table holds the portal window metadata, such as the position, size, and content.
This project has a lot of steps since it contains dynamic results. To get this project started, let’s look at how the project flows (figure 11.4).
Figure 11.4. Ajax portal flow. Users log in to the portal and manage their windows. Changes are saved automatically in the background while they work.
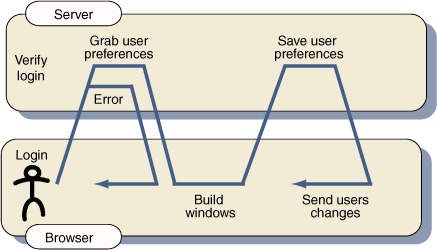
The basic idea of the rich user interface portal that uses Ajax to interact with the server sounds difficult, but you will be amazed at how simple it is to implement the project. The portal architecture illustrated in figure 11.4 contains two major portions: the initial login and the dynamic interaction with the windows. Thus, we can break our processes into two different sections and adapt the Ajax functionality to meet those needs. The first operation validates a user’s credentials against a database, and the second operation interacts with DHTML elements and returns values to our client.
In this chapter, we use a DHTML library to handle a lot of the client-side code. The DHTML library allows us to develop customizable windows that use IFrames to display content. The DHTML windows created by this library can be positioned anywhere on the page since the library supports dragging functionality. Another feature the library supports is resizing of the windows, so we can make the window any size we want. The DHTML library frees us from dwelling on the cross-browser problems that we might encounter with these actions. Instead we can focus on adding the Ajax technology into this library to make a dynamic script even more powerful by integrating it with the server.
The implementation that we’ll present here uses Java on the server side, simply to provide a little variety from the previous two chapters, which used .NET languages. We’ve kept the implementation fairly simple. Because Ajax can work equally well against any server-side technology, we won’t concentrate on the server-side details. The full source code for the server tier is available as part of the download for this book. Let’s start off by introducing the Ajax login.
11.3. The Ajax login
The first action we need to take care of is the login procedure to access our portal. To do this, we create the database table, the server-side code to handle the request, and the client-side code that obtains the login information from the user and processes the request. The first step is to design our user table in the database.
11.3.1. The user table
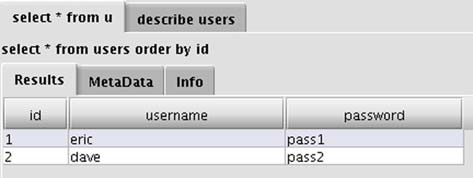
The first table we will look at in the database is the users table. It contains three columns. We are using only the bare minimum of information for this project, but we can add more depending on our needs. The three columns in our user table are id, username, and password, and they are created with the basic SQL statement in listing 11.1. Figure 11.5 shows the table in design view mode with the SQL Squirrel database client program (http://squirrel-sql.sourceforge.net).
Figure 11.5. The users table properties in SQL Squirrel, the graphical database explorer

Listing 11.1. The users table schema
create table users(
  id int primary key unique not null,
  username varchar(50) not null,
  password varchar(50) not null
);
Now that we have created the table, we need to add some users. In this case, we hard-code in the usernames and passwords. As you can see in figure 11.6, two users have been added to the table with the ID numbers of 1 and 2. Those ID numbers will be important later on in this chapter.
Figure 11.6. The contents of the users table
Next, we need to set up the user accounts for the users in the table. As it stands, the portal doesn’t present an administrative user interface for adding new users, and this would have to be done manually using the database tool of your choice. Developing an Ajax-based user administration front-end is possible, but we don’t have the space to explore it here.
The last step is to make sure that we assign the permissions to the table. The user accounts that will be accessing the table must have the read and write permission set. Without setting the permissions, we would have trouble using our SQL query since we would get errors.
Now that we have our users table, let’s write the code for the login process, starting with the server.
11.3.2. The server-side login code: Java
The server-side code for the Ajax portal is simple in nature, but it will have numerous steps by the time we get finished because of all the functionality that the portal contains. Right now, we are concerned with coding the login portion of the Ajax portal.
Let’s review the process. When the user logs into the portal, the client-side code sends a request to the server, passing the user’s credentials with the request. The server-side process that intercepts this request will determine whether the credentials that were sent to the server are correct. If they are correct, we start to process the building of the portal windows. If the user’s credentials are incorrect, we pass an error message back to the client page.
Because we are developing in Java, we’ll use a servlet filter to secure all our interactions with the server. To those unfamiliar with the term, a filter is simply a bit of logic that can be assigned to one or more resources, which is given the opportunity to modify a request before it reaches its destination servlet. We discussed using filters for security in chapter 7. If you’re using a system that doesn’t support filters, you can simply create a helper object or function that checks to see whether the user is logged in and invoke it manually at the top of each page that you want to protect. Listing 11.2 shows our login filter.
Listing 11.2. LoginFilter.java : server-side login code
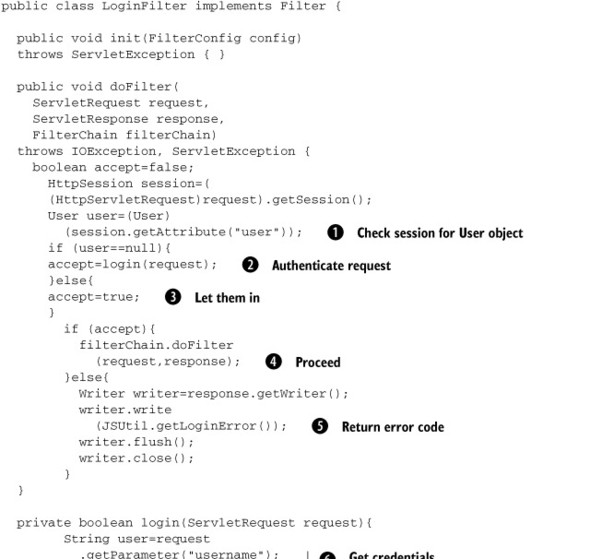
In this case, we will apply a filter that checks to see whether a User object is already held in session ![]() . If it is, then we accept it
. If it is, then we accept it ![]() ; otherwise, we authenticate it against the username and password supplied in the request
; otherwise, we authenticate it against the username and password supplied in the request ![]() . If the request is accepted, it is passed on to the servlet
. If the request is accepted, it is passed on to the servlet ![]() ; otherwise, it will return an instruction to display an error message
; otherwise, it will return an instruction to display an error message ![]() . We have wrapped all generated JavaScript up into an object called JSUtil. The method that generates the error message is
shown here:
. We have wrapped all generated JavaScript up into an object called JSUtil. The method that generates the error message is
shown here:
public static String getLoginError() {
   StringBuffer jsBuf=new StringBuffer()
    .append("document.getElementById('spanProcessing')
")
    .append("  .innerHTML = ")
    .append("'The Username and Password are invalid';
");
  return jsBuf.toString();
}
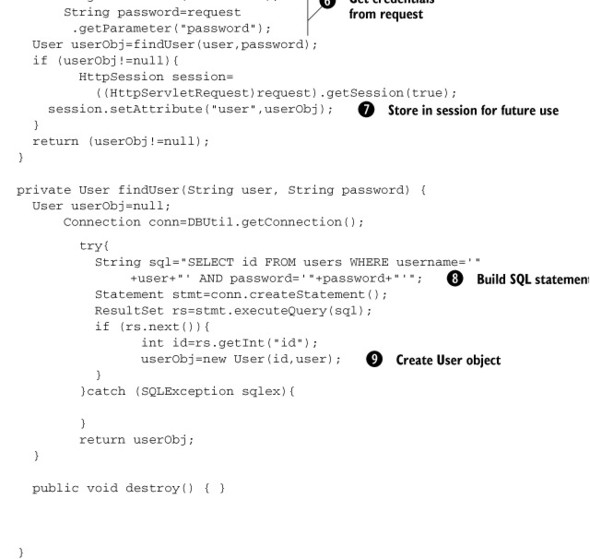
The login() method in listing 11.2 provides the details on authentication. We extract the username and password from the request ![]() and then invoke findUser(), which contacts the database for a matching row
and then invoke findUser(), which contacts the database for a matching row ![]() . (We’ve abstracted away the details of the database behind a DBUtil object here.) If a row matching the user is found, the
function returns a User object
. (We’ve abstracted away the details of the database behind a DBUtil object here.) If a row matching the user is found, the
function returns a User object ![]() , which is then stored in session
, which is then stored in session ![]() for the next time we pass through this filter. On subsequent passes through this filter, we won’t need to provide the username
and password in the querystring, because the User object will already be in session. Another nice feature of this approach is that it makes it easy to log the user out. All we need to do is remove the User object
from session.
for the next time we pass through this filter. On subsequent passes through this filter, we won’t need to provide the username
and password in the querystring, because the User object will already be in session. Another nice feature of this approach is that it makes it easy to log the user out. All we need to do is remove the User object
from session.
The User object itself is a simple representation of the database structure, as shown in listing 11.3.
Listing 11.3. User.java
public class User {
  private int id=-1;
  private String userName=null;

  public User(int id, String userName) {
    super();
    this.id = id;
    this.userName = userName;
  }
  public int getId() { return id;}
  public String getUserName() { return userName;}
}
We do not store the password field in this object. We won’t need to refer to it again during the lifecycle of our portal, and having it sitting in session would be something of a security risk, too! So, that’s our login framework from the server side. Nothing very unusual there. Let’s move on now to see how our client-side code interacts with it.
11.3.3. The client-side login framework
The client-side login framework consists of two parts. The first is the visual part, which the user is able to view and interact with. We will dynamically create this with HTML; you’ll see how easy it is to create a layout with divs, spans, and CSS.
The second part is our Ajax or our JavaScript code, which sends the request to the server and also processes the data. In this case, we are going to introduce JavaScript’s eval() method. The eval() method evaluates the string passed to it as JavaScript code. If the string contains a variable name, it creates the variable. If the eval input contains a function call, it will execute that function. The eval() method is powerful, but its performance can be slow depending on the complexity of the operation.
The HTML layout
As in previous chapters, we are not using a table to do our layout. Table layouts lengthen the page-rendering time, and since we are using Ajax, we would like everything to be faster and more responsive. We need to place a textbox, a password field, and a submit button on a form that we can submit to the server. We also need a span so that we can display the error message from the server if the username or password is invalid. By putting the entire form inside divs and spans, we format the HTML to produce the portal’s header. Listing 11.4 shows the basic HTML framework of our login header.
Listing 11.4. HTML login layout
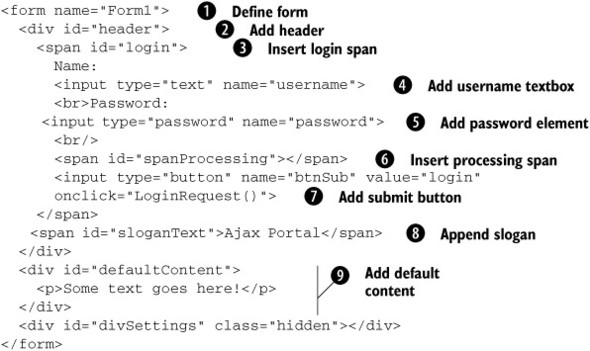
First, we add our form ![]() to our HTML document. The form provides a semantically meaningful container for the textboxes. It also provides a degradation
path for a non-Ajax-based authentication via normal form submission. We create a header div
to our HTML document. The form provides a semantically meaningful container for the textboxes. It also provides a degradation
path for a non-Ajax-based authentication via normal form submission. We create a header div ![]() , which surrounds all our content. A span
, which surrounds all our content. A span ![]() is then added to house our username textbox
is then added to house our username textbox ![]() or password field
or password field ![]() , our processing span
, our processing span ![]() , and our submit button
, and our submit button ![]() .
.
The button we use to submit the data back to the server needs an onclick event handler. The onclick event handler initializes the Ajax by calling a JavaScript function, LoginRequest(). LoginRequest() is explained in the section “The JavaScript login code.”
The only things left for the header are to add the slogan ![]() for the portal and to add a place for the default content
for the portal and to add a place for the default content ![]() to be shown when the page is loaded. Any message can be displayed inside the div defaultContent. In this example, we just put in a string of text, but we can add links, images, text, or whatever we think is appropriate. Then we save the HTML; you can see how unsightly it looks without any CSS applied to the elements (figure 11.7).
to be shown when the page is loaded. Any message can be displayed inside the div defaultContent. In this example, we just put in a string of text, but we can add links, images, text, or whatever we think is appropriate. Then we save the HTML; you can see how unsightly it looks without any CSS applied to the elements (figure 11.7).
Figure 11.7. The HTML login form with no CSS applied
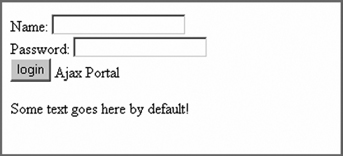
To fix this drab-looking layout, we need to apply CSS to our elements. Since we have given the elements their own IDs, it makes the process simple. We reference the element’s ID by placing a pound sign in front of it. We can add the stylesheet as an external file or inline via the <style> tag. In this case, we are using an inline <style> tag that we add to the head tag of the document. The CSS rules are added to alter the colors, fonts, sizes, location, margins, and so on, as shown in listing 11.5.
Listing 11.5. Login form CSS rules

We start out by removing any margins or padding from the body ![]() of the document. We specify the height as 100% so that it is easier to define document heights in percentages if we need to in the future. It is important to note that
we need to specify these properties both for the HTML and the body tags, since different browsers look at either one tag or
the other for this information.
of the document. We specify the height as 100% so that it is easier to define document heights in percentages if we need to in the future. It is important to note that
we need to specify these properties both for the HTML and the body tags, since different browsers look at either one tag or
the other for this information.
For the header ![]() , we can apply a background color to the div. We can also set the height and add a bottom border to separate the header from
the content in a more dynamic manner. We can also adjust any of the font properties as we think necessary.
, we can apply a background color to the div. We can also set the height and add a bottom border to separate the header from
the content in a more dynamic manner. We can also adjust any of the font properties as we think necessary.
We take the login information ![]() and move it to the right side of the screen. We use the float property and set the value to right. To make the text boxes uniform, we use the text-align property so that the content within the span is also aligned on the right margin. This gives our textboxes a more uniform
look. Without it, the textboxes would not line up correctly since the string name is shorter than the password. We can also
add some margins to adjust the position of the login information so that its right edge is not directly on the border of our
header div.
and move it to the right side of the screen. We use the float property and set the value to right. To make the text boxes uniform, we use the text-align property so that the content within the span is also aligned on the right margin. This gives our textboxes a more uniform
look. Without it, the textboxes would not line up correctly since the string name is shorter than the password. We can also
add some margins to adjust the position of the login information so that its right edge is not directly on the border of our
header div.
The last thing to style in our header is the slogan ![]() . By setting the lineheight to the height of the div, we are allowing the slogan to be centered vertically in the header. We also set the font properties
to make the text noticeable. Just as we did for the login span, we add a margin so the A in Ajax is not directly sitting on the edge of the header. After applying the CSS to our header, we can save the document and view
how the CSS has changed the look and feel of the header, as shown in figure 11.8.
. By setting the lineheight to the height of the div, we are allowing the slogan to be centered vertically in the header. We also set the font properties
to make the text noticeable. Just as we did for the login span, we add a margin so the A in Ajax is not directly sitting on the edge of the header. After applying the CSS to our header, we can save the document and view
how the CSS has changed the look and feel of the header, as shown in figure 11.8.
Figure 11.8. Ajax portal’s login page with the CSS stylesheet attached
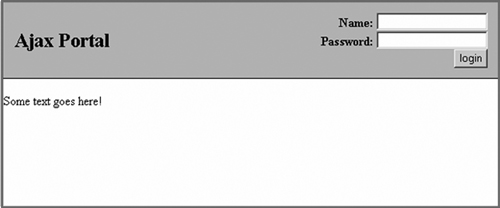
Here you can see that our textboxes are aligned on the right side and that our slogan is on the left side. We have taken the basic HTML structure and created an attractive login header that did not require a table. Now that the header is styled, we can add some functionality to this form. We need to add our JavaScript functionality so that we can make a request back to the server without submitting the entire page.
The JavaScript login code
The JavaScript login code will use the power of Ajax to allow us to send only the username and password to the server without having to submit the entire page. In order to do this, we need to reference our external JavaScript file, net.js, which contains the ContentLoader object, so we can use Ajax to send and retrieve the request:
<script type="text/javascript" src="net.js"></script>
The ContentLoader file does all of the work of determining how to send the information to the server, hiding any browser-specific code behind the easy-to-use wrapper object that we introduced in chapter 3. Now that the net.js file is referenced, we are able to perform the request. The request is initiated by the button click from our login form. The login form needs to perform three actions. The first is to inform the user that his request is being processed, the next is to gather the information, and the third is to send the request to the server (listing 11.6).
Listing 11.6. The XMLHttpRequest login request
function LoginRequest(){
  document.getElementById("spanProcessing").innerHTML =
    " Verifying Credentials";
  var url = 'portalLogin.servlet';
  var strName = document.Form1.username.value;
  var strPass = document.Form1.password.value;
  var strParams = "user="+strName
    + "&pass=" + strPass
  var loader1 = new net.ContentLoader(
    url,CreateScript,null,"POST",strParams
  );
}
Before we send the information to the server, we display a message to the user saying that his action of clicking the button is allowing him to log into the system. This keeps the user from clicking the button repeatedly, thinking that nothing happened.
We obtain the username and password field values and place them into a string that we will submit to the server. We submit the values to the server with our ContentLoader object, which accepts our parameters for the URL, the function to call for success, the function to call for an error, the POST form action, and the string containing the parameters to post. Let’s look at the function we call when the server returns success: CreateScript(). It will process the data returned from the server-side page:
function CreateScript(){
   strText = this.req.responseText;
   eval(strText);
}
When we built the server-side code, we returned text strings that contained JavaScript statements in the responseText of our returned object. In order to effectively use the JavaScript statements, we must process them with the eval() method, which determines exactly what the strings contain and executes it. In this case, the string is either going to contain the error message generated by the LoginFilter failing, or the code to build the windows, if the filter lets us through to the SelectServlet (see listing 11.8).
What does the string consist of? In this application, we are not going to be sending back an XML document, as we have done in many of our examples. Instead, we will be sending back structured JavaScript statements with which we will be able to use the eval() method. Using the terms that we developed in chapter 5, we would say that our solution here is script-centric rather than data-centric. Again, we’ve chosen this approach simply for variety’s sake. A portal solution could equally well be coded using XML or JSON as the communication medium.
We can now save the portal and run it to see if our login procedure is working correctly. As you can see in figure 11.9, the wrong username and password were entered into the fields.
Figure 11.9. An error message is displayed because of invalid credentials.

The text beside the login button in figure 11.9 shows an error message to the user, informing her that the credentials that were provided are incorrect.
If, on the other hand, the login is successful, then the request will be forwarded to the main portal page. In this case, the next step is to build our windows. This will require a large amount of DHTML to develop our rich user interface, but the hard work is already done for us because we are using a prewritten JavaScript DHTML library.
11.4. Implementing DHTML windows
Our Ajax portal has a rich user interface that allows the user to dynamically position the windows. The user can also set the size of the window to the desired width and height. When the user changes these settings, we can use Ajax to interact with the server to store them as values in our database without the user even knowing anything is happening.
To enable this, we need to develop a database table to store the window properties such as height, width, and position. The server-side code needs to receive these new window properties and update the values in the database.
Writing browser-compliant DHTML can be complicated, so we are using a DHTML library script to perform the drag, drop, and resizing of the window. A library is nothing more than an external JavaScript file that contains all of the code for a given functionality. You can obtain the JavaScript library, JSWindow.js, for this project with the rest of the book’s downloads. We will need to make only a few modifications to the library to enable Ajax.
11.4.1. The portal windows database
We need a database table that can hold the properties of several DHTML windows for each user. Each user can have multiple rows in this table, one for every window she has in her portal. The table is used to retrieve the last-known position and size of the window when the user first logs in. When the user makes changes, the values are then updated so that she can access them at future times and still see the same layout. The following SQL will create the portal_windows table:
create table portal_windows(
  id int primary key not null,
  user_id int not null,
  xPos int not null,
  yPos int not null,
  width int not null,
  height int not null,
  url varchar(255) not null,
  title varchar(255) not null
);
Each user can have multiple windows, all with different configurations. The column named user_id relates to our users database. Each of the windows must have an id as the primary key, so we can use this to save and update properties. Make sure you add the auto increment for the window’s id column. This id column is used by the Ajax code and the DHTML window library to obtain and update the user’s window properties.
We need two columns to hold the x and y coordinates of our DHTML window. These give us the location of the window on the screen from the upper-left corner of the browser. The column names for coordinates are xPos and yPos. Two other properties we need to capture are the width and height properties of the DHTML window. These are all stored as integers in the table.
The last two columns in our database determine the URL of the content within the window and the title of the content that the user assigns as a quick reference. All of the database properties for portal_windows are shown in figure 11.10.
Figure 11.10. portal_windows database table structure

Now we need to enter some default values so we can perform some testing. We can add as many windows as we want for any of the users in the database table users. You can see in figure 11.10 that we have added three DHTML windows for user 1.
In figure 11.11, the three DHTML window parameters give us the information needed to create three windows on the screen with different dimensions and positions. The three windows in this table display three different websites: JavaRanch, Google, and Eric’s Ajax Blog. Now that the database table has been built, we have to get this information to the user when he logs into the portal. You’ll see how straightforward this is in the next section.
Figure 11.11. Data entered for the user with the id of 1

11.4.2. The portal window’s server-side code
Let’s assume that our login request has made it through the security filter. The next step is to retrieve the list of portal windows for our authenticated user and send back the JavaScript telling the browser what to display. We define a PortalWindow object that represents a row of data in the database, as shown in listing 11.7.
Listing 11.7. PortalWindow.java
public class PortalWindow {
  private int id=-1;
  private User user=null;
  private int xPos=0;
  private int yPos=0;
  private int width=0;
  private int height=0;
  private String url=null;
  private String title=null;

  public PortalWindow(
      int id, User user, int xPos, int yPos,
      int width,int height,
      String url, String title
  ) {
      this.id = id;
      this.user = user;
      this.xPos = xPos;
      this.yPos = yPos;
      this.width = width;
      this.height = height;
      this.url = url;
      this.title = title;
  }
  public int getHeight() {return height;}
  public void setHeight(int height) {this.height = height;}
  public int getId() {return id;}
  public void setId(int id) {this.id = id;}
  public String getTitle() {return title;}
  public void setTitle(String title) {this.title = title;}
  public String getUrl() {return url;}
  public void setUrl(String url) {this.url = url;}
  public User getUser() {return user;}
  public void setUser(User user) {this.user = user;}
  public int getWidth() {return width;}
  public void setWidth(int width) {this.width = width;}
  public int getXPos() {return xPos;}
  public void setXPos(int pos) {xPos = pos;}
  public int getYPos() {return yPos;}
  public void setYPos(int pos) {yPos = pos;}
}
Again, this object is pretty much a straightforward mapping of the database structure. In production, we’d probably use an ORM system such as Hibernate or iBATIS to help us out, but we want to keep things fairly simple and platform-agnostic for now. Note that we provide setter methods as well as getters for this object, because we’ll want to update these objects dynamically in response to user events.
The URL that we requested on login, portalLogin.servlet, is mapped to a servlet that retrieves all the portal windows for that user and sends back JavaScript instructions. Listing 11.8 shows the main servlet.
Listing 11.8. SelectServlet.java (mapped to ‘portalLogin.servlet’)
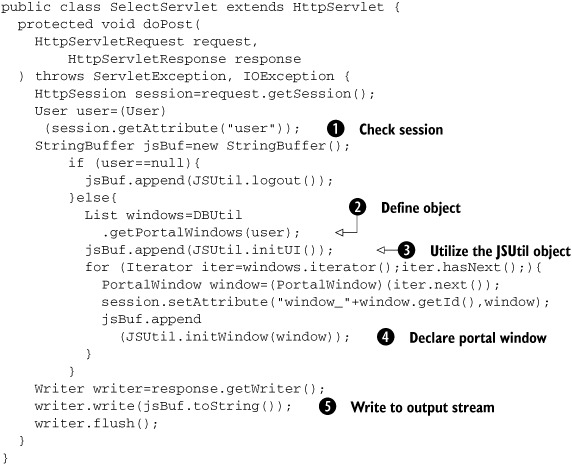
Again, we use the DBUtil object to abstract out the database interactions and the JSUtil to generate JavaScript code. DBUtil
provides a getPortalWindows() method ![]() that takes a User object as an argument. We have one of those sitting in the session, so we pull it out now
that takes a User object as an argument. We have one of those sitting in the session, so we pull it out now ![]() . The actual JavaScript is written by the JSUtil object again, providing some user interface initialization code
. The actual JavaScript is written by the JSUtil object again, providing some user interface initialization code ![]() , declaring each of the portal windows that we’ve extracted from the database
, declaring each of the portal windows that we’ve extracted from the database ![]() and then writing them directly to the servlet output stream
and then writing them directly to the servlet output stream ![]() .
.
Let’s briefly review the helper objects that we’ve used along the way, DBUtil and JSUtil. We used DBUtil to get a list of the portal windows. As we noted, we’d probably automate this in production using Hibernate or something similar; but listing 11.9 provides a method from DBUtil that is a simple home-rolled implementation of accessing the portal_windows table in the database, for teaching purposes. We’re using straightforward SQL directly here, so it should be easy to adapt to the server language of your choice.
Listing 11.9. getPortalWindows() method
public static List getPortalWindows(User user){
  List list=new ArrayList();
  Connection conn=getConnection();
  try{
    String sql="SELECT * FROM portal_windows "
      +"WHERE user_id="+user.getId();   Construct SQL statement
      Statement stmt=conn.createStatement();
      ResultSet rs=stmt.executeQuery(sql);
      PortalWindow win=null;
      while (rs.next()){   Iterate through results
      int id=rs.getInt("id");
        int x=rs.getInt("xPos");
        int y=rs.getInt("yPos");
        int w=rs.getInt("width");
        int h=rs.getInt("height");
        String url=rs.getString("url");
        String title=rs.getString("title");

        win=new PortalWindow(   Add Object
          id,user,x,y,w,h,url,title
        );
        list.add(win);
      }
    rs.close();
    stmt.close();
  }catch (SQLException sqlex){
  }
  return list;
}
We simply construct the SQL statement ![]() , iterate through the result set that it generates
, iterate through the result set that it generates ![]() , and add a PortalWindow object to our list in each case
, and add a PortalWindow object to our list in each case ![]() .
.
Second, we use the JSUtil helper object to generate some initialization code and declare our window objects in JavaScript. The methods are basically exercises in string concatenation, and we won’t show the full class here. The following code gives a flavor of how it works:
public static String initWindow(PortalWindow window) {
  StringBuffer jsBuf=new StringBuffer()
   .append("CreateWindow(new NewWin('")
   .append(window.getId())
   .append("',")
   .append(window.getXPos())
   .append(",")
   .append(window.getYPos())
   .append(",")
   .append(window.getWidth())
   .append(",")
   .append(window.getHeight())
   .append(",'")
   .append(window.getUrl())
   .append("','")
   .append(window.getTitle())
   .append("'));
");
  return jsBuf.toString();
}
The initWindow() method generates the JavaScript code for initializing a single portal window. The JavaScript code from a successful request might look like this, with initWindow() being called for each window in turn (the code has been formatted here for improved readability):
document.getElementById('login')
  .innerHTML='Welcome back!'
document.getElementById('defaultContent')
  .style.display='none';

CreateWindow(
  new NewWin(
    '1',612,115,615,260,
    'http://www.javaranch.com','JavaRanch'
  )
);
CreateWindow(
  new NewWin(
    '2',10,115,583,260,
    'http://www.google.com','Google'
  )
);
CreateWindow(
  new NewWin(
    '3',10,387,1220,300,
    'http://radio.javaranch.com/pascarello','Ajax Blog!'
  )
);
Since we are now logged in, we can remove the login textboxes and submit button by placing a welcome message in their place. After we put up the welcome message, we need to hide the content that’s on the screen by default. To do this, we set the defaultContent DOM element’s display property to none so it is removed from the user’s view.
The JavaScript statement that instantiates the window involves two parts for each window. The first part is a function call to CreateWindow(), which is part of the JavaScript library that we added. Inside the function call, we will call a new object constructor. The constructor creates a window class, to make it easier to reference the window properties. The JavaScript function that produces the window class needs to receive the id, width, height, xPos, yPos, url, and title of the window. When the servlet returns this string to the client, our JavaScript eval() method will execute it.
For the most part, we’re following good code-generation conventions in generating simple, repetitive code that calls out to our JavaScript library functions. Our initialization code could be wrapped up into a single client-tier call, but we leave that as an exercise for the reader.
The JavaScript library that we use creates JavaScript floating windows. Let’s now see how to make those window-building functions available on the client tier.
11.4.3. Adding the JS external library
As mentioned earlier, we are using a DHTML library that you can download from Manning’s website. The file, called JSWindow.js, contains all of the JavaScript DOM methods to produce the window elements. The library also applies event handlers to the window objects so that we can use drag-and-drop functionality. It is convenient to use code libraries that are already developed since it cuts down on development time and the code is normally cross-browser compliant.
The first thing we need to do is rename the file so we can make changes to it. Rename the JavaScript file to AjaxWindow.js, and save it to the directory in which you are working.
To use the functions contained in AjaxWindow.js, we need to reference the external JavaScript file with a script tag. We use the src attribute of the JavaScript element tag. The script element that links to our .js file should be included within the head tags of our HTML page:
<script type="text/javascript" src="AjaxWindow.js"></script>
We also need to get the DHTML windows stylesheet, so we can style the window. To do this, download the file AjaxWindow.css from Manning’s website and link to it using the link tag and the href attribute:
<link rel="stylesheet" type="text/css"
  href="AjaxWindows.css"></link>
Now that we have the JavaScript and the CSS files attached to the HTML page, we can test to make sure that we have linked to them correctly. We are also verifying that our server-side code is calling our JavaScript library correctly. If the code is linked correctly and we have obtained the data from the server properly, we should see three windows created from the information contained in the database, as shown in figure 11.12, after logging in with a username and password from our database. Remember that the library function we created is building the windows and adding all of the functionality to them. In a sense it is magic, since we just call it and it works.
Figure 11.12. The Ajax portal with three windows open on the screen
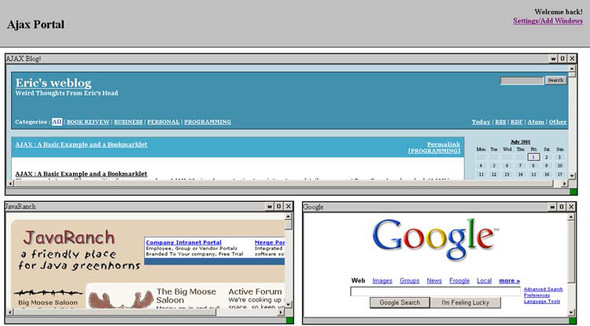
With the portal windows open, we can test the functionalities built into the DHTML library without the Ajax functionality we are going to add next. Here are some of the things we can do:
- Maximize and minimize the windows by clicking on the button labeled with an O.
- Hide the window by clicking the button labeled with an X.
- Open the DHTML window into its own pop-up window by clicking on the w.
- Drag the window by holding down the left mouse button on the title bar and moving the mouse around. Releasing the mouse button stops the drag operation.
- Resize the window by clicking on the green box on the lower-right corner and dragging it around the screen.
You can see that the windows in figure 11.13 are in different positions than in figure 11.12.
Figure 11.13. Ajax portal showing windows with different positions

Now that we have the ability to position and resize the windows with the library, we need to make our changes to the external .js file. The changes will allow us to call a function that utilizes Ajax to send the new property values to our database.
11.5. Adding Ajax autosave functionality
Using Ajax allows us to implement an autosave feature that can be fired by any event without the user knowing that it is happening. Normally, the user would have to click a button to force a postback to the server. In this case, we will be firing the autosave with the onmouseup event, which ends the process of dragging and resizing events. If we were to fire a normal form submission on the onmouseup event, the user would lose all of the functionality of the page, disrupting her workflow. With Ajax, the flow is seamless.
11.5.1. Adapting the library
As we mentioned earlier, the code from JavaScript DHTML libraries is normally cross-browser compliant, which frees us from spending time getting cross-browser code to work correctly. If you look at the code in the external JavaScript file, AjaxWindow.js, you’ll see a lot of functionality (which we will not discuss here because of its length). There are functions that monitor the mouse movements, and one function that builds the windows. There are functions that set the position of the windows, and another function that sets the size. Out of all of these functions, we need to adapt only one to have our window save back to the database with Ajax.
Adapting the DHTML library for Ajax
The DHTML library functions for dragging and resizing windows use many event handlers and DOM methods to overcome the inconsistencies between browsers. The dragging and resizing of the windows is completed when the mouse button is released (“up”). Therefore, we should look for a function that is called with the onmouseup event handler in the AjaxWindow.js file. It contains the following code, which is executed when the mouse button is released:
document.onmouseup = function(){
  bDrag = false;
  bResize = false;
  intLastX = -1;
  document.body.style.cursor = "default";
  elemWin="";
  bHasMoved = false;
}
In this code, a lot of booleans are being set to false to indicate that their actions have been canceled. The cursor is being set back to the default. The line that we need to change is the one where the elemWin reference is being canceled. At this point, we want to take the reference and pass it to another function to initialize our XMLHttpRequest object, in order to transfer the information to the server. Although sometimes when we adapt libraries, it might take a lot of trial and error to adapt them to our needs, in this case, the functionality is pretty straightforward. Just add the following line, shown in bold, to your document’s onmouseup event handler:
document.onmouseup = function(){
  bDrag = false;
  bResize = false;
  intLastX = -1;
  document.body.style.cursor = "default";
  if(elemWin && bHasMoved)SaveWindowProperties(elemWin);
  bHasMoved = false;
}
The bold line in the previous code snippet checks to make sure that the object has been moved or resized and that the element still exists. If the user did not perform either of these actions, then there would be no reason to send the request to the server. If one of these actions was performed, we pass the element reference to the function SaveWindowProperties(), which initiates the request to the server.
Obtaining the active element properties
After the user has moved or resized an element, we must update the server with the new parameters. The DHTML window library uses CSS to position the elements and to set their width and height. This means that all we have to do is obtain the database ID, the coordinates, and the size of the window. We can obtain the coordinates and size by looking at the CSS parameters assigned to the window that had focus. We then can take these new parameters and send them to the server to be saved in the database with Ajax (listing 11.10).
Listing 11.10. SaveWindowProperties() function

As you can see in listing 11.11, we obtain the ID of the window ![]() by referencing the window object. The ID that we obtained was assigned to the window when the library built it. When it assigns
an ID, it appends win in front of the number from the database id column; we can see that by looking at the JavaScript code that is building the windows.
by referencing the window object. The ID that we obtained was assigned to the window when the library built it. When it assigns
an ID, it appends win in front of the number from the database id column; we can see that by looking at the JavaScript code that is building the windows.
The x and y positions of the window are obtained ![]() by referencing the left and top properties in the stylesheet. We also use the stylesheet properties to obtain the size
by referencing the left and top properties in the stylesheet. We also use the stylesheet properties to obtain the size ![]() of the window by referencing its width and height properties.
of the window by referencing its width and height properties.
After obtaining the information, we can call another function, Settings() ![]() , which we will be creating shortly, to send our request to the server. Once we call the function, we should remove the element
object from our global variable elemWin
, which we will be creating shortly, to send our request to the server. Once we call the function, we should remove the element
object from our global variable elemWin ![]() . To do this, we assign an empty string to the variable elemWin. Now with the SaveWindowProperties() function complete, we can initiate our silent Ajax request to the server with the JavaScript function Settings().
. To do this, we assign an empty string to the variable elemWin. Now with the SaveWindowProperties() function complete, we can initiate our silent Ajax request to the server with the JavaScript function Settings().
11.5.2. Autosaving the information to the database
Ajax lets us send information to the server without the user even knowing it is happening. We can see this in action with two projects in this book. We can easily submit requests to the server as a result of both monitoring keystrokes, as we do in the type-ahead suggest (chapter 10), and monitoring mouse movements, as we do in this chapter. This invisible submission is great for developers since we can update the user’s settings without him having to lift a finger. In most cases, reducing steps increases the user’s satisfaction. For this application, the action of the user releasing the mouse button is all we need to initiate the XMLHttpRequest object. Now it’s time to initiate the process to send the request to the server.
The client: sending the silent request
The XMLHttpRequest process in this case will not require anything sophisticated. The user’s interaction with the form sends all of the form properties to our function. We first need to initialize the XMLHttpRequest object:
function Settings(xAction,xParams){
  var url = xAction + ".servlet";
  var strParams = xParams;
  var loader1 = new net.ContentLoader(url,
                BuildSettings,
                ErrorBuildSettings,
                "POST",
                strParams);
}
For the function Settings(), we are passing the action string that contains all of our window’s properties. We attach the parameters that we’re going to post back to the server. If we get a successful round-trip to the server, the loader will call the function BuildSettings(). If we get an error during the round-trip, we will call the function ErrorBuildSettings():
function BuildSettings(){
  strText = this.req.responseText;
  document.getElementById("divSettings").innerHTML = strText;
}
function ErrorBuildSettings(){
  alert('There was an error trying to connect to the server.'),
  document.getElementById("divSettings").style.display = "none";
}
The function BuildSettings() shown here is quite basic; all we are doing is finishing up our XMLHttpRequest received from the server. We can set a message on the portal status bar to show that we have updated the information on the server. We can add an error message to the status bar if we encounter a problem updating the information on the server. We also generate an alert, which tells the user of the error, but will also disrupt their workflow. We presented production-ready notification mechanisms in chapter 6, and leave it as an exercise for the reader to integrate those systems into the portal. Now let’s see what happens on the server.
The server: gathering information from the client
All we have left to do is to extract the values from our form submission. The values were sent by our XMLHttpRequest object, which was triggered by the onmouseup event handlers. We need to create our SQL query with this information and update the record in the database to save the new information. We define an UpdateServlet for this purpose, which is shown in listing 11.11.
Listing 11.11. UpdateServlet.java (mapped to ‘saveSettings.servlet’)
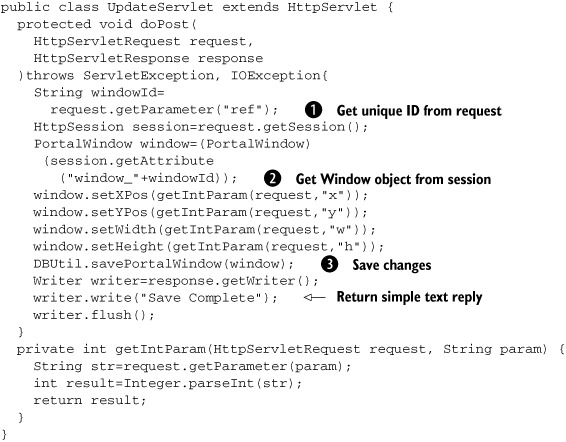
Given the window ID as a request parameter ![]() , we can extract the PortalWindow from session
, we can extract the PortalWindow from session ![]() and update its geometry based on further request parameters. We then call another method on our DBUtil object to save the portal window settings in the database
and update its geometry based on further request parameters. We then call another method on our DBUtil object to save the portal window settings in the database ![]() . Again, the implementation that we’ve provided here in listing 11.12 has been written to be simple and easy to translate to other languages.
. Again, the implementation that we’ve provided here in listing 11.12 has been written to be simple and easy to translate to other languages.
Listing 11.12. savePortalWindows() method
public static void savePortalWindow(PortalWindow window){
  Connection conn=getConnection();
  int x=window.getXPos();
  int y=window.getYPos();
  int w=window.getWidth();
  int h=window.getHeight();
  int id=window.getId();
  String sql="UPDATE portal_windows SET xPos="+x
    +",yPos="+y
    +",width="+w
    +",height="+h
    +" WHERE id="+id;
  try{
    Statement stmt=conn.createStatement();
    stmt.execute(sql);
    stmt.close();
  }catch (SQLException sqlex){
  }
}
The code in listing 11.12 is very straightforward. We read the relevant details from the PortalWindow object and construct a SQL update statement accordingly. Rather than returning any JavaScript this time, we issue a simple text acknowledgment.
To test the new functionality, log into the portal as our test user. Drag the windows around the screen, and resize them so they are in different positions from their defaults. Close the browser to force an end to the session. When we reopen the browser and log back into the portal as that user, we see the windows in the same position. Move the windows to a new position and look at the database table. We are automatically saving the user’s preferences without him even knowing it.
We’ve now provided all the basic functionality for a working portal system, including a few things that a classic web application just couldn’t do. There are several other requirements that we could classify as “nice to have,” such as being able to add, remove, and rename windows. Because of limited space, we are not going to discuss them here. The full code for the portal application is available to download and includes the ability to add, delete, rename, and adjust the window’s properties without leaving the single portal page. If you have any questions about the code in this section or need a more thorough understanding, you can always reach us on Manning.com’s Author Online at www.manning.com.
Our code so far has been somewhat rough and ready so that we could demonstrate how the individual pieces work. Let’s hand it over to our refactoring team now, to see how to tighten things up and make the system easier to reuse.
11.6. Refactoring
The concept of an Ajax-based portal client that interacts with a server-side portal “manager” is, as you’ve seen, a compelling notion. In our refactoring of this chapter’s client-side code, let’s consider our component as an entity that serves as the arbitrator of portal commands sent to the portal manager on the server. Throughout this refactoring discussion, let’s make it our goal to isolate the pieces of code that might change over time and facilitate those changes as easily as possible. Since the portal is a much coarser-grained component and something that will more or less take over the real estate of our page, we won’t be so stringent with the requirement of not interrupting the HTML as we have in the previous two refactoring examples.
But, before discussing the client-side semantic, let’s first stop and contemplate the contract with the server. Our previous server-side implementation was written in Java, so we had a servlet filter perform the authentication functionality: one servlet to return the window configurations, and another servlet to save window configurations. Similarly, for adding new windows and deleting the current ones, we would provide further standalone servlets. In a Java web application, the servlets can be mapped to URLs in a very flexible fashion, defined in the web.xml file of the web archive (.war) file. For example, our SelectServlet, which returned the script defining the initial windows, was mapped to the URL portalLogin.servlet.
One of the strengths of Ajax is the loose coupling between the client and the server. Our portal example uses Java as a back-end, but we don’t want to tie it to Java-specific features such as servlet filters and flexible URL rewriting. An alternative back-end architecture might use a request dispatch pattern, in which a single servlet, PHP page, or ASP.NET resource accepts all incoming requests and then reads a GET or POST parameter that specifies what type of action is being undertaken. For example, the URL for logging in to the portal might be portal?action=login&userid=user&password=password or, more likely, the equivalent using POST parameters. In Java, we might implement a request dispatcher approach by assigning a specific URL prefix, say .portal, to the dispatcher servlet, allowing us to write URLs such as login.portal.
In our refactored component, we will generalize our assumptions about the back-end to allow either a request dispatcher architecture or the multiple address option that we used for our Java implementation. We don’t, however, need to introduce complete flexibility, so we’ll predefine a number of commands that the portal back-end will be expected to understand, covering login, showing the user’s portal windows, and adding and deleting windows from the portal. With these changes to the server in mind, let’s return our attention to the client-side implementation.
Let’s begin our discussion of the portal refactoring by redefining the usage contract from the perspective of the page’s HTML; then we’ll delve into the implementation. Recall that the hook from our HTML page into the portal script was via the login, specifically through the login button:
<input type="button" name="btnSub" value="login"
       onclick="LoginRequest('login')">
We’ll change the onclick handler to be a call to a function that will use our portal component. Let’s assume that the portal component will be instantiated via a script that executes once the page loads. A representative example of what this should look like is shown in listing 11.13.
Listing 11.13. Portal creation and login
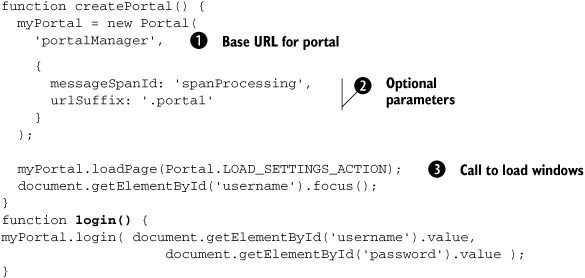
In this usage semantic, createPortal(), which should get called once the page loads, creates an instance of the portal component. The first argument is the base
URL for the portal’s server-side application ![]() , and the second provides optional parameters used to customize it for a particular context
, and the second provides optional parameters used to customize it for a particular context ![]() . In this case, we tell it the ID of the DOM element into which status messages should be written and the name of the request
parameter that will denote which action to execute. Once created, an API on the portal named loadPage is called. This loads the page’s portal windows if there is already a user login present in the server session
. In this case, we tell it the ID of the DOM element into which status messages should be written and the name of the request
parameter that will denote which action to execute. Once created, an API on the portal named loadPage is called. This loads the page’s portal windows if there is already a user login present in the server session ![]() . If nobody is logged in, this server will return an empty script, leaving only the login form on the screen.
. If nobody is logged in, this server will return an empty script, leaving only the login form on the screen.
The login() function is just a utility function in the page that calls the login() method of our portal component, passing the username and password values as arguments. Given this contract, the login button’s onclick handler now calls the page’s login() method, as shown here:
<input type="button" name="btnSub" value="login" onclick="login()">
11.6.1. Defining the constructor
Now that you have a basic understanding of how the component will be used from the perspective of the page, let’s implement the logic, starting with the constructor:
function Portal( baseUrl, options ) {
   this.baseUrl    = baseUrl;
   this.options    = options;
   this.initDocumentMouseHandler();
The constructor takes the URL of the Ajax portal management on the server as its first argument and an options object for configuration as the second. In our earlier development of the script, recall that we had a servlet filter and two servlets perform the back-end processing. Throughout the rest of this example, we’ll assume a single servlet or resource, portalManager, which intercepts all requests to the portal back-end, as configured in listing 11.13. If we wanted to configure the portal against a back-end that didn’t use a single request dispatcher, we could simply pass different arguments to the constructor, for example:
myPortal = new Portal(
  'data',
 { messageSpanId: 'spanProcessing', urlSuffix: '.php' }
);
This will pass a base URL of “data” and, because no actionParam is defined in the options array, append the command to the URL path, with the suffix .php, resulting in a URL such as data/login.php. We’ve given ourselves all the flexibility we’ll need here. We’ll see how the options are turned into URLs in section 11.6.3. For now, let’s move on to the next task. The final line of the constructor introduces the issue of adapting the AjaxWindows.js library.
11.6.2. Adapting the AjaxWindows.js library
Recall that the implementation of this portal used an external library called AjaxWindows.js for creating the individual portal windows and managing their size and position on the screen. One of the things we had to do was to adapt the library to send Ajax requests to the portal manager for saving the settings on the mouseup event. This was the hook we needed; all move and resize operations are theoretically terminated by a mouseup event. The way we performed the adaptation in round one was to make a copy of the AjaxWindows.js library code and change the piece of code that puts a mouseup handler on the document. If we think of the AjaxWindow.js library as a third-party library, the drawback to this approach is evident. We’ve branched a third-party library codebase, that is, modified the source code and behavior of the library in such a way that it’s no longer compatible with the version maintained by its original author. If the library changes, we have to merge in our changes with every new version we upgrade to. We haven’t done a good job of isolating this change point and making it as painless as possible. Let’s consider a less-radical approach of adaptation and see if we can rectify the situation. Recall the last line of our constructor:
this.initDocumentMouseHandler();
Our initDocumentMouseHandler() method is an on-the-fly adaptation of the AjaxWindows.js library. It just overrides the document.onmouseup as before, but within our own codebase instead. Now our own method will perform the logic required to perform the adaptation within the portal’s handleMouseUp() method. This is shown in listing 11.14.
Listing 11.14. Adaptation of the AjaxWindows.js mouse hander
initDocumentMouseHandler: function() {
   var oThis = this;
   document.onmouseup = function() { oThis.handleMouseUp(); };
},

handleMouseUp: function() {
   bDrag    = false;
   bResize  = false;
   intLastX = -1;
   document.body.style.cursor = "default";

   if ( elemWin && bHasMoved )
      this.saveWindowProperties(elemWin.id);

   bHasMoved = false;
},
This solution is much better, but we could take it one step further. If the AjaxWindows.js library defined the mouseup handler within a named function rather than anonymous, we could save the handler under a different name and invoke it from our own handler. This would have the benefit of not duplicating the logic already defined in the AjaxWindows.js library. This approach is illustrated in the following code:
function ajaxWindowsMouseUpHandler() {
   // logic here...
}
document.onmouseup = ajaxWindowsMouseUpHandler;
ajaxWindowsMouseUpHandler() is a callback defined by the AjaxWindows.js external library. Using it would allow us to save the definition of the method and use it later, as shown here:
initDocumentMouseHandler: function() {
   this.ajaxWindowsMouseUpHandler =
      ajaxWindowsMouseUpHandler;   Store our own reference
   var oThis = this;
   document.onmouseup = function() { oThis.handleMouseUp(); };
},

handleMouseUp: function() {
   this.ajaxWindowsMouseUpHandler();   Call library function
   if ( elemWin && bHasMoved )
      this.saveWindowProperties(elemWin.id);   Add our functionality
},
Now our handleMouseUp() method doesn’t have to duplicate the AjaxWindows.js library functionality. We just invoke the functionality ![]() through our saved reference
through our saved reference ![]() and then add our own functionality
and then add our own functionality ![]() . And if the mouseup handler of AjaxWindows changes in the future, we pick up the changes without requiring any code modifications. This is a
much more palatable change-management situation. Of course, it does assume that the implied contract with the library doesn’t
change—the contract being two global variables named elemWin and bHasMoved. Given that the library currently defines the mouseup handler as an anonymous function, we could still save a reference to the existing mouseup functionality with a line of code such as
. And if the mouseup handler of AjaxWindows changes in the future, we pick up the changes without requiring any code modifications. This is a
much more palatable change-management situation. Of course, it does assume that the implied contract with the library doesn’t
change—the contract being two global variables named elemWin and bHasMoved. Given that the library currently defines the mouseup handler as an anonymous function, we could still save a reference to the existing mouseup functionality with a line of code such as
this.ajaxWindowsMouseUpHandler = this.document.onmouseup;
This would achieve the same thing, but it’s a slightly more brittle proposition, since the contract in this situation is much looser. This solution relies on the fact that we’ve included our script libraries in the appropriate order and that the AjaxWindows.js library has already executed the code that placed the mouseup handler on the document. It also assumes no other library has placed a different mouseup handler on the document or has performed some other wrapping technique just as we’ve done.
That’s probably about as much as we can hope to do with the library adaptation. Let’s move on to the portal API. The handleMouseUp() method reveals one of the three portal commands that the portal component has to accommodate. When the mouse button is released, the saveWindowProperties() method is called to save the size and position of the current window. The following discussion will detail that along with the other portal command APIs.
11.6.3. Specifying the portal commands
As already discussed, our portal component is primarily a sender of commands. The commands that are sent are Ajax requests to a server-side portal management system. We’ve already discussed the notion of commands and the formal Command pattern in Ajax, in chapters 3 and 5. Here is another opportunity to put that knowledge to use.
The commands that we’ve supported up to this point in our portal are logging in, loading settings, and saving settings. We’re going to throw in the ability to add and delete windows, which we alluded to although we didn’t show the full implementation. We can think of each of these in terms of a method of our portal. But before we start looking at code, let’s do a bit of prep work to help with the task of isolating change points. What we’re referring to is the names of the commands themselves. Let’s define symbols for each command name so that the rest of our components can use them. Consider the following set of symbols:
Portal.LOGIN_ACTION          = "login";
Portal.LOAD_SETTINGS_ACTION  = "PageLoad";
Portal.SAVE_SETTINGS_ACTION  = "UpdateDragWindow";
Portal.ADD_WINDOW_ACTION     = "AddWindow";
Portal.DELETE_WINDOW_ACTION  = "DeleteWindow";
Even though the language doesn’t really support constants, let’s assume that based on the uppercase naming convention, these values are intended to be constant values. We could lazily sprinkle these string literals throughout our code, but that’s a fairly sloppy approach. Using constants in this way keeps our “magic” strings in a single location. If the server contract changes, we can adapt. For example, imagine the ways in which the server contract could change, as shown in table 11.1.
Table 11.1. Public contract changes
|
Server Contract Change |
Action Required |
|---|---|
| A command is renamed (e.g., PageLoad gets renamed to its verb-noun form LoadPage). | Change the right side of the assignment of the LOAD_SETTINGS_ACTION constant to the new value. The rest of the code remains unaffected. |
| The server no longer supports a command. | Remove the constant, and do a global search for all references. Take appropriate action at each reference point. |
| The server supports a new command. | Add a constant for the command, and use its name within the code. |
Now that we can reference commands by these symbols, let’s look at a generic mechanism for issuing the commands to the portal management server. We need a helper method that generically sends Ajax-based portal commands to the server. Consider this usage contract:
myPortal.issuePortalCommand( Portal.SAVE_SETTINGS_ACTION,
                             "setting1=" + setting1Value,
                             "setting2=" + setting2Value, ... );
In this scenario, we’re contemplating a method named issuePortalCommand() that takes the name of a command as its first argument (for example, one of our constants) and a variable number of arguments corresponding to the parameters the command expects/requires. The parameters are, quite intentionally, of the exact form as that required by the net.ContentLoader’s sendRequest() method. The issuePortalCommand() method we’ve defined could be implemented as follows:
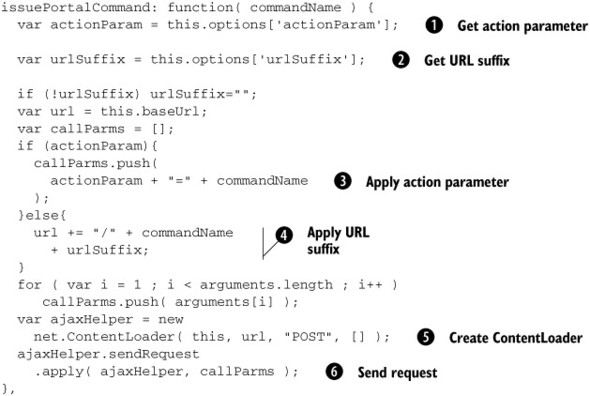
This method builds a URL based on the configuration options that we discussed in section 11.6.1. If we have supplied a value for actionParam ![]() , then it will be added to the parameters that are POSTed to the server
, then it will be added to the parameters that are POSTed to the server ![]() . If not, we will append the command to the URL path
. If not, we will append the command to the URL path ![]() , adding the URL suffix if we have supplied one in our options
, adding the URL suffix if we have supplied one in our options ![]() . The first function argument is the command name. All remaining arguments are treated as request parameters. The URL that
we have constructed is then passed to the ContentLoader
. The first function argument is the command name. All remaining arguments are treated as request parameters. The URL that
we have constructed is then passed to the ContentLoader ![]() , and the request is sent with the request parameters in tow
, and the request is sent with the request parameters in tow ![]() , as illustrated in the example usage shown previously. With this method in place, each of our portal command APIs will have
a nicely minimal implementation. Another “for free” feature of having a generic method like this is that we can support new
commands that become available on the server without having to change any client code. For now, let’s look at the commands
we do know about.
, as illustrated in the example usage shown previously. With this method in place, each of our portal command APIs will have
a nicely minimal implementation. Another “for free” feature of having a generic method like this is that we can support new
commands that become available on the server without having to change any client code. For now, let’s look at the commands
we do know about.
Login
Recall that our login button’s onclick handler initiates a call to the login() method of our page, which in turn calls this method. The login command, at least from the perspective of the server, is a command that the server must handle by checking the credentials and then (if they are valid) responding with the same response that our load-page command would perform. With that in mind, let’s look at the implementation shown in listing 11.15.
Listing 11.15. The portal login method
login: function(userName, password) {

  this.userName = userName;
  this.password = password;

  if ( this.options.messageSpanId )
     document.getElementById(
       this.options.messageSpanId).innerHTML =
       "Verifying Credentials";
  this.issuePortalCommand( Portal.LOGIN_ACTION,
                           "user=" + this.userName,
                           "pass=" + this.password );
},
The method puts a “Verifying Credentials” message into the span designated by our configurable option this.options.messageSpanId. It then issues a login command to the portal back end, passing the credentials that were passed into the method as request parameters. The issuePortalCommand() method we’ve just put in place does all the hard work.
Load settings
Recall that the createPortal() function of our page calls this method to load the initial configuration of our portal windows. The method to load the settings for the page is even simpler than the login method just discussed. It’s just a thin wrapper around our issuePortalCommand(). It passes the user as the lone parameter that the server uses to load the relevant window settings, since the settings are on a per-user basis:
loadPage: function(action) {
  this.issuePortalCommand( Portal.LOAD_SETTINGS_ACTION,
                           "user=" + this.userName,
                           "pass=" + this.password );
},
Save settings
The save settings method is equally simplistic. Recall that this method is called by our AjaxWindows.js library adaptation on the mouseup event in order to store all move and size operations:
saveWindowProperties: function(id) {
   this.issuePortalCommand( Portal.SAVE_SETTINGS_ACTION,
                   "ref=" + id,
                   "x="   + parseInt(elemWin.style.left),
                   "y="   + parseInt(elemWin.style.top),
                   "w="   + parseInt(elemWin.style.width),
                   "h="   + parseInt(elemWin.style.height) );
   elemWin = null;
},
Adding/deleting windows
Although we didn’t fully develop the concept out of adding and deleting windows, at least from the perspective of providing a nice UI to initiate these actions, we can certainly define the command API methods that would support these operations, as shown here:
addWindow: function(title, url, x, y, w, h) {
   this.issuePortalCommand( Portal.ADD_WINDOW_ACTION,
                            "title=" + title,
                            "url="   + url,
                            "x="     + x,
                            "y="     + y,
                            "w="     + w,
                            "h="     + h );

},

deleteWindow: function(id) {
   var doDelete =
      confirm("Are you sure you want to delete this window?");
   if(doDelete)
      this.issuePortalCommand( Portal.DELETE_WINDOW_ACTION,
                              "ref=" + id );
},
This concludes our discussion of the APIs required to support the portal commands. Now let’s look at our portal Ajax handling.
11.6.4. Performing the Ajax processing
As already noted, in this example we’re using an Ajax technique for handling responses in a script-centric way. The technique relies on the fact that the expected response is valid JavaScript code. The thing that’s very desirable about this kind of approach is that the client doesn’t have to do any data-marshaling or parsing to grok (geek-speak for understand) the response. The response is simply evaluated via the JavaScript eval() method, and the client is absolved from all further responsibility. The negative side of this approach is that it puts the responsibility on the server to be able to understand the client-side object model and generate a syntactically correct language-specific (JavaScript) response. The second downside of this approach is partially addressed by the popular variety of this technique of using JSON to define our responses. There are some server-side libraries that aid in the generation of JSON responses (see chapter 3), although these are moving more toward what we described in chapter 5 as a data-centric approach.
For now, we’re going to stick to a script-centric system, so let’s look at our implementation and see what we can do to help it along. Let’s start with our ajaxUpdate() function and its helper runScript():
ajaxUpdate: function(request) {
   this.runScript(request.responseText);
},

runScript: function(scriptText) {
   eval(scriptText);
},
As already discussed, the response handling is simple to a fault. All we do is call the runScript() method with the responseText, and the runScript() simply eval()s the response text. So why, you might ask, don’t we just get rid of the runScript() method altogether and just call eval() from within the ajaxUpdate() method? Well, that’s certainly a valid and useful approach. It might be nice, however, to have a method that encapsulates the concept of running a script. For example, what if we added a preprocessing step or a postprocessing step to our runScript() implementation? Again, we’ve isolated a change point. Our ajaxUpdate() method is happily oblivious of the change, and we pick up the new behavior. One interesting application of this technique would be a preprocessor that does token replacement of values that reside on the client before executing.
Finishing out our Ajax discussion with the ever-important handling of errors, let’s show our handleError() method. Recall that just as the ajaxUpdate() method is an implied contract required for collaboration with the net.ContentLoader, so is the handleError(). The handleError() method is shown here:
handleError: function(request) {
  if ( this.options.messageSpanId )
     document.getElementById
        (this.options.messageSpanId).innerHTML =
        "Oops! Server error.  Please try again later.";
},
This method checks for the existence of the messageSpanId configuration property and, if it exists, uses it as the element to place an “Oops!” message onto the UI. The actual text of the message that’s presented is something that could also be parameterized with the options object. This is an exercise left to the reader.
With that, our portal component refactoring session has come to a close. We’ve created a deceptively simple mechanism for providing Ajax portal management. Now let’s take a few moments to review the focus of our refactoring and recap what we’ve accomplished.
11.6.5. Refactoring debrief
In a couple of ways, the development of this component is quite different than the other component examples in this book. First, the portal component is a more coarse-grained component for providing an Ajax-based portal capability. A third-party developer is unlikely to want to drop a portal system into the corner of his page! Second, it uses a technique for handling Ajax responses as JavaScript code. Our refactoring of this component focused on ways to isolate change points. This was illustrated in several ways:
- We provided a clean way to adapt the AjaxWindows.js library.
- We isolated string literals as pseudo-constants.
- We wrote a generic method for issuing commands.
- We isolated via a method the concept of running an Ajax response script.
11.7. Summary
The portal can be one of the most powerful tools a company has. The company can set up business logic to allow users to see only the information that pertains to them. Portals also allows users to customize the look and feel of the window to fit their needs in order to increase their performance since the page is laid out exactly as they want it to be.
By using Ajax in the portal, we can keep all of the functionality in one area without having to send the server to multiple pages. There is no more worrying about what the back button is going to do when the user logs out. There will be no page history, since we never left the page. We talked about the drawbacks of navigating away from the page, but we were able to solve the problem by using Ajax to perform a request to the server.
We also sent requests back to the server without the user knowing that data was being saved. By triggering Ajax with event handlers, we are able to save data quickly without disrupting the user’s interaction. A portal that uses Ajax introduces a new level of performance in a rich user interface.
In the final section of this chapter, we looked at refactoring the portal code. In previous sections, we have focused on creating a reusable component that can be dropped in to an existing page. In this case, that isn’t appropriate, as the portal is the shell within which other components will reside. Our emphasis in these refactorings has been on increasing the maintainability of the code by isolating String constants, creating some generic methods, and separating the third-party library from our project code in a cleaner way.
In this chapter, we’ve generated simple XML responses from the server and decoded them manually using JavaScript. In the next chapter, we’ll look at an alternative approach: using XSLT stylesheets on the client to transform abstract XML directly into HTML markup.
