
(User’s Manual – Page 200)
When you shoot a portrait-oriented (vertical) image, with the camera turned sideways, the image can later be viewed as a horizontal image lying on its side or as a smaller, upright (tall) image on the camera’s horizontal (wide) Monitor.
If you view the image immediately after taking it, the camera’s software assumes that you are still holding the camera in the rotated position, and the image will be displayed correctly for that angle. Later, if you are reviewing the image with the camera’s playback functionality and have Rotate tall set to On, the image will be displayed as an upright, vertical image that is smaller so it will fit on the horizontal Monitor. You can zoom in to see sharpness detail, if needed.
If you would rather have the camera leave the image lying on its side in a horizontal view, forcing you to turn the camera 90 degrees to view it, you’ll need to choose Off.
The following two settings are available on the Rotate tall menu (Figure 2-27):
On – When you take a vertical image, the camera will rotate it so you don’t have to turn your camera to view it naturally during playback. This resizes the view of the image so that a vertical image fits in the horizontal frame of the Monitor. The image will be a bit smaller than normal. When you first view the image after taking it, the camera does not rotate it, since it assumes you are still holding the camera in a vertical orientation. It also senses which end of the camera is up—if the Shutter-release button is up or down—and displays the image accordingly.
Off – Vertical images are left in a horizontal direction, lying on their side; you’ll need to turn the camera to view the images in the same orientation as when they were taken. This provides a slightly larger view of a portrait-oriented image.
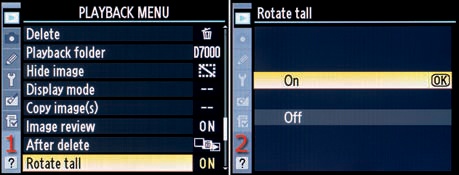
Here are the three steps to choose a Rotate tall setting:
Choose Rotate tall from the Playback Menu and scroll to the right (Figure 2-27, image 1).
Select On or Off from the Rotate tall screen (Figure 2-27, image 2).
Press the OK button to finish.
My Recommendation: I leave Rotate tall set to On. That way I can view a portrait-oriented image in its natural, vertical orientation without turning my camera. Be sure you understand the relationship between this function and Auto image rotation, which stores orientation data with the picture. I always set Rotate tall and Setup Menu > Auto image rotation to On. That lets me view images in the correct orientation on my camera’s Monitor and my computer screen.