
ISO sensitivity settings are provided to give you control over the light sensitivity of the imaging sensor, including whether you manually control it or if the camera sets it automatically.
In the D7000, the ISO numbers are sensitivity equivalents. To make it very simple, ISO sensitivity is the digital equivalent of film speed. The higher the ISO sensitivity, the less light is needed for the exposure. A high ISO setting allows higher shutter speeds and smaller apertures.
In Figure 3-46 you can see the external camera controls used to change the ISO sensitivity on the D7000. This is a good way to adjust ISO sensitivity quickly. This is also the easiest method to change the camera’s ISO sensitivity setting, although it doesn’t involve the Shooting Menu.
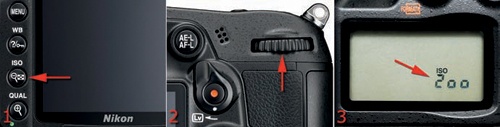
Here are the steps you’ll use to manually adjust the camera’s ISO sensitivity:
Hold down the ISO button (Figure 3-46, image 1).
Rotate the rear Main command dial counterclockwise to increase the ISO sensitivity, or turn it clockwise to decrease the ISO sensitivity (Figure 3-46, image 2).
The ISO sensitivity number will show on the Control panel (Figure 3-46, image 3) and in the Viewfinder.
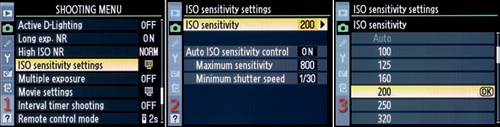
You can also use Shooting Menu > ISO sensitivity settings to change the camera’s ISO sensitivity. Figure 3-47 shows the three screens used select your favorite ISO sensitivity for the circumstances in which you are shooting.
Notice in Figure 3-47, image 3, that there is a list of ISO sensitivity settings, from ISO 100 to Hi 2 (ISO 25,600). The normal ISO range for the D7000 is 100 to 6400. Select your desired ISO sensitivity from the list of available ISO sensitivity settings.
Here are the steps to select an ISO sensitivity setting:
Choose ISO sensitivity settings from the Shooting Menu and scroll to the right (Figure 3-47, image 1).
Select ISO sensitivity from the menu and scroll to the right (Figure 3-47, image 2).
Scroll up or down in the ISO sensitivity menu until you highlight the ISO value you want to use.
Press the OK button to save the setting (Figure 3-47, image 3).
The standard minimum ISO sensitivity for the D7000 is ISO 100. You can adjust the camera in a range from ISO 100–6400, in one-third steps, except for the increase from Hi 1 to Hi 2. The increment value is controlled by Custom setting b1 ISO sensitivity step value, which can be set to 1/3 or 1/2 step. We’ll look at this more carefully in the upcoming chapter titled Chapter 4.
Select your favorite ISO sensitivity setting, using either the external camera controls or the ISO sensitivity settings from the Shooting Menu. If you’d like, you can simply let your camera decide which ISO to use. This brings us to two often-misunderstood features.
You may have noticed in Figure 3-47, image 3, that there’s a grayed out Auto setting at the top of the ISO sensitivity list. This Auto setting is the default when you have the camera set to one of the automatic SCENE modes or the AUTO mode—found on the Mode dial—and allows the camera to take full control of adjusting the ISO sensitivity to help you get the picture under difficult lighting.
Don’t confuse the ISO sensitivity Auto setting with the AUTO mode (it looks like a green camera on the Mode dial) or the Auto ISO sensitivity control we’ll discuss in the next section.
A nice feature on the D7000 is the ability to use the fully automatic AUTO or SCENE modes and still adjust the ISO sensitivity manually by taking it out of Auto mode and selecting a manual ISO instead (Figure 3-47, image 3). Auto will stay grayed out until you enter one of the SCENE or AUTO modes.
This is a fine degree of control that allows a new user to gradually learn how to take more and more control of the camera’s settings.
There’s another, more controllable, automatic setting available: the Auto ISO sensitivity control. This was known on earlier Nikon cameras as ISO-AUTO.
This setting allows the camera to control the ISO sensitivity and shutter speed according to the light levels sensed by the camera.
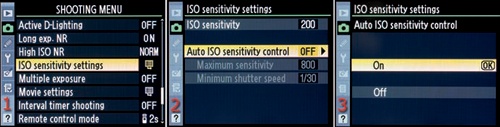
Use the following steps to enable the Auto ISO sensitivity control:
Choose ISO sensitivity settings from the Shooting Menu and scroll to the right (Figure 3-48, image 1).
Select Auto ISO sensitivity control from the menu and scroll to the right (Figure 3-48, image 2).
Choose On or Off from the menu (Figure 3-48, image 3).
Press the OK button to select the setting.
After you set the Auto ISO sensitivity control to On, you should immediately set two values, depending on how you shoot: Maximum sensitivity and Minimum shutter speed.
The Maximum sensitivity setting is a safeguard. It allows the camera to adjust its own ISO sensitivity from the minimum value of ISO 100 to the value set in Maximum sensitivity according to the light conditions. The camera will try to maintain the lowest ISO sensitivity it can to get the picture. However, it can rapidly rise to the Maximum sensitivity level, if needed.
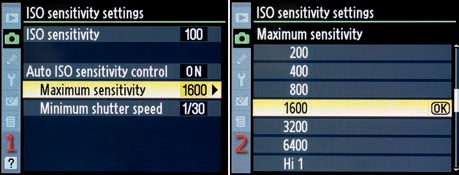
This setting overrides the normal ISO sensitivity settings. If you don’t want the Maximum sensitivity to exceed a certain ISO value, simply select from the list shown in Figure 3-49, image 2, where I selected ISO 1600. The Maximum sensitivity default is ISO 6400. That’s too high for my taste, since it will let the camera take the ISO sensitivity all the way up to ISO 6400 in a low-light situation. That introduces too much noise potential for me! Maybe not for you? In any case, I set my camera’s Maximum sensitivity to ISO 1600, as shown in Figure 3-49, image 2.
Note: It’s a little-known fact that you can also set a minimum sensitivity, of sorts. The User’s Manual describes how to set Maximum sensitivity, but it does not mention (that I’ve found) that you can use the normal ISO sensitivity setting to control the lowest ISO you want the camera to use. If you set the ISO sensitivity to ISO 400 and the Auto ISO sensitivity control > Maximum sensitivity to ISO 1600, then the camera will use the ISO range of 400 to 1600. It will not go below ISO 400, nor will it exceed ISO 1600.
The Maximum sensitivity setting you choose is the maximum ISO value the camera will use to get a good exposure when the light dims.
Interestingly, Custom setting b1 ISO sensitivity step value does not control the incremental ISO numbers between these primary values. I carefully set up my D7000 to test this and found that it would often use an intermediate value like ISO 640, 1100, 1250, 2000, or 2200 as the light dimmed. It did this whether I set Custom setting b1 to 1/3 or 1/2 EV step.
What happens when the camera reaches its Maximum sensitivity and there still isn’t enough light for a good exposure? Let’s find out.
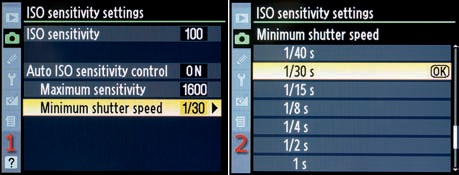
Since shutter speed helps control how sharp an image can be, depending on camera shake and subject movement, you’ll need some control over the minimum shutter speed while the Auto ISO sensitivity control is set to On (Figure 3-50, image 1).
You can select the Minimum shutter speed that the camera will allow when the light diminishes. In Programmed auto (P) (camera controls shutter and aperture) and Aperture priority auto (A) (camera controls shutter and you control aperture) exposure modes, the camera will not go below the Minimum shutter speed unless the Maximum sensitivity setting still won’t give you a good exposure.
This is the answer to our question in the last section about what happens when there is not enough light and the camera has maxed out the Maximum sensitivity level. Even though you’ve selected a Minimum shutter speed, the camera will go below the Minimum shutter speed when the Maximum sensitivity ISO number has been reached and the light is still too low for a good exposure.
In other words, in Programmed auto (P) or Aperture priority auto (A) exposure modes, if you try to take pictures in low light, the camera will try to keep the ISO sensitivity as low as possible until the shutter speed drops to your selected Minimum shutter speed. When it hits the selected Minimum shutter speed value—like 1/30s shown in Figure 3-50, image 2—the ISO sensitivity will begin to rise up to your selected Maximum sensitivity value, such as ISO 1600 as shown in Figure 3-49, image 2.
If there still isn’t enough light for a good exposure after the camera hits the Maximum sensitivity value, it won’t keep raising the ISO sensitivity. Instead, the camera will now go below your selected Minimum shutter speed, dropping below 1/30s as shown in Figure 3-50, image 2. Be careful because if the light gets that low, your camera can go all the way down to a shutter speed of 30 seconds to get a good exposure. You better have the camera on a tripod and a static subject with a shutter speed that low.
Consider the Minimum shutter speed value to be the lowest handheld speed, after which you’ll put your camera on a tripod. Most people can handhold a camera down to about 1/60s if they are careful, and maybe as low as 1/30s if they’re extra careful and brace themselves. At shutter speeds slower than that, it’s blur city for your images. It’s even worse with telephoto lenses because camera movement is greatly magnified with a long lens, and a Minimum shutter speed of 1/250s to 1/500s or more may be required (the maximum is 1/4000s).
For fun, let’s listen to the camera talk to itself while you take pictures in low light with Auto ISO sensitivity control enabled. As we listen in on the D7000 thinking—in the next paragraph—we need to know that the current Maximum sensitivity setting is ISO 1600 and the Minimum shutter speed setting is 1/30s:
Nikon D7000 thinking: Okay, the Auto ISO sensitivity control is on! The light is dropping and my current 1/60s shutter speed at ISO 200 won’t let me make a good exposure. I’ll slow the shutter speed to the minimum of 1/30s, as my owner specified in my Minimum shutter speed setting. More pictures are incoming, and the light is still dropping! I can’t go any lower on the shutter speed for now, since my owner has instructed me to keep the Minimum shutter speed at 1/30s unless I can’t get a good picture. I’ll have to start raising the ISO sensitivity. Here comes more pictures, and whew, it’s getting dark! I’ve now raised the ISO sensitivity to my Maximum sensitivity level of ISO 1600, which is as high as I am allowed to go. I have no choice now but to go below the 1/30s Minimum shutter speed my owner has specified. I hope I’m on a tripod!
Note: The other exposure modes, Shutter priority auto (S) and Manual (M), allow you to control the camera in a way that overrides certain parts of the Auto ISO sensitivity control.
In Manual (M) mode the camera completely relinquishes all control of the shutter and aperture. It can adjust only the ISO sensitivity by itself, so it can obey the Maximum sensitivity, but the Minimum shutter speed is overridden and does not apply.
In Shutter priority auto (S) mode the camera can control the aperture, but the shutter speed is controlled only by the camera user. So Auto ISO sensitivity control can still control the Maximum sensitivity, but the camera cannot control the Minimum shutter speed.
It may be a good idea to enable High ISO NR—as discussed a few pages back—when you turn on the Auto ISO sensitivity control. This is especially true if you leave the camera set to the default Maximum sensitivity value of 6400. Otherwise, you may have excessive noise when the light drops.
How much automation do you need to produce consistently excellent images? Let’s explore how and when automatic, self-adjusting ISO might improve or degrade your images. What is this feature all about? When and why should you use it? Are there any compromises in image quality when using this mode?
Normally, you will set your camera to a particular ISO number, such as 200 or 400, and shoot your images. As the light dims or as the shade deepens, you might increase ISO sensitivity to continue taking handheld images. If you absolutely must get the shot, Auto ISO sensitivity control will work nicely. Here are a few scenarios:
Scenario 1 – Let’s say you’re a photojournalist and you’re shooting flash pictures of the president as he disembarks from his airplane, walks into the terminal, and drives away in his limousine. Under these circumstances, you will have little time to check your ISO settings or shutter speeds and will be shooting in widely varying light conditions.
Scenario 2 – You’re a wedding photographer in a church that doesn’t allow the use of flash. As you follow the bride and groom from the dark inner rooms of the church into the lobby, and finally up to the altar, the light conditions will vary constantly. You have no time to deal with the fluctuations in light by changing your ISO.
Scenario 3 – You’re at a party, and you want some great pictures. You want to use flash, but the pop-up Speedlight may not be powerful enough to reach across the room at low ISO settings. You really don’t want to be bothered with camera configuration at this time but still want some well-exposed images. The light will vary as you move around the room talking and laughing and snapping pictures.
These scenarios present excellent environments for the Auto ISO sensitivity control. The camera will use your normal settings, such as your ISO, shutter speed, and aperture, until the light will not allow those settings to provide an accurate exposure. Only then will the camera raise the ISO or lower the shutter speed to keep functioning within the shutter/aperture parameters you have set.
Look at the Auto ISO sensitivity control as a fail-safe for times when you must get the shot but have little time to deal with camera settings or when you don’t want to vary the shutter/aperture settings but still want to be assured of a well-exposed image.
Unless you’re a private detective shooting handheld telephoto images from your car or a photojournalist or sports photographer who must get the shot every time regardless of maximum quality, I would not recommend leaving Auto ISO sensitivity control set to On. Use it only when you really need to get the shot under any circumstances!
Of course, if you are unsure of how to use the correct ISO for the light level due to lack of experience, don’t be afraid to experiment with this mode. At the very worst, your images might be nosier than usual. However, it may not be a good idea to depend on this mode over the long term because noisy images are not very nice.
Maybe! It really depends on how widely the light conditions vary when you are shooting. Most of the time your camera will maintain the normal range of ISO settings in Auto ISO sensitivity control, so your images will be their normal low-noise, sharp masterpieces. However, at times the light may be so low that the ISO will exceed the normal range of 100–800 and will start getting into the noisier ranges above ISO 800.
Be aware that Auto ISO sensitivity control can and will push your camera’s ISO sensitivity into a range that causes noisier images when light levels drop, if you’ve allowed it by setting the Maximum sensitivity to a high level. Use it with this understanding and you’ll do fine. ISO 6400 is the default maximum. Make sure you understand this or you might get some noisy images.
The Auto ISO sensitivity control is yet another great feature of your powerful Nikon D7000. Maybe not everyone needs this fail-safe feature, but some people rely on it. I use it in circumstances where getting the shot is the most important thing and where the light levels may get too low for normal ISO settings.
Even if you think you might use it only from time to time, do learn how to use it for those times. Experiment a bit with Auto ISO sensitivity control. It’s fun and can be useful!