
|
So far we’ve been focusing on using IronPython with Windows Forms to construct rich desktop applications, but the .NET platform also provides a high-level framework for building web applications: ASP.NET.
ASP.NET includes lots of goodies for web development. It provides a powerful page model where server-to-client round-tripping of data is handled automatically, removing the need for a lot of the boilerplate code in a web application. The .NET class library has a huge range of classes for solving different problems, and ASP.NET also comes with a large number of its own built-in components for user interfaces. The end result is that ASP.NET can help you write web applications faster and with less code—and it can do this even better once we add Python to the mix!
The IronPython team has released a project enabling the use of IronPython within ASP.NET. In this chapter we use it to build a simple application to display a MultiDoc file in a web page, and then extend it to allow you to edit the file over the web. Finally you’ll see how you can package up things we’ve built as controls that can be used in other web pages. Before taking a closer look at the IronPython integration, though, let’s get an overview of the framework itself.
When writing web applications, the user interface isn’t defined in terms of Windows Forms controls, but instead is displayed by the web browser. This means that your interface needs to be represented to the browser as HTML and JavaScript.
ASP stands for Active Server Pages, and was introduced by Microsoft with Internet Information Services (IIS) 3 in 1996. Originally, it provided a simple way of intermingling HTML and JavaScript client-side code with code (usually written in a language called VBScript) executed on the server. When the .NET platform was released in 2002, it introduced a model for building web applications that was substantially different from the original ASP system, called ASP.NET.
ASP.NET provides a structure for creating web applications that allows you to reuse parts of your user interface in the same way that you can reuse code. It also enables you to package the client-side definition of components (their HTML and JavaScript code) together with code that defines their behavior on the server. Before we can look at how ASP.NET combines the client and server code, we need to define some of the key concepts of the system.
Web controls are .NET classes used by the ASP.NET machinery to generate HTML and JavaScript code; they’re the building blocks of web pages. The programming interface they expose is designed to be similar to the Windows Forms controls, although there are many differences because of the more constrained request-response model of the World Wide Web. ASP.NET includes dozens of web controls, from the common Button and TextBox to the powerful GridView, and it’s easy to write new ones yourself.
An important point to note is that some web controls, such as the Panel and Repeater, act as containers that can hold other controls. They enable you to construct a user interface as a tree of controls, with containers providing structure for the text boxes, labels, check boxes, and buttons.
Web controls are put together using a language that is HTML with extensions to allow adding server code and referring to web controls. Files in this language can be pages (with the .ASPX extension), or they can be reusable components called user controls (in ASCX files), which can then be referenced from ASPX pages or other user controls. Both ASPX pages and user controls can have server code either in the same file or in an associated file, called its code file or code-behind. Separating the page and server code is generally cleaner and easier to read, especially if the behavior of the page or control is complicated.
The extensions that make an ASPX page more than HTML include the following:
Directives—. Located at the top of a file. They tell the ASP.NET system how to process the file: where the code file is, whether the page should be cached, as well as a host of other options. They can also add references to user controls that can then be used in the page.
The
runat="server"attribute—. Added to HTML elements. When an element has this attribute, an object representing it is created on the server when the page is requested. Server code for the page can interact with it to change its contents or appearance, or even hide it.Web controls—. Included as tags, which look like
<asp:Button id="button1" runat="server" text="Click"/>.The namebutton1can then be used from the server code to interact with the button. Attribute values (like the button’s text) can also be set in the tag.Code snippets—. Included in the page, enclosed by
<% %>tags. If the snippet starts with=, the value of the expression will be converted to a string and appear in the HTML sent to the client.
So an ASP.NET page is a tree of web controls, constructed according to ASPX and ASCX files. Each web control in the tree knows how to convert itself into HTML and JavaScript code to be displayed in a browser. Where does the code-behind associated with pages and user controls fit into the picture?
The server code is used in two ways. The simplest way is that code-behind can provide methods that can be called from code snippets in the page or user control. This technique can be useful for displaying small pieces of text or turning a part of the markup on or off.
The second way is much more central to the power of the ASP.NET framework. When a page is requested and the tree of controls is being built, the system fires a number of different events that your server code can hook into. Some of these events, such as the Page_Load event, are fired every time a request for the page is made; others, such as button clicks or drop-down list selection change events, are only raised when triggered by the user on the other end of the internet. These events provide a tremendous amount of control over how the page structure is created and how the controls in the page are set up. They also make it much simpler (from the developer’s point of view) to handle user interaction in a web environment. Figure 11.1 shows some of the events fired by the server while handling a request.
Now that you’ve seen a little of what ASP.NET is and what it has to offer, we add IronPython into the mix and use it to create some ASP.NET pages.
Before you can start creating a simple IronPython web application, you’ll need to download two things: Visual Web Developer Express (the free Microsoft IDE for ASP.NET) and the IronPython ASP.NET integration package.
Visual Web Developer Express is available from the following URL:
http://msdn.microsoft.com/vstudio/express/downloads/default.aspx.
You should install it with all the default options. Including the MSDN Library documentation can be useful if you want to refer to a local copy, although it makes the download bigger.
IronPython for ASP.NET is available from the following URL:
http://www.codeplex.com/aspnet/Release/ProjectReleases.aspx?ReleaseId=17613.
Download the ASP.NET WebForms IronPython Sample and the documentation package, and unzip them where convenient. The Sample zip file contains the directory layout and files needed for an IronPython ASP.NET web project. We use this as a template when creating our web application.
Why do you need the IronPython for ASP.NET package? You already have IronPython installed, and ASP.NET allows you to use any .NET language, right? Well, not quite. Although ASP.NET is designed to be able to handle many different programming languages, it expects all of them to compile into normal .NET assemblies; as you’ve seen already, this is something that IronPython doesn’t do because its object model is so different from that of the .NET platform.
To solve this problem, the IronPython team has come up with an alternative compilation and execution model for pages written in Python (and one likely to be extended to other dynamic languages in the future). You can see the differences in figure 11.2.
For more details about the changes made to accommodate dynamic languages, it’s well worth reading David Ebbo’s whitepaper, available at http://www.asp.net/ironpython/whitepaper/. This covers the changes made to ASP.NET internals and looks at the performance implications of the new model.
From the perspective of a programmer writing web applications using the IronPython support, the biggest difference lies in the way custom page code is incorporated. In a standard ASP.NET page, your methods and code snippets live in a subclass of the built-in Page class. In an IronPython page, you don’t define a new class—your code is run by an instance of ScriptPage created at execution time. This change has some implications for how you manage the page state in your applications, as you’ll see later in the chapter.
Now that you have all the prerequisites, you’re ready to create an IronPython web project by following these steps:
Copy the ironpython-webform-sample directory from where you unzipped it, and rename it to ironpython-in-action.
Start Visual Web Developer and select the File > Open Web Site... menu option.
Navigate to the new ironpython-in-action directory in the dialog box and click Open.
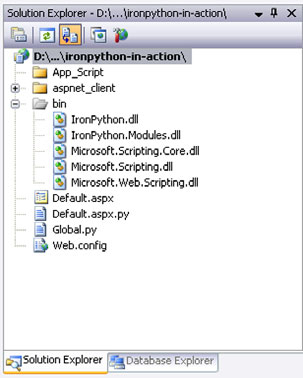
You’ll see the directory structure in the Solution Explorer panel on the right side of the window (figure 11.3).
Now that the site has been created, you can edit the files to add some behavior. Open Default.aspx by double-clicking it in the Solution Explorer. This is the home page of the application—the word default in the filename means that this page will be shown if someone makes a request for the root directory of your web application. As you can see, the markup in the file looks much like Extensible Hypertext Markup Language (XHTML), but note the following two important differences:
The first line is an ASP.NET directive that tells the framework that any code in this file will be in IronPython and that the code-behind for this page is Default.aspx.py.
A code-behind file stores the code for this specific page; keeping the ASPX markup and code separate makes them easier to maintain.
The
<head>and<form>tags haverunat="server"attributes.This attribute tells the ASP.NET machinery to parse the contents of these tags and execute any web controls encountered.
If you click the Design button at the bottom of the window, you can see that the page body contains an asp:Literal element. Let’s change that—click the literal and delete it, and then drag a Label onto the page from the Toolbox tab on the left. If you change back to source view by clicking the Source button, you can see that the IDE has added the following ASPX code to create a Label in the body of the page:
<asp:Label id="Label1" runat="server" text="Label"></asp:Label>
Let’s break this down into its separate components:
asp:Label—. Tells ASP.NET the class of the web control that should be inserted.id="Label1"—. Gives the control a name so that you can refer to it from code.runat="server"—. Tells ASP.NET that this is a control that it should handle. (Without this attribute, the tag would be ignored and sent directly to the browser as is.)text="Label"—. Is a property of theLabelweb control that determines what it will display.
Edit the asp:Label tag to set the Text property to "" instead of the default text Visual Studio has created, and save the file.
The project skeleton has several other things in the directory—which we’ll look at soon; the most important one for now is the Default.aspx.py file, which is the code-behind file for Default.aspx page. Open this file and you’ll see the definition of a function called Page_Load. This function is what the processing machinery calls when the page is first requested; it passes in the page as sender and any event arguments as e. At the moment, it sets the text of the old literal element you removed.
Change the Page_Load function to the following:
def Page_Load(sender, e):
   Label1.Text = "Hello from IronPython"
Make sure that the second line is indented so that it’s the body of the function. Save the file.
Now a little magic: click the Start Debugging button (which looks like a green Play button) in the toolbar. By default, the project isn’t configured for debugging, so Visual Web Developer will ask whether you want the configuration changed—say Yes. Then it will start its built-in development web server on our new project, and launch a browser window navigating to the current page. After a brief wait (and maybe a notification from your firewall software asking whether the web server should be allowed to listen for requests), you should see the Hello from IronPython message you entered in the Page_Load function.
That’s the first step: a basic page generated from IronPython code. Now let’s see how to have the page respond to user input.
At this point you have code in the code-behind file that interacts with a control in the ASPX page. Although this technically is handling an event (the Load event of the Page class), extending the page functionality slightly demonstrates a little more of the power of the ASP.NET system. Let’s add some controls to our page: a text box where users can enter their names and a button that will trigger some processing on the server.
Switch back to editing the ASPX page, and add the following lines at the start of the main <div>, before the Label:
Name:
<asp:TextBox id="TextBox1" runat="server"></asp:TextBox>
<asp:Button id="Button1" runat="server" text="Go!" onclick="Button1_Click"
/><br />
You can add the controls by typing them into the Source view, or by dragging them from the toolbox in either Source or Design view. Change the text on the button to something more interesting—like Click Me or Go!—something with a bit of vim. Add the onclick attribute to the button; this tells ASP.NET to call the function Button1_Click when the button is clicked.
Now edit the code-behind page to have the following function definitions:
def Page_Load(sender, e):
   pass
def Button1_Click(sender, e):
   Label1.Text = "Hello, " + TextBox1.Text
Click the Start Debugging button again; and, after a small pause, you should see a web page with a text box and a button. If you type some text into the text box and click the button, the message Hello, <name you typed> will appear below the text box.
So what’s happening? Here are a few points to think about:
There are two requests for the page: the first when the page is initially loaded, and the second when you click the button.
When the page is submitted because of the button click, the ASP.NET machinery keeps track of this and ensures that the
Button1_Clickfunction is called.After the second request, when the Hello, <name> message is visible, the text box is still populated, even though you’ve done nothing on the server side to set its value. The web controls’ state is stored in a location called the view state, and automatically restored by the framework before event handlers like
Button1_Clickare called.
Later on in the chapter, we explore how view-state handling works by making something more complex: an application that can display and edit MultiDoc documents. We reuse the MultiDoc modules you already have to create, load, and save documents. To integrate the modules into the project, we need to look at some of the support infrastructure ASP.NET provides.
You may have noticed several other items in the project directory we used as a template: files called Web.config and Global.py, along with the App_Script, aspnet_client, and bin folders.
The bin folder contains the IronPython assemblies, as well as Microsoft.Web.Scripting.dll, which provides the integration between ASP.NET and IronPython. The aspnet_client directory is where any supporting JavaScript needed by the ASP.NET controls will be placed. The other three items provide ways of hooking into the ASP.NET system, and each one allows you to customize the environment in different ways.
For code in our web application to use the classes you’ve already written, you need to be able to import the modules. In the normal Python world, you can make one module available for import by another one in the following three ways:
These approaches all work just as well with IronPython in general; but, in the ASP.NET environment, the first option isn’t available (because the current directory is generally the location of the web server, rather than the directory containing the currently executing page), and the second isn’t useful because, by default, sys.path is empty. Instead, the system provides a special folder called App_Script; any packages and modules stored in this folder will be available for import by any other Python code in the web application. (The third option is still available to you, as you’ll see in section 11.3.2.)
Several other special ASP.NET folders can be added to the project, if they’re needed, by right-clicking the project in Web Developer and selecting the Add ASP.NET Folder option. The most important of these folders is the App_Code folder, which is similar to the App_Script folder but is intended to store C# (or other compiled language) library code. This code will then be available to all modules in the web project, along with the extra feature that the ASP.NET system will automatically detect changes to the files and recompile them when necessary.
Because we want to be able to read and write MultiDoc files, you need to add the modules for those tasks to the web project. To do this, right-click the App_Script folder and select Add Existing Item to add the files model.py, xmldocumentreader.py, documentreader.py, and documentwriter.py from chapter 5 to the project. Once this is done, you’ll be able to use them to read and write MultiDocs from any code-behind page in the web application.
The App_Script folder gives you a place to keep support modules that are used by pages in our project, but it’s really meant for library code that you’ll write specifically for this project; if several projects required the same module, you’d need to copy that Python file to each App_Script folder. A better solution in this situation is to put the module in a different location outside your project, and add that project to the sys.path list.
You could modify sys.path by adding a line in your code-behind files, but you’d need to do so on every ASPX page because you don’t necessarily know which page will be visited first. The Global.py file can help because it provides a way to listen for events that affect the application, no matter which page requested to cause the event.
Looking at the Global.py file, you can see that it contains the following empty event handlers:
Application_Start—. Occurs when your application receives its first request and is loaded to respond.Application_End—. Happens when the last session created by a request to your application ends, and the ASP.NET framework unloads it. Subsequent requests to the application will trigger anotherApplication_Startevent.Application_Error—. Happens when an uncaught exception is thrown during a page request, allowing a standard mechanism for logging or changing error display.Application_BeginRequest—. Is fired before each request is processed by your application.Application_EndRequest—. Is fired after each request processed by your application.
In our case, if we want to have extra directories in sys.path, the Application_Start event handler is a good place to add them. Because the MultiDoc modules rely on modules in the Python standard library, you should add the Lib directory to the sys.path with the following change:
def Application_Start():
   import sys
   sys.path.append("C:\Python25\Lib")
(This code assumes that Python is installed in C:Python25; change the path accordingly if not.)
The .NET framework provides a comprehensive, extensible configuration system based on an XML format and a wide range of settings for web projects. The skeleton project we’ve used contains a Web.config file for the project with the configuration for our application. In particular, it includes a number of directives that enable IronPython support in the application. For the moment, you don’t need to change the Web.config file—the default settings are fine for what we’re going to do next.
That’s all the setting-up finished; now we can implement the MultiDoc Viewer using the modules we’ve added to the project.
We start by creating a page that can display the contents of a MultiDoc, and then in section 11.5 we extend it with controls and code to allow you to edit the file. To begin with, the page will display a sample static MultiDoc XML file stored in the web application directory; later we explore how you can change the Viewer to accept the document to display as a parameter.
For the sample MultiDoc file, add a new text file called doc.xml to the project, and populate it with the following XML:
<document>
   <page title="Page one">This page is the first in the MultiDoc</page>
   <page title="Page two">Welcome to the heady delights of the second page</
     page>
</document>
In the following sections we make the ASPX code and Python code-behind that will display the information in this XML.
First, we need to decide how to display a MultiDoc object. Each document is essentially a list of pages—we could display each page in order, but that would be quite different from the tab pages the desktop application uses for display. (It also wouldn’t illustrate some of the details that we want to explore in the ASP.NET system.)
Instead, let’s display a MultiDoc as a list of the titles of all the pages it contains, rendered as links that can be clicked on to display the contents of that page. Then the contents of the selected page will be displayed as a title and body (figure 11.4).

We can convert this sketch into ASPX code piece by piece.
First, create a new web form by copying the webform_template.aspx and webform_template.aspx.py files from the chapter 11 source code. Rename these files to viewer.aspx and viewer.aspx.py respectively. Then edit viewer.aspx and change the CodeFile attribute in the <%@ Page %> directive at the top to point to viewer.aspx.py.[1]
Now that you have an empty web form, add a table with one row containing two cells to the page. You can do this either using the Design view, by dragging-and-dropping a table from the HTML section of the toolbox and deleting cells and rows as desired, or by typing the HTML in Source view. I (Christian) prefer the latter. The design view often generates messy HTML that’s hard to work with later, and has problems round-tripping more complicated page layouts. It can even break your pages in some cases.
The right-hand side of the page is straightforward: it contains a heading and then two labels for the page title and page body respectively. Initially, the page will display the details of the first page in the document and, when a page link is clicked, will display the details of that page instead. Create these by either dragging two Labels into the right-hand table cell from the toolbox, or typing in the asp:Label tags. Give the Label controls the IDs pageTitle and pageContent, and add some formatting.
You’ll create the list of links on the left-hand side of the page using a Repeater control. The Repeater is a container that repeats the controls in its item template once for each item in its data source list. In our case, you’ll use the list of pages in the MultiDoc as the source, and the item template will contain a LinkButton control. LinkButtons are almost identical to Buttons, except that they’re displayed as hyperlinks in the browser. The full ASPX code for the table is shown in listing 11.1.
Example 11.1. ASPX code for the MultiDoc Viewer user interface
<table>
 <tr valign="top">
  <td>
    <b>Pages:</b><br />
    <asp:Repeater id="pageRepeater" runat="server">
     <itemtemplate>
      <asp:LinkButton id="pageLink" runat="server" onclick="pageLink_Click"
     text="<%# title %>" enabled="<%# currentPage != title %>"/><br />
     </itemtemplate>
    </asp:Repeater>
   </td>
   <td>
    <b>Current page</b><br />
    <h2><asp:Label id="pageTitle" runat="server" /></h2>
    <asp:Label id="pageContent" runat="server" /><br />
   </td>
 </tr>
</table>
Look at the asp:Repeater element, which creates the Repeater control. It begins in a way similar to the web controls we’ve already created. The tag name is asp:Repeater, and you give it an id and specify that it runs on the server. Next, in the <itemtemplate> element, you specify the child controls that will be repeated. Inside this is the LinkButton, which has similar attributes to the button created in section 11.2.3—id, runat, onclick, and text—as well as a new attribute, enabled, which controls whether the LinkButton should respond to clicks. The values of the text and enabled attributes are also new—they’re data-binding expressions.
Repeaters and other container controls can be filled using an ASP.NET feature called data binding—you give the control a data source (often in the code-behind), such as a list of items, and tell the control how to display each item (in the ASPX), and it does the rest. You can see the display code in listing 11.1; the code-behind side of the data binding looks like this:
pageRepeater.DataSource = document.pages
pageRepeater.DataBind()
When the DataBind method is called, the item template is duplicated for each item in the DataSource, and any data-binding expressions (snippets of code enclosed in <%# and %>) are evaluated. Note that these expressions are evaluated in the context of the current item. So in listing 11.1, the <%# title %> expression is evaluated in the context of a MultiDoc page object, and the text of the LinkButton is populated with the title of the page.
Data-binding expressions can be arbitrarily complex, and they can call methods or refer to global variables as well as the attributes of the current data item. The expression for the LinkButton’s enabled attribute, <%# currentPage != title %>, disables the control when the title of the current data item matches the title of the page currently selected in the Viewer.
The clarity of these data-binding expressions is due, in part, to using IronPython. When using C# in ASP.NET, data-binding expressions are often much more complicated, due to the indirection required to express arbitrary attribute lookups in a statically typed language.
The ASPX code for the MultiDoc Viewer is complete; now you need to provide the behavior of the page in the code-behind file.
Open the code-behind file, viewer.aspx.py (if you’re editing the ASPX page, you can hit F7), and add the code in listing 11.2.
Example 11.2. Reading MultiDoc file and finding pages
from documentreader import DocumentReader
multidoc = None # the MultiDoc instance
currentPage = None # the title of the selected page

DOCUMENT_LOCATION = "doc.xml"
def getMultiDoc():
   reader = DocumentReader(Page.MapPath(DOCUMENT_LOCATION))
   return reader.read()

def getPage(multidoc, name):
   matches = [page for page in multidoc.pages if page.title == name]
   if matches:
      return matches[0]
   return None
This code provides the DocumentReader class, initializes the two pieces of state that the page will manage, and defines two simple functions; getMultiDoc uses the DocumentReader class to create a MultiDoc instance (using MapPath to avoid having to specify a full path to the doc.xml file), and getPage finds a page in the MultiDoc by its title (or None if there’s no page with the given title).
The state variables are in the global scope; but, because of the way ASP.NET integrates the code-behind file, they aren’t shared between requests (what you might expect if this were a normal Python module). In this case, storing the state in global variables is similar to the way the state would be managed in C#—they would be instance variables of the page subclass.
Now you need to hook into the ASP.NET page lifecycle to interact with the web controls on the page.
A number of different events are raised for a page and its controls in the processing of a request. (See figure 11.1 for a more comprehensive list.) In this case, you need to handle the following:
Page_Loadevent—. Happens when the page is requested, after child controls have been created but before any handling of user input to the page has been doneClickevents—. Are triggered when a user clicks on aLinkButtonto select a page of the MultiDoc documentPage_PreRenderevent—. Is raised when the system is ready to convert the tree of web controls into HTML to be sent to the browser
Let’s look at the code for each of these events in turn, beginning with Page_Load (listing 11.3).
Example 11.3. MultiDoc Viewer Page_Load handler
def Page_Load(sender, event):
   global multidoc, currentPage
   multidoc = getMultiDoc()
   if not IsPostBack:
      currentPage = multidoc.pages[0].title
The Page_Load handler is automatically hooked up to the event by the ASP.NET machinery. In this listing, the code added to the handler loads the MultiDoc from the XML file; and, if this request isn’t a postback (that is, it’s caused by the user navigating to the page, rather than clicking a LinkButton on the page), it sets the currently selected page title to be the first in the document. (The global statement at the start of the function is required so that the assignments rebind the global variables, rather than shadowing them with local variables.) In listing 11.4, you can see the handler for clicking on page links.
Example 11.4. MultiDoc Viewer pageLink_Click handler
def pageLink_Click(sender, event):
   global currentPage
   currentPage = sender.Text
The handler function defined in this listing is attached to each LinkButton created by the Repeater in the ASPX page. When a user clicks one of the page links, the pageLink_Click function will be called. Because the handler is attached to multiple LinkButtons, you use the sender parameter to work out the title that the user clicked, and store that title in the page state for when you render the page. The PreRender handler that uses the page state is shown in listing 11.5.
Example 11.5. MultiDoc Viewer Page_PreRender handler
def Page_PreRender(sender, event):
   pageRepeater.DataSource = multidoc.pages
   pageRepeater.DataBind()
   selectedPage = getPage(multidoc, currentPage)
   pageTitle.Text = selectedPage.title
   pageContent.Text = selectedPage.text
The PreRender handler in this listing is triggered by ASP.NET when all postback event handling is completed, and allows you to use the page state that you’ve loaded and modified in the other handlers to update the state of the web controls on the page. In the MultiDoc Viewer, you create the page links from the list of pages in the MultiDoc using data binding, and then you put the relevant parts of the selected page into the pageTitle and pageContent controls.
The MultiDoc Viewer is now complete. Hit the Play button, and the page should open in a browser window like figure 11.5.

You can click the links to view different pages. Try editing the XML file to add some extra pages in the document and see that they appear in the Viewer.
The structure of the code-behind may seem a little indirect at first glance: why not have the pageLink_Click handler set the page title and text itself, rather than setting internal page state and relying on the Page_PreRender handler to update the labels? This approach tends to cause duplication of code. You’d need to cater for the nonpostback situation (when the pageLink_Click handler wouldn’t be called), and populate the pageTitle and pageContent controls in the Page_Load handler. Additionally, in more complicated pages, more actions are available than clicking one of a list of links; keeping track of where you need to update which controls quickly becomes unwieldy. Writing the postback handlers (such as Click or TextChanged) to only update internal page state, and then having the PreRender handler translate that page state into the states of the child controls, is much more manageable when the possible interactions are wider.
You can see this clearly when we extend the MultiDoc Viewer to allow editing of the documents.
Let’s extend the Viewer into an application that will enable you to update the MultiDoc file, as well as looking at it. What do you need to add to the interface to support this? The simplest way is to add an Edit button to the page display area on the right side of the page. When the users click the Edit button, the page title and page contents are swapped out with text boxes, allowing them to edit the values. The Edit button is replaced with a Cancel button and a Save button. Clicking either button will take the page out of edit mode, but the Save button also writes the updated content of the document out to the XML file.
These changes to the user interface allow you to edit a MultiDoc through the internet. Now we’ll walk through making these changes, starting with the ASPX file.
It’s entirely possible to swap out the labels for editable text boxes by manipulating a web control’s Controls collection. But it’s often simpler and clearer to do so by hiding the controls you want to remove, and making some other (previously hidden) controls visible. A control that makes this technique especially convenient is the Panel, whose sole purpose is to contain other controls.
Let’s update the ASPX page to do this. Change the right-hand cell of the table to contain the code found in listing 11.6.
Example 11.6. Changing page display to allow showing and hiding
<b>Current page</b><br />
<asp:Panel id="viewPanel" runat="server" visible="false">
  <h2><asp:Label id="pageTitle" runat="server" /></h2>
  <asp:Label id="pageContent" runat="server" /><br />
  <asp:Button id="editButton" runat="server" text="Edit this page"
     onclick="editButton_Click" />
</asp:Panel>
The code in this listing wraps the pageTitle and pageContent labels in an asp:Panel element, which has its own ID and adds an Edit button after the labels. The panel will start off hidden (because visible is false). You can show the panel from the code-behind with the following code:
viewPanel.Visible = True
Now you add the Panel containing the controls that you want to display when the page is in edit mode (listing 11.7).
Example 11.7. Controls to edit a MultiDoc page
<asp:Panel id="editPanel" runat="server" visible="false">
  <asp:TextBox id="pageTitleTextBox" runat="server" columns="40" /><br />
  <asp:TextBox id="pageContentTextBox" runat="server" columns="40" height="100"
     textmode="multiline" /><br />
  <asp:Button id="cancelButton" runat="server" text="Cancel"
     onclick="cancelButton_Click" />
  <asp:Button id="saveButton" runat="server" text="Save"
     onclick="saveButton_Click" />
</asp:Panel>
With the ASPX code in this listing added, the page now has two sets of controls that you can turn on and off, depending on whether it should be in reading mode or edit mode. The next step is to extend the code-behind page to handle the new controls.
We do need to think about one more thing, though. The original MultiDoc Viewer only has one piece of state that changes: the current page title. When someone clicked a page link and changed that state, you were always given the new value for it (as the text of the LinkButton that was the sender argument to the handler), so you could set up the page correctly. In the MultiDoc Editor, there are now two different pieces of state that can be changed: the current page title, and whether the page is in edit mode. When you receive an Edit button Click event, you aren’t also told what the current page should be. Correspondingly, if you receive a page link Click, you don’t know whether the page should be in edit mode. You need some other way to persist this information from the handling of one page request to the next.
The facility that ASP.NET provides to deal with this problem is called view state.
View state is an important concept in ASP.NET. At the end of processing a request, the state of all the controls on the page is serialized and stored in a hidden form field in the HTML page sent back to the client. When the next request from the client is received, serialized state is reconstituted and set back into the controls before any postback events are raised. (To ensure that the client hasn’t monkeyed with the state it sends back, the framework cryptographically signs the view state and validates it before deserializing it.)
View state is managed automatically for web controls (unless it has been turned off for the control by setting EnableViewState to false), but you need to add some extra state to the process. In a C# web project, you could do this by overriding the SaveViewState and LoadViewState methods to inject the extra state to be saved. Unfortunately, because in IronPython you don’t directly inherit from the ASP.NET Page class, the SaveViewState and LoadViewState methods don’t get called in IronPython pages. To hook into the view state system, you need a little C# to call custom methods in the code. You put a CustomScriptPage class into the App_Code folder in the web project (listing 11.8).
Example 11.8. CustomScriptPage class for delegating view state handling to Python
using Microsoft.Web.Scripting.UI;
using Microsoft.Web.Scripting.Util;

public class CustomScriptPage: ScriptPage {
   protected override void LoadViewState(object savedState) {
      DynamicFunction f = this.ScriptTemplateControl.GetFunction("ScriptLoadViewState");
      if (f == null) {
         base.LoadViewState(savedState);
      } else {object baseState = this.ScriptTemplateControl.CallFunction(f, savedState);
         base.LoadViewState(baseState);
      }
   }
   protected override object SaveViewState() {
      DynamicFunction f =this.ScriptTemplateControl.GetFunction("ScriptSaveViewState");

      if (f == null) {
         return base.SaveViewState();
      } else {
         object baseState = base.SaveViewState();
         return this.ScriptTemplateControl.CallFunction(f, baseState);
      }
   }
}
This listing creates a subclass of ScriptPage (the base class of all IronPython ASP.NET pages) that will look up functions called ScriptLoadViewState and ScriptSaveViewState in the script of the page (the Python code, in this case), and delegate to them. You can then tweak the view state objects in the code-behind. To declare that our page should inherit from this class, you need to change the first line of the ASPX page to add the Inherits option.
<%@ Page Language="IronPython" CodeFile="Default.aspx.py"
Inherits="CustomScriptPage" %>
To simplify much of the state management in the page, you can use a minimal page state class to group the pieces of state together into one object. This lets you leave out most of the global statements in event handlers, and makes it easier to work out where the names being used in a section of code are coming from. As you can see in listing 11.9, we’ve decided to call the object containing the page state self, which is a little non-standard, but seems to have the right feel in code using the state. (If this seems wrong, you can happily call it state instead.)
Example 11.9. A class to group together page. state
class PageState(object):
   pass
self = PageState()
self.document = None
self.currentPage = None
self.editing = False
Once you have that, you can save and load the page state (listing 11.10).
Example 11.10. Loading and saving the MultiDoc Editor view state
from System.Web.UI import Pair
import pickle

def ScriptSaveViewState(baseState):
   state = Pair()
   state.First = baseState
   state.Second = pickle.dumps((self.document, self.currentPage,
     self.editing))
   return state
def ScriptLoadViewState(state):
   self.document, self.currentPage, self.editing = pickle.loads(state.Second)
   return state.First
The ASP.NET view state machinery can’t natively serialize Python types, so in this listing the ScriptSaveViewState function creates a Pair. A Pair is a .NET class, a clumsy version of Python’s tuple, which can contain two other objects (as .First and .Second) and can be serialized in the view state. You store the standard page view state in .First, and use the Python serialization module pickle to create a string from a tuple of the three pieces of state you need to preserve. Then, in ScriptLoadViewState, you receive the view state object that ASP.NET has pulled out of the request, deserialize our custom page state tuple from the pair.Second, and return the other half back to the machinery to restore the child control state.
You can piggyback almost anything in the view state in this way, as long as you ensure that the original view state is maintained and that anything you add can be serialized by ASP.NET. (The pickle module is very useful here.) Also, you need to be careful that the functions loading and saving the view state are symmetrical—any change in the way you store your custom state needs to be reflected in how it’s loaded again. One more thing to keep in mind is that the view state is sent to the client in each response, and then back to the server with the subsequent request, so it can’t be used to store large volumes of data.
As well as code for loading and saving the view state of the page, you need to include the code for loading and saving MultiDoc files (listing 11.11).
Example 11.11. Loading and saving MultiDoc file
from documentreader import DocumentReader
from documentwriter import DocumentWriter

DOCUMENT_FILE = "doc.xml"
def getDocument():
   reader = DocumentReader(Page.MapPath(DOCUMENT_FILE))
   return reader.read()
def saveDocument(document):
   writer = DocumentWriter(Page.MapPath(DOCUMENT_FILE))
   writer.write(document)
def getPage(document, name):
   matches = [page for page in document.pages if page.title == name]
   if matches:
      return matches[0]
   return None
def Page_Load(sender, event):
   if not IsPostBack:
      self.document = getDocument()
      self.currentPage = None
      self.editing = False
This listing shows the familiar getDocument and getPage functions and adds the new saveDocument function. It also includes the Page_Load event that determines how the state is initialized in the first request, when IsPostBack is false and no view state is processed.
Because you’re now storing the page state in a wrapper object named self, you need to change the data-binding expression in the ASPX file from currentPage != title to self.currentPage != title.
Next you handle the Page_PreRender event (to display the state of the page), and the postback events for the controls you’ve added: Click events from the page links; the Edit, Save, and Cancel buttons; and the TextChanged events from the title and body text boxes.
To start with, let’s consider how our page’s state should be displayed in the web controls in the Page_PreRender handler (listing 11.12). This handler will be called after all of the click-type postback events in the page’s lifecycle.
Example 11.12. MultiDoc Editor Page_PreRender handler
def Page_PreRender(sender, event):
   pageRepeater.DataSource = self.document.pages
   pageRepeater.DataBind()
   viewPanel.Visible = self.currentPage and not self.editing
   editPanel.Visible = self.editing

   if self.currentPage:
      selectedPage = getPage(self.document, self.currentPage)
      pageTitle.Text = pageTitleTextBox.Text = selectedPage.title
      pageContent.Text = pageContentTextBox.Text = selectedPage.text
In this listing, the Page_PreRender handler databinds the pageRepeater in the same way as the previous version of the handler (listing 11.5), creating the page links on the left-hand side of the page. Then you decide which (if either) of the right-hand side panels should be displayed. Finally, if you have a current page, you populate the labels and text boxes for the view and edit panels.
The other event handlers, in listing 11.13, are simple—they merely record the user input in the page state, and rely on the PreRender handler to display the page in a consistent way, whereas the view state is managed by the Save and Load functions. Using the PageState holder class means that the handlers don’t need any global statements cluttering up the code.
Example 11.13. Postback event handlers in MultiDoc Editor
def pageLink_Click(sender, event):
   self.currentPage = sender.Text

def editButton_Click(sender, event):
   self.editing = True

def cancelButton_Click(sender, event):
   self.editing = False
   # throw away any changes that have been made
   self.document = getDocument()

def saveButton_Click(sender, event):
   saveDocument(self.document)
   self.editing = False

def pageTitleTextBox_TextChanged(sender, event):
   selectedPage = getPage(self.document, self.currentPage)
   selectedPage.title = self.currentPage = pageTitleTextBox.Text

def pageContentTextBox_TextChanged(sender, event):
   selectedPage = getPage(self.document, self.currentPage)
   selectedPage.text = pageContentTextBox.Text
In this listing, the TextChanged event handlers for the page title and page body are interesting because typing into the text box doesn’t trigger a postback by default (although it can if the text box has AutoPostBack set to True). In this case, when ASP.NET restores the view state and then applies the posted data to the controls, it detects that the text has changed and raises the event. You use this notification to update the document before the Save button or page link Click events are raised.
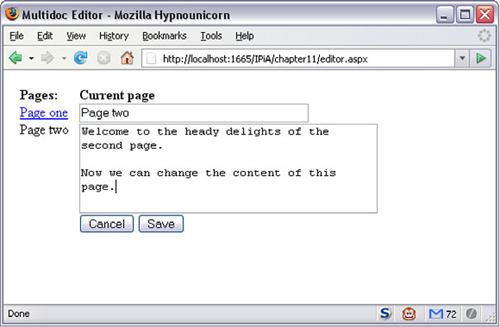
Try running the MultiDoc Editor now. You can view the different pages and click the Edit button to change page titles and bodies. When you click the Save button, the file is updated on the disk.
Beware, though! If you enter anything that looks like HTML tags, you’ll see a rather alarming error page, beginning with the message: A potentially dangerous Request. Form value was detected from the client. This is a security feature in ASP.NET intended to prevent cross-site scripting (XSS) attacks, but it’s so heavy-handed that the idea must be to shock developers into crafting a strategy to handle HTML in user input, after turning the validation off. Obviously, how you prevent cross-site scripting depends on the extent to which you trust the user—in this case, it’s you. To turn off validation, edit the Web.config file, and add validateRequest="false" to the <pages/> element.
At this point, the MultiDoc Editor is largely complete. The only significant feature missing is a New Page button; adding this is straightforward with the techniques used so far, so we don’t cover it here. Another consideration that we haven’t examined is how to handle two people editing the document at the same time. Obviously, the second person to save changes will overwrite those of the first. You can handle this in many ways—for example, using a timestamp on the document or a locking protocol. A robust solution might involve a database; we discuss using the .NET facilities to communicate with databases in the next chapter.
You can see an example of what the Editor looks like in figure 11.6.
Now that you have a MultiDoc Editor, you might want to use it within a larger website. In ASP.NET, packaging up the ASPX and Python code is done by creating a user control. The control can then be embedded into ASPX pages or other user controls, in almost the same way as you’d incorporate standard web controls. Let’s look at what changes you need to make the Editor reusable.
First, create an empty user control to hold the code of our page, by copying the user control template files from the chapter 11 code into the web project. Copy both usercontrol_template.ascx and usercontrol_template.ascx.py to the folder, and rename them as MultiDocEditor.ascx and MultiDocEditor.ascx.py. Open up the copied .ascx file, and you’ll see that it starts with the following line:
<%@ Control Language="IronPython" CodeFile="usercontrol_template.ascx.py" %>
This is almost exactly the same as the page directive at the start of an ASPX page, except for the word Control, and the extension of the code-behind file. The Control directive is all there is in this file, though; it doesn’t have the HTML (the doctype, as well as html, head, body, and form elements) that empty ASPX pages have. User controls are never rendered directly to web clients; they’re always contained in an ASPX page that wraps them (and any other controls in the page) with the normal HTML structure. Other than that difference, writing a user control is similar to writing a normal ASPX web page.
Change the Control directive so that the CodeFile attribute refers to MultiDocEditor.ascx.py.
Now create a new web form called Container.aspx by copying the template web forms, renaming them, and editing the CodeFile attribute in the .aspx. This will be the page that wraps the user control. After the page directive, add the following line:
<%@ Register src="MultiDocEditor.ascx" tagname="multidoceditor"
tagprefix="ipia" %>
This Register directive allows you to include the MultiDocEditor user control in the web page. You add the following line inside the <form> element of the page:
<ipia:multidoceditor id="editor" runat="server" />
You can see that the element name has been constructed from the tagprefix and tagname parameters in the register directive. The tag prefix (ipia in the example) can be anything you like; this can be useful when you want to disambiguate controls from different sources that have the same name.
Now the container page embeds the editor control, although the control doesn’t do anything yet. You could put some text into the ASCX file and view Container. aspx in the browser, and the page would display that text where you’ve added the control. Then you populate the control with the code you already have by doing the following:
Copying the table from the MultiDoc Editor ASPX page into the ASCX
Copying all the code from the original code-behind file to the new one
Unfortunately, before the control will work, we need to revisit the view state handling.
When implementing the Editor as a web page, our page inherited from a custom subclass of ScriptPage. User controls can also inherit from a custom base class, but it needs to be a subclass of ScriptUserControl. You can create a custom subclass to forward the view state handling methods with the code in listing 11.14.
Example 11.14. Delegating view state handling to Python
using Microsoft.Web.Scripting.UI;
using Microsoft.Web.Scripting.Util;

public class CustomScriptUserControl: ScriptUserControl {
   protected override void LoadViewState(object savedState) {
      ScriptTemplateControl stc = (this as
     IScriptTemplateControl).ScriptTemplateControl;
      DynamicFunction f = stc.GetFunction("ScriptLoadViewState");
      if (f == null) {
         base.LoadViewState(savedState);
      } else {
         object baseState = stc.CallFunction(f, savedState);
         base.LoadViewState(baseState);
      }
}
 protected override object SaveViewState() {
    ScriptTemplateControl stc = (this as
   IScriptTemplateControl).ScriptTemplateControl;
    DynamicFunction f = stc.GetFunction("ScriptSaveViewState");
    if (f == null) {
       return base.SaveViewState();
    } else {
       object baseState = base.SaveViewState();
       return stc.CallFunction(f, baseState);
    }
  }
}
This code is almost the same as the CustomScriptPage definition in listing 11.8, with one odd difference—for some reason, ScriptUserControl doesn’t expose a .ScriptTemplateControl directly. Instead, it explicitly implements the property on the IScriptTemplateControl interface; the definition of the property looks something like this:
public virtual ScriptTemplateControl
IScriptTemplateControl.ScriptTemplateControl { get {...} }
You need to cast this ScriptUserControl to an IScriptTemplateControl before you can get hold of the .ScriptTemplateControl property. Ordinarily, you’d use explicit interface implementation to disambiguate when inheriting from two interfaces that expose the same member and you’d need to provide different implementations, but that doesn’t seem to be the situation here.
At this point in the section, you could be forgiven for thinking that wrapping up a page into a user control is rather a lot of work. Forwarding the view state between the C# and Python code of a control is definitely one part of the ASP.NET–IronPython integration that’s still fairly nasty, and it’s something that we expect will be fixed in future versions as the IronPython support matures. In any case, the classes you have work well now, so you can simply reuse the classes when you need to manage view state from IronPython pages and user controls, without worrying too much about the fact that they’re workarounds for gaps in the system.
Once the CustomScriptUserControl class is in App_Code, you can change the user control to inherit from it by adding Inherits="CustomScriptUserControl" to the Control directive in MultiDocEditor.ascx. The view state handling in the code-behind file will now be called by the ASP.NET machinery, and the MultiDocEditor user control will work! The only problem is that it’s not reusable except in a very basic sense: you can put it on different pages, or several instances on one page, but each instance will be editing the same file. That isn’t especially useful. You need to be able to specify which file a particular editor should be using. You can do this by adding a filename parameter to the control.
If you were implementing the user control in C#, you’d expose a filename parameter by creating a property on the class. In IronPython, you make the filename settable in essentially the same way, although it doesn’t use the Python property system (because the IronPython code-behind file doesn’t directly define a class). Add the functions in listing 11.15 to the MultiDocEditor code-behind file to give the user control a Filename property.
Example 11.15. Creating the Filename property
def GetFilename():
   return self.filename
def SetFilename(filename):
   self.filename = filename
These functions will be called by the ASP.NET infrastructure when you specify the filename in ASPX pages that embed the control. (The case of the attribute needs to match the name of the getter and setter functions.)
<ipia:multidoceditor id="editor" runat="server" Filename="doc.xml" />
Alternatively, the getter and setter functions can be called from the code of the container page.
def Page_Load(sender, e):
   editor.SetFilename("doc.xml")
To complete the process, the code-behind needs a few changes to make use of the filename that’s passed in. First, the filename needs to be added to the page state.
self = PageState()
self.filename = None
self.document = None
self.currentPage = None
self.editing = False
Then it needs to be loaded and saved with the view state.
def ScriptLoadViewState(state):
   self.filename, self.document, self.currentPage, self.editing = pickle.loads(state.Second)
   return state.First

def ScriptSaveViewState(baseState):
   state = Pair()
   state.First = baseState
   state.Second = pickle.dumps((self.filename, self.document,
     self.currentPage, self.editing))
   return state
And of course it should be used to load and save the MultiDoc file:
def getDocument():
   reader = DocumentReader(Page.MapPath(self.filename ))
   return reader.read()

def saveDocument(document):
   writer = DocumentWriter(Page.MapPath(self.filename ))
   writer.write(document)
With these changes, the MultiDoc Editor user control is complete! You can view the container page in the browser and edit the document as you could in the case of the single web page. You can add another <ipia:multidoceditor/> element to the container page, specify a different MultiDoc file, and edit the two documents independently in one page. Or you can even create another user control that wraps the MultiDocEditor control—perhaps one that lists the MultiDoc files in a directory in a drop-down list, and allows the user to select which file to edit. As you can see, user controls provide a flexible mechanism for packaging and reusing components when constructing a web application.
This chapter has been a look at the basics of creating ASP.NET web pages and user controls with IronPython. You’ve created a web application, and a web page to display MultiDoc documents. Then you extended the web page with more complex interactions to allow you to edit the documents. Finally, you packaged this functionality into a reusable user control that can be embedded into web pages and other controls. Along the way we’ve touched on some of the support ASP.NET provides for building applications, including view state management, debugging, configuration, and the special App_Script and App_Code directories for shared code. There’s a lot more in the framework; in fact, there are whole books devoted to it! We hope that our overview has given you enough information on the underpinnings of the system that you can take other resources written with C# or Visual Basic in mind and apply them to IronPython.
The support for IronPython in ASP.NET is still new, and there are some rough edges—notably in the view state handling where you needed to use C# to forward calls to IronPython. The IronPython–ASP.NET integration is a work in progress. There are big plans for the future, so we can look forward to the holes being filled soon.
In the next chapter, we look at using databases and web services with IronPython.
[1] The process of copying and renaming template files and updating the new .aspx file to refer to the new code-behind is something that the IDE does automatically for supported languages, using the Add New Item... menu option. Language support for IronPython was included in an earlier release of the ASP.NET integration, but was not ported forward when the package was upgraded to work with IronPython 2. We hope it will be reinstated in the near future!