
Chapter 10. Ship it!
- Packaging your application
- Packaging with the Installer plugin
After spending a good amount of time having fun building a Griffon application, suddenly you realize you must somehow deliver the application to your users. And building an application takes time, even if you use the Griffon framework—after all, the application doesn’t write itself, does it? There are many options for packaging an application—which ones will be best suited for your needs? Memories of painful packaging experiences may start to flow...
The good news is that packaging an application is a task common to all applications, and Griffon provides packaging support out of the box. With Griffon, you get a few choices that should get you out of trouble quickly. But if you require a packaging option that packs more power, the solution is just one plugin install away.
In this chapter, we’ll explore packaging options and packaging targets. We’ll also walk you through using the Installer plugin.
10.1. Understanding the common packaging options
In chapter 2, we discussed using the Griffon configuration file, BuildConfig.groovy, to determine which options to use when building an application. Turns out some of those options control how some files are generated, particularly the applet and web-start support files. It should come as no surprise that those configuration options are reused when packaging the application for distribution.
Before we get into how you configure jar, zip, applet, or webstart options, let’s look at the options shared by all Griffon packaging targets:
- The packaging target runs in the production environment by default. It’s configured to sign and pack all jars. You can change these settings by editing BuildConfig.groovy.
- All packaging targets must build the application jar file, whose name is taken from the following configuration flag: griffon.jars.jarName. The value of this configuration flag can be determined by convention too. Have a look at the application.properties file locate at the root of the application. You’ll notice there’s one entry that specifies the application’s name while there’s
a second one that spells out what’s the latest version. In the case of the GroovyEdit application these entries look like
the following ones:
app.name=GroovyEdit
app.version=0.1
Now, look at figure 10.1, which shows the layout of the configuration directory of the GroovyEdit application you first created in chapter 1.
Figure 10.1. Standard directory structure of an application’s configuration files

You may remember the keys and webstart directories, but dist and its subdirectories are new. Of particular importance is the shared directory (shown highlighted in figure 10.1). Each of the directories in griffon-app/conf/ dist matches a packaging target that will be discussed shortly, except for shared. The responsibility of the shared directory is to hold files that are common across all packaging targets (including those exposed by the Installer plugin). This folder is a perfect place to put a README or LICENSE file, for example.
Now, as you’ve probably guessed, the other directories provide target-specific files. Executing the zip target (griffon package zip) results in all application files associated with that target being created. They’re all the files from griffon-app/conf/dist/zip and from griffon-app/conf/dist/shared.
Based on the directory names in griffon-app/conf/dist, you can probably guess what the default packaging targets supported by Griffon are, and you’d be right. The packaging targets are jar, zip, applet, and webstart. We’ll look at each of them next.
10.2. Using Griffon’s standard packaging targets
The applet and webstart targets make perfect sense, given that an application can be run in both of those modes. It follows that you should be able to package applications for those modes. The jar and zip options take care of the standalone mode. You can package the application in a single jar or zip that contains a conventional structure, including platform-specific launcher scripts. The launcher scripts are used to start the application. So, as you’d expect, when building a zip distribution, there’s a GroovyEdit.bat batch file for Windows OS environments and a GroovyEdit shell script for Linux and Mac OS X environments.
Packaging an application for a desired target is as easy as running the following command:
$ griffon package zip
You can even generate all default targets just by omitting a target. The following command generates all four default targets:
$ griffon package
Let’s start by looking at the simplest packaging target, then move on to the more complex ones.
10.2.1. The jar target
Packaging your application in a single jar is perhaps the quickest way to let your users enjoy your brand new Griffon application. Many platforms are configured by default to launch the application when a user doubleclicks the jar file. Figure 10.2 shows the files created for the GroovyEdit application after the following command has been executed:
$ griffon package jar
Figure 10.2. Directory outline of a jar distribution
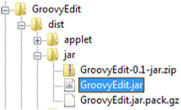
As an alternative, a user can invoke the following command to run the application:
$ java -jar GroovyEdit.jar
This particular packaging mode will expand the contents of all jar files required by the application and package them in a single jar file. There may be times when a few files may result in duplicate entries; for example, two of the application’s dependencies may provide a file named META-INF/LICENSE.txt or build.properties or some other file entry that may be fairly common. The default configuration keeps the first file that was added to the main jar and ignores any subsequent duplicate files. But this might not work for some cases. For instance, it’s common for classes that perform dynamic lookup of services to use a filename by convention, which contains the fully qualified class names of the services to be instantiated. If the duplicate file is skipped, there’s a high chance that the application won’t work correctly, because at least a portion of the services won’t be initialized! This happens because the service definitions were discarded when duplicate entries were skipped. Clearly you need an alternative to just keeping the first file that appeared in the classpath. Fortunately, there’s one solution to this problem: configuring a merging strategy per matching entry.
The Griffon build includes a mechanism that lets you specify a merging strategy for a particular file or path, using a pair of values: a regular expression that specifies the path, and a class name that identifies the strategy to use. Table 10.1 describes the currently available merging strategies and their behavior.
Table 10.1. Merging strategies that can be applied to file paths when building an application in a single jar
|
Strategy |
Description |
|---|---|
| Skip | Avoids any processing. Essentially keeps the previous file untouched and discards the duplicate. This is the default behavior. |
| Replace | Discards the previous file and keeps the newest. |
| Append | Appends the contents of the new file at the end of the previous file. |
| Merge | Common lines found in the new file are discarded. New lines in new file are appended at the end of the previous file. |
| MergeManifest | Manifest keys are merged by overriding the values of common keys and adding missing keys found in the new file. |
| MergeProperties | Like MergeManifest but works with properties files. |
| MergeGriffonArtifacts | This special merging strategy uses a specific file that defines the types and names of the artifacts that should be loaded at runtime. |
Now that you know about these merging strategies, how do you put them to good use? These settings only apply when building the application jar so surely you’ll need to update BuildConfig.groovy somehow. This is exactly what you’re going to do.
Imagine for a moment that you know that two distinct XML files with the same names and paths are included somewhere in the classpath; each one is provided by a different jar file. It follows that they’ll collide when building a single jar for the application. For some reason you’ve decided that you want to retain the last file encountered in the classpath (which is the opposite of the default convention). This means you must configure a merging strategy for it. Open BuildConfig.groovy, and locate the griffon.jars block. Update the text with the following snippet:
griffon {
  jars {
    merge = [
      '/my.xml': org.codehaus.griffon.ant.taskdefs.FileMergeTask.Replace
    ]
  }
}
The merge block is actually a Map, where the keys are regular expressions and the values are class instances—that’s why the Replace strategy uses the fully qualified class name, but you can use an import statement to shorten it up a bit. This particular setting looks for files named my.xml placed at the root of the application’s jar file. If a match is found, the newest file will be kept and the older one discarded. If no matches are found, nothing special happens for that path.
The Griffon build system provides a default set of merging mappings, because some paths are fairly common and their merging strategy is pretty consistent from application to application. Table 10.2 lists those mappings.
Table 10.2. Commonly used paths and their default merging strategies
|
Path |
Strategy |
|---|---|
| /META-INF/griffon-artifacts.properties | MergeGriffonArtifacts |
| /META-INF/MANIFEST.MF | MergeManifest |
| /META-INF/services/.* | Merge |
| .*.properties | MergeProperties |
There are several things worth noting about merges:
- Your settings will override any defaults provided by the system.
- Paths should be defined from the most specific to the least.
- griffon.jars.jarName takes care of the application’s jar filename.
There are no additional settings you can configure for the jar packaging target.
10.2.2. The zip target
The zip target generates a distribution directory commonly found in Linux-like systems, but it isn’t restricted to such platforms. It includes platform-specific launcher scripts for Windows, and the Linux launcher can be used in Mac OS X too.
Figure 10.3 shows the directory structure of a zip distribution for the GroovyEdit application you developed back in chapter 1.
Figure 10.3. Directory outline of a zip distribution

In short, the bin directory contains the application launchers; the lib directory contains all application jar files. The zip packaging target will also create a zip file with all of these files and directories, as you can see in figure 10.3 (the file is GroovyEdit-0.1.zip).
Next, we’ll cover both the applet and webstart targets, because they share a lot of options.
10.2.3. The applet and webstart targets
If you edit the file BuildConfig.groovy, you’ll find a configuration section pertaining to the webstart and applet targets, as shown here:
griffon {

  . . .

  webstart {
     codebase = "${new File(griffon.jars.destDir).toURI().toASCIIString()}"
     jnlp = 'application.jnlp'
  }
  applet {
     jnlp = 'applet.jnlp'
     html = 'applet.html'
  }
}
As you can see, you configure the location of the JNLP file as well as the codebase property of the webstart target. For the applet target, you configure the location of the JNLP and HTML files used to launch the applet.
To override the codebase property at the command line, execute the following command:
$ griffon package webstart -codebase=http://path/to/your/codebase
As you can see, there isn’t much magic going on when you use Griffon’s standard packaging options, just a clever directory naming convention and some configuration flags available for the central configuration file. It’s worth noticing that plugins (discussed in chapter 11) can also provide packaging artifacts; just follow the same directory naming conventions.
Before we move on to additional packaging targets found outside of the default set, we should look at a common option available to all packaging targets, including those we’ll discuss later in this chapter. This feature is related to the manifest file that every jar file must contain, including the application’s jar file.
10.2.4. Customizing the manifest
You might not know this, but jar files are pretty much the same thing as zip compressed files. The difference is that jar files require a few additional files that provide some metadata. This is the role of the manifest.mf file. If you’re curious, you might have taken a peek at a jar file and found the following entry: META-INF/MANIFEST.MF.
A manifest file is a collection of key/value pairs in plain text. In it, you’ll usually find information about the tool that was used to create the jar file, as well as the version of the JVM and maybe the license and the file’s creator.
Griffon is aware of these common settings and will gladly generate a manifest file that contains more information about the application you just packaged. Here, for example, is the default manifest created for the GroovyEdit application:
Manifest-Version: 1.0
Ant-Version: Apache Ant 1.8.1
Created-By: 19.1-b02-334 (Apple Inc.)
Main-Class: griffon.swing.SwingApplication
Built-By: aalmiray
Build-Date: 21-06-2011 19:02:28
Griffon-Version: 0.9.3
Implementation-Title: GroovyEdit
Implementation-Version: 0.1
Implementation-Vendor: GroovyEdit
As you might have guessed, all this information was gathered from the application itself. And although this is fine and dandy, what happens if you require additional values in the manifest? What if you want to change the value of the Built-By key? Well, you’re in luck, because these tasks can be performed by updating the build configuration file. That’s right, you’re back to editing BuildConfig.groovy.
Remember the griffon.jars block we described a few sections ago? We’ll touch on that block once more by adding another configuration option. The following piece of code demonstrates how you can set a new key as well as override the value of a predefined key:
griffon {
  jars {
    manifest = [
       'SomeKey': 'Some Value',
       'Built-By': 'The Awesome Team'
    ]
  }
}
The manifest should have different values now. It should look something like this:
Manifest-Version: 1.0
Ant-Version: Apache Ant 1.8.1
Created-By: 19.1-b02-334 (Apple Inc.)
Main-Class: griffon.swing.SwingApplication
Built-By: The Awesome Team
Build-Date: 21-06-2011 19:10:31
Griffon-Version: 0.9.3
Implementation-Title: GroovyEdit
Implementation-Version: 0.1
Implementation-Vendor: GroovyEdit
SomeKey: Some Value
Notice the appearance of a new key (SomeKey) and that Built-By has a different value.
The final aspect we’ll cover for both applet and webstart packaging targets is the templates used to generate the JNLP and HTML files required to launch the application in the appropriate mode.
10.2.5. Customizing the templates
Earlier we described the contents of griffon-app/conf/dist. You may have noticed that there’s another directory that appears to be a duplicate entry: griffon-app/conf/webstart. This directory is not, in fact, a duplicate but a common location for both applet and webstart packaging targets. It contains the basic templates and icons that will be used when packaging the application in the desired deployment mode.
You can alter any of these files at will; just be careful with the variables surrounded by @ characters, because they will be used by the build system to store the values gathered by inspecting the application’s conventions. Here are a few of them, in case you’re curious:
<title>@griffon.application.title@</title>
<vendor>@griffon.application.vendor@</vendor>
<homepage href="@griffon.application.homepage@"/>
You can instruct the build system to apply a different value even if you don’t change the templates themselves. Take another look at BuildConfig.groovy. Right at the end of the file you’ll see a block of code that looks similar to the following:
deploy {
    application {
        title = "${appName} ${appVersion}"
        vendor = System.properties['user.name']
        homepage = "http://localhost/${appName}"
        description {
            complete = "${appName} ${appVersion}"
            oneline  = "${appName} ${appVersion}"
            minimal  = "${appName} ${appVersion}"
            tooltip  = "${appName} ${appVersion}"
        }
        icon {
            'default' {
                name   = 'griffon-icon-64x64.png'
                width  = '64'
                height = '64'
            }
            splash {
                name   = 'griffon.png'
                width  = '391'
                height = '123'
            }
            selected {
                name   = 'griffon-icon-64x64.png'
                width  = '64'
                height = '64'
            }
            disabled {
                name   = 'griffon-icon-64x64.png'
                width  = '64'
                height = '64'
            }
            rollover {
                name   = 'griffon-icon-64x64.png'
                width  = '64'
                height = '64'
            }
            shortcut {
                name   = 'griffon-icon-64x64.png'
                width  = '64'
                height = '64'
            }
        }
    }
}
Feel free to make some changes and package the application in either applet or web-start mode. You should see a difference in the generated files reflecting your modifications. The values for ${appName} and ${appVersion} are directly taken from the application.properties file.
Now that you know how to use Griffon’s standard packaging commands to package an application, let’s look at the Installer plugin. The Installer plugin gives you a few more options and the ability to create installers and launchers for multiple platforms.
10.3. Using the Installer plugin
Every Java developer knows the Java mantra by heart: compile once, run anywhere. But package once install anywhere doesn’t work, especially when you want your users to have a great user experience when installing your application. Installing the application must appear native to the operating system your user is using.
You can choose from several packaging options for each platform, and some of them have been rounded up in a handy plugin called Installer. In this section, you’ll install the Installer plugin, build a distribution, and take a quick look at several installer targets: izpack, rpm, deb, mac, jsmooth, and windows.
Installing the plugin is done the same way you install other plugins. The Installer plugin can be installed by invoking the following command:
$ griffon install-plugin installer
Upon installing it, you’ll notice that this plugin provides plenty of new scripts—a pair of scripts for each packaging target. At the time of writing, the targets are as listed in table 10.3.
Table 10.3. Installer plugin targets
|
Target |
Description |
|---|---|
| izpack | A universal installer using the IzPack project (http://izpack.org) and batch/shell scripts for launching |
| rpm | Creates a package in RPM format for Linux distributions |
| deb | Creates Debian-based packages |
| mac | Creates a Mac OS X application bundle plus a DMG |
| jsmooth | A Windows launcher based on JSmooth (http://jsmooth.sourceforge.net) and zip files |
| windows | An alias for the jsmooth target |
How complicated is it to package an application using the Installer plugin? Executing the packaging target isn’t complicated at all. The Installer plugin does a great job and saves you a lot of work and headaches. Let’s take a closer look at using it.
10.3.1. Building a distribution
Each packaging target has a prepare script and a create script. The first step in building a distribution is to run the prepare script. This script copies any templates that may be required by a particular distribution, placing them in $projectTargetDir/installer/<target>. You can make as many changes to those templates as you choose. Once you’re comfortable with those changes, it’s time to proceed to the next step.
Tip
If you aren’t sure where the installer files are located, look at the output of the package command. It has the exact path to the location of the files.
The second step is running the create script. This script is the real workhorse for each packaging target. When it completes, the appropriate distribution will have been built and placed in the standard distributions directory (dist).
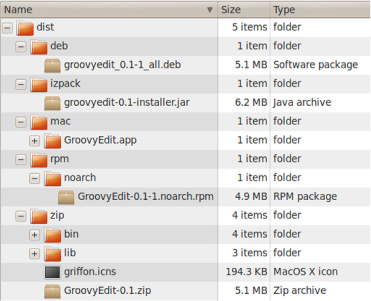
Figure 10.4 shows the result of executing some of the packaging targets in the GroovyEdit application.
Figure 10.4. The outcome of running deb, izpack, mac, rpm, and zip packaging targets on GroovyEdit
Each packaging script fires convenient build events that you can hook into, making the automation of hooking customized templates on your application a trivial task. It also means you can invoke create-* right after prepare-*. These build events have a single argument—the type of the package being built. Here’s a list of the events fired:
- PreparePackage<type>Start, PreparePackage<type>End—Triggered by the prepare-* scripts
- CreatePackage<type>Start, CreatePackage<type>End—Triggered by the create-* scripts
As an alternative to invoking two commands, prepare and create, to build a distribution, you can append the packaging target to the griffon package command. This means you can package an application with an IzPack-based installer by typing the following at your command prompt:
$ griffon package izpack
Remember, too, that these additional packaging targets will automatically include all shared and specific distribution files available at griffon-app/conf/dist.
Let’s review the configuration options for each packaging target.
10.3.2. The izpack target
An IzPack installer provides a wizard-like experience when installing an application. You can configure how many steps are used, how each step page looks, and even hook into specific platform settings. As a result, an IzPack-based installer is perhaps the most versatile option at your disposal, given that it produces a Java-based installer that can be run on any platform. There are plenty of configuration options for IzPack, and we encourage you to visit the official IzPack documentation site to learn more about them (http://izpack.org/documentation).
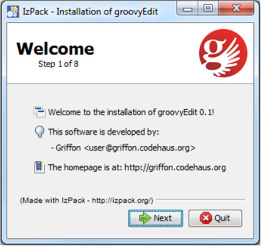
Figure 10.5 shows the first page of the IzPack installer created for the GroovyEdit application using the default values provided by the templates. Remember that you can either double-click the generated installer jar or execute the following command at your console prompt:
$ java –jar <izpack_installer>.jar
Figure 10.5. An IzPack installer for the GroovyEdit application. The default installer template runs eight steps.
The heart of this installer is located at $projectTargetDir/installer/izpack/resources/installer.xml. Every referenced resource is relative to that file’s location. You’ll want to customize this file in order to add or remove steps.
Griffon has several pieces of information (application name, version, author, and so on) that could be valuable when configuring the installer. Rather than having to duplicate this information in the install source files, Griffon has created build variables to represent this information. The variables are independent from IzPack, and Griffon will resolve them when the installer is created:
- @app.name@—The name of the application as it’s found in the application.properties metadata file
- @app.version@—The current application version, also from the application’s metadata
- @app.author@—The name of the application’s author; defaults to “Griffon”
- @app.author.email@—The author’s contact details; defaults to [email protected]
- @app.url@—The application’s website; defaults to http://griffon.codehaus.org
Now let’s investigate platform-specific installers.
10.3.3. The rpm target
RPM stands for Red Hat Package Manager. Originally developed by Red Hat in the mid 90’s, this packaging option is commonly used in several Linux flavors. RPM uses a special file, called the spec, to drive the creation of a package. You’ll find plenty of documentation for the RPM spec file format by doing an internet search. The http://rpm.org site is a good place to start.
The following default variable placeholders are used in the spec file, which you’ll find in $projectTargetDir/installer/rpm/SPECS:
- @app.name@—The name of the application as found in the application.properties metadata file
- @app.version@—The current application version, also from the application’s metadata
- @app.license@—The license of your application; defaults to “unknown”
- @app.summary@—A brief description of the application; defaults to the application’s name
- @app.description@—A detailed description of the application’s features; defaults to “unknown”
- @app.url@—The application’s website; defaults to “unknown”
The following is the output of querying the generated RPM package for GroovyEdit:
rpm -qpil dist/rpm/noarch/GroovyEdit-0.1-1.noarch.rpm
Name        : GroovyEdit

Version     : 0.1
Release     : 1
Install Date: (not installed)
Group       : Applications/GroovyEdit
Size        : 5817059
Signature   : (none)
Packager    : Andres Almiray
URL         : unknown
Summary     : GroovyEdit
Description : unknown
Relocations : (not relocatable)
Vendor      : (none)
Build Date  : Mon 24 May 2010 03:30:21 AM PDT
Build Host  : aalmiray
Source RPM  : GroovyEdit-0.1-1.src.rpm
License     : unknown
// file list omitted for brevity
RPM isn’t the only option for Linux-based installers. The next section describes another popular one.
10.3.4. The deb target
Debian-based installers have been around as long as RPMs. There are several Debian-based distributions out there; perhaps the best known is Ubuntu, due to its ease of use and attention to detail regarding the overall user experience.
Building a Debian package is much like building with an RPM or IzPack installer. You just need to tweak the default settings found in $projectTargetDir/installer/deb/resources/deb_settings.properties.
The variable placeholders are pretty much the same ones as before, plus a few Debian-specific ones. These are all of them, for the sake of completeness:
- @app.name@—The name of the application as found in the application.properties metadata file
- @app.version@—The current application version, also from the application’s metadata
- @app.author@—The name of the application’s author; defaults to “Griffon”
- @app.author.email@—The author’s contact details; defaults to [email protected]
- @app.synopsis@—A brief description of the application; defaults to the application’s name
- @app.description@—A detailed description of the application’s features; defaults to “unknown”
- @app.depends@—The dependencies on other packages; defaults to “sun-java5-jre | sun-java6-jre”
The following output is obtained by querying the generated .deb file for GroovyEdit:
new debian package, version 2.0.

 size 5346426 bytes: control archive= 737 bytes.
     236 bytes,    10 lines       control
    1025 bytes,    13 lines       md5sums

 Package: groovyedit
 Version: 0.1-1
 Section: contrib/misc
 Priority: extra
 Architecture: all
 Depends: sun-java5-jre | sun-java6-jre
 Installed-Size: 5839
 Maintainer: Griffon <[email protected]>
 Description: groovyedit-0.1
  Unknown
On to the next platform: Mac OS X.
10.3.5. The mac target
The Apple-branded UNIX platform, Mac OS X, has become a popular choice for developing applications. Love it or hate it, the fact is that Mac OS X’s first directive is user experience. They make working with applications so easy and intuitive that you don’t need a manual most of the time. Installing an application is also a simple click-and-drag operation.
Applications in Mac OS X are installed via application bundles, which are nothing more than a conventional directory structure—sound familiar? Application bundles are also often distributed using a DMG file. The mac install target can generate both types of archives, but DMG files can only be generated if you execute it when running on Mac OS X.
This time there are no variable placeholders that you can tweak, but you can customize the application’s icon, by placing an .icns file that matches the application name under griffon-app/conf/dist/mac. This means that if you were to distribute a Mac-based installer for GroovyEdit, and you wished to include a custom icon for it, you’d have to name it griffon-app/conf/dist/mac/GroovyEdit.icns. What happens if no custom icon file is defined? The application bundle will use the default griffon.icns file.
10.3.6. The jsmooth target
JSmooth is an executable wrapper around Java. This packaging target will generate an .exe file that can be used to run the application on Windows. There are several options you can configure; perhaps the most interesting one allows the wrapper to embed a particular version of a JRE, which means your application can run in self-contained mode if a suitable JRE isn’t installed on the target computer.
JSmooth uses a template file similar to the other packaging targets. This template includes variable placeholders, but there’s no need to change them because the create-jsmooth script takes care of updating them with the appropriate values. As a matter of fact, it’s recommended that you don’t manually substitute any of the variable placeholders you’ll find in the template.
Refer to the JSmooth manual to learn more about the options available in the template (http://jsmooth.sourceforge.net/docs/jsmooth-doc.html).
10.3.7. The windows target
The windows packaging target is just an alias for the jsmooth target; there’s nothing new to add here. Perhaps in the future a different Windows-based option that doesn’t rely on JSmooth might be added to the Installer plugin.
10.3.8. Tweaking a distribution
Let’s recap for a moment. The Griffon build system provides four default packaging targets (jar, zip, applet, and webstart), which should cover your basic needs for deploying an application. There’s also the Installer plugin, which provides additional packaging targets (izpack, rpm, deb, dmg, and jsmooth). These additional packaging targets are fully integrated with the package command.
The conventions laid out by these packaging targets are good enough for most cases. But if you need to tweak the configuration, what do you do? You can take advantage of the following aspects of the build system:
- Every build operation is encapsulated by a Gant target.
- Start and end events for each invoked target are automatically triggered.
- Event handlers can be built that react to those triggers.
Armed with this knowledge, you only need to know the name of the event you want to handle and the location of the configuration files you need to tweak.
Say, for example, you want to change the configuration for the izpack packaging target. As we said before, this target requires an installer descriptor file, normally named installer.xml. This file is usually generated automatically by the plugin and is placed at ${projectWorkDir}/installer/izpack/resources. You must provide different contents for this file, which can be done easily by overwriting the file at the right time, say at the end of the prepare phase but before the create script is called. That’s the first requirement covered: knowing what to change and when. Now you need to find a way to make the change happen.
The second step is writing an event handler. In chapter 8, we discussed build events and scripts—that’s precisely what you’ll use here. The build system will honor all your build event handlers, as long as you place them in a file named _Events.groovy and place it inside the scripts directory. You can create such a file and fill it with the contents of the following listing.
Listing 10.1. Build event handler to override izpack packaging target settings
eventPreparePackageIzpackEnd = {
  ant.copy(todir: "${projectWorkDir}/installer/izpack/resources", overwrite:
     true) {
    fileset(dir: "${basedir}/src/installer/izpack/resources", includes:
"**")
  }

  ant.replace(dir: "${projectWorkDir}/installer/izpack/resources") {
    replacefilter(token: "@app.name@", value: griffonAppName)
    replacefilter(token: "@app.version@", value: griffonAppVersion)
  }
}
First you define the event handler according to the convention. You might remember it from section 10.3.1. Next, you overwrite the files created by the prepare phase with your own. This script assumes that the new installer files are located relative to the application’s root directory; you can pick a different location if required. Finally, you replace any tokens found in the freshly copied files with their appropriate values; that way you can keep the files parameterized. You can also define your own tokens and values.
This is a trivial example—you’re only copying static files and replacing some tokens. A more elaborate tweak could involve generating files on the fly, for example. There’s no limit to what you can do at the build level. Remember, you have the full power of the Groovy language combined with the Gant target mechanism and all of the Griffon libraries.
10.4. Summary
Packaging an application is one of those common tasks that an application framework should help you get done consistently and quickly. Griffon supports several packaging targets out of the box, depending on the target environment on which you intend to distribute the application.
The jar and zip targets are usually the preferred methods of distributing an application for standalone consumption, whereas applet and webstart are used for their respective environments.
When the standard packaging targets prove to be inadequate for your application’s needs, you can rely on the Installer plugin, which provides more targets that can be hooked into the package command. Currently supported targets include izpack, rpm, deb, mac, jsmooth, and windows. Additional targets may be added in future releases of the Installer plugin.
At this point, you’ve seen how to create a Griffon application from end to end. We’ve covered packaging—what could be next? You’ve used them, and now it’s time to learn how to create one: plugins.