
Chapter 2. A closer look at Griffon
- The structure of every Griffon application
- Conventional configuration
- Command-line utilities
- The application’s life cycle
When starting the development of a brand-new desktop application, what are some of the typical questions that spring to mind?
- Where should the sources be placed?
- What about configuration files?
- Where should libraries and resources be placed, and how should they be managed?
- What about tests?
Isn’t that a huge burden when starting a project? Now imagine working on an existing project. You might stare at the project structure and the source, trying to make sense out of it, perhaps looking for a common pattern that might help you.
When it comes to developing Java desktop applications, no specification describes what, when, and how things should be done. To make matters worse, every company and, often, each project, follows its own approach, making it harder to switch from one development team to the next.
In this chapter, we’ll look at how Griffon aims to bring order to this chaos. It does so by providing a basic structure that all Griffon applications follow to the letter. Each component has its place and purpose, making it easier for anyone to recognize its role in the application in the blink of an eye. That in turn facilitates application maintenance. We’ll also explore Griffon’s command-line tools, which make the job of building your application snappier. We’ll round out this chapter with a look at the application life cycle.
Let’s begin by examining how Griffon applications are structured.
2.1. A tour of the common application structure
If you remember the exercise from chapter 1, where you created a simple multitabbed file-viewer application, you’ll recall that each member of an MVC group follows the naming and placing conventions applicable to its specific responsibilities. Filenames of all MVC group members have a particular suffix that unambiguously spells out what artifact they describe. Those files in turn are placed in directories that share the name with the corresponding suffix. As it turns out, there are more conventional directories to be found in a Griffon application.
Griffon’s conventions are dictated by the common application structure shared by all applications. As you might already know, this structure was created when you invoked the griffon create-app command. Let’s see what else is created by that command. Figure 2.1 shows the directory structure of the GroovyEdit application.
Figure 2.1. Directory structure of the GroovyEdit application
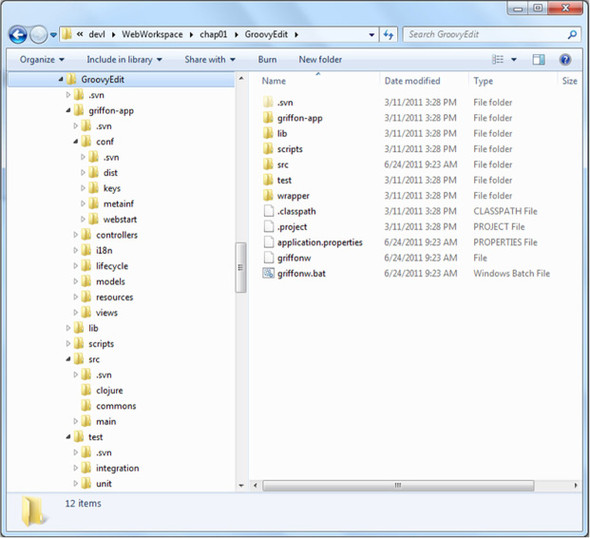
The core of the application resides in the griffon-app directory. There you can find the code for all models, views, and controllers, which together form the backbone of the application. You also find other useful artifacts there. Table 2.1 shows a breakdown of the contents of each directory.
Table 2.1. Directory structure of a Griffon application. Each directory serves a particular purpose.
|
Directory |
Description |
Where to go for more info |
|---|---|---|
| griffon-app | Core Griffon artifacts | |
| + conf | Configuration elements, such as Builder.groovy | Section 2.2 |
| ++ keys | Private keystore for Web Start/applet signing | Chapter 10 |
| ++ metainf | Files that should be included in the application’s jar in the META-INF directory | |
| ++ webstart | Web Start templates | Chapter 10 |
| ++ dist | Miscellaneous files used in packaging | Chapter 10 |
| + controllers | Controllers providing actions | Chapter 5 |
| + i18n | Internationalization message bundles | |
| + lifecycle | Application scripts to handle the life cycle | Section 2.4 |
| + models | Models | Chapter 3 |
| + resources | Application resources, such as images | |
| + views | SwingBuilder DSL scripts | Chapter 4 |
| lib | Jar archives | |
| scripts | Build-time scripts | Chapter 8 |
| src | Other sources | |
| + main | Other Groovy and Java sources | |
| test | Test sources | Chapter 9 |
| + integration | Application-wide tests | |
| + unit | Component-specific tests |
This directory structure is easy to follow. Herein lies one of the strengths of the framework: convention over configuration. As you develop more and more Griffon applications, you’ll come to appreciate that the applications all follow a common structure and layout. It makes moving between applications much easier. You don’t have to take the time to refamiliarize yourself with the application to remember where the views, models, and controllers are located.
You may notice a particular directory named griffon-app/conf; as its name suggests, it’s a place for configuration files. As you may recall from chapter 1, every Griffon application can be deployed in three modes: standalone, Web Start, and applet. The conf directory holds the files and configuration settings to both run and deploy applications in any of these deployment modes. We’ll cover deployment modes in more detail in chapter 10 in the context of packaging options.
This directory is populated with a set of default configuration files when an application is created. Additional configuration files can be found here depending on which plugins you have installed. Yes, Griffon supports the notion of framework plugins. If a particular feature isn’t found in the framework itself, chances are that a plugin provides it. You’ll learn more about plugins in chapter 11.
Let’s look at the basics of configuring an application, which will be helpful when you need to tweak some of its settings.
2.2. The ABCs of configuration
When faced with the task of configuring a Griffon application, just think of it as being as easy as A-B-C, short for Application.groovy, Builder.groovy, and Config.groovy (see table 2.2). You can bet those names weren’t chosen lightly.
Table 2.2. A-B-C summary
|
Configuration Area |
Script name |
Purpose |
|---|---|---|
| Application | Application.groovy | Runtime configuration of MVC groups |
| Builder | Builder.groovy | Defines and constructs the application |
| Config | Config.groovy, BuildConfig.groovy | All other runtime configuration Package and deployment configuration |
Groovy scripts are used as configuration files instead of XML or any other markup language such as YAML or JSON. These scripts are the Groovy version of Java properties files.
To get a better understanding of Griffon and how to configure it, let’s take a peek in each configuration file of the sample application (GroovyEdit) you worked with in chapter 1.
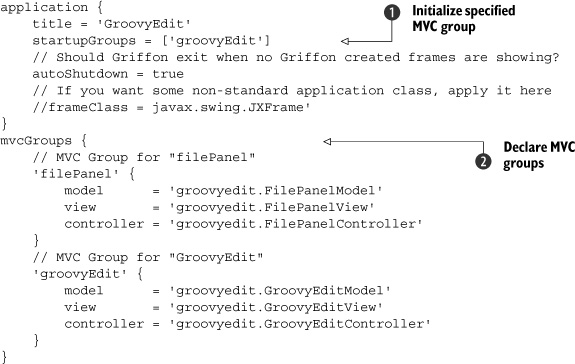
2.2.1. A is for Application
Your first stop in GroovyEdit’s configuration files is Application.groovy. The following listing shows its contents as you left them in chapter 1.
Listing 2.1. Contents of griffon-app/conf/Application.groovy
As noted, Groovy configuration scripts are like Java properties files in disguise. The advantages are clear: you can visualize hierarchies and categories more easily, and you’re able to use more types other than plain strings. For example, application.startupGroups is a list of values, and application.autoShutdown is a boolean value. Groovy can parse these scripts by means of groovy.util.ConfigSlurper and groovy.util.ConfigObject.
This script contains two top-level nodes: application and mvcGroups. The application node is responsible for holding the most basic information about your Griffon application, such as its title.
Initializing the MVC group
Looking closely at the value of the application.startupGroups ![]() configuration option, you’ll observe two things: it’s a list containing a single element, and the element is the name of
one of the MVC groups you created for that application.
configuration option, you’ll observe two things: it’s a list containing a single element, and the element is the name of
one of the MVC groups you created for that application.
This configuration option tells the Griffon runtime which MVC groups should be initialized when the application is bootstrapping itself. Recall from chapter 1 that you had to explicitly initialize an instance of an MVC group of type FilePanel, but you didn’t need to do so for the GroovyEdit group. Now you know why!
Terminating the app
The next configuration option, application.autoShutdown, controls whether the application will terminate when all frames and windows created by Griffon directly—that is, those created using the application node in a view script—are closed. As you’ll soon find out, you aren’t constrained to using the application node on a view script; other nodes let you build additional windows and dialogs. These nodes don’t count as managed by Griffon for purposes of autoShutdown.
Setting the main window class
You already know that an application’s main window is determined by its runtime/ deployment target (the standalone and Web Start modes use a JFrame, whereas the applet mode uses JApplet). But if you’d like to switch to a different class, you need to provide a value for application.frameClass. The script suggests javax.swing.JFrame; certainly any other subclass of javax.swing.JFrame will be gladly accepted by Griffon.
Configuring MVC groups
The second top-level node, mvcGroups ![]() , lists all MVC groups configured in your application. Typically an MVC group configuration defines the full qualified class
names of each of its members. Although the default settings follow a naming convention, you aren’t forced to follow it to
the letter. But we’re getting ahead of ourselves.
, lists all MVC groups configured in your application. Typically an MVC group configuration defines the full qualified class
names of each of its members. Although the default settings follow a naming convention, you aren’t forced to follow it to
the letter. But we’re getting ahead of ourselves.
If you want to know more about MVC groups right now, you’re more than welcome to jump to chapter 6. Remember to come back, though, because there’s more to learn about configuring your application, such as views and their builders.
The next file we’ll review is Builder.groovy. This script holds the configuration of one of Griffon’s key components: the CompositeBuilder.
2.2.2. B is for Builder
Remember the controller and view scripts in the FilePanel MVC group in chapter 1 (listings 1.7 and 1.8, FilePanelController.groovy and FilePanelView.groovy)? Those scripts rely on a Groovy feature called builders, which make creating hierarchical structures, such as Swing views, a breeze. Builders expose a series of nodes and methods that, when used according to their build rules, produce the expected results. Builders help you write code in a more expressive manner. In particular, CompositeBuilder is based on FactoryBuilderSupport (http://groovy.codehaus.org/FactoryBuilderSupport). This is important, because it enables CompositeBuilder to mix and match builders based on FactoryBuilderSupport as well. Clever extension hooks are also provided, as we’ll discuss in chapter 12.
You may have noticed that whereas the FilePanelView file holds a Groovy script, the FilePanelController file holds a class definition. The reason behind this choice is that Views as scripts can be seen as a declarative approach to defining the visuals of an application. Even so, in listing 1.7 the controller is able to tap into “magical” methods that handle threading in a simple manner; the controller class doesn’t implement a particular contract or extend a certain class that provides those methods. Something else must be at work.
Many developers consider builders to be an eye-opening Groovy feature. Once you get to know them, you’ll start to recognize patterns in your code where a builder is better suited to solve the problem at hand. Groovy offers a few choices for creating your own builders, and it packs many builders in its core distribution.
The answer to this conundrum is the CompositeBuilder and its settings. The following listing shows Builder.groovy as configured in the example application.
Listing 2.2. Contents of griffon-app/conf/Builder.groovy
root {
    'groovy.swing.SwingBuilder' {
        controller = ['Threading']
        view = '*'
    }
}
The CompositeBuilder, as its name implies, is a builder that mixes and matches other builders. This feature is the key to adding functionality to your views and controllers via additional nodes and will be examined in chapter 12. For now, let’s concentrate on what the default configuration means to you as you’re getting started.
Every Griffon application has an instance of CompositeBuilder. It’s used as the provider of building blocks for views and controllers. You can think of a view script as providing the application structure, while Groovy is the mortar that holds everything together seamlessly. The default configuration sets up the basic information needed for a run-of-the mill Swing application to get up and running. Figure 2.2 illustrates the composite nature of the CompositeBuilder.
Figure 2.2. CompositeBuilder works with all builders based on FactoryBuilderSupport.
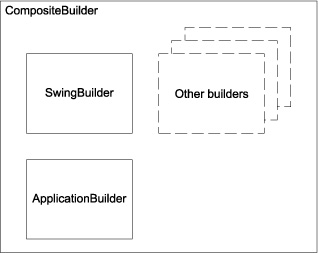
In listing 2.2, the top-level node, root, marks the default namespace used by the builder, which means that node names can be used as is. When an additional namespace is present, its value is used as a prefix for the node names it contributes. As a result, you can mix and match builders even if they contain colliding node names.
SwingBuilder is responsible for exposing all the nodes related to Swing components found in the JDK (and some other useful methods you’ll discover along the way).
Notice that SwingBuilder has view = '*' in its settings. This means all the nodes and methods they provide will be contributed to all view scripts. Notice also that only SwingBuilder defines controller = ['Threading']. This translates into all nodes related to threading being exposed to controllers. That is the missing link in how controllers are able to use threading facilities without resorting to inheritance: the CompositeBuilder injects threading-related nodes and methods into controllers with that particular setting.
If all this builder and nodes talk is too much for you, don’t worry! Its impact will come to you slowly as you progress with the book’s examples. Just remember that if you ever need to adjust a builder’s settings or expose additional nodes to a controller, Builder.groovy is the script you should tweak.
We’ve covered A and B; now it’s time for C. This one is full of goodies, too.
2.2.3. C is for Config
The last two configuration files we’ll review are Config.groovy and BuildConfig.groovy:
- Config.groovy —This file contains runtime configuration. Hmmm. Hold on a second: we just described runtime configuration as the responsibility
of the Application.groovy script. The Application.groovy script only holds runtime configuration pertaining to MVC groups; Config.groovy holds all other runtime configuration the application may need. In the end, as illustrated in figure 2.3, both files are merged into a single object in memory from which an application can read all the settings.
Figure 2.3. Merging the MVC runtime config and all other runtime config into the runtime application config
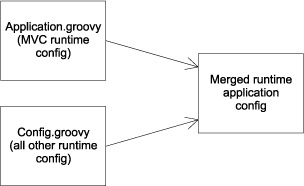
- BuildConfig.groovy —This file is responsible for build-time configuration. It holds the relevant information pertaining to each running environment, and it defines configuration options that become relevant when you’re packaging and deploying an application. You’ll learn more about those options in chapter 10.
Let’s continue with our exploration of runtime and build-time configuration by looking at some typical tasks and where the configuration is located.
Configuring your environments
Have you ever needed to keep separate configuration settings for your development and production code? If so you may have felt the pain of storing repeated information or, worse, having outdated or incompatible settings across these environments. Fortunately, Griffon makes this job easier by keeping all environment-related configuration at the same location.
Environments are a handy way to separate configuration settings depending on the current phase of the application you’re dealing with. For example, you might want to skip signing jar files when prototyping your application, because the signing process takes a few additional seconds to finish. On the other hand, you’ll want all your jars signed and verified before going into production, lest an ugly security error pop up in front of your target audience.
Griffon enables three environments by default:
- Development (dev)
- Test (test)
- Production (prod)
The default settings for this particular configuration section can be rather long. The following is a simplified version.
Listing 2.3. Environment settings on BuildConfig.groovy
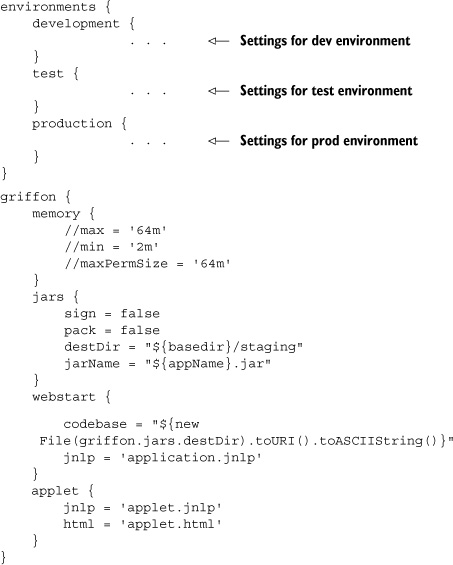
The environments top-level node is responsible for holding the settings for each environment, and you may define as much as you want for each one.
The griffon top-level node serves as a catch-all for any settings that weren’t specified. This means that if your BuildConfig.groovy file looks like this short version, you’ll never sign any jars no matter which environment you choose to run, because griffon.jars.sign is set to false and no other environment overrides that setting. If you’re wondering where griffon.jars.sign is, you won’t find it in the config file exactly like that. But you will find a griffon node, which contains a jar node, which contains a sign variable. This is precisely how Groovy configuration scripts enhance standard Java properties files.
You might be wondering how Griffon knows which environment it should use when running your application. The answer lies again in the rules of the convention-over-configuration paradigm. By default, Griffon assumes the development environment when you run an application using this command:
$ griffon run-app
Conversely, it uses the test environment when you test your application using this command:
$ griffon test-app
How do you specify which environment to use if you want to change the default? You tell the griffon command which environment you want. For example, the following command runs the application in standalone mode using the production environment:
$ griffon prod run-app
The environment feature is another trait shared with Grails; there it’s used to quickly switch between data sources. Seasoned Grails developers shouldn’t have much trouble picking up how Griffon applications are configured. They’re pretty much the same as their Grails cousins.
What if none of the default environments will work for your needs? In that case, you can define a custom environment with any name you want—for example, special.
You can instruct the griffon command that it should use that environment by adding a command flag like this:
$ griffon -Dgriffon.env=special run-app
BuildConfig.groovy has one last responsibility, related to additional configuration settings that other components might need.
Configuring build-related settings
Every now and then, when you’re building an application, you need to make a few tweaks to its build settings. Most of them are already exposed by the environments features we just talked about. In the event that you create a build script or a build event handler (explained in chapter 8) that requires a configurable choice, BuildConfig.groovy is a good place to put the configuration settings. For now, there’s nothing much to see in the sample application, but rest assured that we’ll visit this file again in chapter 8 when we discuss build events and in chapter 11 when we touch the subject of plugins and addons.
Now let’s cover the settings that you can configure in Config.groovy.
Configuring logging
Given that logging is a runtime concern, you’ll find its configuration in Config.groovy. If you look at the contents of the file (see the next listing), it starts with a single configuration node. Its name should give you a hint of what is being configured.
Listing 2.4. Contents of Config.groovy as created by default
log4j = {
    // Example of changing the log pattern for the default console
    // appender:
    appenders {
        console name: 'stdout', layout: pattern(conversionPattern: '%d [%t] %-5p %c - %m%n')
    }

    error  'org.codehaus.griffon'

    info   'griffon.util',
           'griffon.core',
           'griffon.swing',
           'griffon.app'
}
That’s right: you can configure logging for a Griffon application by means of a logging DSL that works with Log4j. You can change two types of settings: the appenders to use and the logging level per package.
Appenders specify where messages are sent or displayed and how they’re formatted. The default configuration specifies a pattern to be used with the console appender. This appender prints to the standard output any message that is logged. You can choose two additional appender presets: file and event. The former saves all messages into a particular file that may grow indefinitely, and the latter pushes application events for every matching logging call. (We cover application events in chapter 8.)
Logging levels, on the other hand, define the priority of a logging message. For example, in the default configuration, messages from the package org.codehaus.griffon (and its subpackages) will be sent to an appender only if their priority is error or higher. The following logging levels are available for configuration, sorted from most important to least: fatal, error, warn, info, debug, and trace. You can use two additional levels:
- all—Enables all levels for a particular package
- off—Disables all messages from a particular package
You configure a logging level by specifying the type (such as error or info) followed by the name of a package or a list of packages.
Tip
To learn more about this logging framework and, in particular, the layout options for formatting messages, refer to Log4j’s documentation.
Last, you can also set in Config.groovy any additional configuration flags that might be needed at runtime. No such flags are needed by default; that’s why you don’t see any in Config.groovy after the application has been created. But plugins (and addons) make extensive use of this file. We’ll cover plugins and addons in chapter 11. You’ll also see a good example of additional configuration flags in chapter 13, where we’ll specify dynamic behavior for some artifacts.
This is all we’ll say about configuring a Griffon application for now. The griffonapp/conf directory should be a familiar place: come back to this section if you have any doubts about how a Griffon application can be configured. We’ll continue exploring Griffon’s feature set by discussing command-line utilities.
2.3. Using Griffon’s command line
You’ve already seen some of Griffon’s commands when building the GroovyEdit sample application, such as create-app and run-app.
A command is the entire line:
$ griffon create-app GroovyEdit
A target is the specific task you’re asking griffon to do:
create-app
The Griffon command line is one more way Griffon makes your job easier. It encapsulates repetitive tasks into single commands to save you time typing. This section provides a detailed list of all the command targets available when you install the Griffon distribution.
Table 2.3 lists several of the targets you can call using the griffon command, gives a short description of each one, and also mentions in which chapter the command will be covered. It’s worth saying that all of these commands are implemented using a Groovy flavor of Ant (http://ant.apache.org) named Gant (http://gant.codehaus.org), which makes them highly customizable.
Table 2.3. Available griffon targets, including a short description and where you can learn more
|
Target |
Description |
Where to go for more info |
|---|---|---|
| Build targets | ||
| create-app | Creates a brand new application | Section 2.3.1 |
| create-mvc | Creates an MVC group and adds it to the configuration files | Chapter 6 |
| compile | Compiles all sources (except tests) | Section 2.3.1 |
| package | Compiles and packages the application | Section 2.3.1 |
| clean | Deletes compiled classes and compile artifacts | Section 2.3.1 |
| Run targets | ||
| run-app | Runs the application in standalone mode | Section 2.3.2 |
| run-applet | Runs the application in applet mode | Section 2.3.2 |
| run-webstart | Runs the application in Web Start mode | Section 2.3.2 |
| shell | Runs an interactive Groovy shell with the application in the classpath | Section 2.3.2 |
| console | Runs an interactive Groovy visual console with the application in the classpath | Section 2.3.2 |
| Miscellaneous targets | ||
| help | Displays a list of available commands | Section 2.3.3 |
| stats | Shows how many lines of code are in your application per artifact | Section 2.3.3 |
| set-version | Sets the application version on the application’s metadata file | Section 2.3.3 |
| upgrade | Modifies your application to comply with a newer Griffon version | Section 2.3.3 |
| integrate | Adds IDE-specific files to your application | Section 2.3.3 |
| create-script | Creates a new Gant script | Chapter 8 |
| create-unit-test | Creates a new unit test for any source artifact | Chapter 9 |
| create-integration-test | Creates a new controller test | Chapter 9 |
| test-app | Runs all application tests, both unit and integration | Chapter 9 |
| set-proxy | Sets proxy settings allowing buildtime tools access the network behind a firewall | Chapter 11 |
| create-plugin | Creates a new plugin project | Chapter 11 |
| package-plugin | Packages the plugin, making it ready to be installed | Chapter 11 |
| release-plugin | Uploads a plugin to the plugin repository | Chapter 11 |
| list-plugins | Provides a list of available plugins | Chapter 11 |
| plugin-info | Displays information about a particular plugin | Chapter 11 |
| install-plugin | Installs a plugin on an application | Chapter 11 |
| uninstall-plugin | Uninstalls a plugin from an application | Chapter 11 |
This is by no means a complete list of targets—future releases of Griffon might provide additional scripts. Also, an installed Griffon plugin may provide more command targets via scripts (as you’ll see in chapter 11). You’ll have the opportunity to provide your own commands as well, also using scripts.
Gant is a Groovy-based tool that lets you script Ant tasks (see http://gant.codehaus.org). It uses the Groovy language as a domain-specific language (DSL) to describe a build manifest. You can think of it as a painless alternative to XML builds. Both Grails and Griffon take advantage of this powerful tool.
Let’s review the command targets by category: build, run, and miscellaneous.
2.3.1. Build command targets
The build command targets allow you to create new artifacts, either source or compiled ones:
- create-app—Chiefly takes one argument, the name of the application to build, and then proceeds to create the entire application structure, configuration, and templates.
- The remaining targets—compile, package, and clean—are responsible for transforming the application sources.
- compile—Compiles all available source code into byte code. This includes all source code found under griffon-app (yes, the configuration files as well) and additional source code found under src/main.
- package—Assembles the application code into a jar, signs it along with additional jars found in the application’s lib directory if jar signing is enabled, and compresses all jars for optimized download if packing is enabled. It also assembles the required files for Web Start and applet deployment. The default location for these artifacts is $basedir/staging, which is a setting you can modify by editing BuildConfig.groovy.
- clean—Deletes the working directory where all classes are compiled, along with the staging directory.
2.3.2. Run command targets
You may already be familiar with this group, because all run-* targets are found here, but this list provides a quick reminder:
- run-app—Runs the application in standalone mode—in other words, as if it were to be deployed as a regular desktop application on any platform.
- run-applet—Runs the application in applet mode. If the default configuration is in place, then application packaging signs and packs all jars.
- run-webstart—Runs the application in Web Start mode. Just as in applet mode, application packaging signs and packs all jars when configured to do so.
- shell and console—Run an interactive Groovy shell with the packaged application on the classpath, allowing you to run it for quick prototyping or API exploration. The difference between these targets is that shell is strict command line and console displays a visual tool. In case you’re wondering, these targets are found in Grails, too.
2.3.3. Miscellaneous command targets
The last group of command targets we’ll review in this chapter provide additional behavior and information. Although we don’t cover the complete list, these command targets are important enough to mention:
- help—Displays the current Griffon version, sample usage of the griffon command, and a list of available commands. You saw the help command target in chapter 1; it verified that you had a working Griffon installation.
- stats—Also demonstrated in chapter 1; parses all of your application’s sources and compiles a list of the number of lines of code per artifact type. This target helps you realize how much you can attain with so little code, thanks to the power of conventions.
- set-version—Updates the application’s current version, found in the application.properties file. If you look back at figure 2.1, you’ll see this file located at the root of your application’s directory. It’s important to update this file using a command target because this file is also responsible for defining which version of Griffon the application is compatible with, and as such this file is an auto-generated one.
- integrate-with—Adds IDE support files. Command-line tools and a simple text editor are good enough to get you started, but if you need additional
power, you might want to try a Java IDE that supports Groovy and Griffon. At the time of writing, you can specify the following
command flags to integrate with a particular IDE or build tool: eclipse, ant, gradle, textmate, and intellij. For example, if you want to add Eclipse-specific support files, you invoke the integrate command as follows:
$ griffon integrate-with –-eclipse You can now open your project from within Eclipse, because this command created a pair of files that every Eclipse project requires: .project and .classpath. You can find comprehensive coverage of setting your IDE to work with Griffon projects, as well as other productivity tools, in chapter 14. - upgrade—Upgrades your application from one version of Griffon to the latest version installed. This target does its best to update all required files, but sometimes it needs help from external agents; this is where custom scripts and plu-gins play a part in the grand scheme.
There’s one last topic to cover before we reach the end of this chapter, and it’s important in terms of the facilities that must be provided by an application framework: the application life cycle.
2.4. Application life cycle overview
Before we jump into the plumbing of MVC groups, we should explain a key concern addressed by Griffon: the application’s life cycle and its management. As discussed in chapter 1, each application should be responsible for bootstrapping itself, allocating resources, and configuring its components as they’re being loaded, instantiated, and wired up. It should also be able to handle its shutdown graciously, liberating any allocated resources and performing any pending cleanup. If you’re building a Java application by hand or using some other framework, it can be difficult to figure out where and how to implement that logic.
Again, Griffon shines and comes to your rescue. A Griffon application has a well-defined life cycle, with each phase neatly handled by a particular script. This life cycle provides easily identifiable places to put your application-specific life cycle logic.
Look at your application’s structure in griffon-app/lifecycle, and you’ll see several files, as listed in table 2.4. These scripts are responsible for handling each phase of the life cycle, and they’re listed in the order in which the life cycle calls them.
Table 2.4. Life cycle phases and associated scripts
|
Script |
|
|---|---|
| Initialize | Initialize.groovy |
| Startup | Startup.groovy |
| Ready | Ready.groovy |
| Shutdown | Shutdown.groovy |
| Stop | Stop.groovy |
Caution
All life cycle scripts run in the event dispatch thread (EDT), and you have to be careful with the code you place in them. Any long-running computation will cause your application to appear unresponsive and sluggish.
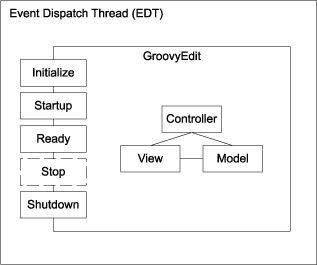
Figure 2.4 shows the GroovyEdit application that you created in chapter 1.
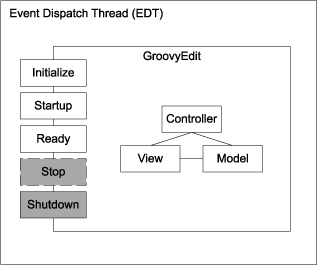
Figure 2.4. Application life cycle
All life cycle scripts run in the EDT. There are some alternatives for proper threading and handling operations in the EDT; feel free to jump to chapter 7 if you can’t wait to learn about them.
The first stop in the chain of events handled by the life cycle is initialization.
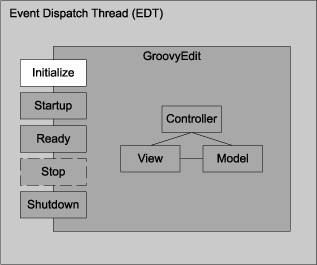
2.4.1. Initialize
When you run GroovyEdit, initialization is the first life cycle phase that takes place (see figure 2.5). It’s triggered after all configuration files have been initialized and read but just before any component is instantiated, meaning you can’t access any MVC members yet.
Figure 2.5. Application life cycle: initialize
But this is an excellent moment to tweak your application’s look and feel, because not a single visual element has been constructed yet. You can do so either by following the standard Swing approach or using the provided utilities. The template for this script suggests a few tweaks, as shown in the following listing.
Listing 2.5. Default contents of Initialize.groovy
import groovy.swing.SwingBuilder
import static griffon.util.GriffonApplicationUtils.isMacOSX
SwingBuilder.lookAndFeel((isMacOSX ? 'system' : 'nimbus'), 'gtk', ['metal', [boldFonts: false]])
The code in this script configures the look and feel. It relies on a list of names that resolve to a particular lookAndFeel setting. For example, if you’re running on JDK 6 or newer, it’s most likely that Nimbus will be the chosen lookAndFeel; if it isn’t available, then the next element in the list will be tried, up to the default provided by the Java platform, which is Metal.
This phase is also useful for performing sanity checks on resources and configuration settings, because you can abort or query the user for additional information. Just remember that none of the MVC groups are initialized at this moment, so any UI you display must be created manually.
The second stop in the chain is startup.
2.4.2. Startup
The script that handles the startup phase is called right after all startup MVC groups have been initialized (see figure 2.6). Remember the settings in Application.groovy (section 2.2.1)? One controls which MVC groups should be instantiated by default when the application runs: its name is startupGroups.
Figure 2.6. Application life cycle: startup
You’re now able to reference any members of those MVC groups already initialized, and you can start any background work that requires those references.
Next in the chain is the ready phase.
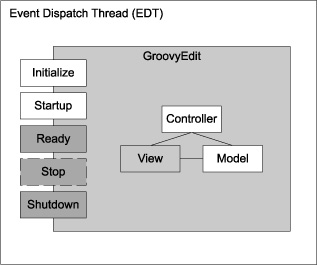
2.4.3. Ready
At first, the ready phase may look superfluous. As with the startup phase, all startup MVC components have been initialized (see figure 2.7). The catch is that this phase takes place after all events posted to the EDT queue have been processed. This means if any of the initialized startup view scripts or code run by the previous phase posted new events to the EDT queue, they should have been consumed by now. If you wanted to restore a previous editing session, this would be a good place to do it.
Figure 2.7. Application life cycle: ready
The main window of the GroovyEdit application is shown after this phase finishes. The application has been fully initialized at this point; no further life cycle scripts will be called until the application is ready to shut down in the next life cycle phase.
2.4.4. Shutdown
This is the last life cycle script called by Griffon. In the GroovyEdit application, this phase can be triggered by choosing File > Quit or via a Window Close event.
The shutdown phase represents the last chance for freeing used resources, saving configuration settings, and closing any connections your application might have opened. If you wanted to save a list of currently open files in GroovyEdit, this is where you would do it.
Once this phase has been executed, there is no turning back: your application will exit.
2.4.5. Stop
We know we said shutdown is the last life cycle phase of an application, but that’s only partly true. Due to the three-way deployment targets supported by Griffon, this phase comes in handy when you’re deploying to applet mode. Applets behave a bit differently than regular desktop applications or Web Start enabled ones. An applet is supposed to run whenever the page that contains it is displayed in a browser. So although startup works as expected with an applet, stop is a special life cycle phase for dealing with browsers.
An applet will sit there happily doing its job until one of the following happens: you close the browser window or tab, or you move away from the page to another.
Figure 2.8. Application life cycle: shutdown
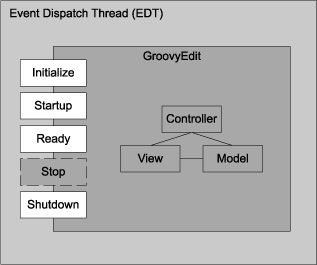
Figure 2.9. Application life cycle: stop
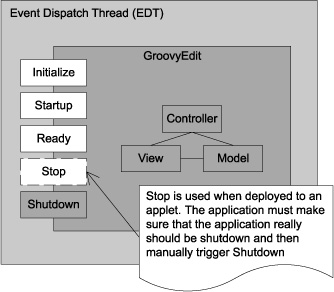
In the former case, the application will cease to exist, in which case the shutdown phase is called. In the latter case, the applet will be stopped; if you want to navigate back to the page where it’s found, the stop phase is called and its handler script executed.
There you have it: the application’s life cycle in a nutshell. It’s simple, but it’s a powerful feature in Griffon’s arsenal against painful desktop application development. Instead of figuring out when and how each of these tasks should be invoked, you let Griffon call the phase-handler scripts when needed.
2.5. Summary
Phew! That was quite an exploration of a Griffon application’s structure. To recap, every Griffon application shares the same directory structure according to the framework’s conventions. This increases your productivity because every artifact has its place and name according to its role. Once you learn the conventions, finding your way around any other Griffon application should be a walk in the park.
You learned that using Griffon is as easy as ABC: Application.groovy, Builder.groovy, Config.groovy, and BuildConfig.groovy. You also learned about the basic command targets provided by the griffon command. These command targets take advantage of the framework’s conventions and your application’s configuration to do their job. Additional command targets will be covered in later chapters of the book.
Finally we touched on the subject of application life cycle management. It’s the framework’s responsibility to figure out the correct stage when an application is run. This relieves you of keeping tabs on how to do this kind of management, leaving you the task of deciding what to do when a particular stage is triggered.
This completes part 1 of the book. Next, we’ll spend some time with models and learn how to automatically transfer values from views to models using bindings.