
Chapter 17. Engines
- The importance of engines for Rails 3
- Building a new engine and exploring the base
- Using behavior-driven development to develop an engine
- Releasing the engine as a gem
- Integrating an engine with an app
Engines are a new feature for Rails 3.[1] They are effectively miniature applications that provide additional functionality to an application, and they function in much the same way as an application.
1 Although in previous versions they were supported by a plugin written by the community: https://github.com/lazyatom/engines.
Back in chapter 6, you used the Devise gem, which itself is an engine. Other engines include the RailsAdmin[2] and forem[3] engines.
An engine allows you to share common functionality across applications in the form of a gem or a plugin.[4] This functionality could be an authentication system such as Devise, a commenting engine, or even a forum engine. If there’s ever been a need to have the same features across an application, this is what engines were made for.
4 In Rails 3, these two are basically interchangeable. One lives in vendor/plugins, the other is installed using gem. For all intents and purposes, they work in a near-identical manner. Developers should try to use gems where possible, as they are versioned and easy to upgrade to specific versions, where plugins are not.
By installing an engine as a gem or plugin and then mounting it at a specific route in the config/routes.rb file of your application, you gain access to its features. Each engine will be different, so be sure to consult the README or other documentation that comes with it in order to figure out exactly how it works.
We’ll begin by discussing the history of engines and why they’re now a major part of the core ecosystem, as it’s helpful to know the reasons why they weren’t available in releases earlier than 2.3.
In this chapter we’ll go through a little bit of the history of engines, why engines are useful, and how they work, and then you’ll develop one of your own. At the end of the chapter, you’ll integrate the engine with the Ticketee application you have developed earlier in the book.
17.1. A brief history of engines
On November 1, 2005, James Adam begun work on what would become the engines plugin.[5] Starting off crudely, engines eventually evolved into something much more useful, serving as the inspiration for the functionality within the Rails core today. There was a lot of controversy surrounding engines,[6] and James spent a lot of his time defending the decision to develop them. Since then, however, the community has grown to accept the idea of engines.
6http://glu.ttono.us/articles/2006/08/30/guide-things-you-shouldnt-be-doing-in-rails and http://article.gmane.org/gmane.comp.lang.ruby.rails/29166 to name two such criticisms.
One of the major problems of having this engines plugin live outside of the core framework was that there wasn’t a clearly defined place where it could hook into Rails code. Rails could potentially change and break the engines plugin, which would prevent people from upgrading to the latest version of Rails until the engines plugin was updated.
It was decided during the development process of Rails 3 that engines should be a core feature, and so a large chunk of work has gone into getting them right. By having them in core, it means that there is a clearly defined public API for engines and when newer versions of Rails come out, there’s an almost-zero[7] possibility of things breaking.
7 In programming, the chances of things breaking over time approaches zero, but never truly reaches it.
Part of this work was added to Rails 2.3, and very basic engines were possible back then,[8] but things such as copying migrations and assets were not supported. Additionally, there was no way of running the Rails generator and so files had to be generated in a real application and then copied over.
8 A good demonstration of engines in Rails 2.3 can be seen on Railscast #149: http://railscasts.com/episodes/149-rails-engines.
Since then, engines have been dramatically improved. Rather than having to copy over migrations manually, there’s a specific Rake task to do that. There is no need to copy over assets from an engine into a Rails application any more either; they are served through the functionality of the Sprockets gem.
Finally, this ancient engine implementation didn’t enforce namespacing of the controllers or models. This could potentially lead to conflicts between engines and the application code, where the application code would override an engine’s code. If the application has a model called Forum at app/models/forum.rb, and the engine has the same model at the same location (relative to its root), the application’s model will take precedence. Namespacing is something that you’ll see has almost a zealot level of impact in the work that is done with engines today. It’s absolutely important to keep the application and engine’s code separate so that they do not conflict.
So today, we’ve now got engines as a core part of Rails 3.1, and they’re better, and they’re here to stay. Let’s see why they’re useful.
17.2. Why engines are useful
Engines allow Rails programmers to share common code between applications in an extremely easy fashion. It’s entirely possible to use more than one engine in an application, and many people do. Engines are generally provided as gems, and so they are managed like every other gem your application uses: by using Bundler.
In previous (before 3.0) versions of Rails, we have seen that people had to use the engines plugin.[9] This was sometimes problematic, because whenever a new Rails version was released it could potentially break the compatibility of the plugin. By having this feature within Rails itself, this issue is fixed.
Alternatively, people could use generators. These would often generate controllers, models, and views in the application itself, which would allow people to change the code exceptionally easily. When new versions of these generators were released with changes to the previously generated code, however, there was no clean way to keep the changes.
One final, very hacky way, would be to copy over the controllers, models, or views into the application manually from a directory, which runs into the same problems as described, as well as making it difficult to know if you got it right or not.
With an engine, all the code is kept separate from the application and must be explicitly overridden in the application if that’s what is needed. When a new version of an engine is released, it will only alter the code of the engine and not the application, making the upgrade process as easy as changing a version number in a Gemfile.
Even the routes for an engine are kept separate, being placed in the engine’s config/routes.rb file rather than the application’s. This allows you to namespace the engine’s routes so that they don’t conflict with the application.
The whole point of engines is to separate out chunks of functionality, and to be able to share it without it crashing into the code that already exists.
Let’s generate your own engine and have a look at its parts.
17.3. Brand-new engine
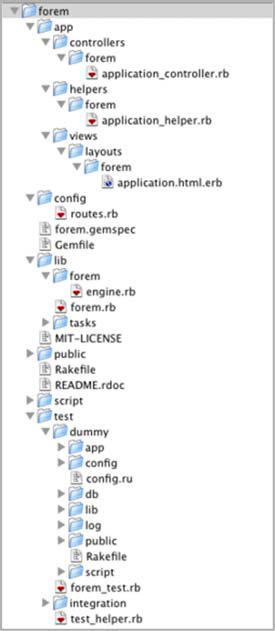
The layout of an engine is nearly identical to that of a Rails application, with the notable exception that all code that usually goes straight into the app directory now goes into a namespace. Let’s take a look at the layout of the forem engine[10] at an early stage of its development, shown in figure 17.1.
Figure 17.1. The forem engine, directory structure
You’re going duplicate a little chunk of this code using the same practices that were used to develop forem. It’s a good an example as any.[11]
11 It also helps that one of the authors of this book has done extensive work on it.
17.3.1. Creating an engine
Here you’ll create your engine using a generator built-in to Rails.
Warning
You’re going to need to use at least the Rails 3.1 version for this, which is what you should have installed from earlier chapters in this book.
You can run this executable file to generate the layout of your engine using this command at the root of the Ticketee application you created earlier:
cd ..
rails plugin new forem --mountable
The --mountable option here is the magic incantation: it tells the plugin generator that you want to generate a mountable plugin, more commonly known as an engine. The output of this command is very similar to that of an application, containing an app directory and a config/routes.rb file. But that’s what an engine is essentially: a miniature application! This command even runs bundle install automatically for you on this new engine, like the rails new command does when you generate a new application.
Before you go any further, run bundle --binstubs in this new directory so that you can use bin/rspec to run your tests, rather than bin/rspec.
Before you get too involved here, you’re going to set this project up as a Git repository and create a base commit that you can revert back to if anything goes wrong. You’ll first need to change back into the forem directory, then set up the git repository:
git init
git add .
git commit -m "Initial base for the forem engine"
With that safety net in place, let’s go through the major parts of what this has generated.
17.3.2. The layout of an engine
You’ve now got the basic scaffold of your engine in the same directory of your application, and you can go back to that directory by using cd ../forem from within the application. Let’s go through the important parts of this engine.
Forem.Gemspec
Each plugin that is generated using the new Rails plugin generator now comes with a gemspec, which allows it to be used as a gem.[12] This file allows you to specify information for your gem such as its name, a helpful description, and most important the other gems it depends on as either runtime dependencies using add_dependency, or as development dependencies using add_development_dependency. You can specify this information by lines like this in the Gem::Specification definition in this file:
12 A great guide to developing a gem can be found here: http://github.com/radar/guides/blob/master/gemdevelopment.md.
s.add_dependency 'rails'
s.add_development_dependency 'rspec-rails'
Gemfile
This file contains the rails and sqlite3 gems, which provide the basis for your application. When, however, people install your engine using gem install forem, they’ll not receive these dependencies. To fix this, you need to place them.
You need to tell your Gemfile to reference the forem.gemspec file too, as you specify gem dependencies in this rather than the Gemfile for engines. The Gemfile is not referenced at all when you install a gem, but the forem.gemspec file is. Therefore, you must put all dependencies in the forem.gemspec file and tell your Gemfile to reference it for all its dependencies. To do this, change the Gemfile to be this:
source :rubygems
gemspec
And add these lines to your forem.gemspec inside the Gem::Specification block:
s.add_dependency "rails", "3.1.0"
s.add_development_dependency "sqlite3"
When you run bundle install, it will install the Rails version specified in your Gemfile and any gem dependencies declared in forem.gemspec.
App
This folder serves the same purpose as an application: to house the assets, controllers, helpers, models, views, mailers, observers, and whatever else is particular to your application.
Rails is automatically told about the app/assets directory contained within an engine, based on the class definition within a file you’ll see a little later on, lib/forem/engine.rb. This folder works in the same way that it does in an application, providing a home for the images, JavaScript files, and stylesheets that are served by the sprockets gem. Providing that either the host application or the engine[13] specifies a dependency on CoffeeScript or Sass, you can use these as well.
13 It’s best to specify this dependency in the engine if you wish to use either of these.
Inside the app directory lies the app/controllers directory, which serves the same purpose as the app/controllers directory in a Rails application. This directory has a key difference though: the controllers should be placed into a forem namespace so that they do not clash with identically named controllers in the application. If you moved these controllers out of the namespace, they’d clash with controllers of the same name in the application, or in other engines that aren’t using namespacing. By namespacing them, you prevent this error from happening. This also explains why the helpers in app/helpers are also separate.
Your Forem::ApplicationController currently inherits from ActionController ::Base, but in the case of your engine you’ll want it to inherit from ApplicationController instead. Therefore, you’ll change app/controllers/forem/application_controller.rb from this
module Forem
class ApplicationController
into this:
module Forem
class ApplicationController
You must use the :: prefix on the super ApplicationController so that it goes to the top-level ApplicationController, not the one inside the Forem model that you’re defining! By inheriting from the ApplicationController, your engine will use the same layout as the application it’s hosted within.
Within the app directory, you can define models which also go under a namespace. If you had a Forum model, it would live at app/models/forem/forum.rb and would be called Forem::Forum. By doing this, you separate the model class from any identically named class in the application or other engines. The default table name for this model would be forums if it weren’t for some additional configuration in lib/forem/engine.rb that you’ll see later.
With models also come migrations. When you create migrations in an engine, these are stored (again, like an application) in db/migrate. When you (or others) install the engine into an application, there’s a rake forem:install:migrations task that will copy across these migrations, adding the migrations to the current list of migrations in the application’s db/migrate folder. If a new version of the engine is released, the user can re-run rake forem:install:migrations and it will only copy across the newer migrations.
Obviously, you shouldn’t alter the migrations at all after releasing the engine to the general public, as there is no clean way of copying the changes. If you wish to make an alteration to a migration after the fact, you should leave the ones already released alone and create new ones.
Finally, in the app directory you’ve got a app/views/layouts/forem/application.html.erb file. This file defines a basic layout for your engine, but you’re going to want to use your application’s layout, not this engine’s, so you can delete it right away.
Config/Routes.Rb
This file defines the routes for your engine. You can use exactly the same helpers you’d use in an application’s routing file, as you’ll see later on this chapter when you develop a feature. We won’t go into detail for the routing right now: we’ll do that after we’ve gone through the directory structure.
Lib/Forem.Rb
This file is automatically required by Bundler when you’re loading your engine as a gem, or by Rails if you’re loading it as a plugin. This is the main entry point for everything your application does. This file is very simple:
require "forem/engine"
module Forem
end
By requiring the forem/engine (which is actually the lib/forem/engine.rb file in the engine), it triggers the process that loads your engine.
The module defined at the bottom of this file is there so that you can define any global behavior you wish. Right now, you don’t need any.
Lib/Forem/Engine.Rb
This file is the heart and soul of the engine and defines the all-important Forem ::Engine. By inheriting from Rails::Engine, it sets in motion a chain of events to notify the Rails stack that an engine exists, providing a path to the assets within the engine. This file is pretty short:
module Forem
class Engine
By using the isolate_namespace method, you isolate this engine’s routes from the application, as well as defining that models within the Forem module are to have a table prefix of forem_.
By isolating the routes, you allow a host application to have a forums_path routing method defined for the application, as well as for the engine itself. When you use forums_path within the application, it will point to the application’s forums_path. If you use it in an engine, it will point to the engine’s forums_path.
If you ever wanted to reference an engine’s route from within your application, there’s a helper defined for that too:
link_to "Forums", forem.forums_path
Calling the routing helper on the forem method automatically provided by this engine will generate the engine’s forums_path rather than the application’s. Note here that you’re using a period (.) rather than an underscore (_). You’re calling the forem method and then calling the forums_path method on that. If you wanted to reference the application’s route from within the engine, you’d use main_app instead of forem.
Inside the Forem::Engine file you have access to the same config that an application would have. This is because the class that your application inherits from, Rails::Application, actually inherits from Rails::Engine as well. Applications and engines share much the same base functionality. This means that you’ll be able to configure your engine to use RSpec as the testing framework by putting these two lines in the Forem::Engine definition:
config.generators.integration_tool :rspec
config.generators.test_framework   :rspec
Rakefile
This file loads the Rake tasks for your engine and any engine tasks Rails wishes to define. It also has one additional benefit: it loads your dummy application’s Rake tasks too. But rather than loading them straight into the Rake global namespace and polluting it, it namespaces the application’s tasks into the app namespace, so any defined task called email would become app:email.
The engine’s tasks are much like an application; you can call rake db:migrate to run the migrations of the engine on your dummy application, and rake db:seed to load the seed data from the engine’s db/seeds.rb directory.
Script/Rails
When you run rails commands, it goes looking for the script/rails file. This is how rails knows if it’s inside an application or not, based solely on the presence of one of these files. In your engine, its presence allows you to use the same generators you normally would in an application to generate your controllers, models, and whatever else you need.
Test
No proper engine would be complete without tests, and it is, by default, the test directory where these would abide. You’re going to be using RSpec because you’re familiar with it. When tests in this directory run, they load the test/test_helper.rb file, which contains this code:
# Configure Rails Environment
ENV["RAILS_ENV"] = "test"
require File.expand_path("../dummy/config/environment.rb",
__FILE__)
require "rails/test_help"
Rails.backtrace_cleaner.remove_silencers!
# Load support files
Dir["#{File.dirname(__FILE__)}/support/**/*.rb"].each { |f| require f }
This file’s second line of real code here requires the test/dummy/config/environment .rb file, which loads the application in test/dummy.
Test/Dummy
The application contained within this directory is purely for testing purposes, but you can set it up to act like a real application by creating controllers, helpers, models, views, and routes if you wish. When the tests run, this application is initialized like a real Rails application.
Your tests then run against this application, which has your engine mounted inside the test/dummy/config/routes.rb file with this line:
mount Forem::Engine => "/forem"
This line mounts the routes of your engine (not yet defined) at the /forem path of your application. This means that whenever you want to access this engine, you must prefix the route with /forem. If you are in code, you can use the forem. prefix for the routing helpers, as seen earlier with forem.forums_path or forem.root_path within the dummy application.
Even though there are a lot of files that are generated for engines—like there are when you generate an application—they all play a crucial role in your engine. Without this lovely scaffold, you’d have to create it all yourself, which would be no fun.
This routing may be a little confusing at first, but it’s quite simple. Let’s look into how this process works, and then you’ll get into developing your first feature for this engine.
17.3.3. Engine routing
In an application, you need to define routes to an engine when you’re using it. You can do that with this line in config/routes.rb:
mount Forem::Engine, :at => "/forem"
To understand how engines are routed, you must understand the concept of middleware within a Rails application.[14] Middleware is the term used for code that sits between the receiving server and the application; middleware can do a number of things, such as serve static assets and set flash messages. Rails 3 applications run on Rack, which uses a stack-based architecture to accomplish a request. A basic stack is shown in figure 17.2.
14 Additional information about middleware can be found in chapter 18.
Figure 17.2. A simple middleware stack
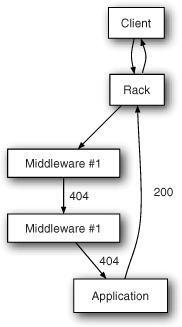
In this picture, a basic request cycle for a Rails application is shown. A request comes from a client and hits Rack first, which then goes through all of the middleware. If a middleware returns a 404 (“Not Found”) HTTP status code, then Rack moves on to the next one, going all the way through each part of the stack, moving on to the next every time the current part returns a 404 until it hits the application. The application is the final stop of this request, and so whatever it returns goes. In this case, the application returns a 200 (“OK”) request, which is then passed back to the client through Rack.
If a non-404 response was ever returned from a middleware object, then the digging would stop there, and the response would climb back to the surface.
In a Rails application, the routing is actually a piece of the middleware stack. As the request goes through the chain, it eventually comes to the routes, which then determine where the request should head. When routing requests to an application, the sequence looks like figure 17.3.
Figure 17.3. Application route cycle
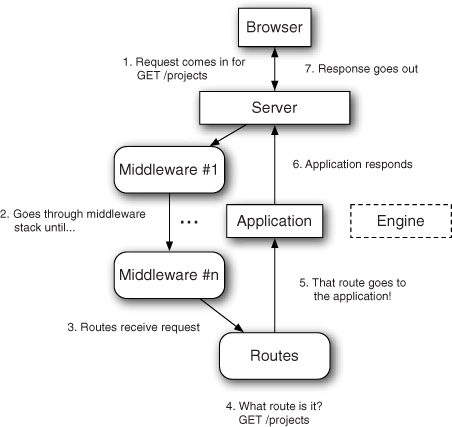
In this example, Rack still receives the request and goes through the middleware stack, with each middleware passing the buck until it comes up to the routes. This then handles the request, routing the request to (usually) a controller, which then executes the necessary code to get the job done and passes the result back up to the client.
An engine is served in much the same way; you mount it at a specific path in your application’s config/routes.rb line with this line:
mount Forem::Engine, :at => "/forem"
Any request to the /forem path will not be passed to the application, but instead passed to the engine. The engine then decides how to route that request and returns a response exactly like an application. This process is shown in figure 17.4.
Figure 17.4. Routing cycle of an engine
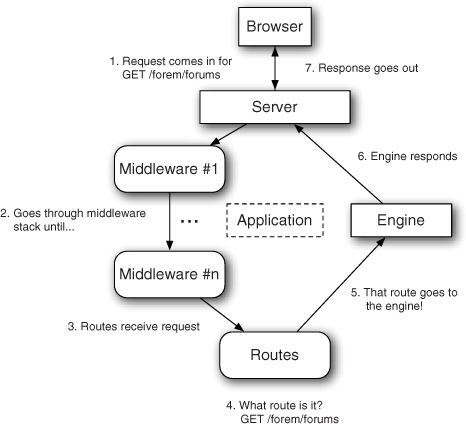
It’s the same cycle, except this time the routing code has determined this request should be handled by the engine, rather than the application.
We’ve talked long enough about the theory of an engine, and you’ve learned some key concepts. An engine is a miniature application that provides some functionality, and it’s routed like a normal application would be, providing you’ve mounted it in your application’s config/routes.rb file.
It’s time to put all this theory into practice.
17.4. Setting up a testing environment
Before you can get down to writing any tests, you’re going to need to set up the environment to do that. For a change, you’re not going to be writing tests for your engine using Cucumber. Instead, you’re going to be using RSpec and Capybara. It’s always good to get a different perspective on testing, as not everyone agrees on the One True WayTM of doing things. The syntax for this RSpec and Capybara is still easy going, however, as shown by this example:
require 'spec_helper'

describe "topics" do
  it "creating a new one" do
    visit topics_path
    click_link "New Topic"
    fill_in "Subject", :with => "First topic!"
    fill_in "Text", :with => "First post!"
    click_button "Create Topic"

    within "#flash_notice" do
      page.should have_content("Topic has been created!")
    end

    within ".forem_topic #posts .forem_post" do
      page.should have_content("First post!")
    end
  end

end
An obvious downside for writing this is that it’s not as human-friendly as a Cucumber test is, but it’s close enough. Anybody with an extremely basic understanding of Ruby should be able to understand everything here apart from the CSS selectors, which are another class of their own.[15]
15 You could create a helper method here to help clarify what these mean, such as this assert_seen method from the real forem engine: https://github.com/radar/forem/blob/87092925e8f7092723e07e0adbae44ad96a45d01/spec/integration/posts_spec.rb#L28
There are a couple of benefits to using Capybara directly over using it in conjunction Cucumber. First, it’s going to be faster because there’s no parsing of the steps as there is in Cucumber—it’s straight method calls to the very same methods that Cucumber uses. Second (and related), all the code for the feature is kept within one file.
You’re going to need to make some changes to your engine to install RSpec and Capybara first.
17.4.1. Removing Test::Unit
At the moment in your application, you’ve got a test directory that uses Test::Unit for testing. We’ve avoided this throughout the book, and this chapter’s not going to be any exception to that rule.[16] You’re going to switch this over to using RSpec.
16 For two reasons. First, the authors prefer RSpec. Second, RSpec is preferred by the majority of people in the community. There are still pockets of resistance though.
Inside this test directory, there is the test/test_helper.rb file that contains this content:
# Configure Rails Environment
ENV["RAILS_ENV"] = "test"

require File.expand_path("../dummy/config/environment.rb", __FILE__)
require "rails/test_help"

Rails.backtrace_cleaner.remove_silencers!

# Load support files
Dir["#{File.dirname(__FILE__)}/support/**/*.rb"].each { |f| require f }
This is really helpful for Test::Unit, but you can also cannibalize it for your RSpec. Let’s create a spec directory and put in it a spec /spec_helper.rb, which contains similar content to the test/test_helper.rb file:

It’s about identical, except you’ve replaced the require to rails/test_help with rspec/rails. This spec/spec_helper.rb file will be loaded by RSpec when you run your tests.
One thing to note is the line Rails.backtrace_cleaner.remove_silencers! ![]() . Rails has an automated backtrace cleaner, which it uses to shorten the resulting backtrace from errors so that it’s easier
to track down. You don’t need this silencing going on in your tests, and so you can remove it using remove_silencers!.
. Rails has an automated backtrace cleaner, which it uses to shorten the resulting backtrace from errors so that it’s easier
to track down. You don’t need this silencing going on in your tests, and so you can remove it using remove_silencers!.
You need to add one more thing to the end of spec/spec_helper.rb, which will reset your database back to a clean slate once all of your tests have finished running. It will do this by running the test’s database queries inside a transaction, which is then rolled back at the end of the test. That would be this little configuration option:
RSpec.configure do |config|
  config.use_transactional_fixtures = true
end
Without this, test data would accumulate in your database, leading to undesired results.
Your next step in replacing Test::Unit with RSpec is to move the test/dummy directory to spec/dummy. This folder is the dummy application for your engine and contains the all-important config/environment.rb file, which is required in spec/spec_helper.rb.
With all this code moved over, you can remove the test directory completely, because you don’t need it any more. The test/dummy directory itself is still referenced in the engine in a couple of places, and you’ll need to replace these references with the new spec/dummy location.
The first of these locations is the Rakefile file at the root of the engine. This file is loaded when any rake task is executed and is responsible for loading those tasks. You need to replace this line in Rakefile
APP_RAKEFILE = File.expand_path("../test/dummy/Rakefile", __FILE__)
with this:
APP_RAKEFILE = File.expand_path("../spec/dummy/Rakefile", __FILE__)
This will now point to the correct location for your dummy application’s Rakefile. If you had defined a custom task within this dummy application called email_everyone, it would be available in your engine as app:email_everyone. This is designed to stop the conflicts between the application and the engine.
Also in Rakefile, you need to replace the use of Rake::TestTask with the equivalent for RSpec. Let’s remove these lines from Rakefile now:
require 'rake/testtask'

Rake::TestTask.new(:test) do |t|
  t.libs << 'lib'
  t.libs << 'test'
  t.pattern = 'test/**/*_test.rb'
  t.verbose = false
end

task :default => :test
Replace them with lines that will do the same thing, but for RSpec:
require 'rspec/core/rake_task'
RSpec::Core::RakeTask.new(:spec)

task :default => :spec
On the final line here you tell Rake to default to the spec task if there is no task specified. This means that, rather than running rake spec to run the tests, you can run rake.
The second and final location you need to change the test/dummy reference is in script/rails at the root of your engine. This contains this line:
load File.expand_path('../../test/dummy/script/rails', __FILE__)
This file would normally load the test/dummy/script/rails file directory, if you hadn’t already moved it. This file is responsible for loading the subcommands for the rails command. You need to change this line to make it work again:
load File.expand_path('../../spec/dummy/script/rails', __FILE__)
With these changes complete, your move away from Test::Unit is also complete. Your next step is going to be installing the RSpec and Capybara gems and setting them up. With those done, then you can get down to writing some tests.
17.4.2. Installing RSpec and Capybara
To install these gems, you’re not going to add them to your Gemfile, but instead to forem.gemspec. The established best practice for developing gems is to put the dependencies inside the gemspec. That way, when people install this engine as a gem using gem install forem, they’ll get all the normal dependencies installed, and if they install it using gem install forem --dev, they’ll get all the development dependencies as well.
Directly before the end of the Gem::Specification.new block, you’ll put these two lines to declare that RSpec and Capybara are development dependencies of your application:
s.add_development_dependency "rspec-rails", "~> 2.5"
s.add_development_dependency "capybara"
You can run bundle install to install these two gems as dependencies because you’ve got the gemspec method call in Gemfile. Once that command is done, then you’ve got what you need in terms of gems.
Your next move is to set up Capybara to be used with RSpec. In spec/spec_helper .rb there’s this line:
Dir["#{File.dirname(__FILE__)}/support/**/*.rb"].each { |f| require f }
This line will require all the files with a .rb extension within the spec/support directory or its subdirectories. You can use this to load Capybara for your tests by creating the spec/support folder and putting a file called spec/support/capybara.rb inside of it with this content:
require 'capybara/rails'
require 'capybara/dsl'

RSpec.configure do |c|
  c.include Capybara, :example_group => {
    :file_path => /spec/integration//
  }
end
The capybara/rails sets up Capybara to be used for your dummy application (which loads your engine), while the capybara/dsl gives you all the helpful Capybara methods that you’re going to need in your tests.
The final chunk of code here includes the Capybara module within all tests that are within the spec/integration directory. This should provide a pretty big clue as to where your integration tests are going for your engine!
That’s all that you’ve got to do for setting up Capybara and RSpec. Let’s make a commit for this:
git add .
git commit -m "Remove Test::Unit, replace with RSpec + Capybara"
Now why don’t we get into some real coding?
17.5. Writing your first engine feature
When they first start writing a Rails application, many people will attempt to create a forum system.[17] This is a great place to start, as a lot of people have used forum systems[18] and therefore they understand the basic concepts of how they work.
17 One of the authors attempted such a project and it grew into rboard: http://github.com/radar/rboard.
18 Such as PHPbb and VBulletin.
Generally, on the home page there’s a list of forums that have topics inside of them and then posts inside of those topics. Each topic and post are created by a user, and there’s a wide gamut of conversation (and, on larger forums, a great deal of trolling) that goes on in them.
Your engine is going to be a stripped-down version of this, showing only topics and posts. It’s a great example of how you can implement engine functionality, and it’s short enough to fit neatly into a chapter. You’re going to be using the User model from the host application (Ticketee) for all of your authentication needs too, which is kind of neat.
Your first port-of-call is adding the ability to create a topic and the first post for that topic at the same time. This topic will then be displayed at the top of a topics listing, which will be the next feature you’ll work on.
17.5.1. Your first Capybara test
You’re going to need to generate a file to put your test in, and that particular file’s going to be called spec/integration/topics_spec.rb. You need to place it inside the spec/integration directory so that you have access to the Capybara helpers that you set up earlier.
In this test, you want to navigate to the listing of all topics, then click the New Topic link, fill in your topic’s details, and see that you’ve got a topic. You’ll do this one step at a time, beginning with the code in the following listing.
Listing 17.1. spec/integration/topics_spec.rb
require 'spec_helper'

describe "topics" do
  it "creating a new one" do
    visit topics_path
    click_link "New Topic"
    fill_in "Subject", :with => "First topic!"
    fill_in "Text", :with => "First post!"
    click_button "Create Topic"

    within "#flash_notice" do
      page.should have_content("Topic has been created!")
    end

    within ".forem_topic #posts .forem_post" do
      page.should have_content("First post!")
    end
  end

end
Here you’ve defined a test like you would in an application. The test requires spec_helper (spec/spec_helper.rb), which sets up the environment for your test and then launches right into defining the test itself.
Inside the test, you use a Capybara method called visit that will navigate to the specified path in the application, which in this case is topics_path. This will take you to the index action on the TopicsController. You’ll put the code that defines this method in your engine’s config/routes.rb in a short while.
The click_link method here will do exactly that: it will click a link called New Topic, taking you to the new action in TopicsController. On this page, there will be a form with two fields, one called Subject and another called Text. You fill these fields in using the fill_in method, and when you click Create Topic with click_button, the form will post to the create action of TopicsController. This action sets a flash notice that you’ll see within an element with its id attribute set to flash_notice. Finally, you should see the content of your post also within another element on the page. You use the within methods provided by Capybara for both of these.
When you run this spec with bin/rspec spec/integration/topics_spec.rb, you’ll be told this:
1) topics creating a new one
     Failure/Error: visit topics_path
     NameError:
       undefined local variable or method `topics_path' for ...
This is missing the resources call for topics in config/routes.rb, which you must add now.
17.5.2. Setting up routes
You’ve not yet defined the route for this resource in your engine’s config/routes.rb, and so you should do that now, transforming the file into this:
Forem::Engine.routes.draw do
  resources :topics
end
You’ll also make it so the index action of the controller for this route (TopicsController) serves as the root page for this engine by putting this line within the draw block:
root :to => "topics#index"
When you run your spec again, you’ll still be given the same error:
1) topics creating a new one
     Failure/Error: visit topics_path
     NameError:
       undefined local variable or method `topics_path' for ...
Even though you’ve defined the routes correctly in config/routes.rb, the routing helpers are not made available to your specs automatically like they are in a Rails application. This is an easy-to-fix problem though: you’ll include them much like you did with the Capybara module earlier.
The routing helpers for a Rails application are actually available in a dynamic module that is accessible through the Rails.application.routes.url_helpers. Like an application, your engine’s URL helpers will be available through Forem::Engine.routes.url_helpers. Let’s include this module for all spec/integration tests by creating a new file in spec/support called spec/support/load_routes.rb, which contains the content from the following listing.
Listing 17.2. spec/support/load_routes.rb
RSpec.configure do |c|
  c.include Forem::Engine.routes.url_helpers,
    :example_group => {
      :file_path => /spec/integration//
    }
end
This will load the URL helpers, such as topics_path, that you need for your test.
One interesting thing to note here is that your topics_path method doesn’t generate the normal /topics URL as would be expected. Instead, it generates the correct /forem/topics path. This is because your engine is mounted in spec/dummy/config/routes.rb under the forem path. When you visit topics_path, you’re actually going to visit the correct path of this route, like you would in a real application.
The next time you run your spec, you’ll see this error:
ActionController::RoutingError:
  uninitialized constant Forem::TopicsController
Now your topics_path helper is working and generating a route to the index action inside Forem::TopicsController, which you attempt to visit by using the visit method. This controller doesn’t exist right now, and therefore you get this error. So let’s generate this controller to proceed.
17.5.3. The topics controller
You’ve come to the stage where you need the first controller for your application, Forem::TopicsController. To generate this controller, you can run this command:
rails g controller forem/topics
You have to namespace your controller by putting forem before it so that Rails creates it correctly. This command will generate the normal controller stuff for your engine, such as the controller itself, a helper, and the app/views/forem/topics directory.
What’s your spec tell you next? Let’s find out with bin/rspec spec/integration/topics_spec.rb:
AbstractController::ActionNotFound:
  The action 'index' could not be found for Forem::TopicsController
You now need to create the index action in Forem::TopicsController.
17.5.4. The index action
Let’s open app/controllers/forem/topics_controller.rb now. Inside this controller, you’ll see this:
module Forem
  class TopicsController < ApplicationController
  end
end
This code has defined a Forem::TopicsController, which inherits seemingly from ApplicationController. This is actually Forem::ApplicationController because the class is being defined in the Forem module. The Forem::ApplicationController will be where you put all your engine’s common controller things later on.
Right now, you need to define this missing index action. This action needs to retrieve a list of all topics and then show them in the view. You’ll define this action by changing your Forem::TopicsController to what’s shown in the following listing.
Listing 17.3. app/controllers/forem/topics_controller.rb
module Forem
  class TopicsController < ApplicationController
    def index
      @topics = Forem::Topic.all
    end
  end
end
You’re namespacing your reference to the Forem::Topic model because it’s actually Ruby that will be loading this class. If you referenced it without the Forem:: prefix, then it would go looking for a normal Topic model that may belong to your application or another engine.[19] At this point, you’re not going to have the Forem::Topic model defined, and so you’ll need to generate that too. It will need to have a subject attribute, as well has having a user_id attribute, which you’ll fill out later:
19 Although, in a perfectly sane world, this last scenario isn’t possible. This isn’t a perfectly sane world.
rails g model topic subject:text user_id:integer
As when you generated the topics controller, this model will also be namespaced. The migration it generates is called create_forem_topics and will create a table called forem_topics. This means the migration, model, and table will not clash with any similarly named migration, model, or table in the main application.
To run this migration, run rake db:migrate as you would in an application. In an engine, this will run the migration against the dummy application’s development database. There’s no rake db:test:prepare in engines at the moment, and so you’ll have to work around this by changing the dummy application’s config/database.yml file to make the development and test databases the same. You’ll do this by using the code in the following listing.
Listing 17.4. spec/dummy/config/database.yml
shared: &shared
  adapter: sqlite3
  database: db/development.sqlite3
  pool: 5
  timeout: 5000

development:
  <<: *shared
test:
  <<: *shared
This won’t be too much of a problem, as you’ll be doing the major part of your engine’s development in tests anyway.
When you run your spec again with bin/rspec spec/integration/topics_spec.rb, you’ll see that it’s missing a template for this index action you have created:
ActionView::MissingTemplate:
  Missing template forem/topics/index ...
This means that you now need to create the view for this action, which goes at app/views/forem/topics/index.html.erb and uses the code from the following listing.
Listing 17.5. app/views/forem/topics/index.html.erb
<h1>Topics</h1>
<%= link_to "New Topic", new_topic_path %>
<% if @topics.empty? %>
  There are currently no topics.
<% else %>
  <table id='topics'>
    <thead>
      <tr>
        <td>Subject</td>
        <td>Posts count</td>
        <td>Last post at</td>
      </tr>
    </thead>
    <tbody>
      <% @topics.each do |topic| %>
        <tr>
          <td id='topic_subject'><%= link_to topic.subject, topic %></td>
          <td id='posts_count'>0 posts</td>
          <td id='last_post'>last post was at TIME by USER</td>
        </tr>
      <% end %>
    </tbody>
  </table>
<% end %>
In this view, you have the New Topic link that you’re going to need to click in order to create a new topic. Underneath that link, you have the table for displaying all the topics, or a short message of “There are currently no topics” if that’s the case.
In this table you’ve got a Posts Count and Last Post At heading, and you’ve set placeholder data for these. You’ll come back to them a little later on.
With the view defined and the New Topic link in it, your spec will get a little further. Let’s run it again with bin/rspec spec/integration/topics_spec.rb:
AbstractController::ActionNotFound:
  The action 'new' could not be found for Forem::TopicsController
You’re missing the new action in your Forem::TopicsController. This action will provide the form that users can use to create a new topic.
17.5.5. The new action
You need to define the new action in the controller. This action and its related view will provide the form for creating a topic and its first post. In this brand new action, you can initialize a new topic and post with the following code underneath the index action:
def new
  @topic = Forem::Topic.new
  @topic.posts.build
end
There’s no association definition or even a model for the posts association yet, and so you should create the model and then the correct associations. You can do this by running this command:
rails g model post topic_id:integer text:text user_id:integer
You can then run rake db:migrate to create the forem_posts table. Next, you need to set up both ends of this association, beginning with the Forem::Post model, which needs to have this line inserted:
belongs_to :topic
Here you don’t need to tell Rails that the class of this association is Forem::Topic, Rails will figure that out itself. In the Forem::Topic model, you need to set up the other end of this association and accept nested attributes for it:
has_many :posts, :order => "created_at ASC"
accepts_nested_attributes_for :posts
You’re putting the accepts_nested_attributes_for in the Forem::Topic model because when you submit the form for this action, you’ll be passing through the attributes for the topic as well as nested attributes for the post. With the association now defined in your Forem::Topic model, your new action will work.
The next step here is defining the view for this action, which you can do by putting this code at app/views/forem/topics/new.html.erb:
<h1>New Topic</h1>
<%= render "form" %>
This view will render the partial at app/views/forem/topics/_form.html.erb, which you need to define using the code in the following listing.
Listing 17.6. app/views/forem/topics/_form.html.erb

Alright now, with the action, the view, and the form partial defined, you’re almost there. In this partial though, you reference
another partial called forem/posts/form ![]() , passing through the local variable of the post form builder object as f to it by using the :locals option. You’re using the long form here, as Rails cannot infer the name of it any other way.
, passing through the local variable of the post form builder object as f to it by using the :locals option. You’re using the long form here, as Rails cannot infer the name of it any other way.
This new partial will provide the text field that you’ll use for posts. You’re placing it into a partial because you may use it later on if you ever create a form for creating new posts, like a reply feature for a topic.
Let’s create the file for this partial now at app/views/forem/posts/_form.html.erb and put these lines in it:
<p>
  <%= post.label :text %><br>
  <%= post.text_area :text %>
</p>
Even though this is an extremely short partial, it’s good to separate it out so that it can be shared across the topic and posts forms, and also in case you ever decide to add any additional information to a post.
Your test should get a little further when you run bin/rspec spec/integration/topics_spec.rb again:
AbstractController::ActionNotFound:
  The action 'create' could not be found for Forem::TopicsController
Now you need to define the create action, the second to last action along this chain, with the show action being the last.
17.5.6. The create action
The create action will take the parameters passed from the form provided by the new action and create a new Topic object with a nested Post object. This action should set the flash[:notice] variable to inform the user that the topic could be created and then redirect to the show action.
This action needs to be defined using the code shown in the following listing, placing it under the new action.
Listing 17.7. app/controllers/forem/topics_controller.rb
def create
  @topic = Forem::Topic.create(params[:topic])
  flash[:notice] = "Topic has been created!"
  redirect_to @topic
end
Note
We’re purposely not including validations in this action. This is mainly to keep the chapter short, but it’s also a good exercise to be left to you. Remember to write tests that the validations work before implementing the code!
When you run your spec again using bin/rspec spec/integration/topics_spec.rb, you’ll get this error:
AbstractController::ActionNotFound:
  The action 'show' could not be found for Forem::TopicsController
You’re getting closer to having your spec pass! When it clicks the Create Topic button, it’s now going through the create action successfully and is then redirecting to the show action, which you need to define now.
17.5.7. The show action
The show action in Forem::TopicsController will be responsible for displaying a topic and its posts. Your first step will be defining this action, which you can do by putting this code inside app/controllers/forem/topics_controller.rb underneath the create action:
def show
  @topic = Forem::Topic.find(params[:id])
end
You’re then going to need to create the view for this action, which goes at app/views/forem/topics/show.html.erb and contains the short bit of code in the following listing.
Listing 17.8. app/views/forem/topics/show.html.erb
<% div_for @topic do %>
  <h1><%= @topic.subject %></h1>
  <div id='posts'>
    <%= render :partial => "forem/posts/post", :collection => @topic.posts %>
  </div>
<% end %>
You’re using a long form of render here again to render the app/views/forem/posts/_post.html.erb partial for each of the posts. The shorter version goes like this:
<%= render @topic.posts %>
Unfortunately, due to the namespacing on your model, Rails will attempt to render the app/views/forem/forem/posts/_post.html.erb (double “forem”) partial instead. You therefore have to be explicit. A short note: the long form’s syntax was how it used to be done in earlier versions of Rails.
The partial that it renders hasn’t been created yet, and so this will be your next step. Let’s create a new file at app/views/forem/posts/_post.html.erb and fill it with this content:
<%= div_for(post) do %>
  <small>Written at <%= post.created_at %></small>
  <%= simple_format(post.text) %>
<% end %>
In this view you see the reappearance of the div_for method (last seen in chapter 10), which will create a new div HTML element with the id attribute set to post_[post.id] and a class attribute set to post. This is so you can easily style the element containing the post text if you wish. You’re also using the simple_format method here too (also last seen in chapter 10), which converts line breaks in the text of the post to HTML br tags.
You’re close to having your spec pass. Go to the new action, fill in the form, click the button, and then you’re on the show page. But something’s missing. Let’s run bundle exec rspec spec/integration/topics_spec.rb to see what this is:
Capybara::ElementNotFound:
  Unable to find '#flash_notice'
Your spec is unable to find the element with the id attribute set to flash_notice, but why? This is because you haven’t defined a way of displaying it in your engine’s dummy application’s app/views/layout/application.html.erb yet. You can do this by using this code inside spec/dummy/app/views/layout/application.html.erb, directly underneath the <body> start tag:
<% flash.each do |key, message| %>
  <div id='flash_<%= key %>'><%= message %></div>
<% end %>
This code will iterate through the flash hash, setting the keys to the key variable and the value to the message variable. For each message contained within flash, a new div element will be put on the page, outputting something like this:
<div id='flash_notice'>Topic has been created!</div>
Your spec should now see this element with the id attribute set to flash_notice and pass. Run bin/rspec spec/integration/topics_spec.rb and see for yourself:
1 example, 0 failures
Good! The test passes. This engine now sports the ability to create a brand-new topic, and that’s a good start. Given that it’s the only test in the engine at this point in time, you don’t need to run all the tests at the moment. Let’s make a commit:
git add .
git commit -m "Added the ability to create a new topic"
You’ve seen here that the basics of developing an engine’s feature are very similar, if not identical, to developing a feature under a namespace in a normal application.
Before we move on to your next feature, you’ll fix up the two placeholders that you left in app/views/forem/topics/index.html.erb. They were these two lines:
<td id='posts_count'>0 posts</td>
<td id='last_post'>last post was at TIME by USER</td>
You’re probably going to want to replace these two lines with actual data, right? Absolutely! Let’s start with the posts count.
17.5.8. Showing an association count
You’re going to want to replace the “0 posts” in app/views/forem/topics/index.html.erb with something actually useful. You can do this very easily. You’ve got a has_many association for posts in your Topic model, which gives you, among other things, a lovely method called count on the association that you can use. Let’s replace this line in the view
<td>0 posts</td>
with this:
<td><%= topic.posts.count %></td>
This line will execute an SQL count query for all the posts with the topic id set to topic.id, a query like this:
SELECT COUNT(*) FROM posts WHERE topic_id = 1
This is great, but doing an extra query for every single topic on the page would be extremely hard on performance. If there were 100 topics, then there would be 100 extra queries.
Enter counter caching. Counter caching will allow you to store the number of posts on the topics table, and then you can use this cache to show the number of posts. It works like a normal attribute on a model, except that it’s updated by Rails. This attribute’s name is [association_name]_count, and so in this case it would be posts_count. To get started with this, you’re going to need to add this attribute to the forem_topics table, which you can do by running this command to generate a migration:
rails g migration add_posts_count_to_forem_topics posts_count:integer
You need to open this migration and set the field to default to 0; otherwise the counter cache won’t know where to start counting! You’ll change this line in the brand-new migration
add_column :forem_topics, :posts_count, :integer
to this:
add_column :forem_topics, :posts_count, :integer, :default => 0
Next, you can run this migration using rake db:migrate. To let Rails know that you’ve now got a counter cache column on your table, you need to open up the app/models/forem/post.rb and change this line
belongs_to :topic
to this:
belongs_to :topic, :counter_cache => true
It may seem counterintuitive to define the field on the table for the Forem::Topic model, but then have the counter_cache option in the Forem::Post model, but it’s really simple. When a post is created, Rails will check for any associations with the counter_cache option set to true. It then gets the current count for this association, adds 1 to it, and saves the associated object. When a post is deleted, it will do the same thing, except instead of adding 1, it will subtract 1. This way, you’re always going to have an accurate count of the number of posts each topic has.
In the app/views/forem/topics/index.html.erb file now, you’ll change this line
<td id='posts_count'><%= topic.posts.count %></td>
to this:
<td id='posts_count'><%= topic.posts_count %></td>
Rather than inefficiently calling posts.count for each topic, Rails will now reference the posts_count attribute for the Forem::Topic object instead, saving you many queries for the index action when you have many topics. This also means that you’ll have an accurate count of posts for your topics!
You’ll commit this change now:
git add .
git commit -m "Add posts counter cache to topics"
You’ve fixed up one of the placeholder lines in the app/views/topics/index.html.erb view now, and when you get around to adding users to your engine, you’ll fix up the second placeholder line.
In this section, you’ve created an interface for creating topics and their first post, which is the first feature of your engine and a well-tested one at that. You’ve seen how to use fields_for to yet again create nested resources. You first saw that back in chapter 8. You’ve also seen the :counter_cache option for belongs_to that you can use to cache the count of an association, so that you don’t have to perform another query to get that number. That’s a potential lifesaver if you’re displaying a lot of objects at once and want to know an association’s count on all of them, like in your topics view.
In the next section, you’re going to add the ability to add posts to a topic, because what are topics without posts?
17.6. Adding more posts to topics
A forum system without a way for users to reply to topics is nearly useless. The whole point of having topics is so that users can reply to them and keep the topic of conversation going for as long as they wish!
The feature that you’re about to develop will let people add these replies to existing topics. They’ll click a New Reply link on a topic, fill in the post text, and click the submit button. They should then see their post within the list of posts in the topic. Simple, really!
You’ll also see here more examples of integration testing with Capybara; you’ll repeat some of the concepts, but it’s a good way of learning.
You’ll start out with a new spec file called spec/integration/posts_spec.rb and begin to fill it with the content from the following listing.
Listing 17.9. spec/integration/posts_spec.rb
require 'spec_helper'

describe "posts" do
  before do
    @topic = Forem::Topic.new(:subject => "First topic!")
    @topic.posts.build(:text => "First post!")
    @topic.save!
  end
end
In order to reply to a topic, you’re going to need to create one. You initialize a new Forem::Topic object by using Forem::Topic.new and then build a post for it. This means that when you navigate to the topic’s page, then you’ll see a post that will have a Reply link for you to click. You’ll put the test underneath the before by using the code in the following listing.
Listing 17.10. spec/integration/posts_spec.rb

In this test, you go to topics_path and click the First Topic! link. Then within a post, you click the Reply link, which will take you to the form to create a new reply to this topic. On this new page, you fill in the text with a short message and click the Create Post button to create a new post. Once this is done, you’ll be taken to the create action in Forem::PostsController, which will set the flash[:notice] to be “Post has been created!” and then redirect you back to the topic’s page, where you should see First Reply! within a post.
You’ve used a slightly obscure selector syntax here; you’re looking for the #forem_topic element, which contains a #posts element, which itself contains many .forem_post elements, of which you want the last one ![]() . This will indicate to you that on the page, the post that has been created is now at the bottom of the posts listing for
this topic, right where it should be.
. This will indicate to you that on the page, the post that has been created is now at the bottom of the posts listing for
this topic, right where it should be.
Let’s start with running this test using bin/rspec spec/integration/posts_spec.rb. It will get through the first two steps, but fail because it cannot find a Reply link:
Capybara::ElementNotFound:
  no link with title, id or text 'Reply' found
This link needs to go in the app/views/forem/posts/_post.html.erb, and you can do that by using this text and placing it inside the div_for in the file, as that’s where your test is expecting the link to be:
<%= link_to "Reply", new_topic_post_path(@topic) %>
This Reply link will go to the new action within the Forem::PostsController. The nested route helper that you use, new_topic_post_path, will again reference only the engine’s new_topic_post_path because the engine is isolated. To define this route helper and the relevant routes for it, you’ll open config/routes.rb and alter this line
resources :topics
to now be these lines:
resources :topics do
  resources :posts
end
When you re-run your spec, you get this error:
ActionController::RoutingError:
  uninitialized constant Forem::PostsController
You need to generate this controller, which you can do by running this command:
rails g controller posts
Again, this will generate a namespaced controller because you’ve isolated your engine. In this controller, you’re going to need to define a new action, as well as a before_filter to load the topic. You’ll change your Forem::PostsController into what’s shown in the following listing.
Listing 17.11. app/controllers/forem/posts_controller.rb
module Forem
  class PostsController < ApplicationController
    before_filter :find_topic

    def new
      @post = @topic.posts.build
    end

    private

    def find_topic
      @topic = Forem::Topic.find(params[:topic_id])
    end
  end
end
Note that the params[:topic_id] here doesn’t need to be namespaced yet again because you’re isolated. This feature is really saving you a lot of useless typing! Now, with the action defined in the controller, you’re going to need a view too. You’ll define it with a couple of lines in a new file at app/views/forem/posts/new.html.erb:
<h2>New Post</h2>
<%= form_for [@topic, @post] do |post| %>
  <%= render :partial => "form", :locals => { :post => post } %>
  <%= post.submit %>
<% end %>
If, in this example, you used this line to render the partial
{ :post => post } %>
the :locals option would be ignored by render. You must always use the :partial option in conjunction with the :locals option; otherwise it will not work.
With the code in the controller for the before_filter, the new action defined, and the view written, when you run your spec again with bin/rspec spec/integration/posts_spec.rb, you’ll be shown this error:
AbstractController::ActionNotFound:
  The action 'create' could not be found for Forem::PostsController
You now need to define the create action within your Forem::PostsController:
def create
  @post = @topic.posts.create(params[:post])
  flash[:notice] = "Post has been created!"
  redirect_to topic_path(@topic)
end
This action will create a new post for the topic with the non-namespaced parameters that have been passed in, set the flash[:notice], and send the user back to the topic_path(@topic) path. Hey, that’s about all that your test needs, isn’t it? Let’s find out with another run of bin/rspec spec/integration/posts_spec.rb:
1 example, 0 failures
Awesome! That was easy, wasn’t it? You’ve now got a way for users to post replies to topics for your engine in a couple of steps. You repeated a couple of the steps you performed in the last section, but it’s good to have this kind of repetition to enforce the concepts. Additionally, having topics without posts would be kind of silly.
Before you run your specs, RSpec has generated controller tests incorrectly for your application, calling the classes inside the files at spec/controllers/forem/topics_controller_spec.rb and spec/controllers/forem/posts_controller_spec.rb TopicsController and PostsController, respectively. You will need to change these to Forem::TopicsController and Forem::PostsController so that RSpec doesn’t barf when you run your tests. There are also the helpers in spec/helpers and the models in spec/models, which need to undergo similar changes.
Did you break anything? Let’s find out with bin/rspec spec:
2 examples, 0 failures
It doesn’t look like it, and that’s a good thing! Let’s commit this change to provide yourself with a nice little checkpoint:
git add .
git commit -m "Added the ability to reply to posts"
Users of your engine are now able to add replies to topics created by themselves or other users.
You’ve got a nice couple of features going for your engine, but they’re very inclusive. You haven’t yet seen how to use the application’s User model to add authorship to your topics and posts, nor any way of integrating this engine with your Ticketee application. But never fear! That’s what the next two sections are for.
17.7. Classes outside your control
When creating an engine such as this one, you may want to rely on classes from the application. To relate posts and topics to users within the application, you could do this in the models:
belongs_to :user
But what if the concept of users in the application isn’t kept within a User model at all? Then this would break. You could store a couple of common model names, such as User, Person, or Account and check for those, but that’s prone to breakage as well.
Here we’ll cover the theory behind configuration options, which you can use to let your engine know the application’s User model.
17.7.1. Engine configuration
Within this engine you’re going to want to reference the User model from your application so that you are able to attribute posts and topics to whomever has created them. However, there’s a catch: within the application, the model that refers to the user in the system may not be called User! Therefore, you’re going to need to create a way to inform the engine of what this class is called from within the application.
The best way to inform the engine about the User model would be to have a file called config/initializers/forem.rb which will run when the application loads like all other initializers. This file would contain a single line, which would tell the engine what class represents users within this application, like this:
Forem::Engine.user_class = User
This configuration setting will then be maintained by your engine across requests, and you’ll be able to reference Forem::Engine.user_class wherever you need it within your application. To add this setting to the engine, you can use a class-level attr_accessor call within the Forem::Engine class, inside lib/forem/engine.rb:
class << self
  attr_accessor :user_class
end
The class << self syntax is known as a metaclass. The code inside of it defines additional functionality on the class it is contained within. The attr_accessor method defines what’s known as an attribute accessor. This consists of a setter (user_class=) and a getter (user_class), which would usually be accessible on instances of this class. Due to how you’ve defined it, it will now be available on the class rather than the instances. These three lines are the equivalent of this:
def self.user_class=(obj)
  @user_class = obj
end

def self.user_class
  @user_class
end
Writing it using only three lines with a metaclass is definitely much easier!
Your engine shouldn’t run if this variable isn’t set, as it’s a requirement for the Forem::Post and Forem::Topic models to work. Therefore, you should get your engine to raise an exception if this method is called and this @@user_class variable isn’t set.
To make this happen, you’ll first write a test for that behavior in a new file at spec/configuration_spec.rb, using the code from the following listing.
Listing 17.12. spec/configuration_spec.rb
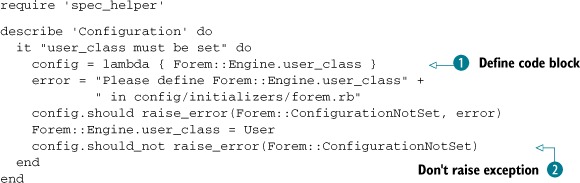
Within this test, you do a couple of new things. First up, you use a lambda ![]() to define a block of code (a Proc object) that you can run later on. After that, you define an error message, which should appear if you don’t have this configuration
setting set. Finally, you get into the meat of your test, asserting that when the config block is called, it will raise an exception with the class of Forem::ConfigurationNotSet and the error message defined earlier in the test.
to define a block of code (a Proc object) that you can run later on. After that, you define an error message, which should appear if you don’t have this configuration
setting set. Finally, you get into the meat of your test, asserting that when the config block is called, it will raise an exception with the class of Forem::ConfigurationNotSet and the error message defined earlier in the test.
Once you set this configuration option to the User class and attempt to reference Forem::Engine.user_class again, you assert that it should not raise that exception ![]() .
.
When you run this test using bin/rspec spec/configuration_spec.rb, it will fail with this error:
uninitialized constant Forem::ConfigurationNotSet
This is because your spec is attempting to reference the exception class before you’ve even defined it! No problem though, you can define this very easily within the lib/forem.rb file by using this code:
class ConfigurationNotSet < StandardError

end
The StandardError class is used for custom errors within Ruby and serves as a great base for this exception. If you run bin/rspec spec/configuration_spec.rb, you’ll see this:
expected Forem::ConfigurationNotSet with
 "[error]" but nothing was raised
When you attempt to grab the user_class setting in your test, it’s not raising this exception when it should. To fix this, you’ll need to redefine the user_class method on the Forem::Engine class by putting this code underneath the attr_accessor line in lib/forem/engine.rb:
def self.user_class
  error = "Please define Forem::Engine.user_class" +
          " in config/initializers/forem.rb"
  @user || raise(ConfigurationNotFound, error)
end
Previously, the user_class method would have returned the @user variable whether or not it was set. In this method, you now define the message that will be shown if this class variable is not set. After that, if the class variable is set then it will be returned by this method, and if not then the ConfigurationNotFound exception will be raised, which seems to be all the criteria needed for your test to pass. Let’s find out by running bin/rspec spec/configuration_spec.rb now:
1 example, 0 failures
Great! That’s all passing. You’ve now got a class-level user_class method that you can set up in any applications that use this engine, so that you can notify the engine of the class that represents users within the application. If this setting is not set by the application by the time the engine gets around to referencing it, then the ConfigurationNotFound exception will be raised, informing the owner of the application that they need to set this variable up in config/initializers/forem.rb.
Let’s now set up the User model within your dummy application so that you can use this setting.
17.7.2. A fake User model
Your engine has been deliberately designed to have no concept of authentication. This is so it can be used with any application, independent of whatever authentication system the application uses, be it Devise (which is what your main application uses) or something else. In this section and the ones following, you’re going to be associating topics and posts to users so that you know who’s been posting what. In order to this, you’re going to need to generate a dummy User model.
When you have this model correctly set up, you’ll use it to restrict access to the new topic and new post actions to only logged-in users, as well as using it to assign ownership to posts and topics. You’ll be able to do this using the current_user made available by the host application. It will be accessible in your engine’s controllers, as Forem::ApplicationController inherits from ApplicationController.
To generate this new User model, you’re going to have to run the generator from within the spec/dummy directory. This is so the generator will place the model code within the dummy application and not your engine. You don’t need anything on this User model besides a login field, which you’ll be using as the display value a little later on by defining a to_s method inside this class. Within the spec/dummy directory, run this command:
rails g model user login:string
To run the migration for this model, run rake db:migrate inside the spec/dummy directory as well.
In this fake model, you’re going to need to define the to_s method your engine will use to display the user’s name. Right now your users table only has a login field, and so you’ll return that:
class User < ActiveRecord::Base
  def to_s
    login
  end
end
With the fake model generated and the to_s method defined in it correctly, the only thing left to do is to set up the initializer in your dummy application. Create a new file at spec/dummy/config/initializers/forem.rb with this simple line:
Forem::Engine.user_class = User
That is all the preparation you need to do to notify your engine of this class. To make your engine use this class, you’ll put this line in both the class definitions of app/models/forem/post.rb and app/models/forem/topic.rb:
belongs_to :user, :class_name => Forem::Engine.user_class.to_s
This line will now reference the setting that’s configured by config/initializers/forem.rb, thereby relating your posts and topics from your engine to the User class within the application, forming a lovely bridge between the two.
Next, you’ll apply what you’ve done here to associate the users who are signed in with the topics they post. This is so people will be able to see who posted what.
17.7.3. Authenticating topics
By having a belongs_to :user association on the Forem::Post and Forem::Topic models, you’ll be able to assign users to topics and posts when they create them so that other users can know who’s been posting what.
You’ve got, on purpose, no authentication in your dummy application at the moment, and so you’ll have to take a shortcut around this. Usually an application would provide a current_user method that returns a User object, but your dummy application doesn’t do this right now. You need this method to sometimes return a user object (like with actions that require authentication), and to sometimes return nil.
A cool way to do this would be to dynamically redefine the current_user method yourself. A way to do this is to have two methods that you can call in your tests—a sign_in! method and a sign_out! method—which will redefine the current_user method in ApplicationController to either return the user object or nil, respectively. You’ll also make this method a helper method by using the helper_method method, which is available in all controllers. This will mean that your fake current_user method can then be referenced by the controllers and views of your engine without any problems.
Define these two new methods in a new file at spec/support/dummy_login.rb using the code shown in the following listing.
Listing 17.13. spec/support/dummy_login.rb
def sign_out!
  ApplicationController.class_eval <<-STRING
    def current_user
      nil
    end

    helper_method :current_user
  STRING
end

def sign_in!(options={})
  ApplicationController.class_eval <<-STRING
    def current_user
      User.find_or_create_by_login("forem_user")
    end

    helper_method :current_user
  STRING
end
When you call the sign_out! method in your tests, it will call the Forem::ApplicationController.class_eval method, which will redefine the current_user to return nil. When you call the sign_in! method, it will find a User record with its login set to forem_user; if it can’t do that, it will create one instead. This will then be the object that is returned when you reference current_user in your application.
The next function you’re going to add to your engine is one that will redirect users who aren’t logged in when they attempt to access the new action in Forem::TopicsController. Your test will also test that an unauthenticated user can’t see the New Topic link on theForem::TopicsController’s index action. You’ll add this spec in spec/integration/topics_spec.rb by using the code in the following listing.
Listing 17.14. spec/integration/topics_spec.rb
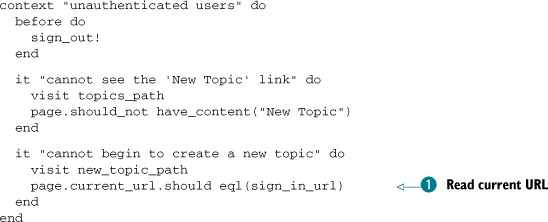
In the before block of this new context, you call the sign_out! method, which will set up the crucial current_user method that this test depends on. If it wasn’t defined, then you’d get an undefined method when current_user attempted to access it.
In this spec, you use page.current_url ![]() to read what the current URL is; it should match whatever main_app.sign_in_path’s method points at. Remember: this is the sign_in_path method, which is made available in the application by a definition in its config/routes.rb file. This is not currently set
up, and so you’ll do that later.
to read what the current URL is; it should match whatever main_app.sign_in_path’s method points at. Remember: this is the sign_in_path method, which is made available in the application by a definition in its config/routes.rb file. This is not currently set
up, and so you’ll do that later.
First, let’s see what the output has to say about your first test when you run bin/rspec spec/integration/topics_spec.rb:25:
Failure/Error: page.should_not have_content("New Topic")
  expected #has_content?("New Topic") to return false, got true
You’re asserting in your test that an unauthenticated user cannot see the New Topic link, but they do. You can go into app/views/forem/topics/index.html.erb and change this line
<%= link_to "New Topic", new_topic_path %>
to these lines:
<% if current_user %>
  <%= link_to "New Topic", new_topic_path %>
<% end %>
When you run this example again with bin/rspec spec/integration/topics_spec.rb:25, you’ll see that it now passes:
1 example, 0 failures
One down, two to go. Let’s run the next spec down in this file with bin/rspec spec/integration/topics_spec.rb:30. When you do, you’ll see this output:
NoMethodError:
 undefined local variable or method `sign_in_url' for ...
Your test currently can’t find the sign_in_path helper for your dummy application. You can define the helper by putting this line in spec/dummy/config/routes.rb:
match "/sign_in", :to => "fake#sign_in", :as => "sign_in"
When you run your test again with bin/rspec spec/integration/topics_spec.rb:30, you’ll be shown this:
expected "http://www.example.com/login"
     got "http://www.example.com/forem/topics/new"
The page expected to be on /login, but was actually on /forem/topics/new! That’s because you’re not yet authenticating users when they go to the new action in Forem::TopicsController. You can add a before_filter to the class definition in app/controllers/forem/topics_controller.rb using this code:
before_filter :authenticate_forem_user!, :only => [:new, :create]
You’ll put this authenticate_forem_user! method definition inside Forem ::ApplicationController so that you can use it for all the controllers of your engine. It’ll go like this:

Now when you visit your new or create actions in Forem::TopicsController, you’ll be sent away to the login path for your application, which you can access by calling sign_in_path on the main_app helper ![]() . You must use main_app here so that you point to the application’s routes rather than the engine’s. The engine itself has no concept of sign_in_path.
. You must use main_app here so that you point to the application’s routes rather than the engine’s. The engine itself has no concept of sign_in_path.
When you run your spec again with bin/rspec spec/integration/topics_spec.rb:30, you’ll see that this test is now failing because your application is missing the FakeController that your sign_in_path route uses:
ActionController::RoutingError:
  uninitialized constant FakeController
You don’t need this controller to do much more than sit there and look pretty. Oh, and it needs to have a login action that responds in an OK fashion too. Let’s define this controller in your dummy application by creating a new file at spec/dummy/app/controllers/fake_controller.rb and putting this content inside it:
class FakeController < ApplicationController
  def sign_in
    render :text => "Placeholder login page."
  end
end
This action will now render the text “Placeholder login page,” thereby returning that OK status you’re after, as well as some helpful text to indicate where you’re at. When you run bin/rspec spec/integration/topics_spec.rb, you’ll see that it passes:
1 example, 0 failures
This means now that any user attempting to access the new action in the Forem::TopicsController will be redirected to the login page. What happens when you run the whole spec file? Let’s find out with bin/rspec spec/integration/topics_spec.rb:
ActionView::Template::Error:
  undefined method `current_user' for #<Forem::TopicsController:...>
  ...
  # ./spec/integration/topics_spec.rb:21:in ...

3 examples, 1 failure
Your final spec in this file is failing with an undefined method current_user, because you’re not calling sign_in! before it. Move this code into its own context with a before like the other two tests have, using the code shown in the following listing.
Listing 17.15. spec/integration/topics_spec.rb
context "authenticated users" do
  before do
    sign_in!
  end

  it "creating a new one" do
    visit topics_path
    click_link "New Topic"
    fill_in "Subject", :with => "First topic!"
    fill_in "Text", :with => "First post!"
    click_button "Create Topic"

    within "#flash_notice" do
      page.should have_content("Topic has been created!")
    end

    within ".forem_topic #posts .forem_post" do
      page.should have_content("First post!")
    end
  end
end
When you run the whole spec with bin/rspec spec/integration/topics_spec.rb one more time, all three examples should pass:
3 examples, 0 failures
You’ve now got your engine using the concept of a current user from the application so that it can authorize users to perform certain actions when they’re logged in. Are all the tests working still? A quick bin/rspec spec will tell you:
ActionView::Template::Error:
  undefined method `current_user' for #<Forem::TopicsController:...>
  ./spec/integration/posts_spec.rb:11:...
Finished in 1.16 seconds
6 examples, 1 failure
It would appear your spec/integration/posts_spec.rb test is failing because current_user isn’t defined. You can fix this very quickly by throwing a sign_in! call in the before, turning it from this
before do
  @topic = Forem::Topic.new(:subject => "First topic!")
  @topic.posts.build(:text => "First post!")
  @topic.save!
end
into this:
before do
  @topic = Forem::Topic.new(:subject => "First topic!")
  @topic.posts.build(:text => "First post!")
  @topic.save!
  sign_in!
end
When you run your specs again, they’ll all pass:
4 examples, 0 failures
Great success! Now it’s time to commit:
git add .
git commit -m "Use application authentication to block
               unauthenticated users from creating topics"
Now that you’ve got an easy way to restrict access to the creation of new topics to only authenticated users, you can be sure you’re always going to have a current_user object that you can use to associate users with topics. With this in mind, you’re going to set the topic’s and its first post’s user when you create a topic.
17.7.4. Adding authorship to topics
You’ll now associate topics and users. To make sure that this will work, add these lines to the example within the authenticated context in spec/integration/topics_spec.rb:
within ".forem_topic #posts .forem_post .user" do
  page.should have_content("forem_user")
end
This is the element in which you’ll be displaying the user on the page, with the content being the name of the user that you set up in the sign_in! method. This user association is actually going to be set both on the topic and its first post. Right now this element doesn’t exist, and so if you were to run this test it would fail.
Your first step is to associate the topic to a user when you create the topic in Forem::TopicsController. You can do this by changing this line of the create action
@topic = Forem::Topic.create(params[:topic])
to these two lines:
params[:topic].merge!(:user => current_user)
@topic = Forem::Topic.create(params[:topic])
This will set up the user association for the topic, passing it through with the other parameters inside params[:topic]. This will not set up the first post for this topic to have this user associated, which is what you need in order to make your test pass. To do this, create a before_save callback in the Forem::Topic by using the code from the following listing, placing it under the accepts_nested_attributes_for :post line in the model.
Listing 17.16. app/models/forem/topic.rb
before_save :set_post_user

private
  def set_post_user
    self.posts.first.user = self.user
  end
With the user association now set for a topic’s first post, you can display the user’s name along with the post by putting this line under the small tag already in app/views/forem/posts/_post.html.erb:
<small class='user'>By <%= post.user %></small>
Here you use Forem::Engine.user_name, which is the method that you use to display the user’s name. In this case, it would display the login attribute. When you run bin/rspec spec/integration/topics_spec.rb, all your tests will pass:
3 examples, 0 failures
That was easy! When a topic is created, the topic and its first post will now belong to the user who created it. Remember: your User model is in another castle, or rather, it is in your application, and so this is very cool.
Now you’ll need to check that users are logged in before they create posts too, and then associate the posts to the users upon creation.
17.7.5. Post authentication
You’ve got the authenticate_forem_user! method defined in the Forem ::ApplicationController, and so it’s available for all controllers that inherit from it. This includes Forem::TopicsController, where you just used it, and Forem::PostsController, where you are about to use it to ensure that users are signed in before being able to create new posts.
Before you use this method, you’ll add a test to the spec/integration/posts_spec.rb to check that a user cannot access the new action if they aren’t signed in, and it will fail because you’re not using it yet.
You’re going to have two context blocks in your spec, one for unauthenticated users and the other for authenticated users. You can share the before block between these two contexts if you take the sign_in! method out and turn your spec into what’s shown in the following listing.
Listing 17.17. spec/integration/posts_spec.rb
require 'spec_helper'

describe "posts" do
  before do
    @topic = Forem::Topic.new(:subject => "First topic!")
    @topic.posts.build(:text => "First post!")
    @topic.save!
  end

  context "unauthenticated users" do
    before do
      sign_out!
    end
  end

  context "authenticated users" do
    before do
      sign_in!
    end

    it "reply to a topic" do
      ...
    end
  end
end
With the before block now run before both of your contexts, you’ll have the @topic object available in both of them. In the “unauthenticated users” context block, you’ll write your test for the unauthenticated new action access under the before block, using the code from the following listing.
Listing 17.18. spec/integration/posts_spec.rb
it "cannot access the new action" do
  visit new_topic_post_path(@topic)
  page.current_url.should eql(sign_in_url)
end
Because you don’t have the before_filter :authenticate_forem_user! line in Forem::PostsController when you run this spec using bin/rspec spec/integration/posts_spec.rb:15, you’ll get this:
expected "http://www.example.com/login"
  got "http://www.example.com/forem/topics/[id]/posts/new"
With your test in place, you can add the before_filter line at the top of your class definition in app/controllers/forem/posts_controller.rb:
before_filter :authenticate_forem_user!, :only => [:new, :create]
When you run your example again with bin/rspec spec/integration/posts_spec.rb:15, this time it’ll pass:
1 example, 0 failures
What happens when you run bin/rspec spec/integration/posts_spec.rb though?
2 examples, 0 failures
This is passing also, which is great to see! Right now though, posts do not belong to users when they are created, and so when you go to display a user’s name for a reply post, nothing will appear. In order to fix this, you’ll copy over the final couple of lines you put in spec/integration/topics_spec.rb and put them at the bottom of the “reply to topic” example you have in spec/integration/posts_spec.rb:
within ".forem_topic #posts .forem_post:last .user" do
  page.should have_content("forem_user")
end
Like last time, you’re asserting that you can see the user’s name within the final post on the page, which you can find using the within method. When you run this test using bin/rspec spec/integration/posts_spec.rb, it will fail because it cannot see the user’s name on the page:
Failure/Error: page.should have_content("forem_user")
  expected #has_content?("forem_user") to return true, got fals
Now that you have a test ensuring that this behavior is indeed not yet implemented, let’s fix it up. First, you’re going to need to change the before block in your test to set up a user for the first post that it creates, changing it into this:
before do
  @user = User.create!(:login => "some_guy")
  @topic = Forem::Topic.new(:subject => "First topic!", :user => @user)
  @topic.posts.build(:text => "First post!")
  @topic.save!
end
That will solve it for the first post on this page, but you also care about the new post that you’re creating. You can fix this one by changing this line in the create action in app/controllers/forem/posts_controller.rb
@post = @topic.posts.create(params[:post])
params[:post].merge!(:user => current_user)
@post = @topic.posts.create(params[:post])
We’re putting this on separate lines to make the second line a little shorter for readability. When you run bin/rspec spec/integration/posts_spec.rb again, you’ll see that it all passes:
2 examples, 0 failures
Now you’re authenticating users before they can create new posts, and then assigning them as the user when they’re authenticated. That means you’re done here and should run all the specs to make sure everything works with a quick run of bin/rspec spec. You should see this:
7 examples, 0 failures
Good to see! Let’s make a commit:
git add .
git commit -m "Authenticate users and link them to posts"
You’ve now got a pretty good starting feature set for your engine. Users are able to create topics and posts, but only if they’re authenticated in the parent application, and that’s a good start. You could generate further features, such as editing topics and posts, but that’s an exercise best left to you.[20]
20 Additionally, this is a long enough chapter already!
One thing you’ve still got left to do is fix up the second placeholder in app/views/topics/index.html.erb, which shows the last post for a topic. You’ll do this now; it’ll only take a moment.
17.7.6. Showing the last post
Currently in app/views/topics/index.html.erb you have this line:
<td id='last_post'>last post was at TIME by USER</td>
It would be extremely helpful to your users if this returned useful information rather than a placeholder. You’ve finished linking posts and users, and so now is a great time to fix this placeholder up.
To begin with, you’re going to add a test to spec/integration/posts_spec.rb to ensure that you do indeed see the last post’s information. It’s the same function displayed to unauthenticated users as it is authenticated users, but you’re going to need current_user set by either sign_out! or sign_in!. Therefore, you’ll put this test inside the context "unauthenticated users" block to make things easy. The code for this test is shown in the following listing.
Listing 17.19. spec/integration/posts_spec.rb
it "should see the post count and last post details" do
  visit topics_path
  within "#topics tbody td#posts_count" do
    page.should have_content("1")
  end

  within "#topics tbody td#last_post" do
    page.should have_content("last post was less than a minute ago
    by some_guy")
  end
end
by some_guy")
end
end
This test ensures that the post count is showing the correct number of posts and that the last post details are displayed correctly. When you run this spec, it will pass the first assertion because of the posts count you set up a little earlier,[21] but it fails on the last assertion because it cannot find the content you’ve specified:
21 Naughty of us not to write tests back then, but sometimes this happens.
Failure/Error: page.should have_content("[content]")
  expected #has_content?("[content]") to return true, got false
The first part of your content is “last post was less than a minute ago.” Let’s focus on getting this working. There’s a helper within Rails that can help you display this “less than a minute ago” text called time_ago_in_words. Let’s assume that you’ve got a method called last_post that returns the last post for now. You’ll define it later. You can use the time_ago_in_words helper within the last post table cell in app/views/forem/topics/index.html.erb:
<td id='last_post'>
  last post was <%= time_ago_in_words(topic.last_post.created_at) %> ago
</td>
This time_ago_in_words helper will display a humanized version of how long ago the post was. When you first create the post, the text would read “less than a minute ago,” as this is the smallest granularity that this helper provides.
Before your test will pass, you’re going to need the other half of this line. At the end of the %> on the line you just wrote, add this:
by <%= topic.last_post.user %>
This first uses a new method that you’ll define shortly on the Forem::Topic model called last_post, which will return the last post for this topic. Then, you’ll display who posted that post by calling user on that object.
When you run your test again, this time it will fail because the last_post method on topic is only defined in your imagination:
ActionView::Template::Error:
  undefined method `last_post' for #<Forem::Topic:0x00000100cfb498>
It’s time this method moved out of your imagination and into your engine. This method needs to return the last post for your topic, and because the topic_id lives on the posts table and you’re wanting only one of these posts, this is a great opportunity to use a has_one association.
This association needs to find the chronological last post for your topics; you can do this by defining this association in app/models/forem/topic.rb like this:
has_one :last_post, :class_name => "Forem::Post",
                    :order => "created_at DESC"
The class_name option you’ve used before; it tells Rails that objects of this association are of that class, rather than the inferred class, which is a constantized version of the association name. In this case, that would be LastPost. The :order option, however, will order the posts by the created_at field in reverse chronological order. The has_one method will then execute this query and limit the results to one, returning only the first post.
With the association defined, you can re-run your test and see it passing:
1 example, 0 failures
You’ve now got a test that covers that a user can see the posts counter and the last post information on the topics page for a topic, which proves that this feature is working. Let’s run all the RSpec tests to make sure that everything’s working with bin/rspec spec:
6 examples, 0 failures
Great, everything’s good. Time for a commit:
git add .
git commit -m "Add last post information to topics index"
This has been quite a long section and we’ve covered a lot of ground. The purpose of this section was to demonstrate how you could reference classes outside your control, such as those in the application or found in other engines. We opted for configuration options for some of the options, and a module for others.
You then asked users to authenticate before they could create new topics and posts, and after that you linked your engine’s classes’ objects to the objects from an application’s class. This is kind of a big deal, as it shows that an engine is able to interact with an application without extravagant modification of the application’s code.
Finally, you fixed up your topics index view to display information from these linked-in classes.
This has been only the beginning of linking your application and engine. In the final sections of this chapter, you’ll see how you can release your engine as a gem and how you can integrate it into your application so that the users of Ticketee have a forum system they can use.
17.8. Releasing as a gem
By releasing your engine as a gem, you’ll make it publicly available for anybody to download from http://rubygems.org. This will also allow you to share this engine across multiple applications. If people wish to use your engine, they would be able to put this line in their Gemfile of their application:
gem 'forem'
Then they would need to go about configuring the application to have a config/initializers/forem.rb file with the proper configuration options (only Forem::Engine.user_class for now, but possibly others). You’d usually put these steps in a README file at the root of the engine.[22]
22 This is so when you put it in GitHub, people will have a clear way of seeing what this engine’s good for and how they can use it.
To release your engine as a gem, you can use Bundler. Bundler provides some gem-management tasks in the form of Rake tasks that allow you to build your gem (basically, zip it up into a .gem file),[23] install the gem locally, and release it.
23 Yup, .gem files are actually .zip files.
To make these tasks available for your engine, you can put this line at the bottom of your Rakefile:
Bundler::GemHelper.install_tasks
When you run rake -T, you’ll see that you’ve got a few tasks for your engine, some of which you’ve already used. This line that you’ve put in the Rakefile will add the build, install, and release rake tasks.
Before you can release your gem, you must give it a unique name. To do this, you’ll go into your application and rename forem.gemspec to your-name-forem.gemspec[24] to make it unique. Then inside this file, you’ll need to change this line
24 A wise decision here would be to use your GitHub username, as that’s bound to be unique, compared to your first name which is most likely not.
s.name = "forem"
to have the same name as the gemspec:
s.name = "your-name-forem"
Now you’re ready to release your gem. Let’s run the rake build task first and see what does:
(in /Users/ryanbigg/Sites/book/forem)
your-name-forem 0.0.1 built to pkg/your-name-forem-0.0.1.gem
This command has built your gem and put it in a new directory called pkg. This new gem can be installed using gem install pkg/your-name-forem-0.0.1 if you wish, but there’s a problem: this gem doesn’t contain all your files.
At the moment, the gem only contains the files specified by this line in your-name-forem.gemspec:
s.files = Dir["lib/**/*"] + ["MIT-LICENSE", "Rakefile", "README.rdoc"]
This line will only include files from the lib directory, as well as the MIT-LICENSE, Rakefile, and README.rdoc files. But you’ve got much more than that in your application, such as the app folder for starters! To fix this little problem, you’ll replace that line with this one:
s.files       = `git ls-files`.split("
")
This will add all the files that have been added to your Git repository to the gem. When you run rake build again, it will create your gem with all the files.
You’ll also need to set up some authors for your gem, which you can do by putting this line underneath s.version in the forem.gemspec:
s.authors = ["[email protected]"]
The next task you can run is rake install. This can be run without having rake build first, as it will run the build code first, then install. This will actually install the gem onto your system so that you can use it. That’s all well and good, but you want to show off your stuff to the world!
That’s what rake release is for. This command will create a git tag for your current commit, then call git push to push your changes online. Next, it will call gem push, which will publish your gem to http://rubygems.org. You may have to set up an account on RubyGems.org first, though.
Once this is done, your gem is released out into the world as version 0.0.1. To bump the version, you need only to alter this line in your-name-forem.gemspec:
s.version = "0.0.1"
It’s sensible to increment the last part of this number for minor corrections, such as typos or bug fixes, the middle part for minor breaking changes and additional feature releases, and the major version for major breaking changes or to represent the solidifying of the API.
With your gem now live and out there, you can use it in your application. Exciting times!
17.9. Integrating with an application
Now you get to the best part of this chapter: linking Ticketee, your Rails application that you’ve built throughout the earlier chapters of this book, to the engine that you have just written, forem. This is a pretty easy process.
The first thing you’re going to need is to add forem to your application’s Gemfile with this line:
gem 'your-name-forem', :require => "forem"
Then you’ll need to run bundle install to install the gem. To install the migrations for this gem, you’ll need to run this command:
rake forem:install:migrations
This task actually copies across the engines migration into the application’s db/migrate directory, with the first migration having a timestamp of the current second, the next migration having it one second in the future, and so on. This is so the engine’s migrations are inserted after the current application’s migrations and maintain the same order that they have in the engine. If you update the engine later on, you’ll have to run this task again. To install these migrations, you’ll run this:
rake db:migrate
After this, you’ll need to mount the engine in your application’s config/routes.rb, which you can do with this:
mount Forem::Engine, :at => "/forem"
You saw this line in your spec/dummy/config/routes.rb file earlier. Mounting your engine will make its routes available to the specified path. If you launch rails server now and go to http://localhost:3000, you’ll be shown this error:
Please define Forem::Engine.user_class in config/initializers/forem.rb
You should follow the advice for this error and define Forem::Engine.user_class within the application’s config/initializers/forem.rb, as you need to tell the engine what the user class is:
Forem::Engine.user_class = User
Because you’ve created a new initializer, you’ll need to restart the rails server that is currently running so that Rails re-evaluates the files in the config/intializers directory. When you do this and refresh the page, you’ll see this error:
undefined local variable or method `admin_root_path' ...
This is happening because your engine is using the application’s layout and is trying to reference admin_root_path method from inside the engine, rather than the one that’s defined in the application. To fix this, you’ll need to first call main_app for these routing helpers and then call the helpers on that. You need to change the root_path, admin_root_path, destroy_user_session_path, new_user_registration_path, and new_user_session_path helpers in the app/views/layouts/application.html.erb file to all have the main_app. prefix on them.
These are all the changes you need to make in order to integrate your engine with your application. Click around a bit and try it out!
17.10. Summary
In this very long chapter we’ve covered quite the gamut! We’ve gone through the theory first of all, the history of engines, and why they’re useful. After that, you saw the layout of one and how the routing for an engine works.
You then spent the rest of the chapter creating your own engine called forem, which provides the basic functionality of a forum: topics and posts.
We got into the nitty-gritty of adding configuration options to your engine, as well as a module called Forem::UserExtensions, which configured the two models in your engine with new associations. This module is exceptionally interesting, as it allows you to configure the engine’s behavior regardless of the class that it’s included into.
We then covered releasing your engine as a gem, which is the best way to get it out into the world.
In the final chapter, we look at how you can write lightweight applications using Rack and Sinatra, and hook them into your Rails application. In Rails 3, that’s become easier than ever to do.