
Chapter 18. Rack-based applications
- Building a basic Rack application
- Tying together Rack applications
- Mounting a Rack app within a Rails app
- Using Rack middleware to alter server response
So far, this book has primarily focused on how to work with pieces of the Rails framework, such as application and engines. In this chapter, we’ll look at how you can use Rack-based applications to respond more quickly than what you’d otherwise be capable of with your main application.
Rack is the underlying web server framework that powers the underlying request/response cycle found in Rails, but it isn’t a part of Rails itself. It’s completely separate, with Rails requiring the parts of Rack it needs. When your application is running, it’s running through a web server. When your web server receives a request, it will pass it off to Rack, as shown in figure 18.1.
Figure 18.1. Application request through the stack
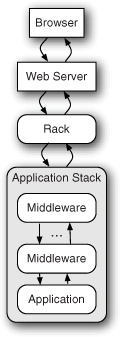
Rack then determines where to route this request, and in this case it has chosen to route to a specific application stack. The request passes through a series of pieces called middleware (covered in the final section of this chapter) before arriving at the application itself. The application will then generate a response and pass it back up through the stack to Rack, and then Rack will pass it back to the server, which will finally pass it back to the browser. All of this happens in a lightning quick fashion.
Separating Rack from Rails not only reduces bloat in the framework, but also provides a common interface that other frameworks can use. By standardizing the request/response cycle, applications that are built on top of Rack can interact with one another. In this chapter, you’ll see how you can do this by making your Rails application work with applications built using Rack, but not Rails.
You’ll build some Rack applications in this chapter that aren’t Rails applications but will work just as seamlessly. You’ll learn how Rack provides the request/response cycle underneath Rails and other Ruby frameworks, and learn how to build your own small, lightweight Rack-based applications.
With these lightweight applications crafted, you’ll then create one more application that will re-implement the tickets API functionality you first created in chapter 13, using another Rack-based web framework called Sinatra. You’ll then mount this Sinatra application inside your Rails application using methods that Rails provides. This will provide an apt example of how you’re able to interact with classes from your Rails application from within a mounted Rack application.
Finally, we’ll take a look at middleware within both the Rack and Rails stacks, and you’ll learn how to use it to your advantage to manipulate requests coming into your application.
All Rack-based applications work the same way. You request a URL from the application, and it sends back a response. But it’s what goes on between that request and the response that’s the most interesting part. Let’s create a basic Rack application now so that you can understand the basics.
18.1. Building Rack applications
Rack standardizes the way an application receives requests across all the Ruby frameworks. With this standardization, you know that any application purporting to be a Rack application is going to have a standard way for you to send requests to it and a standard way of receiving responses.
You’re going to build a basic Rack application so that you can learn about the underlying architecture for requests and responses found in Rails and other Ruby frameworks. With this knowledge, you’ll be able to build lightweight Rack applications that you can hook into your Rails stack, or even Rack middleware.
When you’re content with the first application, you’ll create another and then make them work together as one big application. First things first, though.
18.1.1. A basic Rack application
To build a basic Rack application, you only need to have an object in Ruby that responds to the call method. That call method needs to take one argument (the request) and also needs to return a three-element Array object. This array represents the response that will be given back to Rack, and looks something like this:
[200, { "Content-Type" => "text/plain"}, ["Hello World"]]
The first element in this response array is the status code for your response. In this case, it’s 200, which represents a successful response. You had a bit of a play with status codes back in chapter 13 when you were building your API, so these should be no mystery at this point.
The second element in this array are the headers that will be sent back. These headers are used by the browser to determine how to deal with the response. In this case, the response will be rendered as-is to the page because the Content-Type header is text/plain, indicating normal text with no formatting applied. Usually your Rack application would set this to text/html to indicate an HTML response.
Finally, the third element represents the response body, which is sent back along with the status code and headers to Rack. Rack then compiles it all into an HTTP response, which is sent back to where the request came from.
Let’s see this in action now. You’re going to create a light Rack application that responds with “Hello World” whenever it receives a request. This kind of application is often used to check and see if a server is still up and responding to HTTP calls. You’ll create a new file inside your Ticketee’s application’s lib called lib/heartbeat.ru (you’re checking the “heartbeat” of the server) and fill it with this content:
run lambda { |env| [200, {'Content-Type' => 'text/plain'}, ['OK']] }
Your Rails application also has one of these .ru files, called config.ru, which is used by Rack-based servers to run your application. You can see this in action by running the rackupconfig.ru command, which will start up your application using the config.ru file’s configuration.
If you look in this file, you’ll see these lines:
# This file is used by Rack-based servers to start the application.
require ::File.expand_path('../config/environment',  __FILE__)
run Ticketee::Application
The first line requires config/environment.rb for the application, which is responsible for setting up the environment of the application. Then it uses the run method—just as you are—except it’s passing Ticketee::Application, which actually responds to call.
Cool stuff.
The .ru extension for this file represents a Rack configuration file, also known as a Rackup file. In it, you call the run method, which needs an object that responds to call. When Rack receives a request to this application it will call the call method on the object passed to run, which will then generate and return a response back to the server. The object in this case is a lambda (or Proc) object, which automatically responds to call.
When the call method is called on this lambda, it will respond with the three-element array inside it, completely ignoring the env object that is passed through. Inside this array, you have the three elements Rack needs: the HTTP status, the headers for the response, and the body to return.
To see your lib/heartbeat.ru in action, you can launch a Rack server by using the command you saw in the sidebar:
rackup lib/heartbeat.ru
This is now running a server on 9292 (the standard port for Rack) using the built-in-to-Ruby WEBrick HTTP server, as indicated by the server output you’ll see:
[timestamp] INFO WEBrick 1.3.1
...
[timestamp] INFO WEBrick::HTTPServer#start: pid=... port=9292
You can now go to your browser and open http://localhost:9292 to make a request to this application. You’ll get back “Hello World,” and that’s okay. You can also make a request to any path at the http://localhost:9292 application and it will respond in the same way, such as http://localhost:9292/status.
What you’ve done here is write one of the simplest Rack applications possible. This application receives a response to any path using any method, and always responds with OK. This application will respond very quickly because it hasn’t loaded anything, but at the cost of being a one-trick pony.
You can make this little application respond differently in a number of ways. The easiest (and most fun!) would be to program it to change its response depending on the path it’s given, like a Rails application does. For this, you’ll use the env object. First up, let’s see what this env object gives you by changing your script to do this:
require 'yaml'
run lambda { |env| [200,
  {'Content-Type' => 'text/plain'},
  ["#{env.to_yaml}"]]
}
The to_yaml method provided by the yaml standard library file will transform your env object (spoilers: it’s a Hash) into a human-readable YAML output (like that found in config/database.yml in a Rails application).
To make this new change apply, you can’t refresh the page like you would in a Rails application; you have to stop the server and start it again. You can press Ctrl+C to stop it, and rerun that command. This time when you go to your server, you’ll see output that looks like this:
---
GATEWAY_INTERFACE: CGI/1.1
PATH_INFO: /
QUERY_STRING: ""
REMOTE_ADDR: 127.0.0.1
REQUEST_METHOD: GET
REQUEST_URI: http://localhost:9292/
...
This output is the YAML-ized version of the env hash, which comes from Rack itself. Rack parses the incoming request and provides this env hash so that you can determine how you’d like to respond to the request. You can alter the behavior of the request using any one of the keys in this hash,[1] but in this case you’ll keep it simple and use the PATH_INFO key.
1 Yes, even the HTTP_USER_AGENT key to send users of a certain browser elsewhere.
A lambda is great for one-liners, but now your Rack application is going to become more complex, and so you’ve probably outgrown the usefulness of a lambda. You don’t have to use a lambda though, you only need to pass run an object that has a call method that responds with that three-element array. Your new code will be a couple of lines long, and so it’s probably best to define it as a method (called call) on an object, and what better object to define it on than a class?
A class object would allow you to define other methods, and can be used to abstract chunks of the call method as well. For good measure, let’s call this class Application and put it inside a module called Heartbeat, as shown in the following listing:
Listing 18.1. lib/heartbeat.ru
module Heartbeat
  class Application
    def self.call(env)
      [200, {'Content-Type' => 'text/plain'}, ["Hello World"]
    end
  end
end

run Heartbeat::Application
Here you’ve defined the Heartbeat::Application to have a call method, which once again returns OK for any request. On the final line, call run and pass in Heartbeat ::Application, which will work like your first example because Heartbeat ::Application has a call method defined on it. If this looks familiar, it’s because there’s a similar looking line in your application’s config.ru file that you saw earlier:
run Ticketee::Application
Your Rails application is actually a Rack-based application! Of course, there’s a little bit more that goes on behind the scenes in your Rails application than in your Rack application at the moment, but the two are used identically. They both respond in nearly identical ways with the three-element response array. Your Rack application is nearly the simplest form you can have.
Let’s change your Heartbeat application now to respond differently to different request paths by referencing the PATH_INFO key within env. You’ll replace the code inside your call method with this:
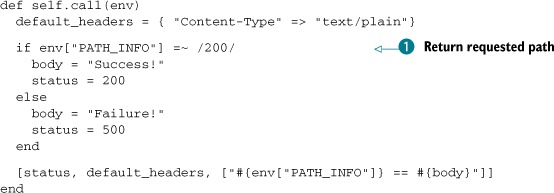
The env["PATH_INFO"] ![]() here returns the path that has been requested. If you made a request like http://localhost:9292/books to your Rack application,
this variable would return /books. You compare this string to a regular expression using the =~ operator, and if it contains 200, you’ll return “Success” in the body along with an HTTP status of 200. For everything else, it’s “Failure” with an HTTP status of 500.
here returns the path that has been requested. If you made a request like http://localhost:9292/books to your Rack application,
this variable would return /books. You compare this string to a regular expression using the =~ operator, and if it contains 200, you’ll return “Success” in the body along with an HTTP status of 200. For everything else, it’s “Failure” with an HTTP status of 500.
Let’s restart the server once again and then make a new request to http://localhost:9292. You’ll see this output:
/ == Failure!
This is because for any request to this server that doesn’t have 200 in it, you’re returning this message. If you make a request to http://localhost:9292/200 or even http://localhost:9292/this/is/a/200/page, you’ll see the success message instead:
/this/is/a/200/page == Success!
Also, if you look in the console you can see a single line for each request that’s been served:
127.0.0.1 - - [[timestamp]] "GET / HTTP/1.1" 500 - 0.0004
127.0.0.1 - - [[timestamp]] "GET /200 HTTP/1.1" 200 - 0.0004
127.0.0.1 - - [[timestamp]] "GET /this/is/a/200/page HTTP/1.1" 200 - 0.0004
This output shows the IP where the request came from, the local time the request happened, the request itself, the HTTP status contained within the response, and finally how long the page took to run. For the first request, it returned a 500 HTTP status, and for the other two requests that contained 200 in their paths, it returned a 200 HTTP status.
What you’ve done here is implement a basic router for your Rack application. If the route for a request contains 200, then you give back a successful response. Otherwise, you give back a 500 status, indicating an error. Rails implements a much more complex routing system than this, extracting the complexity away and leaving you with methods such as root and resources that you use in config/routes.rb. The underlying theory is the same though.
You’ve learned the basics of how a Rack application works and gained an understanding that your Rails application is a bigger version of this little application you’ve written. There’s much more to Rack than providing this abstraction for the underlying request/response cycle. For example, you can build more complex apps with logic for one part of the application in one class and additional logic in another.
One other feature of Rack is the ability to build applications by combining smaller applications into a larger one. You saw this with Rails when you used the mount method in your application’s config/routes.rb to mount the engine you developed in chapter 17. Let’s see how you can do this with Rack.
18.2. Building bigger Rack applications
Your basic Rack application quickly outgrew the lambda shell you placed it in, and so you moved the logic in it into a class and added some more. With the class, you’re able to define a call method on it, which then returns the response that Rack needs. The class allows you to cleanly write a more complex Rack application than a lambda would.
So what happens now if you outgrow a class? Well, you can abstract the function of your application into multiple classes and build a Rack application using those classes. The structure is not unlike the controller structure you have in a Rails application, because it will have separate classes that are responsible for different things.
In your new Rack application, you’ll have two classes that perform separate tasks, but are still running on the same instance of the server. The first class is going to be your Heartbeat::Application class, and the second one will provide two forms, each with one button: one for success and one for failure. These forms will then submit to the actions provided within the Heartbeat::Application class, which will demonstrate how you can get your classes to talk to each other.
18.2.1. You’re breaking up
Now that your Rack application is getting more complex, you’re going to break it out into three files. The first file will be the Heartbeat::Application class, the second will be a new class called Heartbeat::TestApplication, and the third will be the Rackup file that will be responsible for combining these two classes into one glorious application.
Let’s begin by separating out your application and the Rackup file into two separate files. In a new directory at lib/heartbeat.rb, add the code shown in the following listing to lib/heartbeat/application.rb.
Listing 18.2. lib/heartbeat/application.rb
module Heartbeat
  class Application
    def self.call(env)
      default_headers = { "Content-Type" => "text/plain"}

      if env["PATH_INFO"] =~ /200/
        body = "Success!"
        status = 200
      else
        body = "Failure!"
        status = 500
      end

      [status, default_headers, ["#{env["PATH_INFO"]} == #{body}"]]
    end
  end
end
Next, in lib/heartbeat/config.ru, add the code shown in the following listing.
Listing 18.3. lib/heartbeat/config.ru
heartbeat_root = File.expand_path(File.dirname(__FILE__))
require heartbeat_root + '/application'

run Heartbeat::Application
This new lib/heartbeat/config.ru sets up a heartbeat_root variable so that you can require files relative to the root of the heartbeat directory without having to specify direct paths to them. At the moment, this file still contains the run line from the old heartbeat.ru, but you’ll be changing this shortly.
Before that change though, you’re going to add your second application class, Heartbeat::TestApplication, to a new file at lib/heartbeat/test_application.rb by using the content shown in the following listing.
Listing 18.4. lib/heartbeat/test_application.rb
module Heartbeat
  class TestApplication
    def self.call(env)
      default_headers = { "Content-Type" => "text/html"}
      body = %Q{
        <h1>Success or FAILURE?!</h1>
        <form action='/test/200'>
          <input type='submit' value='Success!'>
        </form>

        <form action='/test/500'>
          <input type='submit' value='Failure!'>
        </form>
      }

      [200, default_headers, [body]]
    end
  end
end
This file follows the same style as the file that defines Heartbeat::Application, but in this class the body returned as part of the Rack response consists of two forms, each with its own button. The first form goes to /test/200, which should give you the response of “Success!”, and /test/500, which should give you a “Failure!” response because the path doesn’t include the number 200.
A keen eye may have noticed that you’ve nested the paths to the heartbeat responses underneath a path called test. This is because when you build your combined class application, you’ll make your Heartbeat::Application sit under the /test route. When do you do this? Right now!
18.2.2. Running a combined Rack application
You’re now going to change the lib/heartbeat/config.ru file to now create a Rack application that uses both of your classes for different functionality. For this, you’re going to use the Rack::Builder class, which lets you build Rack applications from different parts. Let’s fill lib/heartbeat/config.ru with the content shown in the following listing.
Listing 18.5. lib/heartbeat/config.ru
heartbeat_root = File.expand_path(File.dirname(__FILE__))
require heartbeat_root + '/application'
require heartbeat_root + '/test_application'

app = Rack::Builder.app do
  map '/test' do
    run Heartbeat::Application
  end

  map '/' do
    run Heartbeat::TestApplication
  end
end

run app
Rather than calling run Heartbeat::Application here, you’re compiling a multi-faceted Rack application using Rack::Builder.app. The run method you’ve been using all this time is defined inside the Rack::Builder class, actually. A *.ru file is usually evaluated within the instance of a Rack::Builder object by the code the rackup command uses, and so you are able to use the run method without having to call Rack::Builder.new before it or wrapping .ru code in a Rack::Builder.app block.
This time, you’re being implicit and building a new Rack::Builder instance using Rack::Builder.app. Inside this instance, you’ll declare two routes using the map method. Within a block given to each of your map calls, you’re calling the run method again, passing it one of your two application classes.
When a request comes into this application beginning with the path /test, it will be served by the Heartbeat::Application class. All other requests will be served by the Heartbeat::TestApplication class. This is not unlike the way certain requests in your Rails application beginning with /tickets are routed to the TicketsController and others beginning with /projects go to ProjectsController.[2]
2 In fact, the similarities are astounding.
Let’s start this application and see what it can do by running this command:
rackup lib/heartbeat/config.ru
Now remember, to make requests to the Heartbeat::Application class you must prefix them with /test; otherwise they’ll be served by Heartbeat::TestApplication.Keeping that in mind, let’s make a request to http://localhost:9292/test/200. You’ll see something unusual: the path displayed on the page isn’t /test/200 as you may expect, but rather it’s /200. The env["PATH_INFO"]key doesn’t need to contain the path where your application is mounted, as that’s not important for routing requests within the application itself.
If you make a request to another path not beginning with the /test prefix (such as http://localhost:9292/foo/bar), you’ll see the two buttons in forms provided by the Heartbeat::TestApplication, as shown in figure 18.2.
Figure 18.2. Success or FAILURE?!

When you click the Success! button, you’ll send a request to the/test/200 path, which will be served by the Heartbeat::Application class and will respond with a body that says /200 == Success!. When you click the back button in your browser and click the Failure! button, you’ll see the /500 == Failure!.
This is the basic foundation for Rack applications and a lightweight demonstration of how routing in Rack applications works. When you began, you were able to write run Heartbeat::Application to run a single class as your Rack application, but as it’s grown more complex you’ve split different pieces of the functionality out into different classes. To combine these classes into one super-application you used the Rack::Builder.app method.
Now you should have a basic understanding of how you can build Rack applications to have a lightweight way of creating dynamic responses. So how does all of this apply to Rails? Well, in Rails you’re able to mount a Rack application so that it can serve requests on a path (like you did with Rack::Builder), rather than having the request go through the entire Rails stack.
18.3. Mounting a Rack application with Rails
Sometimes, you’ll want to serve requests in a lightning-fast fashion. Rails is great for serving super-dynamic requests quickly, but occasionally you’ll want to forego the heaviness of the Rails controller stack and have a piece of code that receives a request and quickly responds.
Previously, your Rack application had done just that. However, when you mount your Rack application inside of a Rails application, you’re able to use the classes (that is, models) from within the Rails application. With these models, you can do any number of things. For example, you can build a re-implementation of your tickets API, which will allow you to see an alternate way to craft the API you created in chapter 13. So let’s do this.
This new API will be version 3 of your API (things move fast in this app!). It will be accessible at /api/v3/json/projects/:project_id/tickets[3] and—as with your original API—will require a token parameter to be passed through to your application. If the token matches to a user and that user has access to the requested project, you can send back a list of tickets in a JSON format. If the token sent through doesn’t match to a user, then you’ll send back a helpful error message explaining that; if the project requested isn’t accessible by the authenticated user, you’ll deny all knowledge of its existence by sending back a 404 response.
3 This URL closely resembles the URL that GitHub uses for v2 of its API, but the similarities are purely coincidental.
18.3.1. Mounting Heartbeat
Before you get into any of that though, you should probably look at how mounting works within Rails by using one of your basic applications first! Mounting a Rack application involves defining a route in your Rails application that basically says, “I want to put this application at this path.” Back when you were doing a pure Rack application, you did this in the lib/heartbeat/config.ru file like this:
map '/heartbeat' do
  run Heartbeat::Application
end
Rails has a better place than that for routes: config/routes.rb. This location provides you with some lovely helpers for mounting your Rack applications. In your Rails application, to do the same thing as you did in your Rack application, you’d need to first require the application by placing this line at the top of config/routes.rb:
require 'heartbeat/application'
Then inside the routes block of config/routes.rb you’d put this line:
mount Heartbeat::Application, :at => "/heartbeat"
The mount method accepts an object to mount and an options hash containing an at option to declare where this should be mounted. Alternatively, you could use the match method in routes:
match '/heartbeat' => Heartbeat::Application
Both lines are identical in function. So let’s make these changes to your config/routes.rb file and boot up your Rails server with this command:
rails s
You should now be able to go to http://localhost:3000/heartbeat/200 and see the friendly /200 == Success! message. This means that your Heartbeat::Application is responding as you’d like it to.
Rails has been told to forward requests that go to /heartbeat to this Rack application and it has done so diligently. Rather than initializing a new instance of a controller (which is what normally happens in a standard Rails request), a Rack class is much lighter and is perfect for serving high-intensity requests that don’t require views, like the response from your Heartbeat::Application and the responses from your API.
So now that you’ve learned how you can mount your Heartbeat::Application, let’s build this slightly more complex Rack application that will serve JSON API requests for tickets. To make sure everything works, you’ll be writing tests using the same Rack::Test::Methods helpers that you used back in chapter 13. These helpers are designed for Rack applications, but they worked with your Rails application because... well, it’s a Rack app too.
Rather than writing this application as a standard Rack app, let’s branch out and use another Ruby web framework called Sinatra.
18.3.2. Introducing Sinatra
Sinatra is an exceptionally lightweight Ruby web framework that’s perfect for building small applications, such as those that serve an API. Like Rails, it’s built on top of Rack and so you’ll have no worries about using them together. You’ll use it here to create version 3 of your API. Building you app this way not only demonstrates the power of Sinatra, but also shows that there’s more than one way to skin this particular cat.[4]
4 Although why anybody would skin a cat these days is unknown to the authors.
To install the sinatra gem, run this command:
gem install sinatra
You can make a small Sinatra script now by creating a file called sin.rb, as shown in the following listing.
Listing 18.6. sin.rb
require 'sinatra'

get '/' do
  "Hello World"
end
This is the smallest Sinatra application that you can write. On the first line you require the Sinatra file, which gives you some methods you can use to define your application, such as the get method you use on the next line. This get method is used to define a root route for your application, which returns the string “Hello World” for GET requests to /. You could also make it into a class, which is what you’ll need to do for it to be mountable in your application:
require 'sinatra'

class Tickets < Sinatra::Base
  get '/' do
    "Hello World"
  end
end
By making it a class, you’ll be able to mount it in your application using the mount method in config/routes.rb. By mounting this Sinatra application, it will have access to all the classes from your Rails application, such as your models, which is precisely what you’re going to need for this new version of your API. You won’t use this code example right now; it’s handy to know that you can do this.
To use Sinatra with your application, you’ll need to add it to the Gemfile with this line:
gem 'sinatra'
Then you’ll need to run bundle install to install it. So let’s go ahead now and start building this API using Sinatra.[5]
5 You can learn more about Sinatra at https://github.com/sinatra/sinatra/.
18.3.3. The API, by Sinatra
Let’s create a new file to test your experimental new API at spec/api/v3/json/tickets_spec.rb. In this file you want to set up a project that has at least one ticket, as well as a user that you can use to make requests to your API. After that, you want to make a request to /api/v3/json/tickets and check that you get back a proper response of tickets. With this in mind, let’s write a spec that looks like the code shown in the following listing.
Listing 18.7. spec/api/v3/json/tickets_spec.rb
require 'spec_helper'

describe Api::V3::JSON::Tickets, :type => :api do
  let(:project) { Factory(:project) }
  let(:user) { Factory(:user) }
  let(:token) { user.authentication_token }

  before do
    Factory(:ticket, :project => project)
    user.permissions.create!(:thing => project, :action => "view")
  end

  let(:url) { "/api/v3/json/projects/#{project.id}/tickets" }

  context "successful requests" do

    it "can get a list of tickets" do
      get url, :token => token
      last_response.body.should eql(project.tickets.to_json)
    end
  end
end
This test looks remarkably like the one in spec/api/v2/tickets_spec.rb, except this time you’re only testing for JSON responses and you’ve changed the URL that you’re requesting to api/:version/:format/:path. When you run this spec with bin/rspec spec/api/v3/json/tickets_spec.rb you’ll see that it’s giving you this error:
... uninitialized constant Api::V3
This is because you haven’t yet defined the module for the Api::V3 namespace. Let’s create a new file at app/controllers/api/v3/json/tickets.rb that defines this module, as shown in the following listing.
Listing 18.8. app/controllers/api/v3/json/tickets.rb
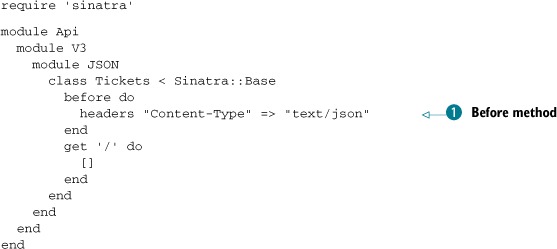
Within this file you define the Api::V3::JSON::Tickets class that is described at the top of your spec, which will now make your spec run. This class inherits from Sinatra::Base so that you’ll get the helpful methods that Sinatra provides, such as the before ![]() and get methods that you use here. You’ve already seen what get can do, but before is new. This method is similar to a before_filter in Rails and will execute the block before each request. In this block, you set the headers for the request, using Sinatra’s
headers method, so that your API identifies as sending back a text/json response.
and get methods that you use here. You’ve already seen what get can do, but before is new. This method is similar to a before_filter in Rails and will execute the block before each request. In this block, you set the headers for the request, using Sinatra’s
headers method, so that your API identifies as sending back a text/json response.
Let’s rerun it using bin/rspec spec/api/v3/json/tickets_spec.rb:
Failure/Error: get url, :token => token
     ActionController::RoutingError:
       No route matches [GET] "/api/v3/json/projects/1/tickets"
This is a better start: now your test is running and failing as it should because you haven’t defined the route for it yet. Your test is expecting to be able to do a GET request to /api/v3/json/projects/1/tickets but cannot.
This route can be interpreted as /api/v3/json/projects/:project_id/tickets, and you can use the api namespace already in config/routes.rb to act as a home for this route. Let’s put some code for v3 of your API inside this namespace now:
namespace :v3 do
  namespace :json do
    mount Api::V3::JSON::Tickets,
      :at => "/projects/:project_id/tickets"
  end
end
By placing this mount call inside the namespaces, the Rack application will be mounted at /api/v3/json/projects/:project_id/tickets rather than the /tickets URI if you didn’t have it nested. Additionally, you’ve specified a dynamic parameter in the form of :project_id. With this, you’ll be able to access the requested project id from inside your Rack application using a method very similar to how you’d usually access parameters in a controller.
If you attempted to run your spec again it would bomb out with another new error:
expected "[tickets array]"
got ""
This means that requests are able to get to your Rack app and that the response you’ve declared is being served successfully. Now you need to fill this response with meaningful data. To do this, find the project that’s being referenced in the URL by using the parameters passed through found with the params method. Unfortunately, Sinatra doesn’t load the parameters from your Rails application and so params[:project_id] is not going to be set. You can see this if you change your root route in your Sinatra application to this:
get '/' do
  p params
end
Then if you run your test, you’ll see only the token parameter is available:
{"token"=>"6E06zoj01Pf5texLXVNb"}
Luckily, you can still get to this through one of the keys in the environment hash, which is accessible through the env method in your Sinatra actions, like it was available when you built your Rack applications. You saw this environment hash earlier when you were developing your first Rack application, but this time it’s going to have a little more to it because it’s gone through the Rails request stack. Let’s change your root route to this:
get '/' do
  p env.keys

end
When you rerun your test, you’ll see all the available keys output at the top, with one of the keys being action_dispatch.request.path_parameters. This key stores the parameters discovered by Rails routing, and your project_id parameter should fall neatly into this category. Let’s find out by changing the p env.keys line in your root route to p env["action_dispatch.request.path_parameters"] and then re-running your test. You should see this:
{:project_id=>"3"}
Okay, so you can access two parameter hashes, but you’ll need to merge them together if you are to do anything useful with them. You can merge them into a super params method by redefining the params method as a private method in your app. Underneath the get you’ll put this:
def params
  hash = env["action_dispatch.request.path_parameters"].merge!(super)
  HashWithIndifferentAccess.new(hash)
end
By calling the super method here, you’ll reference the params method in the superclass, Sinatra::Base. You want to access the keys in this hash using either symbols or strings like you can do in your Rails application, so you create a new HashWithIndifferentAccess object, which is returned by this method. This lets you access your token with either params[:token] or params["token"]. This hash is quite indifferent to its access methods.
Let’s switch your root route back to calling p params. When you run your test again, you should see that you finally have both parameters inside the one hash:
{:project_id=>"3", "token"=>"ZVSREe1aQjNZ2SrB9e8I"}
With these parameters you’ll now be able to find the user based on their token, get a list of projects they have access to, and then attempt to find the project with the id specified. You can do this by putting two calls, a find_user and find_project method, in the before block you already have, using this code:
before do
  headers "Content-Type" => "text/json"
  find_user
  find_project
end
The find_user and find_project methods can be defined underneath the private keyword using this code:
private

  def find_user
    @user = User.find_by_authentication_token(params[:token])
  end

  def find_project
    @project = Project.for(@user).find(params[:project_id])
  end
This code should look fairly familiar: it’s basically identical to the code found in the Api::V1::TicketsController and Api::V1::BaseController classes inside your Rack application. First you find the user based on their token and then generate a scope for all projects that the user is able to view with the Project.for method. With this scope, you can then find the project matching the id passed in through params[:project_id]. You are referencing the models from your Rails application inside your Sinatra application, and there’s nothing special you have to configure to allow this.
Because you’re not too concerned with what happens if an invalid params[:project_id] or user token is passed through at the moment, you’ll fix those up after you’ve got this first test passing. With the project now found, you should be able to display a list of tickets in JSON form in your call method. Let’s change your root route to return a list of JSON-ified tickets for this project:
get '/' do
  @project.tickets.to_json
end
Now your root route should respond with the list of tickets required to have your test pass. Let’s see if this is the case by running bin/rspec spec/api/v3/json/tickets_spec.rb:
1 example, 0 failures
Great, this spec is now passing, which means that your Rack application is now serving a base for version 3 of your API. By making this a Rack application, you can serve requests in a more lightweight fashion than you could within Rails.
But you don’t have basic error checking in place yet if a user isn’t found matching a token or if a person can’t find a project. So before you move on, let’s quickly add tests for these two issues.
18.3.4. Basic error checking
You’ll open spec/api/v3/json/tickets_spec.rb and add two tests inside the describe block in a new context block, as shown in the following listing.
Listing 18.9. spec/api/v3/json/tickets_spec.rb
context "unsuccessful requests" do
  it "doesn't pass through a token" do
    get url
    last_response.status.should eql(401)
    last_response.body.should eql("Token is invalid.")
  end

  it "cannot access a project that they don't have permission to" do
    user.permissions.delete_all
    get url, :token => token
    last_response.status.should eql(404)
  end
end
In the first test you make a request without passing through a token, which should result in a 401 (unauthorized) status and a message telling you the “Token is invalid.” In the second test, you use the delete_all association method to remove all permissions for the user and then attempt to request tickets in a project that the user no longer has access to. This should result in the response being a 404 response, which means your API will deny all knowledge of that project and its tickets.
To make your first test pass you’ll need to check that your find_user method actually returns a valid user; otherwise you’ll return this 404 response. The best place to do this would be inside the find_user method itself, turning it into this:
def find_user
  @user = User.find_by_authentication_token(params[:token])
  halt 401, "Token is invalid." unless @user
end
The halt method here will stop a request dead in its tracks. In this case, it will return a 401 status code with the body being the string specified. When you run your tests again the first two should be passing, with the third one still failing:
3 examples, 1 failure
Alright, so now if an invalid token is passed, you’re throwing exactly the same error as the last two iterations of your API did—good progress! Finally, you’ll need to send a 404 response when a project cannot be found within the scope for the current user. To do this, change the find_project method in your app to this:
def find_project
  @project = Project.for(@user).find(params[:project_id])
  rescue ActiveRecord::RecordNotFound
    halt 404, "The project you were looking for could not be found."
end
When you run your tests for a final time with bundle exec rspec spec/api/v3/tickets_spec.rb, they should all pass:
3 examples, 0 failures
Awesome! This should give you a clear idea of how you could implement an API similar to the one you created back in chapter 13 by using the lightweight framework of Sinatra. All of this is possible because Rails provides an easy way to mount Rack-based applications inside your Rails applications. You could go further with this API, but this is probably another exercise for you later on if you wish to undertake it.
You’ve learned how you can use Rack applications to serve as endpoints of requests, but you can also create pieces that hook into the middle of the request cycle called middleware. Rails has a few of these already, and you saw the effects of one of them when you were able to access the env["action_dispatch.request.path_parameters"] key inside your Sinatra application. Without the middleware of the Rails stack, this parameter would be unavailable. In the next section, we look at the middleware examples in the real world, including some found in the Rails stack, as well as how you can build and use your own.
18.4. Middleware
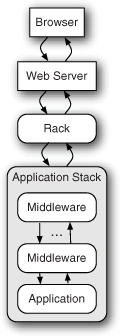
When a request comes into a Rack application, it doesn’t go straight to a single place that serves the request. Instead, it goes through a series of pieces known as middleware, which may process the request before it gets to the end of the stack (your application) or modify it and pass it onward, as shown in figure 18.3.
Figure 18.3. Full request stack, redux
You can run the rake middleware command within your Rails application’s directory to see the list of middleware currently in use by your Rails application:
use ActionDispatch::Static
use Rack::Lock
use ActiveSupport::Cache::Strategy::LocalCache
use Rack::Runtime
...
use ActionDispatch::BestStandardsSupport
use Warden::Manager
run Ticketee::Application.routes
Each of these middleware pieces performs its own individual function. For instance, the first middleware ActionDispatch::Static intercepts requests for static files such as images, JavaScript files, or stylesheets found in public and serves them immediately, without the request to them falling through to the rest of the stack. It’s important to note that this middleware is only active in the development environment, as in production your web server (such as nginx) is better suited for serving static assets.
Other middleware, such as ActionDispatch::BestStandardsSupport, sets additional headers on your request. This particular piece of middleware sets the X-UA-Compatible header to IE=Edge,chrome=1, which tells Microsoft Internet Explorer to “display content in the highest mode available” that is “equivalent to IE9 mode,” meaning your pages should render in a “best standards” fashion.[6] The chrome=1 part of this header is for the Google Chrome Frame, which again will support “best standards” rendering on a page.
6 For more information about IE=Edge and the X-UA-Compatible header, see http://msdn.microsoft.com/en-us/library/cc288325(v=vs.85).aspx.
Let’s look at both of these middleware pieces now.
18.4.1. Middleware in Rails
In the case of the ActionDispatch::Static middleware, a response is returned when it finds a file to serve, and the request stops there. In the case of ActionDispatch::BestStandardsSupport, the request is modified and allowed to continued down the chain of middleware until it hits Ticketee::Application.routes, which will serve the request using the routes and code in your application. The process of ActionDispatch::Static can be seen in figure 18.4.
Figure 18.4. ActionDispatch::Static request

When a request is made to /images/rails.png, the middleware checks to see if the public/images/rails.png file exists. If it does, then it is returned as the response of this request. This middleware will also check for cached pages. If you make a request to /projects, Rails (by default) will first check to see if a public/projects.html file exists before sending the request to the rest of the stack. This type of request is shown in figure 18.5.
Figure 18.5. ActionDispatch::BestStandardsSupport request

In this request, the ActionDispatch::Static middleware first checks for the presence of public/projects.html, which would be there if you had cached the page. Because it’s not there, the request goes through the rest of the middleware stack being passed along. When it gets to ActionDispatch::Best::StandardsSupport, this middleware sets the X-UA-Compatible header and passes along the request to the application, which then serves the request like normal.
Let’s dive into exactly how ActionDispatch::Static works.
18.4.2. Investigating ActionDispatch::Static
The ActionDispatch::Static class is responsible for serving static requests in the development environment for your application. The code for this piece of middleware can be found in the actionpack gem, which you can view by opening the path provided by the command bundle show actionpack in your editor. The file that defines the ActionDispatch::Static middleware can be found at lib/action_dispatch/middleware/static.rb. The first 10 lines in this file are shown in the following listing.
Listing 18.10. lib/action_dispatch/middleware/static.rb
require 'rack/utils'

module ActionDispatch
  class Static
    FILE_METHODS = %w(GET HEAD).freeze

    def initialize(app, root)
      @app = app
      @file_server = ::Rack::File.new(root)
    end
The first line requires the rack/utilsfile, which contains the Rack::Utils module this file references a little later on. The next three lines define the ActionDispatch ::Static class and a constant called FILE_METHODS. Finally, this middleware defines the initialize method, which takes two arguments, an app and a root. This method then assigns the app argument to the @app variable so that it can be accessed in methods called after this point. The root variable is passed to a call to ::Rack::File.new[7] which is then assigned to the @file_server variable. The Rack::File class is actually a Rack application too, as you’ll see later.
7 Not-well-known Ruby fact: the double colon (::) of ::Rack::File represents a top-level class, meaning that Ruby will get the Rack::File class defined at the top level of your application, rather than one (potentially) within the current class or module.
So why does this middleware begin in this particular way, and what is app? Well, app is the next piece of middleware in the stack that you can pass requests to if you wish. You’ll see this app variable used later. The instance of your middleware is then cached by the Rails server so it can call the call method on it when a request comes into the stack. The call method in this middleware begins with this:
def call(env)
  path   = env['PATH_INFO'].chomp('/')
  method = env['REQUEST_METHOD']

  if FILE_METHODS.include?(method)
The env variable here is the same sort of style as the env variable that you used back in your Rack application. Rack middleware and Rack applications are actually designed almost identically. You saw the env["PATH_INFO"] key before—that’s the one that contains the path of the request, something such as /images/rails.png. By calling chomp on this, it strips off any trailing forward-slashes on the end of this URL.
The env["REQUEST_METHOD"] key contains the HTTP request method used in this request. If this method is either GET or HEAD, then the code inside the if runs here. The next line after this one checks for the presence of a file:
if file_exist?(path)
This method is defined further down in this file, like this:
def file_exist?(path)
  full_path = File.join(@file_server.root, ::Rack::Utils.unescape(path))
  File.file?(full_path) && File.readable?(full_path)
end
This method uses the root method, which returns the fill path to the public directory of your application. This method then uses File.join to join the path to the public directory and the unescaped name of the file that’s being requested. Finally, this method uses the File.file? and File.readable? methods to determine if the path specified is actually a file and if that file is readable. If it is indeed a file and is indeed readable, then this line is executed:
return @file_server.call(env)
This calls the call method on the Rack::File instance, which then (after some additional processing) serves the file.
So far, this has been the process this piece of middleware uses for an existing file. If the file doesn’t exist, then it goes into the else for the if File.exists? line, which results in the following code being run:
cached_path = directory_exist?(path) ? "#{path}/index" : path
cached_path += ::ActionController::Base.page_cache_extension

if file_exist?(cached_path)
  env['PATH_INFO'] = cached_path
  return @file_server.call(env)
end
The first line here checks for a directory with the same name as the path you’ve requested. Imagine your request is now /projects and you have a public/projects directory. This directory_exists? method would then return true because this directory exists. The directory_exists? method is defined like this:
def directory_exist?(path)
  full_path = File.join(@file_server.root, ::Rack::Utils.unescape(path))
  File.directory?(full_path) && File.readable?(full_path)
end
It performs basically the same function as the file_exist? method, except that it uses File.directory? to check for the directory rather than File.file?. If this directory does exist, then the cached_path variable is set to /projects/index in your case. The second line in this else references the ::ActionController::Base.page_cache_extension, which is a string that defaults to .html and makes your cached_path variable now projects/index.html, the alternate path where the page for /projects may be cached.
If this file exists, then the middleware sets env["PATH_INFO"] to be this path so that the Rack::File instance knows what’s being requested, and then it makes a call to the @fileserver.call method and returns the response it gives back.
If everything fails and there’s no file at the path you’ve requested, the middleware gives up and passes the request to the next piece of middleware by using this line:
@app.call(env)
The request then continues on down the chain of middleware until it hits a middleware that serves that request or the Ticketee::Application.routes endpoint. Either way, the browser (or whatever makes the request) is basically guaranteed to get a response from a piece of middleware or the application itself. For the first situation, a middleware can return a response itself:
return [200, { "Content-Type" => "text/html" }, ["Oh happy day!"]]
Or it can pass the buck to the next piece with the call method, passing through the (possibly modified) env variable representing this request’s environment:
@app.call(env)
Now that you’ve got a nice grasp of how one piece of middleware works, let’s build your own!
18.4.3. Crafting middleware
Soon you’ll have your own piece of middleware that you can put into the middleware stack of a Rails or Rack application. This middleware will allow the request to run all the way down the chain to the application and then will modify the body, replacing specific letters in the text for links with other, equally specific letters. Create a new file for your middleware at lib/link_jumbler.rb and fill it with the content shown in the following listing.
Listing 18.11. lib/link_jumbler.rb
require 'nokogiri'
class LinkJumbler

  def initialize(app, letters)
    @app = app
    @letters = letters
  end

  def call(env)
    status, headers, response = @app.call(env)
    body = Nokogiri::HTML(response.body)
    body.css("a").each do |a|
      @letters.each do |find, replace|
        a.content = a.content.gsub(find.to_s, replace.to_s)
      end
    end
    [status, headers, body.to_s]
  end
end
In this file you’ve defined the LinkJumbler class, which contains an initialize and a call method. The initialize method sets the stage, setting up the @app and @letters variables you’ll use in your call method.
In the call method, you make a call down the middleware stack in order to set up your status, headers, and body values. You can do this because the @app.call(env) call will always return a three-element array. Each element of this array will be assigned to its respective variable. In a Rails application’s middleware stack, the third element isn’t an array but rather an instance of ActionDispatch::Response. To get to the good part of this response you can use the body method, like you do on the second line of your call method.
With this body you use the Nokogiri::HTML method (provided by the require 'nokogiri' line at the top of this file) to parse the body returned by the application into a Nokogiri::HTML::Document object. This will allow you to parse the page more easily than if you used regular expressions. With this object, you call the css method and pass it the "a" argument, which finds all a tags in the response body. You then iterate through each of these tags and go through all of your letters from @letters, using the keys of the hash as the find argument and the values as the replace argument. You then set the content of each of the a tags to be the substituted result.
Finally, you return a three-element array using your new body, resulting in links being jumbled. To see this middleware in action, you’ll need to add it to the middleware stack in your application. To do that, put these two lines inside the Ticketee ::Application class definition in config/application.rb:
require 'link_jumbler'
config.middleware.use LinkJumbler, { "e" => "a" }
The config.middleware.use method will add your middleware to the end of the middleware stack, making it the last piece of middleware to be processed before a request hits your application.[8] Any additional arguments passed to the use method will be passed as arguments to the initialize method for this middleware, and so this hash you’ve passed here will be the letters argument in your middleware. This means your LinkJumbler middleware will replace the letter e with a anytime it finds it in an a tag.
8 For more methods for config.middleware look at the “Configuring Middleware” section of the Configuring official guide: http://guides.rubyonrails.org/configuring.html#configuring-middleware.
To see this middleware in action, let’s fire up a server by running rails s in a terminal. When you go to http://localhost:3000 you should notice something’s changed, as shown in figure 18.6.
Figure 18.6. What’s a Tickataa?!

As you can see in this figure, your links have had their e’s replaced with a’s and any other occurrence, such as the user’s email address, has been left untouched.
This is one example of how you can use middleware to affect the outcome of a request within Rails; you could have modified anything or even sent a response back from the middleware itself. The opportunities are endless. This time though, you’ve made a piece of middleware that finds all the a tags and jumbles up the letters based on what you tell it to.
18.5. Summary
You’ve now seen a lot of what Rack, one of the core components of the Rails stack, can offer you. In the beginning of this chapter you built a small Rack application that responded with OK. You then fleshed this application out to respond differently based on the provided request. Then you built another Rack application that called this first Rack application, running both of these within the same instance by using the Rack::Builder class.
Next you saw how you could use these applications within the Rails stack by first mounting your initial Rack application and then branching out into something a little more complex, with a Sinatra-based application serving what could possibly be the beginnings of version 3 of Ticketee’s API. Sinatra is a lightweight framework offering the same basic features as Rails.
Finally, you saw two pieces of middleware, the ActionDispatch::Static piece and the ActionDispatch::BestStandardsSupport. You dissected the first of these, figuring out how it worked so that you could use that knowledge to build your own middleware, a neat little piece that jumbles up the text on the link based on the options passed to it.