Chapter 9:
Editing Film on Final Cut Pro NLEs with FilmLogic
In this chapter, we’ll examine the methods for cutting films using two relatively new applications. Apple’s Final Cut Pro is a very popular nonlinear editing application that was designed for video editing with Apple’s Quicktime digital movie format. FilmLogic, a matchback and 24 fps solution made by Focal Point Software, is compatible with Final Cut Pro, Media 100 and Adobe Premiere. It can be used as a standalone application or as a plug in with Final Cut Pro.
FilmLogic
FilmLogic consists of a powerful database manager that can create cut lists in two very different ways. Like Slingshot Pro, FilmLogic can compare between telecine and EDL databases to assemble cut lists. But it also works with certain applications as a plug-in, which will allow output of a cut list from within the NLE application. Currently, FilmLogic offers plug-in support for Premiere, Media 100 and Final Cut Pro. It can also be used as a stand alone application in conjunction with Avid, and EditDV as well as the previously mentioned NLEs.
Normally, a plug-in feature would not make that big of a difference. After all, it is still necessary to import the telecine logs into the database to compare work done with the NLE. But when used with an NLE, plug-ins have the ability to bypass time code information and generate a cut list without the need to generate an EDL.
Version 3 of FilmLogic was the first version of the software to add plug-ins. It also offers something once exclusively reserved for more expensive NLEs: 24 fps editing. 24 fps editing with FilmLogic can be achieved in one of two ways: hardware 24 fps or software 24 fps.
Apple’s Final Cut Pro can work with almost any type of video capture card. There are a number of new cards coming onto the market with HD capability as well as true 24 fps capture rates. In order to correctly capture at 24 fps and remove pulldown frames from the telecine video, these cards use SMPTE time code information.
As discussed earlier, it is very important to use nondrop frame time code on the telecine masters and audio tapes. Assuming the standard configuration in which an A frame starts at :00 time code and repeats at :05, a 24 fps card knows where to look to remove the extra pulldown fields. The audio remains intact, without need for any time adjustment, because the quicktime file can change its time base to a true 24 fps without altering the audio.
The key to attaining 24 fps has to do with Quicktime architecture. Quicktime, unlike standard NTSC or PAL video, is not limited by a set framerate or frame duration. As a result, 24 fps capability can be achieved within Quicktime by either eliminating the pulldown during digitization with a 24 fps video capture card or removing pulldown with FilmLogic software through a process called reverse telecine.
The ability to reverse the telecine process is relatively new to FilmLogic as is its plug in capabilities. Reverse telecine uses information in the database and Quicktime’s ability to change frame rates and alter time base in order to reduce the framrate to 24 fps and remove pulldown fields.
Although Quicktime allows for a reversal of the process, FilmLogic has to recalculate each frame. In Quicktime, a frame is not always the same size and duration. As a result, FilmLogic has to uniformly adjust or conform the frames and match them to the video rate of 23.976. But there’s a problem here: the audio has not been reduced .01 percent to accurately reflect the pulldown. Reverse telecine fixes the problem by adding more time to the frames, increasing the frame rate to a true 24 fps, thus negating any audio mismatches in sync.
Just what is FilmLogic? A database? A Quicktime application? A matchback application? A file conversion program? A logging application? The answer is yes.
Importing the Telecine Log
The FilmLogic suite of functions can be used as a plug-in to Final Cut Pro (FCP), allowing the user to operate from a single application. Final Cut Pro was invented for video editing, not film editing. So in order to open a telecine log, it must first be done using FilmLogic.
FilmLogic accepts the four most commonly used telecine logs; TLC or Flex files (.flx), Aaton files (.atn), Evertz files (.ftl), and Avid Log Exchange files (.ale). To convert the telecine logs with FilmLogic, start the application and create a new database. Import the telecine logs into the database. This database will be used later for matching back to the original film numbers. Remember, FCP doesn’t have the capability to store the film numbers, so the logs must be in the database to work. Once the logs have been imported into FilmLogic, they can be exported as a Final Cut Pro batch capture list. From there, the project can be digitized in Final Cut Pro.
Keep in mind as the logs are imported that FilmLogic relies on the scene and take fields in the log as key databasing information. To simplify matters, it’s a good idea to retain that information in the names of clips used with Final Cut Pro. For example, Scene 37 Take 1 is normally labeled 37/1 or 37-1.
Logging the Database Manually
FilmLogic comes in two distinct flavors: full-blown and FilmLogic LE, a truncated version. FilmLogic LE is, of course, less expensive, but it doesn’t allow manual logging. Instead it assumes the use of telecine logs imported into the database. It also does not use any plug in architecture. As such, it is a matchback only program. The full blown version of FilmLogic will allow manual logging, linking files in the database, and the entry of copious amounts of information about each clip and other preferences. I have only used the full version, so all of my descriptions of functions in this book refer to the use of the full version.
To log clips manually, launch FilmLogic and create a new database. FilmLogic, like most Mac programs, can be launched by double clicking on a database file. If the application icon is double clicked, FilmLogic will ask where the database is located. Because one hasn’t been created yet, click Cancel. Under the Database menu, select New Database. The new database menu appears, as shown in Figure 9.1.
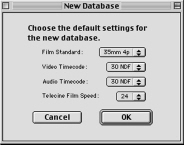
Figure 9.1 New Database Menu
The New Database menu needs some very basic information about the project. There are two important things to keep in mind. First, any mixed formats or gauges are fine with FilmLogic. It can alter frame counts according to gauge independently for each clip. For example, if the project integrates 16mm with 35mm, it could do it. Why would anyone do this? You could never project such a film! I guess the point here is that it can adapt capably and bypass the project settings. Second, if logs are imported, FilmLogic will read the log and bypass project settings for the type or gauge of film specified in the log. This is very important. If the log is incorrect, it will need to be fixed. FilmLogic assumes that the log information is correct (as it should be). So if the project is a 16mm film and the telecine operator forgot to change the gauge type in the database, it will be necessary to alter the log manually with a text editor or reorder the log with corrected information.
The new database asks for four pieces of information, as shown in Table 9.1. FilmLogic can work with both PAL A and PAL B telecine modes. If PAL A is used, remember that the film will be 4.166 percent faster than normal speed. If audio is digitized separately, it’s necessary to adjust it to this speed as well. PAL A projects can be conformed to 24 fps using FilmLogic’s conform feature, which will be discussed later in this chapter.
Table 9.1 New Database Guide Settings
Setting | Preferences |
Film Standard | 35mm 4p- 35mm film with four perforations per frame. Standard 35mm gauge. |
35mm 3p- 35mm film with 3 perfs per frame. Used as a film saving device on television shows. Not commonly used on projected film, but easily telecined. | |
16mm 20- 16mm film with 20 frames (every 6”) between key numbers. Common format, used with Kodak and most other major film manufacturers | |
16mm 40- 16mm film with 40 frames (every foot) between key numbers. Less common. | |
Video time code | 30 NDF- 30 fps Nondrop Frame (Actually 29.97) Recommended for film, especially when using hardware reverse telecine to 24 fps. |
30 DF- 30 fps Drop Frame (again, 29.97) | |
25 fps- Used for PAL | |
24 fps- Used for 24p (see chapter 11) | |
Audio time code | Same as video preferences. |
Telecine Film Speed | 24fps- for NTSC pulled down and PAL Telecine B. |
25fps – for PAL Telecine A (25@24fps) |
If 24 fps is used as the telecine speed, FilmLogic will create a matchback list because of the variance of framerate. The project can also be digitized on some newer video cards at an accurate 24 fps or use FilmLogic’s reverse telecine.
A Word about Backing up and Undo
FilmLogic is a very powerful database, but two things it does not do is back up or undo. As with many databases, once the information is entered, it becomes part of the database record. As a result, it’s necessary to make a backup copy from time to time. There is no Save As dialog in FilmLogic, but the project can be backed up by either option dragging the file to a backup folder or dragging it to another drive. It’s a good idea to keep previous databases. One never knows when a virus or hardware problem could destroy precious data.
It’s important to be aware that once information is entered, there is no Undo function on FilmLogic. Be careful how and when the information is databased.
Working with FilmLogic’s Database
Once the New Database information is defined, two windows will appear on the desktop. These two windows are representations of the database that is being built. One is a list view of found files in the database. The other is detail information about each clip. The detail view in FilmLogic is loaded with potential entries of information about each clip. It includes the information shown in Table 9.2. The detail view is the master source of clip information and is filled with both visual and textual information pertaining to each clip. The file is linked to Quicktime files that are used by Final Cut Pro in an editing project. It can also contain a great deal of information that will aid the editor in choosing and organizing shots. Normally, such a robust database would be expected in the NLE, but the creators of FilmLogic chose to go beyond the normal confines of a matchback application and feature some advanced databasing functions.
Table 9.2 Detail View Entries in FilmLogic
The list view contains a list of records from within the database. The list view can be used to show the results of a search for scene and take criteria or to show the entire database. FilmLogic’s programmers claim to be adding more versatility to the Find function in future versions, such as keyword searches.
To list all of the records in the list view, from the Database Menu, select Find (or type Command-F), then select All Records. The list will show all of the records. If all of the records for a specific scene are to be shown, type Command-F and in the scene entry, type the number of the scene and press Return. The found items in the list view will appear.
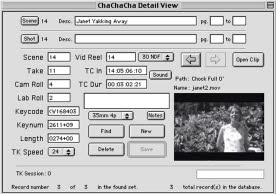
Figure 9.2 Detail View window in FilmLogic
It’s important to remember while browsing detailed views in the database that the records shown will only be those in the list view. To browse all files in detail view, they have to be in the list.
List View has 3 data viewing options. They are key code (default), video, and sound. The viewing options can be selected from the menu at the bottom menu of the list. When key code is selected, the following items appear:
Scene
Take
Roll (Lab Roll Number)
Key code (Key code & key num start)
Length (feet + frames)
Clip name (name of corresponding Quicktime file linked to the record)
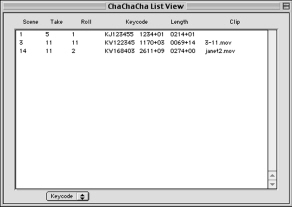
Figure 9.3 The List View
If Video is selected, the List view will show
Scene
Take
Roll (videotape number)
Time code (time code start)
Length (time code format in hours: minutes: seconds: frames)
Clip name (name of corresponding Quicktime file linked to the record)
If Sound is selected, the List View will show:
Scene
Take
Roll (sound roll number)
Time code (time code start on sound roll)
Length (time code format in hours: minutes: seconds: frames)
Clip name (name of corresponding Quicktime file linked to the record)
Linking Media to the Database
In order for FilmLogic to properly function, all of the clips need to be linked to the media so that the relational database is properly established. This not only is necessary for building the database, but is also helpful for finding information about the clips through the database.
Locating and linking clips is relatively easy, assuming that the clips are all located within a single folder. Normally, a clip name consists of the scene and take number. Thus Scene 3 Take 24 would be 3/24.mov or 3-24.mov. So finding the right clips for the right takes is easy. Once FilmLogic has found the clips, it can play them back and display information about the framerate, compression codec, and other tidbits.
Either a group of clips or a single clip can be opened to link to the database. To open a single clip, first load the clip into detail view. Select Find Clip from the right side of the interface. Using standard Macintosh navigation, locate the clip and open it. When the clip opens, note that it immediately becomes linked in the detail view of the database. A thumbnail appears in the lower right corner of Detail View and the name of the Quicktime file appears above it. The file is now linked to that database record. If several files are to be linked, select Find Clips from the Database menu and direct it to the folder where the clips are stored.
Verification
Once the clips are linked, verify burned-in information with the database. With the clip open, click on the Identify button. Specific information about the clip is revealed, including key code prefix, key num, cam roll, format, lab roll, vid TC, sound TC, sound speed and TK (telecine) speed. Verification is one of the key features for FilmLogic. It allows the editor or assistant to verify that the picture information is consistent with the database information. This assures peace of mind, which is what every assistant seeks.

Figure 9.4 The clip menu in FilmLogic
The Info button in the clip window is also helpful for verification. It includes duration, date of recording, codec used, frame rate, audio sampling rate, average data rate and quality of the picture. It can be used to determine frame rate issues with particular clips as well as bandwidth and sound sampling issues for the NLE.
Conforming
FilmLogic is loaded with interesting functions. It can conform a picture to its correct time base as well as alter that time base to more accurately reflect a conversion to a 24 fps rate. It all sounds pretty heady, but it’s really simple. Quicktime architecture allows for a frame to be any size or duration. Thus, when capturing frames at 30 fps, the duration of each frame is not necessarily 1/30 second. Some Quicktime frames are larger and slower than others. It doesn’t seem to make much difference at a 30 fps frame rate, but it does affect a single frame’s duration. FilmLogic can change this by conforming a clip to its true time base of 1/30 of a second. The result is more accuracy in conducting frame counts as well as editing.
Even more fascinating is what conform can do for 24 fps PAL films running at 25 fps. By conforming the 25 fps film back to 24 fps, FilmLogic slows the time base down to reflect the more accurate 24fps that will be displayed in the theater. Instead of having to deal with 4.166 percent speed ups and slow downs, 25 fps media can be conformed to 24 fps and still retain frame-to-frame accuracy.
To conform a clip, locate the desired clip in the detail view of the database and select Open Clip. The linked clip will open. To the right of the clip is a column of buttons. Click Conform. There are options to conform the film to 23.98 fps (actually 23.976, the speed of film in a telecine), 24 fps, 25 fps, 29.97 fps or 30 fps. When the clip speed is chosen, select Conform Clip. Remember that conforming a clip cannot be undone. If you’re experimenting, make a self-contained copy of the clip to protect the original.
Reverse Telecine
Reverse telecine can function in much the same way as conform for NTSC video. By altering the time base and removing pulldown fields, FilmLogic creates a true 24 fps editing environment. Cut lists will match perfectly—no matchback is necessary here because only the 24 original film frames have been retained. Furthermore, by conforming to a true 24 fps, not 23.976 as it is with telecine, the time base is converted to a true 24 fps. The only difference between conforming and reverse telecine is that reverse telecine removes pulldown before altering the time base.
To reverse telecine, click on the Open Clip button in detail view of the clip to be reverse telecined. Select Reverse Telecine from the right-hand row of buttons. If the clip is not digitized at the correct speed, reverse telecine will not work. In order to reverse telecine, the clip frame rate should either be 29.97 or 30.0. PAL projects cannot use reverse telecine. Instead try Conform as mentioned previously.
Reverse telecine can create clips at the following frame rates; 23.98 (actually 23.976), 24 fps, 29.97 fps, 30 fps, and 25 fps. It’s also necessary to determine the following information in order to make reverse telecine work properly with the clip: whether the clip is single field or double field; the A, B, C, or D identity of the frame; whether or not the fields are standard upper/lower or vice versa; and whether to create a new independent file or alter the original. The operations guide that came with the digitizing card should show whether the frames are digitized upper or lower first. I personally prefer to create a new file rather than altering the original when I reverse telecine. With some codecs, the quality is compromised. Once those determinations have been made, the clip can be reverse telecined.
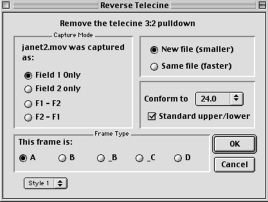
Figure 9.5 Reverse Telecine Menu
Limitations
Although FilmLogic is a very robust database and matchback system, some problems have been reported using Reverse Telecine and Conform on FilmLogic with some versions of NLE applications. Users have lost links to the media files after using reverse telecine. Others have reported that some NLE applications will not use the new time code data properly. All of these issues could very well be fixed, so it’s best to consult FilmLogic’s website, listed in the Webliography, for current information.
A limitation of reverse telecine is that the time base of the clips inside of the Quicktime-based NLE precludes export of a 30 fps video EDL, but FilmLogic does support 24 fps EDLs. Because the end product is film, this shouldn’t pose too many issues. If a 24 fps project is exported to videotape, the videotape will not necessarily perform the pulldown properly. The tape will record whatever frames comprise each second of video, without given durations or intervals for the frame. No fields will be inserted at correct pulldown times. As a result, a frame-to-frame accuracy with respect to pulldown is not guaranteed on an export to tape. However, Final Cut Pro and other Quicktime-based NLEs can use Adobe After Effects plug-ins like the Telecine 3:2 pulldown effect, which can recreate the media at 29.97 fps with pulldown at correct intervals.
When digitizing with Final Cut Pro, be sure to examine the tape to make sure that the burn-in time code window matches the time code that Final Cut Pro captures. If it does not match, the time code Offset might need to be adjusted. Time code offset is located in the capture preferences. Adjusting the offset will ensure that all of the captured frames match time code in the database as well as in the burn-in. This is a small price to pay for an application that can digitize from almost any serial controlled source and most video capture cards.
Sound Considerations
Telecine rates for film are normally 23.976 fps. If sound is recorded separately from telecine, the adjustment of picture speed must be made to sound. Because the picture is pulled down to the slower rate, sound speed must be slowed .01 percent in order to stay in sync. If the sound speed isn’t changed, the result is a slip of one frame every 33 seconds. This could be avoided by inserting a frame of room tone every 33 seconds into a synced picture. However, speeding up and slowing down sound in Final Cut Pro is simple, so there’s really no need to do this.
To slow down the sound, select Final Cut Pro’s Modify menu and choose Speed. Enter 99.99% into the pop-up menu and press Return. The sound speed will now match a standard telecine tape.
If reverse telecine is applied to the picture, the pulldown has been removed and the picture retains true 24 fps original camera speed. As a result, the sound speed recorded should be the same as the picture speed and no speed adjustments should be necessary.
Exporting Batch Lists
FilmLogic has a lot of considerations when it comes to databasing. Now that everything is databased and sound and telecine speed have been adjusted, it’s time to export a batch list. With the database open in FilmLogic, under the File menu, select Export, then Batch Capture. FilmLogic exports the information into a batch capture log that can be imported into Final Cut Pro. Batch capture logs can be exported for Edit DV, Final Cut Pro, Media 100, and Premiere.
Importing the Batch Capture Log
After launching Final Cut Pro, it’s necessary to import the batch list. Select the File menu, then Import, then Batch List. Using the standard Mac navigation, find the list and import it. The media, if it is not digitized, will appear in the bin with a red slash across its icon. To batch capture, select the File menu and Batch Capture (or choose Command-H).
Editing with Final Cut Pro
Edit in Final Cut Pro just like any other video project. Final Cut Pro offers some matte effects for standard film aspects which can be used. Be sure to use lab standard dissolves for 16mm films to save money on opticals. Once the sequence is edited, export the cut lists directly from Final Cut Pro using FilmLogic’s cut list plug-in. There is no need to export an EDL for matchback. The plug-in analyzes the data and does all of the work.
Exporting a Cut List
From the File Menu, select Export> FilmLogic Cut List. The menu shown in Figure 9.6 appears.
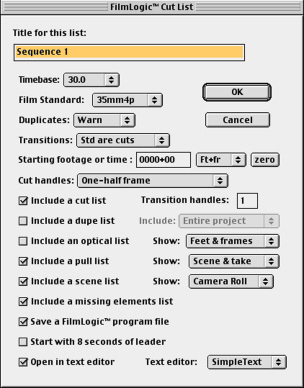
Most of the list options are standard, with a couple of key differences. Although FilmLogic will not open the databases and flag non-standard or missing key numbers, it will generate a list of missing elements. Missing elements can include any clips that don’t contain key numbers or those that might have been databased with incomplete elements from which a cut list cannot be created. If there are any missing elements in the list, it’s a fairly simple process to open up the detail view, database the correct information and run the list again.
The other unique option is the creation of a FilmLogic database program. The database program is absolutely essential to creating an audio EDL. Without the database program, it cannot be done. It’s highly recommended that a database program be generated with every list. Should any later editing need to be done, all of the elements for re-creating and generating lists are present. When it comes to information on a re-edit, more is better than less.
Table 9.5 shows a list of options available with their descriptions, including the two unique options mentioned previously. FilmLogic creates a text format cut list that can be opened in any text readable application on the computer.
Table 9.5 FilmLogic Cut List Options in Detail
Option | Description |
Title for This Sequence | The name of the sequence in the list |
Timebase | 24, 25, 29.97 or 30 fps |
Film Standard | As defined in project settings |
Duplicates | Warn or Don’t warn if dupes exist in the list. Good to use when checking for dupes before a final list is made. |
Transitions | Can be std. or cut for conforming |
Starting Footage or Time | Can use feet+frames or time durations |
Cut Handles | Handles needed for splicing |
Cut List | Selects cut list generation. Be sure to put handles on transitions. |
Dupe List | Selects Dupe List generation. Whenever possible, run a dupe list to ensure that costly dupes are kept to a minimum. |
Optical List | Selects Optical List Generation |
Pull List | Selects Pull List Generation |
Scene List | Selects Scene Pull List Generation |
Include Missing Elements | Includes elements without Key numbers or other incompletely databased information in the cut. |
Save a FilmLogic File | Saves a program database file of the cut that FilmLogic can use for audio EDL generation. |
Start with 8 sec. Leader | Adds 8 seconds for SMPTE leader at the head of the reel. |
Open In Text Editor | Allows the editor to examine the lists after generation in a preferred text generator |
Show | Normally, it’s preferred to show feet + frames, Scene & Take, and Cam Roll numbers. |
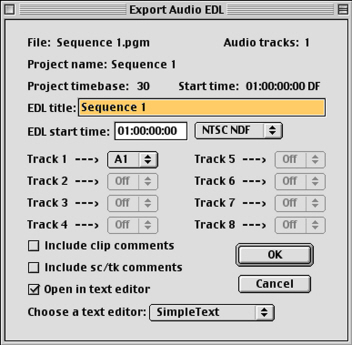
Exporting EDLs
To export an audio EDL, launch FilmLogic, and under the File menu, select Export> Export Audio EDL from Program DB. FilmLogic will ask where the program database is located, then ask where the FilmLogic database is located. Once all of the databases are accounted for, it’s time to export an EDL!
Most of the items in the menu are either preset or self-explanatory. Be sure to select the right text editor for viewing and make sure the time code start point is correct. Once you’re ready, take a deep breath and select OK. The result is two separate files: one for notes on the EDL list generation, with any errors noted. The other is the actual EDL. FilmLogic saves the EDL in a text readable file.
Future Hopes
FilmLogic has a robust database that works really well with Final Cut Pro. The company compares their database with a film code book, and I think they’re right. The product continues to develop and they frequently post new information on their website, which can be found in the Webliography.