Chapter 2:
Post Production Workflow
There is an old saying that if you don’t know where you’re headed, you’ll never get there. This certainly rings true when it comes to the creation of a motion picture. It is fascinating to see how each filmmaker works, because there are so many different ways to create film. And no two filmmakers work exactly alike.
The first step to successfully creating a film is to define a path or plan, a workflow of how the film will be produced from beginning to end. Some of these workflows are elaborate, resembling architectural drawings for skyscrapers. Others are written on the back of a piece of cardboard. It doesn’t really matter. But without a workflow, every phase of production will suffer. Some filmmakers lack the experience to create a workflow, as parodied in the films American Movie and Bowfinger. The workflow is the key to finishing any film successfully, whether it be a low-budget slasher or a blockbuster extravaganza.
The post production workflow is normally determined by above-the-line staff, usually the line producer. The line producer develops this workflow with the director in preproduction meetings. It is the responsibility of the editor to notify the producer of any proposed changes in the workflow that could affect the process. The line producer must always be made aware of how the process will change, particularly with respect to how money is being spent on services and supplies. Any alteration in the work flow could potentially cause a waste of resources, loss of available personnel, or a loss of monies reserved for services in the budget. Post production services, such as telecine, lab work, and editing facilities, are prearranged by the production company. If the editor determines that a change is necessary, he or she must first consult with the line producer for approval. Failure to do so could result in dismissal.
One of the biggest flaws in writing about film post production workflow is that no matter how adamant one is about the “proper” methods used for film creation, there is at least another who will say, “we don’t do it that way.” And there is far more variance in the process of filmmaking than of videomaking.
Why? One reason is that filmmaking, particularly film editing, can use a wider variety of methods and tools than video can. Some filmmakers developed their methods of post production long ago. For others, their post methodology develops as rapidly as technology itself. Many theatrical motion pictures are edited concurrently with the production phase, a method rarely used in video editing. By bringing in the post production team at an early stage, the director can find continuity, scripting, action, and editing flaws early in production and seek solutions while the film is still being shot on location. Of course, this isn’t always possible. Some films don’t begin post production until after principal photography is completed. Any reshoots or pickup shots are done after the first edit, when flaws and needs of the film are detected.
Low-budget films, particularly those with little planning, can unwisely eliminate production crew positions that seem too expensive, such as a script supervisor or continuity person. These seemingly economic decisions can lead to disastrous consequences in post. The end result is that the fledgling director learns a lesson and the editor is made to suffer the result of a bad decision. It has happened many times. As long as there are new and inexperienced directors, this problem will no doubt continue.
This chapter examines some post production workflows, from high-budget feature films to ultra-low-budget indies. It also explores a workflow for the relatively new method of digital video (DV) filmmaking. In the process of doing so, one can get a pretty good idea of the different approaches to post production of a motion picture.
Three Workflow Scenarios
Here are some different scenarios for post production. Keep in mind that none of these are necessarily the exact way that any film is edited. There is more than one way to skin a cat.
The High-Budget Film Workflow
As mentioned previously, it is desirable in most higher budget films for the editing staff to commence work immediately once the principal photography phase begins. If shooting takes place on a soundstage, it is common for the editing crew to be placed in a nearby building, so that the director can walk a short distance to look at dailies. As production continues, the editors and assistants are deluged with questions from the set. Will this work, or, what are we going to do about that? How will we be able to cut from this scene to the next? All of the questions can be answered a short distance away.
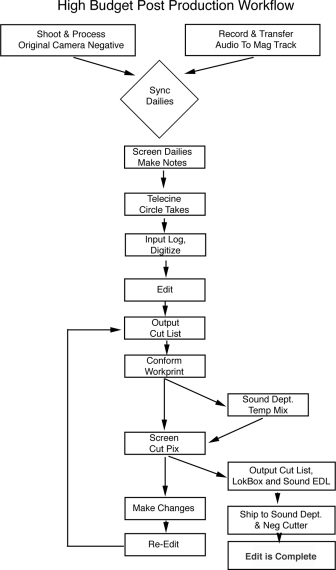
Figure 2.1 A High-Budget Post Production Workflow
When a film is shooting on location, it was previously more common for the editing crew to stay at the production company’s home city and discuss these problems by phone or fax. The OCN would be shot, selected takes (dailies) would be workprinted, synched and transferred, and the editorial crew would begin working on them the next day. Because of the relative portability of NLEs, on-location editing has become far more common. Homeward Bound II was shot in Vancouver, B.C., at the old Molson Brewery. There was plenty of room in the administration building for nonlinear equipment, so the Avids were set up there. Looking at dailies or checking a continuity problem meant a short stroll across the brewery.
In some cases, where locations were a bit more remote, NLEs have been installed in mobile facilities. On the motion picture Assassins, Sony Pictures Digital Editorial (SPDE) set up a recreational vehicle with two NLEs inside. SPDE manager Stephen Cohen oversaw the creation of this vehicle and it worked quite well for the editorial crew, who could move from location to location with relative ease. Director Richard Donner and editor Richard Marks could view dailies, discuss continuity issues, and play back completed scenes in a comfortable environment, even while situated in the middle of nowhere.
Advancements in this technology are making it even easier and better for editors at remote locations. Most NLEs can digitize “on the fly,” that is, record immediately with a click of the mouse. Using the video tap from a film camera, which is normally used for video assist, an editor could conceivably sit in a trailer and record the takes on location as they are being shot. The big advantage would be almost immediate feedback on how well the scene would cut. If there were any problems, the director would be notified before the set was struck. The drawback would be that anything edited would need proper entry of edge numbers in the database at a later time, a lamentable task for even the most valiant assistant.
With those examples in mind, the workflow of a big-budget picture follows a fairly straightforward path.
- Shoot and process Original Camera Negative.
- Workprint everything. The director is going to want to see projected dailies.
- Using camera and sound reports, the circled takes selected by the director are synched and telecined from the OCN to videotape. During telecine, a log is created of the transferred takes.
- The log is converted into a readable format by the NLE and the footage is digitized into the editing system.
- The editor edits.
- A cut list is created.
- The cuts in the list are conformed to workprint.
- The cut is screened.
So far, so good, right? Here’s where everyone on the edit crew can take a breather. A little calm before the storm.
- Changes are made.
- The editor re-edits the film.
- The new cut list or a change list is made.
- Workprint is reordered if necessary and conformed.
- The film is screened…again.
And so it goes. Steps 9-13 are repeated until a solid cut of the film is achieved. After that, it goes to the sound department. The picture cut is complete.
There are quite a few variances that can occur in this workflow. One is that the director may not need to have workprint of all of the dailies on hand before cutting begins. But it’s much better to view all of the footage on the big screen. Dailies can be screened with the director and notes can be made early in the process. In such a case, the dailies would need to be synched and coded, then transferred. This method was used on Homeward Bound II. The editors wanted to see the dailies on a flatbed, sometimes with the director on hand. So the assistants took the workprint, synched it with mag stock, coded it, and left the synch rolls on the flatbed until late afternoon for any necessary viewing. After that, the lead assistant would take the workprint to telecine, transfer it, and digitize it into the NLE. The next morning, the editors would cut those scenes.
In other cases, the assistants might conform workprint concurrently as it is being cut on the NLE. For example, the editor might have a good draft of Scene 26. The director wants to see it, so the assistants conform it from workprint and mag stock. The scene is screened on an interlock projector and change notes are made.
This method has served many features well, however this is a capital intensive workflow, and budget constraints may prevent some productions from working in this manner. The next examples will address a workflow with tighter purse strings.
The Medium-Budget Film Workflow
These days, a “medium-budget film” is ill defined. In Hollywood, a $6 million dollar film would be considered low budget. But the recent rise of ultra-low-budget filmmaking lowers the bar a bit. So for these purposes, a medium-budget film is one that can’t quite afford the luxuries of high-budget techniques. In this case, the methods define it a lot better than the budget.
Medium-budget films are deceiving, in that they may use some of the techniques of higher-budget films and yet cut costs in other more extraordinary ways. For example, I used Homeward Bound II, a medium-budget film, in the previous examples of high-budget films. It did have some workflow methods that high-budget films use, but in most ways it was a medium-budget film. One of the cost cutting methods on HBII was the use of non-time code DAT machines for recording the character voices of the dogs and cats in the film. DAT machines, particularly those that utilize SMPTE time code, can be fairly costly. To cut costs, Disney used a high-end prosumer DAT machine and recorded SMPTE time code on audio track 2. This saved them several thousand dollars, and took very little extra work on the NLE (an Avid), which could read audio time code.
The mark of most medium-budget films is a reduced use of traditional film editing and increased dependency on NLEs as synching and screening devices. Like their high-budget cousins, medium-budget films still rely on screening of a workprint, but only in the final stages of post production.
Because of the ability to synchronize sound and picture inside an NLE, medium-budget films can use the latent edge numbers of a film and the SMPTE time code from DAT machines as a method of synching and later conforming the film. This eliminates the need for creating ink code on workprint and mag stock.
All of the synching can be done inside the NLE as opposed to telecine, where it is much more expensive.
Here then, is an example of a medium-budget post production workflow.
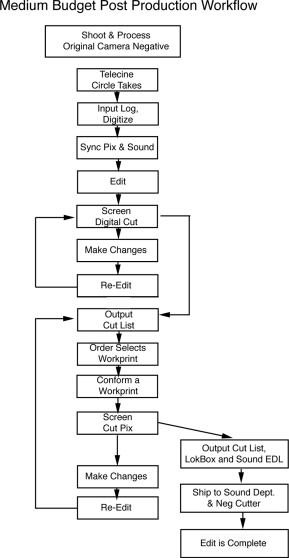
- Shoot original camera negative.
- Using camera reports, the circled takes are telecined MOS from the OCN to videotape. During telecine, a log is created of the transferred takes.
- The log is converted into a readable format by the NLE and the footage is digitized into the editing system. Sound is digitized into the NLE using sound reports, going direct from the original time code DAT.
- Both sound and picture are synched in the NLE by an assistant.
- The editor edits.
- A digital cut is screened on the NLE.
- Changes are made, usually in the form of a list, sometimes one by one with the director on hand.
- The editor re-edits the film.
From this point, steps 5-8 are repeated until a truly “screenable cut” is completed. Once the director green-lights the cut, a workprint is ordered of the scenes in the NLE cut and the workprint is conformed using the cut list from the NLE.
- A cut list is created.
- The editor outputs sound directly from the NLE. Sound is transferred to mag stock for screening on an interlock projector with the workprint.
- The cuts in the list are printed from the OCN to workprint.
- The workprint is conformed.
- The film is screened, with sound and picture interlocked.
Usually, steps 9-13 are repeated at least twice more before the project goes to the sound department.
These methods, though somewhat constrained by budget, allow for enough flexibility for the editor and director to work together in a fairly comfortable arrangement with some margin for error. The next workflow deals with less comfortable conditions, particularly with respect to monies and resources.
The Ultra-Low-Budget Film Workflow
When I first started working in Dallas as a television editor, I learned a valuable lesson. A client had given me a fairly sizable project, ridden with problems. It was a musical, with theatrical lighting and a lot of shaky handheld camera work. The cameras would start and stop intermittently, making match cuts impossible. Matching color seemed out of the question. With a large ensemble cast, the camera never seemed to be on the right actor at the right time. And the music? Yikes! The sound crew must have fallen asleep at the console.
The producer, a kindly good ole boy type, asked me “What do you think?” I managed to sputter out a laundry list of serious issues, much like the ones mentioned above. “We already know what’s wrong with it,” he replied. “I meant, what can you do for it?” In a single moment, I came to realize that the director has seen the production many more times than I, and that their purpose in working with an editor is to gain insight into the solutions, not the problems of their production. Stephen Hullfish, the supervising editor at DHV TV in Chicago, put it best: “An editor is a solver of problems, not the creator.”
Every film has problems. Listen to the director’s track on any DVD. Talk to the editors of big-budget films. Money may add production value, but it doesn’t necessarily prevent problems.
In Saving Private Ryan, the eight American soldiers looking for Ryan enter a village. One is killed by a sniper’s bullet. In a later scene, it cuts to a wide shot of the men combing the terrain of a large green field, and there are eight of them again. Titanic shows the entryway to the first class dining room, a glass door. And in the door, the reflection of the camera crew is seen. Planes, Trains and Automobiles had to reshoot an entire crowd scene in the train station, because a crowd of onlookers (not extras) had gathered to see Steve Martin and John Candy. The problem was that the windows of the train showed the reflection of the onlookers.
So every film has issues, including high-budget films. But big-budget films have the money to solve them. Low-budget pictures can’t afford this luxury.
The late Edward Dmytryk, considered by many the father of film noir and an excellent editor himself, once defined three types of editors: the mechanic, the cutter and the miracle worker.
A mechanic is a button-pushing automaton, who offers little more to a film than the ability to operate equipment, follow the script verbatim and do exactly as the director says. The cutter is a creative person who sees the film as the audience sees it and can offer solutions, alternative viewpoints, and new ideas on how to finish the film. But the miracle worker can get the director out of any fix, repair any problem, come up with a better solution to any issue.
Every ultra-low-budget film needs a miracle worker. When reshoots are impossible, ADR (automatic dialog recording) improbable, and compromises are inevitable, it is the task of the film editor to make a low-budget picture watchable. Not everyone can do this. Not everyone wants to do it.
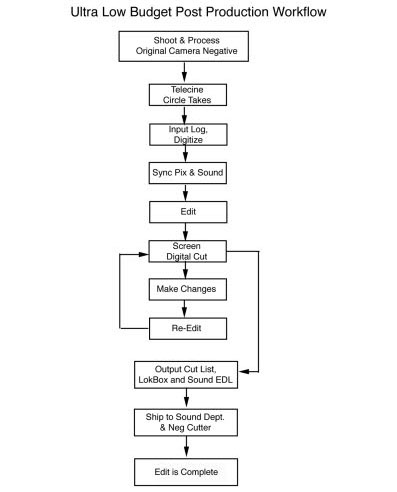
There are more variables than ever in a low-budget post production scenario. Creative budgeting calls for some daring techniques. Here’s one example:
- Shoot original camera negative.
- Using camera reports, the circled takes are telecined MOS from the OCN to videotape. During telecine, a log is created of the transferred takes.
- The log is converted into a readable format by the NLE and the footage is digitized into the editing system. Sound is digitized into the NLE using sound reports.
- Both sound and picture are synched in the NLE by an assistant.
- The editor edits.
- A digital cut is screened on the NLE.
- Changes are made, usually in the form of a list, sometimes one by one with the director on hand.
- The editor re-edits the film.
- Repeat steps 5-8 until the film is completed.
In this scenario, every screening takes place on an NLE. Most directors would like to see their work projected before it goes to the neg cutter. In most ultra-low-budget films, they never will be projected on a big screen. Instead, they go straight to tape, so there’s no reason to even attempt to screen them outside of the NLE environment.
But it’s very risky to go from NLE to neg cut. If there are any mistakes made, a cut neg cannot be replaced. In these situations, it’s a good idea to send a digital cut on videotape to the neg cutter along with your cut list and sound EDLs.
I haven’t mentioned a lot about sound, but in the case of ultra-low-budget films, it’s very important. In higher-budget films, an EDL of the sound cuts is made. That way, the sound department can conform the time code numbers in the list from the original DATs directly onto their digital audio workstations. In lower-budget films, the sound is often taken directly from the NLE onto a DAT, which saves conforming time. This makes the picture cutter a sound cutter as well. On an ultra-low budget, the sound effects, mixing and music might all be done on the NLE. Most picture editors don’t particularly like doing this, but it happens—a lot.
If the film goes directly from NLE to an answer print, there might be a few surprises. Some of the low-budget wonders that we’ve completed through the Film Camp program have used this method. The best solution is to project the NLE cut on a large format television. At Film Camp, we use a 60-inch projection TV. Subtle reactions become easy to read. Marginal production errors are amplified. Even small plot twists can seem contrived. A large screen will amplify every intention of the filmmaker. So if any money is available in the budget, a filmmaker should at least consider projecting on a large format screen. Making a workprint of the NLE edit for a theater screen is even better.
Digital video, better known as DV, is deceiving. Although it may seem to be a much less expensive method of filmmaking, getting the video back to film can be an expensive, unforgiving, and time consuming process.
Some of the latest versions of NLEs offer uncompressed video output. I highly recommend that this type of system is used as the final video source. There are others that tout “full resolution DV,” but these systems use a codec, a compressor-decompressor, and the resolution is compromised. In fact, when any effect is placed on a DV source in an NLE, it leaves the digital domain.
In the ever-changing world of video technology, one thing is sure: the resolution, format, contrast ratio, and colorimetry of video pictures will improve. The near future offers high-definition formats, progressive scan frames, and wider screens. Soon it will be hard to tell the difference between video- and film-originated pictures. But for now, it’s pretty easy. So choose your format wisely.
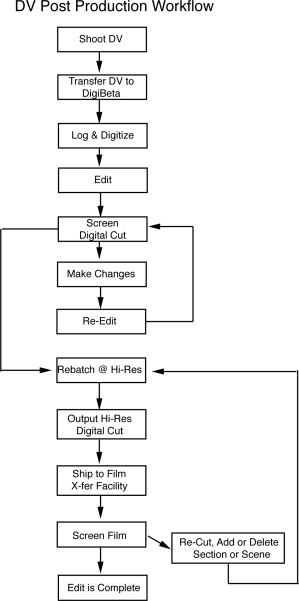
Here’s an example of a DV project workflow
- Principal photography (shooting on video).
- Transfer the DV tape onto another format for cutting. DV videotape is a very thin 8mm metal tape. It’s better to work from a more durable and stable source instead of the original. When the final high-resolution redigitizing is done, use the originals.
- Using a log or script supervisor notes, digitize the selected takes from DV to NLE.
- The editor edits.
- A digital cut is screened on the NLE.
- Changes are made, usually in the form of a list, sometimes one by one with the director on hand.
- The editor re-edits the film.
Steps 5-7 are repeated until the film is completed.
- Rebatch digitize the entire film at the highest resolution of your NLE. It’s best to use an uncompressed resolution with color correction.
- Send the videotape to the video-to-film transfer facility.
- Screen the film and make changes when necessary and/or possible.
Like the low-budget scenario, a DV film will be screened on the NLE. I highly recommend the use of a large format projection television or monitor. It’s easier to detect some of the subtleties and errors previously mentioned.
The final stages of DV filmmaking are the most critical. Choosing a method of transfer and solving the problems associated with DV can be difficult. For more information on the processes involved, see Chapter 10.