Chapter 1:
Tools of the Film Editor
Several years ago I was asked to consult on a “problem” film. It was a low-budget independent film (an indie) being cut in Los Angeles. The editor was very competent at cutting video, but had no idea how to cut film. The producer of the film knew that this particular editor was very competent at working with NLEs (nonlinear editing systems), but had no idea about his editor’s film experience. In other words, the editor was in over his head.
Despite what you might think about this editor’s judgment, he was only doing what video editors have done for years. New video equipment is introduced all the time. For the savvy editor, it takes a short time to master new equipment. But in this case, the “new equipment” was film. Knowing the “say no once and you’ll never work again” mindset of Los Angeles producers, when asked about his skill level with film, of course the editor said he could do it! In this case, the editor was trying to learn how to cut film as he went. As a result, the project was set up incorrectly from the start.
The film was cut digitally at thirty frames per second (30 fps), with no method of matching back to the original film frames (matchback) enabled on the NLE, which was an Avid. The lab, according to the producers, had not recorded key numbers and starting time code numbers for the beginning of each cam roll, so going back to the lab and autoconforming the film according to the time code EDL on an Excalibur was out of the question. To complicate matters even further, there was no burn-in video time code or film key numbers on the videotape transfers, and the telecine house had absolutely no database records, again, according to the producer.
So, I was asked, what’s the next step?
Disaster has a uniquely slow pace. On the Titanic, people continued drinking and dancing after their ship had hit an iceberg, unaware that they were slowly sinking into the frozen waters of the North Sea. They weren’t going to survive longer than a couple more hours. When it became apparent that there was trouble, all hell broke loose and everyone abandoned ship. In this case, my editor was about to abandon ship as well.
It troubles me greatly that such a foolish mistake could be made, that in haste someone would actually decide to cut a project and then try to figure out how to piece it back together. In this case, the last moments of cutting a poorly planned project seemed more like an I Love Lucy skit than a professional post production project.
Another example of lack of care happened more recently, again with a low-budget indie. I don’t mean to pick on low-budget indies, but they are far more familiar to me. Similar mistakes have happened in my experience with filmed sitcoms and higher budget films, but it is usually the low-budget films, on which less-experienced people work, that have the biggest problems.
In this case, the film was cut. The project was complete, with a database intact and everything organized. There was only one small issue that the editor had to resolve. The key numbers displayed above picture from the NLE were not matching the key numbers on his burn-in video. The editor wondered, “would this be a problem?”
The answer, of course, was yes.
Somewhere along the line — we eventually pinpointed the problem to the telecine transfer (the process of transferring the film to videotape) — the numbers in the log had been converted from a 35mm project to 16mm gauging. As a result, the NLE was giving him frame counts up to 19, running on a base 20 scale used for 16mm instead of 16 frames per number, which is used for 35mm. Any list created by the NLE at that point would have been no good.
It’s easy to become too comfortable with technology and not careful enough. In this case, the whole problem could have been avoided by looking at the telecine log, checking the numbers on the first clip to see that both NLE and videotape burn-ins matched and making sure that the proper gauge of film was noted on the log. The editor claimed that he didn’t have the budget to hire an assistant, who could have checked those numbers.
“Too bad,” I said. “Now you’re responsible.”
It is for these reasons that I wrote this book. Film editing, a relatively easy subject to comprehend, is replete with small details and potential pitfalls.
Film editing has been around much longer than video. But unlike video, it has changed very little. The methods used for traditional film editing are pretty much the same as they were in the 1940s. The tools are certainly the same. In fact, many of those tools remain in use today, and they are just as accurate and useful as they ever were.
In the 1980s, equipment manufacturers were making steady attempts at uniting two very different groups of people: film editors and video editors. In those days, video editors tended to be more gadget savvy and technocratic. Film editors, on the other hand, were very hard to impress and preferred to be left to their own devices. Although a number of interim solutions were introduced in the mid and late 1980s, it wasn’t until the 1990s that nonlinear editors or NLEs made an impact. The predecessors of the modern NLE were ruled out as either “too technical” or “not sophisticated enough.”
In hindsight and through my own experience, I understand what made film editors standoffish when it came to new technology. Their methods were better. The thought of having to create anything in a linear manner was unthinkable.
Linear editing is like building a brick wall. It starts at the bottom and works its way up. If, when halfway through, the builder discovers that one of the bricks on the bottom is too short, he or she will have to tear down the whole wall and start over again. I can attest to this, having been through many recuts and trace edits during my tenure in television.
Film is different. The nonlinear method of cutting film is more akin to building a sand castle. It starts out by creating a basic shape that doesn’t even have to look like a castle. Then, through slow trimming and sculpting of the sand, it eventually becomes a magnificent sculpture, assuming that the creator has the knack for sculpting.
Another problem for film editors was the missing element of hands-on control of the film. While they used machines to edit, film editors didn’t have to trust machines to tell them which scene they were cutting or what frame they were on. They used their own eyes, hands, and good judgment for that fundamental information. As a result, the individuality of the editors seemed diminished when they were forced to use machines to tell them what they could not see: an edge number beside a frame or a grease pencil mark.
But in the early to mid 1990s, two companies began to make solid gains toward converting film and video editors toward the same type of editing equipment. Avid and Lightworks had both developed nonlinear editing machines using a means that combined the nonlinear elements of filmmaking with the technological prowess of digital video.
With the advent of NLEs, there has been a lot of crossing of traditional lines. “On line” and “Off line,” terms that video editors used, became vague. Higher resolutions used with NLEs allowed creative off line editing to be completed on line. All types of editors — film, off line, and on line video—had to learn each other’s trade.
But today there is still a learning gap when a video editor makes the jump to film. That gap is primarily due to a lack of understanding of how films work. In this chapter, we’ll look at some of the tools and methods of traditional film editing. Later, we’ll examine how they are still integrated today in even the most technical films.
A Tour of the Film Cutting Room
To a modern NLE editor, the film cutting room might seem more like a museum than a work space. Nonetheless, it has served, and continues to serve, a purpose. If a director wants to see his or her film projected before the final negative is cut, the editor must come here to conform workprint and mag stock, the visual and aural elements used in film, using lists created by an NLE.
Nowadays these rooms are used less, but they’re no less important. Conforming a workprint from an NLE cut list has to be done on an edit bench. It can be checked on a Moviola upright or a KEM flatbed. But the assembly of film begins here, and no matter how high tech the rest of the digital world may be, the only way to project a film is to cut film.
The survey of film editing tools begins with the traditional film cutting room. Most film cutting rooms are the same. There is always a workbench or edit bench with reel rewinds on either end, where the film is cut, synched, and conformed. The work bench has a synchronizer, also known as synch blocks or a gang sync, in between the two rewinds. Here the workprint and mag stock are synched together. There is usually a backlit portion of the table top for viewing frames. A loupe, used for looking closely at frames, is an absolute necessity. And some overhead lights are good, too. Most editors use metal long-armed clamp-on incandescent lights. These make the bench look absolutely hideous, but editors find themselves redirecting these lights all the time, so they’re a must.
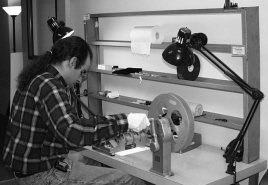
Figure 1.1 A typical film editing bench
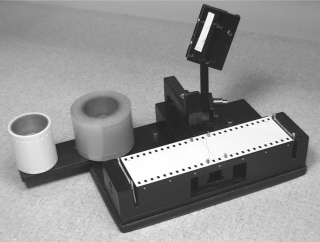
And what would be the purpose of an edit bench without a splicer? Most benches have a Rivas (also called “butt”) splicer on hand. Some use a guillotine splicer. Guillotine splicers are especially efficient for 16mm films. Lisa Day, the editor of many Hal Ashby films, introduced me to a roller splicer made in Canada. The circular blade rolls across the film when it cuts. I like this splicer, mostly because I’m left-handed and have a tendency to reach across the Rivas, which results in splicing more than just film. Splicers are equipped with rolls of splicing tape. Clear tape is used for picture, white tape for sound. The splicer is adjustable to create diagonal cuts for mag stock and straight cuts for film. Diagonal cuts are more durable and less likely to break. But a diagonal cut across a frame of film would be objectionable.
There is always a viewing device. Different editors prefer different devices. There are two different types of devices: uprights and flatbeds. I think uprights are a lot easier to use for most purposes, but they’re also very hard on workprint. As the film goes through the gate of an upright, it brushes against the bottom of the hard metal surface. I’ve seen a number of homemade devices that prevent the film from scratching on an upright. The most popular seems to be a velvet cloth taped to the bottom near where the film enters the gate. For smaller formats like 16mm, I prefer a flatbed, which is not only kinder and gentler on film, but also quieter than the rattle and hum of an upright.
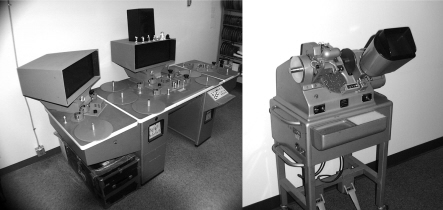
Figure 1.3 KEM Universal Flatbed and a Moviola Upright
A typical film editing room will have a lot of storage racks, large metal bins with cloth bags used for hanging cut film clips, white boxes for storage of cam rolls, sound rolls and left-over clips that are too short to hang in a bin, film cleaner, and other knick knacks. So why am I bringing all of this up in a book about digital filmmaking? Two reasons: One, you might be asked to visit such a room. Try not to freak out. And the second reason is that you might actually be asked to work in a film editing room. If the project follows some of the workflows presented in Chapter 2, there’s little reason to worry. You will only be required to conform the film to the list of numbers generated on your nonlinear editing system.
It’s surprising to find how intuitive film cutting machines are. If you can align a piece of film properly in sprockets, you’ll probably find the process of conforming films relatively easy.
Let’s take a look at film formats and aspect ratios.
Film Gauges and Shooting Formats
Motion picture uses two common gauges but many formats. The common gauges are 16mm and 35mm. 65mm is also used in extraordinary high-budget cases (65mm is the shooting equivalent of 70mm without the 5mm soundtrack area) and there is also Super Panavision 70mm.
The formats of film differ primarily in two ways: matte size, which creates the film’s aspect ratio, and anamorphics, which is an optical solution that allows the film to be expanded for a wider aspect ratio despite its smaller original size.
A full frame of film, whether it be 16 or 35mm, has an aspect ratio very similar to video: film is 1.37:1 whereas video is 1.33:1. So why is the picture wider in the theatre? For the most part, this wasn’t so before the 1950s.
The “Golden Age” of television wasn’t so golden for the film world. More people were staying at home with their families in front of the tube. Box office receipts were plummeting. Many of the major studios were on the threshold of bankruptcy. Something had to be done. One of the answers to the problem was to create, promote and advertise different formats and processes. These included wider screens, brighter colors, bigger pictures and better sound.
Filmmakers found that they could create more dynamic pictures that spilled across giant screens by matting the top and bottom of the film frame and projecting it over a wider space. These mattes created a wider aspect ratio, which later became the standard for almost all theatrical releases.
One of the first of these films to come along was The Robe, presented in CinemaScope at a 2.35:1 aspect ratio. The wider aspect made the viewing of the film much more spectacular. As a result, box office receipts began to increase again.
Of all the mattes that were created, the 1.85:1 aspect ratio turned out to be the most popular. As a result, most films made in America still use that aspect ratio today. European films thought 1.66:1 to be a better solution, and that became their more common standard. The beauty of mattes is that there is no single standard that has to be used. Not all American films use 1.85:1. For example, Tim Burton’s Nightmare Before Christmas was shot with a 1.66:1 matte.
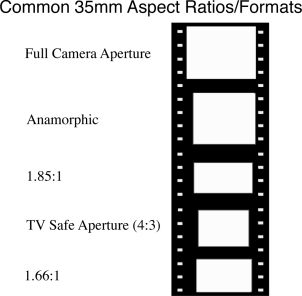
Anamorphics
Anamorphics is the optical science of compressing wide pictures into a more narrow frame of film and decompressing them during projection onto wide screens. Without special anamorphic camera and projection lenses, the film would look compressed when projected. The opening and closing credits of The Sound of Music on video is a good example of an anamorphic distortion. In order to be displayed correctly, movies must be shot and projected with the same type of anamorphic lens. In the case of some video releases where the opening and closing titles are shot in a wider scope, the aspect ratio is so large that to display it on video at the correct aspect ratio would cause the image to shrink significantly. The compromise is an elongated and somewhat distorted image.
Not all directors like anamorphics. There is a compromise in picture quality, particularly in high-contrast images, where bright light smears across the screen. Nonetheless, it is very popular with those films that use environment as part of the character of the film. Westerns with scenic panoramas and science fiction epics with fictional, futuristic worlds tend to take advantage of wider, more spectacular anamorphic aspect ratios.
Soft Mattes versus Hard Mattes
Now that the more common film formats have been shown, here’s how they are created. As it was mentioned previously, an anamorphic film is created with a special type of lens. Different aspect ratios are created with mattes. There are two different types of mattes used when shooting a film, called soft and hard mattes. If the soft matte method of production is used, the final matte or cropping of the frame is created in negative printing, the final stage before the film is released. If a hard matte is used, the aspect has already been determined and the film is cropped during production.
A soft matte, might be considered a virtual matte in today’s terms. That is to say, the matte doesn’t actually exist on the exposed negative. Instead, the director of photography has an outline of the matte in the ground glass viewfinder of the camera. The DP knows where the matte will be, despite the fact that the entire picture is viewable in the viewfinder. The director, when using video assist, has the video monitor cropped to show where the matte will be placed and where the active portion of the frame exists.
The biggest advantage of a soft matte is that it can always be corrected. For example, if by mistake the director of photography included a stray boom microphone in the shot, a soft matte affords the opportunity to move the image higher up into the matted area by creating a new optical of the scene at the lab. Normally this is used only when absolutely necessary, as optical printing can be expensive.
Another advantage of shooting full frame and adding mattes later is that the film can be printed in full frame as well as matted, provided that proper steps were taken during the production phase. This allows an easy conversion for television at its native aspect ratio. Many DVDs provide both full aspect video and letterboxed film aspect ratios. Without a soft matte, the film must use pan and scan to create a full frame image within the normal television (1.33:1) aspect. This requires some hard decisions by the director as to what to include and exclude in the frame. This is becoming less necessary, as new widescreen televisions can adjust for different aspect ratios.
The advantage of a hard matte is simple: what you see is what you get (WYSIWYG). In production, post production, conforming, neg cutting, and release printing phases, the picture is always true to itself. No confusion or questions about what is on the screen. A hard matte is created during production by installing a proper matte in the matte box of the camera and exposing the original camera negative (OCN) with the matte in place.
Camera Rolls and Sound Rolls
Normally a film is shot on 400 foot camera rolls. On 16mm film, this translates to about 11 1/2 minutes. On 35mm, it’s close to 4 minutes. Numbering systems for cam rolls are usually very simple. The first one is Roll 1, second is Roll 2, and so on. If two cameras are used for a scene, the numbers have letters attached. For example, cam roll 3 on the first camera is 3A, cam roll 3 on the second camera is 3B. In cases when the second camera is seldom used, the cam roll number matches the succession of single cam roll numbers. In other words, if the production is shooting a twenty-third cam roll, but it is the first cam roll using a second camera, the cam roll would be called 23B, not 1B.
Sound is recorded on location using either a time code Nagra reel to reel recorder or a time code DAT. Nagras appear to be getting more scarce on the set, because of the digital qualities of DAT and the ease of SMPTE time code. A time code DAT can go direct from the production set to an NLE. Nagra reels are seldom transferred in this fashion.
Time code DATs range in length from 30 to 90 minutes. In some higher-budget cases, the DATs are transferred to mag stock, a magnetic oxide tape that has sprockets and is the same gauge as the film. Once a cut list is completed, the editor and assistant can cut or “conform” a workprint and a mag stock copy of their digital cut on an edit bench.
In extreme cases, non-time code DAT can be used on location as well. In order to stay in the digital domain and establish frame accuracy, it must be transferred or cloned through a digital port on the machine to a time code source deck, preferably another DAT. Without this, it will not be able to redigitize the sound. Any accidental deletion of files from the NLE could prove disastrous.
Numbering Formats
Films can use several different frame numbering schemes. Each of these methods is valid, but they are used for different purposes. This section examines the most common ways used to number film frames, and how they are synchronized with sound.
Edge numbers is a frequently used and often confusing term. There are actually two different types of edge numbers: ink numbers and key numbers.
Ink Numbers
Ink numbers are printed onto workprint and mag stock after they’ve been synched on the editing bench. Ink numbers are used a lot less on NLE projects these days because material can be synched in the NLE after it is transferred on a telecine instead of on an edit bench. However, if the budget allows conforming a workprint during an edit on an NLE, ink numbers could be used as a reference. There are lots of different ways to cut films, which are examined in Chapter 2.
Ink numbers are divided into three components: a prefix, which is two alphanumeric characters for 16mm and three for 35mm; the leading numbers, which come in two varieties as well, four digit and five digit; and a frame count, which is not a visual part of the ink number, but is used to identify frames between ink numbers. Usually the prefix numbers match each synched roll of film. Most major studios have individual methods of numbering ink numbers on their films. Alphabetic characters can be used, so that synch roll letters are not confused with cam roll numbers. The original intent of the prefix was for shot numbers, which is the English method of shooting films. Instead of using scene numbers as a guide, each shot is numbered and the ink numbers reflect that number in the prefix. So shot 1 would have a prefix of 01, and so forth. Ink numbers are more difficult to track, so a code book is needed. The code book shows the relationships between ink numbers and the latent edge numbers on the OCN and workprint. It also shows the relationships for original recorded sound and the mag stock that is used to conform the workprint.
Figure 1.5 Ink Numbers on workprint This 35mm mag stock has a three digit prefix followed by four leading numbers.
Key Numbers
Key numbers, also called latent edge numbers, are more commonly used with NLEs. Key numbers are generated along the edge of the film after it is processed. They are a physical part of the film and don’t require inkjet printing, as ink numbers do. When a workprint is made, the key numbers match the ones on the OCN, or original camera negative. Using this method, it is a lot easier to conform the OCN after the cutting is done. Beside the key number on the film’s edge is a bar code, known as the Key code. This bar code can be read by most telecine machines and makes it easy for the colorist to database frame numbers to use in an NLE. 35mm films have a new key number every 16 frames for each foot of film. Kodak 16mm films change key numbers every 20 frames, or 6 inches of film. Some other 16mm film manufacturers have key numbers every 12 inches or 40 frames. To accurately keep track of each frame beyond the key number, a frame count is added.
One of the problems with the use of key numbers is that they are indeed latent. In other words, if there is a light leak in the camera and the film edge is exposed, it could actually overexpose the key number, so that the telecine (or anyone or anything else) could not read it. Still, it is much more advantageous in the realm of NLEs to use key numbers than to revert to a code book.
The key numbers identify certain traits of the film, including the manufacturer, the stock type, a prefix identifying the roll and a footage count. For example, the key number KN 91 1246 7990 indicates that the film used is Eastman 7292 stock (see Table 1.1). Every manufacturer uses a different prefix for each stock.
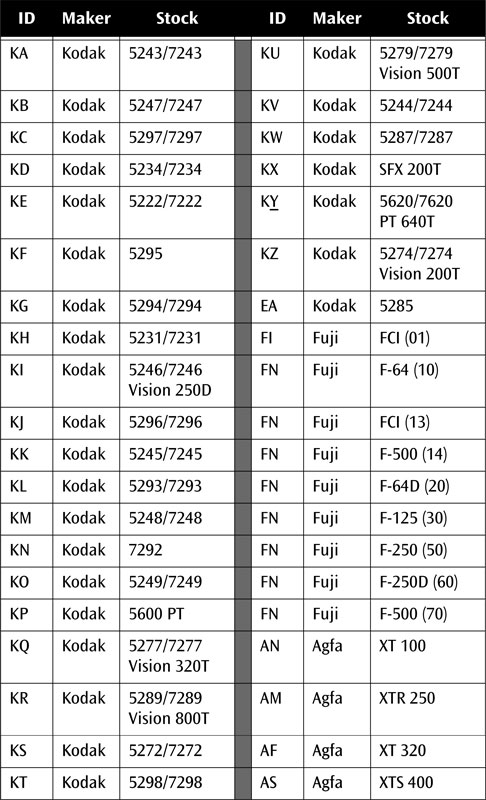
Note that Fuji Keykode ID “FN” refers to several different stocks. To decode the exact stock used, it is necessary to read the barcode, which has a numbering system instead of lettering. The bar code ID number is in parentheses.
The key code reveals the same information as the human-readable key numbers, but adds information about the date of manufacture of the film.
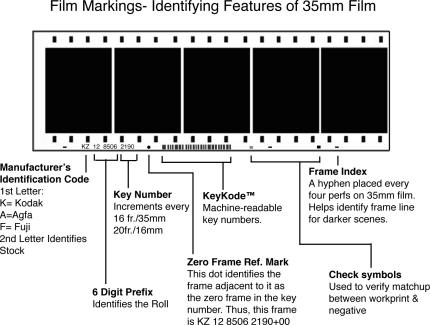
Figure 1.6 Identifying Marks on 35mm Film
Time Code
Time code is used as a method for counting frames with videotape. From its beginning in the mid 1960s time code was never accurate. Time code measured the frame rate of video at 30 fps, when in fact the frame rate is 29.97 fps. For years, this was not a problem. In the late 1970s, a combination of automated equipment and syndicated television significantly changed that. Broadcast playback was measured by a clock in real time. But a program that ran 28:30 minutes using 30 fps time code was actually a couple of seconds longer. So the automated equipment ended the program abruptly and went to a commercial. Unfortunately, the last two seconds of the program was usually the syndicator’s logo.
The result was the use of a new, more accurate form of time code. To distinguish between the two, the accurate version was called drop frame because it “dropped” two numbers of frames every minute except for every tenth minute, which maintained accurate timing according to the 29.97 fps play rate. The traditional 30 fps measuring method was called nondrop frame.
It is important to note that drop frame never truly drops a frame. It drops the names of the frames. The number of frames is the same in nondrop frame time code and drop frame time code, but the names of the frames differ between the two. This could be compared to high-rise buildings that have at least thirteen floors. They always have a 13th floor, but they often skip the floor number 13, going from 12 to 14.
Both of these types of measurement are still used today. Broadcasters generally prefer drop frame, although it should be noted that some still stick to the old way. Many of the programs that I edited for PBS used nondrop frame. As a result, a standard 30 minute show, with a running time of 28:38 was actually came in at 28:36:08 using nondrop time code.
Animators, advertisers, and filmmakers tend to avoid drop frame time code. Animators find the loss or dropping of frames confusing. When each frame of animation is created, a dropped frame can confuse the count of actual frames produced. For the filmmaker, it can cause a numeric inconsistency for gauging pulldown. If a telecine transfer is made and it is assumed that every fifth frame of time code is a telecine A frame, for example, what happens at the top of every minute when that count is altered by two frames? The consistency goes away. As a result, filmmakers usually insist that nondrop frame time code be used both for picture and sound.
Advertisers tend to use nondrop frame for another reason. Their end product, normally under a minute, doesn’t require any end-of-minute adjustments to maintain consistency. A 30-second spot will not need a frame adjustment.
With filmmaking, the rule is simple: use nondrop frame time code.
There is no doubt that a film generates more paperwork than any television or video product ever could. Perhaps the best reason for this is that there are so many people working on so much footage that the more information given, the better the odds of successfully working with the materials. As a result, logs of information are kept so that film editors can understand what took place during the production.
A typical production uses these logs and reports:
Script supervisor daily production report or log
Facing pages
Lined script
Camera reports
Sound reports
Script Supervisor Daily Log
Some new directors of low-budget films make the poor decision not to hire a script supervisor. This almost always results in catastrophe. A good script supervisor can make the post production process smooth through the use of informational tools such as the script supervisor daily log. This log is full of details that can prevent the editor from wasting time looking for missing footage.
On every shooting day, the script supervisor prepares a log. The log is a journal of sorts, with complete details on which scenes were shot on which cam rolls and sound rolls and which takes the director wants to print. A typical log will contain
Production title
Director
Date
Production company
Script supervisor
It also contains entries for each shot, including
Cam roll number
Sound roll number
Slate (scene number)
Print (selected take numbers, chosen by the director)
Time (duration of the shot in minutes:seconds)
Description
The description usually contains a few words about the subject and framing of a shot. It may also contain information that the director requests be put into the log.
Facing pages are given their name because they are printed on the back of a sheet of three ring paper instead of on the front. Their purpose is to be placed opposite a corresponding script page, so that the editor may look at all of the information about a scene with the script on the other side of the open binder.
Each facing page has an entry for the corresponding script page that it should face. They are one-sided, so that additional pages may be added when necessary. For some films, the facing pages have such copious notes that they do not all face the correct page. In these cases, the pages are placed together so that the editor can find the one that corresponds with the scene they are cutting.
Facing pages have much of the same information as a daily log, with more explicit descriptions, remarks, and lens length. The remarks usually have some information about the director’s preference, or note any mistakes were on any of the takes. They also contain information about changes in the blocking or in the script and how they were dealt with on the set.
Facing pages also have circled takes, which help the editor determine the director’s preferred take. Facing pages may not always explain why certain takes were preferred over others, but that is usually evident in the dailies themselves.
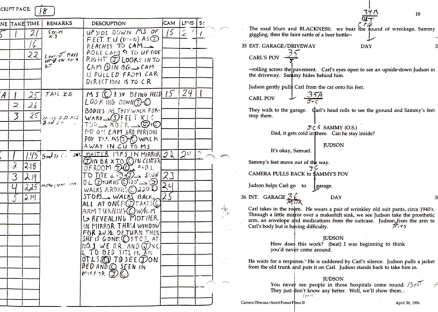
Figure 1.7 Facing Pages next to a Lined Script.
Lined scripts provide the editor with a visual representation of what is happening on camera over the course of the script. Script supervisors create lined scripts to let the editor know circled takes and coverage for the scene. A typical lined script would contain
Scene number
Circled takes
A straight line during dialog to indicate that the persons speaking are covered in the shot
A squiggly line during dialog to indicate that the persons speaking are not in the shot
A brief shot description, such as MS- Dan Keitz in living room
In some cases, an audio or video time code for the start of the shot
When used with facing pages, the lined script contains all of the items necessary to edit a scene. These tell the story of what was intended and what actually happened. Other elements, such as sound and camera reports can also be used as a reference.
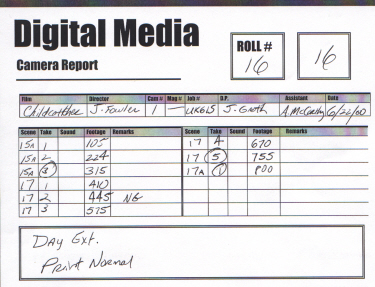
Camera Reports
Camera reports are created by the camera department and contain information about what was shot on each camroll, including
Cam roll Number
Scene/take
Length of shot (in footage)
Total footage per roll
Frame rate (normally 24)
Date
Notes
Camera operator or assist name
Circled takes (chosen by the director)
Circled takes can be noted in NLEs by either adding a Print column to an electronic bin or using an asterisk (*) next to a clip name. Any uncircled takes are also referred to as B-Neg and aren’t always telecined or printed, depending on the budget.
Sound Reports
Sound reports are the sound department’s equivalent of a camera report. The sound reports have more precise information, because SMPTE time code can be noted during recording of sound. A sound report will contain
Sound roll number
Scene/take
SMPTE time code
Date
Sound mixer name
Notes
Circled takes
Code Books
Code books are post production logs for recording the relationship of scenes with ink numbers, key numbers, sound rolls, cam rolls, lab rolls, and time code. Primarily used for tracking ink numbers to their original cam roll and corresponding key numbers, a code book is a regular item in most film cutting rooms.
Code books aren’t always necessary in a digital editing suite. The database of materials is already recorded in an electronic bin, the result of an automated telecine log, which records the numbers automatically. But a code book is a very handy reference in either room, particularly if there is doubt regarding the validity of the database, or if ink numbers are used.
Slates
A slate is the best visual representation of what happened on each shot in the dailies. The slate should contain both audio and visual information. In some cases, if the shot is without sound (MOS), the sound person will do the audio slate anyway. The slate should contain the production name, director, director of photography (DP), scene and take and shoot date.
There is also a “smart slate” that will generate audio time code information in an LED array located at the top of the slate. This makes it much easier to sync sound with picture. An editor can check the smart slate against the database in the NLE to ensure that the audio time code matches. In some situations, audio time code will have to be entered manually. Audio time code should always be recorded using nondrop frame mode.
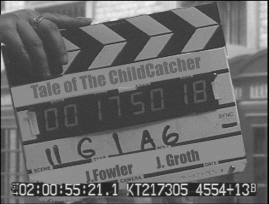
Figure 1.9 Smart Slate
When Good Notes Go Bad
If the camera reports don’t match sound reports on circled takes or the facing pages don’t have information that agrees with the rest of the production notes, it is best to call the script supervisor. This person is in charge of keeping track of the various reports and should have accurate answers. Any of the production paperwork that doesn’t jibe is the responsibility of the script supervisor. Going over the supervisor’s head to the director is considered bad form and can create more problems.
It’s important to get to the bottom of these minor problems before they become big problems downstream. As the late Alabama football coach Paul “Bear” Bryant once said, “It’s the little things that’ll git ya.”
Now that the tools of filmmakers have been examined, let’s move on to some of the workflows for post production.