Chapter 8:
Editing Film on Media 100 NLEs with Slingshot Pro
In this chapter, we’ll take a look at integrating film with two popular applications, Media 100 and Trakker Technologies Slingshot Pro.
About Media 100
Media 100 is a digital 30 fps NLE. It is built for video editing and does not have any special features, effects or listing capabilities that relate to film. Media 100, Inc. recently made a move toward producing NLEs for interactive and web output. They acquired Terran, Inc. and have been focused primarily on furthering the development of streaming video and interactive technology. There are a great many Media 100 systems in the market with several options and features. None of these relate to film. This necessitates the use of a matchback program. In this chapter, we’ll look at using the Media 100 with Slingshot Pro.
About Slingshot and Trakker Technologies
Trakker Technologies’ Slingshot Pro is a suite of applications for matching back EDLs from NLEs with the original telecine log. It should be noted that Slingshot Pro is very robust and can work with just about any NLE made, including Avid and Final Cut Pro. Slingshot Pro consists of three stand alone applications:
The Telecine Log Converter (TLC) converts the four most common log types into batch digitize lists for all major NLEs.
The Film Trakker converts video EDLs into 24 fps film cut lists, including assemble, dupe, optical, pull, and optical pull lists.
The Sound Tracer traces information from any telecined audio back to its original time code in the database. If audio is digitized separately, there is not normally a need for this application. However, it is an absolute necessity for finding the original numbers of sound transfers done in telecine.
Drag and Drop Functionality
Slingshot’s biggest asset is its drag and drop functionality. From the first few pages of the User Guide, it’s easy to learn how to set up the applications and drag the proper files in and out for a fast and easy matchback. There are so many options that one could select when using matchbacks that it could be overwhelming. Slingshot sticks to the important items and pretty much ignores fancy window dressing. It’s configurable to a number of specifications, but also is easy to run.
In order to do the work, Slingshot creates an intermediary file between the original telecine log and the final EDL. This file, called the Telecine Log Converter file or TLC (not to be confused with Time Logic Control) is the key to creating successful lists.
Slingshot lets the databases do their work without interference. Instead of having to database each shot that has already been databased in the telecine logs, Slingshot translates them into the language of the target NLE rather than making the editor redo work that’s already been done.
Supported Telecine Logs
Slingshot’s Telecine Log Converter will convert from the four most popular formats of telecine log, which are shown in Table 8.1. Telecine Log Converter will create three types of files from the original telecine logs: they are import logs, TLC files, and dailies logs.
Table 8.1 Telecine Log Converter Input Formats
Log Type | File Name = Tape name + Extension |
Keyscope Telecine Logs | .KSL |
FLEX Telecine Logs (aka “Flex Files) | .FLX |
Evertz Telecine Log | .FTL |
Avid Log Exchange | .ALE |
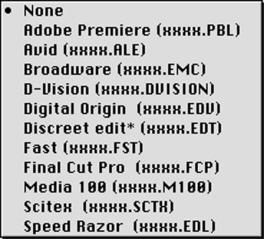
Import logs are the files converted by TLC for batch digitizing with the NLE. These files are created specifically for the type of NLE that is being used. Once imported into the NLE, the individual clips in the files can be batch digitized. TLC will output Adobe Premiere, Avid Log Exchange, D-Vision, EMC, Media 100 Power Log, Discreet Edit, Scitex/ImMix, Speed Razor and Final Cut Pro input files. As seen in Figure 8.1, just about any type of NLE is supported.
TLC Files
TLC files contain the vital information necessary for Slingshot to perform film and sound matchbacks. Be sure to keep these in a folder in a safe place. It also isn’t a bad idea to copy the TLC files onto a removable form of media for archive. Without these files, a matchback is impossible, so plan wisely. They will be used at the end of the edit to create the final cut lists and sound EDL.
Dailies Log
The dailies log is created for the use of the assistant editor or editor. The dailies log contains vital information in detail for each day of telecine transfer. It also serves as a tool for proofreading log information and correcting any errors in the database. The dailies log will contain key numbers, camera roll, sound roll, sound time code, video time code, reel name, and scene and take entries. The dailies log can be printed and placed in a binder for use in conjunction with camera reports, sound reports, and script supervisor notes.
Log Conversion Procedure
Before starting TLC, create three new folders to hold your TLC, import files and dailies logs. TLC will work with these folders later when the preferences are adjusted. Launch TLC. The pop-up menu shown in Figure 8.1 appears.
TLC Preferences
Before any logs are converted, it’s necessary to adjust the preferences to choose a destination folder for each of our TLC file outputs. First, click on the pop-up menu and choose the editing system being used (in this case, Media 100). Next, select the destination folders under Preferences. The screen shown in Figure 8.2 appears.
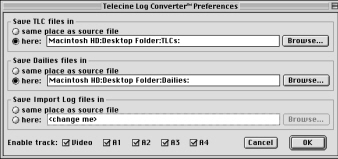
Figure 8.2 TLC Preferences menu
In the Preferences menu, destination folders and track enabling can be selected for the conversion. Once this is set, drag and drop telecine logs on the TLC application and it will automatically place the results in the appropriate folders.
Choosing Destinations
For each TLC, dailies and import log, save the files in the three separate folders created earlier. For purposes of organization, it is recommended to use separate folders. If a single folder is used, the organization of the project becomes muddled and files are harder to find. Choose the destination by clicking on the Browse button and navigating to the proper folder. If Browse is grayed out, deselect the Same Place As Source File option by clicking on the Here radio button.
Enable Tracks
Sometimes telecine databases include audio tracks that need not be digitized. As a result, if the telecine files are directly converted and batch digitized as databased, you’ll eat up a lot of drive space on your NLE digitizing redundant or empty sound tracks. This error can be reduced by examining the source tapes and determining which tracks actually contain audio that needs to be digitized. Usually this information is on the label, however, the transfer could also have included redundancy between tracks one and two, in which case, only one track needs digitization.
When the proper tracks are selected under Enable Tracks on the preferences window, it will eliminate unnecessary tracks on the batch digitize Input list for the NLE, thus saving time and drive space. Undoing this in the NLE is time consuming and tedious. Better to do it here before importing.
Syntax Error Correction
Telecine logs can potentially contain incorrect or missing information. This results in redigitizing, clip modification, bogus bins and media files, and other nasty artifacts. When converting logs through TLC, any syntax errors will be flagged before the conversion is complete. The syntax checker in TLC is rather sophisticated, with a WYSIWYG debugging-type screen that not only explains the error, but shows it in the text of the log file.
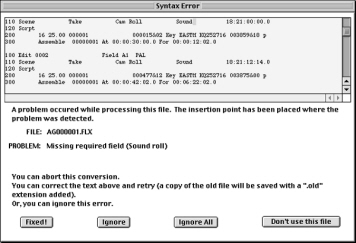
Figure 8.3 Syntax Error screen in Telecine Log Converter
When a syntax error occurs, the top of the screen shows the error in the native file. An insertion point cursor has been placed on the errant section of the text. Below the text is an explanation of why the file was not converted, the file name, and the problem. At the bottom of the screen is an explanation of options and the actions that can be taken. With syntax errors, there are four options from which to select at the bottom of the screen.
Fixed! Choosing Fixed! indicates that the text at the insertion point has been adjusted and the error is fixed. For example, if a scene number is missing, the insertion point is placed next to the Scene entry in the log. Type in the proper number and then choose Fixed! If Fixed! is selected, be careful not to accidentally ruin the formatting of the file by placing spaces in between the entries. If the other entries in the log shift disproportionately, it is possible that another syntax error has been created. In any event, if this error occurs, abort the conversion and start over again.
Ignore. If the error is ignored, TLC will continue with the log conversion. But be warned! Ignoring the error in a telecine log could have disastrous results. The logs could contain inaccurate information or even be incomplete. On some occasions, I’ve had the misfortune of making this error, only to have the director ask, “Where’s take 11?” to which I respond, “I didn’t know we had a take 11.” Which leads to a mad skimming of the camera reports, which leads to investigating the original logs which leads to total recall of a bumbling error on my part.
Ignore All. Be sure that you feel confident when choosing this option. Ignoring All pretends that any syntax errors don’t exist. Although there may be a known consistent error in the log, it could also contain a few surprise errors as well. Choosing Ignore All will bypass any errors encountered. See the previous anecdote for potential results.
Abort. If you feel squeamish about debugging telecine logs, simply choose Abort and send it back to the telecine house. Let them deal with it.
Once the logs are exported in the appropriate format, enter the Power Batch capture tool in Media 100 and digitize as usual. Because the lists are controlled externally by Film Trakker, there are no special considerations when cutting with Media 100 except for creation of lab standard dissolves for A/B conforming, normally used with 16mm films. Film Trakker uses the laboratory standard lengths.
Synching Picture with Sound in Media 100
Synching up in Media 100 is about as easy as it gets. To do this, you’ll need to create a new program in the timeline for every clip that needs to be synched. Before you begin, it is wise to create a new bin for synched clips to avoid any confusion with clip names. The original audio and video clips should be together in the same bin.
First, load the video into the timeline. Double click on the video clip to make it appear in the Edit Clip window. Look for the first frame where the clapper contacts the slate. Press Control-F6 (the function key) to mark that point on the clip. A small blue triangle appears at the current time indicator in the timeline. That triangle is the sync mark.
Next, load the audio clip into the timeline so that it overlaps the video, and scrub through it until the first frame of the clapper is heard. Waveforms can also be used to see the sound. From the Track menu, select Show Audio Waveform. It may be necessary to zoom in to the timeline a bit to see the waveform. When the frame where you can first hear (or see, with audio waveforms enabled) the clapper connect is found, press Control-F6 to put a sync marker on that frame of the current time indicator. Holding the option key down, click on the video track and drag it so that the two blue sync markers connect in the timeline. Holding down the option key will cause the two to snap together. Select both the audio and video clips by clicking on the first clip, then shift-clicking on the second clip. From the Program menu, select Sync Clip. The clips in the timeline will turn pink, signifying that the clips are synched together. Click and drag the synchronized clips from the timeline into the new bin.
With each synchronization, it is important to check for accuracy. I find it somewhat common to be off a frame when synching up clips. If you find yourself in this predicament, no problem. Re-mark the originals and do it again, until you get it right.
Some Media 100 users recommend deleting the original video and audio clips- not the media, mind you, but the clips. I highly recommend that you not do this. Instead, place them in an archive bin, where they can be accessed in the event of an emergency.
A project can be organized in a Media 100 in exactly the same fashion that I mentioned previously in the Avid chapter. Import the log and place it in a cam roll bin. Copy the clips and place them in separate scene bins. When you sync up clips, create synched scene bins and use them there. This redundancy allows you to have a backup in case unforeseen bin corruption or sync issues are later discovered.
That’s not to say that NLEs regularly lose bin information. In my entire nine years of working with NLEs, I’ve lost only two bins to corruption. But in both cases, I recovered the information because the clips were redundant in other bins. Most NLEs have a recovery process for missing clip information, but who wants to go through that in the middle of an edit?
Because Media 100 is a video editing machine, audio sync can only be frame accurate, as opposed to perf accurate. Most 35mm film formats have four perfs per frame, so when cutting on a traditional bench, it’s easier to attain sync by slipping the audio track a perf or two. Avids have the ability to slip perfs in 24 fps projects. Still, missing sync by a perf or two is common. If you look closely at filmed television, you’ll see it all the time.
Media 100 has a full suite of effects, but most don’t have a lot to do with filmmaking. An exception is its matting capability, which can allow you to letterbox for appropriate formats. When creating dissolves, be sure to make them center-point dissolves at lab standard frame counts to avoid additional optical costs.
After the film is edited, it’s time to output EDLs. For Slingshot, output either CMX 3600 (most commonly used), CMX 3400, or GVG 4.0-7.0 EDL formats.
Film Trakker
Once the EDLs are output from the Media 100, use Film Trakker to generate your cut lists. The Film Trakker program works very simply, comparing the TLC file, which contains both key numbers from the film and transfer tape time code to the video EDL. First, launch the Film Trakker application. The FT interface appears, as shown in Figure 8.4.
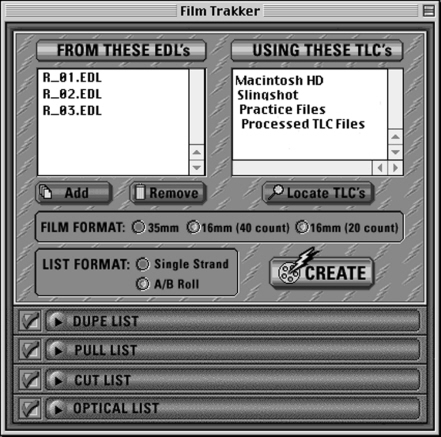
Figure 8.4 Film Trakker Interface
Film Trakker Preferences
Before creating the lists, be sure to select preferences. Each one of the Preferences must be selected before an accurate list can be generated. Once saved, the preferences will work automatically, as described with TLC.

Figure 8.5 Film Trakker Preferences
Format
There are four formats available, as shown in Table 8.2.
Table 8.2 Film Trakker Format Preferences
Film Trakker Format Preferences | Description |
NTSC 30:24 | Use this option if the film was shot at 24 fps, then transferred at 24 fps to video at 30 fps. (29.97fps) |
NTSC 1:1 | Use this option if the film was shot and transferred at 30 fps to video at 30 fps (29.97 fps) |
PAL 25:24 | Use this option if the film was shot and transferred at 24 fps to video at 25 fps (PAL B Telecine- See Chapter 3) |
PAL 1:1 | Use this option if the film was shot at 24 or 25 fps then transferred at 25 fps to video at 25 fps (PAL A Telecine- See Chapter 3) |
Choosing this option turns on the syntax checker when comparing EDLs to TLC files. The syntax checker with Film Trakker works exactly as it does with TLC.
Flag and Match Unknown Tape Names
As Film Trakker reads the EDLs, it looks for syntax errors and any unknown sources. To ensure accuracy, select this option so that Film Trakker will spot any unknown tapes that exist in the EDL that aren’t in the TLC files. There could be a few reasons to use this option.
- A tape has been digitized into the NLE without transferring its telecine log. Film Trakker will need the right information to correctly produce the cut list. Transfer the telecine log with TLC so that Film Trakker can find the proper corresponding key numbers.
- The name of an existing tape was changed. In this case, match the new tape name in the EDL to an existing tape number that was previously used to designate the same tape.
- You’ve forgotten or missed running a log through TLC. Make sure that all of the logs are converted and saved in the same folder so that Film Trakker can use them.
When Film Trakker encounters a Flag and Match error, there are three options.
Table 8.3 Flag and Match Options
Flag & Match Error Option | Description |
No Match | This tells Film Trakker that there is no match, i.e., that a telecine log doesn’t exist for this reel. |
This One | Selects the reel highlighted on the left side of the screen in the tape list. |
Ignore Remaining | Ignore is rarely a good idea when it comes to matching lists, but if you’re creating a combined list of film & video, I could see why you might want to avoid the annoyance of flag & match warnings. Just remember, you asked for it. |
SyncLock is the process that Film Trakker uses to maintain correct sync between picture and sound, as all matchback programs must do. (See Chapter 6 for details on how matchback works.) If sound sync is not important for your list and the duration poses no problems (“Running Short” and “Running Long” in Chapter
6), then you can disable this option. For most purposes, you’ll want to keep SyncLock on.
Show EDL Comments
This option transfers comments from the EDL to their corresponding event in the cut list.
Use Feet + Frames vs. Absolute Frames
This option allows the choice between showing durations in the cut list as feet+frames or absolute frames. Most editors like footage, but animators prefer absolute frame counts, for the most part.
Cut List Options
Film Trakker creates cut lists (also called assemble lists), dupe lists, pull lists and optical lists. The options for each type of list are selected by clicking on the twirl down button on the Film Trakker interface next to the list that is selected (see Figure 8.4). Here are the contents of each list and the configurable options.
Cut List
The cut list for Film Trakker includes the following entries: event number, footage (feet + frames or absolute frames), record time code, duration (for both film and video), first and last key number (a.k.a. key number in and key number out), cam roll number, and clip name (normally the scene and take numbers).
The following options are available on the cut list tool:
Include Optical Count allows for opticals to be included in the assemble cut list. It’s convenient to see all of the events in the list. However, this is not recommended for use with the optical house. Most optical houses just want to see opticals, not everything else in the movie. The cut list makes allowances for lab standard dissolves on A/B conforms and includes them in the cut list, not the optical list.
The start frame is a footage counter and is expressed in feet and frames, normally starting at 0000+00. Check with the neg cutter before assigning a number. Some start with 0000+00, others prefer every frame counted and start at 0000+01.
Film Trakker’s dupe lists can be traced across several EDLs. For example, if you build 7 reels for a feature, Film Trakker will check all of the reel EDLs for dupes at a single time. It’s a good idea to check for dupes after the first cut from time to time. The sooner it is done, the less possibility that the director will fall in love with the cut and want to use both. Dupes are expensive.
The dupe lists include the following entries:
Set – Each duped section is listed as a set of dupes. In this way, you can determine where they’re located and which, if any, to eliminate.
EDL – The name of the originating EDL of the dupe.
Time Code- The location of the dupe on your sequence’s master time code.
Event- The event number of each duped item according to the cut list.
Footage- The running footage count in the cut list where the dupe occurs.
Duration- Expressed in feet and frames or absolute frames.
First/Last Key- Key numbers, starting and ending.
Cam Roll
Clip Name – The clip name normally identifies scene and take
Dupe List Options
The dupe lists in Film Trakker offer sort and handles options. Normally one would sort a dupe list by Cam Roll first, then by Key Number. However, the following sort criteria are available to choose from:
Footage- where the clip occurs in the edit.
Record TC- master record time code in point.
Duration – length of the duped clips
First Key- Key number start frame
Last Key – Key number end frame
Camera Roll
The number of frames used for handles in the dupe list can also be adjusted. Contact the neg cutter to see how many frames they will need for each dupe.
As described in Chapter 6, pull lists help the person conforming the film to pull the clips necessary for conforming a workprint or negative. A Film Trakker pull list contains
Reel & Event- based upon built reels and the event numbers in the cut (assemble) list.
First/ Last Key
Duration- Feet + frames or absolute frames
Cam Roll
Clip Name- scene and take
Pull List Options
Pull lists can be sorted by the same criteria as specified in the Dupe List Options. Normally, pull lists are sorted by cam roll, then first key numbers. There is also the ability to set handles. As before, check with the neg cutter when setting handles.
Additionally, a choice can be made between creating a cut pull or optical pull list, or both. And you can create a global pull list for a set of EDLs or an individual pull list for each EDL.
Optical List
Optical lists contain specific information that needs to be sent to the optical house to create non-standard fades, dissolves, and other effects. This information includes A and B sides of the optical, key numbers of A and B sides, the optical effect and duration of the effect.
Optical List Options
List Format – Choose between a number of optical list formats. The Trakker format looks much like a cut list and is the easiest to read.
Global List- Same as the option on Pull lists. This will create an optical list from several chosen EDLs.
Individual List- Again, same as the option on Pull lists. This creates an optical list for a single EDL only.
Before the lists are created, select a format on the Film Trakker Interface. Choose between 35mm, 16mm (40 Count), and 16mm (20 count). After selecting the film gauge, it’s necessary to select a conforming format. Standard is single strand for 35mm, A/B for 16mm. For more details on conforming, see Chapter 4. Add all of the EDLs and TLC files. Select the EDLs in the left window, the TLCs in the right. Once the list types are selected at the bottom of the interface, click on Create. The lists can now be viewed, printed, or saved.
Did you notice that I mentioned not one, but multiple EDLs and TLC files? Film Trakker recognizes that filmmakers will create separate built reels for conforming. As a result, you’ll need an EDL for each reel. Film Trakker can search across several reels for dupes. If you ran a separate matchback for each reel without one recognizing the other, this would be impossible.
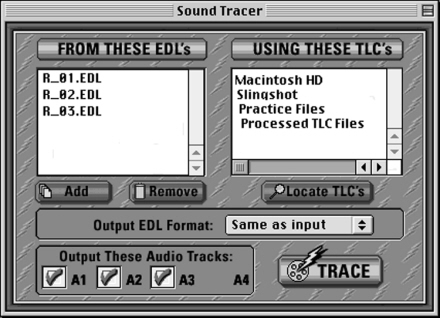
Figure 8.6 Sound Tracer Interface
The Sound Tracer
The sound tracer uses the data from TLC logs and EDLs to trace back to time code of the original sound source (DATs or Nagra recordings) so that an EDL can be created for the sound department. You can always go with your NLE sound or an EDL from the videotapes, but if you use sound from an original source, the Sound Tracer can help you find the original numbers. Most sound departments want the most pristine recordings available, and that doesn’t come from videotape!
Using Sound Tracer is like using any other Trakker application. Once the preferences are set, drag and drop EDLs onto the Sound Tracer icon. From there, double click on it to open the interface. Sound Tracer uses the TLC files and the EDLs to determine correct original sound numbers that are used to create the final EDL. Like Film Trakker, it can input CMX 3400, CMX 3600 or GVG 4.0-7.0 EDLs. It outputs these same types of EDLs. Sound Tracer has the same syntax correction as well as flag and match functions as TLC and Film Trakker. After using Slingshot a few times, it became very clear to me that the creators of the application wanted a hassle-free experience for matching back.
Sound Tracer Preferences
Before generating your EDLs, set the Sound Tracer preferences.
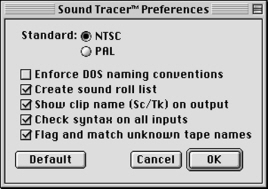
Figure 8.7 Sound Tracer Preferences
Standard— Choose NTSC or PAL
Enforce DOS Naming Conventions—Anyone who has been around computers for a while knows that DOS has some limitations on the number of characters used in file names and extensions. If your sound department uses DOS, you need to select this option.
Create Sound Roll List— This option creates a list of sound rolls used in the EDL so that the sound department can pull them for mixing.
Show Clip Name (Sc/Tk) On Output— Shows the scene number and take in the EDL. Sound mixers usually need this type of information to correlate any spotting notes made by the director.
Check Syntax on all inputs— Same as in Film Trakker.
Flag and Match Unknown Tape Names— Same as in Film Trakker.
After the preferences are set, the TLC files located, an output format is chosen and the tracks to be included in the list are selected, click on the Trace button and Sound Tracer creates the list.
Running the Lists
Now that I’ve gone through every configuration, here’s an example of how Slingshot would run with Media 100 if we had the preferences set and the film edited.
Drag and drop all of the telecine logs onto TLC. The logs are converted in your TLC folder. Drag and drop all of your EDLs into Film Trakker. Set up the project under Preferences by choosing the conversion type. Select the type of cut lists that you wish to generate. Click on Create. It’s that easy. Save everything and print as required.
Slingshot Pro can tackle matchback as good or better than any other program on the market. But what if you want to a more integrated matchback application that works inside of your NLE? In the next chapter, we’ll take a look at FilmLogic, which uses a combination of databasing, plug ins and reverse telecine.