
Chapter 7: Working with Life Cycle Events, Validations, and UI Logic
In this chapter, we'll work with the life cycle events of our page, which will help you to execute your custom code before or while exiting the page. Life cycle events are very important to understand as they help you to perform cleanup and other important tasks before a user enters or exits a page. For example, you can redirect a user to the login page if a user is trying to access a secured page or you want to abort the user session before the user leaves a secured page. We'll execute an example where you will see how to use a life cycle event to load data before a page loads.
We'll show you how to populate the data from relational Business Objects in two separate tables and how to populate child data based on the selection of a parent row. You will learn how to validate a web form on the client side.
We'll show you how to implement various logic related to UI components, such as hiding/showing UI components, calculating a value based on the value of other fields, enabling a logout feature, and so on. You will also learn how to create dependent lists of values from two different Business Objects.
In this chapter, we will cover the following topics:
- Exploring life cycle events
- Loading data on page load
- Showing the parent-child relationship on a page
- Enabling client-side validation on forms
- Working with various UI logic
- Creating dependent lists of values
After completing this chapter, you will be familiar with the life cycle events of a page, how they work, and how to use them in a VB application. You will be able to use the ADP variable to load data from a Business Object and use it to populate a table. You will be able to perform client-side validation on a web form using JavaScript. You will be able to perform various UI logic in a VB application and you will be able to create dependent lists of values.
Technical requirements
To complete this chapter, you need the following:
- A Visual Builder instance
- VB login credentials
- A Business Object
You can find the full source code used in this chapter here: https://github.com/PacktPublishing/Effortless-App-Development-with-Oracle-Visual-Builder/tree/main/Chapter07.
Exploring life cycle events
Each and every page in a VB application goes through a life cycle in which a series of actions or tasks is performed. These actions include the initialization of a page, the initialization of types and variables, the rendering of UI components, allowing a user to save the changes before they exit a page, and the cleanup of the resources after leaving the page. It's really important to understand the life cycle of a page so that you can write your code at the correct life cycle stage.
Similarly, an application and its flows have their own life cycles. An application can contain multiple flows, and a flow can contain multiple pages.
Every stage of the page has associated events that you can use to write your code. For example, you want users to log in before they try to access a secured page, and you want to delete the user's session after they have left that page.
Let's learn about the different life cycle events of a page through the following figure:
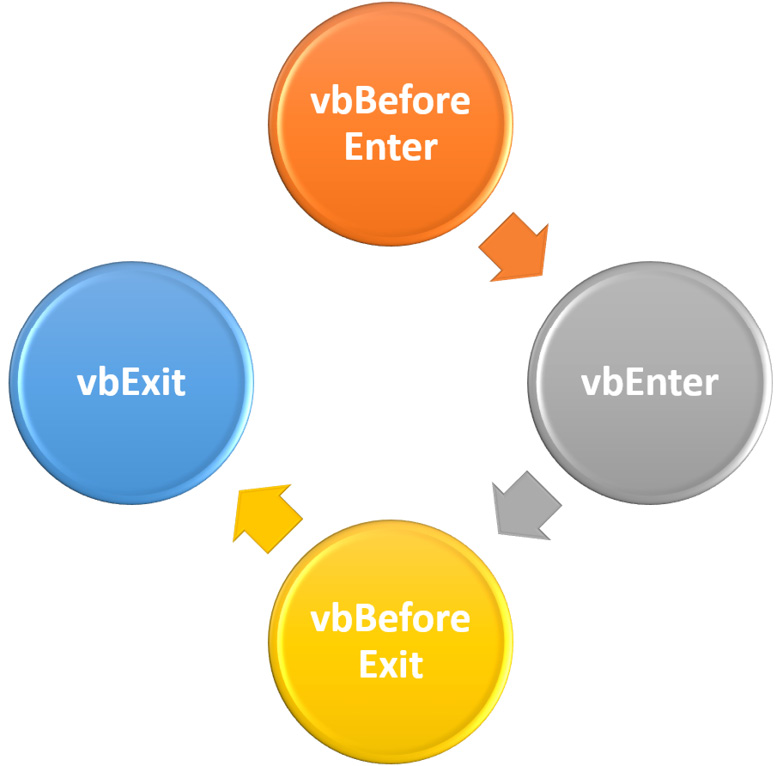
Figure 7.1 – Life cycle events of a page
The following sections will provide explanations of each and every life cycle event of a page.
vbBeforeEnter
This event is triggered before a user tries to navigate from one page to another. Visual Builder will start the navigation to the next page, but it will not crush the state of the previous page.
Let's try to understand how the vbBeforeEnter event is helpful for VB applications. Let's suppose a user is trying to access a secured page for which the user doesn't have permission. In that case, you can cancel the navigation and redirect the user to an "unauthorized" page or the login page. You can write your redirect code in the Action Chain associated with the vbBeforeEnter event.
With this event, you can fetch data from the following variables scope:
- $application: All the application variables can be used in the event Action Chain.
- $flow: All the parent flow variables can be used in the event Action Chain.
- $parameters: All the input parameters from the URL can be used in the event Action Chain.
vbEnter
This event is triggered after all the page-scope variables are added and initialized with their default values, values from URL parameters, or persisted values. This event is generally used to fetch data from Business Objects or Service Connections for reusability purposes.
For example, you can fetch data from a Business Object or Service Connection on page load and populate various UI components with that data.
With this event, you can fetch data from the following variables:
- $application: All the application variables can be used in the event Action Chain.
- $flow: All the parent flow variables can be used in the event Action Chain.
- $parameters: All the input parameters from the URL can be used in the event Action Chain.
vbBeforeExit
This event is triggered before page exit. Once all the Action Chains associated with the vbBeforeExit event are complete, the page instance is destroyed, and future attempts to access the page will throw an exception.
For example, let's suppose that a user has filled in a form and is trying to navigate to another page before saving their form. So, in this event, you can execute an Action Chain and warn the user that their unsaved changes would be lost.
vbExit
This event is triggered when exiting a page. With this event, you can associate the Action Chain that you want to execute after navigating to another page. This event is primarily used to clean up resources.
For example, you can destroy the logged-in user session after a user logs out from an application.
In this section, we learned about various page life cycle events that will help you to execute the necessary code depending on your requirements. In the next section, we'll look at how to use the vbEnter event to load data before the page load.
Loading data on page load
In the previous section, we learned about the different life cycle events of a page; now we will execute a vbEnter event, which will help to load page data before a page is loaded.
In this section, we will execute a use case that will load data from the Employee Business Object before page load and show the data in a table component. The following are the high-level steps to achieve the use case:
- Create a type and a variable of the Array Data Provider (ADP) type.
- Register the vbEnter event and load the Employee Business Object data.
- Populate the Employee Business Object data from the ADP variable in a table.
We'll create a new web application with the name chapter7 under our VBCSBook application and develop all the use cases in this web application. Refer to Chapter 3, Exploring Visual Builder Ingredients, specifically the Understanding the application's structure section, to see how to create a new web application.
ADP is one of the out-of-the-box data types. It keeps a collection of data as an array that is accessible in the page/app.
Let's execute this use case.
Creating a type and an ADP variable
The following are the steps to create a type and an ADP variable:
- Open the main-start page of the chapter7 web application.
- Go to the Types tab, click on + Type, and select From Endpoint.
- Expand Business Objects | Employee, select GET /Employee/{Employee_Id}, and click on the Next button as per the following screenshot:

Figure 7.2 – Select the endpoint
- From the next screen, select id, firstName, lastName, fullName, emailAddress, contactNumber, age, qualification, and click on the Finish button.
- The previous action will create a type with the ID get_Employee.
- Switch to the Variables tab, click on + Variable, enter EmployeeADP as the variable ID, and set Type as Array Data Provider, as per the following screenshot:

Figure 7.3 – Create a variable
- Select the EmployeeADP ID that we just created, go to the Properties palette of the variable, select get_Employee from under Item Type, and set id for Key Attributes, as per the following screenshot:

Figure 7.4 – Configure the variable
The previous steps will create a type and a variable.
Registering the vbEnter event and loading the Employee Business Object data
In this section, we'll look at how to use the vbEnter event, call the Employee Business Object, and assign the Business Object response to the EmployeeADP variable.
The following are the steps to register the vbEnter event:
- Select the main-start page, go to the Event Listeners tab, and click on + Event Listener.
- From the Create Event Listener dialog box, select vbEnter, and click the Next button:
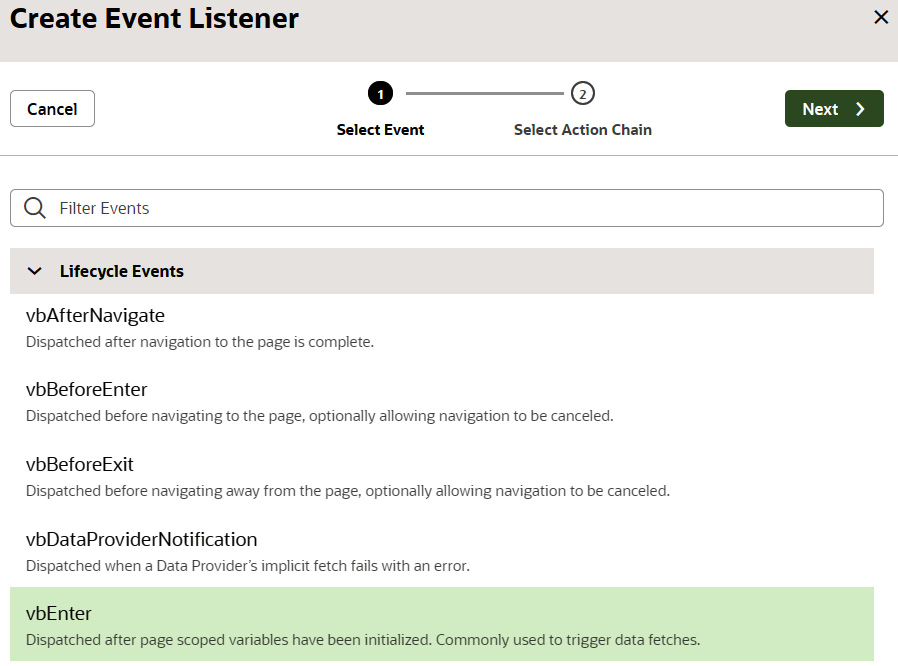
Figure 7.5 – Select the vbEnter event
- The next screen will allow you to create or select the existing Action Chain in the Page, Flow, or Application scope. Click on Page Action Chains + and enter the Action Chain name as loadEmployeeData as per the following screenshot. Click on the Finish button to complete the dialog box:
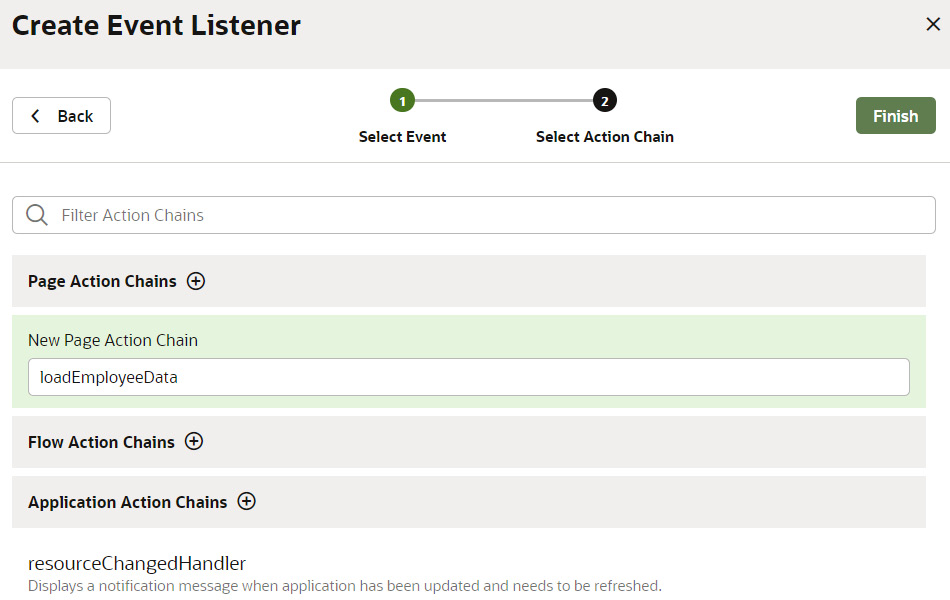
Figure 7.6 – Create the Action Chain
The previous action will create a new Action Chain on the page scope.
- Hover over loadEmployeeData and click on Go to Action Chain. This action will take you to the Action Chain to implement the logic.
- Drag and drop the Call REST action just below the Start action. Rename the ID property of the Call Endpoint action as callRestEndpointEmployee from the Properties palette.
- Click on Select to the right of Endpoint for the Call REST action from the properties palette.
- From the Select Endpoint dialog box, expand Business Objects | Employee, and select the GET /Employee endpoint. Click the Select button:
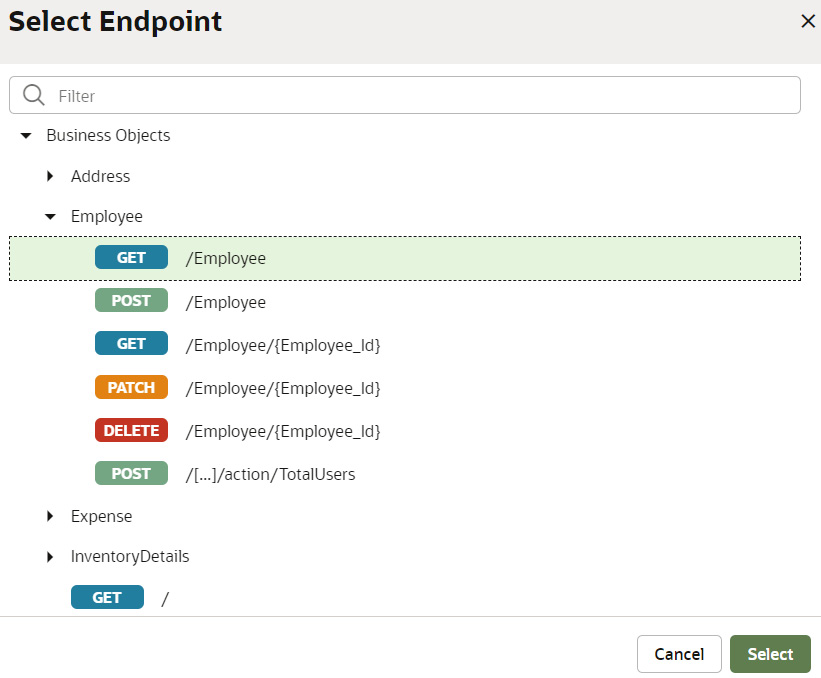
Figure 7.7 – Select the endpoint
- On the Success path, drag and drop the Assign Variables action, and change the ID property to assignVariablesEmployeeData. Click on Assign to the right of Variables in the Properties palette for the Assign Variables action.
- In the Assign Variables dialog box, map the source to the target as follows:
Action Chain/Results/callRestEndpointEmployee/items to Page/EmployeeADP/data
The following screenshot shows the source and target mapping:

Figure 7.8 – Map the fields
That completes the Action Chain logic.
Important Note:
You can associate multiple Action Chains with a single event listener.
This Action Chain will be fired before the main-start page loads.
Populating the Employee Business Object data
In this section, we'll look at how to use ADP variables to populate a table component with data.
The following are the steps to populate data in a table using the ADP variable:
- Open the main-start page, go to the Page Designer tab, and drag and drop the Table component on the page.
- Select the Table component, go to the Data tab in the properties palette, hover on the Data property, click on the Select Variable icon, and select the EmployeeADP variable inside the Page scope.
- In the same Data tab, hover over the Table Columns property, select the Edit Columns icon, and select id, firstName, lastName, fullName, emailAddress, contactNumber, age, and qualification. As soon as you select the fields, they will be visible in the table along with the data.
The following screenshot shows the table component:

Figure 7.9 – Run the page and see the data
Preview the page and the data will be loaded in the table component through the vbEnter event. You can use the EmployeeADP variable to populate another component too.
In this section, you learned how to use the vbEnter event to load data on page load. Now you can use this event to execute any code that you want before page load. In the next section, we will work with the parent-child relationship.
Showing a parent-child relationship on a page
In this section, we'll look at how to show relational Business Object data in two different tables. In the first table, we'll show the employee data, and in the second table, we'll show the address of the employee selected in the first table.
The following are the high-level steps to execute the use case:
- Create a table to populate with the employee data from the Employee Business Object.
- Create a table to populate with the address data from the Address Business Object.
- Implement the logic to show the addresses of the selected employee.
We'll use the main-start page that we created in the previous section and consider the Employee table as the first table.
Creating a table to populate the addresses
The following are the steps to populate the table component with the addresses:
- Open the main-start page and create a new variable with the fullName ID of the String type, and assign the default value as '' using the Default Value property.
- Return to the Page Designer, and drag and drop the Heading component just below the first table.
- Bind the Text property of the Heading component as [['Address information of '+ $variables.fullName ]].
- Drag and drop the Table component just below the Heading component.
- Select the Table component, open the properties palette, go to the Quick Start tab, and select the Add Data option.
- From the Add Data dialog box, select the Address Business Object and select the Next button.
- On the next screen, select address1, address2, city, state, country, and zipCode, and click the Next button.
- Initially, we don't want to populate the addresses in the address table because the addresses data will be populated based on the employee selected from the employees table. So, on the next screen, we have to add a filter criterion that will restrict the table not to populate address data initially.
Select filterCriterion and click on the Click to add condition link as shown in the following screenshot:

Figure 7.10 – Enable filterCriterion
- From the IF dropdown, select employeeId, set the operator as equals($eq), and enter any values that you would never expect in the address table for the employee ID. Enter -1 for the time being and click on the Finish button:
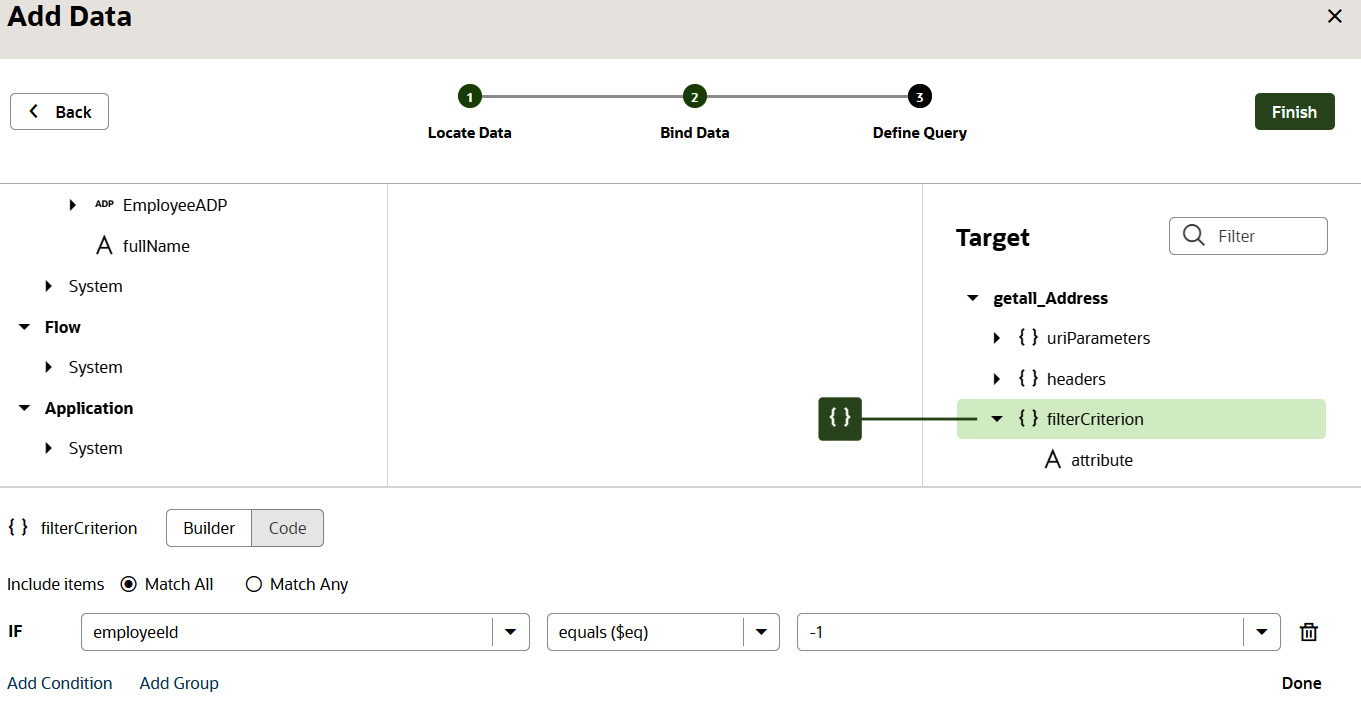
Figure 7.11 – Add condition
Notice that the address table will not be populated due to the filter criterion.
Implementing the logic to show the address of the selected employee
In this section, we will implement the logic that will show the address of the selected employee in the address table.
The following are the steps to implement the logic:
- Select the employee table, go to the Events tab from the properties section, select + New Event, and select Quick Start: 'first-selected-row'. This action will create an Action Chain and will take you to that Action Chain.
- In the Action Chain, drag and drop the Assign Variables action and click on Assign to the right of Variables in the properties palette.
- From the open Assign Variables dialog box, expand addressListSDP on the target side, select filterCriterion, and click on the Click to add condition link. From the IF dropdown, select employeeId, set operator as equals($eq), and select $variables.rowKey from the value dropdown:
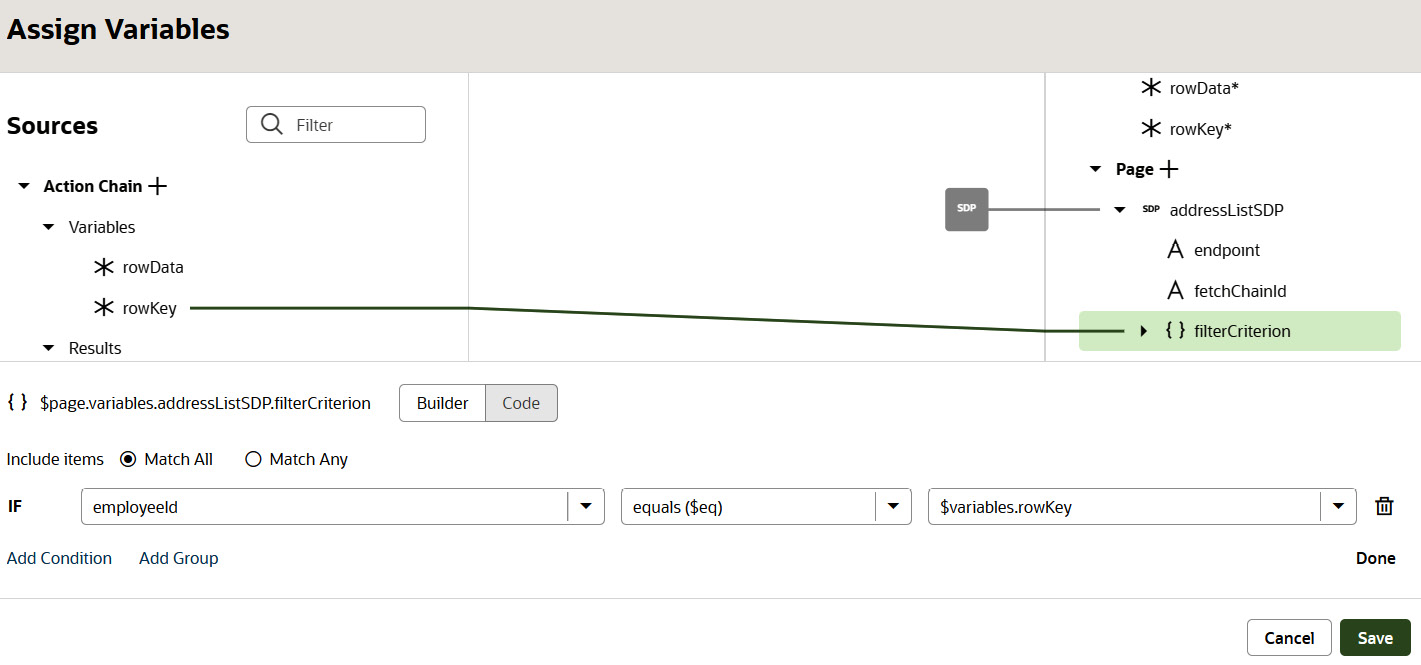
Figure 7.12 – Enable the filter criterion
- As shown in the previous screenshot, the Action Chain has two variables: rowData and rowKey. The rowData variable contains the complete data set of the selected row. So, the expression $variables.rowData.fullName will give you the full name of the selected employee.
- Now we want to assign the fullName variable with the full name of the selected employee. So, select the fullName variable on the Target side and enter the expression as $variables.rowData.fullName as in the following screenshot. Click on the Save button to close the dialog box:
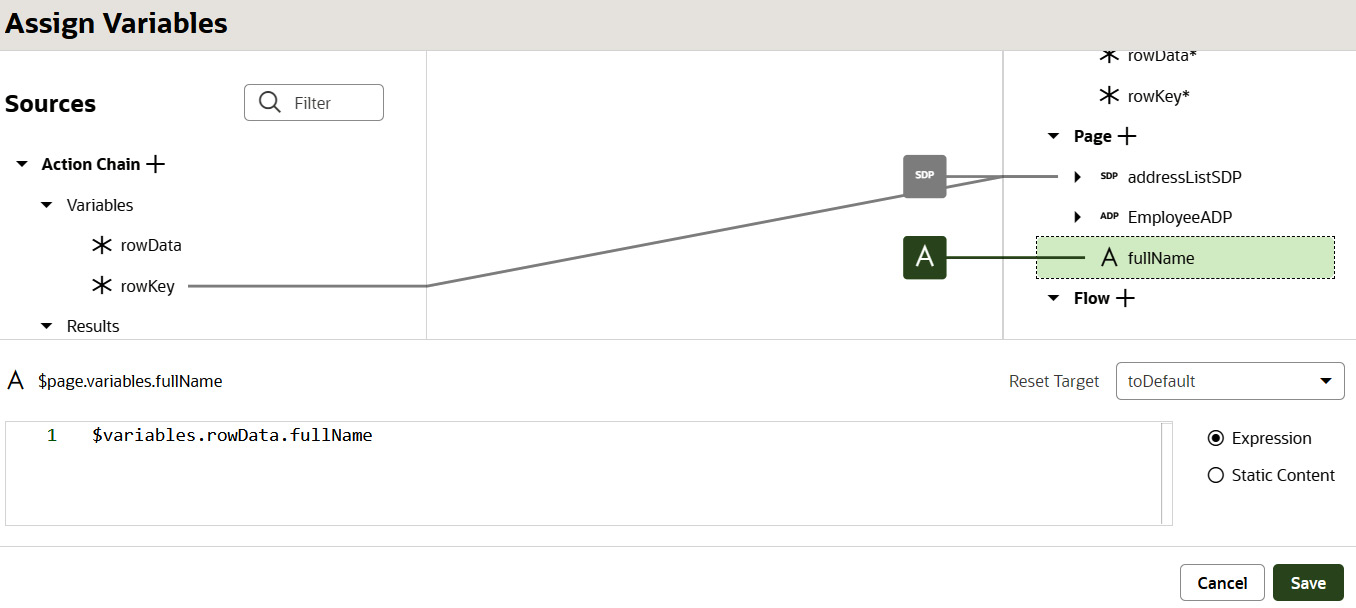
Figure 7.13 – Map the fields
This completes the logic for populating the address of a selected employee.
Import data in the Address Business Object, preview the application, then select any one of the rows, and the address table should be populated with the associated employee data, if any.
The following screenshot shows the address of the selected employee:

Figure 7.14 – Run the page and see the result
This is how you can show relational data in two different tables.
In this section, we learned how to show data from two different relational Business Objects using two different tables and show the child data based on the selected parent data. In the next section, we'll look at how to validate web forms on the client side using JavaScript.
Enabling client-side validation on forms
Client-side validation is one of the most important things in each and every web or mobile application; it helps to validate the data on the client side before a request is sent to the server. In this section, we'll look at how to validate a form on the client side using JavaScript.
In this section, we'll create a web form to onboard a new employee and will apply client-side validation before we save the data in a Business Object.
The following are the high-level steps to execute this use case:
- Create a web form.
- Create JavaScript to validate the web form.
- Implement the logic to validate the form and insert data into the Business Object.
We'll look at the preceding steps in detail in the upcoming sections.
Creating a new web form
The following are the steps to create a new web form:
- Create a new page with the main-onboard-employee Page ID under the chapter7 web application.
- Create a type using GET /Employee/{Employee_Id} from the Employee Business Object type. Refer to the Loading data on page load section, specifically the Creating a type and an ADP variable section, to see how to create a type.
- Create a variable with the NewEmployee ID of type get_Employee as in the following screenshot:
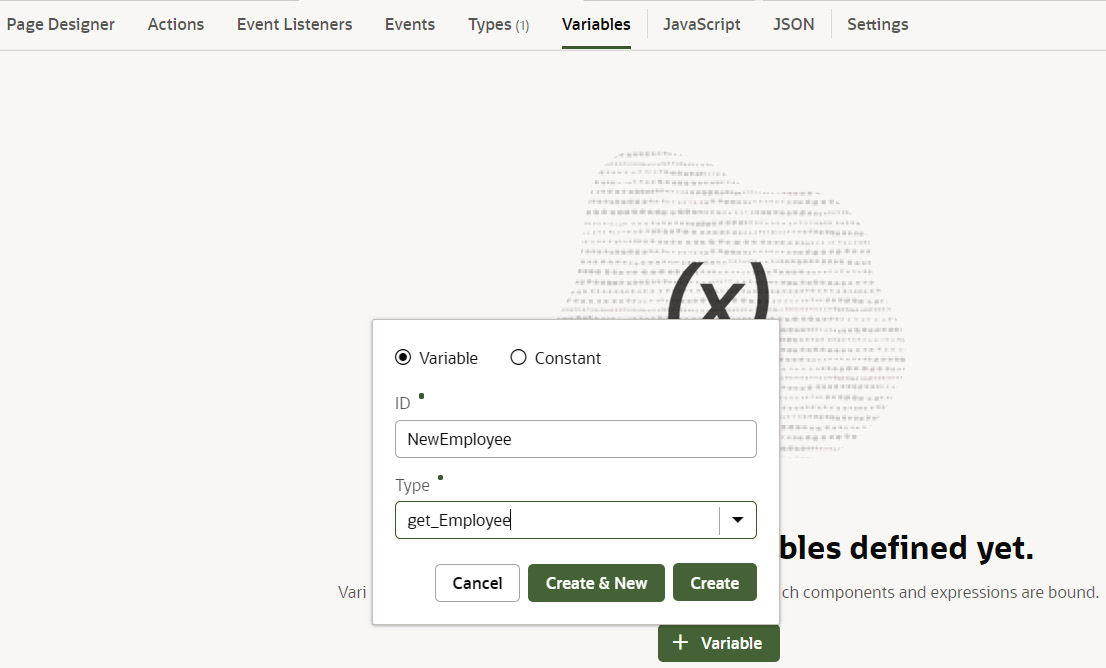
Figure 7.15 – Create a variable
- Drag and drop the UI components on the page as per the following table:
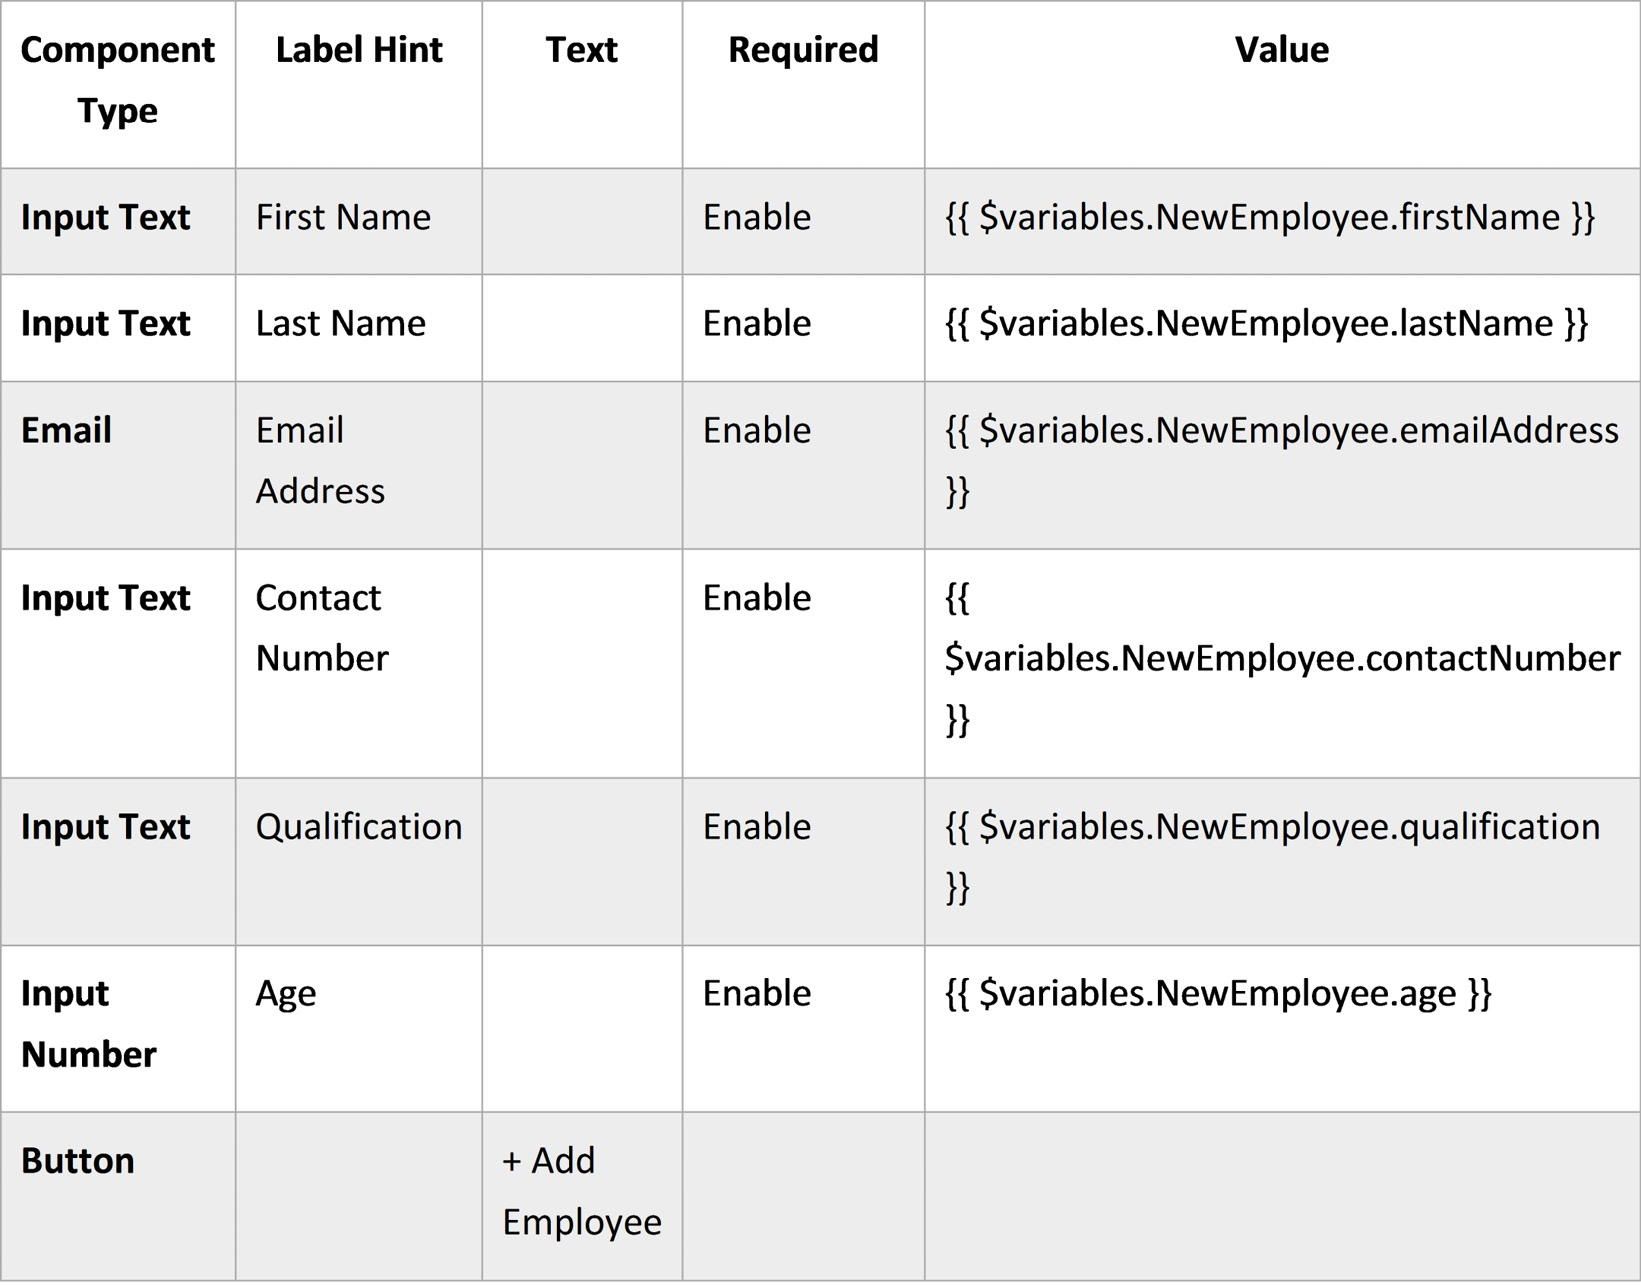
Table 7.1 – A table of UI components
The page looks as shown in the following screenshot:

Figure 7.16 – UI of the page
This completes our web page.
Creating JavaScript to validate a form
As a next step, we'll create a JavaScript code that will validate the web form. If the values are entered in the required fields, then only save the data into the Business Object; otherwise, show the validation messages.
The following are the steps to create JavaScript code:
- Open the main-onboard-employee page and move to the JavaScript tab.
- Enter the following code just below the var PageModule = function PageModule() {}; line:
PageModule.prototype.validateForm = function(form) {
var myform = document.getElementById(form);
if (myform.valid === "valid") {
return true;
} else {
myform.showMessages();
myform.focusOn("@firstInvalidShown");
return false;
}
}
The previous JavaScript function will validate all the required fields of the web form. If any one of the fields is blank, the function will return false; otherwise, it will return true.
Implementing logic to validate a form and insert data into a Business Object
In this section, we'll call the previous JavaScript on button click, and if the JavaScript function returns true, then we'll insert the employee details into the employee Business Object; otherwise, we'll show the validation messages.
The following are the steps to implement the logic:
- Open the Page Designer tab of the main-onboard-employee page, then move to the Code tab of the web page.
- In the code section, add the first line as <oj-validation-group id="new-employee"> and the last line as </oj-validation-group>.
- Switch back to the Design tab, select the + Add Employee button, go to the Events tab in the properties pallet, click + New Event, and select Quick Start:'oj Action'.
- On the Action Chain, drag and drop the If action (this allows you to check the condition) just below the Start action, then change the ID property to ifValidateForm. In the Condition property of the If action, set the condition as {{ $page.functions.validateForm("new-employee") }}. new-employee is the ID of the <oj-validation-group> tag.
- In the true path, drag and drop the Call REST action, then change the ID property to callRestEndpointAddEmployee. Click Select to the right of Endpoint, and select the POST /Employee endpoint of the Employee Business Object.
- Select Assign to the right of Parameters as in the following screenshot:

Figure 7.17 – Assign the payload
- From the Assign Variables dialog box, drag and drop NewEmployee on body as in the following screenshot, and click on the Save button:

Figure 7.18 – Map the fields
- Drag and drop the Fire Notification (used to display notification messages inline on the browser window) action on the success path.
- Set the following properties of the Fire Notification action:
a. Summary as Success
b. Message as Employee created successfully
c. Display Mode as transient
d. Notification Type as confirmation
That's all the logic to validate the web form and insert data into the Business Object programmatically.
Preview the main-onboard-employee page, click on the + Add Employee button without entering any values for any of the UI components, and notice the inline validation messages:
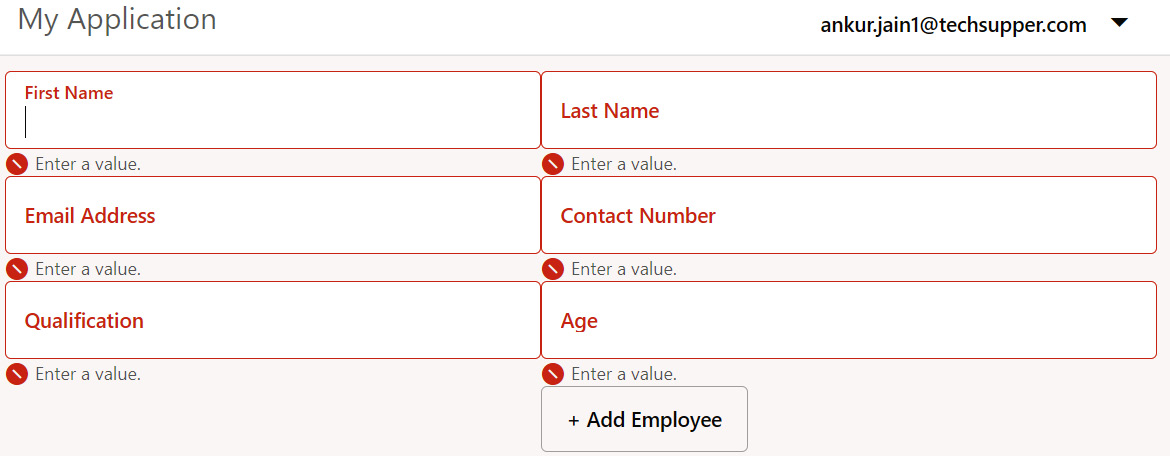
Figure 7.19 – Run the page and view the result
Now, enter values in all the fields and click on the + Add Employee button. The employee details should be saved into the Employee Business Object and you will see a confirmation message on the page as shown in the following screenshot:
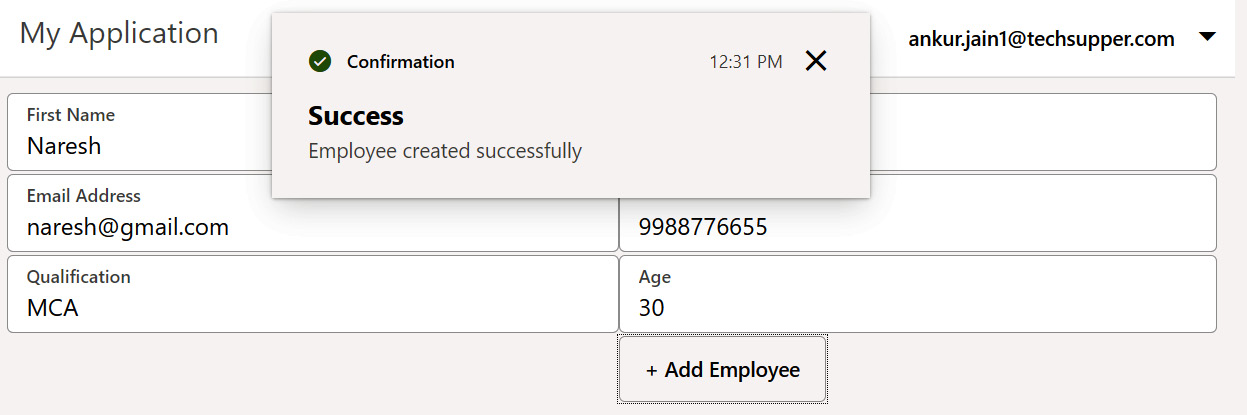
Figure 7.20 – Run the page and view the result
Open the Employee Business Object and you should see data there.
In this section, we learned how to validate a web form on the client side using JavaScript and show the inline messages if values are not entered in the required fields. Next, we'll look at how to implement various logic at the UI level.
Working with various UI logic
In this section, we'll see how to implement different logic for UI components, such as logic for hiding/showing UI components, calculating values, enabling a logout feature, and so on.
In this section, we are going to cover the following:
- Hiding/showing UI components
- Calculating fields
- Enabling a logout feature
- Validating input using a regex
Hiding/showing UI components
It's a very frequent requirement to hide or show UI components when some other UI component is interacted with. For example, you might show a form if the user clicks on a button and hide the form when the user clicks on the button again.
The following are the steps to take to hide/show UI components using JavaScript:
- Create a new web page with the main-ui-logics Page ID under the chapter7 web application.
- Drag and drop the UI components on the page as per the following table:
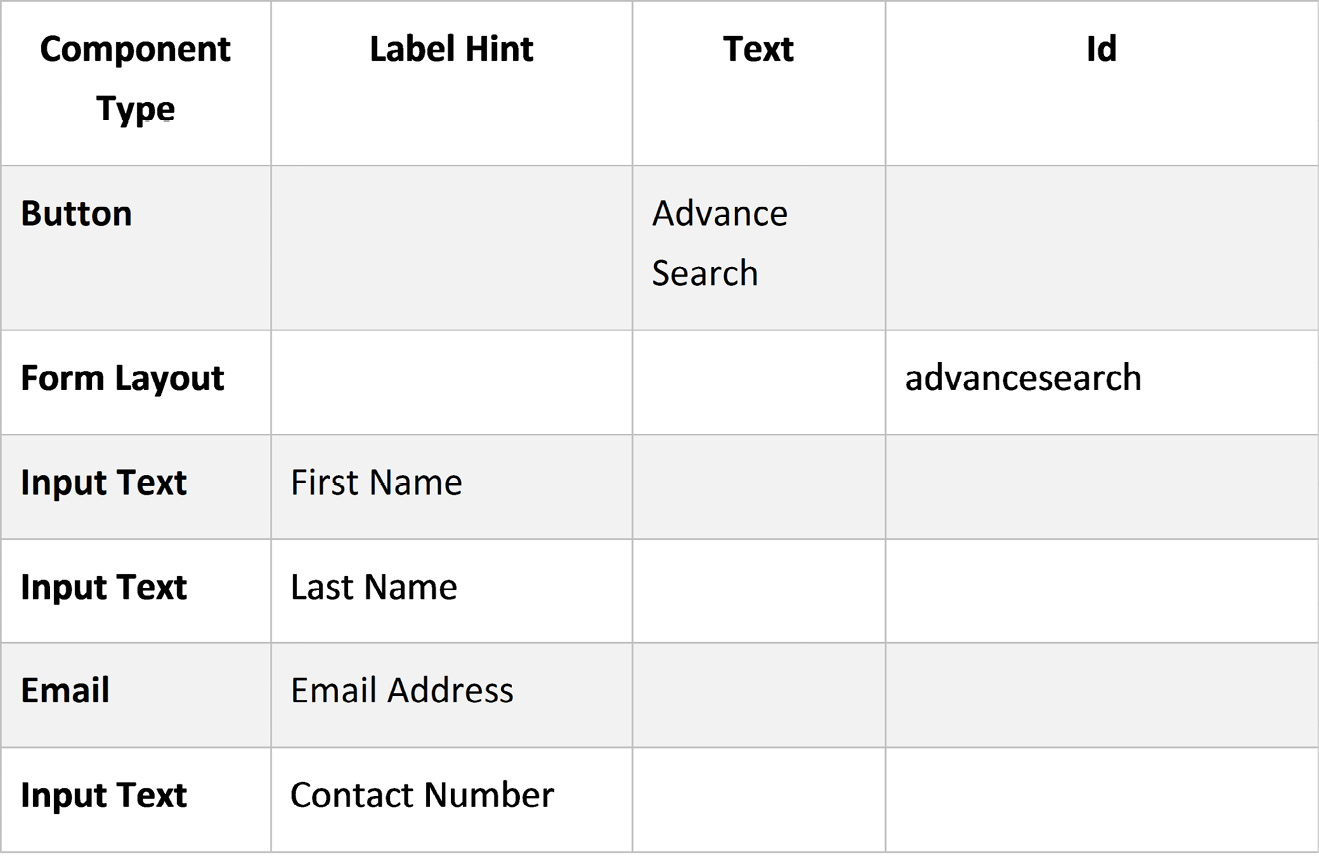
Table 7.2 – A table of UI components
Make sure all the Input Text components are inside the form layout.
- Select the Form Layout component from the Structure palette and set the Max Columns property to 2 and set the ID property as advancesearch. Go to the All tab from the properties palette of the Form Layout component, go to the style property, and enter display:none. This code will hide the form initially.
- Go to the JavaScript tab of the page and enter the following JavaScript code:
PageModule.prototype.showHide = function() {
var x = document.getElementById(
"advancesearch").style.display;
if (x === "none") {
document.getElementById(
"advancesearch").style.display = "block";
} else {
document.getElementById(
"advancesearch").style.display = "none";
}
}
- Return to the Page Designer tab, select the Button component, and register the ojAction event.
- Go to the Action Chain of the ojAction event, then drag and drop the Call Function action just below the Start action.
- Select the showHide function from the Function Name property of the Call Function action.
The following screenshot shows the page:
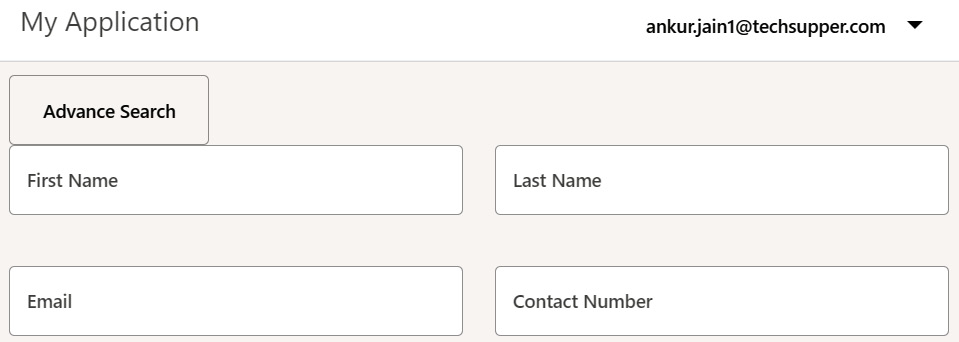
Figure 7.21 – UI of the page
All the configuration is complete now. Just switch to the live mode of the page. Initially, the form layout will not be visible. Click on the Advance Search button; this will show or hide the form layout.
Calculating fields
Sometimes you need to calculate values based on the input of other fields and show the calculated values in a different field. For example, on a web page, there may be a date field that allows you to enter a date of birth, and based on the date of birth entered, a different UI component may display an age figure in years. In this section, we want to execute this use case. So, let's see how to execute such type of use-case requirement using VB.
The following are the steps to calculate age based on date of birth:
- Open the main-ui-logics page and create a variable with age ID of type Number.
- Drag and drop the Input Date component on the main-ui-logics page just below the Form Layout component. Change the Label Hint property of this component to Date of Birth.
- Drag and drop the Text component just below the Input Date component. Set the Value property as [['You are age is ' + ($variables.age?$variables.age:'')]] for the Text component.
- In the text Value attribute, we use the ternary operator to check if age is not blank, then we show the value of age; else, we leave it blank with the hardcoded string.
- Go to the JavaScript tab of the main-ui-logics page and enter the following JavaScript code to calculate age based on the date of birth:
PageModule.prototype.calculateAge = function(dateOfBirth)
{
var currentDate = new Date();
var birthDate = new Date(dateOfBirth);
var totalAge = currentDate.getFullYear() – birthDate.getFullYear();
var month = currentDate.getMonth() - birthDate.getMonth();
if (month < 0 || (month === 0 && currentDate. getDate() < birthDate.getDate())) {
totalAge--;
}
return totalAge;
}
- Return to the Page Designer tab, select the Input Date component, and register a value event from the Events tab of the properties palette.
- Drag and drop the Call Function action just below the Start action and change the ID property to callModuleCalculateAge. Select the calculateAge function from the Function Name dropdown.
- Click on Assign to the right of Input Parameters and map $variables.value to dateOfBirth as in the following screenshot, then click on the Save button:
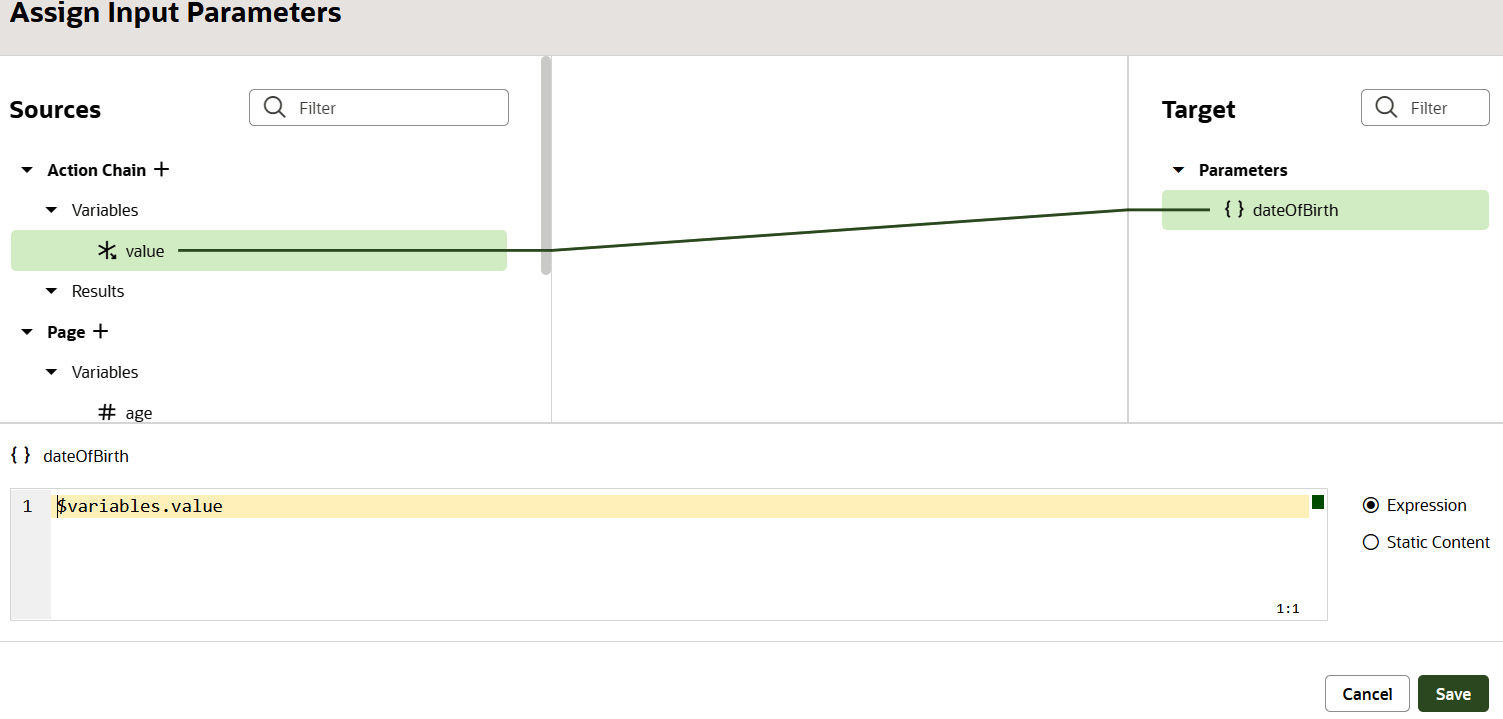
Figure 7.22 – Map the fields
- Drag and drop the Assign Variables action just below the Call Function action. Click on Assign to the right of Variables, map $chain.results.callModuleFunctionCalculateAge to $page.variables.age, and click on the Save button.
Now the configuration is complete. Go to the main-ui-logics page and go to the live mode, enter a date of birth, and you should see that an age is shown, as in the following screenshot:
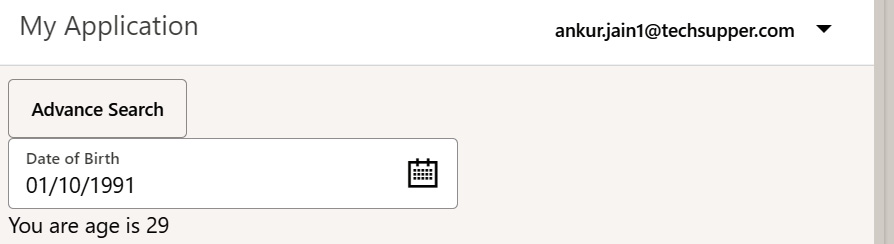
Figure 7.23 – Run the page and view the result
The value event will be fired as soon as you enter a value in the date of birth field and call the associated Action Chain.
Enabling a logout feature
Whenever you develop any application inside the VB, you will see the logged-in user's name in the top-right corner of every page, along with a Sign Out option:
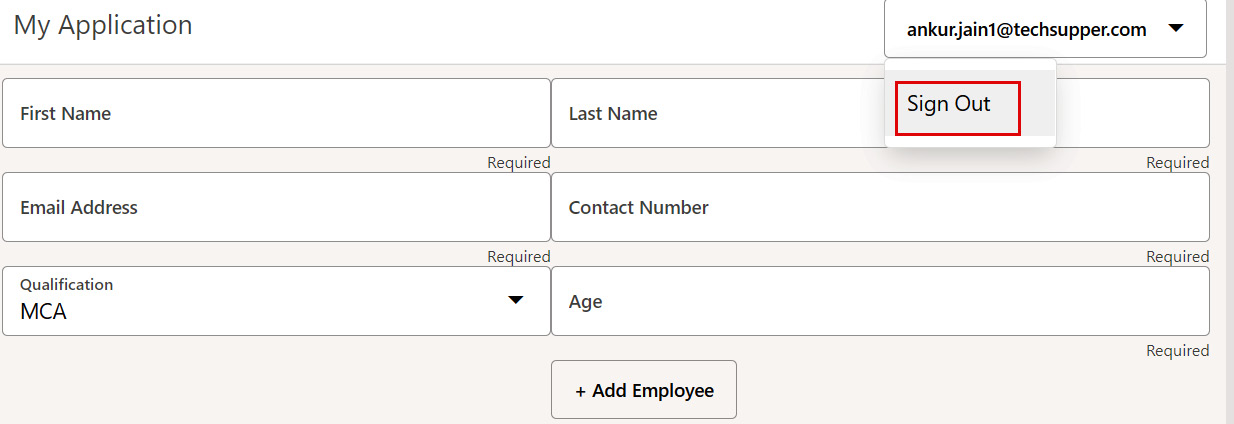
Figure 7.24 – Sign Out button
The sign-out button functionality is not enabled by default. You have to enable it manually. The logged-in username and button are set on the shell page of the application.
The following are the steps to enable the logout feature:
- Open the shell page of the chapter7 application inside Root Pages.
- Go to Structure for the page and select the Menu component, then go to the Events tab and register the ojAction event as in the following screenshot:
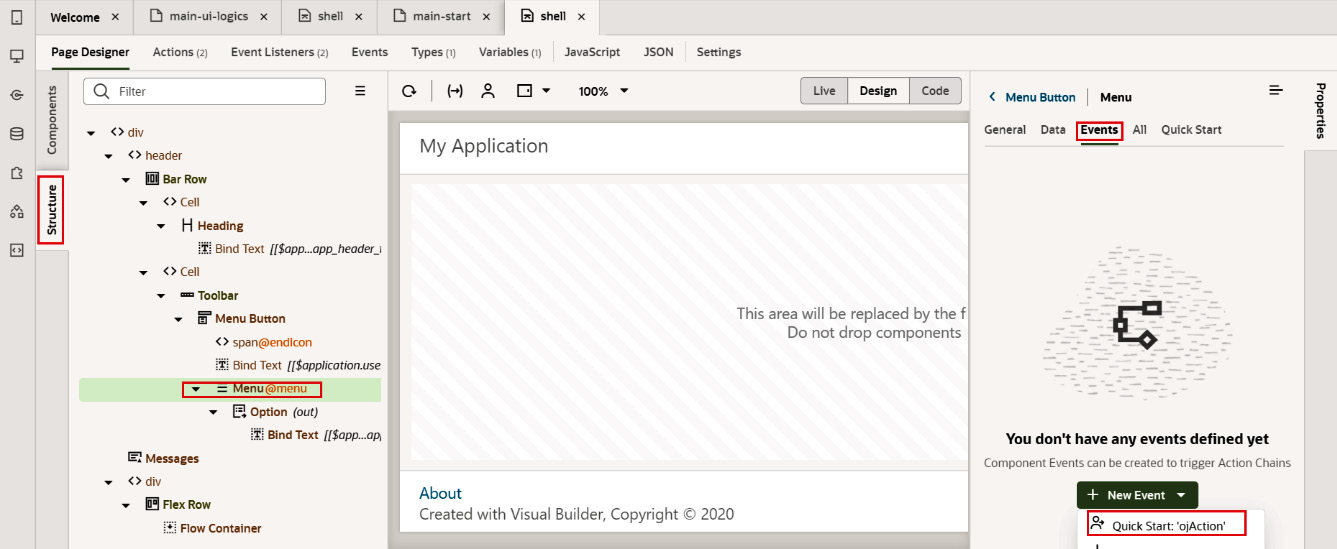
Figure 7.25 – Register event for sign-out button
- Drag and drop the If action just below the Start action and set the condition as [[ $variables.menuId ==='out']].
Important Note:
out is the ID of the sign-out menu component; hence, we are checking a condition if a user clicks on the sign-out menu, and only then do we allow users to sign out.
- Drag and drop the Logout action on the true path. This action allows you to set the logout URL in the Logout URL property.
The following is the structure of the logout URL:
https://<unique_idcs_identifier>.identity.oraclecloud.com/oauth2/v1/userlogout
You have to replace unique_idcs_identifier with the IDCS identifier of your Oracle Cloud instance.
- Enter the logout URL in the Logout URL property.
That's all about enabling a logout feature in a VB application. Run the application and click on the Sign Out button. You will be signed out completely from the VB application.
Validating an input component using a regex
Whenever you develop a web form, you always need to take valid data from users and restrict users from entering enter junk data into the web form. For example, you will want users to enter only alphabet characters in the name fields and use the correct email address format in the email field.
Oracle VB allows us to validate data using the Validator property of the input components.
The following are the steps to validate an input text field using a regex:
- Open the main-ui-logics page under the chapter7 web application.
- Select the first input text component from the page structure, go to the properties palette, go to the All tab, and enter the following JSON in the Validator property:
[{"type":"regexp", "options":{"pattern":"[a-zA-Z ]*$", "hint":"Enter a valid value.", "messageDetail": "Only characters are allowed"}}]
Run your page, enter an invalid value in the first name field, and the component should throw an error, as in the following screenshot:
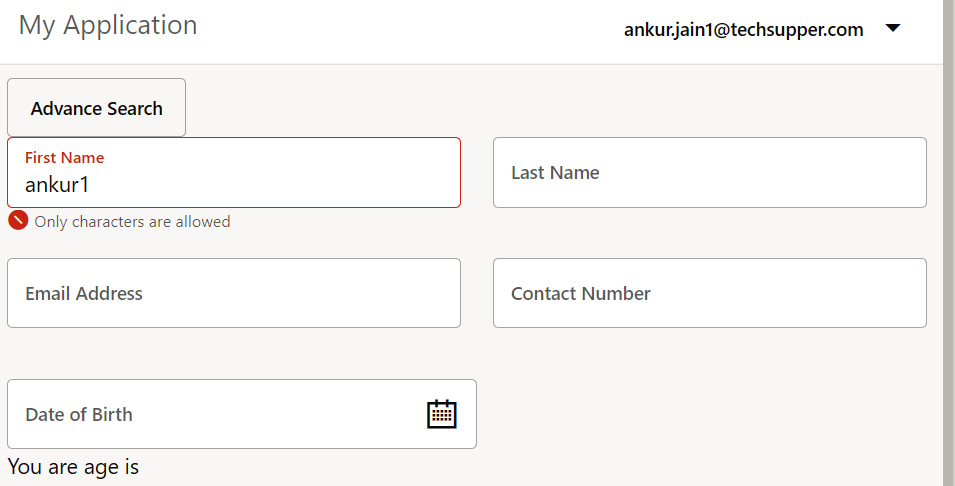
Figure 7.26 – Run the page and view the result
The Validator property of the input component accepts the JSON array in the previous format. You can use the same format to validate other components too and provide different regexes in the pattern property.
In this section, we learned how to implement logic for UI components, such as logic for hiding or showing UI components, calculating values based on another value, enabling a logout feature, and validating input using the Validator property. In the next section, we'll look at how to create dependent Select (Single) components.
Creating dependent Lists Of Values
Dependent Lists of Values (LOVs) are when two or more LOVs are created, and the values of one LOV depend on the values of the other LOV. For example, the values of a State LOV may depend on the values of a Country LOV.
In this section, we'll create two LOVs using the Select (Single) component. In the first LOV, we'll populate email address using the Employee Business Object, and in the second LOV, we'll populate inventory name from the InventoryDetails Business Object.
The following are the steps to create dependent LOVs:
- Create a new web page with the Page ID main-dependent-lov under the chapter7 web application.
- Drag and drop the Select (Single) component on the new page and modify the Label Hint property to Employee.
- Go to the Quick Start tab from the properties palette of the Select (Single) component and select Add Options.
- From the Add Options dialog box, select the Employee Business Object, and click on the Next button.
- From the next screen, drag and drop emailAddress on Label and id on Value, then enter Select Employee for Placeholder and click on the Next button:
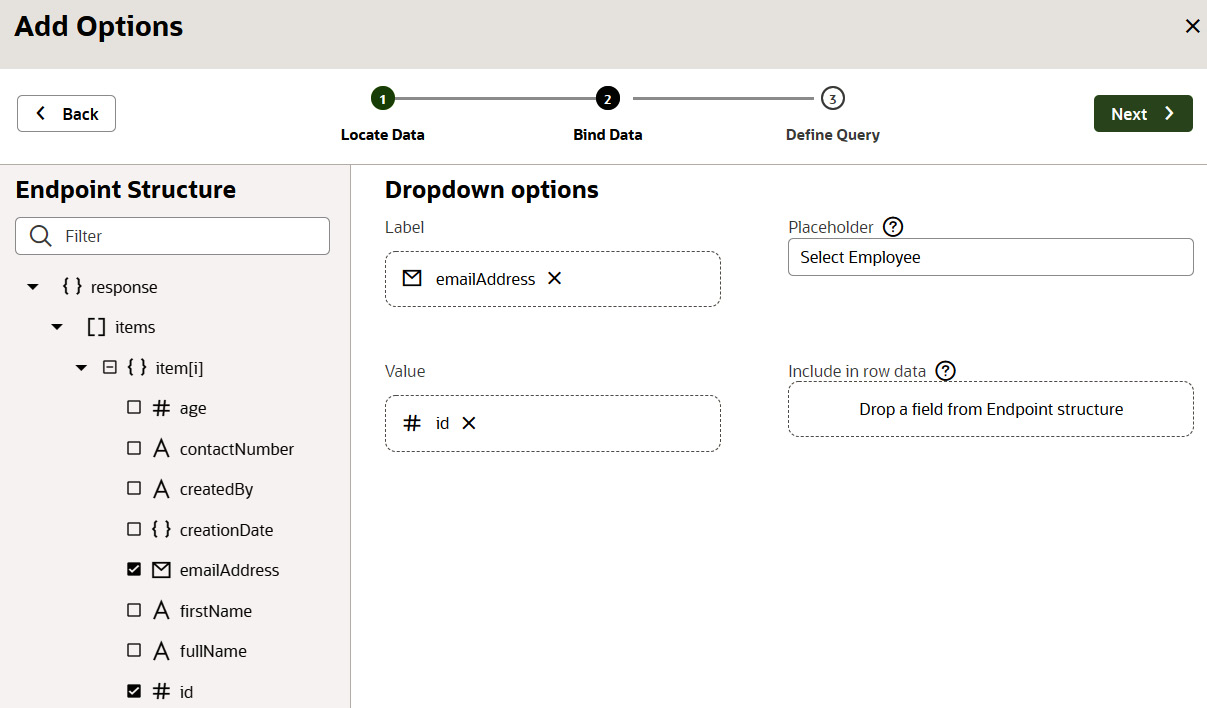
Figure 7.27 – Configure the Select (Single) component
- Click on the Finish button to complete the dialog box.
- The previous steps will create one LOV and will populate the employee's email address as a label.
- Drag and drop the Select (Single) component again just below the first Select (Single) component and modify the Label Hint property to Inventory Details.
- Go to the Quick Start tab from the property palette of the second Select (Single) component and select Add Options.
- From the Add Options dialog box, select the InventoryDetails Business Object, and click on the Next button.
- From the next screen, drag and drop name on Label and id on Value, then enter Select Inventory Details for Placeholder and click on the Next button.
- From the next screen, select filterCriterion, click on Click to add condition, select employeeId from the IF dropdown, select equals ($eq) from the operator dropdown, and enter -1 for value, as in the following screenshot:
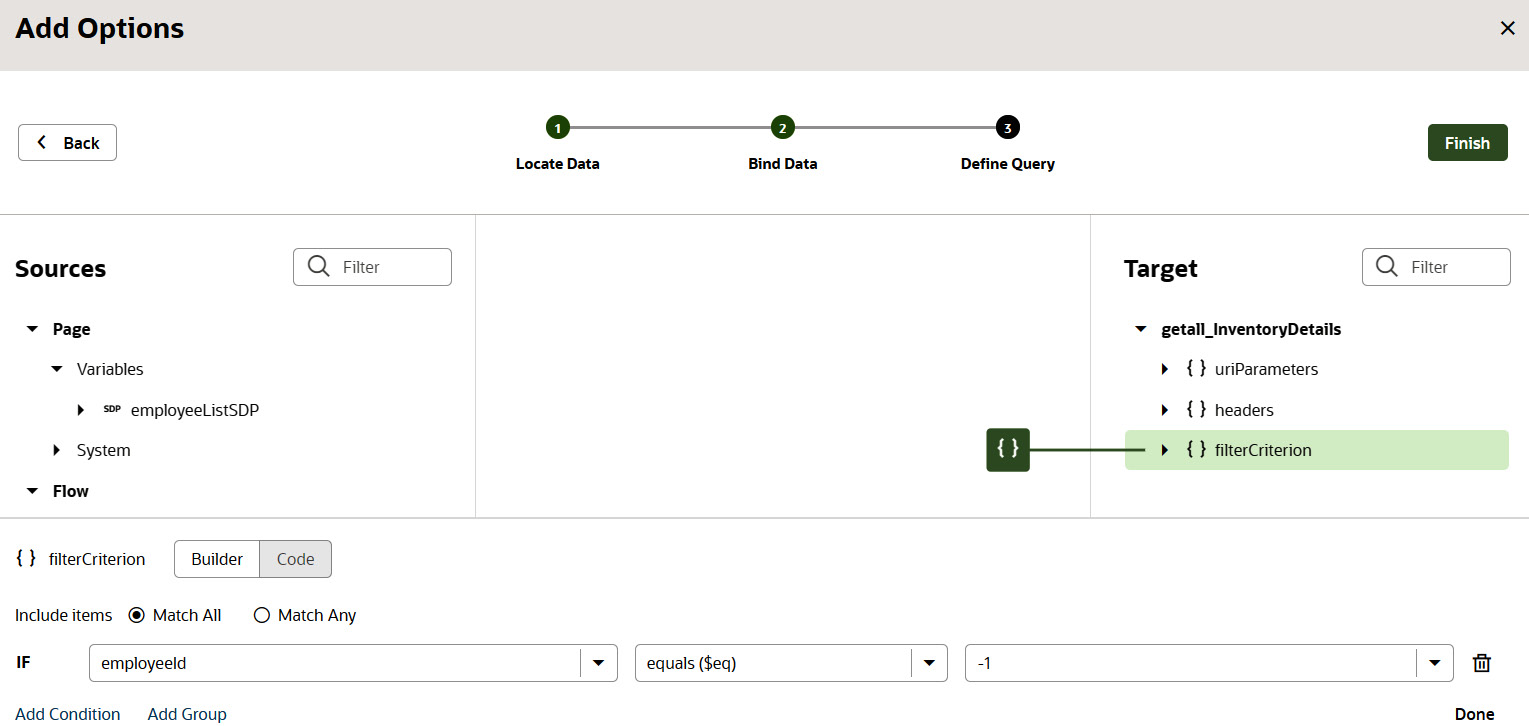
Figure 7.28 – Configure the filter criterion
- Click on the Finish button to complete the dialog box.
- Select the first Select (Single) component and register the value-item event from the Events tab.
- Drag and drop the Assign Variables action just below the Start action.
- Click on Assign to the right of Variables.
- From the Assign Variables dialog box, expand inventoryDetailsListSDP, select filterCriterion, and click on Click to add condition.
- Select employeeId from the IF dropdown, select equals ($eq) from the operator dropdown, and enter $variables.key for value.
- Click on the Save button to finish the dialog box.
The configuration is complete now. Switch the page to live mode, select any one of the email addresses from the first LOV, and the corresponding inventory name should be populated in the inventory details LOV if available.
The following screenshot shows the dependent LOVs:
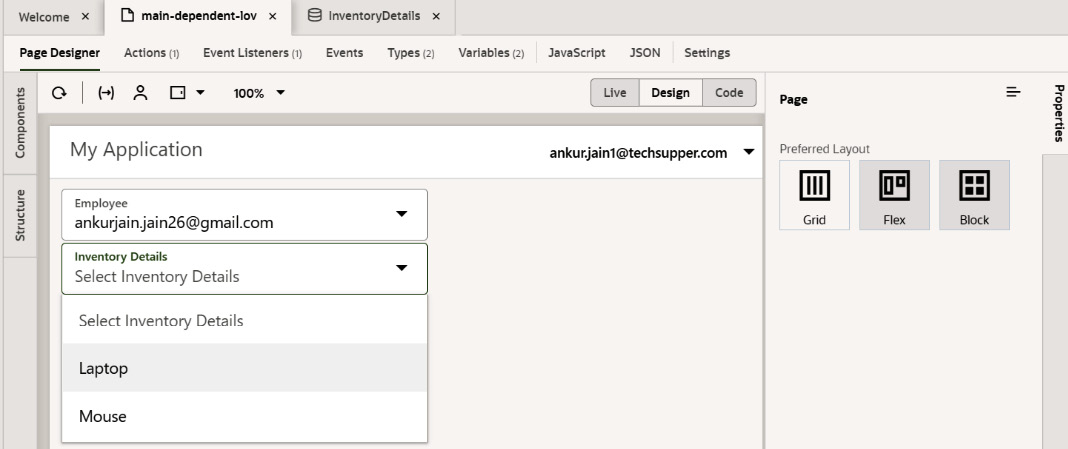
Figure 7.29 – Run the page and view the result
This is how you can create dependent LOVs.
In this section, we learned how to create dependent LOVs using Business Objects. You can use a similar approach to create dependent LOVs from Service Connections.
Summary
In this chapter, we learned about the life cycle events of a page and the significance of each life cycle event in detail with examples. This will help you to implement logic at the correct stage based on your web/mobile application's requirements. You learned how to use one of the out-of-the-box events, vbEnter, to load data on page load. We created an ADP variable to load data and used the variable to populate a table.
You learned how to use two related Business Objects to populate data in two tables and populate a child table data based on the row selected in the parent table. With this, you learned how to use filterCriterion to filter data on a page. You learned how to use JavaScript to validate web forms on the client side.
You learned how to implement logic in the UI layer, such as for hiding or showing UI components based on interaction with other components, calculating age based on date of birth using JavaScript, and enabling a logout feature for your VB application, and you learned how to validate UI components using the Validator property. You also learned how to create dependent LOVs using Business Objects.
Along with what you learned in the previous chapter, now you will be able to develop a mid-sized application.
In the next chapter, we'll work with another set of UI components, including checkboxes, dialog boxes, and list components. We'll implement sorting, searching, and pagination for table components and will work with other different visualization components such as PIE, BAR, and AREA.
Further reading
- Read about ADP: https://docs.oracle.com/en/cloud/paas/integration-cloud/visual-developer/array-data-provider.html
- Read about <oj-validation-group>: https://www.oracle.com/webfolder/technetwork/jet/jetCookbook.html?component=validationGroup&demo=formFieldsValidation
- Read about validators: https://www.oracle.com/webfolder/technetwork/jet/jetCookbook.html?component=validators&demo=regExpValidator