Chapter 2: Provisioning and Understanding the Visual Builder Instance
In the previous chapter, you learned what VB is and its benefits and features. That gave you a good start in knowing about Visual Builder.
In this chapter, you will get started with VB instance creation using the Oracle Cloud portal and learn what you should have before you create an instance. This is really important to know how much you need to pay to use VB, and in this chapter, we will focus on the cost derivation of using VB. Once an instance is created, you will learn how you can access the VB instance.
We will also go through the various navigations provided by Visual Builder.
In this chapter, we will cover the following topics:
- Provisioning a VB instance
- Creating users and assigning roles
- Deriving the cost of using VB
- Accessing the VB instance
- Exploring various navigations of VB
The main objective of this chapter is to give you an understanding of how to create and manage a Visual Builder instance along with how to access Visual Builder. With that, you will be able to manage your Visual Builder instance independently.
Technical requirements
To complete this chapter, you should have the following:
- A valid email address
- A valid phone number
- A valid credit card
Provisioning a VB instance
In order to get started with VB, a VB instance needs to be provisioned that will be used to develop and deploy web and mobile applications. In order to create a VB instance, you must have an Oracle Cloud account in place. Don't worry if you don't have one; you can create one to practice for 30 days.
To create an Oracle Cloud account, you must have a credit card; Oracle will hold the nominal amount for verification purposes, which will be reversed immediately.
Copy and paste the link https://signup.oraclecloud.com/ into a browser to sign up for an Oracle Cloud account. Skip this step if you already have an Oracle Cloud account.
Important Note:
VB is also part of the Oracle Integration Cloud (OIC) service, so if you already have an OIC instance, then you don't need to create a VB instance separately.
Once the free Oracle Cloud account is created successfully, you will get the following:
- A 30-day free trial
- US $300 in free credit
- A few services that are always free and can be used forever
Refer to https://www.oracle.com/cloud/free/ to find out what services are free forever.
Important Note:
Oracle will not charge anything unless you choose to upgrade the account.
The 30-day free services will be terminated after 30 days but the Oracle Cloud account will remain active as you can use other free services forever.
Important Note:
To set up a VB instance, you must have admin privileges. If you don't have admin privileges, ask your Oracle Cloud administrator to create a VB instance for you.
There are two ways to create an Oracle VB instance:
- Quick Start
- Custom instance
Once the Oracle Cloud account is created successfully and all Oracle cloud services are available, then you can create the VB instance using either approach.
Important Note:
Sometimes, the Oracle Cloud account takes time to bring up all the Oracle Cloud services. So, you might not see all the services under the Cloud dashboard for the first few hours.
In the next sections, we will discuss each approach in detail.
Creating an instance using Quick Start
This option uses default settings while creating a VB instance. To create the VB instance, you must log in to the Oracle Cloud dashboard with admin privileges. The Quick Start option creates the instance with the following features:
- An Oracle-managed Visual Builder instance
- A cluster with two nodes
- An embedded database
To create a new VB instance, perform the following steps:
- Log in to the Oracle Cloud dashboard using your unique cloud account name and enter the credentials on the login page. Upon successful login, you will land on the Oracle Cloud Infrastructure (OCI) dashboard.
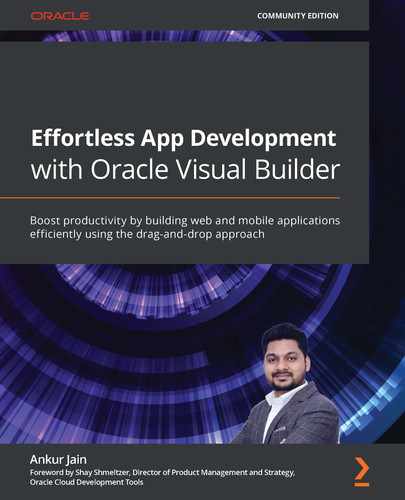
- From the dashboard, click on the hamburger menu at the top left of the screen. Expand Platform Services and click on Visual Builder.
Important Note:
Don't select Visual Builder Classic (if you see this as one of the options) as this is for old customers who are using old VB versions.
The following screenshot shows us these menu selections:
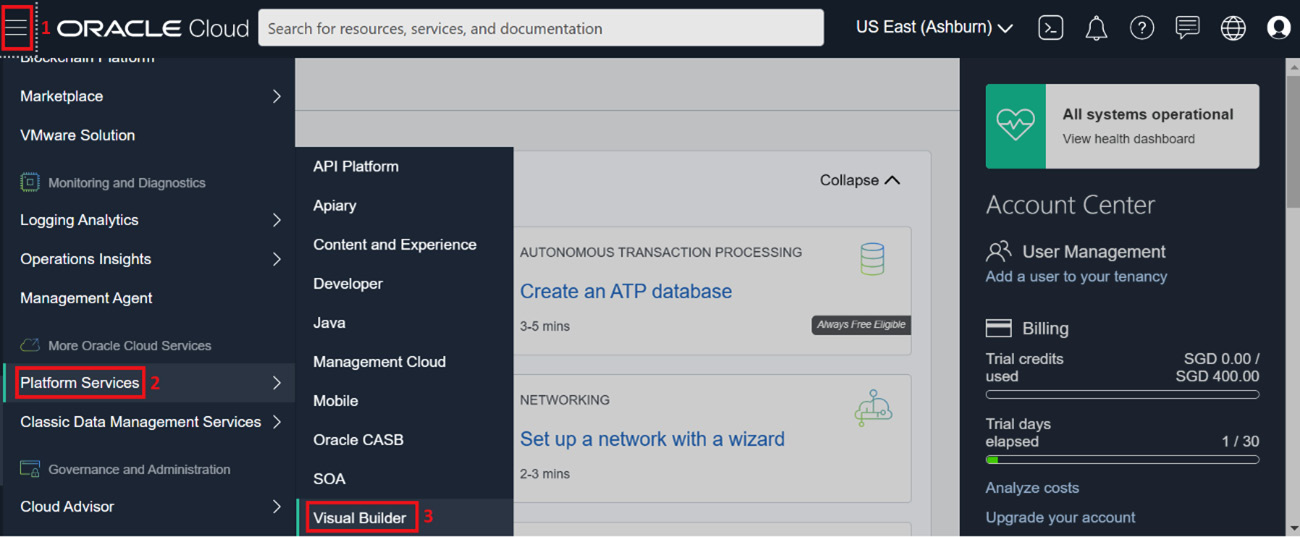
Figure 2.1 – Visual Builder
This action will take you to a new tab and will open the Visual Builder instance management page.
- Click on QuickStarts near the Welcome link. This will open the Create Instance page. The Quick Start option only allows you to enter the instance name.
- Enter the information for *Instance Name. This is a unique name across all the VB instances and will be used to identify the instance. The name must start with a letter, must contain only letters and numbers, and can contain up to 24 characters. Enter vbcs01 for the time being and click on the Create button.
The following screenshot shows the QuickStarts page under Create Instance:

Figure 2.2 – Quick Start option to create a Visual Builder instance
- The instance creation process will start once you click on the Create button. The instance creation will take 2–5 minutes and even longer, sometimes.
- You will be returned back to the Visual Builder page where you will see Status as Creating service… and the Submitted On label, as shown in the following screenshot:
Figure 2.3 – Visual Builder instance creation status
While the instance is in the creation state, you cannot take any actions (stop, start, or delete) on the VB instance. Once the instance is created successfully, the status will be removed and the Submitted On label will be changed to Created On.
Creating a custom instance
Custom instance creation allows you to choose more information and is the recommended approach when you prepare the VB instance for production. Perform the following steps to create a VB instance:
- Log in to the Oracle Cloud dashboard.
- Click on the hamburger menu at the top left of the screen, expand Platform Services, and click on Visual Builder.
- Click on the Create Instance button, which will open the instance creation page.
- Specify the following details and click on the Next button:
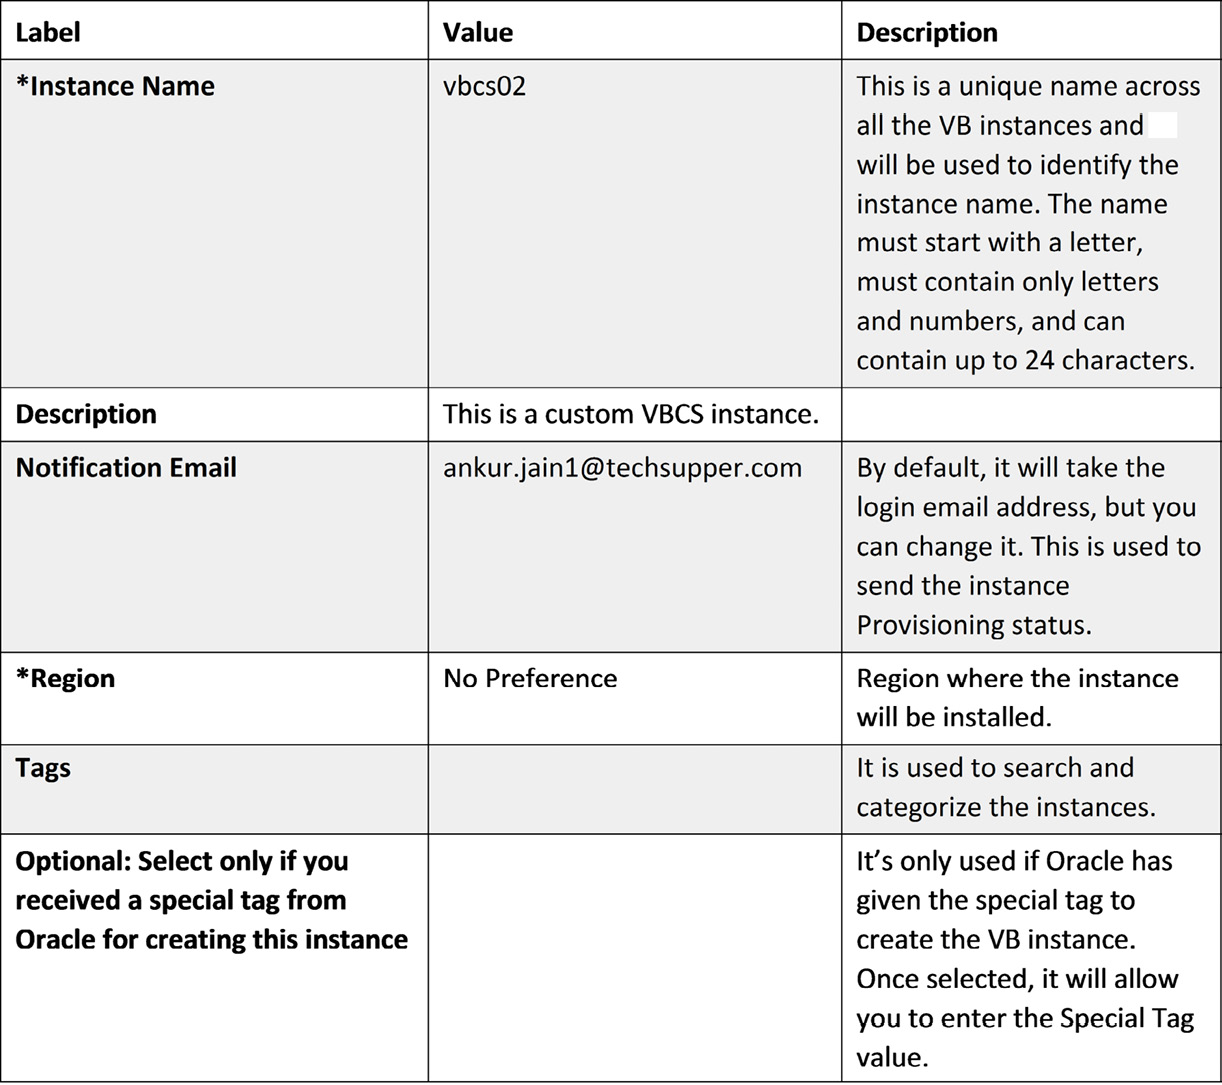
Table 2.1 – Details for the instance creation page to create a VB instance
- Enter the preceding instance creation details, as shown in the following screenshot:
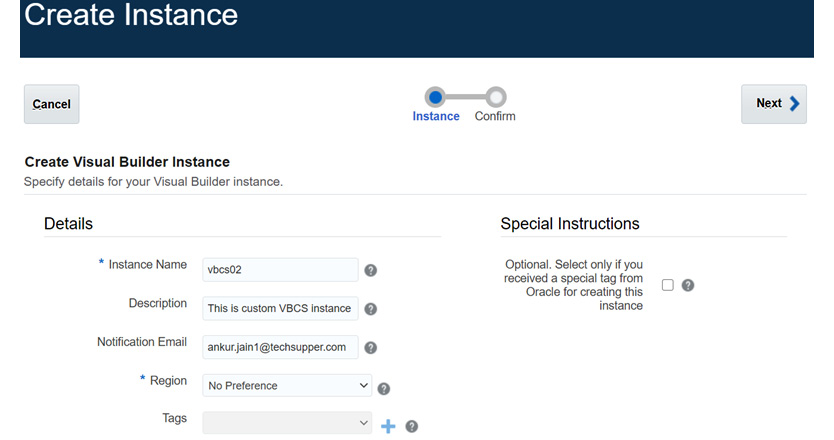
Figure 2.4 – Custom instance option to create a Visual Builder instance
- Click on the download icon on the next page, which will download the JSON file, as shown:
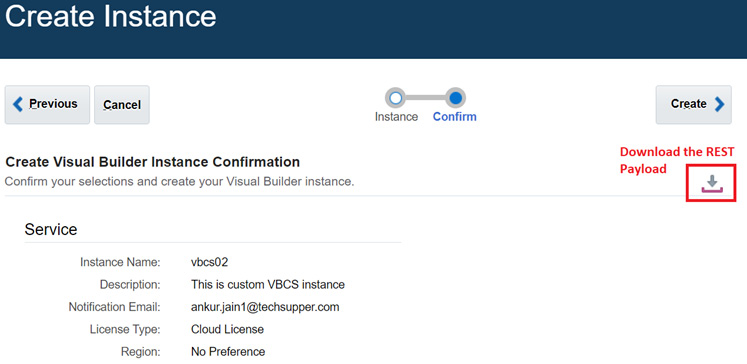
Figure 2.5 – Create Visual Builder Instance Confirmation
This JSON file contains a payload that will allow you to provision a VB instance using the REST API. A snippet of the JSON file is as follows:
{"serviceVersion":"1.0","specialInstructions":"false","managedSystemType":"oracle","edition":"SUITE","enableNotification":"true","serviceDescription":"This is custom VBCS instance ","serviceName":"vbcs02","serviceLevel":"PAAS","subscriptionId":"1145011","notificationEmail":"[email protected]","isBYOL":"false"}
- Click on the Create button. This will initiate the instance creation process. Once the instance is created successfully, you can use it to start development.
The following screenshot shows the VB instances:
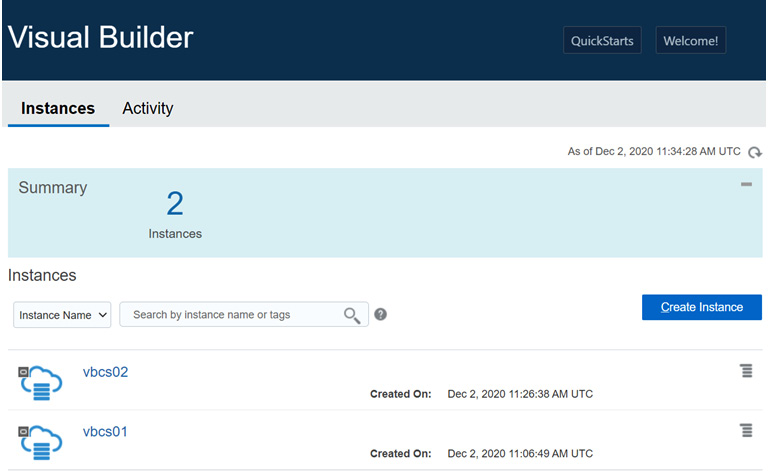
Figure 2.6 – Visual Builder instance page
Once a VB instance is created successfully, you can perform the following actions from the VB instance name. Click on the action icon (on the right side) of the VB instance name to view the available actions, which are as follows:
- Start: This action will allow you to start the VB instance if already stopped.
- Stop: This action will allow you to stop the VB instance. Once the VB instance is shut down, the billing will be stopped for the duration that the instance is stopped.
- Manage Tags: The action will allow you to manage the tags for this instance.
- Delete: This action will allow you to delete the instance permanently. Please think twice before taking this action as once the instance is deleted, it cannot be recovered.
Tip:
It is always good to stop a VB instance if not in use to save costs.
After provisioning a VB instance, next we'll have a look at how to create users and assign roles.
Creating users and assigning roles
Every application (OIC, VB, API PCS, and so on) in Oracle Cloud has pre-defined roles but only a few of the roles are mapped to the pre-defined role of VB.
Each and every VB instance has pre-defined roles with certain responsibilities. A role allows users to perform different actions inside the VB tool. The following table lists pre-defined roles of Oracle Visual Builder:
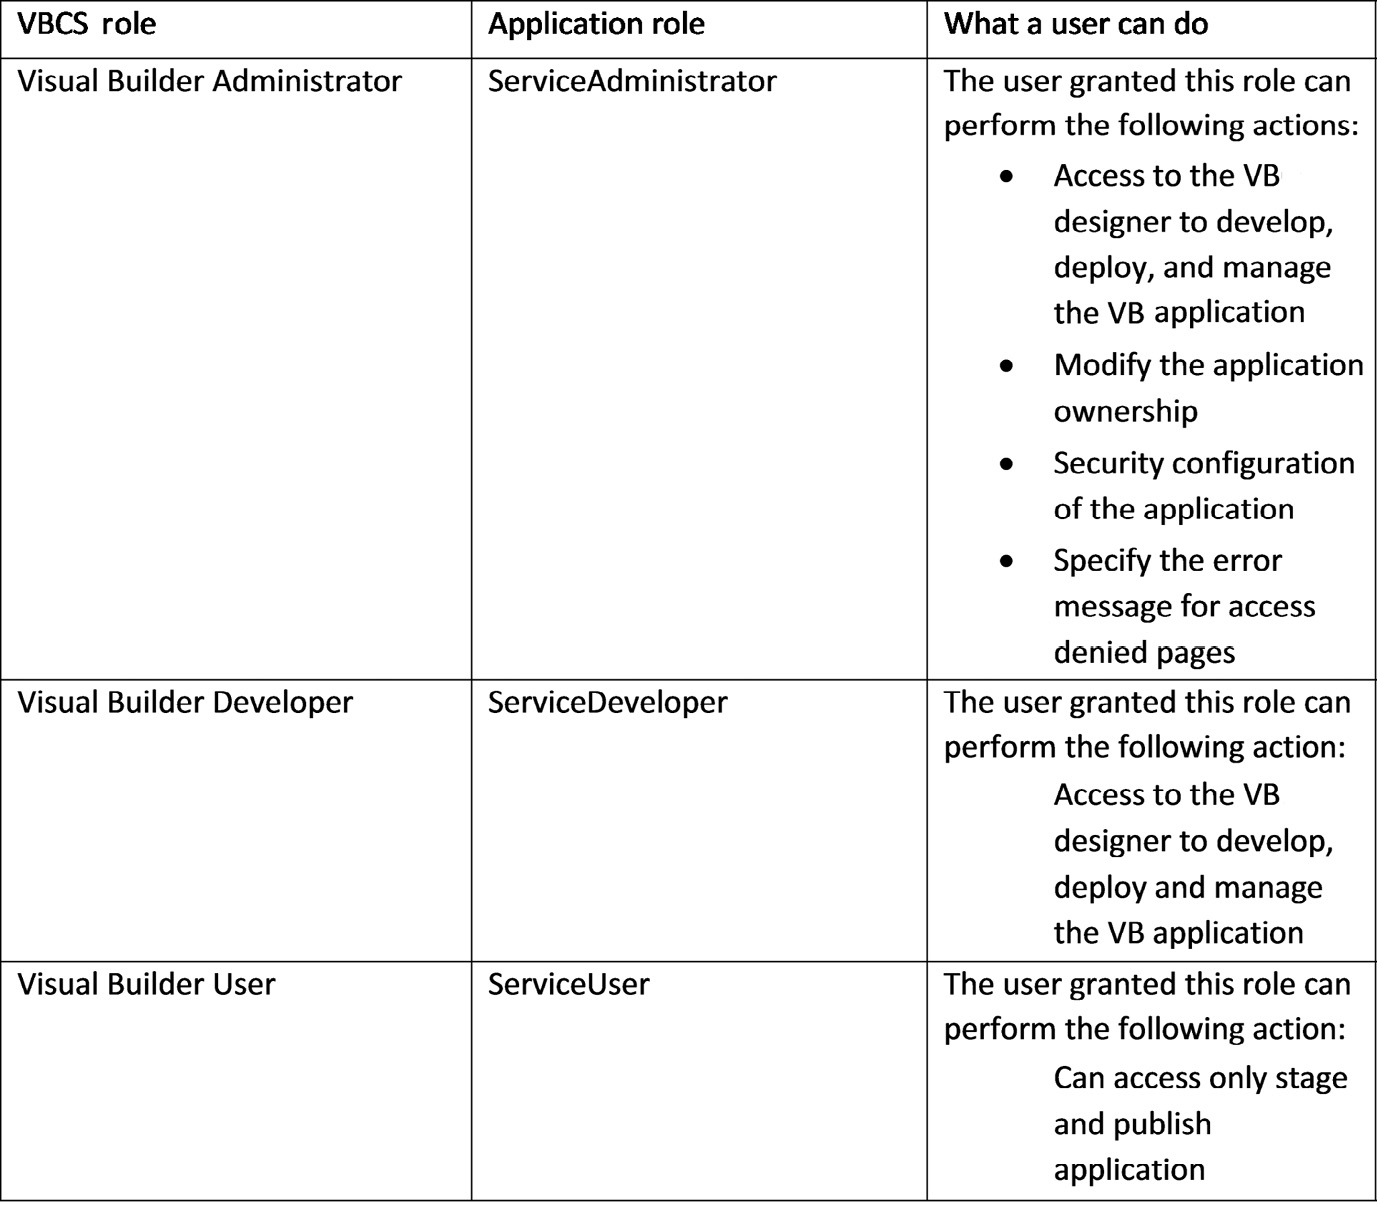
Table 2.2 – Pre-defined roles of Oracle Visual Builder
In the following sections, we will learn how to create a user.
Adding a user to IDCS
In order to assign roles to a user, a user must exist in Oracle Identity Cloud Service (IDCS). The following are the steps to create a user in IDCS:
- Log in to IDCS using the following URL: https://<unique_idcs_identifer>.oraclecloud.com/ui/v1/adminconsole.
- Click on Users from the dashboard.
- Click on the + Add button.
- Enter the details as follows and click on the Finish button:

Table 2.3 – Details for creating a user in IDCS
The following screenshot shows the Add User Details dialog box:

Figure 2.7 – Add User Details dialog box
The user will get an email notification at the specified email address upon user creation with the account activation link, using which the user can set the password in order to log in to their Oracle Cloud account.
The following screenshot shows the user information page:
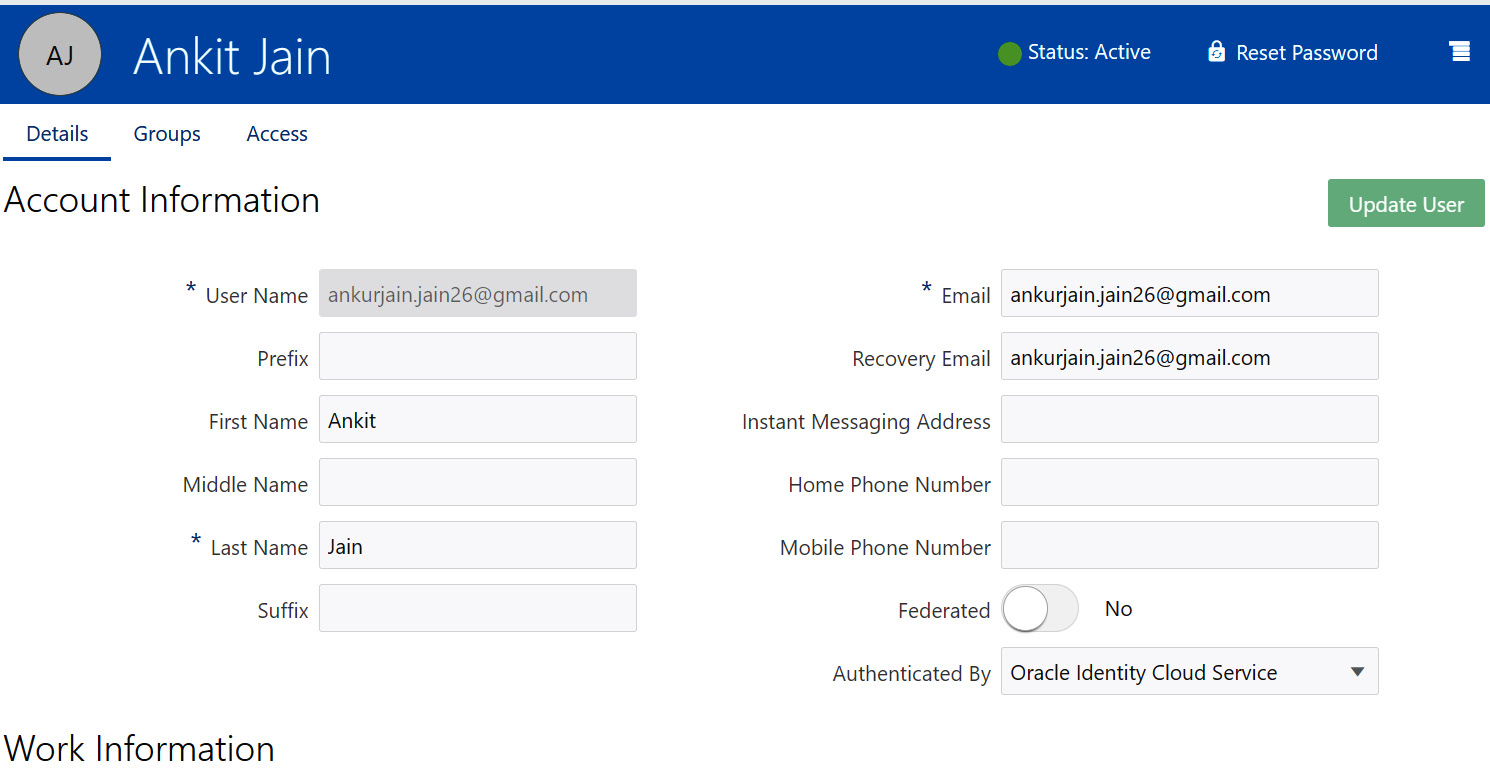
Figure 2.8 – User information page
You can use the user details page to add or modify the user details. Once modified, click on the Update User button.
Assigning a role to a user
Assigning a role to a user is done to specify what tasks a user can perform. Only the Identity Domain administrator can assign roles to a user.
The following are the steps to assign a role to a user:
- Log in to IDCS using the IDCS link: https://<unique_idcs_identifer>.oraclecloud.com/ui/v1/adminconsole.
- Click on the hamburger menu and click on Oracle Cloud Services.
- Search for your VB instance with the name, for example, VBINST. This will show all the VB instances that you have previously created.
The following screenshot shows the Oracle Cloud Services page:
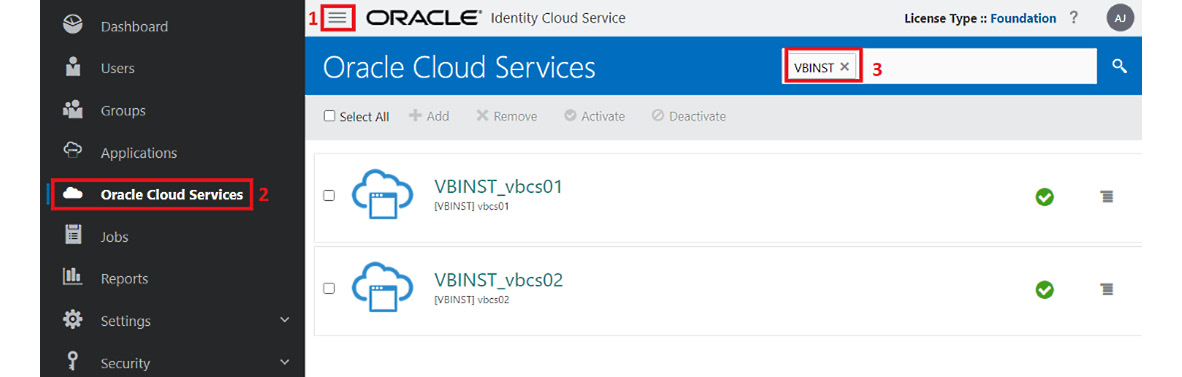
Figure 2.9 – List of the Visual Builder instances
- Click on any of the instances to which you want to assign roles to a user. Here we will click on VBINST_vbcs01.
- Click on the Application Roles tab, which will show all the roles specific to the application. Select the action icon (on the right side) next to the role and select Assign Users to assign the role.
- Search the user, select the checkbox next to the name of the user, and click on OK.
The following screenshot shows how to assign a role to users:
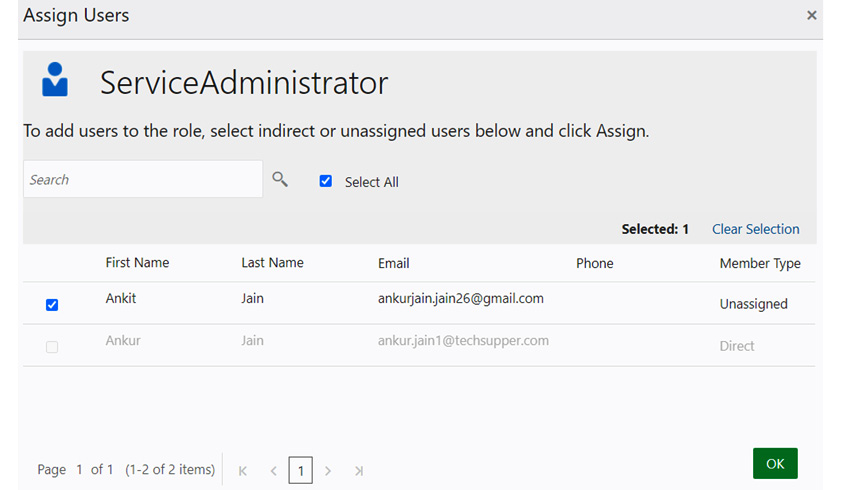
Figure 2.10 – Assigning a role to a user
Now the ServiceAdminstrator role is assigned to the user.
Now that we have looked at user creation and role assignment, next we'll look at how to derive the VB cost.
Deriving the cost of using VB
Cost plays a vital role whenever you buy any product and it helps you to make the correct decision. Cost is an important aspect to evaluate any product and helps to onboard the product in an organization. The correct decision to onboard a new product can help an organization to save huge costs. The cost derivation of any product should be easy and clear.
The Oracle Cloud pricing model is based on the unit cost structure. There are two pricing models that Oracle offers:
- Simple unit pricing: This model allows you to quickly provision a service and only pay for what you use. You have an option to switch off the service when not in use to save costs.
- Bring Your Own License (BYOL): This model allows existing on-premise customers to use their existing on-premise licenses.
The cost of VB can be derived using the Oracle Cost Estimator tool, which is easy to access and understand. This tool is accessible at https://www.oracle.com/cloud/cost-estimator.html.
If you are creating an independent instance of VB, then the cost of the VB instance (Enterprise Edition) will be as per the following:
- Unit price: US $1.2365
- Metric: OCPU/hour
Important Note:
Oracle is fully authorized to update the price list at any time. So, before you commit anything to a customer, always have a look at the Oracle Cost Estimator tool for up-to-date pricing.
You can view the price list at https://www.oracle.com/cloud/price-list.html#visual-builder.
If you are using Visual Builder as part of the OIC instance, then the cost will be different than for an independent instance. The cost model of OIC is different than VB. OIC licenses are based on messages/hour, as follows:

Figure 2.11 – Cost model of OIC
View the up-to-date price for OIC at https://www.oracle.com/cloud/price-list.html#integration.
If you are using the VB feature of OIC, then 100 messages will be consumed per concurrent user/hour. If there are two concurrent users, 200 messages will be consumed from the OIC messages pack.
Refer to http://www.oracle.com/us/corporate/contracts/paas-iaas-universal-credits-3940775.pdf to see the Oracle PaaS and IaaS universal credits service descriptions.
We have seen how to work out the VB cost, so in the next section, we'll look at how to access the VB instance.
Accessing the VB instance
There are two ways to access the VB instance. You can use the VB instance management page or directly use the VB link to access Visual Builder. We will discuss each in the next sections.
Accessing VB via the Visual Builder instance page
For this, you need to perform the following steps:
- Log in to the Oracle Cloud dashboard.
- Click on the hamburger menu, expand Platform Services, and click on Visual Builder.
- Click on the action menu to the right of the Visual Builder instance name and click on Open Visual Builder Home Page, as shown:

Figure 2.12 – Open to log in to Visual Builder
This action will take you to the Visual Builder home page.
Accessing VB using a direct URL
If you already know the Visual Builder URL, you can directly paste the URL into the browser and enter the login details. This is how a VB URL is structured: https://<vbcs_instane_name>-<cloud_account_name>.builder.ocp.oraclecloud.com/ic/builder.
Replace vbcs_instance_name and cloud_account_name with the actual values, for example, https://vbcs01-ankurjain1.builder.ocp.oraclecloud.com/ic/builder/.
You can bookmark the VB direct URL for easy login. The login page will appear if you enter the direct URL into the browser and if you are not already logged in in the same browser.
Tip:
Every application in Oracle Cloud is secured via the Oracle Identity Cloud. Hence, the login page is common for each application.
The following screenshot shows the login page:
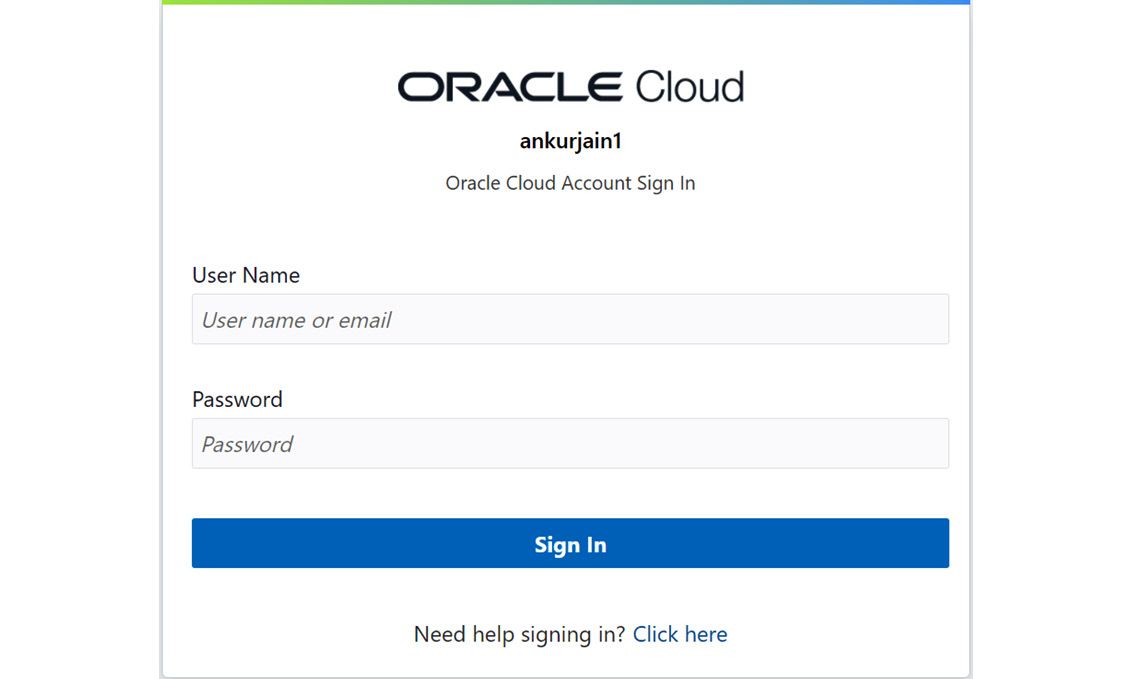
Figure 2.13 – Login page
Upon successful login, you will land on the Visual Builder home page.
Next, we'll explore different navigations of Visual Builder.
Exploring various navigations of VB
Once you log in to Visual Builder, you will see three main navigations under the home page. It's really important to be familiar with each and every navigation before you start development as it will help you to choose the right navigation to do the right things.
The three main navigations of Visual Builder are as follows:
- All Applications
- Settings
- Certificates
The following screenshot shows these three main navigations:

Figure 2.14 – Visual Builder's all navigations
Let's discuss each option in the next sections.
All Applications
Once you click on the All Applications navigation, you will be landed on the all applications page. It shows all the Visual Builder applications created earlier, if any, else the page shows only two buttons: + New Application and + Import Application.
The following screenshot shows the all applications page when no application exists:
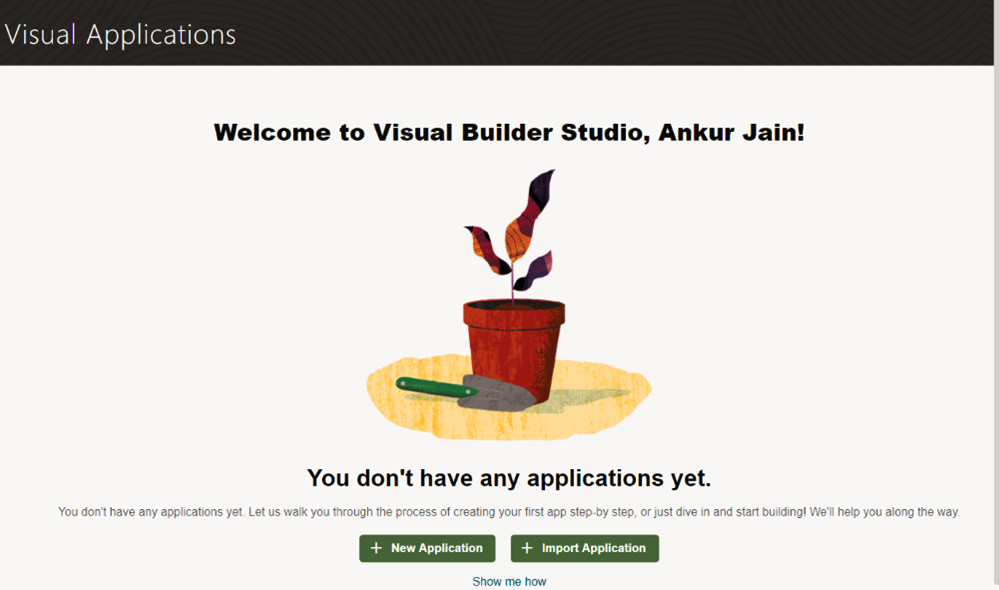
Figure 2.15 – All applications page
The + New Application button will allow you to create a new application; however, the + Import Application button will allow you to import an existing application.
If you have at least one application in Visual Builder, the all applications page looks as follows:

Figure 2.16 – All applications page with various options
The following list explains each and every action marked in the previous screenshot:
- Filter by Name: Allows you to search the application using the application name.
- Status: Allows you to filter the application status-wise. There are different statuses of an application.
- Administered by me: Developers can view and manage applications on the application page. If the logged-in user is the administrator of the Visual Builder instance, then only this checkbox is visible. If checked, it will list all the applications, even if the admin is not a team member in the application.
- Import: Allows you to import the existing application.
- New: Allows you to create a new application.
- Name: Represents the name of the application.
- Action: Shows different actions of an application. This menu differs as per the application status (Development, Stage, or Live).
Settings
Only service administrators are allowed to view the settings navigation. This is used to manage the global-level settings of the VB instance. There are different security settings that can be managed using this page. We'll discuss all of them in detail in this section.
There are two tabs on the settings page:
- General
- Services
The following screenshot shows the page when you are on the General tab:

Figure 2.17 – Tenant Settings page – the General tab
Let's have a quick look at each section.
Security
This section is used to manage the security of all applications in the VB instance. When Allow only secure applications to be created is checked, then all the published and staged applications will require user login. Without user login, the application can't be accessed. When this checkbox is checked, then only Only Visual Builder users can access secure applications will be enabled.
So, if you want only authenticated users to access all your VB applications, then check the Allow only secure applications to be created option.
Message for access denied errors
Authenticated users can see the default access denied message and page when they attempt to access the page or application for which they don't have proper roles. VB allows an administrator to override the default access denied message and page. Specify the redirect URL and "Access Denied" Message options, shown in the following screenshot:

Figure 2.18 – Access denied options
This setting is applicable for all the applications in a VB instance.
Allowed Origins
In general terms, Cross-Origin Resource Sharing (CORS) is a mechanism that allows restricted resources to be accessed from another domain. By default, incoming requests from outside domains are blocked. For example, if any SaaS application wants to embed the VB application and try to access it, then the request will be rejected and the client can see the CORS error in the browser console.
In order to enable an outside domain to access the VB application, you have to add the origin by clicking on the + New Origin button under the Allowed Region section, as shown in the following screenshot:

Figure 2.19 – CORS origin settings
Once you click on the button, it will allow you to enter the allowed origin URL. Click on the right icon to save the settings.
Tenant Database
As I mentioned earlier, the VB instance is provisioned with an embedded database but this database has a limitation in terms of space. The embedded database comes with 5 GB of space across applications in a VB instance. If you think this limit is insufficient for all your applications, then you have an option to switch your embedded database with another Oracle database, as follows:
- Oracle Database as a Service (DBaaS)
- Oracle Autonomous Transaction Processing (ATP)
In order to switch the database, click on the Use Different Database button under the Tenant Database section. Once you click on the button, it will open a wizard that gives you the option to select either Oracle Database Connection with JDBC or Oracle Autonomous Transaction Processing Cloud Wallet. To use a different database, you need the database admin user.
If you are willing to use Oracle DBaaS, assign privileges to the user as per the following script:
GRANT CONNECT, RESOURCE, DBA TO [adminuser];
GRANT SELECT ON SYS.DBA_PROFILES TO [adminuser] WITH GRANT OPTION;
GRANT SELECT ON SYS.DBA_USERS TO [adminuser] WITH GRANT OPTION;
GRANT SELECT ON SYS.DBA_DATA_FILES TO [adminuser] WITH GRANT OPTION;
GRANT SELECT ON SYS.DBA_SEGMENTS TO [adminuser] WITH GRANT OPTION;
In the case of ATP, the following privileges are required for the database user:
GRANT CREATE USER, ALTER USER, DROP USER, CREATE PROFILE TO [adminuser]
WITH ADMIN OPTION;
GRANT CONNECT TO [adminuser] WITH ADMIN OPTION;
GRANT RESOURCE TO [adminuser] WITH ADMIN OPTION;
GRANT CREATE SEQUENCE, CREATE OPERATOR, CREATE SESSION,ALTER SESSION,
CREATE PROCEDURE, CREATE VIEW, CREATE JOB,CREATE DIMENSION,CREATE
INDEXTYPE,CREATE TYPE,CREATE TRIGGER,CREATE TABLE,CREATE PROFILE TO
[adminuser] WITH ADMIN OPTION;
GRANT UNLIMITED TABLESPACE TO [adminuser] WITH ADMIN OPTION;
GRANT SELECT ON SYS.DBA_PROFILES TO [adminuser] WITH GRANT OPTION;
GRANT SELECT ON SYS.DBA_USERS TO [adminuser] WITH GRANT OPTION;
GRANT SELECT ON SYS.DBA_DATA_FILES TO [adminuser] WITH GRANT OPTION;
GRANT SELECT ON SYS.DBA_SEGMENTS TO [adminuser] WITH GRANT OPTION;
In the next section, we'll look at the component exchange repository.
Component Exchange
Component exchange is a repository of custom components available in Visual Builder Studio (VBS). All these components can be used on the web or on mobile applications.
Navigate to the Services tab from the Tenant Settings page in order to enable connections with backend services, as follows:
- Oracle Cloud Application Instance: This will allow you to configure a connection with the Oracle SaaS application. Once the connection is established, you can use the extend the Oracle SaaS application functionality in the VB application.
- Integrations: This will allow you to set up the connection with Integration. By default, the Integration connection is configured. But you have an option to update the connection details and point them to other Integration instances.
- Process: This will allow you to connect to Processes. If VB is part of an OIC instance, then this will also be configured by default. If not added, you can simply add the process connection.
- Custom: This allows you to create your own backend that will point to a custom server other than the inbuilt backends such as Integration, Process, and Oracle Cloud applications.
- Custom ADF Describe: This will allow you to add a custom ADF describe file as a backend.
Click on the + button in order to configure the backend services, as shown:
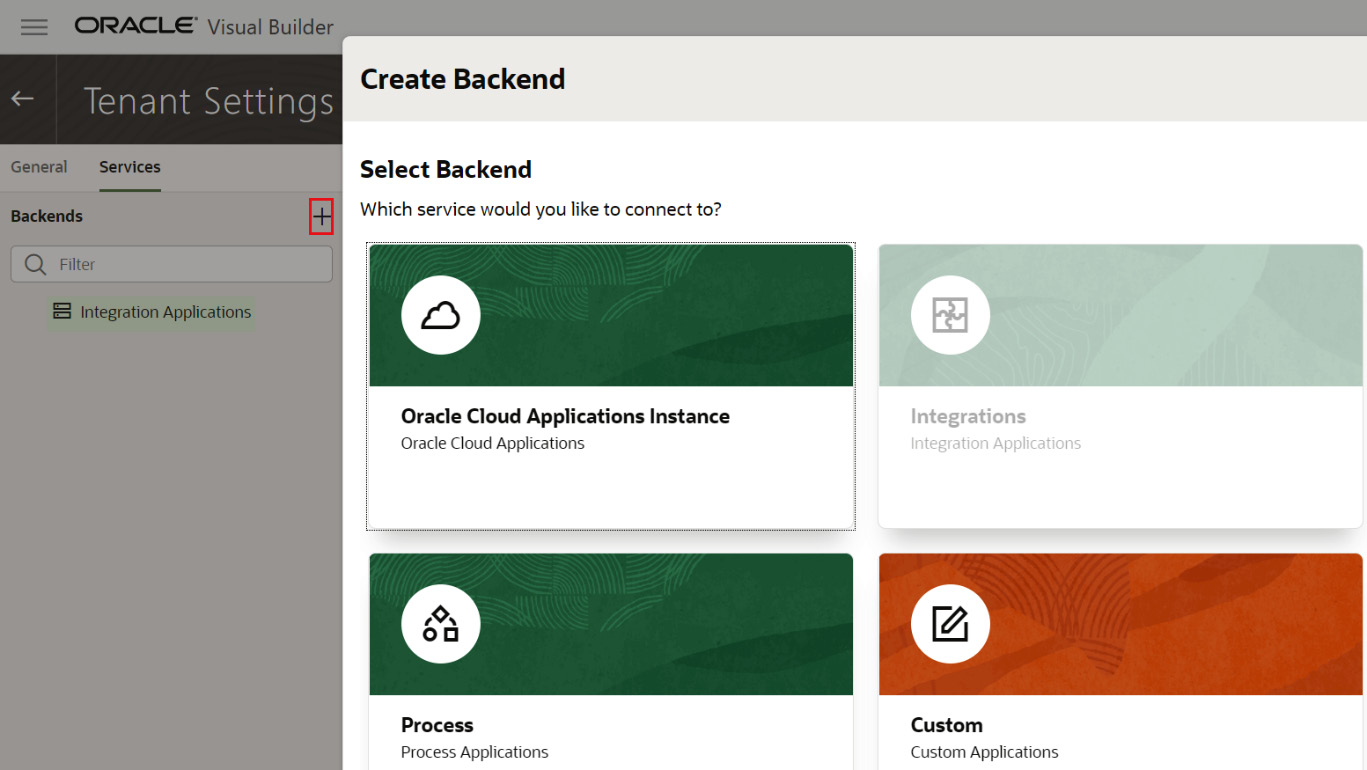
Figure 2.20 – Adding backend services
Once the backends are added, you have an option to update the connection properties. In order to update the connection properties, select the backend, go to the Servers tab, and click on the pencil icon to the right of the backend name.
Certificates
The page allows administrators to upload and manage the self-signed certificates used by this VB instance. The certificates allow inbound and outbound SSL communications to the REST APIs.
This page lists all the certificates that have been added already. You can delete an existing certificate using the delete icon next to the certificate name.
In order to upload a new certificate, click on the Upload button in the top-right corner of the page and upload or drag the certificate file. The following screenshot shows how to upload a certificate:
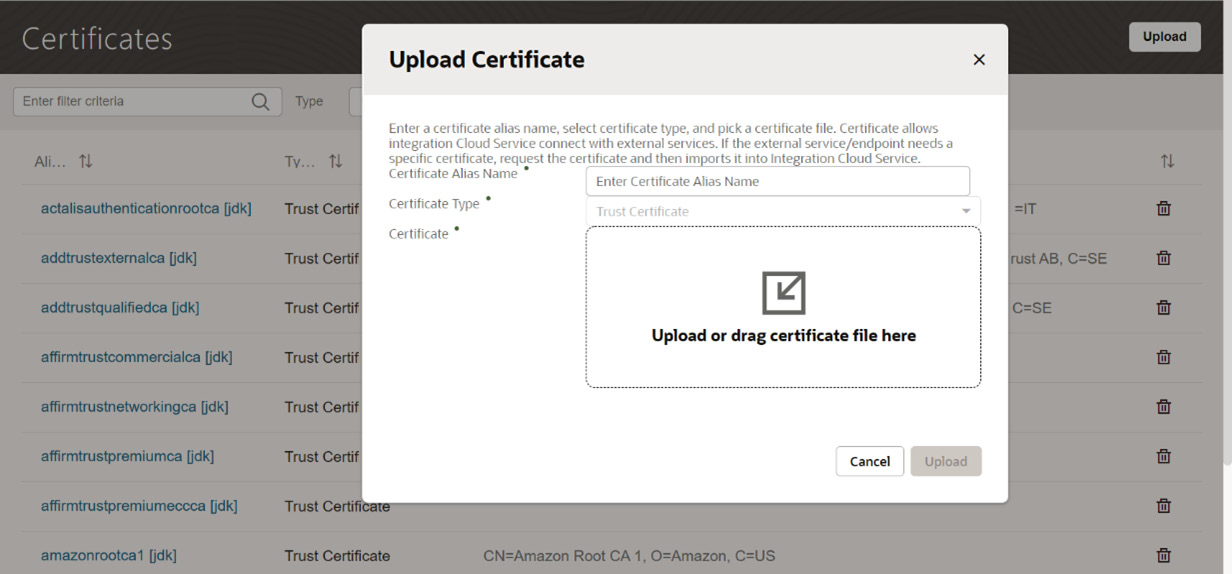
Figure 2.21 – Upload Certificate
Click on the Upload button in order to upload the certificate successfully.
In this section, we have explored various navigations of VB that will help you to choose the right navigation to do the right things.
Summary
In this chapter, we learned about two ways to provision a VB instance and saw the different actions that you can perform once a VB instance is created successfully. We explained various pre-defined roles of applications and VB, which will help you to provide a suitable role to users as per the requirements. We went through all the steps to provision a user via IDCS and how to assign pre-defined roles to a user.
We also discussed the VB costing, learned how you can get the VB cost, and looked at various links to derive the cost. You learned about two ways to access the VB instance to start your development. We also saw various navigations of VB with a detailed explanation that will help you to choose the right navigation to do the right thing.
This chapter helped you to learn various important things to kick off the VB journey. In the next chapter, we'll talk about various building blocks of Visual Builder that will be used throughout the book. So, don't skip the next chapter, and read it carefully to understand each and every building block.