
Chapter 15: Troubleshooting and Debugging VB Applications
In this chapter, we'll talk about various ways to troubleshoot and debug the VB application. So far, we have developed a lot of web and mobile applications and tested the happy flow (where the application is tested without seeing any design and runtime issues). But what if there is an issue in the applications during runtime? How will you debug and troubleshoot the application and fix the issues early? If you don't know what the issue is and you don't know how to debug it, then it's very difficult to fix it. So, it's very important to know the ways to troubleshoot and debug the application to know the exact issues.
We'll describe how to debug the VB application end to end to find out the issues that occur during development and runtime. As all the data communication happens via REST APIs, it's very important to explore various ways to debug REST APIs and check how they are behaving during runtime.
We'll show how to log messages at different levels such as JavaScript and Action Chain to make the debugging easier.
Every developer has to deal with errors and exceptions and when an exception occurs in an application, system generated messages are raised that cannot be understood by end users. So, it very important for the developers to suppress the system-generated messages and show user friendly messages to the users. We'll show how to show user friendly message to the users in case of any exceptions occur in the application.
In this chapter, we will cover the following topics:
- Learning about the tools for debugging applications
- Tracking REST calls
- Logging the data to debug issues
- Debugging the application code
- Exception handling
After completing this chapter, you will understand various ways to debug and troubleshoot the VB application to find design and runtime issues quickly and fix them. Also, you will see how to handle exceptions and how to log messages at the different component levels.
Technical requirements
To complete this chapter, you should have the following:
- A VB instance
- VB login credentials
Learning about the tools for debugging applications
In the software development life cycle, every developer has to deal with different types of known and unknown issues. Developers deliver the application for the end users but sometimes it does not work as expected due to various issues, such as data issues, server issues, network issues, and so on. But it's the developer's responsibility to find out the root cause of the issues and fix it. This is where debugging comes into play.
Visual Builder follows the multi-tier architecture to develop web and mobile applications, so developers might need to debug the applications at each layer to find out the root cause. Since VB is a UI tool, developers have to be dependent on the browser development tools to debug the applications. All browsers (Chrome, Firefox, and so on) offer development tools to debug applications. You can simply open the browser development tools using the F12 key. The following is a screenshot of the Google Chrome browser that shows the development tools:

Figure 15.1 – Chrome's browser development tools
Similarly, all other browsers have the same kind of development tools.
Important Note:
Throughout this chapter, we'll use the Chrome browser's development tools to debug the applications.
As you can see from the preceding screenshot, the following are the different consoles available in the browser development tools that will make your life easy to debug applications:
- Network: This console allows you to see the traffic between the client and server. You can inspect the properties of an individual's resources such as a complete request including the request parameters, body, content size, and so on, and similarly the complete response, including the response, headers, and so on.
- Console: This allows you to see the overall flow of the application. You can track the messages flowing from one page to another, including error messages, notifications, data, and so on.
- Elements: This console helps the UI designer to fix UI-related issues such as repositioning UI elements, color changes, alignment of components, and so on.
Similarly, there are other tools available, as shown in Figure 15.1, which will help you to debug the application end to end. Developers have to completely rely on those development tools to debug the application.
The VB application runs on a Verbose mode of output that provides the complete details on what's happening in the application.
Another layer that you may need to debug is the Business Objects. In order to debug the Business Objects, you can use the inbuilt logging mechanisms of Oracle VB.
These tools will help you to troubleshoot and debug development and runtime issues.
In this section, you have learned about various tools to troubleshoot and debug the VB application, which will help you to solve issues quickly. In the next section, we'll describe how to track REST calls.
Tracking REST calls
In this section, we'll describe how to track REST calls. Since the data communication in Visual Builder applications happens via REST APIs, it's very important to track the REST calls. When you call any Business Objects or any external REST APIs, a request is made to the server to push or pull data depending on the REST call. Sometimes you may need to track the REST calls end to end to debug the REST API issues.
For example, if the VB application calls any external REST API to push data into the external application but somehow all the records could not be updated successfully in the external application, as a developer, it's your duty to debug the VB application to check where the problem is located.
In order to debug such issues in VB, open the browser development console, move to the Network tab, and replicate the issue. Click on the REST API name that you want to track and view the complete REST API details from request to response.
The following screenshot shows the REST call that is made to post the opportunity in Salesforce:
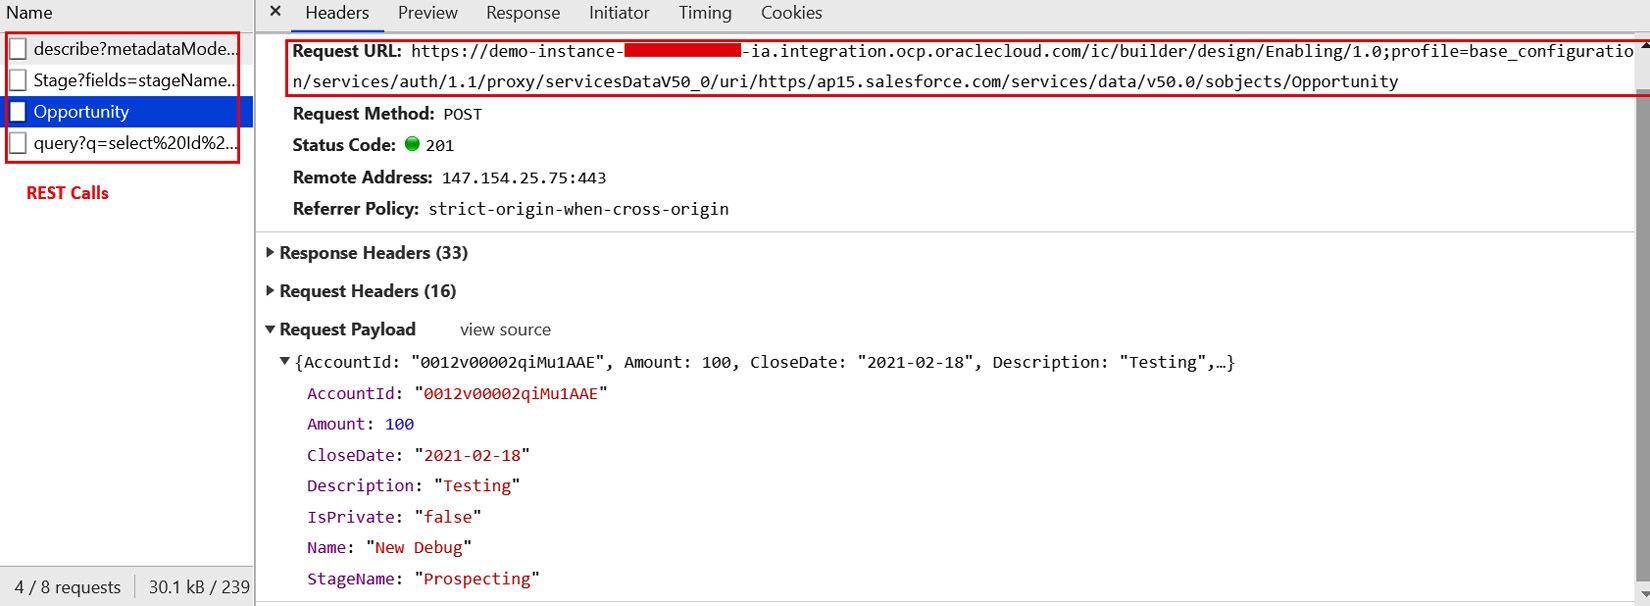
Figure 15.2 – Tracking a REST call
In the previous screenshot, you can see the following sections:
- Request URL: This section displays the complete URL that was used to invoke the REST API.
- Response Headers: This section displays all the response headers received from the REST server.
- Request Headers: This section shows all the headers sent in the request.
- Request Payload: This section captures the complete request that is sent to the REST server.
You'll need to switch to the Response tab to see what responses you have received from the REST API.
How do we know the actual error if any of the REST APIs fail? Such errors can be seen in the Network tab if the REST API has failed. The following screenshot shows a failed REST API call:
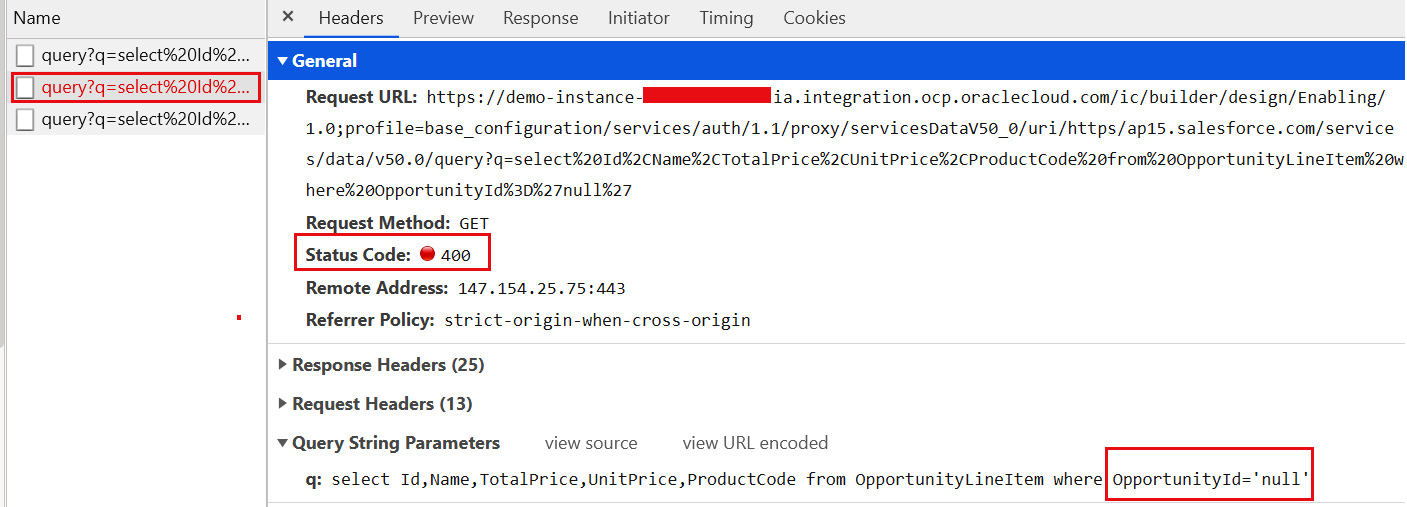
Figure 15.3 – Tracking errors in the REST call
The failed API will be marked in red on your screen, and you can look to the Status Code section to find out the reason for the error. You can move to the Response tab to find out about the actual error if the API throws the failure reason.
If you go to the Console tab of the developer tools, you can see the REST API error there too.
The Network tab will also display the time taken by each REST API to serve the request. The following screenshot shows the Network tab of the browser developer console:
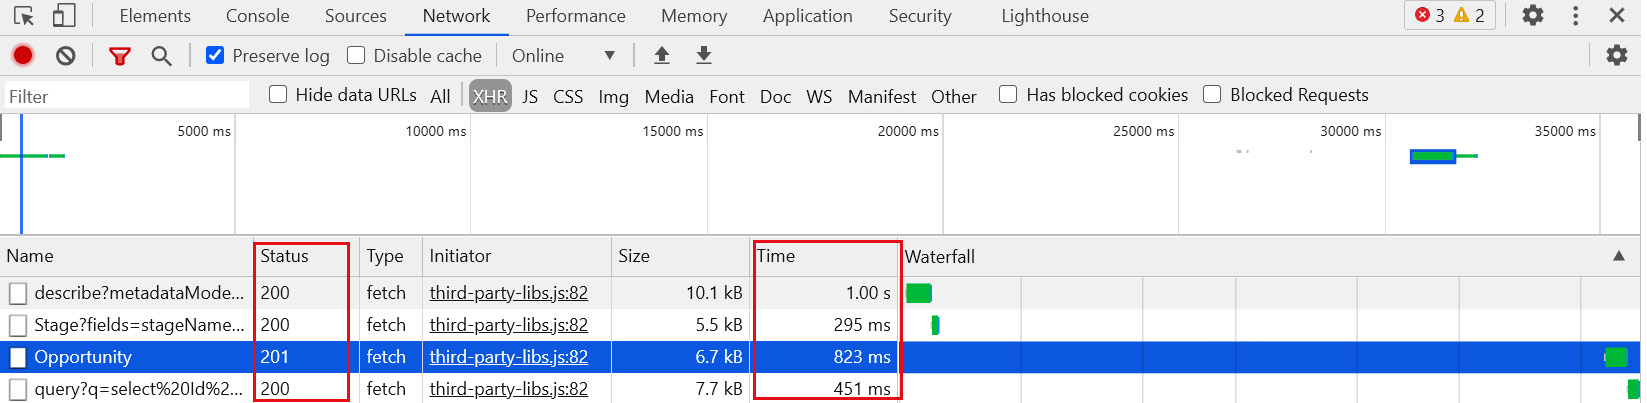
Figure 15.4 – Tracking response time in the REST call
As you can see, the Time column displays the complete time taken by each API to complete the request and the Status column displays the HTTP status code of the REST API response.
If you want to persist the errors, create a Business Object and insert all relevant error details to debug it offline.
In this section, we learned how to track the REST API calls end to end using the browser development console, how to see the request being sent, and the response received from REST. In the next section, we'll look at various ways to log the error messages that will make debugging easier.
Logging the data to debug issues
In this section, we'll describe various ways to log data to debug development and runtime issues. When you develop applications, logging the data at relevant places is very important. It will help you to debug issues very easily. But make sure you don't log sensitive information such as bank details, credit card details, passwords, and so on due to security reasons.
We'll use logging for different layers to debug issues, such as the following:
- JavaScript
- Action Chains
- Business Objects
In the subsequent sections, we'll see each of the aforementioned loggings in detail.
JavaScript logging
JavaScript is used to write custom logic or to filter out the data. In past chapters, we created some JavaScript code to build custom logic. If you want to debug issues during development and runtime, you can use the following one-line code in JavaScript to log the hardcoded string along with variables:
console.log("Hardcoded string "+ variable_name)
console.log() is an inbuilt JavaScript function that is used to print any kind of messages and variables.
The following screenshot shows the console.log() function added in the JavaScript code:

Figure 15.5 – The JavaScript console.log() function
All the messages printed by the console.log() function can be seen in the browser development console as in the following screenshot:
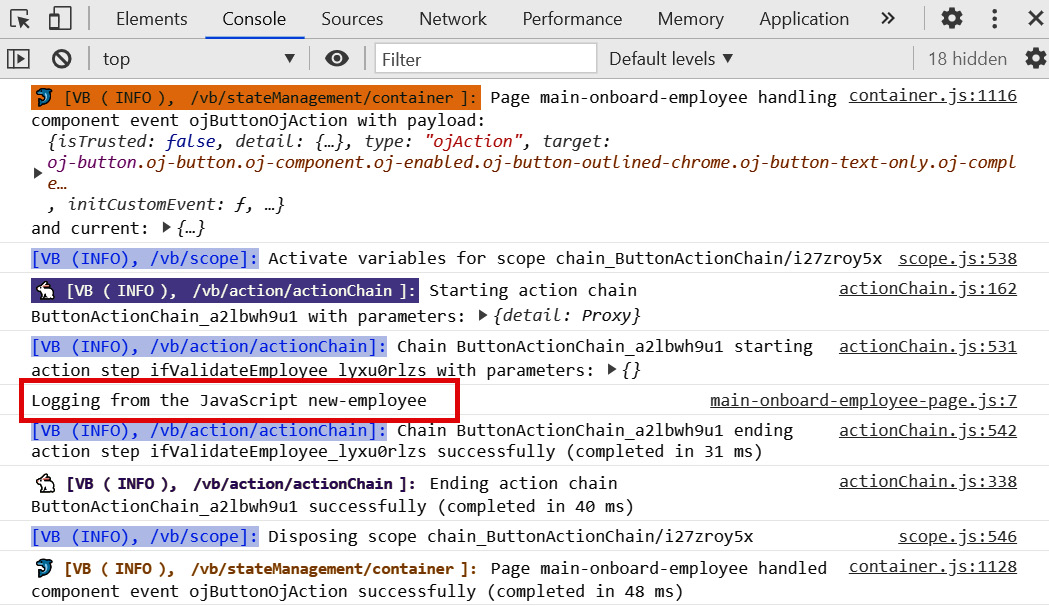
Figure 15.6 – JavaScript log message in the console
The JavaScript logging will help to debug JavaScript-related issues.
In the next section, we'll look at how to log messages at the Action Chain level.
Action Chain logging
In this section, we'll look at how to log messages in Action Chains. Action chains are used to build logic that executes in response to events such as a button click, value change, and so on. In Action Chains, there is no inbuilt logging action as such that can be used to print messages in the browser development console. However, there is an inbuilt Fire Notification action that can help you to debug development-related issues. This action shows an inline notification on the page.
For example, if you want to know the values being passed to the Action Chain, you can use the Fire Notification action to see the data inline on the page.
As shown in the following screenshot, three Fire Notification actions are added at different steps. The first Fire Notification action is added to view the first name that is being passed to the Action Chain. The second Fire Notification action is added to show the confirmation message if the REST API sends the success response and the third one is added to show an error message in the case of REST API failure:
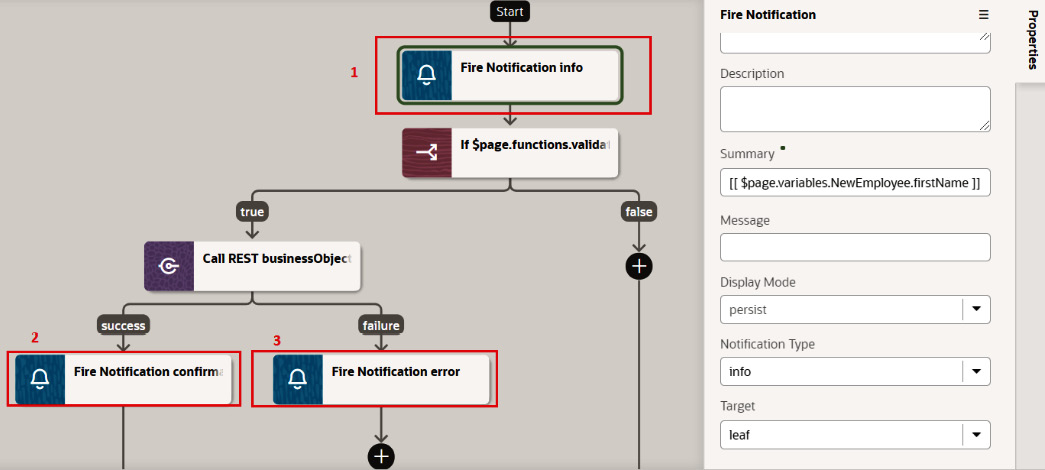
Figure 15.7 – Logging in an Action Chain
The following screenshot shows the value of the First Name field being passed to the Action Chain when the + Add Employee button is clicked:
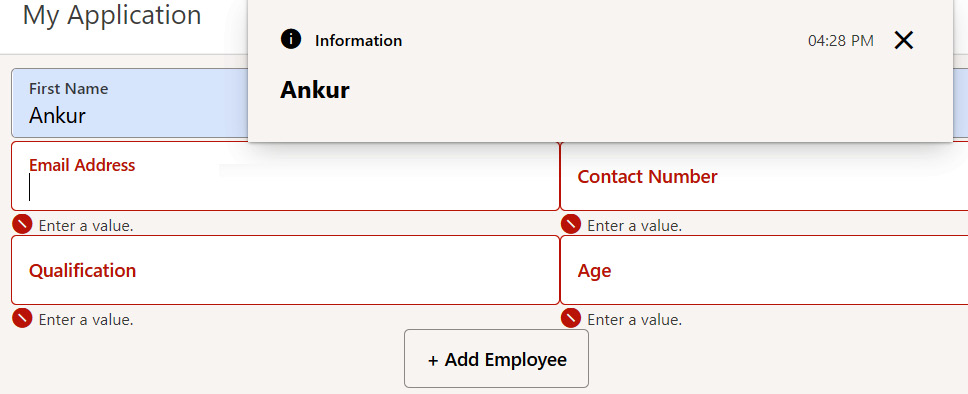
Figure 15.8 – Transient message on the web form
The complete information of the Fire Notification action is also printed in the browser console, as shown in the following screenshot:
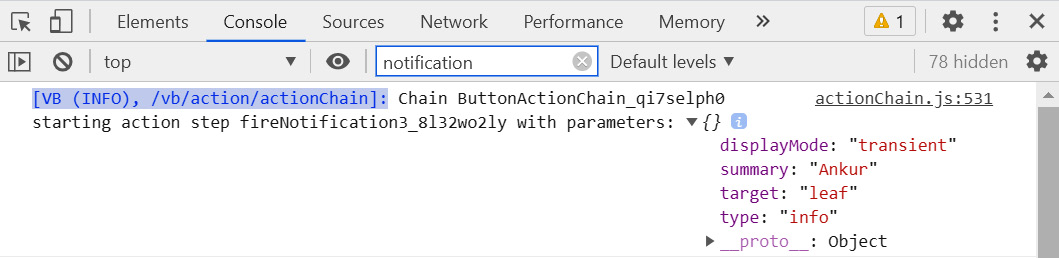
Figure 15.9 – Tracking Fire Notification in the browser console
When you use the Call REST action to call the REST APIs, it creates two branches, one for success and another for failure. In the failure branch, VB automatically adds the Fire Notification action to print the error messages. Refer to Figure 15.7 and notice the Fire Notification action labeled 3, which is added automatically by VB under the failure branch.
In the next section, we'll look at how to log messages at the Business Object level.
Business Object logging
In this section, we'll look at how to log messages at the Business Object level. The data communication between Business Objects and the UI layer happens using the REST APIs, so the debugging can happen via the browser development console in the case of REST APIs. But if you have created the business rules inside the Business Objects, then these logs can't be tracked from the development console.
The business rules logs can be tracked using the log viewer available inside the VB developer console. Click on the Logs links at the bottom of the screen, as shown in the following screenshot:

Figure 15.10 – Tracking Business Object logs
By default, the logging is not enabled. Click on the Enable Logging checkbox to enable it. This will only be enabled for a single session. If you re-log in to VB, you have to re-enable logging. All the business rules-related logs will be printed in the logs table.
Let's take an example of how to log messages in business rules. Say you have created a Before Insert Object Trigger rule in which you want to execute the custom code. In the Custom Code editor, you can use the println function to log any message. The following screenshot shows the usage of the println function:
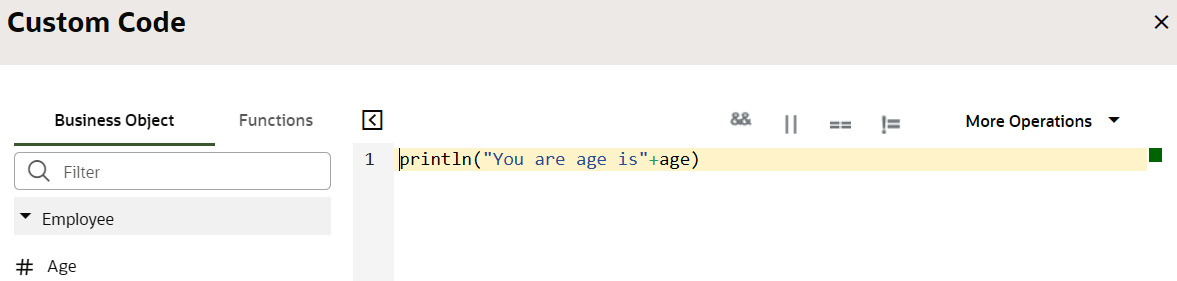
Figure 15.11 – Usage of the println function in custom code
Similarly, the println function can be used in the custom groovy code to log any message.
In addition to this custom logging, the Trigger start and Trigger end actions are always logged in the logs. This is how the logs can be added to the Business Objects.
In this section, you learned about various ways to log messages at various levels to debug issues. The logging mechanism will help you in troubleshooting the application. In the next section, we'll look at how to debug the application code.
Debugging the application code
In this section, we'll look at how to debug the application code step by step to identify the issues raised during development and runtime. VB uses Verbose mode, which captures the complete details of what's happening inside the application. Verbose mode shows additional information as to what an application is doing. The developer only has to rely on the browser development tools to track the end-to-end flow.
When you run the application, the complete flow of the application is captured in the browser console, including the REST calls, variables assignment, Action Chain flow, events, and so on. Everything is logged in the sequence from the starting of the application until the page loading successfully.
The following screenshot shows the browser developer console that shows all the actions that are captured when the + Add button is clicked:
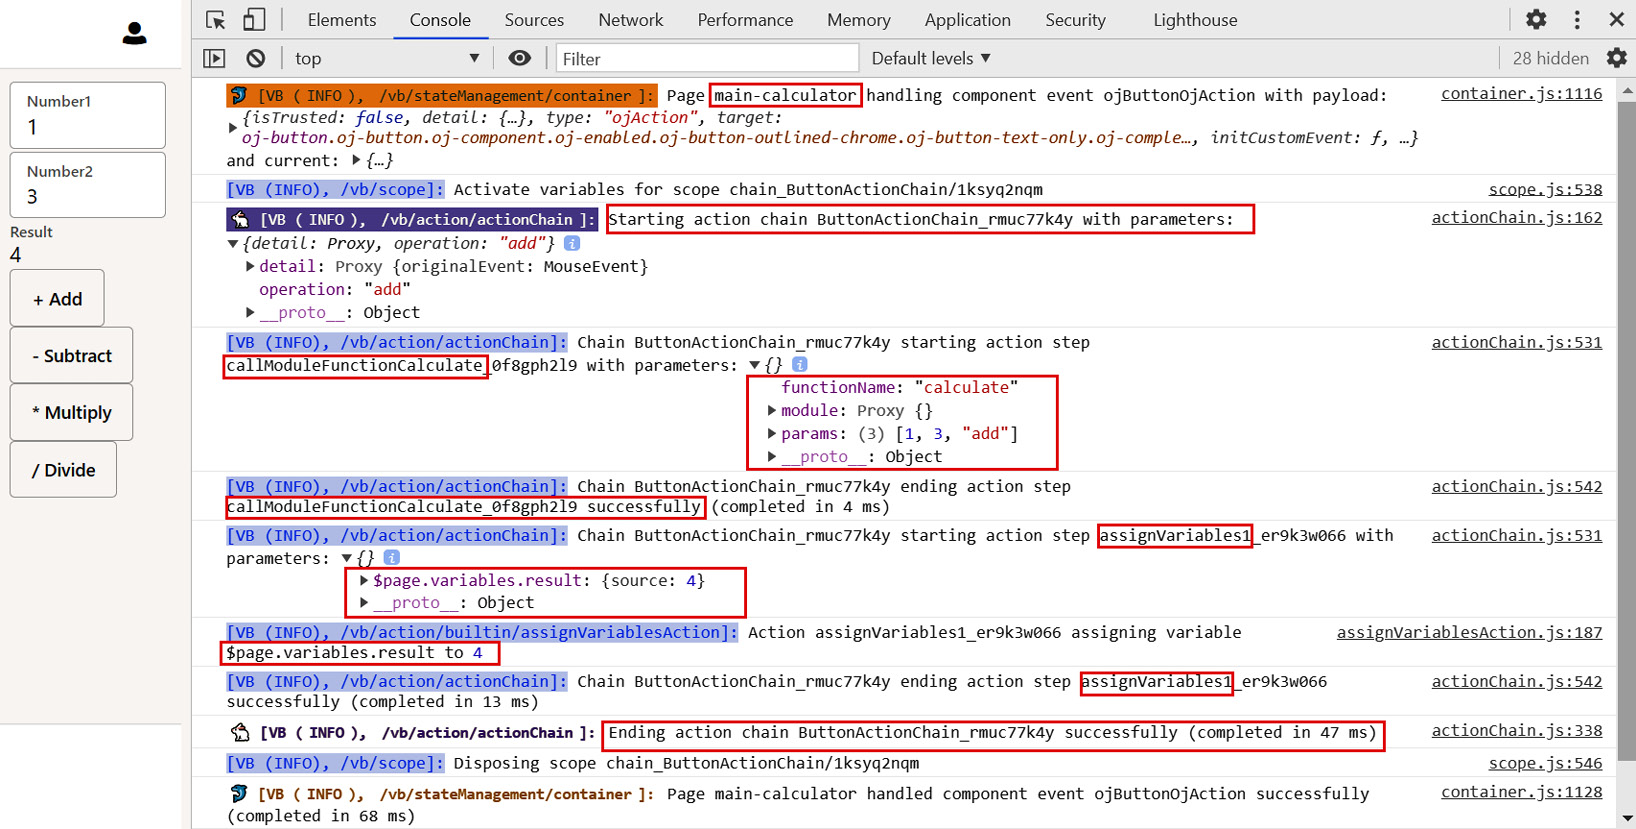
Figure 15.12 – End-to-end tracking using the browser console
Notice the highlighted sections between the starting Action Chain and the ending Action Chain. All the actions are captured along with the data. Also, notice that the callModuleFunctionCalculate action is executed and has called the JavaScript function named calculate with three parameters, 1, 3, and add. Similarly, other actions are captured in the console too.
In the case of any error at any point in time, it will be captured in the console too. The following screenshot shows an error highlighted along with the reason:

Figure 15.13 – Tracking errors in the console
As you can see, the error indicates that the error occurred while calling the calculate function because the op1 variable is not defined. After seeing this error, you will know the exact issue and can fix it easily.
The browser developer console provides a feature to search the actions with a name and allows you to filter the messages via the logging level. The following screenshot shows the different logging levels to filter messages:
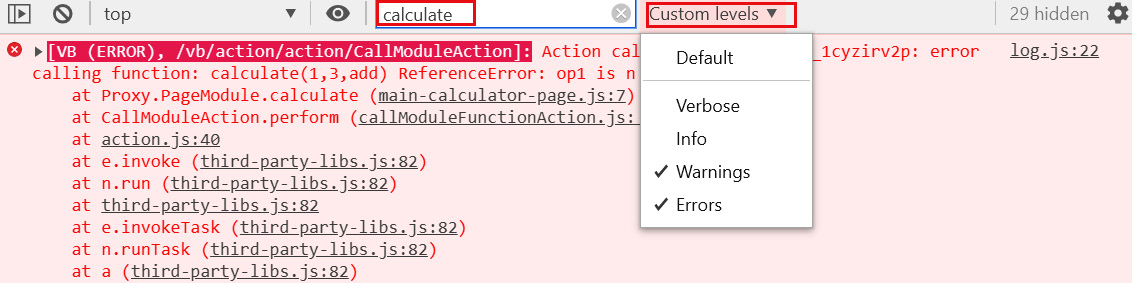
Figure 15.14 – Filtering messages in the browser console
When your application moves to the production stage, you might want to reduce the logging to show only critical information. You can control the level of logging that VB generates in the console in the application settings. To know more about this, refer to this blog: https://blogs.oracle.com/vbcs/controlling-browsers-console-log-level-in-visual-builder.
This is how you can debug the application code end to end. You can view what value is assigned to what variables, which JavaScript function is called along with the parameter values, what value is returned back from the function, and much more. The browser development console is one of the most powerful tools that will help you in troubleshooting and fixing the code.
Sometimes you may need to raise an Oracle service request in the case of any application-related issues. In order to debug the issues, Oracle can ask to replicate the issue, download the HAR file (a HAR file, or HTTP Archive file, tracks the information between the client and server) from the browser development tool, and upload it on the service request.
In this section, we learned how to track the flow of the application step by step, how to see which method is called, along with the parameter values, and how to search the action using the name. These debugging techniques will certainly help you to find out the root cause of the issues. In the next section, we'll look at how to handle exceptions and show a friendly message to users in the case of any errors.
Exception handling
In this section, we'll look at how to handle exceptions in the VB application when any issue is raised and provide a meaningful message to users. When you develop an application and deliver it to the end users to use it, they may face different kinds of issues, such as data issues, network issues, REST API issues, and so on.
When an issue is raised when using the application, a system-generated message is thrown, which an end user cannot understand. So, it's the developer's responsibility to suppress the system-generated message and show user-friendly messages to users.
In the subsequent sections, we'll describe how to handle exceptions at different levels.
Handling REST API exceptions
In this section, we'll look at how to handle exceptions related to REST APIs. In VB, we use REST APIs extensively for data communication, so it's very important to handle exceptions in the case of any issues. In order to call REST APIs, we use the Call REST action of the Action Chain.
When you drag and drop this action on an Action Chain, two branches are created automatically by VB, one for success and another for failure. The failure path executes when any issue or exceptions is raised while calling the REST API and it pops up an inline notification message on the page, as shown in the following screenshot:
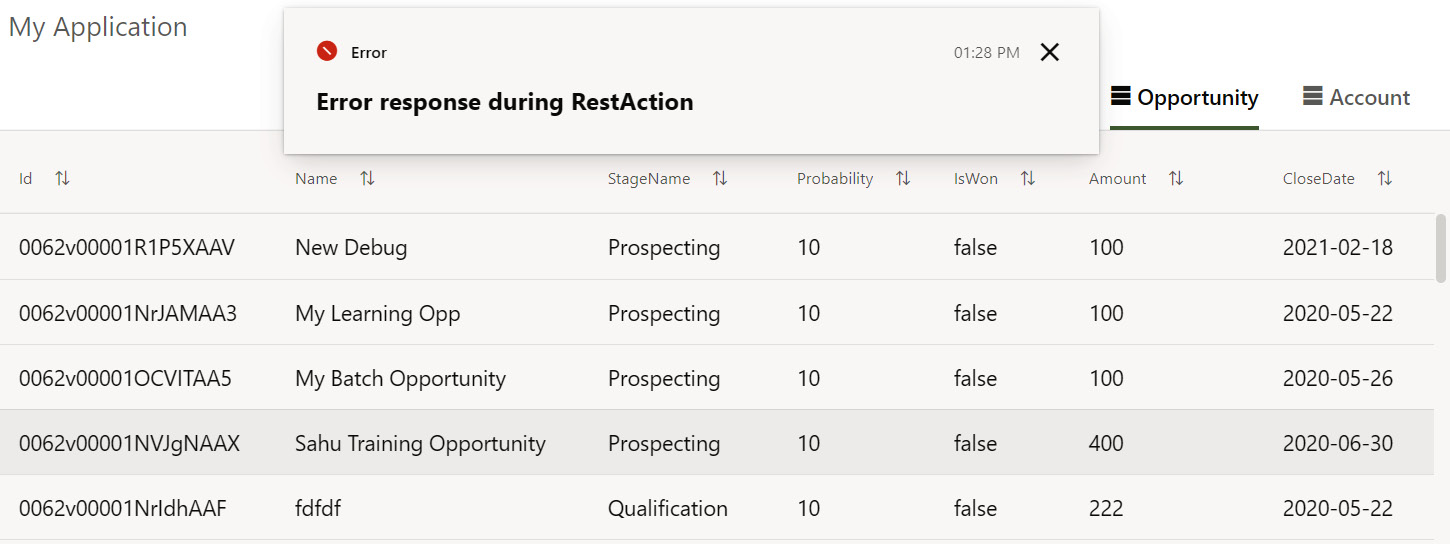
Figure 15.15 – REST API system-generated message
This error message is fired because the Fire Notification action is configured inside the failure path, as shown in the following screenshot:

Figure 15.16 – Fire Notification used to display an error message
Instead of showing the system-generated message, which is configured in the Summary attribute, we specify a custom user-friendly message so that the user can understand it. In order to review the error messages, open the browser development console to view the complete error details or persist the error messages in the Business Objects to analyze issues further.
Also, testing the REST service calls from outside VB (for example, using POSTMAN or similar tools) will help determine if the issue is in the REST service itself, or in the way that VB interact with it.
This is how you can handle the exceptions raised when calling REST APIs.
In the next section, we'll look at how to handle data-level issues.
Handling data-level issues
In this section, we'll describe how to handle data-level issues. When an application is created to capture data from a user and send it to the external system, or to save in the Business Objects, it's important to take valid data only to minimize the data-level issues. In order to minimize data-level issues, we should allow users to enter valid records only in the web forms.
There are various ways that you can prevent your users from entering invalid records, as follows:
- Client-side validation: When you create a web form to take input from users to push into the external systems or Business Objects, it is always recommended to put the client-side validation on the web form using JavaScript and use specific UI components to build a web form that has the inbuilt validations.
For example, the use of the Email JET component allows users to enter email addresses in a valid format. The Email component has inbuilt validation that will restrict users to only provide a correct email address, as shown in the following screenshot:
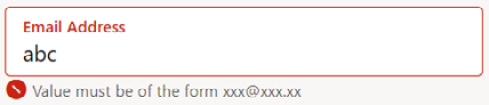
Figure 15.17 – Email component
Use JavaScript to perform client-side validation to validate the web form and allow users to only enter valid data. Refer to the Enabling client-side validation on the forms section of Chapter 7, Working with Life Cycle Events, Validations, and UI Logic, to see how to perform client-side validation. By doing so, you will ensure that only valid data will be sent to the external application or Business Objects.
- Business Object validation: Along with the client-side validation, you can put field-level validation on Business Objects. This will ensure that if someone hits the Business Object APIs directly, the APIs will throw an error if passed data that is not valid as per the validations.
- Usage of the If action: The If action allows you to put different conditions. The conditions you put in If evaluate to either true or false. So, before you execute any business logic, such as calling any external APIs, you can use the If action to add conditions. Accordingly, you can configure true and false branches to execute the custom logic as per your application requirements.
Use all these preceding methods to validate the data before you actually call the REST APIs. This will ensure that data will always be valid and will minimize data-level issues.
This is how data-level issues can be handled in VB.
In this section, we learned how to handle exceptions in VB and show friendly messages to the end users in case of any error. We also learned how to handle data-level issues and ways to handle them.
Summary
In this chapter, you learned about various ways to troubleshoot and debug techniques to handle the issues raised in the VB application. You learned about browser development tools and consoles that will help you to troubleshoot and debug the development and runtime issues. By knowing how to use all these tools, you will be able to easily debug your application and fix your issues easily.
We explained how to track REST API calls end to end, including what request was sent, the request body sent to the REST API, the response received, and how much time a REST API is taking to respond. We also described how to know about an error raised while calling the REST API.
You learned about various ways to log data that will help you to debug issues step by step. We explained at what level logs can be enabled, including the JavaScript call, Action Chains, and Business Objects. Since the VB application is built on multi-layer architecture, you may need to log the message at the relevant places to make your debugging life easier. We explained how to debug the application code step by step, how to track variables, activities, what values are assigned to which variables, and so on. You also learned how to filter messages based on the name and logging level along with screenshots.
You also learned how to handle exceptions raised in the application code, suppress system-generated messages, and show friendly messages to end users. We explained how to handle the REST API exceptions raised when calling the REST APIs in the Action Chain and how to handle data-level issues.
In the next chapter, you will learn how to manage the VB application using Visual Builder Studio (VB Studio). We'll explain VB Studio and the tools offered by it. We'll demonstrate how to provision VB Studio and how to access it. You will learn how to create projects in VB Studio, how to connect VB with VB Studio, and how to connect the VB application with the VB Studio Git repository. You will learn how to manage the version control of the VB application using the VB Studio Git repositories, including code check-in, pulling updates, modifying the code file using the Git interface, and importing applications from VB Studio Git repositories.
Further reading
- Refer to this blog post to learn more about debugging and troubleshooting techniques in VB: https://blogs.oracle.com/vbcs/debugging-and-troubleshooting-visual-builder-logic
- Refer to this blog post to learn how to abort long-running processes: https://blogs.oracle.com/vbcs/restabort
- Refer to this blog post to learn how to download an HTTP Archive (HAR) format file: https://support.zendesk.com/hc/en-us/articles/204410413-Generating-a-HAR-file-for-troubleshooting