Chapter 9: Extending Oracle and Non-Oracle SaaS Applications
Extending Software as a Service (SaaS) applications such as Oracle Cloud, HCM, and Salesforce is one of the most common requirements across any organization. You can develop custom screens using VB to extend the SaaS application's functionality and interact with their day-to-day activities directly from the VB application without logging in to the SaaS application.
In this chapter, we will develop custom VB screens and show how to extend Oracle and non-Oracle SaaS applications. We are going to use Salesforce as a non-Oracle SaaS application and develop a few custom screens in VB to communicate with the Salesforce application. We'll list and create new accounts and opportunities from the VB application that will be created in the Salesforce application.
Similarly, we'll create another set of custom screens that will allow us to interact with the Oracle Cloud application. In these custom screens, we'll interact with the REST API accounts to show all the customers and allow them to update records. We will also create another set of screens from where you can nominate customers for their feedback and which will store all the nominated customers in the VB application.
We'll create a multilingual application that will allow end users to view the application in their language of choice.
In this chapter, we will cover the following topics:
- Extending a Salesforce application
- Extending an Oracle Cloud application
- Creating a multilingual application
After completing this chapter, you will be able to extend Oracle and non-Oracle SaaS applications using the VB and you will also be able to develop a multilingual application.
Technical requirements
To complete this chapter, you will require the following:
- A Visual Builder instance
- VB login credentials
- A Salesforce instance
- An Oracle Cloud instance
You can find the full source code used in this chapter here: https://github.com/PacktPublishing/Effortless-App-Development-with-Oracle-Visual-Builder/tree/main/Chapter09.
Extending a Salesforce application
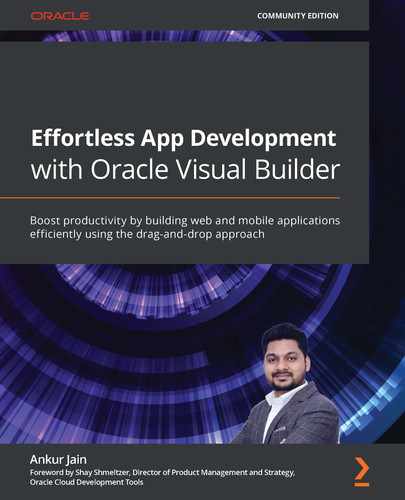
In this section, we'll extend a Salesforce application's functionality using the VB. In order to extend a Salesforce application, a new web application with the name salesforceext_chapter9 is created under the VBCSBook application. While creating this application, select Tabbed as the navigation style and add two navigation items with the names Opportunity and Account as per the following screenshot:
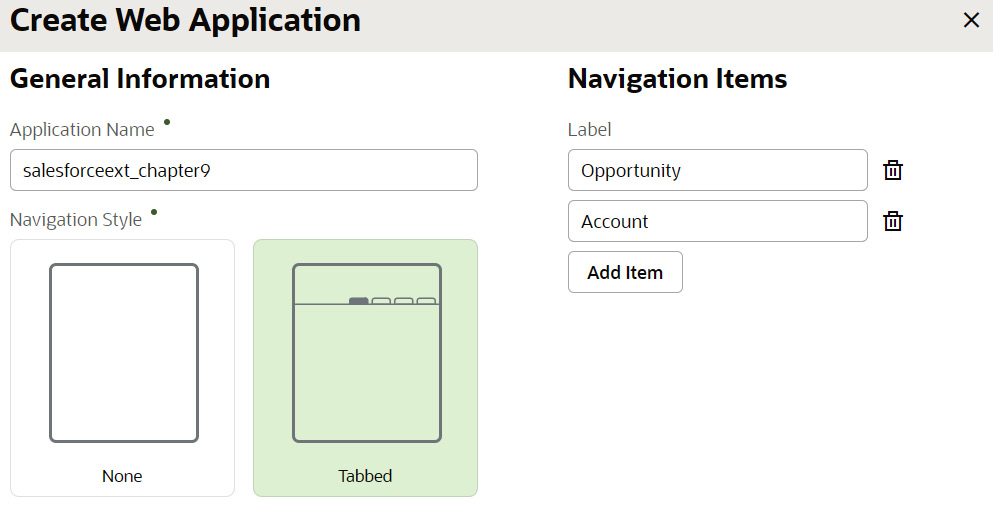
Figure 9.1 – A new web application to extend Salesforce
The salesforceext_chapter9 application will be created with two flows with the names Opportunity and Account. We'll manage (list and create) Salesforce opportunities under the Opportunity flow and accounts under the Account flow.
Pre-requisites for extending the Salesforce app
In order to extend the Salesforce application, the following are required:
- The Salesforce developer instance. You can use https://developer.salesforce.com/signup to create a free Salesforce account and https://login.salesforce.com to log in.
- We'll use the Salesforce REST API using the OAuth2.0 protocol, so it is necessary to create a connected app in Salesforce that will provide the consumer key (client ID) and consumer secret (client secret). The client ID and client secret will be used to generate the access token, which will be used to call other Salesforce REST APIs.
Tip:
You can use the documents (available at https://help.salesforce.com/articleView?id=connected_app_create_basics.htm&type=5 and https://help.salesforce.com/articleView?id=connected_app_create_api_integration.htm&type=5), one by one, to create the connected app.
- A Salesforce username and password, along with a client ID and client secret, will be used to generate the access token. The password that needs to be supplied is a combination of password + security token. Therefore, you need to obtain a security token from Salesforce.
Tip:
Follow the document at this URL in order to obtain the security token: https://help.salesforce.com/articleView?id=user_security_token.htm&type=5.
We'll use the following Salesforce REST APIs for this use case. These APIs will be used for the following purposes:
- To query the Opportunity, Opportunity Line Items, and Account data: GET (https://ap15.salesforce.com/services/data/v50.0/query)
- To create a new opportunity: POST (https://ap15.salesforce.com/services/data/v50.0/sobjects/Opportunity)
- To create a new account: POST (https://ap15.salesforce.com/services/data/v50.0/sobjects/Account)
In the next section, we'll create a Service Connection with the Salesforce APIs.
Creating a Service Connection
We need to create a Service Connection using the Salesforce REST APIs. To do this, perform the following steps:
- Open the VBCSBook application, open the Services tab from the application navigator, and click on the + button and Service Connection to create a new Service Connection. Then, select Define by Endpoint from the opened dialog box.
- Enter the API URL, https://ap15.salesforce.com/services/data/v50.0/query, and then click on the Next button.
- Go to the Server tab and select OAuth 2.0 Resource Owner from the Authentication dropdown. Supply the Salesforce username and password under the Username section, and Client ID and Secret under the Client ID section.
- Enter the Token URL as https://login.salesforce.com/services/oauth2/token.
- Select the Dynamic, the service does not support CORS option from the Connection Type dropdown.
- Switch to the Request tab, go to the Parameters tab, and then add a new dynamic query parameter with the name q and check the Required checkbox to make it required.
- Switch to the Test tab, go the URL Parameters tab, enter the query, select id,name,stagename,amount,closedate,probability,iswon from opportunity, in the q parameter, and then click on the Send Request button. Click on the Save as Example Response button to save the response as a sample.
- Then, click on the Create button to create the Service Connection successfully.
As part of this use case, we'll create two separate screens to create accounts and opportunities that will be created in Salesforce directly, so we need to add the following two POST endpoints to the same Salesforce server:
- /sobjects/Opportunity
- /sobjects/Account
Important Note:
Refer to Chapter 5, Creating and Managing Service Connections, under the Adding more endpoints to the Service Connection section, to learn how to add Service Connections to the same server.
To add /sobjects/Opportunity and /sobjects/Account to the Service Connection, copy and paste the following request and response JSON body in the Request and Response tabs:
- The following JSON request will be used to create a new opportunity, /sobjects/Opportunity:
{
"AccountId": "0012v00003AZLNJAA5",
"IsPrivate": false,
"Name": "postman",
"Description": null,
"StageName": "Prospecting",
"Amount": 9300.0,
"CloseDate": "2021-12-30"
}
- The following JSON request will be used to create a new account, /sobjects/Account:
{
"Name":"Google India",
}
The following JSON response will be captured when a new account and opportunity is created in Salesforce. Copy and paste it in the response for both endpoints:
{
"id": "0062v00001R0hMgAAJ",
"success": true,
"errors": []
}
Now, the required endpoints are added to the Service Connection. Let's create a few common types and variables at the salesforceext_chapter9 application level.
Click on the salesforceext_chapter9 web application and create the following type:
Create a custom type with an Account ID of the object type and add four fields, Id, Name, Industry, and Type, of the String type.
Create the following variables:
- Create a variable with the ID Accounts of the ADP type. Select Account as the item type, and Id as the key attribute.
- Create a variable with the ID OpportunityQuery of the String type and then enter select Id,Name,Stagename,Amount,Closedate,Probability,Iswon from opportunity as the default string. This variable holds the query to obtain the opportunity data.
- Create a variable with the ID OpportunityLineItemQuery of the String type and enter select Id,Name,TotalPrice,UnitPrice,ProductCode from OpportunityLineItem where OpportunityId= as the default string. This variable holds the query to get the Opportunity Line Item (OLI) data based on the Opportunity ID.
- Create a variable with the name AccountQuery of the String type and enter select Id,Name,Type,Industry from Account as the default string. This variable holds the query to get the Account data.
In the next section, we'll create a page that will be used to fetch accounts and to create a new account in Salesforce.
Listing and creating accounts
In this section, we'll get a list of accounts from Salesforce and populate them in a table. Also, we'll create a form to add a new account. These are the steps to achieve this:
- Click on the salesforceext_chapter9 web application, go to the Event Listeners tab, and then register the vbEnter event. Then, add a new Action Chain with the name loadData and click on the Finish button.
Important Note:
Refer to Chapter 7, Working with Life Cycle Events, Validations, and UI Logic, under the Registering the vbEnter event and loading Employee Business Object data section, to learn how to register a vbEnter event.
- Go to the loadData Action Chain, drag and drop the Call REST action just below the Start action, and select the GET/query endpoint of the Salesforce Service Connection.
- Click Assign on the right of Input Parameters, drag and drop application.variables.AccountQuery on uriParams.q, and then click on the Save button from the opened dialog box.
- Drag and drop the Assign Variables action under the success path, and then click on Assign next to Variables. Drag and drop chain.results.callRestEndpoint1.body.records on application.variables.Accounts.data, and then set the Reset Target property as empty.
The loadData Action Chain will fetch all the accounts from Salesforce and assign them to the Accounts ADP variable.
- Open the account-start page, drag and drop a Table component, go to the Data tab from the Properties palette, and select application.variables.Accounts from the Data property.
- Add the fields Id, Name, Industry, and Type from the Table Columns property.
- Set the Style property of the table to height:300px.
Now, the table will be populated with all the accounts that are in Salesforce. Next, we'll add a form on the same page that will allow you to add a new account:
- Under the accounts-start page, create a type using the From Endpoint option, select POST /sobjects/Account, and then select Name under Request, as per the following screenshot:
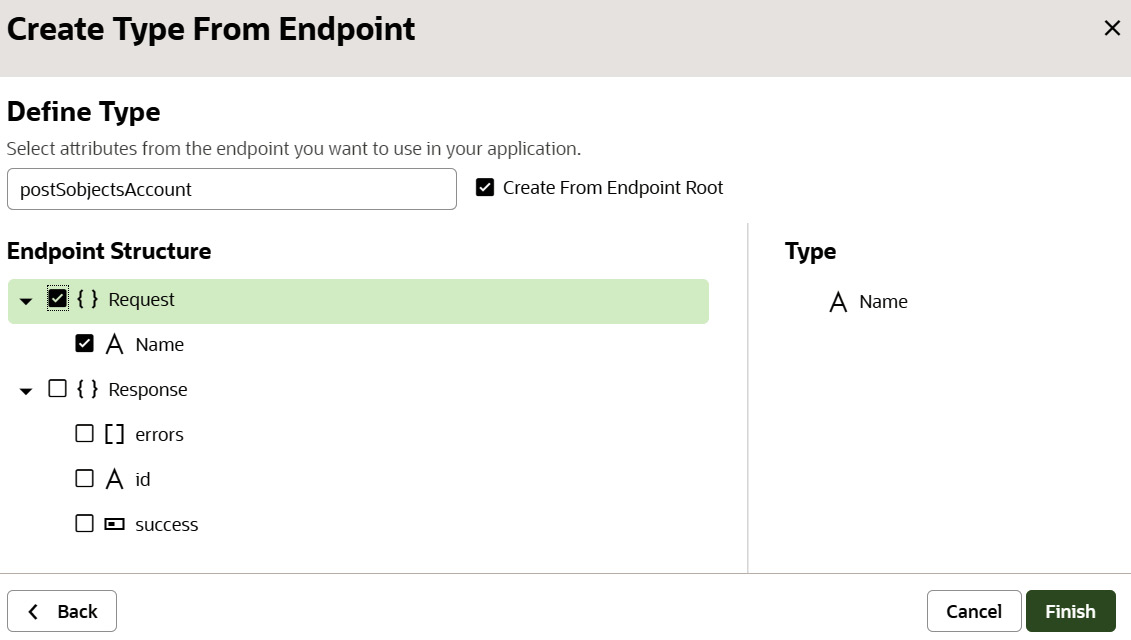
Figure 9.2 – Creating a type
- Create a variable with the ID NewAccount of the postSobjectsAccount type.
- Drag and drop the Heading component just below the table and change the Text property to Add Accounts.
- Drag and drop the Form Layout component just below the Heading component and change the Max Columns property to 2.
- Drag and drop the Input Text and Button components inside the form layout.
- Change the Label Hint field to Account Name, and select variables.NewAccount.Name as the value of the Input Text property.
- Change the Text property of the button to + Add Account and register the ojAction event on the button.
- In the button's Action Chain, drag and drop the Call REST action just below the Start action. Select POST /sobjects/Account, which is used to create a new account.
- Assign page.variables.NewAccount to the body.
- Drag and drop the Call Action Chain under the success path and select loadData from the Action Chain ID property. This action will call the account query again from Salesforce and refresh the table.
The configuration is now complete. Run the application and then switch to the Account tab. All the accounts should be populated in the table. Add a new account under the Add Accounts section. As soon as you add a new account, the account will be created in Salesforce and will be visible in the table too.
The following screenshot shows the accounts data. A new account, Oracle United State, has been added, which is reflected in the table:
Figure 9.3 – Viewing and adding new accounts
Let's now move on and work with the opportunity flow.
Listing opportunities
In this section, we'll work with the opportunity flow, and look at how to list and create new opportunities in Salesforce. We'll also show the opportunity line items in a dialog when a particular opportunity is selected from the table.
The following are the steps to complete the opportunity flow:
- Open the opportunity-start page, drag and drop the Table component on to the page, move to the Quick Start tab, and then select the Add Data option.
- Select the GET/query endpoint of Salesforce and then click the Next button. From the next screen, select Id, Name, StageName, Probability, IsWon, Amount, and CloseDate. Select Id as the primary key and then click the Next button.
- Drag and drop application.variables.OpportunityQuery on to uriParameters.q and then click the Finish button.
- Set the style property of the table to height:300px.
All the Salesforce opportunities will be listed in a table after completing the previous steps. Next, we'll show Opportunity Line Items in a dialog, when an opportunity is selected from a table:
- Create an object Type with the ID OLI and then create Id, Name, and ProductCode fields of the String type. We also create TotalPrice and UnitPrice fields of the Number type.
- Create an ADP variable with the name OLIADP, select OLI as the item type, and then choose Id as the key attribute.
- Drag and drop a Dialog component just below the table, change the ID of the dialog to oli-dialog. Set width:900px; of the dialog component using the style property and then change the dialog-title property to Opportunity Line Items.
- Drag and drop the Table component inside the Dialog component. Set the Data property to variables.OLIADP and then select the Id, Name, ProductCode, TotalPrice, and UnitPrice columns from the Table Columns properties.
- Change the Text property of the button to Ok, which is inside the Dialog component. Register the ojAction event on that button and configure the Action Chain to close the dialog box.
Important Note:
Refer to Chapter 8, Exploring Other Visual Components and Their Advanced Functionalities, under the Opening and closing the dialog on an action section, to learn how to close the dialog.
- Return to the Page Designer tab of the opportunity-start page. Register the first-selected-row event on the opportunity table.
- Inside Action Chain of the table event, drag and drop the Call REST action and then select the Get/query endpoint of Salesforce.
- Configure the q parameter with the expression $application.variables.OpportunityLineItemQuery+"'"+ $variables.rowKey+"'". This expression will append the opportunity ID of the selected row with the Opportunity Line Item query. Make sure that the Expression checkbox is selected from the opened dialog box.
- Drag and drop the Assign Variables action under the success path. Map the chain.results.callRestEndpoint1.body.records source to the target, page.variables.OLIADP.data. Update the Reset Target property to empty.
- Drag and drop Call Component to below Assign Variables. Select oli-dialog from the Component property and then select or enter open from the Method Name property.
Now, when you click on any of the opportunities from the table, a dialog will be opened that will show all Opportunity Line Items of the selected opportunity as per the following screenshot:
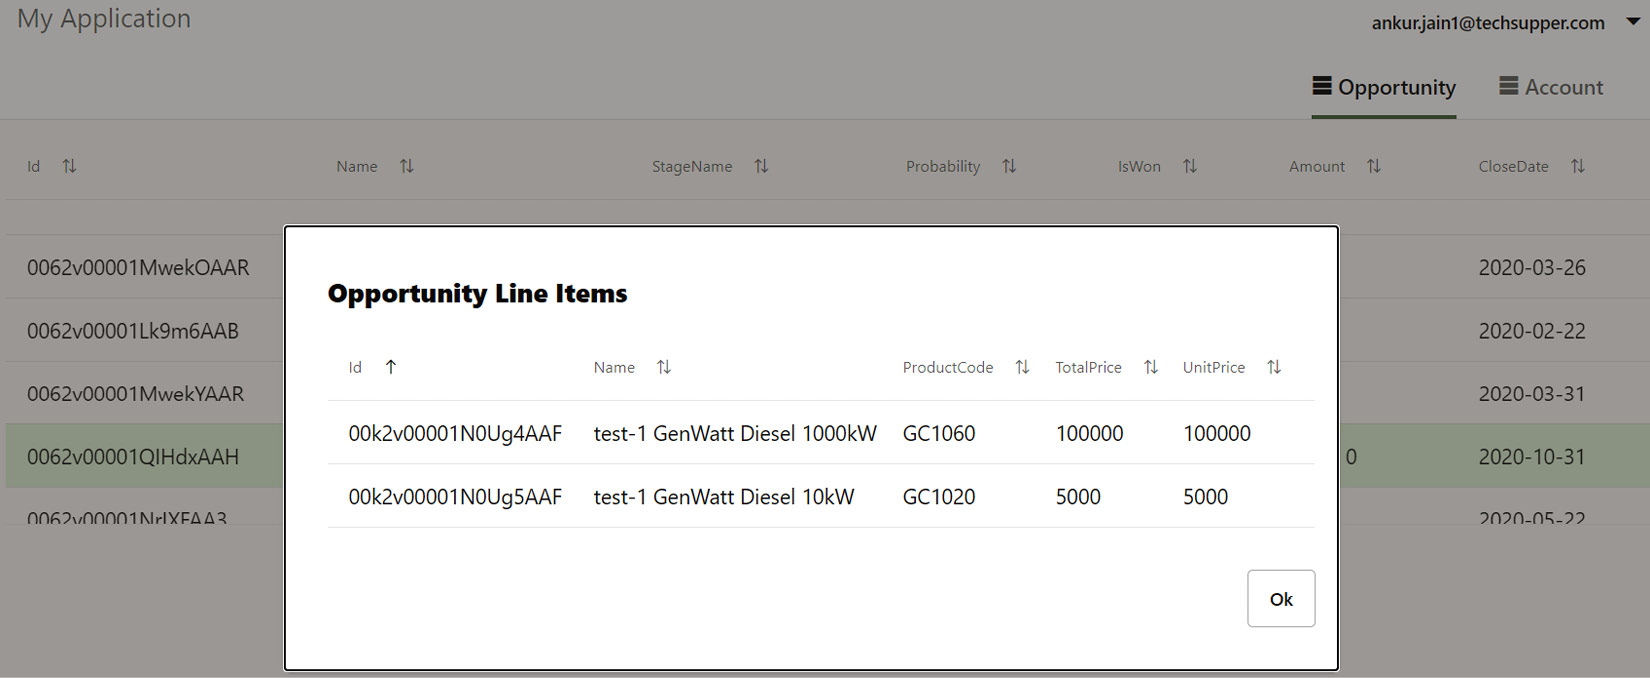
Figure 9.4 – Opportunity Line Items
Next, we'll create a form on the same opportunity-start page that will allow us to create new opportunities.
Creating opportunities
In this section, we'll create a form that will be used to create new opportunities and that will be created in Salesforce directly. The following are the steps to achieve this:
- Open the opportunity-start page and create a new Type using the From Endpoint option. Select the POST /sobjects/Opportunity endpoint from the opened Create Type From Endpoint dialog box, and then click on the Next button.
- From the next screen, select the checkbox to the right of the Request node, which will select all the fields under the Request node, and then click on the Finish button. This action will create a type with the ID postSobjectsOpportunity.
- Create a new variable with the ID NewOpportunity and then select postSobjectsOpportunity as the type.
- Return to the Page Designer tab, drag and drop the Heading component just below the table, and change the Text property to Add Opportunities.
- Drag and drop the Form Layout component just below the Heading component and change the Max Columns property to 2.
- Configure the UI components inside Form Layout as per the following table:

Table 9.1 – List of UI components
- In order to configure the Stage Select (Single) component, a new Business Object is created with the name Stage, along with a single column with the name Stage Name. Three rows are added with the values Prospecting, Qualification, and Need Analysis in the Stage Business Object. These values are as per the Salesforce stage data. We bind Stage Select (Single) to Stage Business Object in order to populate stage values. While configuring this, select the stageName field in both Label and Value.
- Configure Radio Button Set with the static values. Use Create Static List of Options under the Quick Start tab to create a static list. Enter Public and Private for Label, and false and true for Value, respectively, as per the following screenshot:
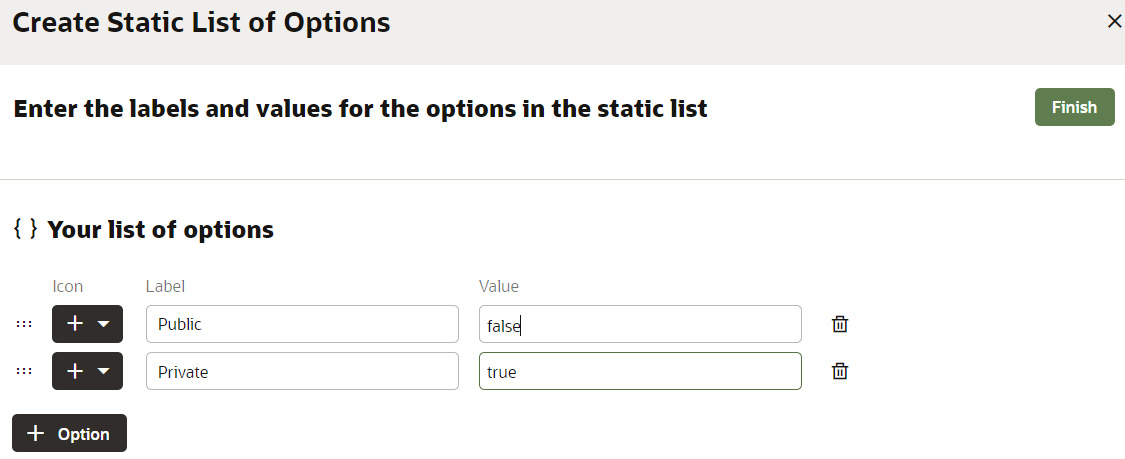
Figure 9.5 – Configuring the radio button set component for the opportunity type
We also need to set the class property of the Radio Button Set component to oj-choice-direction-row.
- Register the value-item event on Account Select (Single). In the Action Chain of this event, drag and drop the Assign Variables action, and then map the variables.data.Id source to the page.variables.NewOpportunity.AccountId target. This action will map the selected account ID to the AccountId variable during runtime.
- Return to the Page Designer tab, drag and drop the Button component on to the page after Form Layout, and change the Text property to + Add Opportunity.
- Register the ojAction event on the + Add Opportunity button. In this Action Chain of the event, drag and drop the Call REST action just below the Start action, and then choose the POST /sobjects/Opportunity endpoint. Assign page.variables.NewOpportunity to the body.
- Drag and drop the Fire Data Provider Event action under the success path. Select page.variables.getQueryListSDP from the Event Target property, and then select Refresh from the Type property.
Now the configuration is complete. Run the page and create a new opportunity using the Add Opportunity form. As soon as a new opportunity is added, it will be created in Salesforce and reflected in the table, too, as per the following screenshot:
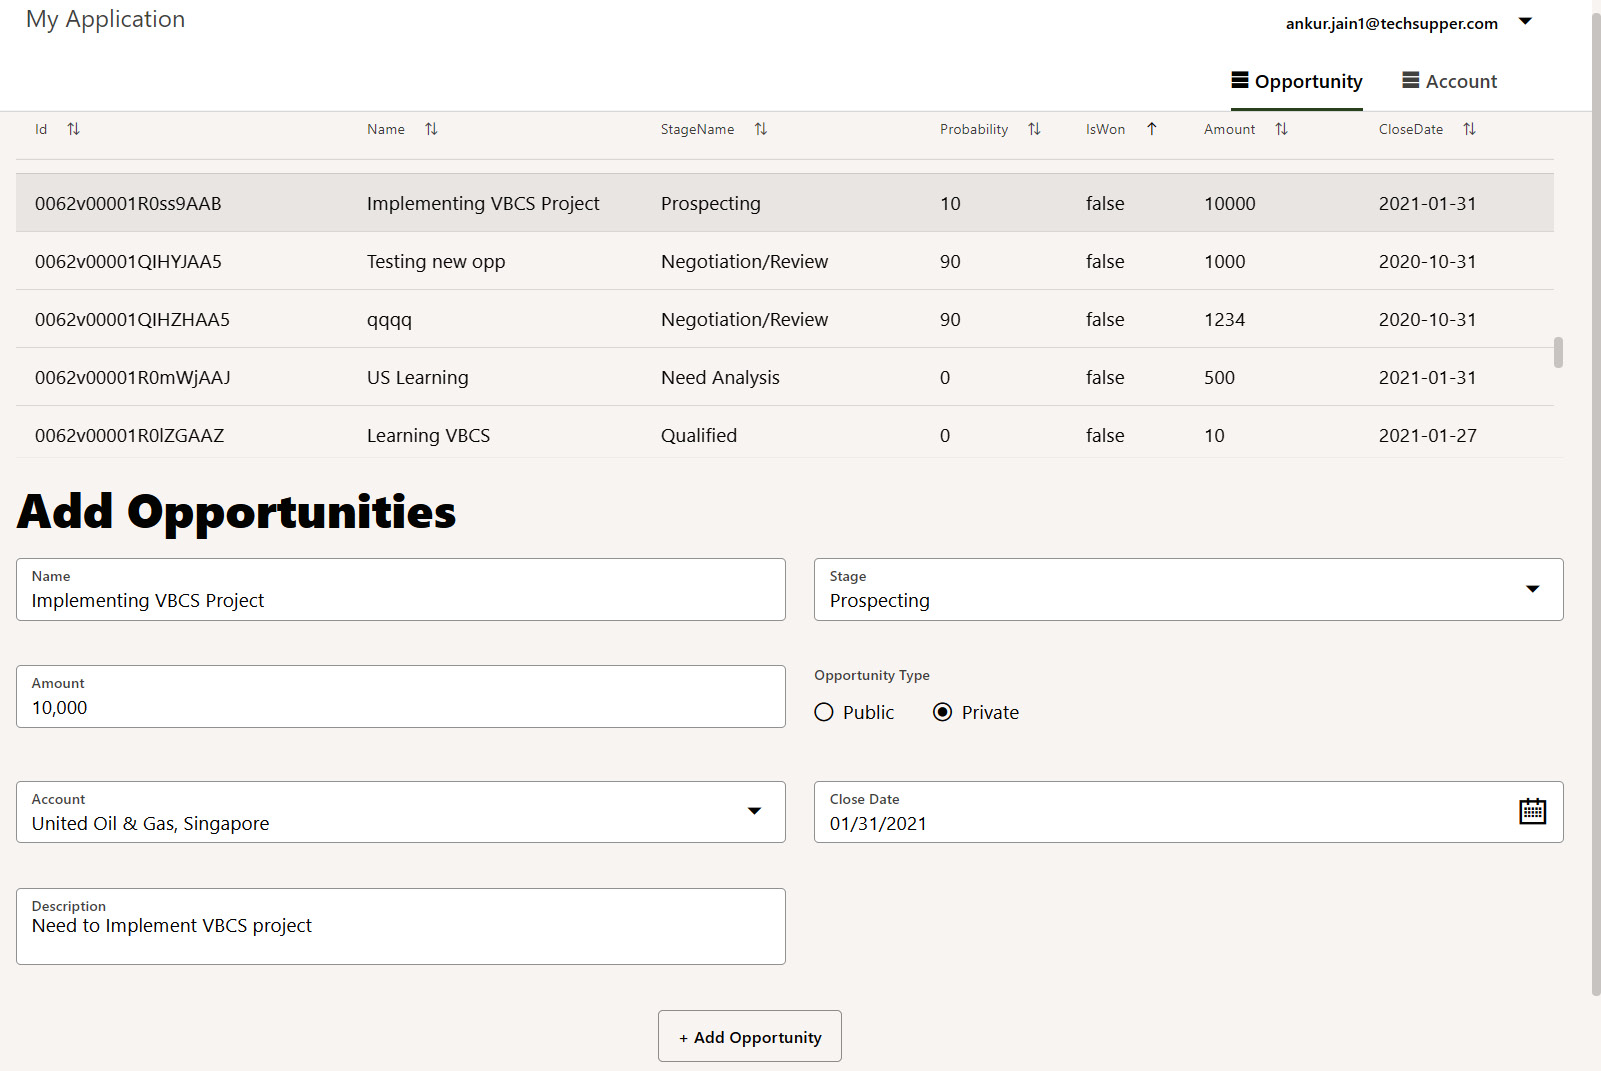
Figure 9.6 – Listing and adding new opportunities
That's everything regarding extending the Salesforce application using the VB. In this complete use case, we extended two Salesforce opportunities and accounts objects, and similarly, more functionalities can be added. The advantage of this extension is to provide access to the VB application in order to view and create new opportunities and accounts directly without providing access to the Salesforce system. In the next section, we'll look at how to extend the Oracle Cloud SaaS application using the VB.
Extending an Oracle Cloud application
Extending Oracle Cloud applications using VB is a common requirement. VB provides a built-in catalog that allows us to interact with the Oracle Cloud application directly with the help of their REST APIs.
In this section, we'll create a feedback nomination application from where Oracle Cloud application customers can be nominated for their feedback. We'll show all the customers (accounts) from the Oracle Cloud application and allow these to be modified as well.
Important Note:
In order to execute this use case, the Oracle Cloud application backend must be added. If it has not been added already, please do so. Refer to Chapter 5, Creating and Managing Service Connections, under the Managing Backends in the Visual Applications section, to learn how to add a backend.
A new web application with the name oraclecloudext_chapter9 is created under the VBCSBook application. While creating this application, select Tabbed as the navigation style and add two navigation items with the names Customers and Nomination.
Let's move on and build the Oracle Cloud SaaS extension.
Adding an accounts REST endpoint
We will use the accounts services of the Oracle Cloud CRM application, so we need to add the accounts REST endpoints to the already added crmRestApi Service Connection.
Important Note:
Refer to Chapter 5, Creating and Managing Service Connections, under the Creating Service Connections with Oracle Cloud Applications section, to learn how the crmRestApi Service Connection was added.
Add the accounts REST endpoint to the crmRestApi Service Connection.
Important Note:
While adding these endpoints, if you see any warning such as The following definitions, which are referenced by the selected endpoints, could not be fetched: "standardLookupsLOV, languagesLOV". Lookups for some fields might not be available, simply ignore this and go ahead and add the endpoints.
Add the /accounts and /accounts/{account_id} endpoints as per the following screenshot:

Figure 9.7 – Adding accounts endpoints
Once the relevant accounts endpoints are added to the Service Connection, you will be able to get and update the accounts in Oracle Cloud application from the VB application. In the next section, we'll use these endpoints to list and update the account details.
Listing and updating the accounts
In this section, we will fetch all the accounts from the Oracle Cloud application and display them in the table. Along with this, we will allow the information pertaining to existing accounts to be updated too. All the updates, which will be executed from the VB screen, will be updated directly in the Oracle Cloud application.
The following are the steps to list and update the accounts:
- Open the customers-start page under the oraclecloudext_chapter9 web application.
- On the customers-start page, drag and drop the Table component.
- Go to the Quick Start tab of the Table property and select the Add Data option.
- From the opened Add Data dialog box, select accounts under the crmRestApi Service Connection and then click on the Next button.
- From the next screen, select the CEOName, CEOTitle, Country, EmailAddress, and URL fields. Change the URL type to Hyperlink and then click on the Next button.
- Click on the Finish button to complete the dialog box. As soon as the dialog is complete, the accounts will be populated in a table.
- Click on Hyperlink under the URL column of the table, copy the value, which is under the Text property, and paste it in the URL property under the Data tab. Modify the Text property to {{ $current.row.URL? 'Visit Site':'' }}.
The following screenshot shows all the accounts fetched from the Oracle Cloud application in real time:
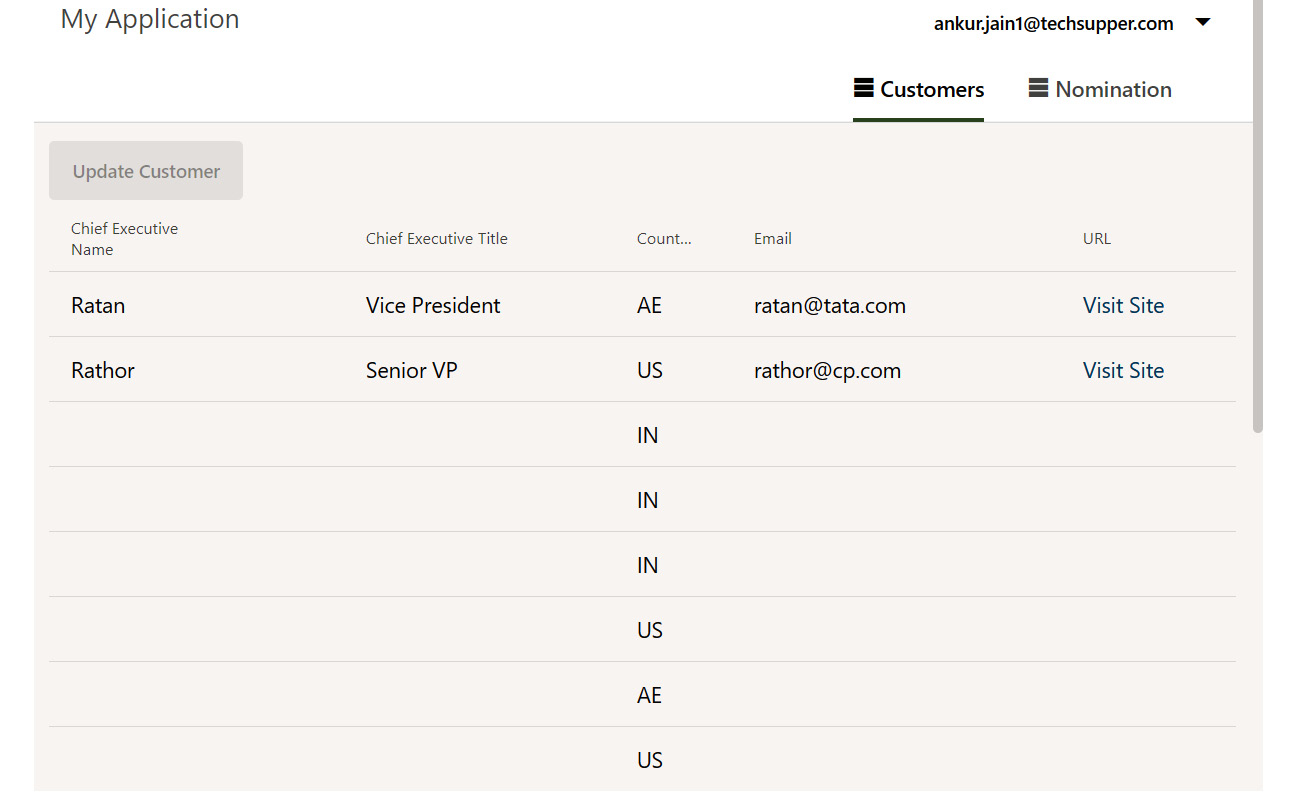
Figure 9.8 – List of customers
As per the previous screenshot, the information is not updated for a few accounts in the Oracle Cloud application. So, let's add the functionality that will allow us to update the account details.
- Select the Table component, move to the Quick Starts tab from the table's Properties palette, and then select the Add Edit Page option.
- From the opened Add Edit Page dialog box, select accounts under the crmRestApi Service Connection and then click on the Next button.
- From the next page, select accounts under the crmRestApi Service Connection and then click on the Next button.
- From the next page, select the CEOName, CEOTitle, EmailAddress, and URL fields. Change the EmailAddress type to Email, and the URL type to URL. Update Button label to Update Customer, Page Title to Edit Customer, and then click on the Finish button.
The previous configuration will add an Update Customer button to the top of the table. Run the application, select any of the accounts, and then click the Update Customer button. You will be redirected to the new page with the pre-populated information pertaining to the account, if available.
The following screenshot shows the Edit Customer page:

Figure 9.9 – Updating the customer
Update the account information and then click on the Save button. Once you click on the Save button, the information will be updated in the Oracle Cloud application and will be visible in the customer's table.
Adding nomination functionality
As the next step, we'll add the customer nomination functionality. In this functionality, we'll create a page that will allow us to nominate the customers, another page that will show all the nominated customers, and from the same page, the nominations can be withdrawn.
A new Business Object with the name Nomination is created to store all the nominated customers with three fields, with the names cEOName of the String type, emailAddress of the Email type, and nominated of the Boolean type.
Select the Nominated field under the Fields tab of the Nomination Business Object, select the Set to default if value not provided option under the Value Calculation property, and then select the true value. This will update the Nomination field with the value true if not provided while adding a new row.
The following screenshot shows the Nomination Business Object:
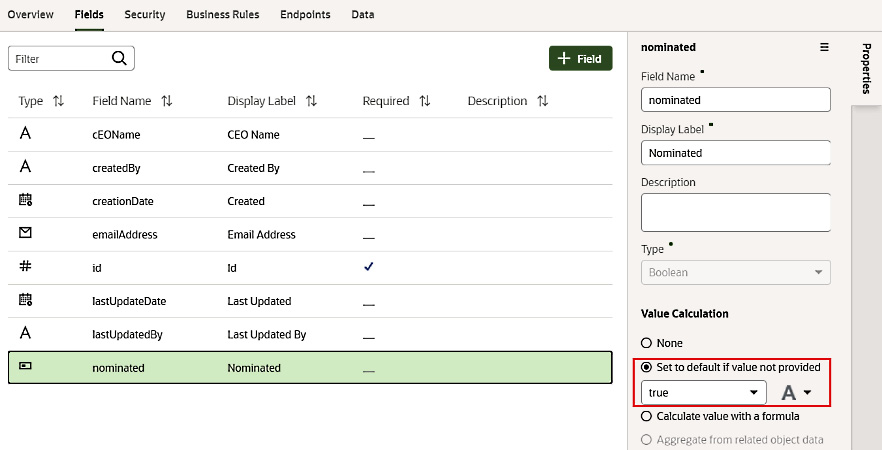
Figure 9.10 – Nomination Business Object
The following are the steps to add the nomination functionality:
- Open the nomination-start page and drag and drop the Table component on to the page.
- Bind this table with the Nomination Business Object using the Add Data option. Select the cEOName, emailAddress, and nominated fields from the Add Data dialog box.
The nominated customers will be populated on the table if they exist. Initially, the table will be blank as no nominated customer exists in the Business Object. By way of a next step, we'll create a page that will allow us to nominate a customer.
- Select the table component on the nomination-start page, go to the Quick Start tab from the table's Properties palette, and then select the Add Create Page option.
- From the opened Add Create Page dialog box, select the Nomination Business Object and then click on the Next button.
- From the next screen, select cEOName, change Button label to Nominate Customer and Page Title to Nominate Customer, and then click on the Finish button.
Once you click on the Finish button, a new page will be created with the ID nomination-create-nomination and with a single Input Text field.
- Open the nomination-create-nomination page, go to the Types tab, and then update the createNominationRequest type, which is created automatically. Then, we add two new variables to this type, with the ID emailAddress of the String type, and nominated of the Boolean type.
- Create a new Object type with the ID Accounts and then add two String fields named CEOName and EmailAddress, as per the following screenshot:
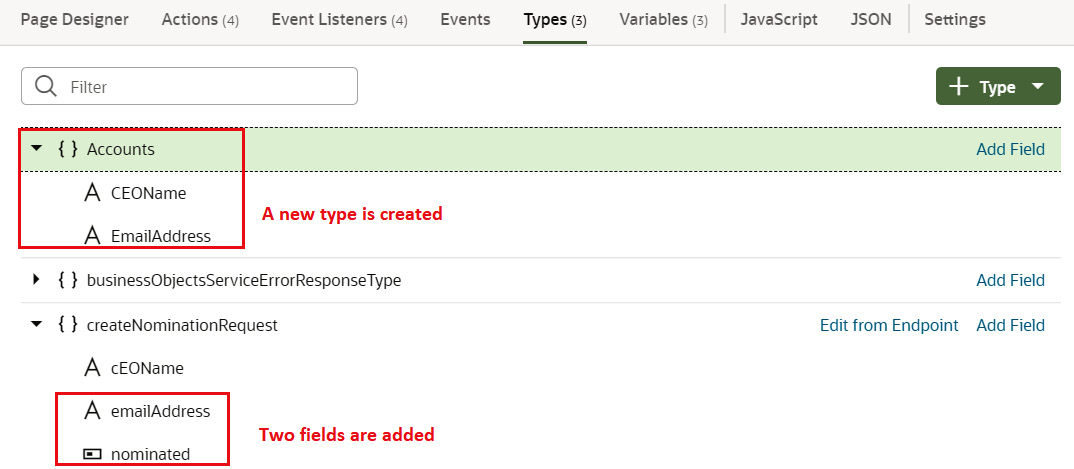
Figure 9.11 – Creating a type
- Go to the Variables tab and create a new Array Data Provider variable with the ID AccountsADP. Select Accounts as the item type and EmailAddress as the Key Attributes field of the AccountsADP variable property.
- Go the JavaScript tab and add the following JavaScript:
PageModule.prototype.getCustomersToNominate = function(customersData,nominatedCustomers){
var customersToNominate = [];
var find = false;
for (var i=0;i<customersData.length;i++){
if(customersData[i].EmailAddress!=null){
find = false;
for (var j=0;j<nominatedCustomers.length;j++){
if(customersData[i]. EmailAddress==nominatedCustomers[j]. emailAddress){
find = true;
break;
}
}
if(!find){
customersToNominate.push(customersData[i]);
}
}
}
return customersToNominate;
}
The JavaScript function accepts two input parameters. The first input parameter, customersData, will accept all the customers fetched from the Oracle Cloud application. The second input parameter, nominatedCustomers, will accept all the customers who are already nominated and stored in the Nomination Business Object. The JavaScript function will return all the customers who are not nominated by comparing the email addresses from both the input parameters.
- Go to the Event Listeners tab, click the + Event Listener button, register the vbEnter event, and create a new Action Chain with the name loadData at the page level.
- Go to the loadData Action Chain and drag and drop the Run in Parallel (used to execute multiple actions in parallel) action just below the Start action.
- Drag and drop the Call REST action two times under Run in Parallel as per the following screenshot:
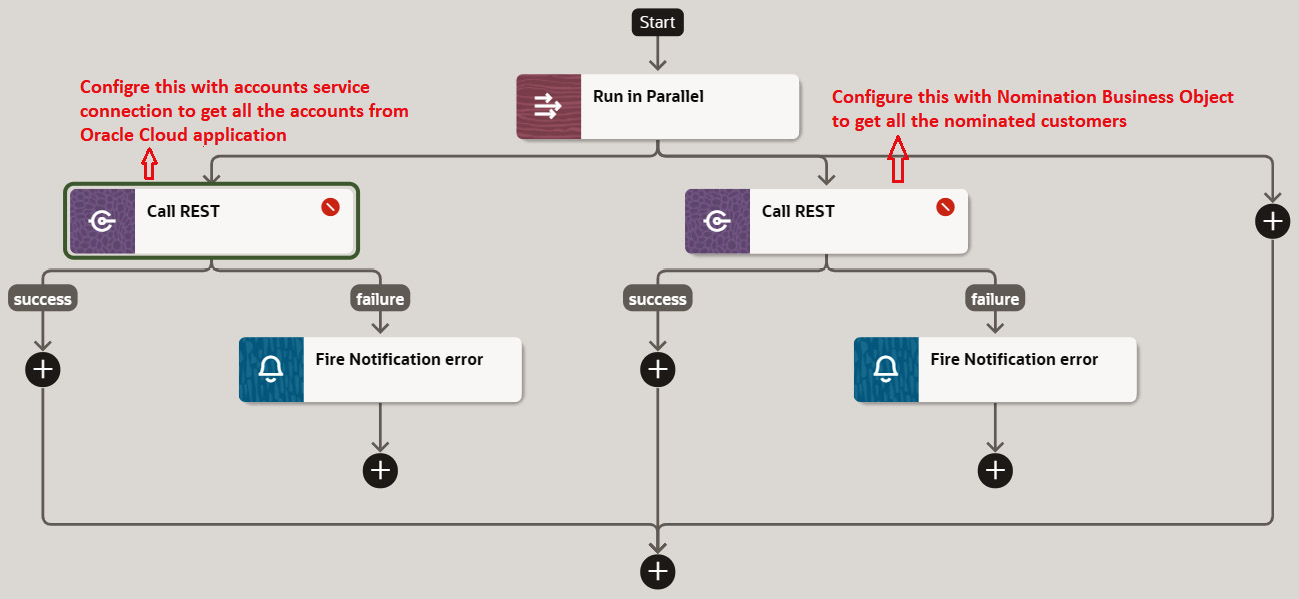
Figure 9.12 – Run in Parallel
- Configure the first Call REST action to call the GET /accounts REST endpoint to get all the accounts from the Oracle Cloud application, and then configure the second Call REST action to call the GET /Nomination Business Object to obtain all the nominated customers.
- Drag and drop Call Function when the Run in Parallel action completes.
- Select getCustomersToNominate from the Function Name dropdown, and then configure Input Parameters from the source, chain.results. callRestGetallAccounts.body.items, to the target, customersData, and from the source, chain.results. callRestGetallNomination.body.items, to the target, nominatedCustomers.
- Then, select Array from the Return Type dropdown. The following screenshot shows the Call Function action:

Figure 9.13 – Configuring the call module function action
- Drag and drop the Assign Variables action just below the Call Function action. Select Assign right next to Variables and assign the source, callFunctionGetCustomersToNominate, to the target, page.variables.AccountsADP.data, and then update the Reset Target property to empty.
- Go back to the Page Designer tab on the nomination-create-nomination page, delete the Input Text component, and then drag and drop the Select (Single) component.
- Then, change Label Hint to Customers. Move to the Data tab from the Properties palette of the Select (Single) component, configure the Data property with variables.AccountsADP, and then set the Item Text property to CEOName.
- Register the value-item event on the Select (Single) component. In the Action Chain of the value-item event, drag and drop the Assign Variables action just below the Start action.
- Click on Assign right next to Variables and map the source, variables.data.CEOName, to the target, page.variables.nomination.cEOName. Also, map the source, variables.data.EmailAddress, to the target, page.variables.nomination.emailAddress.
Now, the configuration is complete and all nominated customers can be viewed. To nominate the customers, run the application and move to the Nomination tab. Initially, the table will be blank. Click on the Nominate Customer button to nominate the customer. In the Select (Single) component, you will see all the customer names. Select the customer name to nominate and then click on the Save button.
The following screenshot shows the Nominate Customer page:
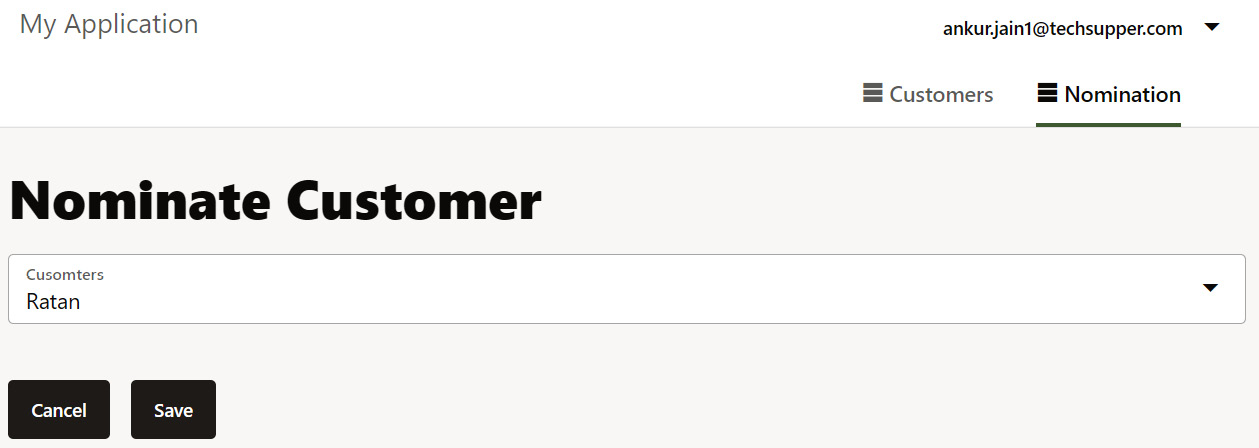
Figure 9.14 – Nominating a customer
Once you click on the Save button, the information will be saved to the Nomination Business Object. You will be returned to the previous page and can view the nominated customer as per the following screenshot:
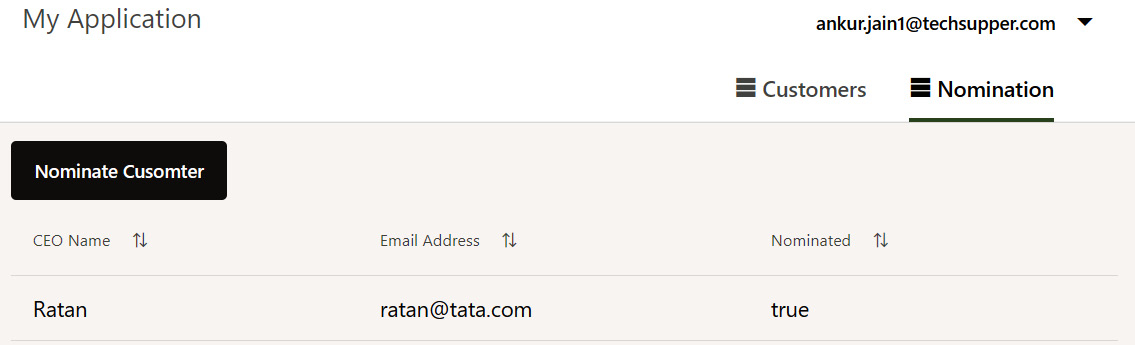
Figure 9.15 – List of nominations
When you click again on the Nominate Customer button, you will not see Ratan in the Customer dropdown, as Ratan has already been nominated.
Withdrawing nominations
Now, once a customer has been nominated, we may need to withdraw the nomination. The following are the steps to show how to withdraw nomination functionality:
- Open the nomination-start page, open the Page Designer tab of the page, and drag and drop the Switch component to the Nominated column.
- Select the Switch component, go to the Data tab from the Properties palette, and select current.data from the Value property.
- Register the value event on the Switch component. In the Action Chain of the value event, drag and drop the Call REST action just below the Start action.
- Click Select right next to Endpoint, select PATCH /Nomination/{Nomination_id} from the opened Select Endpoint dialog box, and then click on the Select button.
- Select Assign right next to Input Parameters and then map the source, variables.key, to the target, uriParams.Nomination_Id.
- Select Assign right next to Parameters, and assign {"nominated": $variables.value} to body as per following screenshot, and then click on the Save button:
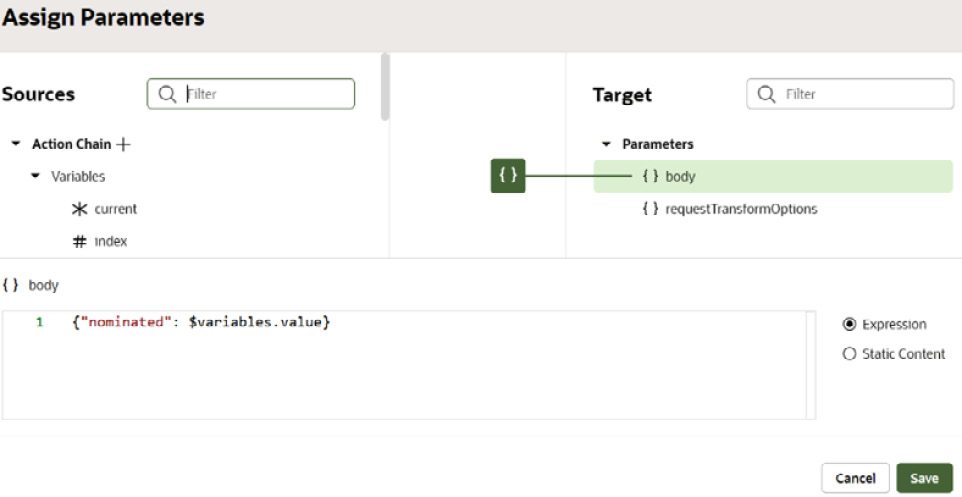
Figure 9.16 – Set the nominated field
The withdraw nomination functionality is complete. Run the application and switch to the Nomination tab. In the nominated customer table, click on the toggle button to withdraw the nomination. Once clicked, the Nomination Business Object will be updated.
The following screenshot shows a list of nominated customers along with the Switch component, which will allow you to withdraw the nomination and nominate the customer again:

Figure 9.17 – Withdrawing the nomination
That is everything regarding extending the Oracle Cloud SaaS application using the VB. You can add more functionality to the VB application and interact with the Oracle Cloud application directly.
In this section, we learned how to use the built-in Oracle Cloud application catalog to extend the Oracle Cloud SaaS application. We covered how to fetch data from the Oracle Cloud application in real time and how to update the data in the Oracle Cloud application directly. We extended the functionality and created another custom screen to nominate the customers. All the nominations are stored in the VB local database. In the next section, we'll look at how to create a multilingual application.
Creating a multilingual application
Oracle VB allows us to build an application that can be rendered in different languages, called a multilingual application. A multilingual application enables an end user to view the application in their language of choice. In this section, we'll demonstrate how to create a multilingual application in VB.
In order to make a multilingual application, we need to convert strings into other languages and upload them in translation bundles, which is a JSON file containing keys and values.
We'll use the customers-start page of the oraclecloudext_chapter9 application to render it in two different languages, English and French.
The following sections demonstrate how to develop multilingual applications in VB.
Configuring an application to set the selected language locale
The following are the steps to set the locale of the selected language:
- Go to Source View from the application navigator and open the app-flow.json file under the oraclecloudext_chapter9 application.
- Enter the following line of code after "security": {} in the app-flow.json file. The modified (bold) content is given as follows (don't forget to put a comma (,)):
"localization": {
"locale": "{{ window.localStorage.getItem('current. locale') || navigator.language }}"
}
The previous code will set the locale property to a locale value when we switch the application to render in a different language. By default, the locale browser will be set.
The following screenshot shows the localization property updated in the app-flow.json file:
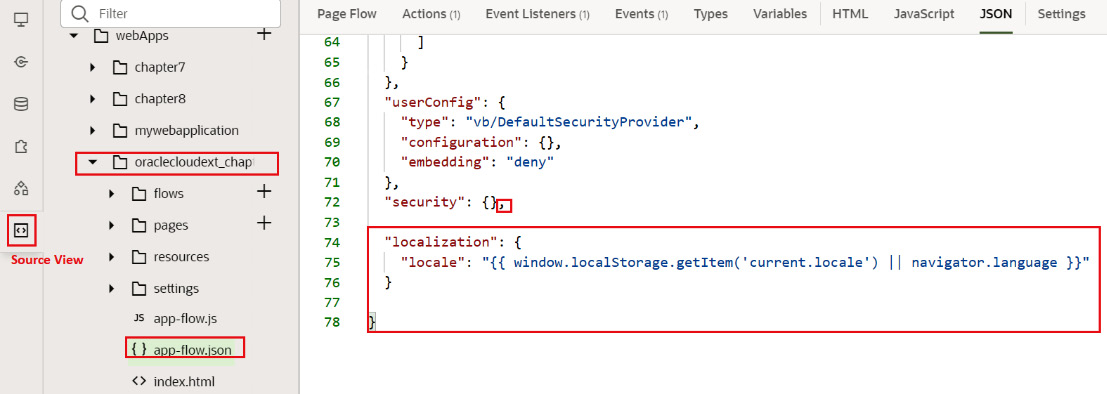
Figure 9.18 – Setting the localization property
- Open the index.html file as shown in the preceding screenshot, and paste the following code before the <oj-vb-content config="[[vbApplication]]"></oj-vb-content> line:
<script>
var html = document.documentElement;
var locale = localStorage.getItem('current.locale');
if (locale) {
html.lang = locale;
}
</script>
- Go back to the oraclecloudext_chapter9 application and open the customers-start page. Move to the JavaScript tab and enter the following lines of JavaScript code:
PageModule.prototype.settingLocale = function(currentLocale){
if (currentLocale) {
window.localStorage.setItem('current.locale', currentLocale);
}
};
The previous JavaScript code will set the current.locale property to the selected locale.
Generating translatable strings
Translatable strings are used to store data in different languages. The following are the steps to generate translatable strings:
- Go to the customers-start page, select the table, go to the Data tab from the Properties palette, hover on the CEOName column, and then select the Column Detail icon.
- Click the Make String Translatable icon from the Columns, Header Text property. When you click on the Make String Translatable icon, this opens the inline popup. This popup allows you to change the Text and Key values. The Key value is generated automatically (a random string) for each and every text. Update Key to ceo_name to make it more meaningful, as per the following screenshot:
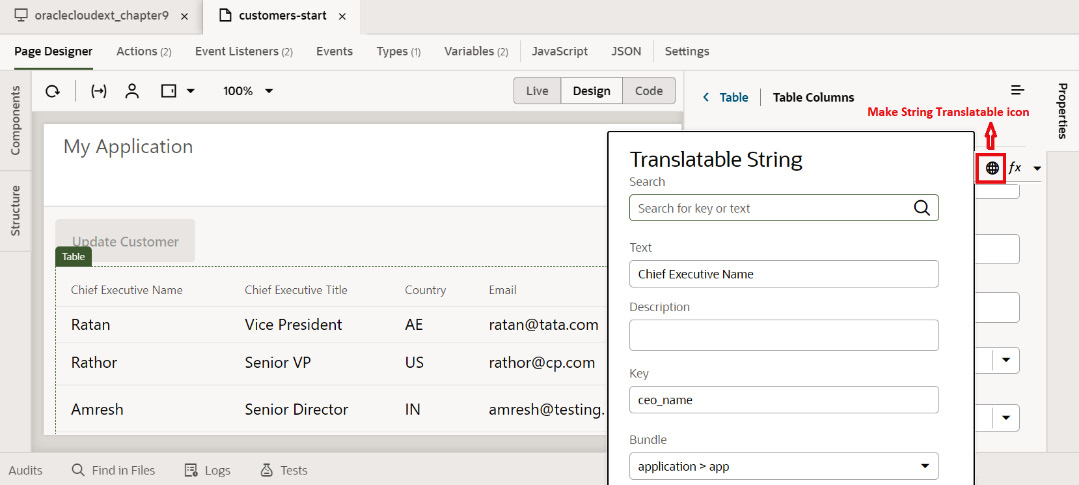
Figure 9.19 – Creating translatable strings
- Click on the Save button after updating Key. Notice that Columns, Header Text will be changed by an expression that specifies the key.
- Repeat step 1 and step 2 for the rest of the columns (Chief Executive Title, Country, Email, and URL) and change the Key values to ceo_title, country, email, and url, respectively.
Now, translatable strings have been generated for the table columns.
Downloading and uploading the bundle
In this section, we'll download the resource bundle, create separate files to support different languages, bundle them, and upload the bundle again to the VB application. The following are the steps to download and upload the bundle:
- Open the app-strings.json file under the Resources/strings/apps/nls folder of the oraclecloudext_chapter9 application. Initially, it contains only a single key-value definition. This will be updated automatically when we upload the bundle to support different languages.
- Open the apps-strings.json file under the root folder and view all the translatable strings, which we created in the previous section, as per the following screenshot:
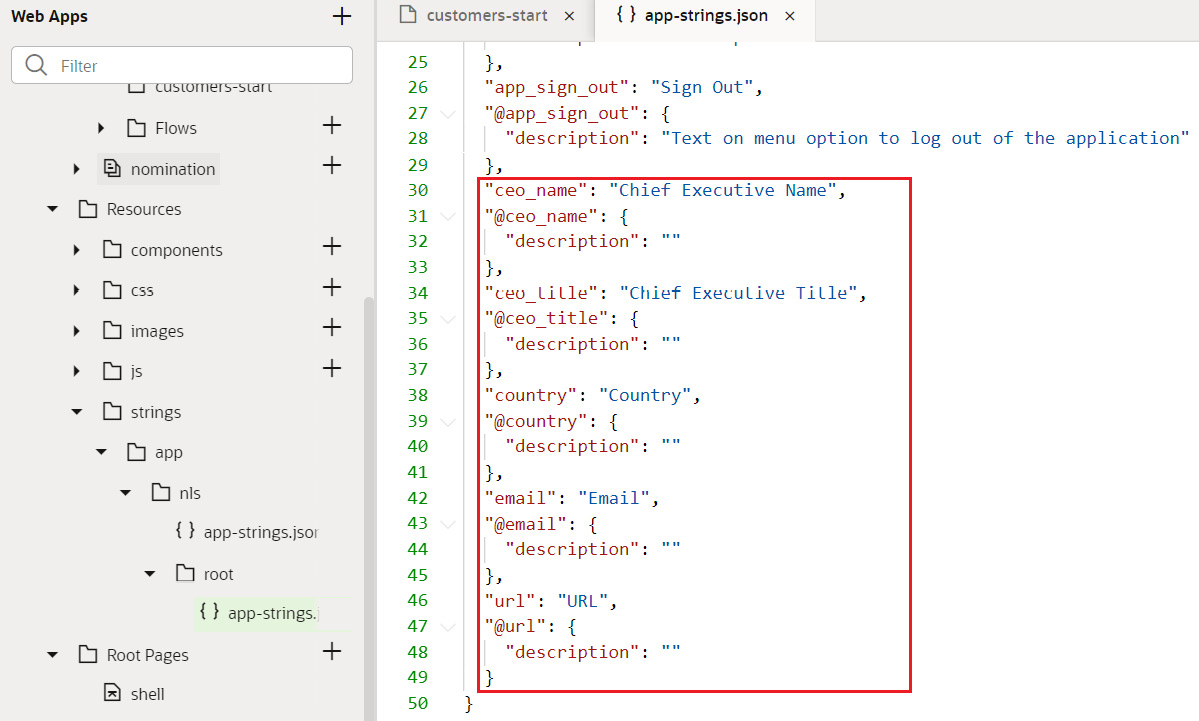
Figure 9.20 – Translatable strings
- From the application menu in the top-right corner of the page, click on Settings.
- Go to the Translations tab and click on ARB (Application Resource Bundle) under the Download All String section. This action will download a .zip file named VBCSBook-strings-all—arb.zip.
- Extract the .zip file. The unzipped folder will contain different folders for each and every application.
- Open the oraclecloudext_chapter9_app folder under the unzipped folder and you will see that there is a single file named app-strings.arb. This file will contain all the translatable strings.
- Make a copy of this file in the same folder and rename it app-strings-fr-FR.arb (fr-FR represents the language of translation and the country as French (France)).
- Open the app-strings-fr-FR.arb file. For all the translatable strings, replace the key value with the French translation. The following file shows the translatable strings (marked in bold); the email and URL are the same in both English and French:
"ceo_name" : "Nom du directeur général",
"@ceo_name" : {
"description" : "",
"source_text" : "Chief Executive Name"
},
"ceo_title" : "Titre de directeur général",
"@ceo_title" : {
"description" : "",
"source_text" : "Chief Executive Title"
},
"country" : "Pays",
"@country" : {
"description" : "",
"source_text" : "Country"
},
"email" : "Email",
"@email" : {
"description" : "",
"source_text" : "Email"
},
"url" : "URL",
"@url" : {
"description" : "",
"source_text" : "URL"
}
- Save the file and zip the oraclecloudext_chapter9_app folder. Make sure that the zipped folder contains both the ARB files.
- Return to the VB application and, from the Translation page under the Settings application, upload the oraclecloudext_chapter9_app.zip folder from the Upload Updated Bundle section.
- Once the bundle file is uploaded successfully, you will receive a confirmation message and the bundle will be added under the nls folder as per the following screenshot:

Figure 9.21 – Uploading the bundle
- Open the app-strings.json file under the fr-FR folder, which will show all the translatable strings.
- Open the parent app-strings.json file under the nls folder and you will see two key-value definitions as per the following screenshot:

Figure 9.22 – The app-strings.json file
The updated bundle has been uploaded successfully.
Adding a language switcher
In this section, we'll add a language switcher in the form of a radio button, which will allow the application to be rendered in the required language.
The following are the steps to make a language switcher:
- Open the customers-start page, and drag and drop the Radio Button Set component above the Update Customer button.
- Open the Properties palette of the Radio Button Set component, change the Label Hint property to Language Switcher, and then change the Styling property to Row.
- Go to the Quick Start tab and click the Create Static List of Options button. From the opened dialog box, add two entries as per the following screenshot, and then click on the Finish button:
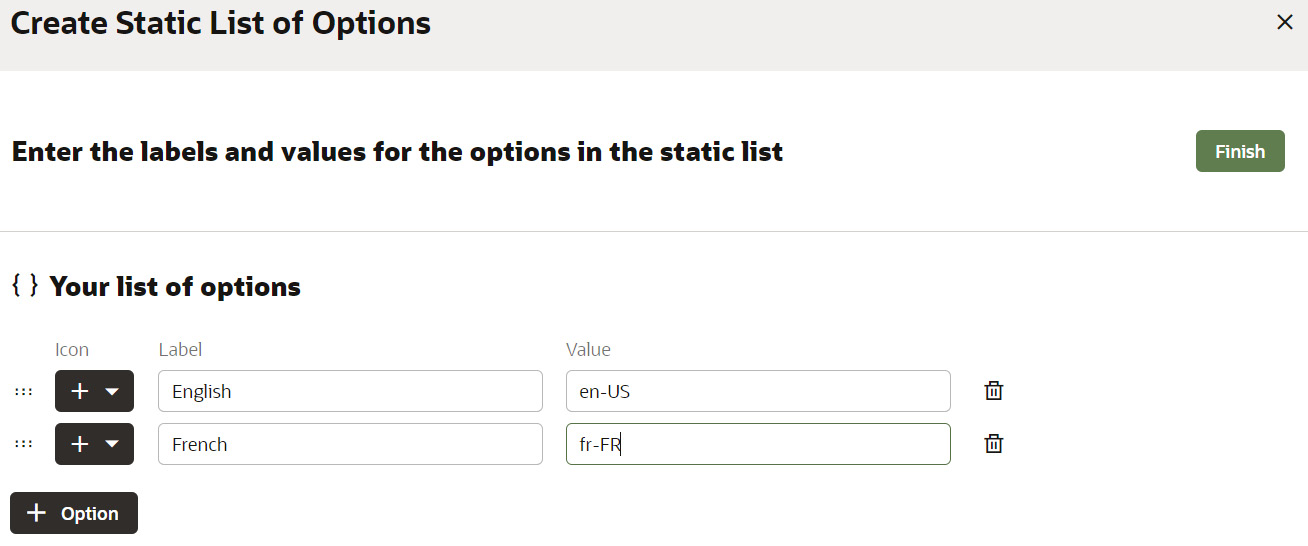
Figure 9.23 – Configuring the Radio Button Set component
- Register the value event on the Radio Button Set component.
- In the Action Chain of the value event, drag and drop the Call Function action. Select the settingLocale method under the Function Name property and map the source, variables.value, to the target, currentLocale.
- Drag and drop the Open URL (used to open any URL) action just below the Call Function action. Enter index.html under the URL property. This will load the application after changing the language.
Important Note:
index.html is the file that maintains all the UI-related code. You can see this page in Source View under the application navigator.
All the configuration required is complete. Run the application and see that the application is rendered in English by default. Select the French radio button and you will see that the table columns are rendered in French:
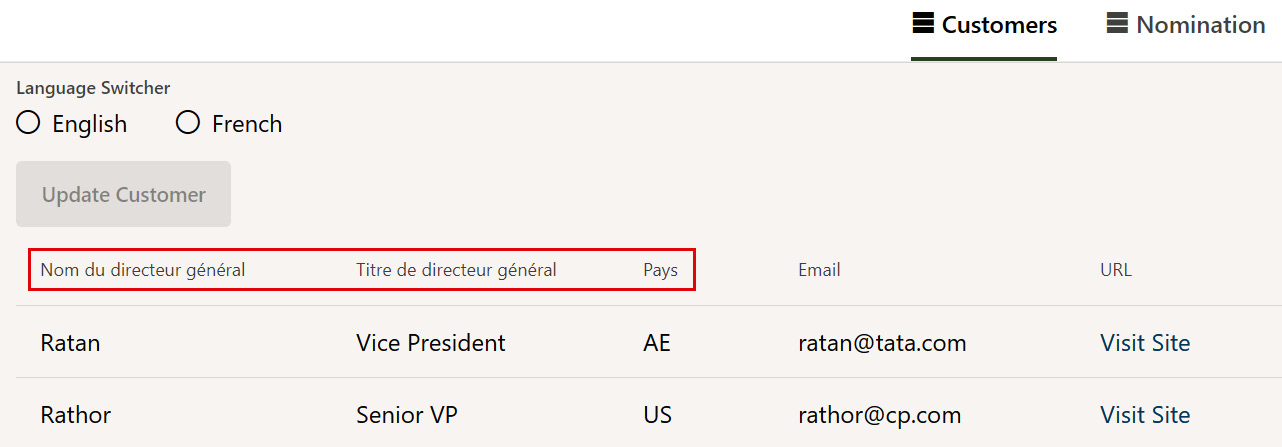
Figure 9.24 – Application in the French language
Click on the English radio button and you will see the table columns rendered in English.
This is how multilingual applications are created and allow users to view the application in their language of choice. In this section, we learned how to create a multilingual application to render the application in a different language.
Summary
In this chapter, we learned how to extend Oracle and non-Oracle SaaS applications. We extended the Salesforce application using the REST APIs. We created an application where we saw how to get all the opportunities from Salesforce in a table and created a new opportunity using the custom form. We created another set of screens to populate all the accounts and allow a user to create new accounts, too.
We learned how to extend the Oracle Cloud application using the inbuilt catalog. We created a set of custom screens in VB to list all the accounts and allow modification of them in real time. We extended the functionality and created another set of custom screens to nominate the customers and store them locally.
We learned how to create a multilingual application to render the application in a different language. We created an application to render the application in both English and French.
In the next chapter, we'll look at how to create a connection with Processes, add business processes to a VB application, and enable a user to take actions (approve/reject) directly from the VB screen.