Chapter 10: Working with Business Processes
Business processes that are created and deployed in Process Cloud can be initiated from VB, and pending tasks can be managed from the VB application directly. The benefit of integrating Processes with VB is to provide a unified application where end users can initiate, view, review, approve, and reject all the tasks aligned under the respective user without logging into the Process workspace.
In this chapter, we'll look at how to add Process backend that will be used to consume the Process task in the VB application. Once the backend is added, we'll create a VB application where users can initiate processes.
We'll create another set of screens in the same VB application that will allow managing tasks and provide an option to approve or reject a task directly from the VB application. Users can view the complete dataset they have initiated.
We'll look at how to configure the process server under the VB application, which will be used to configure a different target server when you switch the VB application from one stage to another.
In this chapter, we will cover the following topics:
- Adding the Process backend
- Registering business processes
- Initiating a process from the VB application
- Managing process tasks
- Configuring a connection to a process server
After completing this chapter, you will be able to consume business processes in the VB application and allow a user to take action on pending tasks.
Technical requirements
To complete this chapter, you should have the following:
- A Visual Builder instance
- VB login credentials
- A OIC instance
- A deployed process in process server
You can find the full source code used in this chapter here: https://github.com/PacktPublishing/Effortless-App-Development-with-Oracle-Visual-Builder/tree/main/Chapter10.
Adding the Process backend
In order to work with a business process in VB, a Process backend must be added under the tenant settings of the Visual Builder instance. Refer to Chapter 5, Creating and Managing Service Connections, under the Adding a new backend section, to know how to add a backend server.
Important Note:
If a Visual Builder instance is part of an Oracle Integration Cloud (OIC) instance, then the Process backend will exist by default and you won't need to add it manually.
If the Visual Builder instance is not part of OIC, then the Process backend needs to be added manually to point to the Process instance. When you add the backend, under the Tenant settings you will only see None, Propagate Current User Identity, and Oracle Cloud Account options under the Authentication drop-down list. You can override these settings at the application level to view more Authentication options such as Basic, OAuth 2.0 Client Credentials, and so on.
The following screenshot shows the Edit Server dialog to override the Tenant settings at the application level:
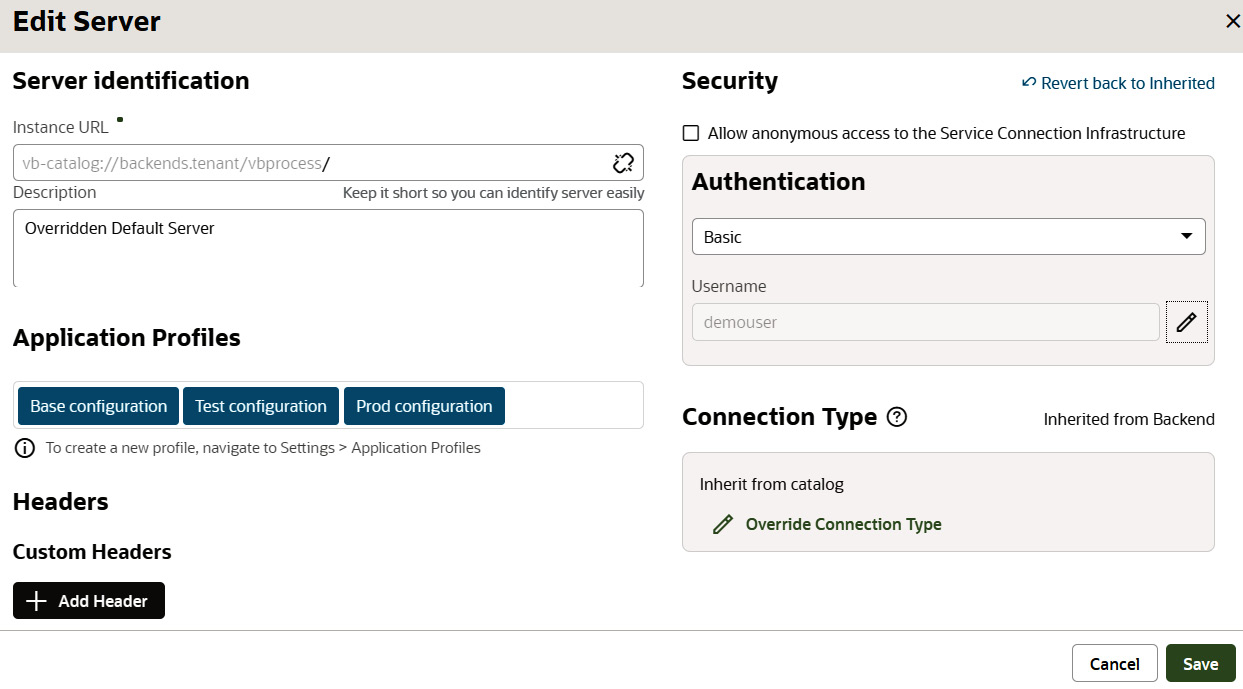
Figure 10.1 – Edit Server dialog box
In this section, we learned how to add a Process backend in a Visual Builder instance and how to override the settings. In the next section, we'll look at how to add business processes to the VB application.
Registering the business processes
Once a business process is created in Process instance, you can register the business processes in the Visual Builder application and manage the processes in web or mobile applications.
A business process is developed in Process instance, which will be used to raise a Travel Reimbursement request. A level-one approval is added in the process to approve and reject the request.
Download the application using the following URL, import it into the Process instance, and activate it:
The following are the steps to register business processes in the VB application:
- Open the VBCSBook application and go to the Processes navigator. When you click on the Processes navigator for the first time, it creates a connection with the process server automatically.
- Click on the + Register Deployed Process button, which will open the Register Deployed Process dialog box. The dialog box will show all the deployed processes.
- Select the process that you want to register. Once you select the process, the alias name will be shown in the Alias textbox. The alias name will be the same as the selected process name, but you can change it if required. Click on the Add button to register the process.
Important Note:
The process that you are registering, make sure it is deployed on the Process server and users are added to the roles. Also, make sure Default Target Server is selected under the Base configuration application profile. For development purposes, continue to use Player Target Server.
The following screenshot shows the process registration process:

Figure 10.2 – Register Deployed Process dialog box
- Click on the Done button to close the dialog box. Once a process is registered, it will be visible in the Processes navigator.
- Click on the process name that is registered. Go to the Code Snippets tab and see the various actions. You can use HTML and JSON code in the VB application to interact with registered processes.
The following screenshot shows the HTML code of the registered process:
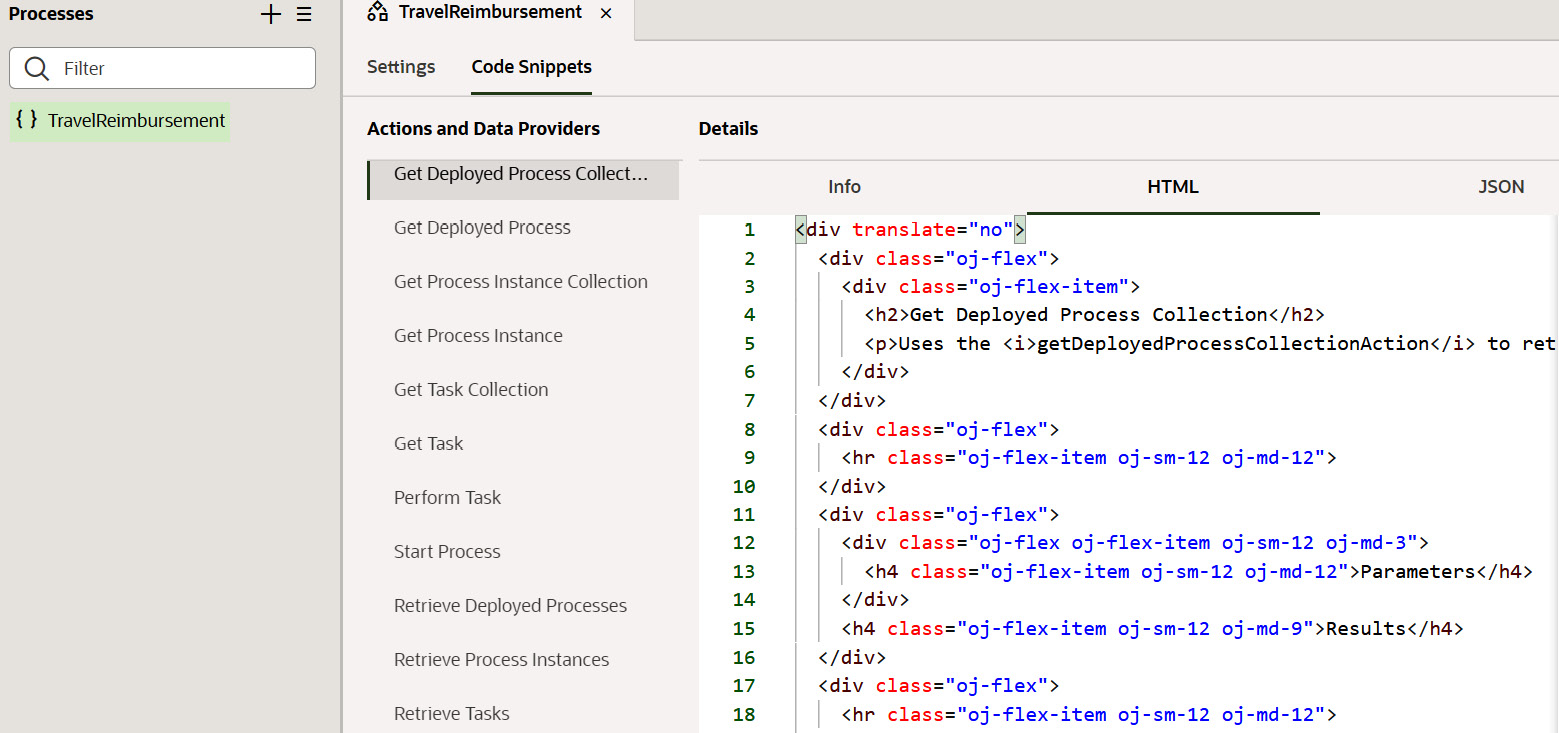
Figure 10.3 – Process HTML code
As you can see, the Info tab will provide information about the metadata of the selected action such as Retrieve Deployed Processes, Retrieve Process Instances, and so on.
In order to execute all the use cases in this chapter, a new web application is created with the Page ID chapter10 using the Tabbed style pattern, and two tabs are created with the names Initiate Process and Manage Processes.
Important Note:
In order to develop the use case in this chapter, we are using a Visual Builder instance that is part of an OIC instance as the Process instance is part of it. It is recommended to use VB, which is part of OIC, if you want to work with business processes in VB.
In this section, we learned how to register a deployed process in a VB application, and we saw the HTML code generated after registering the process. In the next section, we'll look at how to initiate the registered process.
Initiating the process from the VB application
In this section, we'll create a form in the VB application that will allow us to initiate the registered TravelReimbursement process.
The following are the steps to initiate the process from VB:
- Open the initiate-process-start page under the chapter10 web application.
- Open the Variables tab and create five variables of the String type with the ID firstName, lastName, travelReason, travelStartDate, and travelEndDate, and one variable of the Number type with the ID amount.
- Go to the Page Designer tab of the page, drag and drop the Heading component on the page, and change the Text property to Raise Travel Reimbursement.
- Drag and drop the Form Layout component just below the Heading component, and change the Max Columns property to 2.
- Configure the UI component under Form Layout as per the following table:

Table 10.1 – List of UI components
- Drag and drop the Button component after the Form Layout component, and change the Text property to Submit.
- Select the Submit button and register the ojAction event.
- In this Action Chain of the button event, drag and drop the Start Process (used to initiate the deployed process) action just below the Start action. Update the ID property to startTravelProcess.
- Click Select right next to Process Interface from the Start Process property palette. From the opened Select Process Interface dialog box, expand the Process Aliases | TravelReimbursement option and select Submit Request. Click on the Select button as per the following screenshot:
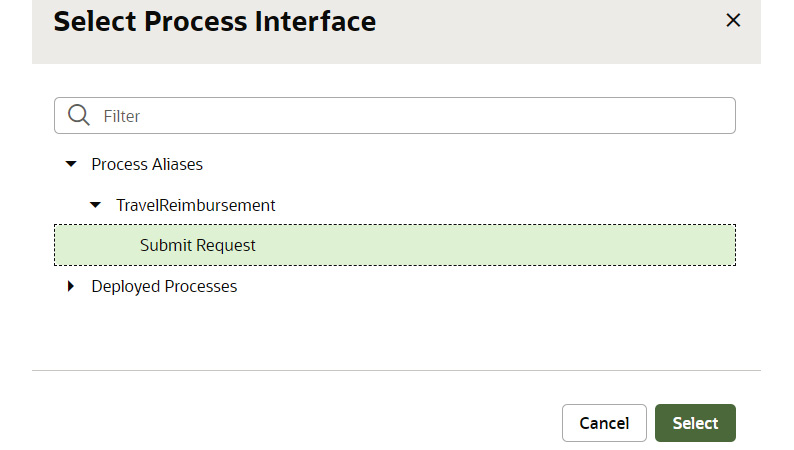
Figure 10.4 – Select the Process REST endpoint
- The selected process requires the input parameters. Click Assign right next to Input Parameters. From the Assign Input Parameters dialog box, map the source to target as per the following table, and click on the Save button after the mapping is completed:

Table 10.2 – Mapping of Process REST endpoint
- Drag and drop Fire Notification under the success path, configure the Summary property to [["You are request has been initiated with process id " + $chain.results. startTravelProcess.content.id ]], and set Notification Type as confirmation.
Now, we have completed the configuration to initiate the task. Run the application, fill in the form, and click on the Submit button to initiate the process.
The following screenshot shows the process ID after it is initiated:

Figure 10.5 – Travel reimbursement request
You can open the Process workspace and should see the task visible with process ID 2292. This is how the process can be initiated from the VB application.
In this section, we learned how to initiate processes from the VB application using the Start Process action of the Action Chain. In the next section, we'll look at how to manage process tasks from the VB application.
Managing process tasks
When a process has commenced, a task is generated and then the approver needs to take some action on this like review, approve, or reject for taking the task forward. So we'll add an action dropdown by which user will be able to take an action on the tasks pending in his/her bucket. We'll create a page by which the users can manage all the pending tasks and approve or reject the tasks directly from the VB application without going to the Process workspace
The following are the steps to manage process tasks from the VB application:
- Open the manage-processes-start page, drag and drop the Table component on the page, set the style property to height:200px;.
- Click the Table | Quick Stat | Add Data options.
- From the opened Add Data dialog box, select task under the Process Objects section as per the following screenshot, and click on the Next button:
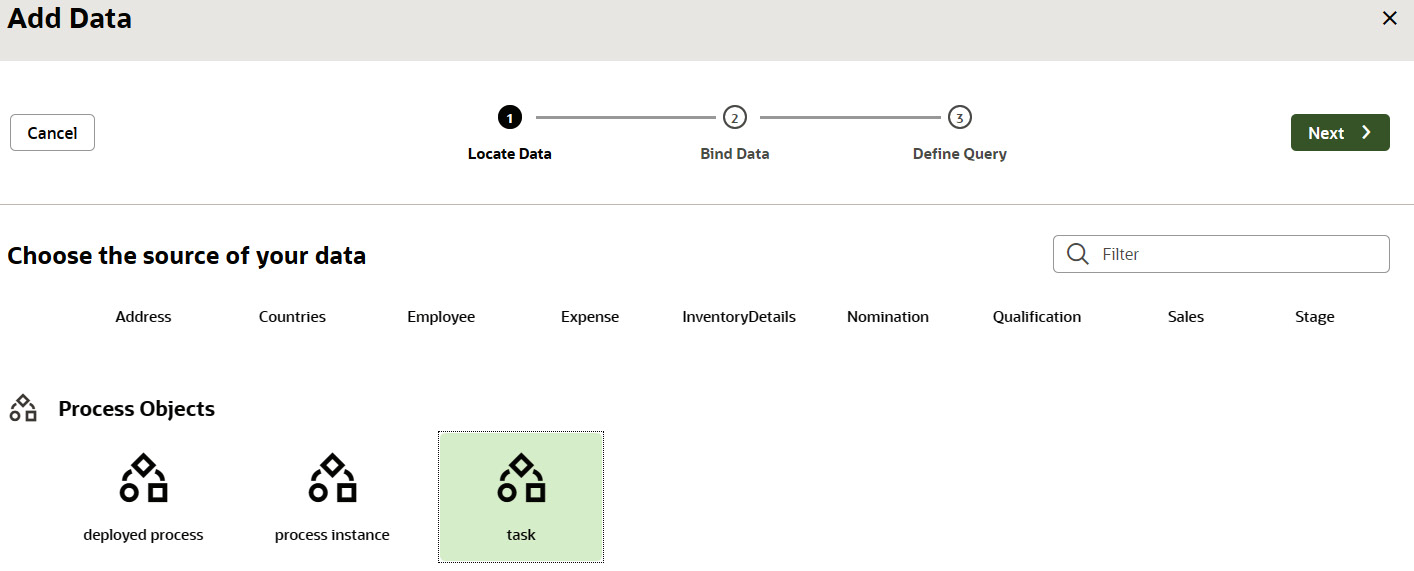
Figure 10.6 – Select the task
- From the next screen, select label, creationUser, creationDate, priority, and click on the Next button. Click on the Finish button to complete the dialog box.
- Select a table, go to the Data tab, and change the table columns' names to Application Name, Initiated By, Initiated Date, and Priority to make it more logical.
Run the application, move to the Manage Processes tab, and you will see that all the tasks are populated in a table. The following screenshot shows all the process tasks:

Figure 10.7 – Tasks are populated in a table
- Return to the VB designer, go back to the Page Designer tab of the manage-processes-start page, select the table, go to the Quick Start tab, and click the Add Task Actions option.
- From the opened Add Task Actions box, select the Finish button. This action will add a drop-down list along with a Submit button. The drop-down list will show all the task actions, such as SUBMIT, APPROVE, REJECT, and so on.
Run the application again, move to the Manage Processes tab, and select any one of the tasks from the table. Select any one of the actions from the Choose an Action drop-down list and click on the Submit button.
The following screenshot shows all the actions that can be taken on the selected task:

Figure 10.8 – Actions on the task
Once the task is approved, either it will be completed or will go for the next action. If it is completed, the tasks will be removed from the table as the table only populates pending tasks.
That's all about managing process tasks from the VB application.
In this section, we learned how to populate a table with all the process tasks and added the Choose an Action dropdown, which will allow the user to act on a task directly from the VB application. In the next section, we'll look at how to extract the data object and show it in a table.
Extracting the data object
In the previous section, we saw how to populate the processes tasks in a table and allow users to take necessary action on the task if required. In this section, we'll implement functionality that will fetch the data object (information entered by user while submitting the process) that was submitted while raising the Travel Reimbursement request.
In order to get the data object, the Process REST API will be used. The data object /ic/api/process/v1/processes/{processId}/dataobjects REST endpoint will be used to extract the data object for a process instance.
Create a Service Connection using the Process GET REST API to get the data object, https://<OIC_URL>/ic/api/process/v1/processes/{processId}/dataobjects. Replace OIC_URL with the actual hostname of OIC and use Basic Authentication to authenticate the REST API.
Important Note:
Refer to Chapter 5, Creating and Managing Service Connections, under the Creating a Service Connection from an endpoint section, to learn how to create a Service Connection using the REST endpoint.
Once the Service Connection is created, follow these steps to show the data object of the selected process task:
- Open the manage-processes-start page, go to the Types tab, create a custom object Type with the ID DataObject, and add fields in this type with the IDs emailAddress, firstName, lastName, travelEndDate, travelReason, and travelStartDate of the String type, and one field with the ID amount of the Number type.
- Go to the Variables tab and create one variable with the ID DataObjectADP of the Array Data Provider type. Set DataObject as Item Type, and emailAddress as the key attribute.
- Return to the Page Designer tab, drag and drop the Heading component just below the table, and change the Label Hint property to Data Object.
- Drag and drop the Table component just below the Heading component. Bind the Data property with the DataObjectADP variable. Select all the columns from the Table Columns property.
- Go to the JavaScript tab of the manage-processes-start page and enter the following code:
PageModule.prototype.convertToJson = function(data){
var jsonArray = [];
jsonArray = JSON.parse(data)
return jsonArray;
}
The Process REST API provides the data object as a JSON string. So the JavaScript code will convert the JSON string into a JSON object and will return it as an array.
- Select the first table from the page, go to the Events tab, and register the first-selected-row event.
- In the Action Chain of this event, drag and drop the Call REST action just below the Start action and change the ID property to callRestEndpointDataObject. Select the Process GET endpoint as per the following screenshot:
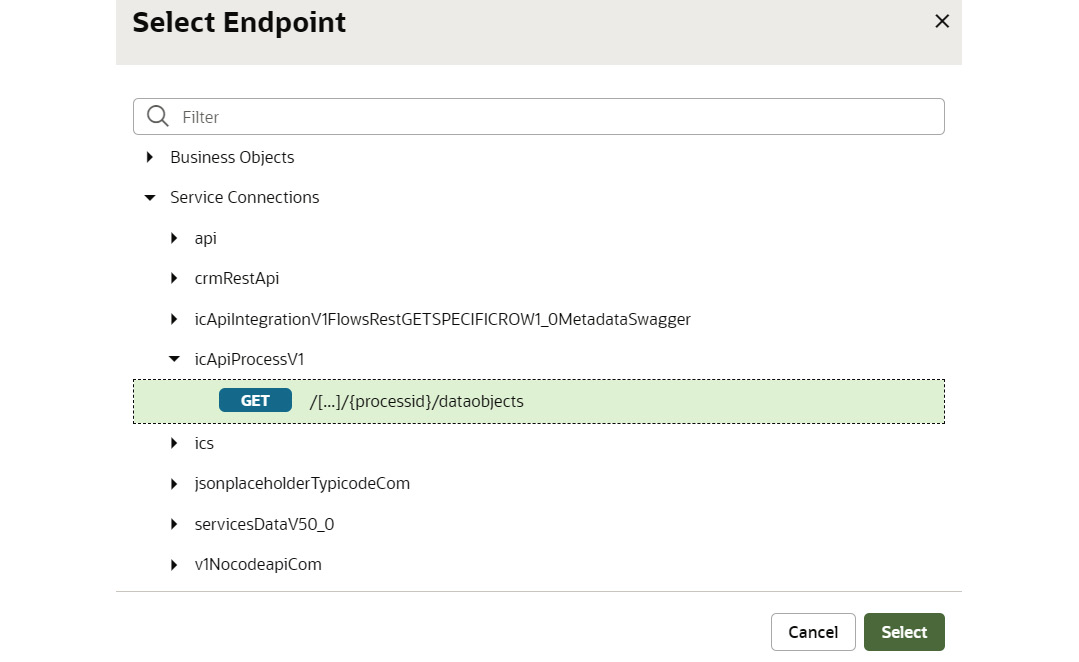
Figure 10.9 – Select the data object REST endpoint
- Assign the source variables.rowData.processInstance.id to the target uriParams.processid as the input parameter of the selected REST endpoint.
- Drag and drop Call Function under the success path, select the convertToJson function from the Function Name property, and update the ID property to callFunctionConvertToJson. Select the Assign property right next to Input Parameters and map the source chain.results.callRestEndpointDataObject.body.dataVariableFlatTree[0].value to data, and click on the Save button. Select Array from the Return Type property of the Call Function action.
- Drag and drop Assign Variables action below the Call Function action, click Assign right next to Variables, and map the source chain.results.callModuleFunction1 to the target page.variables.DataObjectADP.data. Update the Reset Target property to empty.
That's all about extracting the data object of a process task.
Now, we run the application, move to the Manage Processes tab, select any one of the tasks from the table, and see the data object populated in another table that was inserted while raising the Travel Reimbursement request:
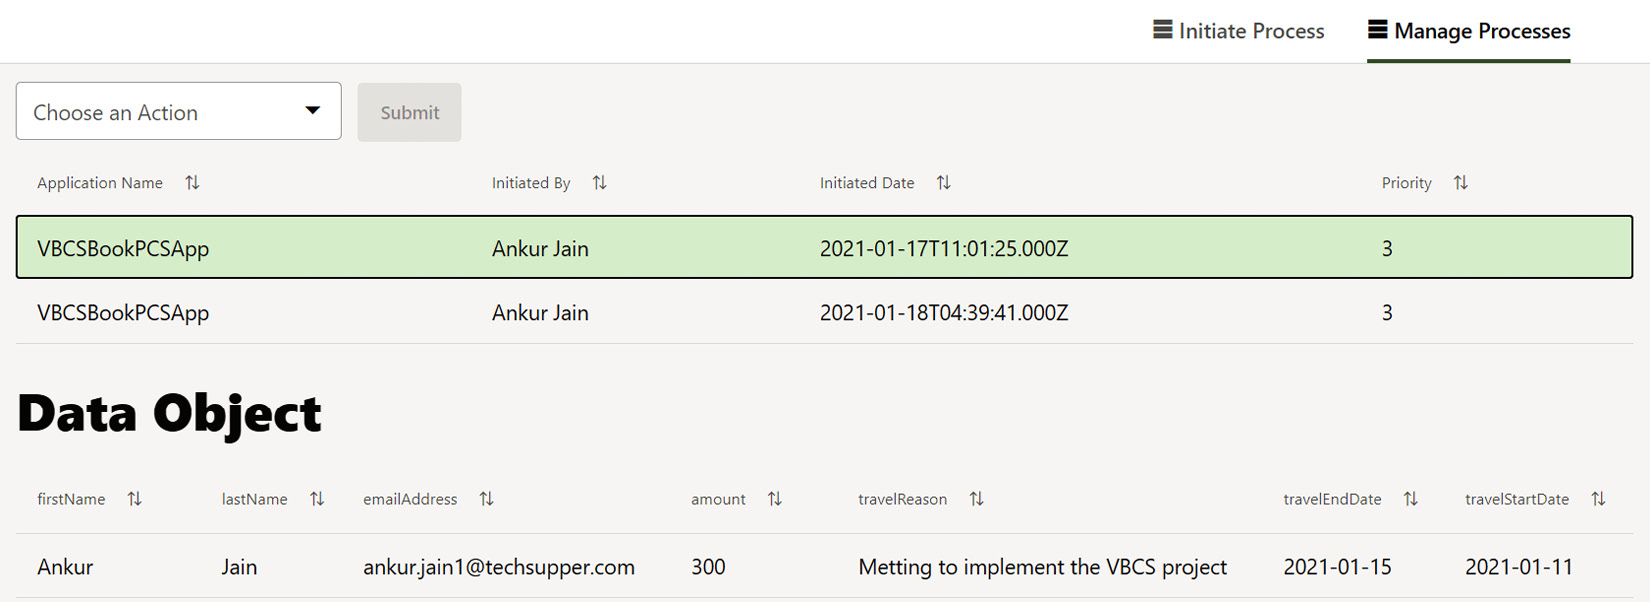
Figure 10.10 – Data object of the selected task
In this section, we learned how to fetch the data object corresponding to a process task and display it in a table. In the next section, we'll look at how to configure a process server connection.
Configuring a connection to a process server
When you create a VB application that uses the business process, VB sets up a default process server configuration. The following are the steps to view all the default process servers and to configure the process server:
- Click the Services tab from the application navigator, and go to the Backends tab.
- Then, click on Process Applications and go to the Servers tab. You'll see a Process Server, which in development mode and is configured to point to a test environment of the Oracle Process Cloud Service instance as per the following screenshot:
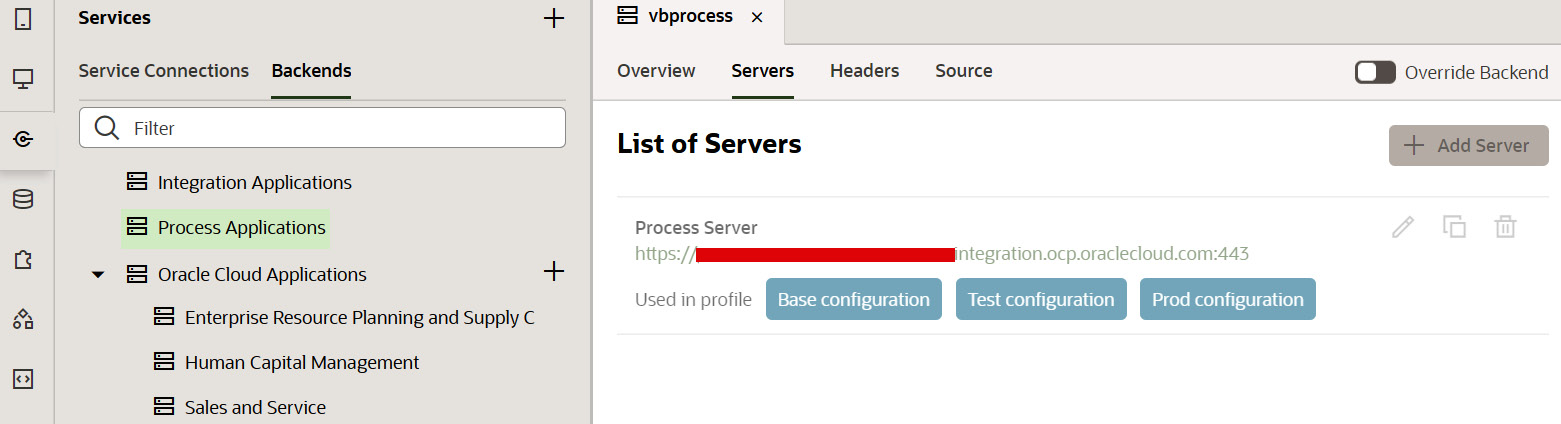
Figure 10.11 – Default process server
When you register any process under the Processes tab or you use a Process Quick Start, the Tenant settings will be overridden and one more Player Target Server will be visible under the Process Applications backend as shown in the following screenshot:
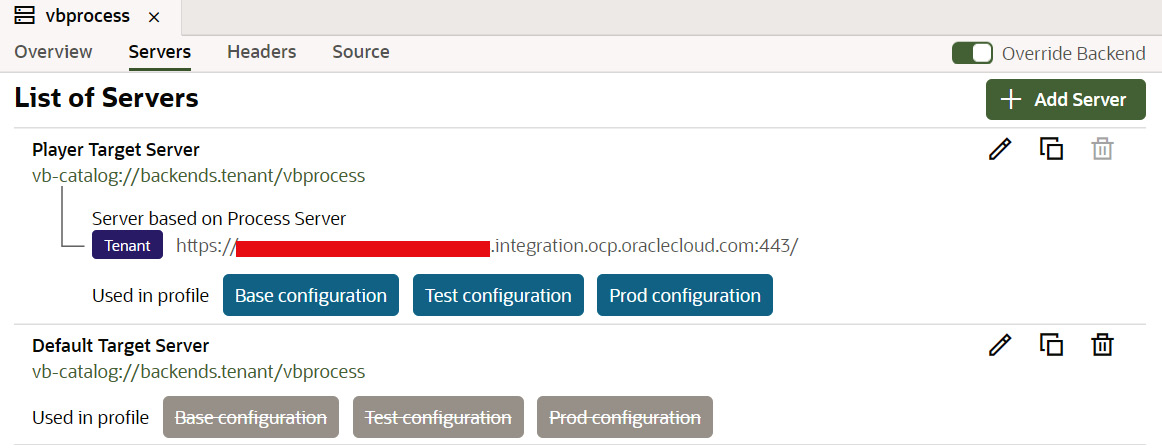
Figure 10.12 – Player Target Server
- The target server is set up under Application Profiles. Click on the action from top right corner, click the Settings menu from the top right corner, and move to the Application Profiles tab and see that Player Target Server is set up for all the configured application profiles by default as per the following screenshot:
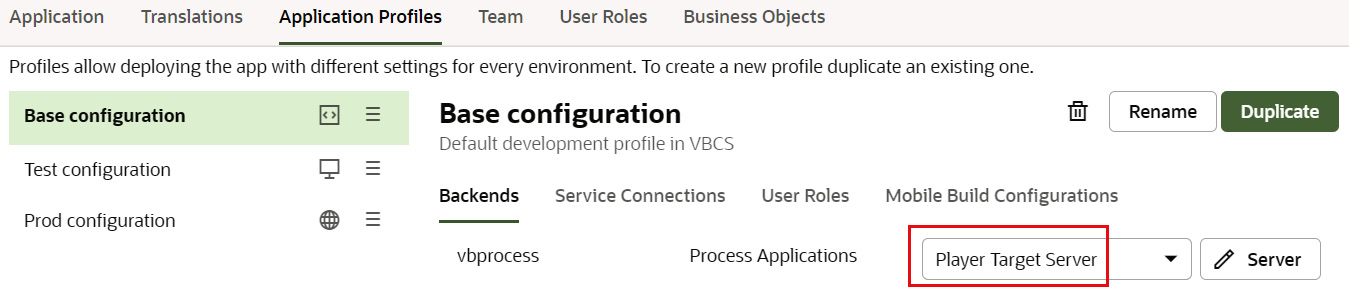
Figure 10.13 – Application profiles
- In order to change the target server, click any one of the profiles from Application Profiles and change Process Applications to Default Target Server. This configuration is required when you publish the VB application.
The following screenshot shows that the target server is changed to Default Target Server for the Prod Configuration application profile, which is the default profile for the publish application:
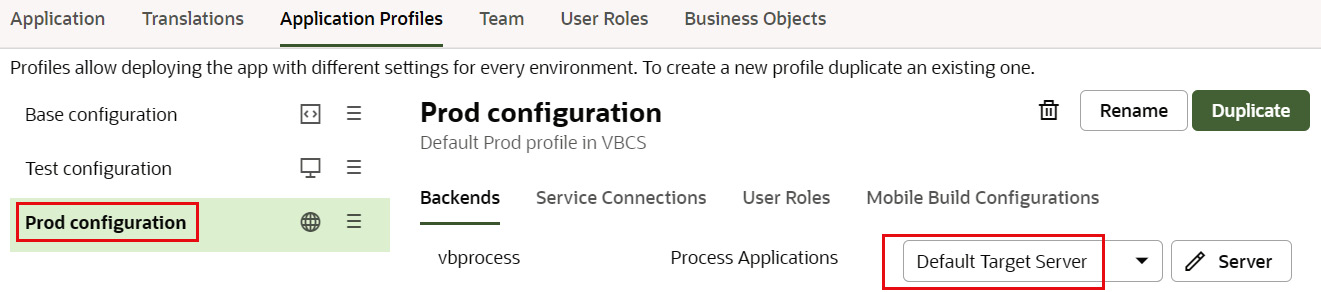
Figure 10.14 – Update the process server
This is how you can configure the process server in the VB application.
In this section, we learned how to configure the process server in the VB application and change the target servers.
Summary
In this chapter, you learned how to work with business processes in the VB application. You learned how to add and override the Process backend in Visual Builder. You also learned how to register the deployed business process in VB and see the HTML code of the registered process.
You learned how to initiate the business process from the VB application. We created a form in the VB application that allows you to enter a reimbursement request and submit the request. This initiates the Travel Reimbursement process and shows the generated process ID.
We also developed a page in the VB application to manage all the process tasks and populate them in a table. We added the action dropdown, which allows taking actions (APPROVE/REJECT) directly from the VB application without logging in to the Process workspace. We also added another functionality that retrieves the data object of the submitted task and populates it in a table. You learned how to configure the connection to a process server.
In the next chapter, we'll develop a mobile application in VB and add the various functionalities to the mobile application. We'll develop different pages and use different UI components. We'll show how to develop a Progressive Web App (PWA) and will also show how to compile an application to support different platforms.
Further reading
- Learn about Oracle Processes: https://www.oracle.com/in/cloud/integration/process-cloud-service/
- View all the Process REST APIs: https://docs.oracle.com/en/cloud/paas/integration-cloud/rest-api/index.html
Questions
- Is it recommended to override the default settings of the Process Application Backend?
- What is the difference between the Player Target Server and Default Target Server?