Chapter 13: Understanding and Managing Various Stages of a VB App
So far, we have developed various web and mobile applications including Business Objects and Service Connections. In this chapter, we will talk about various aspects in regards to managing the Visual Builder (VB) application and various statuses of the VB application. We'll look at how to create different versions of the VB application and how to clone the VB application.
We'll also learn how to promote a VB application from one VB instance to another and what we'll need to reconfigure after the application is promoted. We'll describe and show how to stage and publish the visual application.
We'll learn how to add team members to an application to enable other developers to work independently on applications.
In this chapter, we will cover the following topics:
- Managing the VB application
- Versioning of the VB application
- Cloning the VB application
- Promoting the VB application
- Staging and publishing the VB application
- Adding team members to the application
After completing this chapter, you will be able to manage the VB application, create different versions of the application, and promote the application from one instance to another. You will also be able to stage and publish the VB application.
Technical requirements
To complete this chapter, you should have the following:
- A VB instance
- VB login credentials
Managing the VB application
The VB home page allows us to manage the VB application. The VB home screen shows all the applications that are created by you or in which you have been added as a team member. Each application is displayed as a single row including all the versions of the application.
Every application has different options using which we can perform various tasks. Click on the action menu icon right next to the application to view all the available options, as in the following screenshot:
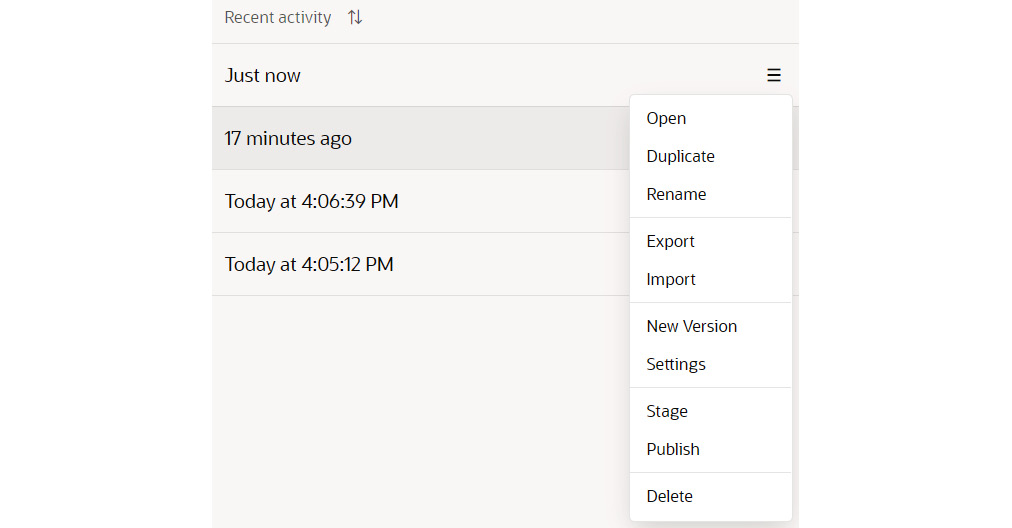
Figure 13.1 – Options of the VB application
As you can see, these are all the options from the menu:
- Open: This option opens the application to make changes.
- Duplicate: This option allows you to create a copy of the application.
- Rename: This option allows you to rename the application.
- Export: This option allows you to export the application as an archive file.
- Import: This option allows you to upload an archive file to update the application.
- New Version: This option allows you to create a new version of the application.
- Settings: This option opens the settings page of the application. Each version of the application has different settings.
- Stage: This option allows you to stage the application.
- Publish: This option allows you to publish the application.
- Delete: This option allows you to delete the application. Please note that you cannot recover the application once deleted.
- Lock/Unlock: These options (Lock or Unlock) will be visible only if the application is in live mode. The Lock option locks the live application and prevents users from accessing it. The Unlock option is visible only if the application is locked and allows you to unlock the application.
- Rollback: This option allows you to roll back to the previous live version. This option is available only for live applications.
A few options are displayed depending on the current status of the application.
Glancing at the different application statuses
Every VB app goes through different statuses. The default status of an application is Development. From the home page, you can filter the application status-wise. The following table describes the various statuses of the VB application:
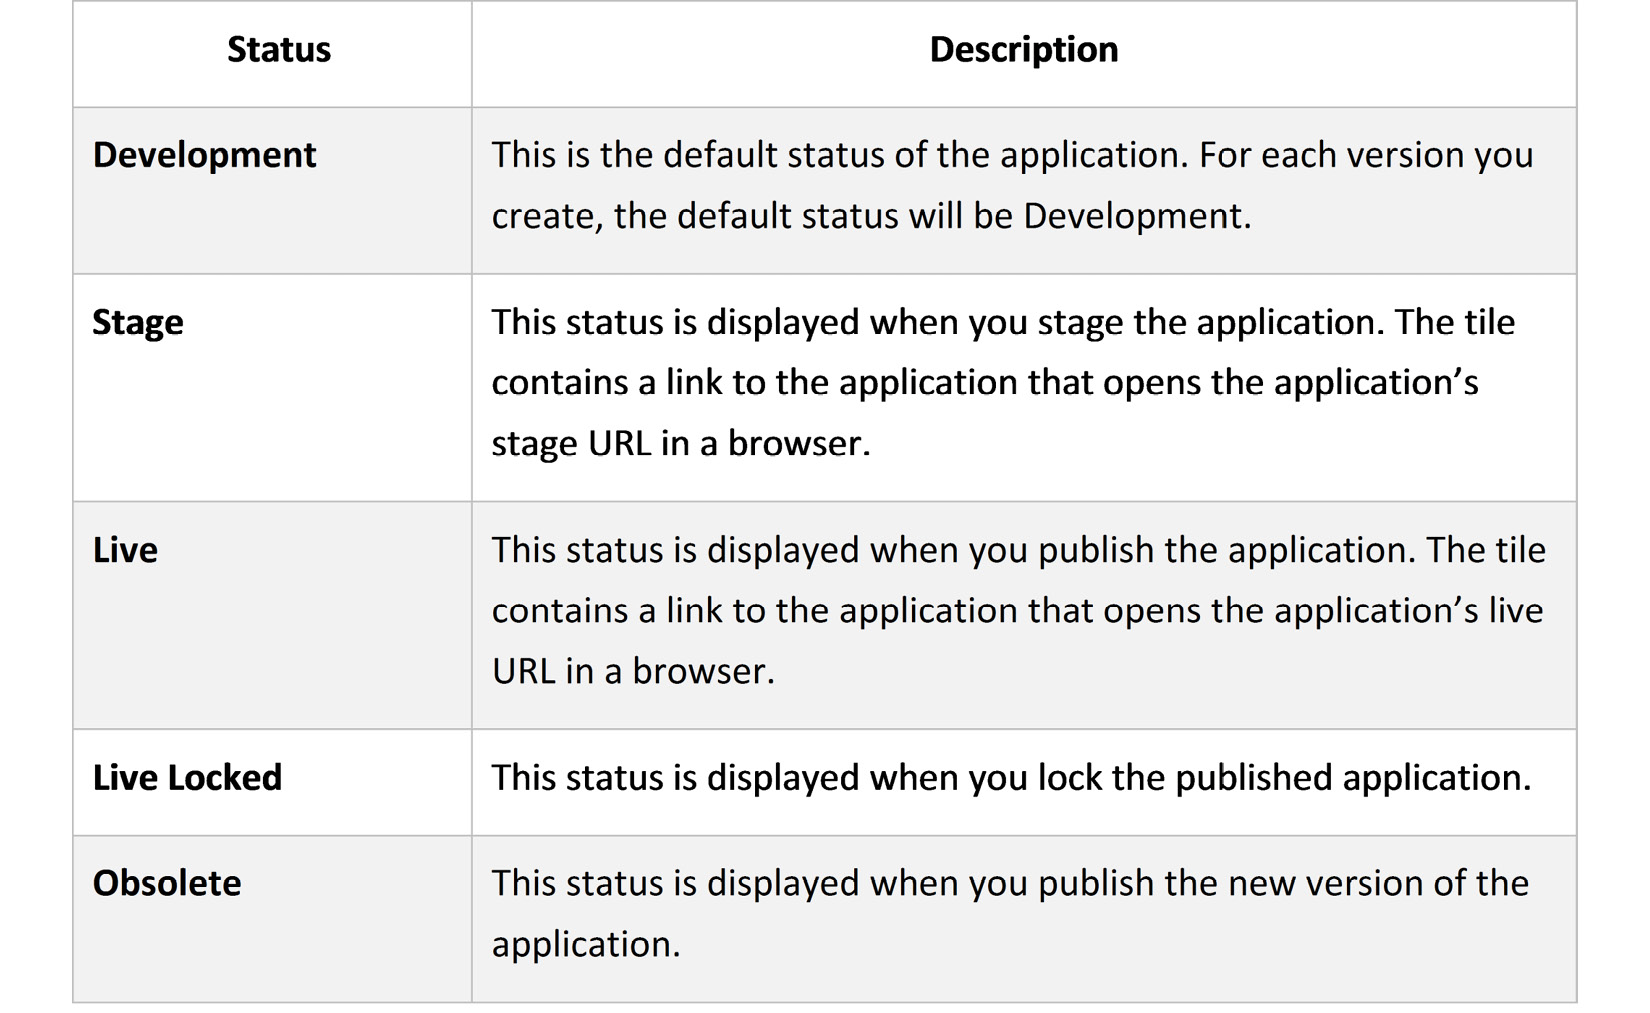
Table 13.1 – Different statuses of the application
That's all for the different statuses of the VB application.
In this section, we discussed various options of the application along with their description. We also learned about the different statuses of the application. In the next section, we'll talk about the versioning of the VB application.
Versioning of the VB application
VB allows us to create different versions of an application to enable parallel development. When a new version is created, a separate copy is created of the same application with the same artifacts and a separate database schema.
We can stage and publish any version of the VB application. You can stage multiple versions of the same application but only a single version can be published at a time. If multiple versions of the same application are staged, they will all have a separate URI to identify the version; however, all the versions will have the same URI once published.
Once the application is published, you cannot do any modifications to the live application. So, if you want to make any changes or fix any issues, you have to create a new version of the VB application.
We can use these steps to create a new version of the application:
- Open the Visual Builder home page and click on the action menu to the right of any of the applications for which you want to create a new version.
- Click on the New Version option from the action menu, as shown in the following screenshot:
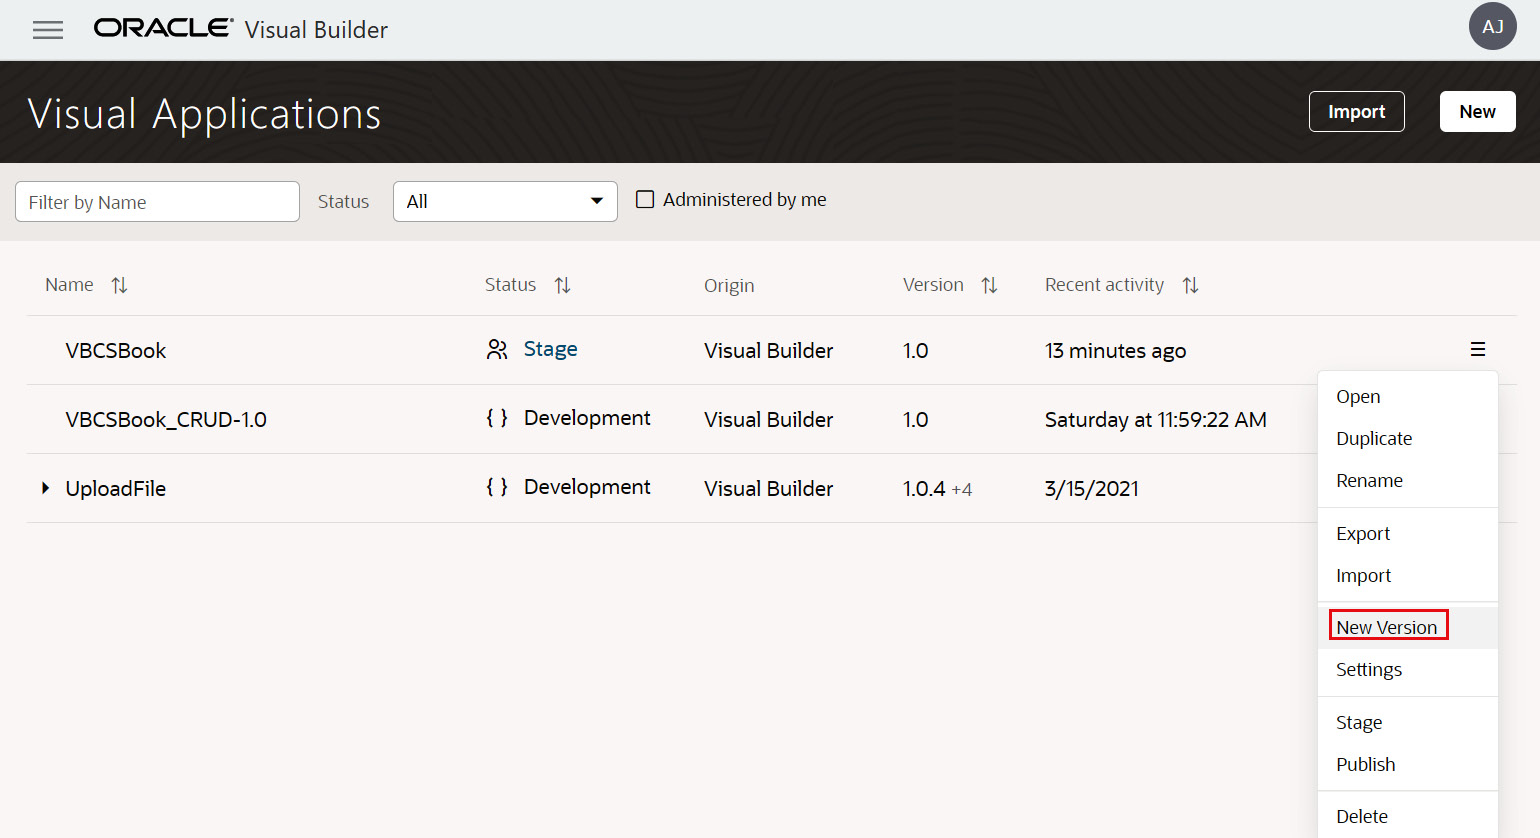
Figure 13.2 – New Version option of the VB application
- In the opened New Application Version dialog box, enter the unique version of the application in the New Version field or leave the suggested version as it is. Then, enter a description (optional), and then click on the Create button, as shown in the following screenshot:
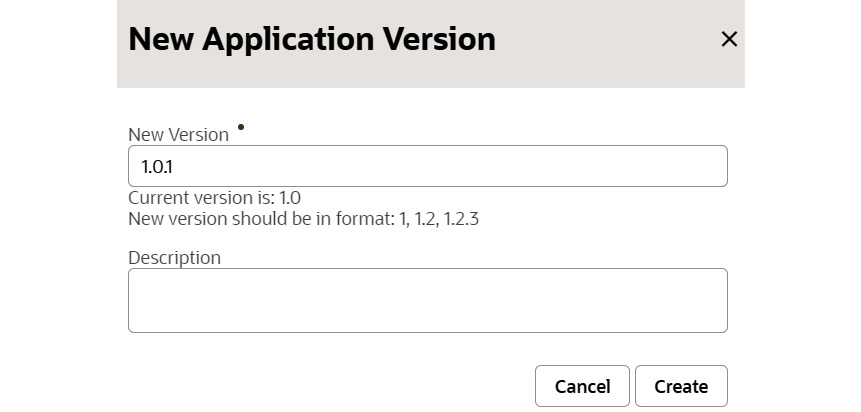
Figure 13.3 – New Application Version dialog box
Every time you create a new version of an application, it will always be in Development status. All the versions of the same application will be displayed in a hierarchical tree.
In this section, we learned how to create a new version of the application. In the next section, we'll look at how to clone the VB application.
Cloning the VB application
VB allows us to create a fresh copy of the VB application as an independent application that will have all the resources and the database schema. But the copy of the VB application will have a different name, application ID, and URI.
We can follow these steps to clone a VB application:
- Open the Visual Builder home page and click on the action menu to the right of any of the applications for which you want to create a new version.
- Click on the Duplicate option from the action menu.
- From the opened Duplicate Application dialog box, enter the details for Application Name, Application ID, and Description (optional), and then click on the Duplicate button, as shown in the following screenshot:
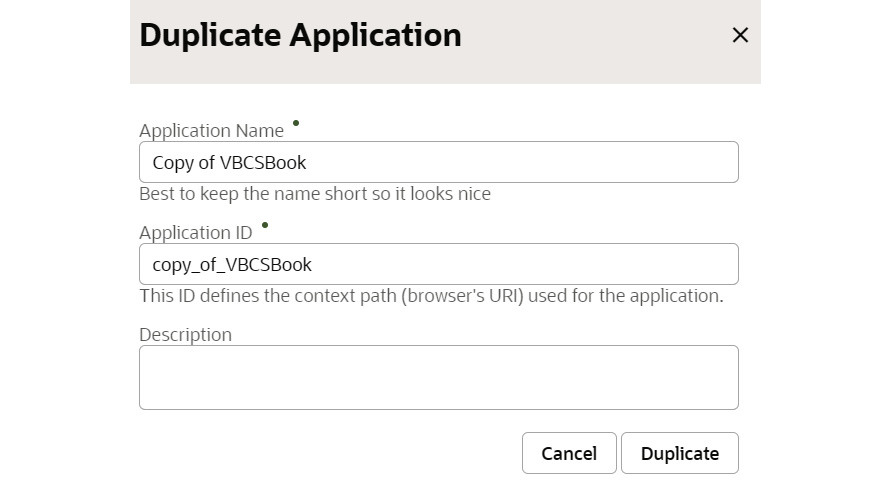
Figure 13.4 – Duplicate Application dialog box
When you create a copy of an application, it will be treated as a separate application.
In this section, we learned how to create a copy of the VB application. In the next section, we'll look at how to promote the VB application from one instance to another.
Promoting the VB application
Promoting means to migrate the VB application from one instance to another. Promotion of the VB application is straightforward; you simply need to export the VB application from the source instance and import it in the target instance. When you export the application, an archive file is exported containing all the resources, such as web and mobile applications, Business Objects, and Service Connections. VB removes the external REST endpoint credentials from the Service Connection during export. When you import it onto the target instance, you have to reconfigure the Service Connection credentials.
The following diagram depicts the promoting process:

Figure 13.5 – Promoting process
In the previous diagram, we considered three VB instances, namely, development (Dev), UAT, and production (Prod). On the development instance, the developers do the development, and once the development is over, the application will be exported. The exported application will be imported on the UAT instance, the Service Connection credentials will be configured if required, and the application will be staged.
On the UAT instance, the testing team can perform the testing, and once testing is over, the application will be exported from the UAT instance. The exported application from the UAT instance will be imported on the production instance, the Service Connection credentials will be configured, if required, and the application will be published.
Exporting the application
The exported application contains all the resources as an archive file. The VB application you export can be used to create a new copy of the application by importing it into the same instance, or it can be imported to a new instance.
When you export the application, you will be prompted to export the application with or without data that is in the Business Objects. If the Contains Application Setup Data option is selected on the Overview page of the Business Object, then the data will always be part of the exported application of those Business Objects, even if you choose the Export without Data option.
We can execute the following steps to export the application:
- Open the Visual Builder home page and click on the action menu to the right of any of the applications that you want to export.
- Click on the Export option from the action menu.
- From the opened Export Application dialog box, choose either the Export with Data or Export without Data option, as shown in the following screenshot:

Figure 13.6 – Export Application dialog box
- Choose the Export with Data option for this demonstration. Once the application is exported, a .zip file will be saved on your local drive. Open the .zip file and see the various folders inside the unzipped folder.
In the next section, you will look at how to import the VB application.
Importing the application
You can import an application that has previously been exported from the VB instance to create the new application. Use the Import button in the top-right corner of the Visual Builder home page.
You can also replace an existing application using the Import option that is available in the action menu to the right of the application. When you click on the Import option, the Import Resources dialog box will be opened, as in the following screenshot:
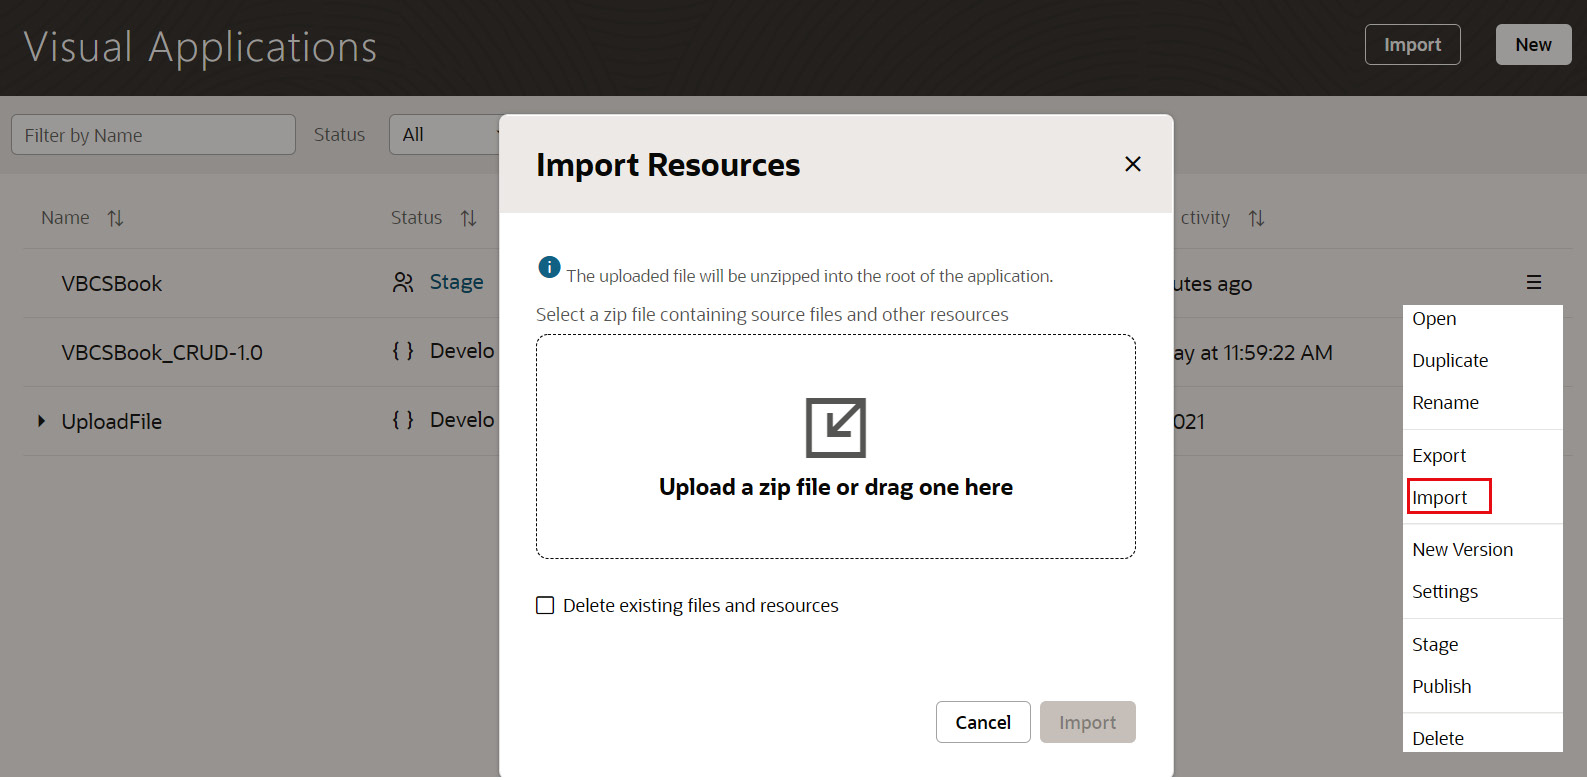
Figure 13.7 – Import option and the Import Resources dialog box
Upload the .zip file from the opened dialog option. If you choose the Delete existing files and resources checkbox, all the existing files will be deleted from the existing application.
We can use these steps to import the application to create a new copy of the application:
- Open the VB instance where you want to import the application and go to the Visual Builder home page.
- Click on the Import button in the top-right corner, as shown in the following screenshot:

Figure 13.8 – Import option
- From the opened Import dialog box, click on the Application from File option and select the archived file. The details for Application Name and Application ID will be filled in automatically based on the archive filename.
- Modify it with the correct application name and application ID as per your source instance (if the VB instance is different from the one where you are importing the application), and then click on the Import button, as shown in the following screenshot:

Figure 13.9 – Import Application from File dialog box
- Once the application is imported successfully, open Service Connections and update the credentials if required to run the application successfully.
Important Note:
The source instance from which you export the application must be the same or an earlier version of the instance where you want to import the application.
In this section, we learned about the process of promoting a VB application and how to export and import the application on the target instance. In the next section, we'll look at different phases of the VB application.
Staging and publishing the VB application
The VB application goes through three different phases to complete the life cycle of a web or mobile application. The following diagram shows the three different phases of a VB application:
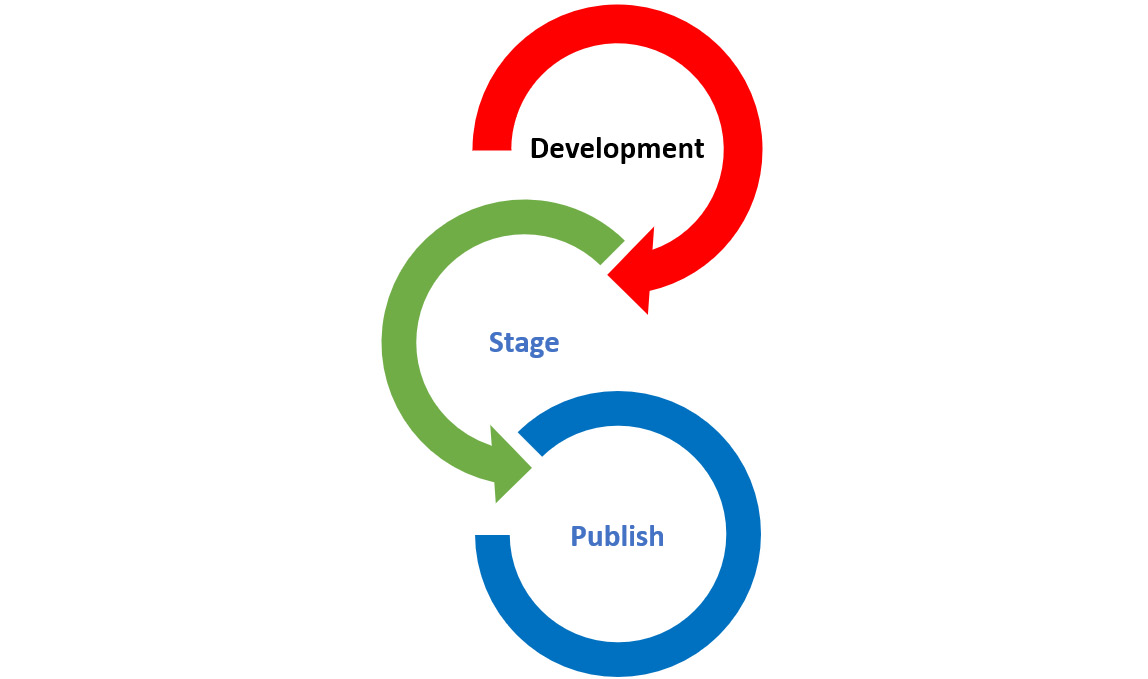
Figure 13.10 – Different phases of an application
As you can see, these are the three phases of an application:
- Development is the initial phase of the application and is used by developers to develop the application.
- Stage is the second phase of the application. The application is switched into this phase when application development is completed and ready for testing.
- Publish is the final phase of the application. The application is switched into this phase when the application functionality is ready to go live.
Every phase of the VB application has a different database schema.
Important Note:
When you stage a VB application containing a mobile application, at least one mobile application build configuration must exist, else the stage of the visual application will fail.
When the application is switched to the Stage or Publish phases, the application resources are deployed on the VB runtime engine that serves the requests.
The application must be in the Stage phase to be published. When an application is published, the Stage version becomes the live version. After the application is published, you cannot modify the application, so it's important to review all the application settings (such as credentials, environment-specific values, and so on) before you publish it. If you want to make any changes to the published application, you have to create a new version, modify the application, switch to stage, and then publish it.
We'll learn about staging and publishing the VB application in the following sections.
Staging the VB application
Once the application development is completed, you need to provide the application URL to the stakeholders, who will validate the functionality of the application. So, you have to switch the phase of application from Development to Stage, and once the application is staged, a unique URL will be generated, which you can distribute to various types of users to test the functionality as per their role. For each version of the application, the stage URL will be unique.
When you stage the application, the following process takes place on your behalf:
- The complete application structure is copied to a directory on the VB server.
- Every time you stage the application, the staging database structure is updated with the development database.
- A unique URL is exposed to access the web application and to download the mobile application. The stage URL is different for each version.
When staging the application, you need to choose from one of the available options depending on the stage iteration. These options are used to manage the Business Object data. The following table describes the different options with descriptions of when you stage the application:
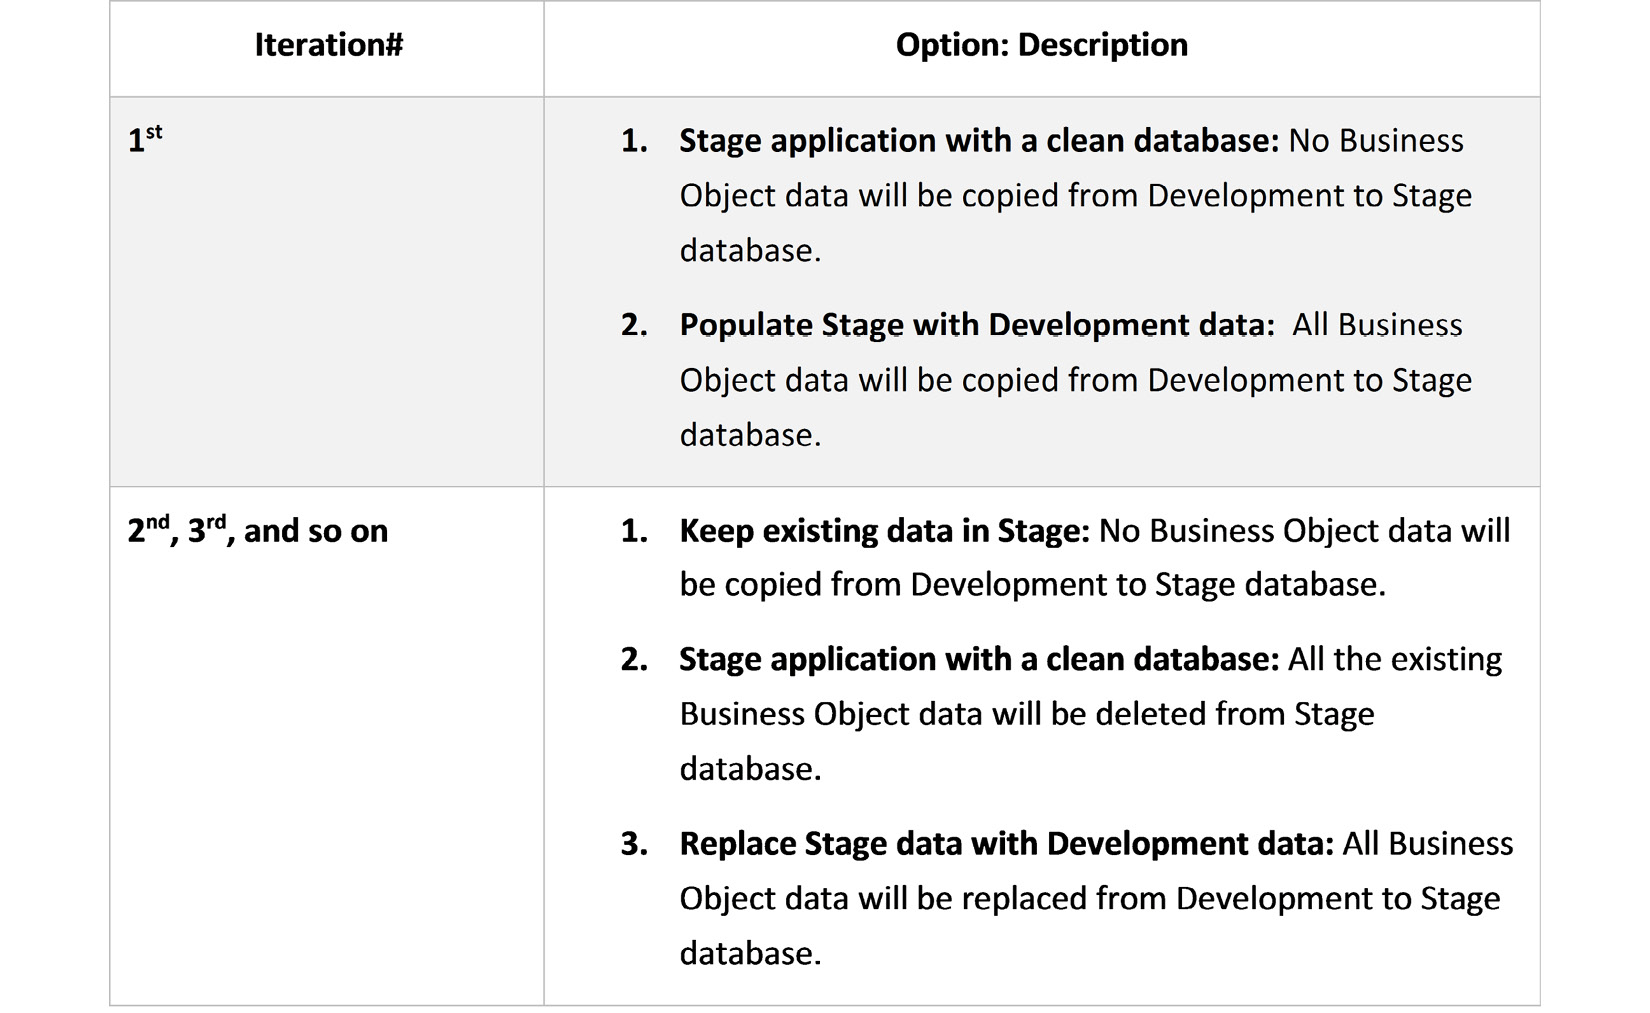
Table 13.2 – Different options during stage
We can follow these steps to stage the application:
- Open the Visual Builder home page and click on the action menu to the right of any of the applications that you want to stage.
- Click on the Stage option from the action menu. If you are staging the application for the first time, you need to choose either the Stage application with a clean database or Populate Stage with Development data option, as shown in the following screenshot:

Figure 13.11 – Stage Application dialog box
- Refer to Table 13.2 to understand the options and choose any of the options to manage your Business Object data. Choose Populate Stage with Development data for this demonstration and click on the Stage button.
- After the application is staged, if you update your application to make some enhancements or bug fixes, you have to stage the application again to make the change effective. For the subsequent stage of the application, follow the same stage application procedure, and choose either the Keep existing data in Stage option, the Stage application with a clean database option, or the Replace Stage data with Development data option, as shown in the following screenshot:

Figure 13.12 – Stage Application dialog box on the subsequent iteration
- Choose any of the available options to manage the Business Object data and click on the Stage button.
- Once your application is staged successfully, you can distribute the stage application URL to the stakeholders for testing. To get the URL, click on the Stage option under the Status column, and click on any of the web applications to get the URL, as shown in the following screenshot:
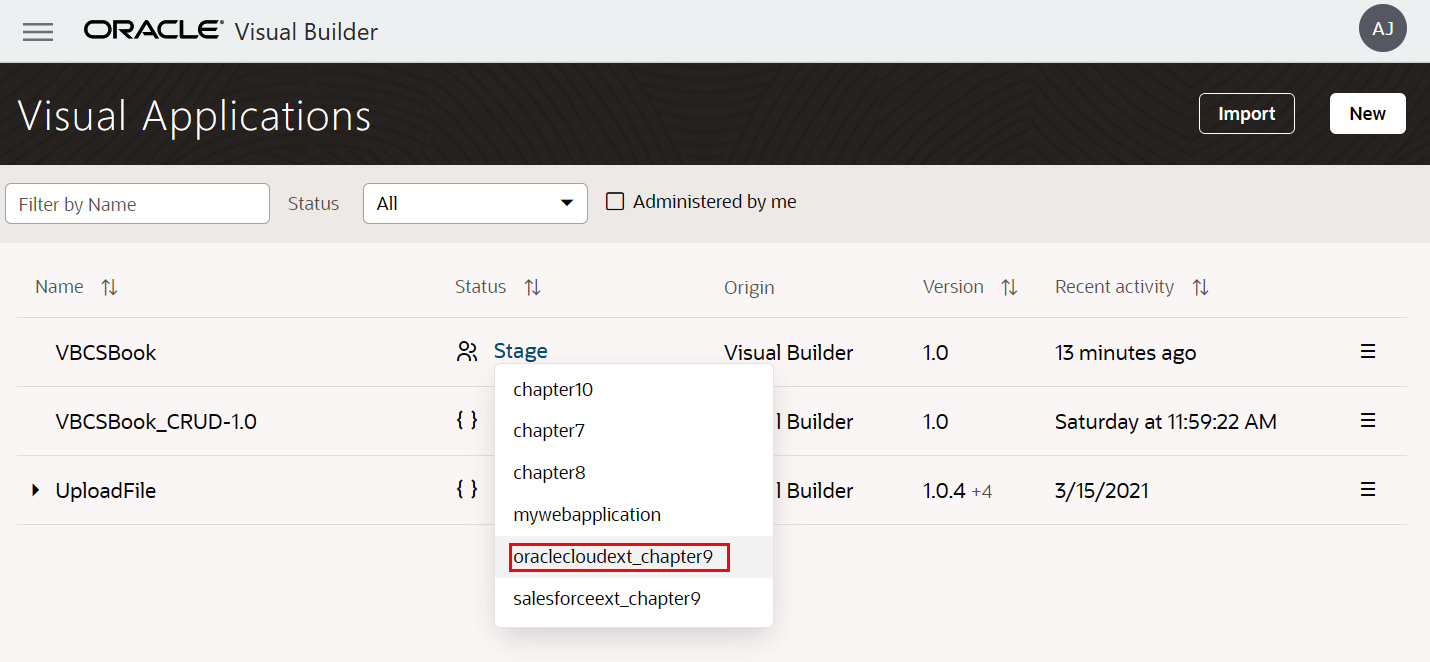
Figure 13.13 – Stage option of the application
Once you click on any of the web applications listed on your screen, you will be redirected to a different tab. Copy the URL and distribute it wherever you want.
In the next section, we'll learn about publishing the VB application.
Publishing the VB application
Once the changes and testing are completed, you can publish the application and make it available for end users.
When you publish the application, the following process takes place on your behalf:
- The directory containing the staged application becomes live.
- Every time you publish the application, the live database structure is updated with the stage database.
- A unique URL is exposed to access the live web application and to download the mobile application. For the subsequent publishing of the application, the URL remains the same irrespective of the version.
Similar to staging, you need to choose any of the available options to manage the Business Object data when publishing the application. The following table describes the different options with descriptions when you publish the application:

Table 13.3 – Different options during publishing
These are the steps we can use to publish the application:
- Open the Visual Builder home page and click on the action menu to the right of any of the applications that you want to publish.
- Click on the Publish option from the action menu. If you are publishing the application for the first time, you need to choose either the Include data from Stage option or the Publish application with a clean database option, as shown in the following screenshot:
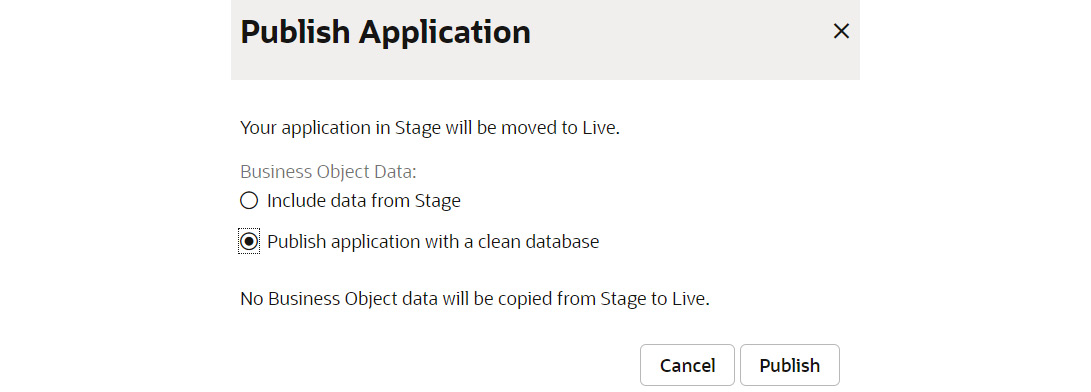
Figure 13.14 – Publish Application dialog box
- If you update the application, then you have to re-publish the application to make the change effective. But in order to make the changes, you have to version the application, stage it, and only then you will see the Publish option. The previously published version will be locked. In the subsequent iteration, choose either the Keep existing data in Live option, the Replace Live with Stage data option, or the Publish application with a clean database option, as shown in the following screenshot:
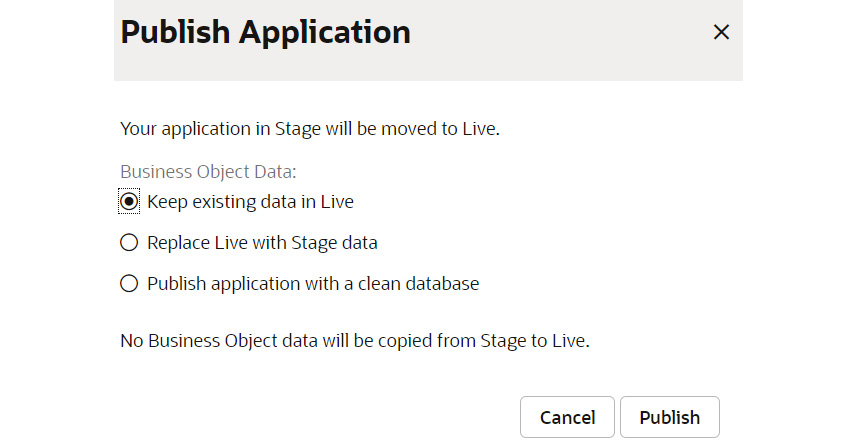
Figure 13.15 – Publish Application dialog box on the subsequent iteration
- Select any one of the options as per Table 13.3. Click on the Publish button to publish the application.
- Once your application is published successfully, you can distribute the published application URL to the end users. To get the URL, click on the Live option under the Status column and click on any of the web applications on your screen to get the URL.
That is all for staging and publishing the VB application.
In this section, we learned about staging and publishing the VB application. We saw how to stage and publish the application and various options that you need to select when switching the application phases. In the next section, we'll demonstrate how to add team members to the application.
Adding team members to the application
If you want your team members to collaborate on your VB application, then you can add them as team members in the application. The team members you want to add to the VB application must be part of Oracle IDCS.
We can use these steps to add team members to the application:
- Open any of the VB applications in which you want to add team members.
- Go to the menu in the top-right corner and click on the Settings option.
- Go to the Team tab. The Members section already displays added team members, and the History section displays the history of the last update of the application along with the email address of the team member who made the changes.
- Under the Members section, select or search the name of the team member you want to add and click on the Add button, as in the following screenshot:

Figure 13.16 – Adding team members
Once the team member is added, their name will be displayed under the Members section and the newly added team member can collaborate in the application.
Important Note:
In order to add team members, the user should be added to the VB Application Roles instance from Oracle IDCS.
In this section, you learned how to add team members to the application to collaborate on the development activities.
Summary
In this chapter, you learned how to manage the VB application and explored various options and the different statuses of the VB application. You learned about the versioning of the application and how to create various versions of the application. Along with versioning, you learned how to create a clone of the application.
You also learned about promoting the VB application and explored the complete process to promote the application from one instance to another. You learned how to export the application as an archive file and import it to another instance. We explored different phases of the VB application and how an application can be switched from one phase to another.
You learned about the staging of the VB application, various options while you stage the application, how to stage the application, and distributing the URL to validate the functionality. We learned about publishing the application, various options you need to deal with while publishing the application, how to publish the application, and then distributing the URL to end users.
You also learned how to add team members to the VB application to contribute to the development activities.
In the next chapter, we will talk about various best practices to develop an application that will enhance the performance of the application. We'll describe various best practices and recommendations when creating Business Objects and Service Connections that will reduce development and migration efforts too.
Questions
- Can we modify the variable values in the published application?
- Can we insert or modify the data in a Business Object once the application is published?
- Is it mandatory for the user to be part of Oracle IDCS to add them as a team member?