
▶ 4.3 Access Control Lists and MacOS
In many access control problems, we have a single group of users who all need identical access rights to a particular set of files. We can easily solve such problems with group permissions. There are, however, cases where we can’t use file permission flags and a single user group to achieve Least Privilege. Consider a policy that requires these three conditions:
Block access to the user community in general.
Grant read-only access to one group of users.
Grant read/write access to a second group of users.
We can’t do this with Unix-style permission flags and achieve Least Privilege. We might come close if we grant read-only access to everyone and read/write access to the second group. We also might come close if we create a single large group out of the first and second groups. We then grant read/write access to all, and we tell members of the first group to restrain themselves. To achieve Least Privilege, we need ACLs.
In Section 4.1, we introduced Windows “home edition” ACLs that grant rights to specific users. This particular implementation can solve the problem just described: We list all users individually and grant the appropriate access to each one. This is a reasonable solution if we are controlling the rights for only a handful of people. It becomes impractical as the groups grow in size.
To implement the policy for larger groups, it is easier and more reliable to establish separate user groups. We then establish permissions for each group instead of setting permissions on a per-user basis. It is much easier to verify correct group membership than it is to review the access rights for dozens of individual users.
Fortunately, most modern ACL implementation can specify permissions for groups of users as well as individuals. Modern Unix-based systems that include ACLs, like Apple’s MacOS, support group permissions as well as individual user permissions. Professional and “business” versions of Windows also support group permissions.
MacOS ACLs
MacOS ACLs are built on top of standard Unix permissions and designed to work well with Windows-style ACLs (FIGURE 4.9). Most users interact with these ACLs through the standard Macintosh GUI, known as the “Finder.” Superficially, MacOS ACLs are similar to the simple Windows ACLs shown in Figure 4.2.

FIGURE 4.9 MacOS ACL for Bob and Tina’s shared file.
Screenshot reprinted with permission from Apple, Inc.
We start with access allowed by the owner, and we can add access rights for other users. As with the earlier example, one of the users can simply add access rights for the other. Just as Tina granted access to Bob, Bob can grant access for Tina (Figure 4.9).
To modify the ACL, we must first unlock it by clicking on the padlock in the lower right-hand corner. Unfortunately, we need administrator rights to make changes to an ACL. Thus, Bob had to type in an administrator’s name and password in order to fix the ACL. Once we unlock the ACL, we add another user by clicking on the “+” box in the lower left-hand corner. The Finder then displays a list of existing users, and we click on the name we wish to add.
To change the access rights in an ACL entry, we have two choices. If we want to remove all access permissions, we can delete the corresponding ACL entry. To do this, we select the corresponding row and then click on the “-” sign in the lower left.
Default rights, like those assigned to the owner, owning group, or world, can’t be deleted. To remove access for one of those, we click on the corresponding entry under “Privilege” and choose the access rights we want. FIGURE 4.10 shows the “pop-up” menu to choose the access rights. In the example, we choose “No Access” rights for “everyone” not listed in the ACL.
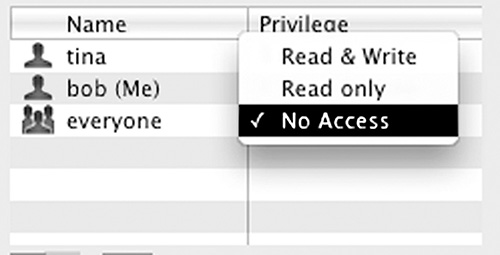
FIGURE 4.10 Modifying the rights on a MacOS ACL entry.
Screenshot reprinted with permission from Apple, Inc.
Unlike the simple Windows ACLs described earlier, MacOS allows us to add ACL entries for groups as well as users. We first create a group by selecting “User Accounts” under the System Preferences application. We unlock the application by clicking on the padlock in the lower left and typing an administrator’s password; then we click on the plus “+” sign above the padlock, and we choose to create a group. Once the group exists, we can modify its name and members by editing the screen shown in FIGURE 4.11.

FIGURE 4.11 Choosing users for a group in Apple’s MacOS.
Screenshot reprinted with permission from Apple, Inc.
We give the group the name “survey” and select members by checking them in the “Membership” window. In the figure, we have selected Bob and Tina as members. Note that other groups also may be members of groups.
To include a group in an ACL, we first display and unlock the ACL, then we click the plus sign to add a new entry. We select the group’s name from the list, and then set the group’s access rights.
When we create a new file on a Macintosh, the file grants full rights to the owner and read-only access to everyone else. This does not, however, mean that we are sharing files by default. Every user has a “home directory” that carries his or her user name; within that directory are personal directories with names like Desktop, Documents, Downloads, Library, and Pictures. By default, other users cannot read these directories. Even if they have read access to the files themselves, they can’t read the files because they can’t reach them easily. Only the Public directory grants read access to users in general.
If we wish to share files with others, we either place the files in the Public directory, or in another directory that’s not part of our user file directories. For example, Bob might create a “Projects” directory in the root directory that is readable by everyone. Within that directory, he creates a new directory for every project, and he sets access permissions to allow project members only.
When Tina creates a file in their shared “survey” directory, the file will grant full access to her and read access to everyone else. This is the default behavior. The protections on its directory will protect the file from other users. The system will not, however, automatically fill in the ACL with permissions for Bob. He will be able to read the file because, by default, he receives read access with the rest of the world. Unlike the rest of the world, he can read the directory. This allows him to actually read the file.
Although this approach will protect the “survey” files from being read by outsiders, it is best to explicitly change permissions to block access by people outside the group. Bob won’t share his administrative password with Tina, so she can’t change ACLs herself. However, she can type in a “chmod” command by hand to remove access by the world (“others”) to her new files.