If you want to build a PivotTable using a sorted, filtered, subset of an external data source, you must use Microsoft Query to specify the sorting and filtering options and the subset of the source data that you want to work with.
Databases such as those used in Microsoft Access and SQL Server are often very large and contain a wide variety of data scattered over many different tables. When your data analysis requires a PivotTable, you can never use an entire database as the source for the report. Instead, you can extract a subset of the database: a table or perhaps two or three related tables. You may also require the data to be sorted in a certain way and you may also need to filter the data so that you only work with certain records.
You can accomplish all three operations — extracting a subset, sorting, and filtering — by creating a database query. In Excel, the program that you use to create and run database queries is Microsoft Query. You learn how to use Microsoft Query in this appendix. This section gets you started by introducing you to various query concepts and how they fit into Microsoft Query.
All database queries require two things at the very beginning: access to a database and an Open Database Connectivity, or ODBC, data source for the database installed on your computer. ODBC is a database standard that enables a program to connect to and manipulate a data source. An ODBC data source contains three things: a pointer to the file or server where the database resides; a driver that enables Microsoft Query to connect to, manipulate, and return data from the database; and the login information that you require to access the database.
You learn how to create a new data source in the next task, "Define a Data Source."
Database queries knock a large database down to a more manageable size by enabling you to perform three tasks: selecting the tables and fields you want to work with, filtering the records, and sorting the records.
The first task you perform when you define a query is to select the table or tables that you want to work with. After you have done that, you then select the fields from those tables that you want to use in your PivotTable. Because external databases often contain a large amount of data, you can speed up your queries and reduce the amount of memory Excel uses by returning only those fields that you know you need for your PivotTable.
You may not require all a table's records in your PivotTable report. For example, if a table contains invoice data from several years, you may only want to work with records from a particular year. Similarly, you may be interested in records for a particular product, country, or employee. In each case, you can configure the database query to filter the records so that you only get the records you want.
A database query also enables you to sort the data that you are extracting. This does not matter too much with a PivotTable because Excel sorts the field items in ascending alphabetical order by default. However, the sorting option is important if you import the data into your Excel worksheet; as described in Appendix C.
You can specify the filtering portion of a database query by specifying one or more criteria. These are usually logical expressions that, when applied to each record in the query's underlying table, return either a true or false result. Every record that returns a true result is included in the query, and every record that returns a false result is filtered out of the query. For example, if you only want to work with records where the Country field is USA, then you would set up criteria to handle this, and the query would discard all records where the Country field is not equal to USA. The following table lists the operators you can use to build your criteria expressions:
OPERATOR | VALUE IN THE FIELD |
|---|---|
Equals | Is equal to a specified value |
Does not equal | Is not equal to a specified value |
Is greater than | Is greater than a specified value |
Is greater than or equal to | Is greater than or equal to a specified value |
Is less than | Is less than a specified value |
Is less than or equal to | Is less than or equal to a specified value |
Is one of | Is included in a group of values |
Is not one of | Is not included in a group of values |
Is between | Is between (and including) one value and another |
Is not between | Is not between one value and another |
Begins with | Begins with the specified characters |
Does not begin with | Does not begin with the specified characters |
Ends with | Ends with the specified characters |
Does not end with | Does not end with the specified characters |
Contains | Contains the specified characters |
Does not contain | Does not contain the specified characters |
Like | Matches a specified pattern |
Not like | Does not match a specified pattern |
Is Null | Is empty |
Is Not Null | Is not empty |
Microsoft Query is a special program that you can use to perform all the database query tasks mentioned in this section. You can use Microsoft Query to create data sources, add tables to the query, specify fields, filter records using criteria, and sort records. You can also save your queries as query files so that you can reuse them later. If you start Microsoft Query from within Excel, you can return the query records to Excel and use them in a PivotTable.
Before you can do any work in Microsoft Query, you must select the data source that you want to use. If you have a particular database that you want to query, you can define a new data source that points to the appropriate file or server.
As you learned in the previous section, "Understanding Microsoft Query," an ODBC data source contains: a pointer to the file or server where the database resides; a software driver that enables Microsoft Query to connect to, query, and return data from the database; and the login information that you require to access the database.
Most data sources point to database files. For example, the relational database management programs Access, Visual FoxPro, Paradox, and dBase all use file-based databases. You can also create data sources based on text files and Excel workbooks. However, some data sources point to server-based databases. For example, SQL Server and Oracle run their databases on special servers.
As part of the data source definition, you need to include the software driver that Microsoft Query uses to communicate with the database. An Access database requires an Access driver; a SQL Server database requires a SQL Server driver, and so on.
Finally, you must include in the data source any information that you require to access the database. Most file-based databases do not require a login, but some are protected with a password. For server-based data, you are almost certainly required to provide a username and password.
Note
This appendix uses the Northwind.mdb database, which comes with Microsoft Access, or you can create your own sample database.
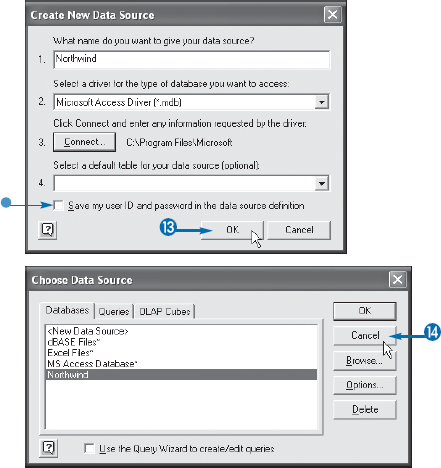
The Choose Data Source dialog box appears.
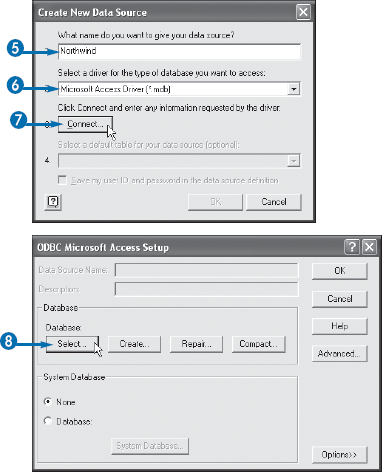
The Create New Data Source dialog box appears.

The dialog box for the database driver appears.
Note
The steps that follow show you how to set up a data source for a Microsoft Access database.
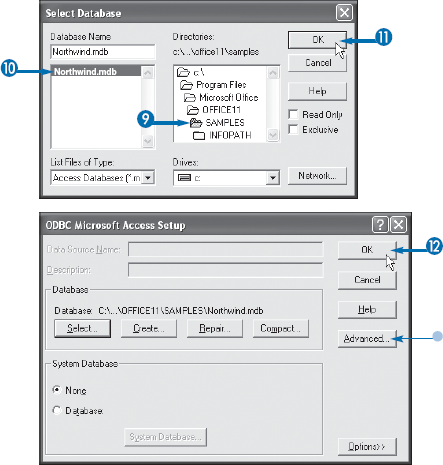
The Select Database dialog box appears.
Apply It
Many medium- and large-sized businesses store their data on Microsoft's SQL Server database system. This is a robust and powerful server-based system that can handle the largest databases and hundreds or thousands of users. If you need to define a data source for a SQL Server installation on your network or some other remote location, first follow Steps 1 to 4 to get to the Create New Data Source dialog box.
Type a name for the data source and then, in the list of database drivers, click SQL Server. Click Connect to display the SQL Server Login dialog box. Your SQL Server database administrator should have given you the information you require to complete this dialog box.
Type the name or remote address of the SQL Server in the Server text box. If the SQL Server administrator has associated your Windows login data with the SQL Server login, then you do not need to specify login data, so click OK. Otherwise, deselect Use Trusted Connection (
Perform Steps 13 to 15 later in this task to complete the SQL Server data source.
Your system probably comes with a few data sources already defined, and you can use these predefined data sources instead of creating new ones.
In the Choose Data Source dialog box, the list in the Databases tab often shows one or more predefined data sources. These data sources are created by programs that you install on your system. When you install Microsoft Office and, in particular, the Microsoft Query component, the installation program creates three default data sources: dBase Files, Excel Files, and MS Access Database. These are incomplete data sources in the sense that they do not point to a specific file. Instead, when you click one of these data sources and then click OK, Microsoft Query prompts you for the name and location of the file. For example, if you use the dBase Files data source, Microsoft Query prompts you to specify a dBase (.dbf) database file. These data sources are useful if you often switch the files that you are using. However, if you want a data source that always points to a specific file, use the steps outlined in this task.
You are returned to the database driver's dialog box.
You are returned to the Create New Data Source dialog box.
You are returned to the Choose Data Source dialog box.
You can now use the data source in Microsoft Query.
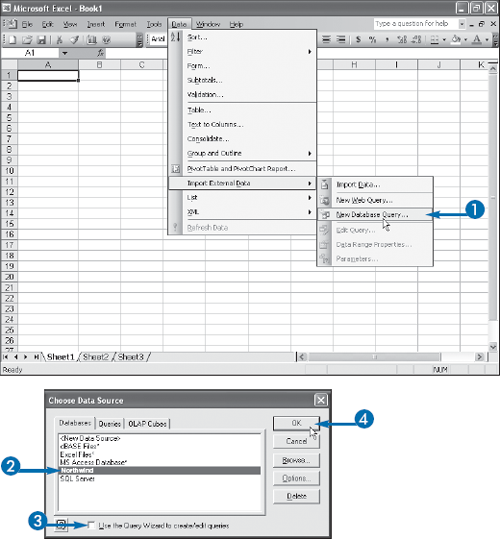
To create a query that defines the fields and records that appear in your PivotTable report, you must begin by starting the Microsoft Query program.
Microsoft Query is part of the Office Tools collection that ships with Microsoft Office. Although you can start the program on its own — click Start→Run, type c:program filesmicrosoft officeoffice11msqry32.exe, and then click OK — you can almost always start it from within Excel. That way, the data you configure with the query is automatically returned to Excel so that you can build your PivotTable report.
Extra
If you cannot follow the steps in this task, you may not have Microsoft Query installed on your computer. Select Start→Control Panel and double-click Add or Remove Programs. In the Add or Remove Programs window, click Microsoft Office and then click Change. Click Add or Remove Features (
The Choose Data Source dialog box appears.
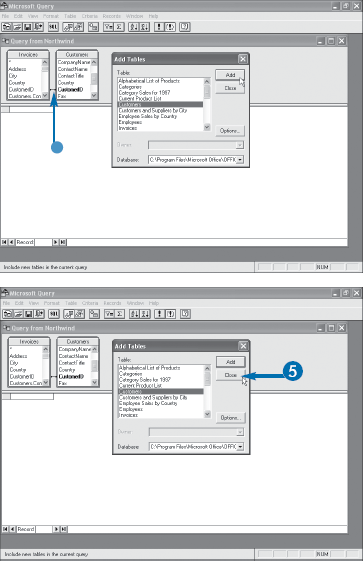
The Microsoft Query window and the Add Tables dialog box appear.
Note
To learn how to use the Add Tables dialog box, see the task "Add a Table to the Query," later in this appendix.
You can get the most out of Microsoft Query if you understand the layout of the screen and what each part of the Microsoft Query window represents.
Although you have not yet created a query using the Microsoft Query program, it is worthwhile to pause now and take a look at the various elements that make up the Microsoft Query window. Do not worry if what you currently see on your screen does not look like the window shown in this section. By the time you finish this appendix, you will see and work with all the elements shown here.
This window is where you create and edit, as well as preview the results. The query window is divided into three panes: the table pane, the criteria pane, and the results pane.
This toolbar contains buttons that give you one-click access to many of Microsoft Query's most useful features.
This pane displays one list for each table that you add to the query; see the task "Add a Table to the Query," later in this appendix. Each list shows the fields that are part of the table. Click View→Tables to toggle this pane on and off.
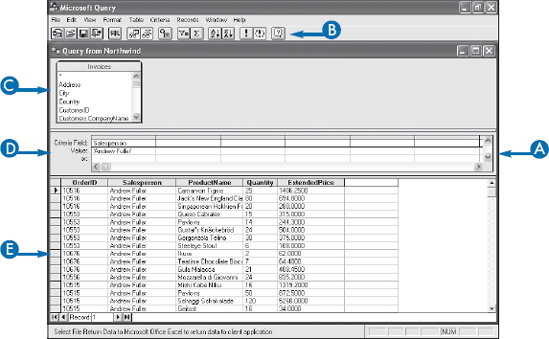
This pane is where you define the criteria that filter the records you want to return to Excel. See the task "Filter the Records with Query Criteria," later in this appendix. Click View→Criteria to toggle this pane on and off.
This pane gives you a preview of the fields and records that your query will return to Excel. As you add fields to the query, change the query criteria, and sort the query (see the task "Sort the Query Records," later in this appendix), Microsoft Query updates the results pane, also called the data grid, automatically to show you what effect your changes will have.
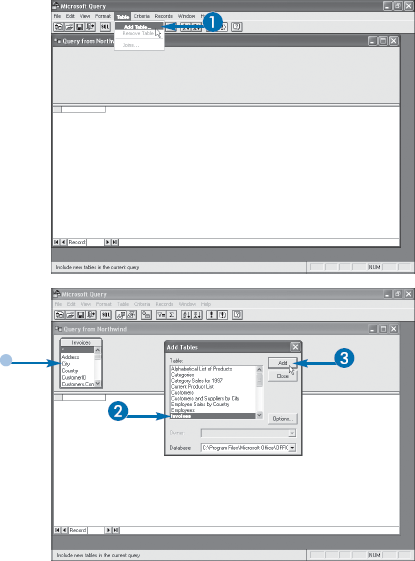
With your data source running and Microsoft Query started, the next step you must take is to add a table to the query.
In a database, a table is a two-dimensional arrangement of rows and columns that contains data. The columns are fields that represent distinct categories of data, and the rows are records that represent individual sets of field data. In some database management systems, the database files themselves are tables. However, in most systems, each database contains a number of tables. Therefore, your first Microsoft Query task in most cases is to select which table you want to work with.
Note, too, that many database systems also enable you to filter and sort data using their own versions of the querying process. Creating a query in Microsoft Access, for example, is similar to creating one in Microsoft Query. By default, when Microsoft Query shows you a list of the tables in the database, it also includes any queries — or views, as Microsoft Query calls them — that are defined in the database, so you can add these objects to your query, if required.
However, if the query is based on multiple, related tables, then for best results you may also need to add all the related tables to your query. For example, if you are using the Northwind sample database and you add the Invoices view to your query, it includes the field Customers.CompanyName. This tells you that you should also add the Customers table to your query.
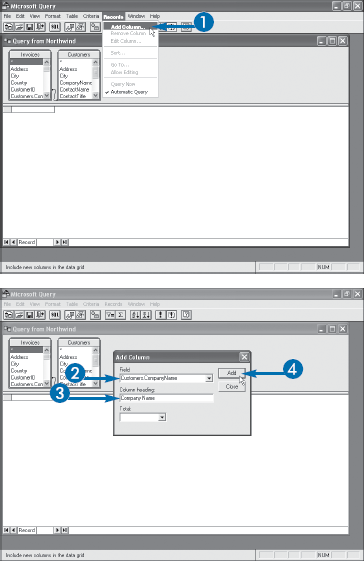
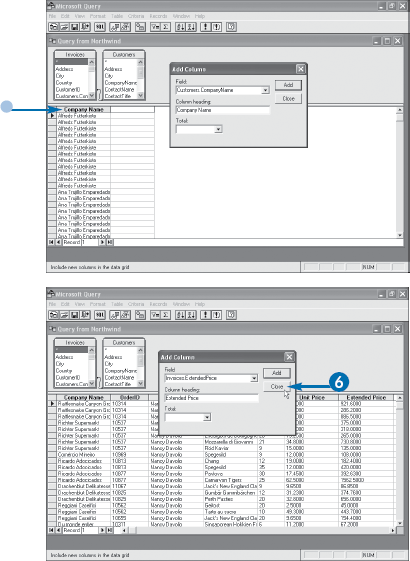
To display records in the query's results pane, you must first add one or more fields to the query.
After you add one or more tables to the query, your next step is to filter the resulting records so that you return to Excel only the data you need for your PivotTable. Filtering the records involves two tasks: specifying the fields you want to work with and specifying the criteria you want to apply to records. This task shows you how to add fields — or columns, as Microsoft Query calls them — to the query. See the next task, "Filter the Records with Query Criteria," to learn how to add criteria to the query.
In the query window's table pane, you see a list for each table in the query. Each list contains an item for each field in the table. At the top of each list, you also see an asterisk (*) item. The asterisk item represents all the fields in the table. So if you know that you want to include in your query every field from a particular table, you can do this easily by adding the asterisk "field" to the query.
As you add fields to the query, Microsoft Query automatically shows the corresponding records in the results pane. If you would rather control the display of the results, click the Auto Query toolbar button (
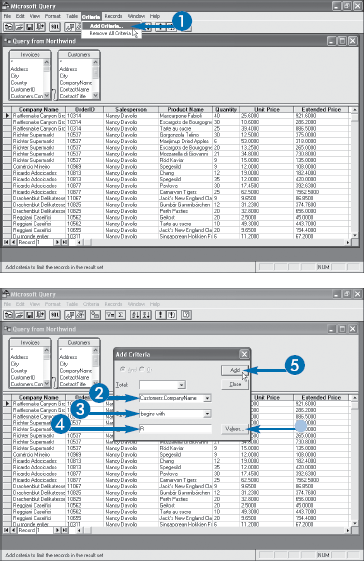
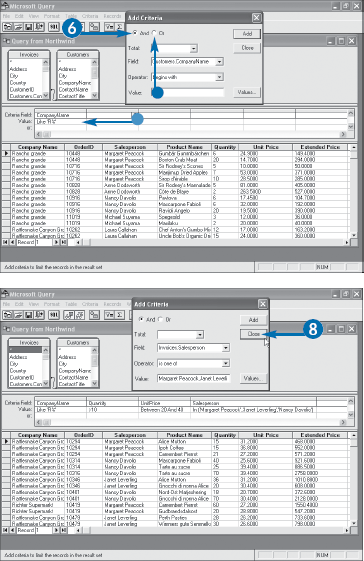
To display specific records that you want to return to Excel for your PivotTable, you must use criteria to filter the records.
After you add your fields to the data grid, your next step is to specify which records you want to include in the results. You can do this by specifying the conditions that each record must meet to be included in the results. If you are working with invoice data, for example, you may only want to see those orders where the customer name begins with R, the order quantity is greater than 10, the unit price is between $10 and $40, and so on.
In each case, you specify a criteria, which is an expression — an operator and one or more values — applied to a specific field. Only those records for which the expression returns a true answer are included in the query results.
You can enter just a single criteria — the plural word is used even if you are talking about just one expression — or you can enter two or more. If you use multiple criteria, you must decide if you want Microsoft Query to include in the results those records that match all the criteria, or those records that match any one of the criteria.
You learned the various criteria operators in the section "Understanding Microsoft Query," earlier in this appendix. Operators such as "equals" and "is one of" are English language equivalents of the actual operators that Microsoft Query uses. These actual operators include the comparison operators (=, <>, >, >=, <, and <=) as well as keywords such as Between x And y, In, and Like. However, if you use the Add Criteria dialog box, as shown in this task, you do not need to use the actual operators directly.
You can sort the query results on one or more fields to get a good look at your data.
If you are using the query results within a PivotTable, it does not matter if the results are sorted, because Excel uses a default ascending alphabetical sort when it displays the unique values from a field in the PivotTable report. However, there are two reasons why you might want to sort the records that appear in Microsoft Query's results pane:
You want to be sure that you are returning the correct records, and the records are often easier to examine if they are sorted.
You are importing the query results to Excel instead of applying them directly to a PivotTable; see Appendix C. In this case, the sort order you apply in Microsoft Query is the order that the records will appear in Excel.
You can sort the records either in ascending order (0 to 9, A to Z) or descending order (Z to A, 9 to 0). You can also sort the records based on more than one field. In this case, Microsoft Query sorts the records using the first field, and then sorts within those results on the second field. For example, in the invoice data, suppose you are sorting first on the OrderID field and then on the Quantity field. Microsoft Query first orders the records by OrderID. Then, within each OrderID value, Microsoft Query sorts the Quantity field values.
The Sort dialog box appears.
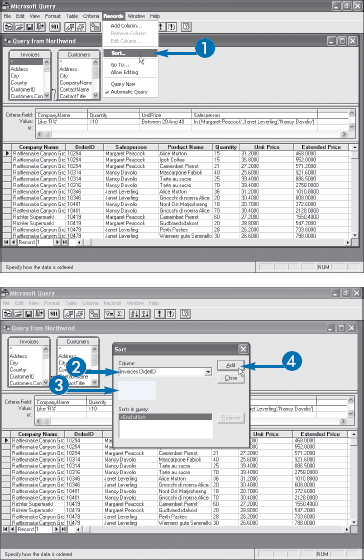
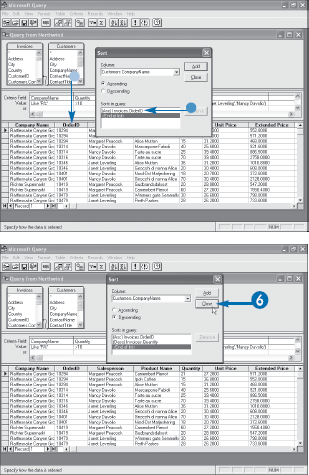
Microsoft Query sorts the records.
Extra
If you only want to sort the query results on a single field, you can perform the sort much faster by using the toolbar. First, in the results pane, click any cell in the field you want to sort. Then click one of the following buttons:
BUTTON | DESCRIPTION |
|---|---|
Sorts the field in ascending order | |
Sorts the field in descending order |
If you want to sort on multiple fields, you can still use the toolbar, but it takes a bit more work. First, organize the fields in the results pane so that all the fields you want to use in the sort are side by side, in the order you want to apply the sort. Click and drag the mouse pointer from the heading of the first sort field to the heading of the last sort field. You should now have all the sort fields selected. Finally, click either sort button,
If you have applied a sort that you no longer want to use, you should remove it from the query. Click Records→Sort to display the Sort dialog box. In the "Sort in query" list, click the sort that you want to delete, and then click Remove.
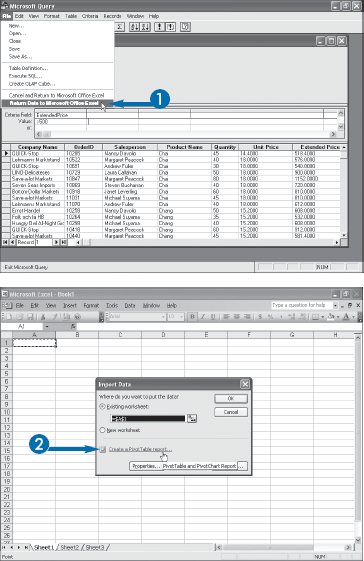
After you finish adding fields to the query, filtering the data using criteria, and sorting the data, you are ready to return the results to Excel for use in your PivotTable.
Microsoft Query is just a helper application, so the data that resides in the query results does not really "exist" anywhere. To manipulate or analyze that data, you must store it in a different application. In your case, you are interested in using the query results as the source data for a PivotTable report. Therefore, you need to return the query results to Excel, and then start a new PivotTable based on those results.
If you think you will reuse the query at a later date, you should save the query before returning the results. See the tip on the next page to learn how to save and open Microsoft Query files.