
![]()
SportsStore: A RESTful Application
In the previous chapter, I laid the foundation for the SportsStore application by creating the Product and Order repository and setting up ASP.NET Identity for user management. In this chapter, I build on that foundation to define the web services that will drive the SportsStore application.
Creating a RESTful Web Service
In Chapter 5, I created the data model and repository and populated the repository with data. I also set up ASP.NET Identity so that I can authenticate and authorize users. These two building blocks create the foundation on which I can build a Web API web service.
When using Web API, it is a simple task to create a RESTful web service. Web API uses controllers, just like the MVC framework, but the action methods return C# data objects rather than Razor views. In fact, getting started with Web API is so simple that you will be forgiven for wondering why I have written such a large book about the topic. The reason is simple: getting started is easy, but creating a truly useful web service requires more effort and a greater understanding of how Web API really works.
To demonstrate how easy it is to get up and running, I right-clicked the Controllers folder, selected Add ![]() Controller from the pop-up menu, selected the Web API 2 Controller – Empty template, and clicked the Add button. I then set the name of the controller to ProductsController and clicked the Add button. Visual Studio has the same approach to templates for Web API controllers as it does for its MVC framework counterparts, and the Empty template contains just the basic controller definition, as shown in Listing 6-1.
Controller from the pop-up menu, selected the Web API 2 Controller – Empty template, and clicked the Add button. I then set the name of the controller to ProductsController and clicked the Add button. Visual Studio has the same approach to templates for Web API controllers as it does for its MVC framework counterparts, and the Empty template contains just the basic controller definition, as shown in Listing 6-1.
![]() Tip The convention for naming Web API controllers is to prefix the word Controller with the plural form of the model class that the web service will expose. My web service will operate on Product objects, so I have created the ProductsController class.
Tip The convention for naming Web API controllers is to prefix the word Controller with the plural form of the model class that the web service will expose. My web service will operate on Product objects, so I have created the ProductsController class.
Listing 6-1. The Contents of the ProductsController.cs File
using System;
using System.Collections.Generic;
using System.Linq;
using System.Net;
using System.Net.Http;
using System.Web.Http;

namespace SportsStore.Controllers {

    public class ProductsController : ApiController {

    }
}
There are two important namespaces in Web API development: System.Net.Http and System.Web.Http. Web API relies on an abstract model of HTTP requests and responses that is defined in System.Net.Http. The classes from this namespace that you will work with most often are HttpRequestMessage and HttpResponseMessage, which are used to represent an HTTP request from the client and the response that will be sent in return. I describe these classes in Chapter 9, and you will see them used throughout this book as I dig into the details of how requests are dispatched.
The most important namespace, however, is System.Web.Http, which is where the Web API classes are defined. One of the most important classes in this namespace is ApiController, which is the standard base class for creating Web API controllers and provides support for features such as action methods, model binding, and validation and error handling. I describe all of these features (and the classes contained in the System.Web.Http namespace and its children) in later chapters, but for now I am going to use another ApiController feature: the RESTful action method naming convention. Listing 6-2 shows the changes I made to the Products controller to create a RESTful web service that provides access to the Product model objects in the repository.
Listing 6-2. Adding RESTful Action Methods in the ProductsController.cs File
using System;
using System.Collections.Generic;
using System.Linq;
using System.Net;
using System.Net.Http;
using System.Web.Http;
using SportsStore.Models;
using System.Threading.Tasks;

namespace SportsStore.Controllers {

    public class ProductsController : ApiController {

        public ProductsController() {
            Repository = new ProductRepository();
        }

        public IEnumerable<Product> GetProducts() {
            return Repository.Products;
        }

        public Product GetProduct(int id) {
            return Repository.Products.Where(p => p.Id == id).FirstOrDefault();
        }

        public async Task PostProduct(Product product) {
            await Repository.SaveProductAsync(product);
        }

        public async Task DeleteProduct(int id) {
            await Repository.DeleteProductAsync(id);
        }

        private IRepository Repository { get; set; }
    }
}
With just a few lines of code, I am able to define a working RESTful web service that exposes the product repository and its contents over HTTP requests. This is just a starting point, but Web API development is a rewarding experience because you get a solid foundation so quickly.
Testing the Products Web Service
To make sure that the controller is working, start the application by selecting Start Debugging from the Visual Studio Debug menu, and use the browser to request the following URL:
http://localhost:6100/api/products/2Enter the URL as though you were requesting a regular web page. I explain the full API that the Products web service supports in the next section, but this simple test will ensure that Web API is receiving requests and dispatching them correctly.
![]() Tip There will be a short pause between making the first request using Postman after you start the application. This is because I configured the product database so that its contents and schema are regenerated when the application is initialized in Chapter 5. I change this setting to make the data persistent in Chapter 8, but for the moment it is helpful to be able to reset the database so that the results that I show will match the ones that you receive.
Tip There will be a short pause between making the first request using Postman after you start the application. This is because I configured the product database so that its contents and schema are regenerated when the application is initialized in Chapter 5. I change this setting to make the data persistent in Chapter 8, but for the moment it is helpful to be able to reset the database so that the results that I show will match the ones that you receive.
If everything is working correctly, then you will see the following response displayed in the browser window:
<Product xmlns:i="http://www.w3.org/2001/XMLSchema-instance"
        xmlns="http://schemas.datacontract.org/2004/07/SportsStore.Models">
    <Category>Watersports</Category>
    <Description>Protective and fashionable</Description>
    <Id>2</Id>
    <Name>Lifejacket</Name>
    <Price>48.95</Price>
</Product>
The response is an XML document that describes the Lifejacket product from the database, whose Id property corresponds to the one I specified in the URL. XML isn’t widely used in modern web applications, and I’ll show you how to change the format Chapter 13.
![]() Tip The simplest way to test basic GET requests is with the browser, but I will be using the Postman client to create more complex requests as I add features to the SportsStore application. See Chapter 1 for details of getting Postman installed and working.
Tip The simplest way to test basic GET requests is with the browser, but I will be using the Postman client to create more complex requests as I add features to the SportsStore application. See Chapter 1 for details of getting Postman installed and working.
Putting the Web Service in Context
Table 6-1 describes the web service API that my Product controller creates. Knowing the effect of the additions in Listing 6-2 will make it easier to understand how key features work in the sections that follow.
Table 6-1. The Web Service API Presented by the Products Controller

Two things should occur to you when so much functionality appears with so little effort. The first is that there must be a lot of work going on behind the scenes. The second thing is to consider what the catch is.
There is a lot going on just out of sight, and the size of this book gives you an indication of just how many features, conventions, and techniques that my simple Product controller relies on to deliver the API shown in the table.
You can get a hint of some of the best Web API features by looking at the action methods I added in Listing 6-2. For example, here is the action method that I tested in the previous section:
...
public Product GetProduct(int id) {
    return Repository.Products.Where(p => p.Id == id).FirstOrDefault();
}
...
Working with Regular C# Objects
The first thing to notice is that I have used regular C# classes throughout the action method. Web API uses a data binding and URL routing processes similar to the MVC framework to extract data values from the request to present as action method parameters. For this action method, URL routing and the binding process are used to extract an int value that is used for the id parameter.
![]() Tip I describe the binding process in Chapters 14 to 17 and Web API routing in Chapters 20 and 21.
Tip I describe the binding process in Chapters 14 to 17 and Web API routing in Chapters 20 and 21.
The result from the action method is also a regular C# class: the Product class in this case. Within the action method, I use LINQ to query the repository and locate a Product that has the desired Id property value and then return the matching object as the method result. Web API takes care of creating an HTTP response that contains a serialized representation of the result object. You saw this serialization process at work when the browser displayed the XML description of the Lifejacket object.
![]() Tip Serialization is handled by a feature called media type formatters, which I describe in Chapters 12 and 13. Media type formatters are also used to bind data values for action method parameters, as I describe in Chapters 14–17. I change the serialization settings for the SportsStore application in the “Configuring Serialization” section.
Tip Serialization is handled by a feature called media type formatters, which I describe in Chapters 12 and 13. Media type formatters are also used to bind data values for action method parameters, as I describe in Chapters 14–17. I change the serialization settings for the SportsStore application in the “Configuring Serialization” section.
The effect of working with regular C# classes is that writing action methods is a simple and natural process, especially when you are exposing the data in a repository and you can map action methods to data operations directly, as I have been able to do in the Products controller.
Using the RESTful Action Method Convention
Web API makes it easy to create RESTful web services by applying a helpful convention when selecting action methods to handle requests: it looks for action methods whose name starts with the request HTTP verb.
I didn’t have to specify the name of the action method in the URL when I made a test request. As a reminder, here is the URL I requested:
http://localhost:6100/api/products/2The URL does specify the name of the controller (/api/products/2) but not the action method. Web API selects the action method by looking at the action methods defined by the controllers and filtering out any whose name doesn’t begin with the request HTTP verb. In the Products controller, there are two candidate action methods for a GET request.
...
public IEnumerable<Product> GetProducts() {
...
and
...
public Product GetProduct(int id) {
...
Web API then looks at the data that has been extracted from the request by the URL routing system and selects the method whose parameters match the data.
![]() Tip Only the start of the action methods names are used to match requests. The convention is to append the model name to the action method, but that is not required.
Tip Only the start of the action methods names are used to match requests. The convention is to append the model name to the action method, but that is not required.
The overall effect is that writing action methods is a natural process that doesn’t require the developer to think about HTTP verbs, serialization, data binding, or any of the other details that are required to process an HTTP request in order to create a response.
The catch—and, of course, there is one—is that I have created a web service that lacks some important features and is far from useful in a real application.
Web API gives you a big rush of initial functionality right at the start of the project, which I love because it helps compensate for the preparation I had to perform in Chapter 5. But going from the basic web service I created in Listing 6-2 to one that is ready for deployment requires more work—and compromises some aspects of the nice features I described in the previous section. As it stands, the web service that I created in Listing 6-2 doesn’t have any security, doesn’t validate data, and doesn’t handle errors, all of which are serious omissions.
Web API provides features to fill in the gaps, but they are not applied by default. I’ll work through the process of completing the web service as I build out the SportsStore application, but it is important to understand that writing the action methods is only the start of the process.
The first thing I am going to change is the way that data model objects are serialized when they are sent to the client. In the previous section, I made a simple GET request with the browser and received a response that contained XML data.
Clients can specify the data formats they are willing to work with in the Accept request header, and Web API will use the formats that are specified to select a serialization format. Web API comes with built-in support for serializing objects to the XML and JSON formats. The reason that I got an XML response is because the Accept header that Google Chrome sends specifies that it will accept any data format, but it would rather receive XML.
There are two ways to change the data format: I can alter the Accept header sent by the client, or I can alter the way that Web API responds to it. Since I don’t have control over the header that Chrome uses, my only option is to reconfigure Web API.
The serialization of data objects so they can be sent to the client is handled by media type formatter classes. Web API comes with some built-in media type formatters and can serialize objects to the XML and JSON data formats by default (although you can add your own data formats, as I explain in Chapter 12).
To disable XML output, I am going to remove the XML media type formatter so that it is no longer used to serialize objects, leaving only the JSON formatter to handle requests.
Listing 6-3 shows the changes that I made to the WebApiConfig.cs file in the App_Start folder to disable XML serialization.
![]() Tip The WebApiConfig.cs file is used to configure Web API rather than the Global.asax.cs file, and the statements that Visual Studio adds by default configure the URL routes that are used to process requests. (I describe the routing configuration for the SportsStore application in the “Preparing the Routing Configuration” section, and I describe Web API URL routing in detail in Chapters 20 and 21.)
Tip The WebApiConfig.cs file is used to configure Web API rather than the Global.asax.cs file, and the statements that Visual Studio adds by default configure the URL routes that are used to process requests. (I describe the routing configuration for the SportsStore application in the “Preparing the Routing Configuration” section, and I describe Web API URL routing in detail in Chapters 20 and 21.)
Listing 6-3. Disabling XML Serialization in the WebApiConfig.cs File
using System;
using System.Collections.Generic;
using System.Linq;
using System.Web.Http;

namespace SportsStore {
    public static class WebApiConfig {
        public static void Register(HttpConfiguration config) {

            config.MapHttpAttributeRoutes();

            config.Routes.MapHttpRoute(
                name: "DefaultApi",
                routeTemplate: "api/{controller}/{id}",
                defaults: new { id = RouteParameter.Optional }
            );

            config.Formatters.Remove(config.Formatters.XmlFormatter);
        }
    }
}
I have added a statement to the Register method, which is called to configure Web API when the application is started. The Register method accepts an instance of the HttpConfiguration class, which provides properties and methods to configure different aspects of the way that Web API works.
The statement I added uses the Formatters property, which returns the collection of media type formatters in the application. This collection also defines convenience properties that allow me to refer to the important built-in properties directly. The XmlFormatter property returns the object that is used to serialize data objects to XML. I read the XmlFormatter property to get a reference to the XML media type formatter and pass it to the Remove property to remove it from the Formatters collection.
![]() Tip Although the WebApiConfig.cs file is used to configure Web API, it is the Global.asax.cs file that initiates that process when the application is hosted by IIS, which is required when MVC 5 and Web API 2 are used in the same application. If you look at the Global.asax.cs file, you will see a call to the GlobalConfiguration.Configure method, which is a static method used to configure Web API. The argument passed to the Configure method is an Action that specifies the configuration will be performed by the WebApiConfig.Register method. In Chapter 10, I explain the role of the GlobalConfiguration class and how Web API is configured in detail.
Tip Although the WebApiConfig.cs file is used to configure Web API, it is the Global.asax.cs file that initiates that process when the application is hosted by IIS, which is required when MVC 5 and Web API 2 are used in the same application. If you look at the Global.asax.cs file, you will see a call to the GlobalConfiguration.Configure method, which is a static method used to configure Web API. The argument passed to the Configure method is an Action that specifies the configuration will be performed by the WebApiConfig.Register method. In Chapter 10, I explain the role of the GlobalConfiguration class and how Web API is configured in detail.
You can see the effect of the statement I added in Listing 6-3 by restarting the application and using the browser to request the http://localhost:6100/api/products/2 URL again. The Accept header that Chrome sends is unchanged, but Web API can no longer use the browser’s preferred data format and will produce JSON data instead, as follows:
{"Id":2,"Name":"Lifejacket",
 "Description":"Protective and fashionable","Price":48.95,"Category":"Watersports"}
This is a representation of the same Product object, but expressed using the JSON format, which has become dominant in the world of HTTP web services.
![]() Tip There are two reasons to remove a media type formatter. The first is that you are not going to support the format and don’t want to have to test the output from your application in, say, JSON and XML. The second reason is that Web API usually selects the right format for each client, but the process by which this is done, known as content negotiation, has some wrinkles that can trap the unwary, resulting in a client receiving data that it doesn’t know how to process. I describe how media type formatters work in Chapter 12 and describe the content negotiation process in Chapter 13.
Tip There are two reasons to remove a media type formatter. The first is that you are not going to support the format and don’t want to have to test the output from your application in, say, JSON and XML. The second reason is that Web API usually selects the right format for each client, but the process by which this is done, known as content negotiation, has some wrinkles that can trap the unwary, resulting in a client receiving data that it doesn’t know how to process. I describe how media type formatters work in Chapter 12 and describe the content negotiation process in Chapter 13.
Adding Basic Data Validation
As it stands at the moment, my web service just assumes that the data it is receiving from the client is valid and can be used to manipulate the repository. To see an example of this, request the following URL using the browser:
http://localhost:6100/api/products/200This request will invoke the GetProduct method and be interpreted as a request for the Product object in the repository whose Id property is set to 200. There is, unfortunately, no such object, and you can see the result displayed by the browser in Figure 6-1.
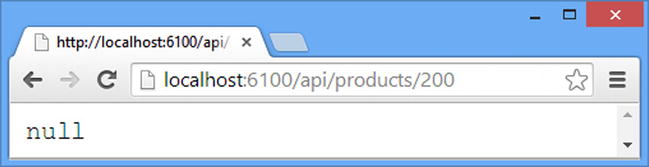
Figure 6-1. The effect of requesting a nonexistent product
The problem is that Web API has no insight into the purpose and implementation of my action method and so has no way to validate that the value for the int parameter refers to a valid Product object. I need to perform the basic validation myself and report an error to the client when there is no match. Listing 6-4 shows the changes that I made to the GetProduct action method.
![]() Tip This is only the most basic kind of validation. I describe the support available for binding more complex values, known as model validation, in the “Adding Model Validation” section.
Tip This is only the most basic kind of validation. I describe the support available for binding more complex values, known as model validation, in the “Adding Model Validation” section.
Listing 6-4. Handling an Error in the ProductsController.cs File
...
public Product GetProduct(int id) {
    Product result = Repository.Products.Where(p => p.Id == id).FirstOrDefault();
    if (result == null) {
        throw new HttpResponseException(HttpStatusCode.BadRequest);
    } else {
        return result;
    }
}
...
I have added a simple check to see whether I am able to retrieve a Product object from the repository. If I am, then I return the Product object as the action method result so that it can be serialized and sent to the client as part of the HTTP response. If there is no matching Product, then I create and throw an instance of the HttpResponseException, which is used to specify that an error occurred and to set the HTTP status code that will be used for the response.
In Web API, HTTP status codes are represented using values from the System.Net.HttpStatusCode enumeration. In this example, I have specified the HttpStatusCode.BadRequest value, which means that the status code for the response will be 400 (Bad Request).
![]() Tip The HttpResponseException class is only one of the ways in which Web API deals with errors. See Chapter 25 for details.
Tip The HttpResponseException class is only one of the ways in which Web API deals with errors. See Chapter 25 for details.
You can see the effect of the exception by restarting the application and using the browser to request the http://localhost:6100/api/products/200 URL. The browser window will be empty, but if you use the browser’s F12 tools to examine the network request, you will see that the web service returned the error response, as shown in Figure 6-2.
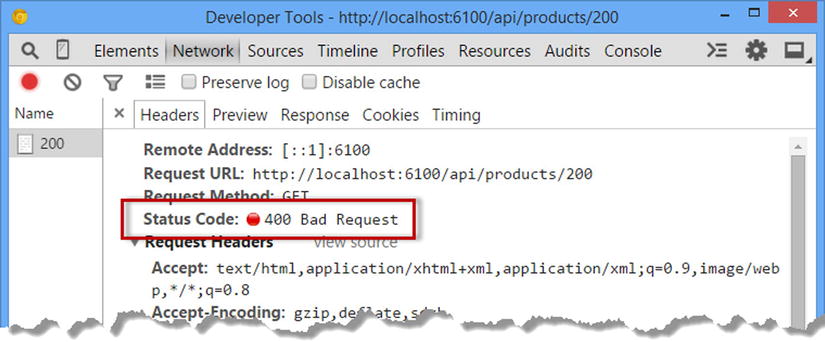
Figure 6-2. The effect of some basic validation
Using Action Results
An alternative approach to using regular C# objects and the HttpResponseException is to use action results, which perform the same function as in the MVC framework and give you greater flexibility in how you structure your action method code. The ApiController class provides a number of convenience methods for creating action results, and I have used two of them in Listing 6-5 to modify the GetProduct action method.
![]() Tip Web API uses a completely different set of namespaces and classes than the MVC framework. Web API action methods implement the IHttpActionResult interface in the System.Web.Http namespace.
Tip Web API uses a completely different set of namespaces and classes than the MVC framework. Web API action methods implement the IHttpActionResult interface in the System.Web.Http namespace.
Listing 6-5. Using Action Results in the ProductsController.cs File
...
public IHttpActionResult GetProduct(int id) {
    Product result = Repository.Products.Where(p => p.Id == id).FirstOrDefault();
    return  result == null
        ? (IHttpActionResult) BadRequest("No Product Found") : Ok(result);
}
...
I have used two of the action result methods that the ApiController class provides. The BadRequest method generates a response with the 400 (Bad Request) status code, and the Ok method generates a 200 (OK) result and serializes its argument.
You can see the effect of the change by starting the application and using the browser to request the http://localhost:6100/api/products/200 URL again. This time, the browser will display some content in the main window, as shown by Figure 6-3.
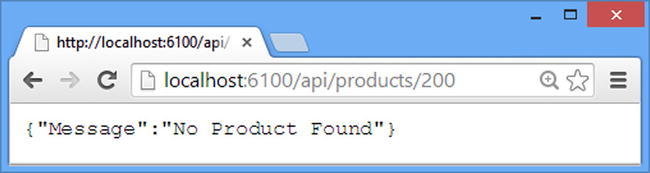
Figure 6-3. A description of an error displayed by the browser
The response contains a JSON-formatted object that has a Message property set to the string I passed to the ApiController.BadRequest method. The Web API error handling process creates an HttpError object to convey information to the client when something goes wrong, and the Message property is intended to be displayed to users. I explain how to use the HttpError class in Chapter 25.
CHOOSING BETWEEN OBJECTS/EXCEPTIONS AND ACTION RESULTS
There is no practical difference in the results generated from action methods that use action methods instead of regular C# objects and the HttpResponseException, and the decision between them is a matter of personal style.
I like the more natural objects and exceptions approach because I like the way it hides the details of the web service and allows me to focus on writing the controller logic, but I generally switch to action results once the web service gets to a certain level of complexity because getting all of the features implemented required embracing, not hiding, the details of HTTP and the requests and responses that a web service details with.
That is just my preference, however, and you are free to develop your own preferences. You can get a long way without needing to even think about action results, so don’t feel you have to adopt them if you prefer working with objects and exceptions.
Securing the Product Web Service
By default, there are no restrictions on who can the access action methods defined by a Web API controller, which means that anyone can use the Products controller to create, modify, and delete objects in the repository.
To demonstrate the problem, I need to use Postman to generate an HTTP request. Using a browser works for GET requests, but Postman can be used for all types of request.
Enter the http://localhost:6100/api/products/2 URL into the main part of the Postman window and select the DELETE option from the drop-down list, as shown in Figure 6-4. (Postman has a rather cluttered interface, so I have highlighted the URL and method list.)
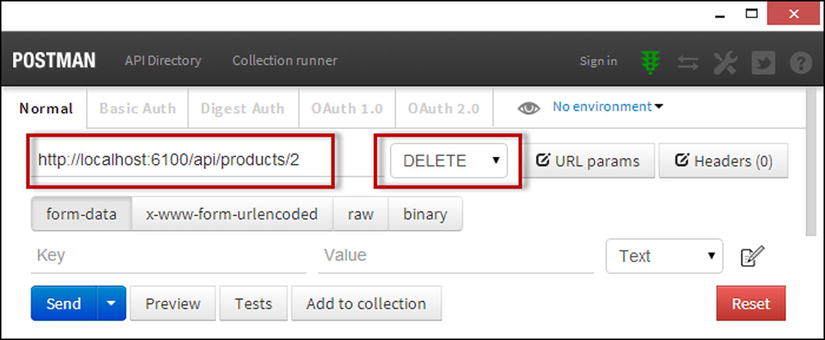
Figure 6-4. Creating an HTTP DELETE request using Postman
Click the blue Send button, and Postman will send an HTTP DELETE request to the URL, which will invoke the DeleteProduct action method. The Product object whose Id property is 2, which is Lifejacket, will be removed from the repository. Postman displays the response from the web service in the area beneath the Send button, as shown in Figure 6-5.
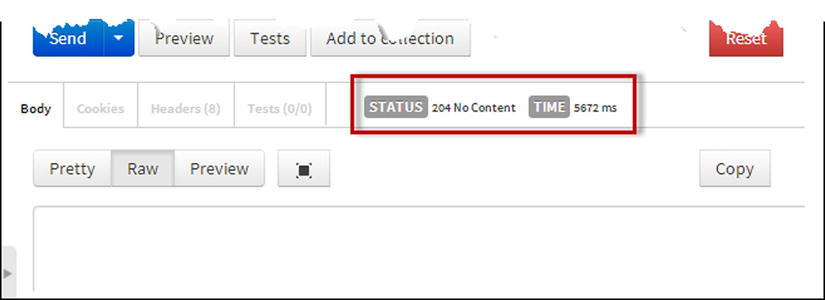
Figure 6-5. Displaying the results of the DELETE request
I have highlighted the part of the interface that displays the response status code, which is 204 (No Content) for this request. This response tells the client that the request was successfully processed but that no data was generated, which is a common way for a web service to handle a request to delete a data object. This is the status code used by Web API for asynchronous action methods that return Task or void synchronous methods. (Another common approach is to return the data object that has been deleted, in which case a 200 [OK] status code would be used.)
![]() Tip Notice that Postman reports that the request in Figure 6-5 took more than five seconds. This is a combination of the amount of time taken for ASP.NET to initialize the application and for the database to be dropped and re-created. Subsequent requests on my system take 127 milliseconds, but the initial request is slower because of the work required to get the application up and running, which is a process that doesn’t start until the first request is received from the client.
Tip Notice that Postman reports that the request in Figure 6-5 took more than five seconds. This is a combination of the amount of time taken for ASP.NET to initialize the application and for the database to be dropped and re-created. Subsequent requests on my system take 127 milliseconds, but the initial request is slower because of the work required to get the application up and running, which is a process that doesn’t start until the first request is received from the client.
You can see the effect of the DELETE request sending a GET request by using Postman to send a GET request to the http://localhost:6100/api/products URL or by using the browser to request the http://localhost:6100/Prep/Index URL, as shown in Figure 6-6. As expected, the Lifejacket product, which has the Id of 2, is no longer in the list.

Figure 6-6. The effect of sending a DELETE request
Restricting Access to Action Method
Having shown that the DeleteProduct action method works and can be invoked by any request, it is time to restrict access so that only authenticated users who have been assigned to the Administrators role that I created using ASP.NET Identity in Chapter 5 can invoke the method. The first step is to apply the Authorize filter to the action method that I want to protect, as shown in Listing 6-6.
Listing 6-6. Applying Authorization in the ProductsController.cs File
...
[Authorize(Roles = "Administrators")]
public async Task DeleteProduct(int id) {
    await Repository.DeleteProductAsync(id);
}
...
Web API filters have the same effect as their counterparts in the MVC framework, which is to add logic into the request handling process that doesn’t belong elsewhere in the components of the MVC pattern, such as logging or security, known as cross-cutting concerns. The Authorize filter prevents action methods from being invoked unless the request has been authenticated and the user associated with the request belongs to one or more specified roles. This is the same way that the MVC framework Authorize filter works, but Web API has its own set of interfaces and classes, and the Authorize attribute shown in the listing does not apply the same class as the filter with the same name applied to an MVC framework action method. I describe the Web API filters and explain how they work in Chapters 23 and 24.
![]() Tip You can also use the Authorize filter to restrict access to individual users, but this is usually a poor strategy because it means you cannot change which users have access without deploying a new version of the application. Using roles means you can assign users in the ASP.NET Identity database and have the changes take effect without needing to write, test, and deploy code.
Tip You can also use the Authorize filter to restrict access to individual users, but this is usually a poor strategy because it means you cannot change which users have access without deploying a new version of the application. Using roles means you can assign users in the ASP.NET Identity database and have the changes take effect without needing to write, test, and deploy code.
To see the effect of the Authorize filter, start the application and resend the DELETE request using Postman. (Postman keeps a history of the requests you have made in a list on the left side of the window, which makes it easy to resend requests.) Rather than the 204 (No Content) success method that was returned in the previous section, the web service now returns a 401 (Unauthorized) response, as illustrated in Figure 6-7. If you request the /Prep/Index URL, you will see that the Lifejacket product remains in the repository and has not been deleted.
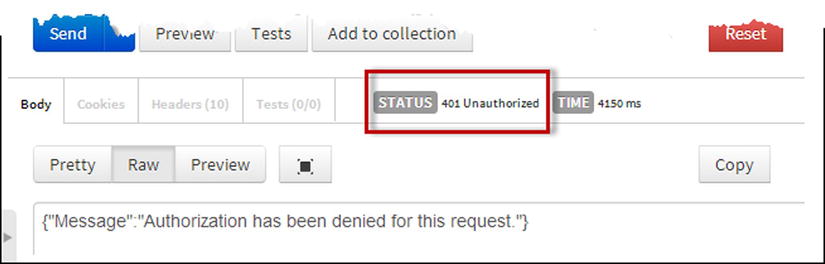
Figure 6-7. The effect of applying authorization to an action method
Authenticating Requests
Restricting access to authorized users is helpful only if there is also a mechanism for those users to authenticate themselves.
Web API lets you choose your own approach to authenticating requests, and in Chapters 23 and 24, I show you how to create a custom implementation of HTTP basic authentication. Basic authentication is a rudimentary system that is safe only over SSL connections and that requires the client to provide the name and password of the user for every request, but it provides a nice demonstration of how you can integrate authentication into a Web API application.
More broadly, authentication for web services is something of a Wild West, with no unified approach for sending credentials to authenticate a user or subsequently identifying authenticated requests. Some web service platforms rely on cookies, others use headers, and some rely on both, but even when two platforms use the same basic approach, there is substantial variation in the implementation detail.
The most common approach to authentication requests in Web API is to use ASP.NET Identity, which I configured in Chapter 5. Authenticating users with ASP.NET Identity requires a specifically formatted request, but once the initial authentication has been performed, subsequent requests are identified as being authenticated by setting the standard HTTP Authorization header or an authentication cookie, using a value that is provided in the initial request. I’ll demonstrate the requests that are required—and the responses they produce—as I define the authentication functionality in the sections that follow.
![]() Caution The integration of ASP.NET Identity into ASP.NET Web API is something of a mess because Microsoft is trying to make Identity operate in both the old world of the traditional ASP.NET platform and the new world of OWIN and wider hosting options (which I describe in Chapter 26). Getting authentication to work through a web service requires some ugly code, which I show you in the listings that follow but don’t explain in depth. My advice is to use the code in the listings—which you can download from Apress.com—verbatim in your own projects and avoid digging to the detail of Identity until it has been more smoothly integrated with Web API.
Caution The integration of ASP.NET Identity into ASP.NET Web API is something of a mess because Microsoft is trying to make Identity operate in both the old world of the traditional ASP.NET platform and the new world of OWIN and wider hosting options (which I describe in Chapter 26). Getting authentication to work through a web service requires some ugly code, which I show you in the listings that follow but don’t explain in depth. My advice is to use the code in the listings—which you can download from Apress.com—verbatim in your own projects and avoid digging to the detail of Identity until it has been more smoothly integrated with Web API.
Defining the Authentication Provider
ASP.NET Identity is an extensible user-management framework that can be used to implement any authentication mechanism. Oddly, however, there is no built-in support for authenticating users against the credentials stored in the database that I created in Chapter 5. This means the first step in setting up authentication is to implement a provider class that will authenticate the user based on the username and password and generate the cookie used to identity subsequent requests from the client. Listing 6-7 shows the contents of the StoreAuthProvider.cs file, which I added to the Infrastructure/Identity folder.
Listing 6-7. The Contents of the StoreAuthProvider.cs File
using System.Security.Claims;
using System.Threading.Tasks;
using Microsoft.AspNet.Identity;
using Microsoft.Owin.Security;
using Microsoft.Owin.Security.OAuth;

namespace SportsStore.Infrastructure.Identity {
    public class StoreAuthProvider : OAuthAuthorizationServerProvider {

        public override async Task GrantResourceOwnerCredentials(
                OAuthGrantResourceOwnerCredentialsContext context) {

            StoreUserManager storeUserMgr =
                context.OwinContext.Get<StoreUserManager>("AspNet.Identity.Owin:"
                    + typeof(StoreUserManager).AssemblyQualifiedName);

            StoreUser user = await storeUserMgr.FindAsync(context.UserName,
                context.Password);
            if (user == null) {
                context.SetError("invalid_grant",
                    "The username or password is incorrect");
            } else {
                ClaimsIdentity ident = await storeUserMgr.CreateIdentityAsync(user,
                        "Custom");
                AuthenticationTicket ticket
                    = new AuthenticationTicket(ident, new AuthenticationProperties());
                context.Validated(ticket);
                context.Request.Context.Authentication.SignIn(ident);
            }
        }

        public override Task ValidateClientAuthentication(
                OAuthValidateClientAuthenticationContext context) {
            context.Validated();
            return Task.FromResult<object>(null);
        }
    }
}
The authentication provider is derived from the OAuthAuthorizationServerProvider class and overrides the ValidateClientAuthentication and GrantResourceOwnerCredentials methods.
The ValidateClientAuthentication method is called to check whether the client is allowed to perform authentication, which I accept by calling the Validated method on the context object passed as the method parameter. (I allow any client to perform validation because I care only about usernames and passwords in the SportsStore application.)
The GrantResourceOwnerCredentials method is called to authenticate the user, and the context parameter provides access to the username and password provided by the user. I follow the same basic approach that I used for the SignIn method in the Prep controller in Chapter 5 and use the user manager class to check the username and password that I have received and to add a cookie to the response if they are valid.
Using ASP.NET Identity in a web service requires some configuration statements in the IdentityConfig.cs file, in addition to the ones that I needed to perform authentication through an MVC framework controller in Chapter 5. Listing 6-8 shows the statements that I added to configure Identity to use the provider class I created in the previous section and to set up authentication as part of the Web API request handling process.
Listing 6-8. Configuring ASP.NET Identity to Work with Web API in the IdentityConfig.cs File
using Owin;
using Microsoft.Owin;
using Microsoft.AspNet.Identity;
using Microsoft.Owin.Security.Cookies;
using SportsStore.Infrastructure.Identity;
using System;
using Microsoft.Owin.Security.OAuth;

[assembly: OwinStartup(typeof(SportsStore.IdentityConfig))]

namespace SportsStore {
    public class IdentityConfig {

        public void Configuration(IAppBuilder app) {

            app.CreatePerOwinContext<StoreIdentityDbContext>(
                StoreIdentityDbContext.Create);
            app.CreatePerOwinContext<StoreUserManager>(StoreUserManager.Create);
            app.CreatePerOwinContext<StoreRoleManager>(StoreRoleManager.Create);

            //app.UseCookieAuthentication(new CookieAuthenticationOptions {
            //    AuthenticationType = DefaultAuthenticationTypes.ApplicationCookie
            //});

            app.UseOAuthBearerTokens(new OAuthAuthorizationServerOptions {
                Provider = new StoreAuthProvider(),
                AllowInsecureHttp = true,
                TokenEndpointPath = new PathString("/Authenticate")
            });
        }
    }
}
I have set three configuration properties that control the way that requests are authenticated. The Provider property specifies the object that will authenticate the user, which is in this case an instance of the StoreAuthProvider class that I defined in Listing 6-7.
![]() Tip There are many configuration options for authentication—too many for me to describe in this book. See http://msdn.microsoft.com/en-us/library/microsoft.owin.security.oauth.oauthauthorizationserveroptions(v=vs.113).aspx for the full list.
Tip There are many configuration options for authentication—too many for me to describe in this book. See http://msdn.microsoft.com/en-us/library/microsoft.owin.security.oauth.oauthauthorizationserveroptions(v=vs.113).aspx for the full list.
Setting the AllowInsecureHttp property to true allows authentication to be performed for any HTTP request rather than the default behavior, which is to support only SSL requests.
The final property—TokenEndpointPath—specifies a URL that will be used to receive and process authentication requests. I have specified /Authenticate, which means that clients will send their authentication requests to http://localhost:6100/authenticate, as I demonstrate in the next section.
The process for testing authentication is cumbersome because I am going to create the requests that I need using Postman. I’ll write the JavaScript code that will handle authentication in Chapter 7, but I want to focus on just the web service in this chapter. First I am going to show you what happens when authentication is attempted with invalid credentials and then with valid ones.
Set the Postman request URL to http://localhost:6100/authenticate and select the POST verb from the drop-down list. When you select POST, a set of buttons will appear that allow the encoding style for the data in the request to be selected; click the x-www-form-urlencoded button.
Beneath the buttons are spaces for Key and Value. As you start typing in one of the spaces, a new line will appear beneath so that you can enter multiple values. Enter the key/value data shown in Table 6-2.
Table 6-2. The Key Value Data Required for an Authentication Request
Key | Value |
|---|---|
grant_type | password |
username | Bob |
password | secret |
The grant_type entry specifies what type of authentication is being requested, and the username and password entries specify the credentials to be validated. I have specified the username Bob, which is invalid because I only created an Admin user in Chapter 5. Figure 6-8 shows how Postman should look before performing the authentication request.
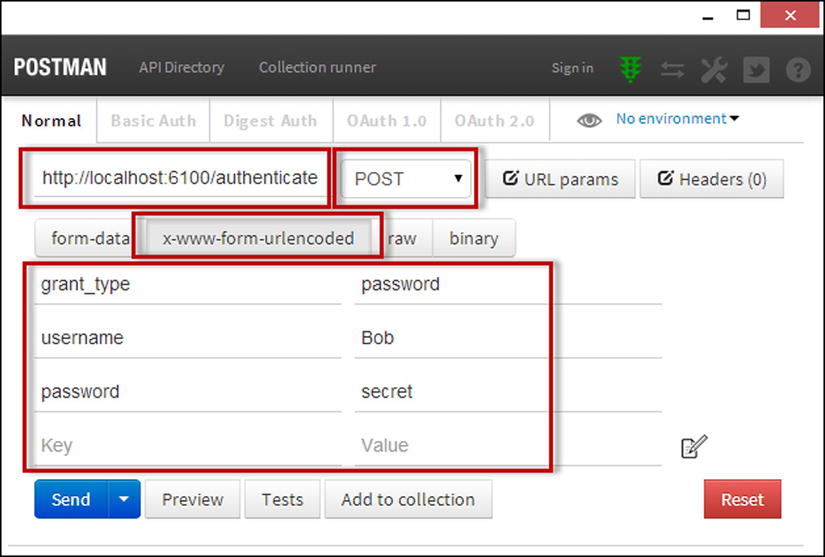
Figure 6-8. Creating an authentication request using Postman
Click the Send button when you have configured the request. Postman will show that the response had the 400 (Bad Request) status code and contained the following JSON data:
{"error":"invalid_grant","error_description":"The username or password is incorrect"}![]() Tip A common cause of confusion is the response code for a failed authentication code. Many developers expect to receive a 401 (Unauthorized), but that is sent only when accessing a restricted URL without being authenticated or authorized.
Tip A common cause of confusion is the response code for a failed authentication code. Many developers expect to receive a 401 (Unauthorized), but that is sent only when accessing a restricted URL without being authenticated or authorized.
To make a successful authentication request, change the username value to Admin while leaving all of the other values as they are and click the Send button. This time the credentials are valid, and you will receive a 200 (OK) response. The data returned by the web service will look like this:
{"access_token":"vJwc8Aj2r2nt0NxtO1uhL7YOc66vMS1fsUfYvvQuZ76X-SQxxRLdaECj1Dnu0BpbVi
    ExwX9TEdQQ-4A3d4BSlz8HCOp5nhPaveLifLaflAmj1NGv8KDef0azJBWCgFs2E3IiAGs-qLrXzR
    _9iZyW1W3cdbo6vP6Wdzc5KVoB4y2ihA6qdVbOkREkCjgxtBbH7rz26kbE4xTddPAeIqsJPtgSTM
    XeT4X-WlgW_QAwul3AER_52nmA8UEu7uBBz1YWAEtfl-MYEEkMa2hwN-aPz91mypaYSb4-SlWAqr
    -OY73iv1GTxcEn11h0GE4YDCZZ4DJ5i1YiYeGF5GYQPPnLghWMOBH5nEGlsZTb7ee9M3SSAgYQZw
    k1y8f8k8tDR9DuEniJTSessK2V_8AqTjleDhOkGStzzD5Je_pz30CP9UZMwsH3yyBpOS-XoXzgO-
    jcyMsYguIf0D_dT9Qp2gBrkuoSaAvlu8_bVAERL1rwZERtoKVkoMCxKxdFgnnKLOaU",
 "token_type":"bearer",
 "expires_in":1199}
This is a JSON-formatted object that contains the result of the successful authentication request. You will see a different access_token value because this is the string that will uniquely identify subsequent requests as being authenticated without having to send the username and password each time.
To make an authenticated request, follow these steps in Postman:
- Copy the value of the access_token property from the results. It is important to get just the value without the opening and closing quotes or any other part of the response.
- Click the Reset button to reset the Postman request settings.
- Set the request URL to http://localhost:6100/api/products/2.
- Select the DELETE verb from the drop-down list.
- Click the Headers button (which is to the right of the verb list).
- Enter Authorization into the header area.
- Set the value to bearer followed by a space and then the value of the access_token from the authentication request. (The value bearer is taken from the token_type property in the response.)
Postman should look like Figure 6-9 when you have finished configuring the request, and I have highlighted the important changes that have to be made.
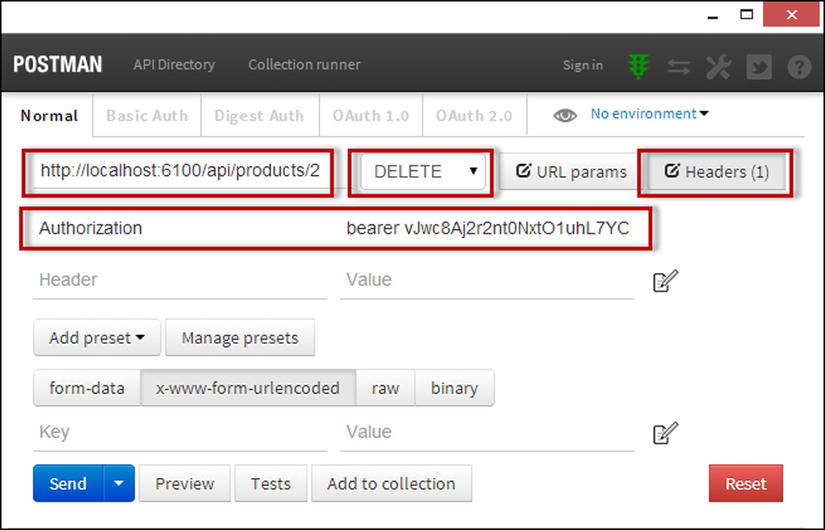
Figure 6-9. Configuring an authenticated DELETE request
Click the Send button, and you should receive a 204 (No Content) response. You can check the contents of the repository by using the browser to request the /Prep/Index URL, and if everything has worked correctly, then there should be no Lifejacket product in the list.
![]() Tip If you don’t get the expected result, then the most likely cause is a problem with the access_token value, which is long and difficult to manipulate. Make sure you have not missed any characters or added any extra when copying the value. The access_token value is valid for only 20 minutes by default, so if you are having problems, take care to repeat the authentication request to get a new access_token value every now and again.
Tip If you don’t get the expected result, then the most likely cause is a problem with the access_token value, which is long and difficult to manipulate. Make sure you have not missed any characters or added any extra when copying the value. The access_token value is valid for only 20 minutes by default, so if you are having problems, take care to repeat the authentication request to get a new access_token value every now and again.
This is an undeniably awkward process, but it demonstrates the two-stage approach required for web service authentication. The process is somewhat easier to handle when using jQuery to make Ajax requests, as I demonstrate in Chapter 7.
![]() Tip ASP.NET Identity can also be configured to use cookies for authentication, which means you don’t need to set the Authorization header. I am using the header approach because it lets me have more control over the authentication process for the SportsStore application, as you will see in Chapter 6, which makes demonstrating the functionality simpler. I disabled the cookie support in Chapter 5, but you can leave it enabled it in your own applications. I also demonstrate the cookie-based approach in Pro ASP.NET MVC 5 Platform, which is published by Apress.
Tip ASP.NET Identity can also be configured to use cookies for authentication, which means you don’t need to set the Authorization header. I am using the header approach because it lets me have more control over the authentication process for the SportsStore application, as you will see in Chapter 6, which makes demonstrating the functionality simpler. I disabled the cookie support in Chapter 5, but you can leave it enabled it in your own applications. I also demonstrate the cookie-based approach in Pro ASP.NET MVC 5 Platform, which is published by Apress.
Web API works on a best-efforts approach when it comes to creating the objects that are passed as arguments to action methods, and it won’t complain if there more or less data than is required to create the objects that the action methods require. Web API also doesn’t have any insight into the meaning of the properties that model classes define, which means it is easy to send requests that create objects that don’t make sense. As a simple example, Web API won’t prevent a negative value from being assigned to the Price property of a Product object in the SportsStore application because it doesn’t have any knowledge of what that property means in the context of the application.
To demonstrate the problem, I am going to use Postman to modify one of the products in the database. Here are the steps that I followed to create the request:
- Click the Reset button.
- Set the request URL to http://localhost:6100/api/products/1.
- Select the POST verb from the drop-down list.
- Ensure the x-www-form-urlencoded button is selected.
- Enter the key/value pairs shown in Table 6-3.
Table 6-3. The Key Value Pairs for a POST Request
Key | Value |
|---|---|
Id | 1 |
Price | -100 |
When you have configured the request, Postman should resemble Figure 6-10.
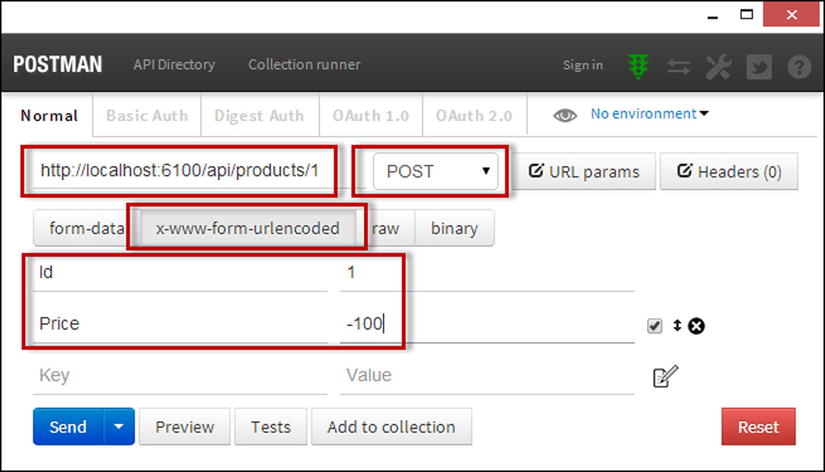
Figure 6-10. Configuring a POST request in Postman
Click the Send button to send the request to the web service. The response will be a 204 (No Content) response that indicates success (but does not require the web service to send the client any data), and you can see the changes to the data in the repository by using the browser to display the /Prep/Index URL, as shown in Figure 6-11.
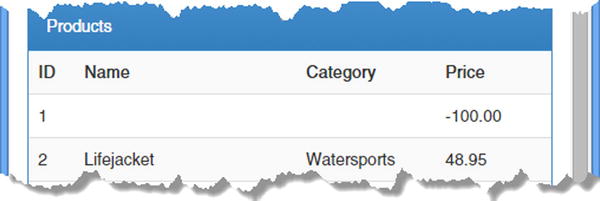
Figure 6-11. The effect of an unvalidated request
Applying Validation Attributes
I added some simple validation to the GetProduct method earlier in the chapter, but Web API supports a sophisticated validation feature that shares a lot of common features with the one you will have used in the MVC framework, based on the application of validation attributes to model objects. Listing 6-9 shows the additions I have made to the Product class to prevent poor-quality data from being added to the database.
Listing 6-9. Applying Validation to the Product.cs File
using System.ComponentModel.DataAnnotations;

namespace SportsStore.Models {

    public class Product {
        public int Id { get; set; }
        [Required]
        public string Name { get; set; }
        [Required]
        public string Description { get; set; }
        [Required]
        [Range(1, 100000)]
        public decimal Price { get; set; }
        [Required]
        public string Category { get; set; }
    }
}
I describe the attributes in detail in Chapter 18, but the ones I have applied to the Product class require the client to provide values for the Name, Description, Price, and Category properties and limit the value of the Price attribute so that it is between 1 and 100,000. This is a pretty simple set of validation attributes, but it is enough to demonstrate the model validation mechanism and to prevent the kind of problem that I demonstrated in the previous section.
Validating the Model
The final step is to check that the model object passed to the action method is valid, which is done through the ModelState property defined by the ApiController class. I describe the model validation process and classes in detail in Chapter 18, but in Listing 6-10 you can see how I assess the validity of the object through the IsValid property.
Listing 6-10. Validating a Model in the ProductsController.cs File
...
public async Task<IHttpActionResult> PostProduct(Product product) {
    if (ModelState.IsValid) {
        await Repository.SaveProductAsync(product);
        return Ok();
    } else {
        return BadRequest(ModelState);
    }
}
...
I have changed the action method so that it returns an IHttpActionResult (although since this is an async method, the result type is Task<IHttpActionResult>, as I explained in Chapter 3). If the value of the ModelState.IsValid property is true, then I know that the data sent by the client has passed the validation tests defined by the attributes I applied in Listing 6-9 and that I can safely store the object in the repository.
If the IsValue property is false, then I know that there is a problem with the data that the client has sent and that one or more properties have failed to pass its validation test. I call the BadRequest convenience method to generate a 400 (Bad Request) response. I pass the value returned by the ModelState property to the BadRequest method, which has the effect of sending the client details of which properties are problematic and why.
![]() Tip I describe the model state in Chapter 18 and the different ways in which errors can be handled in Chapter 25. I list all of the convenience methods defined by the ApiController for creating action method results in Chapter 11.
Tip I describe the model state in Chapter 18 and the different ways in which errors can be handled in Chapter 25. I list all of the convenience methods defined by the ApiController for creating action method results in Chapter 11.
To see the effect of the validation, start the application and use Postman to resend the POST request I defined at the start of this section. Postman will display the 400 (Bad Request) status code and show the following data, which the web service includes in the response:
{"Message":"The request is invalid.",
 "ModelState":{ "product.Name":["The Name field is required."],
     "product.Description":["The Description field is required."],
     "product.Price":["The field Price must be between 1 and 100000."],
     "product.Category":["The Category field is required."]
    }
}
The data sent to the client provides information about each property, but, as I explain in Chapter 25, this data doesn’t follow any widely accepted standard, and the client has to have prior knowledge that the web service will send this kind of data when there is a validation problem.
Adding Simple Dependency Injection
Dependency injection (DI) is a contentious topic, and either you love the idea and apply it relentlessly to your applications or you hate it entirely and resent the imposition of a pattern that you neither like nor value. (And I really do mean hate. You should see some of the e-mails I get on this topic).
If you are reading this book, then you have already made up your mind because you have built applications using the MVC framework. If you are a DI hater, then you can avert your eyes and move on to the next section in which I create another Web API controller (although be warned that I return to the topic of DI again in Chapter 10). If you are interested in DI, then I am going use this section to create a simple custom resolver that will allow me to decouple the ProductController class from the ProductRepository implementation of the IRepository interface.
Recapping the Problem
The problem I am trying to solve is that the constructor of the Product controller directly instantiates the ProductRepository class so that the action methods in the controller have access to an implementation of the IRepository interface.
...
public ProductsController() {
    Repository = new ProductRepository();
}
...
Tightly coupled components are hard to test because I can’t readily separate the behavior of the ProductController class from the ProductRepository class. A loosely coupled approach would allow the ProductController class to obtain an implementation of the IRepository interface without needing to specify which implementation is used. This allows me to change the IRepository implementation without having to also change the ProductController class, and that makes testing and maintenance simpler.
Creating the Dependency Resolver
I show you how to use the Ninject package to perform DI in Web API in Chapter 10, but in this chapter I am going to create a custom resolver that will create instances of the ProductResolver class to service requests for the IRepository interface. This is a small fraction of the functionality that a real DI package like Ninject offers, but it is enough to get the SportsStore application up and running and to demonstrate some useful Web API functionality. I started by adding a class file called CustomResolver.cs to the Infrastructure folder and using it to define the class shown in Listing 6-11.
Listing 6-11. The Contents of the CustomResolver.cs File
using System;
using System.Collections.Generic;
using System.Linq;
using System.Web.Http.Dependencies;
using SportsStore.Models;

namespace SportsStore.Infrastructure {
    public class CustomResolver : IDependencyResolver, IDependencyScope {

        public object GetService(Type serviceType) {
            return serviceType == typeof(IRepository)
                ? new ProductRepository()
                : null;
        }

        public IEnumerable<object> GetServices(Type serviceType) {
            return Enumerable.Empty<object>();
        }

        public IDependencyScope BeginScope() {
            return this;
        }

        public void Dispose() {
            // do nothing - not required
        }
    }
}
Web API uses two interfaces to resolve dependencies: IDependencyResolver and IDependencyScope. I explain the role and purpose of these interfaces in Chapter 10, but for this chapter it is enough to know that the GetService method will be called when Web API needs to get instances of most types, including implementation of the IRepository interface. If this is the type that is required, then I return a new instance of the ProductRepository class. For all other types, I return null, which tells Web API to use its default behavior to create instances of the types it requires. The default behavior is to invoke a public parameterless constructor.
Registering the Dependency Resolver
I have to tell Web API that I want it to use the resolver, which I do in the WebApiConfig.cs file, as shown in Listing 6-12. (I explain more about the Web API configuration options in Chapter 10.)
Listing 6-12. Registering a Dependency Resolver in the WebApiConfig.cs File
using System;
using System.Collections.Generic;
using System.Linq;
using System.Web.Http;
using SportsStore.Infrastructure;

namespace SportsStore {
    public static class WebApiConfig {
        public static void Register(HttpConfiguration config) {

            config.MapHttpAttributeRoutes();

            config.Routes.MapHttpRoute(
                name: "DefaultApi",
                routeTemplate: "api/{controller}/{id}",
                defaults: new { id = RouteParameter.Optional }
            );

            config.Formatters.Remove(config.Formatters.XmlFormatter);
            config.DependencyResolver = new CustomResolver();
        }
    }
}
Using the Dependency Resolver in the Controller Class
My dependency resolver is simple and requires the constructor of the Product controller to explicitly request an implementation of the IRepository interface. Real dependency injection packages, such as Ninject (which I demonstrate in Chapter 10), will use reflection to inspect classes and resolve dependencies automatically, which is a more elegant approach. Even so, my simple resolver provides enough functionality for me to decouple the ProductController and ProductRepository classes, as shown in Listing 6-13.
Listing 6-13. Using a Dependency Resolver in the ProductController.cs File
using System;
using System.Collections.Generic;
using System.Linq;
using System.Net;
using System.Net.Http;
using System.Web.Http;
using SportsStore.Models;
using System.Threading.Tasks;

namespace SportsStore.Controllers {

    public class ProductsController : ApiController {

        public ProductsController() {
            Repository = (IRepository)GlobalConfiguration.Configuration.
                DependencyResolver.GetService(typeof(IRepository));
        }

        public IEnumerable<Product> GetProducts() {
            return Repository.Products;
        }

        public IHttpActionResult GetProduct(int id) {
            Product result = Repository.Products.Where(p => p.Id == id).FirstOrDefault();
            return  result == null
                ? (IHttpActionResult) BadRequest("No Product Found") : Ok(result);
        }

        public async Task<IHttpActionResult> PostProduct(Product product) {
            if (ModelState.IsValid) {
                await Repository.SaveProductAsync(product);
                return Ok();
            } else {
                return BadRequest(ModelState);
            }
        }

        [Authorize(Roles = "Administrators")]
        public async Task DeleteProduct(int id) {
            await Repository.DeleteProductAsync(id);
        }

        private IRepository Repository { get; set; }
    }
}
This slightly awkward statement accesses the runtime configuration objects to get an implementation of the IDependencyResolver interface and uses it to get an implementation of the IRepository interface. The result is that the ProductController class is not tightly coupled to the ProductRepository interface and can be more readily tested and maintained.
Creating a Non-RESTful Web Service
To finish this chapter, I am going to create a Web API controller that will provide access to the Order and OrderLine objects in the repository. The controller that I created to serve requests for Product objects followed the Web API naming convention for a RESTful web service, but that is an optional pattern, and it is perfectly possible—and reasonable—to create non-RESTful web services, and this is what I will do in this section.
Preparing the Routing Configuration
The URL routing system is responsible for matching requests in order to extract data and select the controller that will generate the response for the client. The default Web API configuration doesn’t deal with action method names because the assumption is that you will follow the RESTful naming convention, so the first task is to add a new route that will match requests for my non-RESTful controller and extract both the controller and action method names from the URL, as illustrated in Listing 6-14.
![]() Tip I describe the Web API URL routing features in detail in Chapters 20 and 21.
Tip I describe the Web API URL routing features in detail in Chapters 20 and 21.
Listing 6-14. Defining a New Route in the WebApiConfig.cs File
using System;
using System.Collections.Generic;
using System.Linq;
using System.Web.Http;
using SportsStore.Infrastructure;

namespace SportsStore {
    public static class WebApiConfig {
        public static void Register(HttpConfiguration config) {

            config.MapHttpAttributeRoutes();

            config.Routes.MapHttpRoute(
                name: "OrdersRoute",
                routeTemplate: "nonrest/{controller}/{action}/{id}",
                defaults: new { id = RouteParameter.Optional }
            );

            config.Routes.MapHttpRoute(
                name: "DefaultApi",
                routeTemplate: "api/{controller}/{id}",
                defaults: new { id = RouteParameter.Optional }
            );

            config.Formatters.Remove(config.Formatters.XmlFormatter);

            config.DependencyResolver = new CustomResolver();
        }
    }
}
To avoid routes being matched to the wrong kind of controller (RESTful and non-RESTful), I have defined a route with a separate prefix: nonrest. This allows me to continue to send requests to target RESTful controllers using URLs prefixed with api without the route for non-RESTful controllers getting in the way (I explain this problem in detail in Chapter 22).
To prepare the Order and OrderLine classes, I have applied attributes for validation, as shown in Listing 6-15.
Listing 6-15. Applying Attributes in the Order.cs File
using System.Collections.Generic;
using System.ComponentModel.DataAnnotations;
using System.Web.Http;

namespace SportsStore.Models {
    public class Order {
        [HttpBindNever]
        public int Id { get; set; }
        [Required]
        public string Customer { get; set; }
        [Required]
        [HttpBindNever]
        public decimal TotalCost { get; set; }
        public ICollection<OrderLine> Lines { get; set; }
    }

    public class OrderLine {
        [HttpBindNever]
        public int Id { get; set; }
        [Required]
        [Range(0, 100)]
        public int Count { get; set; }
        [Required]
        public int ProductId { get; set; }
        [HttpBindNever]
        public int OrderId { get; set; }

        [HttpBindNever]
        public Product Product { get; set; }
        [HttpBindNever]
        public Order Order { get; set; }
    }
}
The Required and Range attributes have the same effect as when I applied them to the Product class, ensuring that the request contains a value for a property and limiting the acceptable set of values for that property.
I have also used the HttpBindNever attribute, which prevents Web API from assigning a value to a property from the request. This ensures I don’t get unexpected or undesired behavior by accepting request values for properties that I need to set in the application. The best example is the Order.TotalPrice property: I don’t want the client to be able to set the total price of the order because it won’t take long for an ambitious customer to create an order for all of the SportsStore products in stock and pay only a dollar for them.
There is a circular reference in the relationship between the Order and OrderLine classes: an Order has a collection of OrderLine objects, each of which contains a reference back to the Order. This is a problem for the standard serialization process, which will report an error when it finds such a loop. To prevent this from being a problem, I need to change the behavior of the class responsible for serializing objects into JSON so that it simply ignores circular references, rather than throws an error. Listing 6-16 shows the configuration statement that I added to the WebApiConfig.cs file.
Listing 6-16. Disabling Errors for Circular References in the WebApiConfig.cs File
using System;
using System.Collections.Generic;
using System.Linq;
using System.Web.Http;
using SportsStore.Infrastructure;

namespace SportsStore {
    public static class WebApiConfig {
        public static void Register(HttpConfiguration config) {

            config.MapHttpAttributeRoutes();

            config.Routes.MapHttpRoute(
                name: "OrdersRoute",
                routeTemplate: "nonrest/{controller}/{action}/{id}",
                defaults: new { id = RouteParameter.Optional }
            );

            config.Routes.MapHttpRoute(
                name: "DefaultApi",
                routeTemplate: "api/{controller}/{id}",
                defaults: new { id = RouteParameter.Optional }
            );

            config.Formatters.Remove(config.Formatters.XmlFormatter);
            config.DependencyResolver = new CustomResolver();

            GlobalConfiguration.Configuration.Formatters.JsonFormatter
                .SerializerSettings.ReferenceLoopHandling =
             Newtonsoft.Json.ReferenceLoopHandling.Ignore;
        }
    }
}
JSON serialization is handled by the Json.NET package, and this statement that I added to the WebApiConfig.cs file sets a configuration property defined by that code. I explain some of the other configuration options that Json.Net provides for serialization in Chapter 13.
Defining the Web API Controller
The final step is to define the controller itself. I added a class file called OrdersController.cs to the Controllers folder and used it to define the class shown in Listing 6-17.
Listing 6-17. The Contents of the OrdersController.cs File
using System.Collections.Generic;
using System.Linq;
using System.Threading.Tasks;
using System.Web.Http;
using SportsStore.Models;

namespace SportsStore.Controllers {
    public class OrdersController : ApiController {

        public OrdersController() {
            Repository = (IRepository)GlobalConfiguration.Configuration
                .DependencyResolver.GetService(typeof(IRepository));
        }

        [HttpGet]
        [Authorize(Roles="Administrators")]
        public IEnumerable<Order> List() {
            return Repository.Orders;
        }

        [HttpPost]
        public async Task<IHttpActionResult> CreateOrder(Order order) {
            if (ModelState.IsValid) {

                IDictionary<int, Product> products = Repository.Products
                    .Where(p => order.Lines.Select(ol => ol.ProductId)
                        .Any(id => id == p.Id)).ToDictionary(p => p.Id);

                order.TotalCost = order.Lines.Sum(ol =>
                    ol.Count * products[ol.ProductId].Price);

                await Repository.SaveOrderAsync(order);
                return Ok();
            } else {
                return BadRequest(ModelState);
            }
        }

        [HttpDelete]
        [Authorize(Roles = "Administrators")]
        public async Task DeleteOrder(int id) {
            await Repository.DeleteOrderAsync(id);
        }

        private IRepository Repository { get; set; }
    }
}
The Orders controller defines three action methods: List, CreateOrder, and DeleteOrder. These names don’t provide Web API with information about which HTTP verbs each will accept, so I have to apply attributes to specify them. In the listing, I have used the HttpGet, HttpPost, and HttpDelete attributes, but Web API provides a wider range of verb attributes, as I describe in Chapter 22.
The only other point of note for this controller is the LINQ that I use to set the Order.TotalPrice property in the CreateOrder action method. I applied the HttpBindNever attribute to this property in Listing 6-15, which means that no value will be taken from the request when the Order parameter for the action method is created. That means I am responsible for determining the value of the order, which I have done using two LINQ statements.
Completing the Product Controller
Before moving on, I need to make a final change to the Product controller, which is to apply the Authorize attribute to the PostProduct action method. I didn’t do this earlier because I wanted to demonstrate how to apply model validation without needing to deal with the authentication process. Now that all of the web service features are in place, I can apply the Authorize attribute so that only users assigned to the Administrators role are able to create or modify products, as shown in Listing 6-18.
Listing 6-18. Applying Authorization to the PostProduct Action in the ProductsController.cs File
using System;
using System.Collections.Generic;
using System.Linq;
using System.Net;
using System.Net.Http;
using System.Web.Http;
using SportsStore.Models;
using System.Threading.Tasks;

namespace SportsStore.Controllers {

    public class ProductsController : ApiController {

        public ProductsController() {
            Repository = (IRepository)GlobalConfiguration.Configuration.
                DependencyResolver.GetService(typeof(IRepository));
        }

        public IEnumerable<Product> GetProducts() {
            return Repository.Products;
        }

        public IHttpActionResult GetProduct(int id) {
            Product result = Repository.Products.Where(p => p.Id == id).FirstOrDefault();
            return result == null
                ? (IHttpActionResult)BadRequest("No Product Found") : Ok(result);
        }

        [Authorize(Roles = "Administrators")]
        public async Task<IHttpActionResult> PostProduct(Product product) {
            if (ModelState.IsValid) {
                await Repository.SaveProductAsync(product);
                return Ok();
            } else {
                return BadRequest(ModelState);
            }
        }

        [Authorize(Roles = "Administrators")]
        public async Task DeleteProduct(int id) {
            await Repository.DeleteProductAsync(id);
        }

        private IRepository Repository { get; set; }
    }
}
Summary
In this chapter, I created the two Web API controllers that define the HTTP web services for the SportsStore application. I started with a simple RESTful controller that services requests for Product objects and gradually added layers of functionality, such as authentication, data validation, and dependency injection. I finished the chapter by showing you how to create a non-RESTful controller, which I will use to service requests for Order objects. In the next chapter, I create the single-page applications that deliver the SportsStore application to customers and administrators.