
![]()
Essential Techniques
As I explained in Chapter 1, this book is targeted at MVC framework developers, which means you already know C# and key components such as Razor and action results. In this chapter, I provide a quick primer for three topics that you may not be as familiar with: using C# async methods, making Ajax requests using jQuery, and using the Knockout library. Understanding all three will help you get the most from this book.
Asynchronous methods are important in Web API development, especially once you go beyond creating action methods and start to customize the way that requests are processed using the techniques I describe in Part 3 of this book.
jQuery and Knockout are not part of Web API, but I use them throughout this book to create client applications that demonstrate different kinds of interactions with web services that I create using Web API. jQuery and Knockout are both packages with a rich range of functionality, but I describe only the features that I use in examples.
Preparing the Example Project
For this chapter, I created a new Visual Studio project by following the same process that I used in Chapter 2 and that I use throughout this book. Select New Project from the File menu to open the New Project dialog window, and locate the ASP.NET Web Application template in the Visual C# ![]() Web section. Set the name of the project to Primer, as shown in Figure 3-1.
Web section. Set the name of the project to Primer, as shown in Figure 3-1.
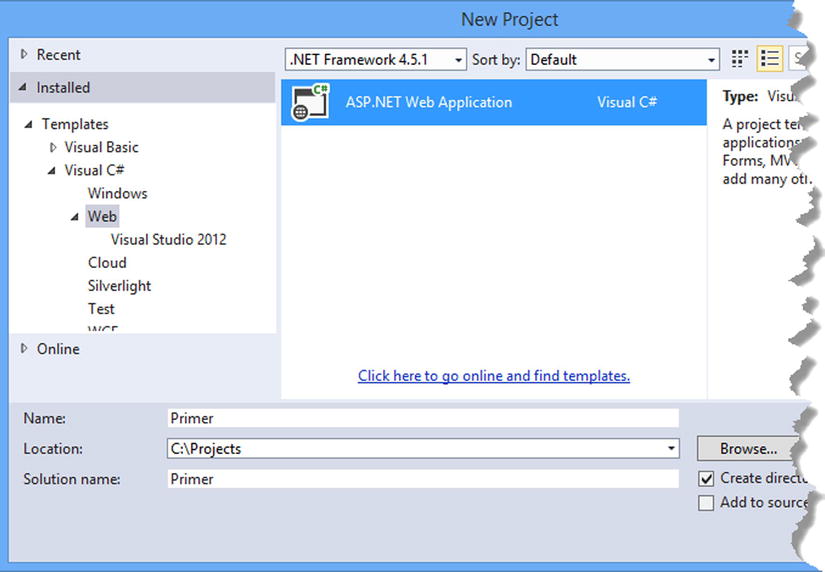
Figure 3-1. Creating the Primer project
Click the OK button to move to the New ASP.NET Project dialog window. Ensure that the Empty option is selected and check the MVC and Web API core references options, as shown in Figure 3-2. Click the OK button, and Visual Studio will create the project.
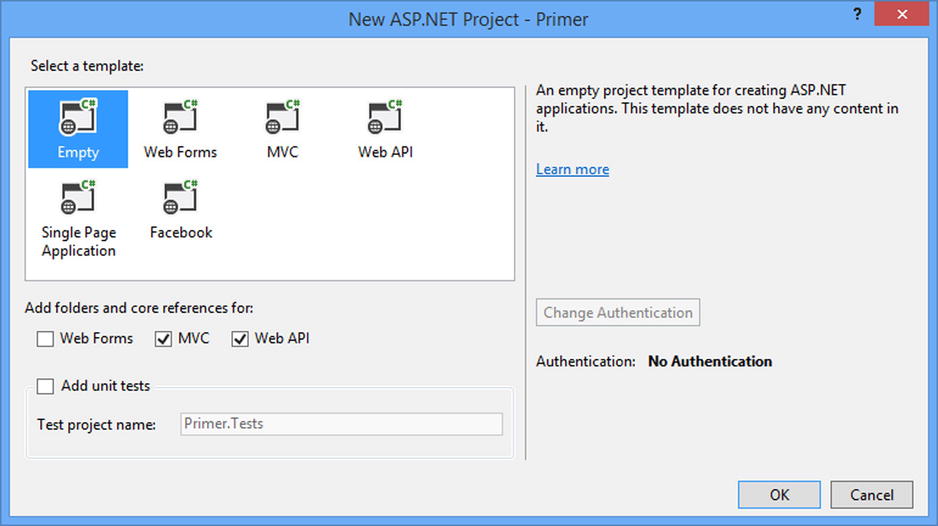
Figure 3-2. Selecting the ASP.NET project type
Adding and Updating NuGet Packages
Select Package Manager Console from the Visual Studio Tools ![]() NuGet Package Manager menu and enter the following commands to update the MVC and Web API packages and install the jQuery Bootstrap and Knockout packages:
NuGet Package Manager menu and enter the following commands to update the MVC and Web API packages and install the jQuery Bootstrap and Knockout packages:
Update-Package microsoft.aspnet.mvc -version 5.1.1
Update-Package microsoft.aspnet.webapi -version 5.1.1
Update-Package Newtonsoft.json -version 6.0.1
Install-Package jquery -version 2.1.0
Install-Package bootstrap -version 3.1.1
Install-Package knockoutjs –version 3.1.0
Creating the Web API Controller
I need a simple web service for this chapter, which means creating a Web API controller class. The controller I create in this chapter is basic, rather like the one I created in Chapter 2, and it exists only so I can demonstrate essential techniques. You can see a more complete example in Chapter 6, when I create a more realistic Web API application, and I explain how controllers fit into Web API in Chapter 22.
To create the controller, right-click the Controllers folder and select Add ![]() Controller from the pop-up menu. Select Web API 2 Controller – Empty from the list of controller types, as shown in Figure 3-3.
Controller from the pop-up menu. Select Web API 2 Controller – Empty from the list of controller types, as shown in Figure 3-3.

Figure 3-3. Adding a Web API controller
Click the Add button once you have selected the type, set the name of the new controller to PageSizeController, and click the Add button to create the Controllers/PageSizeController.cs file. Listing 3-1 shows the action method I added to the controller.
Listing 3-1. Adding an Action Method to the PageSizeController.cs File
using System.Net;
using System.Web.Http;
using System.Diagnostics;

namespace Primer.Controllers {

    public class PageSizeController : ApiController {
        private static string TargetUrl = "http://apress.com";

        public long GetPageSize() {
            WebClient wc = new WebClient();
            Stopwatch sw = Stopwatch.StartNew();
            byte[] apressData = wc.DownloadData(TargetUrl);
            Debug.WriteLine("Elapsed ms: {0}", sw.ElapsedMilliseconds);
            return apressData.LongLength;
        }
    }
}
The action method is called GetPageSize, and it makes HTTP requests for the Apress home page and returns the number of bytes returned. I use the Stopwatch class from the System.Diagnostics namespace to measure how long the requests take and use the Debug class to write out the duration to the Visual Studio Output window.
![]() Tip Getting the number of bytes returned by a URL isn’t something you will often need in a real project, but it is a helpful demonstration of a task that can be performed synchronously and asynchronously without requiring me to write any code beyond the Web API controller. If you are keen to see a more realistic example, then skip ahead to Chapter 5, where I begin the development of the SportsStore application.
Tip Getting the number of bytes returned by a URL isn’t something you will often need in a real project, but it is a helpful demonstration of a task that can be performed synchronously and asynchronously without requiring me to write any code beyond the Web API controller. If you are keen to see a more realistic example, then skip ahead to Chapter 5, where I begin the development of the SportsStore application.
Creating the MVC Framework Controller
I will be using the MVC framework to deliver HTML and JavaScript to the browser so that I can explain how to send Ajax requests back to the web service and use Knockout to respond to the data that is received. To create an MVC controller, right-click the Controllers folder and select Add ![]() Controller from the pop-up menu. Figure 3-4 shows the options that Visual Studio presents for creating controllers for both MVC and Web API.
Controller from the pop-up menu. Figure 3-4 shows the options that Visual Studio presents for creating controllers for both MVC and Web API.

Figure 3-4. Selecting a controller type
Select the MVC 5 Controller – Empty option from the list, click the Add button, and set the name to HomeController, as shown in Figure 3-5.
Figure 3-5. Creating an MVC controller
Clicking the Add button creates the Controllers/HomeController.cs file, the contents of which are shown in Listing 3-2.
Listing 3-2. The Contents of the HomeController.cs File
using System.Web.Mvc;

namespace Primer.Controllers {
    public class HomeController : Controller {

        public ActionResult Index() {
            return View();
        }
    }
}
The only action method is Index, which renders the default view. To create the view, right-click the action method in the code editor and select Add View from the pop-up menu. Ensure that the View Name field is set to Index and click the Add button to create the Views/Home/Index.cshtml file. Replace the contents of the file so they match Listing 3-3.
Listing 3-3. The Contents of the Index.cshtml File
@{ Layout = null;}
<!DOCTYPE html>
<html>
<head>
    <meta charset="utf-8" />
    <meta name="viewport" content="width=device-width, initial-scale=1.0">
    <title>Primer</title>
    <script src="~/Scripts/jquery-2.1.0.min.js"></script>
    <script src="~/Scripts/knockout-3.1.0.js"></script>
    <link href="~/Content/bootstrap.css" rel="stylesheet" />
    <link href="~/Content/bootstrap-theme.css" rel="stylesheet" />
</head>
<body>
    <h2>Content will be added here</h2>
</body>
</html>
The view contains script elements for jQuery and Knockout and link elements for the Bootstrap files. I have left a placeholder within the body element that I will replace when I start to demonstrate client-side features later in the chapter.
Setting the Port and Start URL
The final preparations I need to make specify the TCP port that will be used to receive requests and the initial URL that will be passed to the browser when the project is started, just as I did in Chapter 2. Select Primer Properties from the Visual Studio Project menu and click Web to open the settings for ASP.NET projects.
Enable the Specific Page option and enter Home/Index into the field. On the same page, change the value shown in the Project Url field to http://localhost:38000/ and click the Create Virtual Directory button.
The first change prevents Visual Studio from trying to work out what URL should be shown when the application first starts based on the file you edited most recently, and the second change means that requests will be received on TCP port 38000.
Testing the Web Service
Start the application by selecting Start Debugging from the Visual Studio Debug menu. Ignore the browser window that is opened; I will not add any useful content to the view until the “Making Ajax Requests with jQuery” section.
Instead, start the Postman client (which I described in Chapter 1 and used in Chapter 2) and send a GET request to the following URL:
http://localhost:38000/api/pagesizeThe default behavior for the Web API controller is to use the HTTP verb to select the action method, and the GET request will target GetPageSize. The action method will request the content from Apress.com and return the number of bytes received, as shown in Figure 3-6.
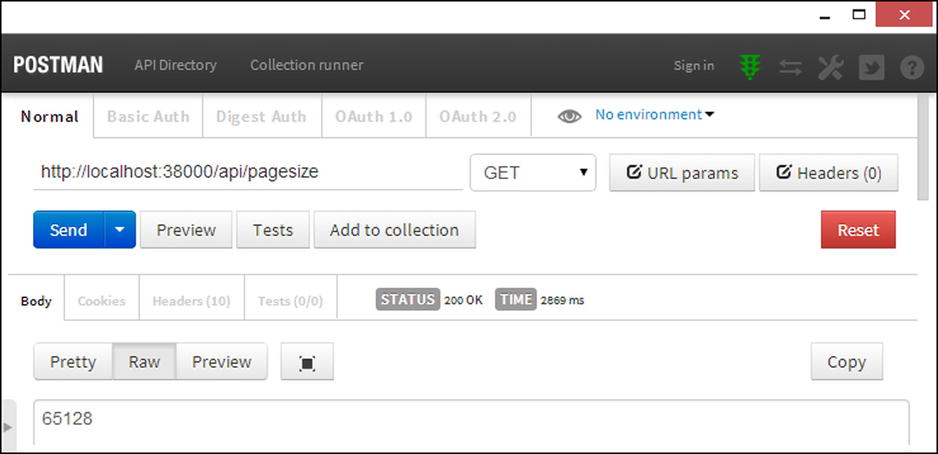
Figure 3-6. Testing the Web API web service
![]() Note The Apress web site changes often to reflect new releases and special offers. The number of bytes you receive is likely to be different from the result I show here.
Note The Apress web site changes often to reflect new releases and special offers. The number of bytes you receive is likely to be different from the result I show here.
Understanding Asynchronous Methods
Asynchronous methods have been part of ASP.NET for a while, but as something of an afterthought. Web API adopts asynchronous methods throughout its API. They are optional in controllers, but many of the classes that customize the way that Web API processes requests define only asynchronous methods.
Asynchronous methods are one of the most misunderstood aspects of web application development. In the sections that follow, I’ll explain the benefit they offer, dispel a commonly held misconception, and demonstrate the patterns you will need to deal with asynchronous methods in Web API.
Understanding the Problem Asynchronous Methods Solve
When writing action methods—or any part of a web application—the natural tendency is to think about the path that a single request follows through the code. In the case of the GetPageSize action method in the PageSize controller, the path is simple: a request arrives at the action method, I make a request to the remote web server, and 500 milliseconds later, I get the data I need and can return the result, as illustrated by Figure 3-7. (The actual elapsed time will differ, but I am going to assume a constant 500 milliseconds.)

Figure 3-7. The request path for the GetPageSize action
The handler that is processing the request has nothing to do except wait during the 500 milliseconds it takes for the action method to send the HTTP request to Apress.com and receive the response.
This isn’t a problem when you are thinking about only one request, but it causes problems for the overall application. Imagine that the PageSize controller is being run in a web application server that processes only one request at a time and that all of the requests target the GetPageSize action method. In such a situation, the server can process two incoming client requests a second, as shown in Figure 3-8.
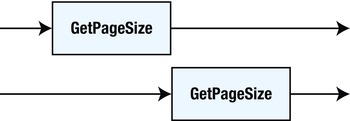
Figure 3-8. The request sequence
![]() Tip An application server that handles only one request at a time isn’t as unlikely as it may seem, as the success of Node.js has demonstrated.
Tip An application server that handles only one request at a time isn’t as unlikely as it may seem, as the success of Node.js has demonstrated.
The handler can start processing a request only when it has finished processing the previous one, and for the majority of the time, the handler is sitting idle. The problem isn’t the work that the action method is performing—it is the way that the handler and the action method work together.
The solution is to perform the request to Apress.com asynchronously, which frees up the handler to process other incoming client requests instead of waiting for the Apress.com response. Listing 3-4 shows the application of the async and await keywords to the GetPageSize action method.
Listing 3-4. Creating an Asynchronous Action Method in the PageSizeController.cs File
using System.Net;
using System.Web.Http;
using System.Diagnostics;
using System.Threading.Tasks;

namespace Primer.Controllers {

    public class PageSizeController : ApiController {
        private static string TargetUrl = "http://apress.com";

        public async Task<long> GetPageSize() {
            WebClient wc = new WebClient();
            Stopwatch sw = Stopwatch.StartNew();
            byte[] apressData = await wc.DownloadDataTaskAsync(TargetUrl);
            Debug.WriteLine("Elapsed ms: {0}", sw.ElapsedMilliseconds);
            return apressData.LongLength;
        }
    }
}
The async keyword is applied to the method definition, and the result is changed to a Task<long>, which means a Task object that will yield a long value when it completes. Within the action method, I have used an asynchronous implementation of the method that gets the HTTP data, and I apply the await keyword to indicate that this is an asynchronous operation and that the statements that follow can be packaged up by the complier to generate the Task<long> result required as the method result.
This arrangement doesn’t change the work that the action method performs, but it does mean that the handler is free to handle other client requests while the action method is waiting for the response from Apress.com. Figure 3-9 illustrates the effect.
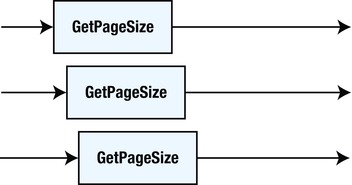
Figure 3-9. The effect of an asynchronous action method
Instead of waiting for the action method as it waits for Apress.com , the handler can process the next request or process the results when Apress.com responds.
Using asynchronous methods increases the overall throughput of the web application, but it can degrade the performance for each individual request. This is because there is only one handler, and it is now responsible for managing several concurrent requests. In the synchronous model, the handler was able to deal with the result from the action method immediately because it had been waiting for it to arrive, but in the asynchronous model, the handler may be doing something else and not be available to process the result immediately. Or, put another way, asynchronous methods increase the overall performance of the application by reducing the performance of individual requests.
![]() Tip The amount of delay will depend on how the application server is configured and what kind of requests are being processed—and, of course, how many handlers are available to process those requests (because single-handler servers are great for describing theory but are not often used in ASP.NET projects).
Tip The amount of delay will depend on how the application server is configured and what kind of requests are being processed—and, of course, how many handlers are available to process those requests (because single-handler servers are great for describing theory but are not often used in ASP.NET projects).
Implementing an Asynchronous Interface
You can choose between asynchronous and synchronous action methods in Web API controllers, but once you start using some of the advanced features, you will need to implement interfaces that are written explicitly for asynchronous execution. As an example, I created a folder called Infrastructure and added to it a class file called ICustomController.cs that I used to define the interface shown in Listing 3-5.
Listing 3-5. The Contents of the ICustomController.cs File
using System.Threading;
using System.Threading.Tasks;

namespace Primer.Infrastructure {
    public interface ICustomController {

        Task<long> GetPageSize(CancellationToken cToken);
    }
}
You will see this pattern of interface method a lot in Part 3 of this book, when I describe the end-to-end dispatch process: a return type of Task or Task<T> and a CancellationToken parameter. In the sections that follow, I’ll show you how to deal with some common patterns of asynchronous method you will need to write.
If the method you are going to write calls another asynchronous method, then you can use the async and await keywords, just as I did in Listing 3-4 and receive the CancellationToken parameter, as shown in Listing 3-6.
Listing 3-6. Implementing the Interface in the PageSizeController.cs File
using System.Net;
using System.Web.Http;
using System.Diagnostics;
using System.Threading.Tasks;
using Primer.Infrastructure;
using System.Threading;

namespace Primer.Controllers {

    public class PageSizeController : ApiController, ICustomController {
        private static string TargetUrl = "http://apress.com";

        public async Task<long> GetPageSize(CancellationToken cToken) {
            WebClient wc = new WebClient();
            Stopwatch sw = Stopwatch.StartNew();
            byte[] apressData = await wc.DownloadDataTaskAsync(TargetUrl);
            Debug.WriteLine("Elapsed ms: {0}", sw.ElapsedMilliseconds);
            return apressData.LongLength;
        }
    }
}
I come back to the CancellationToken parameter in the next section, but implementing the Web API asynchronous interface pattern is simple when you are relying on other asynchronous methods to do your work, something that is often the case in action methods that access services like the Entity Framework and ASP.NET Identity, both of which I use in Chapter 5 when I prepare for the more realistic SportsStore application.
![]() Tip If you define a CancellationToken parameter on an action method, Web API will provide one for you that is triggered when the request is terminated.
Tip If you define a CancellationToken parameter on an action method, Web API will provide one for you that is triggered when the request is terminated.
Not all methods can use this approach, however, either because they are going to perform the work directly or because the implementation of the method is so simple that the overhead of creating and managing Task objects does not justify the benefit of freeing the handler to process other requests. In the sections that follow, I show you how to handle the most common scenarios you are likely to encounter.
![]() Note I don’t go into detail about what is happening behind the scenes in this chapter. If you want more information about .NET asynchronous programming, then see my Pro .NET 4 Parallel Programming in C# book or Pro Asynchronous Programming with .NET, written by Richard Blewett and Andrew Clymer. Both books are published by Apress.
Note I don’t go into detail about what is happening behind the scenes in this chapter. If you want more information about .NET asynchronous programming, then see my Pro .NET 4 Parallel Programming in C# book or Pro Asynchronous Programming with .NET, written by Richard Blewett and Andrew Clymer. Both books are published by Apress.
Dealing with Cancellation
The CancellationToken parameter is used to signal when the request has been cancelled. You can ignore cancellation in your asynchronous methods, but it is good practice to stop the work you are performing if you can, not least because you know that the result you produce is going to be discarded. In Listing 3-7, I have changed the implementation of the GetPageSize method in the PageSize controller so that it does more work and monitors its cancellation token.
Listing 3-7. Using a Cancellation Token in the PageSizeController.cs File
using System.Net;
using System.Web.Http;
using System.Diagnostics;
using System.Threading.Tasks;
using Primer.Infrastructure;
using System.Threading;
using System.Collections.Generic;
using System.Linq;

namespace Primer.Controllers {

    public class PageSizeController : ApiController, ICustomController {
        private static string TargetUrl = "http://apress.com";

        public async Task<long> GetPageSize(CancellationToken cToken) {
            WebClient wc = new WebClient();
            Stopwatch sw = Stopwatch.StartNew();

            List<long> results = new List<long>();

            for (int i = 0; i < 10; i++) {
                if (!cToken.IsCancellationRequested) {
                    Debug.WriteLine("Making Request: {0}", i);
                    byte[] apressData = await wc.DownloadDataTaskAsync(TargetUrl);
                    results.Add(apressData.LongLength);
                } else {
                    Debug.WriteLine("Cancelled");
                    return 0;
                }
            }

            Debug.WriteLine("Elapsed ms: {0}", sw.ElapsedMilliseconds);
            return (long)results.Average();
        }
    }
}
This implementation gets the content from the Apress web site ten times and averages the result. (Ignore the fact that there is unlikely to be any variation between requests.) Before I send each request to Apress.com, I check the value of the CancellationToken.IsCancellationRequested property to see whether the request has been cancelled. If it has been cancelled, I know that the request has been terminated and do not perform any further work. I return zero as the result from the method, although I could have returned any value from the method because it will be discarded.
![]() Tip Use the browser to test request cancellation by requesting the URL http://localhost:38000/api/pagesize and then clicking the Cancel button. Don’t use Postman because the current version as I write this doesn’t terminate the HTTP request when its Cancel button is clicked—and this means that the Web API application will not trigger the cancellation token and all ten requests to Apress.com will be performed.
Tip Use the browser to test request cancellation by requesting the URL http://localhost:38000/api/pagesize and then clicking the Cancel button. Don’t use Postman because the current version as I write this doesn’t terminate the HTTP request when its Cancel button is clicked—and this means that the Web API application will not trigger the cancellation token and all ten requests to Apress.com will be performed.
Creating a Self-Contained Asynchronous Method Body
A common scenario in Web API development is where you have a series of synchronous statements that you want to execute asynchronously. This is done by creating and starting a Task that wraps around the statements you need to execute and return the Task as the result from the method, as shown in Listing 3-8.
Listing 3-8. Creating a Task in the PageSizeController.cs File
using System.Net;
using System.Web.Http;
using System.Diagnostics;
using System.Threading.Tasks;
using Primer.Infrastructure;
using System.Threading;
using System.Collections.Generic;
using System.Linq;

namespace Primer.Controllers {

    public class PageSizeController : ApiController, ICustomController {
        private static string TargetUrl = "http://apress.com";

        public Task<long> GetPageSize(CancellationToken cToken) {

            return Task<long>.Factory.StartNew(() => {
                WebClient wc = new WebClient();
                Stopwatch sw = Stopwatch.StartNew();

                List<long> results = new List<long>();

                for (int i = 0; i < 10; i++) {
                    if (!cToken.IsCancellationRequested) {
                        Debug.WriteLine("Making Request: {0}", i);
                        results.Add(wc.DownloadData(TargetUrl).LongLength);
                    } else {
                        Debug.WriteLine("Cancelled");
                        return 0;
                    }
                }

                Debug.WriteLine("Elapsed ms: {0}", sw.ElapsedMilliseconds);
                return (long)results.Average();
            });
        }
    }
}
I have returned to calling the synchronous WebClient.DownloadData method in this example, which lets me demonstrate using a set of synchronous statements. I call the static Task<long>.Factory.StartNew method to create and start the Task and pass the statements I want executed through a lambda expression. You must create and start the Task in the action method; if you just create and return the Task without starting it, then the work will never be performed, and eventually the client times out waiting for a response.
![]() Tip Notice that the method definition does not include the async keyword. This is required only when using the await keyword.
Tip Notice that the method definition does not include the async keyword. This is required only when using the await keyword.
Returning a Task from a Synchronous Method Body
There is nothing about the method definition I created in Listing 3-5 that forces you to create an asynchronous method—just an opportunity to create one if it would be advantageous to your application. For simple methods, the overhead of creating a Task is greater than simply executing the method statements synchronously. As a demonstration, I have added a new method to the ICustomController interface, as shown in Listing 3-9.
Listing 3-9. Adding a New Method in the ICustomController.cs File
using System.Threading;
using System.Threading.Tasks;

namespace Primer.Infrastructure {
    public interface ICustomController {

        Task<long> GetPageSize(CancellationToken cToken);

        Task PostUrl(string newUrl, CancellationToken cToken);
    }
}
The new method is written so that it can be implemented asynchronously, but my implementation in the controller, as shown by Listing 3-10, can do its work in a single statement.
Listing 3-10. Implementing a Simple Method in the PageSizeController.cs File
using System.Net;
using System.Web.Http;
using System.Diagnostics;
using System.Threading.Tasks;
using Primer.Infrastructure;
using System.Threading;
using System.Collections.Generic;
using System.Linq;

namespace Primer.Controllers {

    public class PageSizeController : ApiController, ICustomController {
        private static string TargetUrl = "http://apress.com";

        public Task<long> GetPageSize(CancellationToken cToken) {

            return Task<long>.Factory.StartNew(() => {
                WebClient wc = new WebClient();
                Stopwatch sw = Stopwatch.StartNew();

                List<long> results = new List<long>();

                for (int i = 0; i < 10; i++) {
                    if (!cToken.IsCancellationRequested) {
                        Debug.WriteLine("Making Request: {0}", i);
                        results.Add(wc.DownloadData(TargetUrl).LongLength);
                    } else {
                        Debug.WriteLine("Cancelled");
                        return 0;
                    }
                }

                Debug.WriteLine("Elapsed ms: {0}", sw.ElapsedMilliseconds);
                return (long)results.Average();
            });
        }

        public Task PostUrl(string newUrl, CancellationToken cToken) {
            TargetUrl = newUrl;
            return Task.FromResult<object>(null);
        }
    }
}
The static Task.FromResult<T> method is used to create a Task that is a wrapper around a specific value. The version I used in the listing is helpful when the method doesn’t return a value. If I had a similar method that returned an int value, for example, then I might use the following statements:
...
int x = 100;
int y = 200;
return Task.FromResult<int>(x + y);
...
Task.FromResult allows you to generate Task wrappers around results that you generated synchronously; in this case, the evaluation of x+y happens synchronously and is wrapped in the Task that yields this value immediately. There is no asynchronous work performed when you use the FromResult method.
Making Ajax Requests with jQuery
The jQuery library is one of my favorite pieces of software. It makes manipulating HTML and CSS simple, easy, and consistent, and it has so many features that it took me more than 1,000 pages to describe them all in my Pro jQuery 2 book.
In this book, I use jQuery only to make Ajax requests. This is a small fraction of what jQuery is capable of, but Ajax is a theme that runs throughout this book, and jQuery Ajax is robust, is reliable, and has some helpful convenience features. In the sections that follow, I show you the pattern I used to make jQuery Ajax requests in this book.
![]() Note You don’t need to be able to send Ajax requests to use Web API. In fact, for projects that involve third-party developers, you may not have to write a client at all. Most projects, however, will involve some form of client development, and this is likely to be a browser-based client if you are also using the MVC framework. So, while Ajax isn’t part of Web API, it is the way that most clients will access your web services.
Note You don’t need to be able to send Ajax requests to use Web API. In fact, for projects that involve third-party developers, you may not have to write a client at all. Most projects, however, will involve some form of client development, and this is likely to be a browser-based client if you are also using the MVC framework. So, while Ajax isn’t part of Web API, it is the way that most clients will access your web services.
Making an Ajax Request
jQuery provides a range of different ways to make Ajax requests, but the one that I have used in this book is the $.ajax method (that is a dollar sign, followed by a period, followed by ajax). There are some higher-level alternatives available, but the $.ajax method lets me make a complete range of HTTP request types and take control over the way that the request is formatted, sent, and processed.
Before I start using jQuery, I am going to change the implementation of the GetPageSize action method in the PageSize controller. The implementation I defined in Listing 3-8 makes ten requests to Apress.com and averages the responses, which was useful for demonstrating how to deal with asynchronous methods but is not helpful when you are waiting for a response to test a client feature. Listing 3-11 shows how I have simplified the action method so that it makes only a single request.
Listing 3-11. Simplifying an Action Method in the PageSizeController.cs File
using System.Net;
using System.Web.Http;
using System.Diagnostics;
using System.Threading.Tasks;
using Primer.Infrastructure;
using System.Threading;
using System.Collections.Generic;
using System.Linq;

namespace Primer.Controllers {

    public class PageSizeController : ApiController, ICustomController {
        private static string TargetUrl = "http://apress.com";

        public async Task<long> GetPageSize(CancellationToken cToken) {
            WebClient wc = new WebClient();
            Stopwatch sw = Stopwatch.StartNew();
            byte[] apressData = await wc.DownloadDataTaskAsync(TargetUrl);
            Debug.WriteLine("Elapsed ms: {0}", sw.ElapsedMilliseconds);
            return apressData.LongLength;
        }

        public Task PostUrl(string newUrl, CancellationToken cToken) {
            TargetUrl = newUrl;
            return Task.FromResult<object>(null);
        }
    }
}
To get started with jQuery, I have updated the Index.cshtml file so that I can send a basic request to the web service. Listing 3-12 shows the changes I made.
Listing 3-12. Making a Simple Ajax Request in the Index.cshtml File
@{ Layout = null;}
<!DOCTYPE html>
<html>
<head>
    <meta charset="utf-8" />
    <meta name="viewport" content="width=device-width, initial-scale=1.0">
    <title>Primer</title>
    <script src="~/Scripts/jquery-2.1.0.min.js"></script>
    <script src="~/Scripts/knockout-3.1.0.js"></script>
    <script src="~/Scripts/primer.js"></script>
    <link href="~/Content/bootstrap.css" rel="stylesheet" />
    <link href="~/Content/bootstrap-theme.css" rel="stylesheet" />
</head>
<body>
    <div class="alert alert-success">
        <span data-bind="text: modelData"></span>
    </div>
    <button class="btn btn-primary"data-bind="click: sendRequest">
        Send Request
    </button>
</body>
</html>
Within the body element, I have added HTML elements and applied Knockout bindings. I touched on Knockout bindings in Chapter 2, and I return to them in the “Using Knockout” section of this chapter. My emphasis in this section is on how to use jQuery, so I’ll skip over the detail and just summarize: the text data binding displays the value of a JavaScript variable called modelData in a span element, like this:
...
<span data-bind="text: modelData"></span>
...
The text content of the span element will change automatically when the modelData value changes. The other binding I have used is click, which invokes a JavaScript function when the button element it is applied to is clicked.
...
<button class="btn btn-primary" data-bind="click: sendRequest">
...
The function is called sendRequest, and I defined it—and the modelValue variable—in a JavaScript file called primer.js, for which I added script element in Listing 3-12. I created the primer.js file in the Scripts folder, and Listing 3-13 shows its contents.
Listing 3-13. The Contents of the primer.js File
var modelData = ko.observable("(Ready)");

var sendRequest = function () {
    $.ajax("/api/pagesize", {
        type: "GET",
        success: function (data) {
            modelData("Response: " + data + " bytes");
        }
    });
}

$(document).ready(function () {
    ko.applyBindings();
});
The interesting part of the primer.js file—at least for this section of the chapter—is the call to the $.ajax method. To test the example, start the application and click the Send Request button. After a brief pause, the response from the server will be displayed in the browser window, as shown by Figure 3-10.
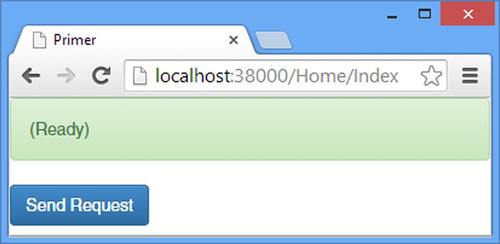
Figure 3-10. Sending a Simple Ajax Request
Understanding the $.ajax Method
The $.ajax method accepts two arguments: the URL that the request will be sent to and a JavaScript object that contains the settings for the request. The URL is expressed relative to the URL of the document that has loaded the JavaScript code, which is why I am able to specify the URL like this:
...
$.ajax("/api/pagesize", {
...
The URL of the web page is http://localhost:38000/Home/Index, and by specifying a relative URL that starts with a / character, I am specifying that the request be directed to http://localhost:38000/api/pagesize, which is the URL for my web service.
The second argument provides control over how the request is made. The properties of the object correspond to request settings. I have specified the HTTP verb for the request with the type property and a callback function that will be invoked for successful requests with the success property. The argument to the function assigned to the success property is an object that jQuery automatically decodes from the serialized data that the web service sends in the request. The success function that I specified in Listing 3-13 uses the data argument to set the value of the modelData property, which Knockout uses to update the content of the span HTML element.
UNDERSTANDING JSON DATA
JavaScript Object Notation (JSON) has become the de facto data format for web apps. JSON is simple and easy to work with in JavaScript code, which is why it has become so popular and has displaced XML. (The x in Ajax stands for XML, but it is a format that is used less and less.)
JSON supports some basic data types, which neatly align with those of JavaScript: Number, String, Boolean, Array, Object, and the special type null. You don’t have to work directly with JSON when writing Web API web services or when using jQuery to handle Ajax requests; Web API will automatically encode your data as JSON, and jQuery will automatically decode it. I explain how Web API deals with JSON in Part 2 of this book and demonstrate how to take control of the serialization and deserialization processes.
A lot of configuration properties are available for jQuery, all of which are detailed at http://api.jquery.com/jQuery.ajax. Table 3-1 describes the properties that I use most often in this book to configure the Ajax requests I sent to my web services.
Table 3-1. The jQuery Ajax Properties Used in This Book
Name | Description |
|---|---|
accepts | This property sets the content types that the client will tell the server it is willing to accept. This is part of a process called content negotiation, which I describe in Part 2. |
complete | This property registers a callback function that is invoked when the Ajax request is complete, regardless of whether the request was successful or failed. |
contentType | This property sets the value of the Content-Type header, which tells the server how the data in the request has been formatted. |
data | This property specifies the data that will be sent to the server. jQuery will automatically serialize a JavaScript object to produce a JSON string. |
dataType | This property specifies the type of data that the client should expect the web service to return. |
error | This property specifies a callback function that is invoked when the Ajax request fails. |
headers | This property is set to a JavaScript object used to define headers for the request. The object properties specify the headers to be set. |
success | This property registers a callback function that is invoked when the Ajax request succeeds. jQuery deserializes the data sent by the web service and presents the callback function with a JavaScript object. |
type | This property specifies the HTTP verb for the Ajax request. |
![]() Tip jQuery also provides the $.ajaxSetup method that configures all subsequent Ajax requests. I use this method in Chapter 7 to configure client-side authentication for the SportsStore example application. The $.ajaxSetup method uses the same configuration properties as the $.ajax method.
Tip jQuery also provides the $.ajaxSetup method that configures all subsequent Ajax requests. I use this method in Chapter 7 to configure client-side authentication for the SportsStore example application. The $.ajaxSetup method uses the same configuration properties as the $.ajax method.
Using Knockout
I use Knockout in this book to create example clients that respond automatically to the data that is returned by web services. There are other libraries and frameworks that perform the same task, including AngularJS, which I use for my most complex projects. Knockout, however, is perfect for simpler projects and has the benefit of being one of the libraries that Microsoft has started including in the ASP.NET example application and templates, giving it a semi-blessed status. In the sections that follow, I show you how I use Knockout in this book.
![]() Tip Knockout has more functionality than I describe here. See http://knockoutjs.com or my Pro JavaScript for Web Apps book for more details.
Tip Knockout has more functionality than I describe here. See http://knockoutjs.com or my Pro JavaScript for Web Apps book for more details.
There are two major Knockout components: the model and the bindings. The model consists of one or more observable data items. An observable data item is monitored by Knockout, and when it changes, the new value is used to update the content of HTML elements that have been annotated with the bindings. Bindings are also used to respond to user input and update the model values. You saw a simple example of a model in Listing 3-13, where I defined an observable called modelData, like this:
...
var modelData = ko.observable("(Ready)");
...
I called the ko.observable method to set up a new observable and passed the initial value as the method argument. I assigned the result to a JavaScript variable called modelData, and in doing so, I created a simple Knockout data model.
Knockout can also create observable arrays, through the use of the ko.observableArray method. Here is an example of a model from Chapter 7 that mixes standard observables with observable arrays:
...
var customerModel = {
    productCategories: ko.observableArray([]),
    filteredProducts: ko.observableArray([]),
    selectedCategory: ko.observable(null),
    cart: ko.observableArray([]),
    cartTotal: ko.observable(0),
    cartCount: ko.observable(0),
    currentView: ko.observable("list")
}
...
Applying the Bindings
Knockout defines a range of bindings. The simplest bindings insert model values into HTML elements, but there are also bindings for generating HTML elements for each item in an array and even responding to user input. Here is an example of a binding from Listing 3-12 that applies a binding to a span element:
...
<span data-bind="text: modelData"></span>
...
Bindings are applied to HTML elements using the data-bind attribute, the value of which is set to the binding name, followed by a comma, followed by an expression that the binding uses to do its work. In this case, the value of the attribute is text: modelData, meaning that I have applied a binding called text with the expression modelData. Bindings interpret their expressions in different ways, but the effect of this binding is to set the text content of the span element to the value of the modelData variable. Table 3-2 describes the bindings that I have used in this chapter.
Table 3-2. The Knockout Bindings Used in This Book
Name | Description |
|---|---|
click | This binding is used to invoke functions when an element, typically a button, is clicked. If you just want to invoke the function without arguments, then specify the function name: data-bind="click: myFunction". If you want to provide arguments to the function, then you have to use a different approach, like this: data-bind="click: myFunction.bind($data, "hello"). This will have the effect of invoking the function with a single hello argument because the $data value is not passed to the function. I use the click binding throughout this book to invoke functions that send Ajax requests. |
css | This binding is used to assign CSS classes to an element when the expression evaluates as true. The CSS classes are removed from the element when the expression is false. I use this binding to change the style of HTML elements when an Ajax request fails. |
foreach | This binding is used to generate HTML elements for each item in an array. The content of the element to which the binding is applied is treated like a template with its own data bindings. The current item is referred to using $data within the template. I use this binding to display data received from web services, usually as tables. |
text | This binding sets the text content of an element to the value of the expression. I use this binding throughout the book to display the results obtained from web services. |
value | This binding is used with input and select elements and synchronizes an observable value with the contents of the element. I use this binding to obtain user input so that I can send it to web services. |
visible | This binding changes the visibility of the element it is applied to. The element is visible if the expression evaluates to true and hidden otherwise. I use this binding to treat sections of the HTML document as views and show only one to the user at a time. |
![]() Tip You can also define JavaScript functions that are invoked when an observable or observable array is changed. I use this feature in Chapter 7 to derive data values from the model so that I have to perform complex calculations only once but display the results several times.
Tip You can also define JavaScript functions that are invoked when an observable or observable array is changed. I use this feature in Chapter 7 to derive data values from the model so that I have to perform complex calculations only once but display the results several times.
There isn’t always a convenient HTML element to which you can apply a Knockout binding. In Chapter 7, I encounter such a problem when creating a complex table layout with the foreach binding and solve it by applying the binding to a specially formatted comment.
Knockout has to process the HTML elements in a document to locate and activate its data bindings. Here are the statements that perform this initialization from Listing 3-13:
...
$(document).ready(function () {
    ko.applyBindings();
});
...
The initialization is performed by the ko.applyBindings method. I don’t want to call the method until the browser has finished loading all of the HTML elements; otherwise, there may be bindings that are not activated. To ensure that all of my bindings are activated, I call the ko.applyBindings method from within a function passed to the jQuery ready function, which I introduced in Chapter 2.
Summary
In this chapter, I described the essential techniques you will need to get the most from this book. I showed you different ways of dealing with asynchronous methods and described how I use jQuery to make Ajax requests and Knockout to create dynamically updating applications. In Chapter 4, I put HTTP web services in context and explain the role of Web API in the ASP.NET world.