


Versioning and promoting APIs
This chapter describes versioning and promoting APIs in IBM API Management during the API development lifecycle.
This chapter contains the following topics:
8.1 Versioning APIs
API developers can create both minor and major versions of APIs in IBM API Management as part of the development lifecycle.
8.1.1 Minor versions
API developers can create a minor version of an API for changes that will not require modifications in applications that call the API. For example, developers can add a new resource to an API or change a resource implementation without modifying the inputs or outputs.
The minor version saves all the data about the API implementation, including entitlements, security, and connections. However additional documentation files and URLs are not versioned.
All minor versions of an API share the same URL, so API developers can switch seamlessly between them without the apps that call them being affected. However, only one minor version of an API can run at any one time.
The API developer can develop the next minor version while the current minor version is running, but the developer must switch to running the next minor version before they can test it. Visibility is managed at the API level, so any new resources in public APIs will be visible on the Developer Portal at this time before they have been tested. Any changes to the additional documentation for a public API will also be visible as soon as the changes are made.
The API developer can switch back to running a prior minor version of the API if there are any problems. They can also change the version currently being edited to a prior minor version to start editing again from that point.
|
Note: The procedure to create, start, and revert to a minor version of an API is documented in the IBM API Management Version 2.0 information center:
|
8.1.2 Major versions
If the API changes can break the existing apps that call the API, then the API developers should create a major version for the API. For example, they can remove a resource or modify the required parameters.
Each major version of an API has a unique URL and name, and they can all run simultaneously in the same IBM API Management tenant. Existing apps continue to use the previous version of the API. If the existing app needs to use the new version of the API, the application developer must modify the existing app to use the new API version.
The API developer can develop and test the next major version without affecting the current major version. The API developer can also choose to keep the next major version private and invisible to application developer until the version is ready for release.
To create a major version of an API, edit the API, and click the Duplicate icon. Enter a new name, context, and description for the API in the dialog box. The new major version of the API cannot have the same name or context as the previous major version; both the name and context must be unique in each IBM API Management tenant. Click the Duplicate button to return to the APIs view. The new major version will be included in the list of APIs.
8.2 Promoting APIs
Each IBM API Management customer typically defines multiple environments, for example three environments such as development, test, and production environments. The API Promotion feature allows the API developer to promote an API from one environment to another as part of the development lifecycle.
Figure 8-1 on page 158 provides an overview of API promotion.

Figure 8-1 API promotion overview
The API promotion feature can also be used to do these tasks:
•Attach an API to an IBM Support request.
•Store an API version in an external source code control system.
•Back up an API for disaster recovery.
The promotion is done by exporting an API in one environment and importing it into another environment using the API Manager.
|
Note: The procedure to export an API and import it into another environment is documented in the IBM API Management Version 2.0 information center:
|
8.2.1 Exporting APIs
When an API is exported, a compressed file (API name-version.zip) is downloaded. The file contains encrypted information about a single minor version of the API, including its name, visibility, context, and the configuration of the resources in the API. The compressed file also contains details of the connections, entitlements, and security configuration (including the LDAP and OAuth profiles) that are used by that API.
Each API must be exported individually. There is no feature to export all the APIs in a tenant in a single action. It is possible to export any minor version of an API (major versions are treated the same as standalone APIs), and each minor version must also be exported individually.
8.2.2 Importing APIs
If an API does not already exist in the target environment, a new API is created when the API is imported. All the connections, entitlements and security configuration required by that API are also created. The new API will be listed in the APIs view after the import with an updated URL to match the new environment domain name. The new API will be imported in the stopped state. You must start it before you try to test it.
If an API already exists in the target environment, the exported minor version of the API is added to the Manage Versions tab for the API when it is imported. The current version of the API that is being edited does not change, so you must revert to the newly imported version to be able to view or edit that version of the API. You must also start the new version of the API before the changes take effect in the currently running version.
During the import, the connection, entitlement, and security configuration are compared with the target environment and an error message is displayed if there is a conflict. You must correct the reported problem before you can successfully import the API. An error also occurs if you try to import a version that already exists.
Each API must be imported individually. Just as export, there is no feature to import all the API files in a directory in a single action. It is possible to import any minor of an API (major versions are treated the same as stand-alone APIs), and each minor version must also be imported individually.
8.2.3 Limitations
Several limitations exist when promoting APIs:
•An API must be unique in an environment and it cannot be re-imported after you have deleted it, so this feature cannot be used to do these tasks:
– Share an API with another tenant in the same environment.
– Recover an API that has been deleted accidentally.
•You can manually re-create the same API in the same environment using the same configuration you used for the first API because it would have a different internal identifier from the first API.
•If you edit an API in two separate environments, there is no way to merge the changes together.
You must manually merge the changes in a single environment and export the new version to import it into the other environment.
•A connection must be unique to an environment and it cannot be re-imported after you have deleted it, so this feature cannot be used to do these tasks:
– Import two APIs that share the same connection into two different tenants in another environment.
– Import an API with a connection, delete the API and connection, and then try to import another API with the same connection.
•Entitlements, OAuth profiles, and LDAP profiles can be imported into multiple tenants in the same environment.
You can also delete them and import another API that uses them.
•You can manually recreate the same connection in the same environment using the same configuration you used for the first connection because it would have a different internal identifier from the first connection.
•If you import an API that has a connection with the same details as an existing connection but it was created in a tenant different from the existing connection, a duplicate connection will be created with the same name.
– You can manually edit each resource that uses the second connection to use the existing connection instead, and then delete the second connection.
– If the second connection has the same name as the first connection, you must rename one of them before being able to edit them.
•You cannot import changes to an existing API if the source and target connections, entitlements, OAuth profiles or LDAP profiles do not match. To work around this limitation you can do one of the following steps:
– Edit the source configuration to match the target before export.
– Edit the target configuration to match the source before import.
– Edit the source API to use a new connection, entitlement, OAuth profile or LDAP profile before export.
•Nothing is logged in the API Manager Activity Feed for API imports and exports.
|
Note: See the following technote (“Reverting to an older version of an API in IBM API Management causes connection problems to endpoints”):
|
8.3 Best practices
Some of the industry best practices related to API promotion are as follows:
•Use minor versions for small changes that will not affect the documentation or existing apps that call the API, or when you need to keep the same API URL.
Use major versions for all other changes.
•Test each version in your development and then test environments before promoting to production.
– Perform minimal testing in production to check end-to-end connectivity, authentication and so on.
– Promote minor versions to production at off-peak times, preferably during a scheduled maintenance window, because they cannot be tested without replacing the existing version.
• Test new minor versions as soon as you start them in production and quickly revert if any issues occur.
• Debug issues in the development or test environments before re-promoting to production.
– Ensure major versions are private before starting them in production, and test them before making them public.
•Use a consistent numbering convention for minor and major versions such as major.minor. For example 1.0, 1.1, 1.2… 2.0, 2.1, 2.2, and so on.
•Include the version in the API (major version) context and name.
– On IBM API Management versions 2.0.0.0 and 2.0.0.1, it is not valid to include a forward slash ('/') character in the API context, so a convention such as myapiv1/resource should be used.
– On version 2.0.0.2 and later, the REST versioning convention to declare the version in the URI, such as myapi/v1/resource, should be used.
•Do not create development and test tenants in the same environment because it is not possible to promote APIs between two tenants in the same environment.
•Do not use multiple development tenants with the same target test and production tenants because you will create duplicate connections, entitlements, OAuth profiles and LDAP profiles when you promote the APIs.
•Do not delete any APIs or connections that may be included in future imports to avoid errors.
•Internally document APIs and connections in case you need to manually recreate them in future. This documentation should not be uploaded to the API definition in the API Manager if you do not want it to be published in the Developer Portal when the API is made public.
8.4 Scenario: Versioning and promoting the JKHLE Airways API
This section continues the use case scenario we developed in earlier chapters to cover API versioning and promotion.
Following the feedback through Twitter from the developer community, new features are identified by the JKHLE architecture team:
•Users want to view their meal preference in their profiles in the TravePortalExpress portal.
•Users also want be able to update their profile from the TravelPortalExpress portal.
The new features are then defined in the JKHLE API and TravelPortalExpress portal using the following steps:
1. Shavon raises a request with the team maintaining the existing REST-based service to add mealPreference to the profile resource and allow the profile resource to be updated in a new version of the service. The new version is required to prevent the existing API from being affected.
2. When a new version of the REST service is available, Shavon creates a new major version of the API because the changes would break the existing TravelPortalExpress implementation and both versions of the API will run concurrently.
3. Shavon then did the following steps to update the API:
a. Edit the profile GET resource to add the meal preference information in the response body.
b. Add a new PUT resource for updating the profile information.
c. Create a new minor version for each of the new features after she successfully unit tests and documents them.
d. Promote each new minor version to the test environment for functional testing in accordance with the agile development methodology.
e. Fix any defects found during functional testing in the next minor version promoted from development to test (she does not edit the API in the test environment).
f. Promote the API to production when all the new features have been functionally tested and documented.
4. Shavon checks that the API is working in production then makes it public. The new content is now visible in the Developer Portal.
5. Andre accesses the Developer Portal to start building out a new version of his mobile app against the new version of the API.
8.4.1 Creating a major version
Version 1.0 of the JKHLE API and Version 2.0 of the REST service have already been created, tested, and promoted to the test and production environments. Create Version 2.0 using the Duplicate functionality when you edit the API.
Log on to the API Manager, click Create and then execute the following steps:
Figure 8-2 Duplicate the API
– API name: JKHLE API v2
– Context: passengersv2
– API description: Access to your profile, flights, and baggage status. New changes allow you to edit your profile and include your meal preference.
Figure 8-3 Detail information for the duplicated API
3. The new major version of the API will be listed in the APIs view. See Figure 8-4. Note that the new major version of the API is initially private so it will not be visible in the Developer Portal.

Figure 8-4 The duplicate API in the API list
8.4.2 Updating and unit testing the GET profile resource
Edit the profile GET resource to add the meal preference information in the response body using the following steps:
1. Click JKHLE API v2 → Resources → GET passengersv2/my/profile.
2. Replace the Response Body with the JSON in Example 8-1 on page 165 that also contains the mealPreference.
Example 8-1 Response body for GET profile resource
{
"id": 3001,
"firstName": "Andrew",
"lastName": "Daniel",
"frequentFlyerNum": "998",
"frequentFlyerTier": "GOLD",
"bookedFlights": [
{
"flightNumber": "JOY180",
"numberBags": 2,
"preferredSeatNumber": "3B",
"baggage": {
"status": "IN_FLIGHT",
"carrierFlightNumber": "JOY180"
}
}
],
"username": "[email protected]",
"mealPreference": "vegan"
}
GET profile response body
Figure 8-5 shows the updated GET profile response body.
Figure 8-5 Update the GET profile response body
3. Click the Implementation tab and update the proxy URL to the following value to use the new version of the REST service (see Figure 8-6):
http://jkhleapi.castironcloud.com:9080/AirlineExample2/rest/passengers/my
Figure 8-6 Update the GET profile implementation
4. Click JKHLE API v2 → Start to start the new major version of the API ready for unit testing.
5. Click OK to close the confirmation dialog.
6. Click the Test tab. Select the GET my/profile resource and Test application. Enter the Basic Auth Username, Basic Auth Password and ibm-app-user header required and then click Test. Check that the call succeeds and the mealPreference field is displayed in the response body. See Figure 8-7 on page 167.

Figure 8-7 Test the GET profile changes
8.4.3 Promoting the GET profile resource changes to test
Create a new minor version for the changes to the GET profile resource and then promote it to test using the following procedure:
Figure 8-8 Create a new minor version
– Version Number: 2.0
– Description: Added mealPreference to GET profile resource

Figure 8-9 Enter the new minor version details
3. The Manage Versions tab opens (Figure 8-10). Click the Export icon next to Version 2.0. A compressed file (JKHLE_API_v2-2_0.zip) is downloaded according to your browser settings.

Figure 8-10 Export version 2.0
4. Log in to the API Manager for your test environment.

Figure 8-11 Import API
6. Click Select a File, browse for the JKHLE_API_v2-2_0.zip file you downloaded, and click Import. See Figure 8-12.

Figure 8-12 Import version 2.0
7. Click OK to close the confirmation dialog.
JKHLE API v2 is now in the APIs list, and the URL is automatically updated to match the test environment. See Figure 8-13.

Figure 8-13 Version 2.0 in the test environment
8.4.4 Updating and unit testing the GET profile resource in test
Each API Management environment typically connects to a different set of resources. For example, development, test, and production versions of the REST service exist used respectively by the development, test, and production instances of the JKHLE API. Therefore, Shavon can modify JKHLE API v2 in the test environment to use the test REST service in each resource.
Because the profile resource is a proxy, this is edited in the resource implementation. Update the GET profile resource implementation and test it in the test environment using the following steps:
1. Click JKHLE API v2 → Resources → GET passengersv2/my/profile → Implementation and update the proxy URL to the following value to use the test version of the new REST service (see Figure 8-14):
http://jkhleapi.castironcloud.com:9080/AirlineExample2Prod/rest/passengers/my

Figure 8-14 Update the GET profile implementation in test
2. Click JKHLE API v2 → Start → Current Version to start the imported API with the implementation change ready for functional testing.
3. Click OK to close the confirmation dialog.
4. Click the Test tab, select the GET my/profile resource and the Test application, enter the Basic Auth Username, Basic Auth Password and ibm-app-user header required for the test REST service and then click Test. Check that the call succeeds and the mealPreference field is displayed in the response body. See Figure 8-15 on page 171.
Figure 8-15 Test the GET profile changes in test
8.4.5 Creating and unit testing the PUT profile resource
The REST service does not offer a PUT method on passengers/my, but one for passengers/{id} can be used instead. You first do a GET operation on passengers/my to get the ID. Because two REST calls are required to update the profile, this resource will be implemented using an assembly.
Add a new PUT resource for updating the profile using the following steps in the development environment:
1. Click JKHLE API v2 → Resources → Add a Resource. Enter the following details and then click Add (Figure 8-16 on page 172):
– HTTP method: Select PUT.
– Resource URI: my/profile
– Resource description: Update passenger profile
Figure 8-16 Create the PUT profile resource
2. Click the PUT passengersv2/my/profile resource to edit it.
3. Enter the following details in the Request Headers section:
– Header name: ibm-app-user
– Description: The username of the passenger profile to update
4. In the Request Body, enter the JSON listed in Example 8-2.
Example 8-2 JSON for Request Body
{
"firstName": "Andrew",
"lastName": "Daniel",
"frequentFlyerNum": "998",
"frequentFlyerTier": "GOLD",
"bookedFlights": [
{
"flightNumber": "JOY180",
"numberBags": 2,
"preferredSeatNumber": "3B",
"baggage": {
"status": "IN_FLIGHT",
"carrierFlightNumber": "JOY180"
}
}
],
"username": "[email protected]",
"mealPreference": "vegan"
}
PUT profile request body
Figure 8-17 shows details of the PUT profile request.
Figure 8-17 PUT profile request details
5. Click Implementation → Assemble.

Figure 8-18 Add an HTTP GET Operation
– Name:
JKHLE 2 My Profile
– URL:
http://jkhleapi.castironcloud.com:9080/AirlineExample2/rest/passengers/my
Figure 8-19 Connect to my profile resource
8. Enter the following details and click Configure:
– Request Header name: IBM-app-user
– Request Header description: The username of the passenger profile to retrieve
– Response Body, as shown in Example 8-3.
Example 8-3 Response body for GET operation
{
"id": 3001,
"firstName": "Andrew",
"lastName": "Daniel",
"frequentFlyerNum": "998",
"frequentFlyerTier": "GOLD",
"bookedFlights": [
{
"flightNumber": "JOY180",
"numberBags": 2,
"preferredSeatNumber": "3B",
"baggage": {
"status": "IN_FLIGHT",
"carrierFlightNumber": "JOY180"
}
}
],
"username": "[email protected]",
"mealPreference": "vegan"
}
GET my profile response body
Figure 8-20 shows the definition of GET my profile operation.

Figure 8-20 Define the GET my profile operation
9. On the Configure tab, click Select Available Value next to ibm-app-user and select the ibm-app-user request header. See Figure 8-21.

Figure 8-21 Configure the GET my profile operation
10. Click the plus sign (+) under the Request task and click HTTP PUT Operation.
– Name:
JKHLE 2 Profile By ID
– URL:
http://jkhleapi.castironcloud.com:9080/AirlineExample2/rest/passengers/{id}
Figure 8-22 Connect to profile by ID resource
Example 8-4 Request Body content for PUT profile by ID operation
{
"firstName": "Andrew",
"lastName": "Daniel",
"frequentFlyerNum": "998",
"frequentFlyerTier": "GOLD",
"bookedFlights": [
{
"flightNumber": "JOY180",
"numberBags": 2,
"preferredSeatNumber": "3B",
"baggage": {
"status": "IN_FLIGHT",
"carrierFlightNumber": "JOY180"
}
}
],
"username": "[email protected]",
"mealPreference": "vegan"
}
PUT profile by ID request body
Figure 8-23 shows the defined PUT profile by ID operation.
Figure 8-23 Define the PUT profile by ID operation
13. Select the value for the ID parameter from the GET my profile response and select the values for the other fields from the request body, as shown in Figure 8-24 on page 180.
Figure 8-24 Configure the PUT profile by ID operation
14. Click JKHLE API v2 → Stop to stop the previous version of the API.
15. Click OK to close the confirmation dialog.
16. Click Start → Current Version to start the API with the changes ready for unit testing.
17. Click OK to close the confirmation dialog.
18. Click the Test tab, select the PUT my/profile resource and the Test application, enter the Basic Auth Username, Basic Auth Password, ibm-app-user header, and a request body with modified data from the existing record (for example with a different mealPreference). Click Test and then check that the call returns a 200 OK response. See Figure 8-25 on page 181.
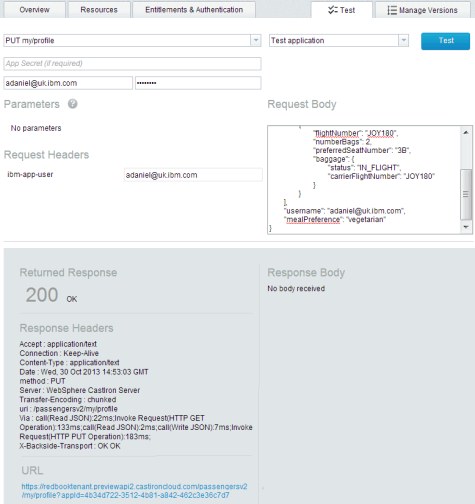
Figure 8-25 Test the PUT profile resource
19. Select the GET my/profile resource, enter the same ibm-app-user header and then click Test. Check that the response contains the updated data (in this case the mealPreference). See Figure 8-26 on page 182.

Figure 8-26 Check the profile has been updated
8.4.6 Promoting the PUT profile resource to test
Create a new minor version for the new PUT profile resource and then promote it to test using the following procedure:
1. Click Version to create a new minor version.
2. In the Create Version dialog window (Figure 8-27 on page 183), enter the following details and click Create:
– Version Number: 2.1
– Description: Added PUT profile resource

Figure 8-27 Enter the new minor version details
3. The Manage Versions tab opens. Click the Export icon in the Version 2.1 section. A compressed file (JKHLE_API_v2-2_1.zip) is downloaded according to your browser settings.

Figure 8-28 Export version 2.1
4. In the API Manager for your test environment, click All APIs → Import API.
5. Click Select a File, browse for the JKHLE_API_v2-2_1.zip file you downloaded, and click Import. See Figure 8-29 on page 184.
Figure 8-29 Import version 2.1
6. Click OK to close the confirmation dialog.
7. Click JKHLE API v2 → Manage Versions. Version 2.1 is now listed, however the current version is still 2.0.

Figure 8-30 Version 2.1 in the test environment
8.4.7 Reverting to Version 2.1 in test
Shavon might want to modify version 2.1 of the API in the test environment to use the test REST service for all resources. Before version 2.1 can be edited, she must first switch it to be the current version by using the following steps:
1. Click the Revert icon in the Version 2.1 section to change the current version being edited to 2.1. See Figure 8-31 on page 185.

Figure 8-31 Revert to Version 2.1
2. A dialog opens (Figure 8-32) where you select whether to save the current version before reverting. In this case, the current version is Version 2.0 with the changes to the GET profile resource implementation to use the test REST service. Because making and testing these change took time, a good idea is to save them as a version in case you need to revert to that version in the future. Enter the following details and click Revert:
– Select YES. Create a version with the current changes and then revert.
– Version Number: 2.0.1
– Description: Modified the GET profile resource to use the test service
Figure 8-32 Create a new version before reverting
3. The JKHLE API v2 Overview opens. Click the Resources tab and confirm that the new PUT profile resource is listed. See Figure 8-33.
Figure 8-33 Confirm the new resource is listed
8.4.8 Updating and unit testing the PUT profile resource in test
The new PUT resource is an assembly, so update the connections used by the implementation by completing the following steps:
1. Click APIs → Connection Details → JKHLE 2 My Profile. Update the URL to the following value to use the test version of the REST service and click Connect:
http://jkhleapi.castironcloud.com:9080/AirlineExample2Prod/rest/passengers/my
2. After the connection test succeeds, click Save & Apply to save the changes to the URL in all APIs that use it (as listed below the connection details). See Figure 8-34 on page 187.
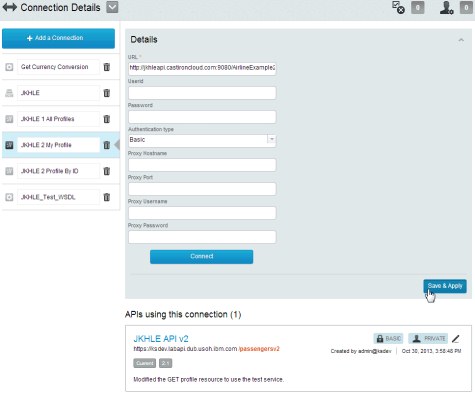
Figure 8-34 Update the GET my profile connection
Figure 8-35 Confirm the update to the GET my profile connection
4. Click JKHLE 2 Profile By ID, update the URL to the following value to use the test version of the REST service and click Connect:
http://jkhleapi.castironcloud.com:9080/AirlineExample2Prod/rest/passengers/{id}
5. After the connection test succeeds, click Save & Apply to save the changes to the URL in all the APIs that use it (as listed below the connection details).
6. Click OK to confirm that you want to update the Connection for one API.
7. Click JKHLE API v2 → Stop to stop the previous version of the API.
8. Click OK to close the confirmation dialog.
9. Click Start → Current Version to start the API with the changes ready for functional testing.
10. Click OK to close the confirmation dialog.
11. Click the Test tab, select the PUT my/profile resource and the Test application, enter the Basic Auth Username, Basic Auth Password, ibm-app-user header, and a request body with modified data from the existing record (for example with a different mealPreference) required for the test REST service. Click Test, and check that the call returns a 200 OK response.
12. You can confirm that the profile data has been updated as expected if you update the GET profile resource to use the test REST service (using the steps from 8.4.4, “Updating and unit testing the GET profile resource in test” on page 169). The implementation of the GET resource in the current version was overwritten with the development REST service URL when version 2.1 of the API was imported.
8.4.9 Promoting the new version to production
Now the required changes have been made in the development environment, and unit-tested and functionally tested in the test environment, they are ready to be promoted to the production environment. Shavon repeats the same process that was used to import the API into the test environment to do this.
After Shavon tests that the new version of the API works in the production environment, she makes it public by clicking the Permissions button in the API overview. The API then becomes visible, to Andre, in the Developer Portal, and he can start building a new version of his mobile app for the new version of the API.
..................Content has been hidden....................
You can't read the all page of ebook, please click here login for view all page.