


API security
This chapter describes the importance of securing APIs and how to do so, including encryption, authentication, and authorization. It describes user authentication through directories and external web servers, and different methods of authenticating users. Finally it takes you through how these are implemented in IBM API Management and implement security on several APIs for the JKHLE Airways scenario.
This chapter describes the following topics:
5.1 API security introduction and its importance
Today, more information is freely available over the Internet for everybody to consume, and much of this information is accessed through APIs. We can find the current weather in any city, browse hundreds of photographs, and even check the schedule and status of nearly every flight happening at any moment. However, information retrieved from APIs is not only generic, it can be personal. Personal information such as our email address, postal address, date of birth, even our bank information can be available through API calls. With thieves constantly attempting to access our personal information in attempt to steal our identities, security is an important factor to consider when designing and creating an API, especially when sensitive data is concerned.
Therefore, a crucial consideration is that we allow only the correct users access to the information that they are authorized to consume by using secure methods. This consideration should be key in the design of an API and its resources. Not every API must be secured, however, because some might not contain sensitive data, but a small subsection of your APIs is likely to need security.
With IBM API Management keeping the information you provide as secure as possible relatively simple, by handling the implementation and the standards so the API developer does not have to. All that is required is a simple setup of security aspects, and then enable authentication on individual resources, and they are secured.
|
Difference between authentication and authorization:
•Authentication is the act of confirming the identity of a user. A simple example is a login page, available with most applications. This proves that the users are who they say they are, because they provided the predetermined password.
•Authorization is the act of determining what information the authenticated party can access. An example of this is an operating system with multiple users, each having a private directory. When one user attempts to access another user’s private directory, the system must check whether the user is authorized to do so.
|
Security can be applied in multiple stages of an API call in IBM API Management. The connection can be encrypted with Transport Layer Security (TLS) or Secure Sockets Layer (SSL) protocol over HTTPS. The user can then authenticate through methods built into HTTP called basic authentication using a directory of users. Or users can be authorized using OAuth.
Finally we can allow only approved applications to call APIs by providing them with security keys called Application IDs and Application Secrets.
5.2 Transmission encryption
One method (of many) of securing data being passed between a server and a client is to encrypt the transmission. One common method of doing this, especially when transferring data through HTTP (as we do with web traffic) is to apply TLS or SSL, to form an HTTPS protocol. This protocol is widely used, and can be easily identified when communicating with a secure web server by noticing the https:// identifier at the start of the web address, as shown in Figure 5-1. Some browsers can help you identify secure traffic with additional information about the security, such as the encryption method and trust certificates.

Figure 5-1 A sample website uses HTTPS and SSL to secure traffic
HTTPS creates a secure channel between the client and the server, and protects the data that is transmitted from being snooped, or from an intruder to intercept the data and understand it. This means sensitive information, such as credit card details, are safe to be passed between the client and the server.
IBM API Management enforces all API calls to use HTTPS. This is required to ensure secure transmission between the client and the server for all information passed between them.
5.2.1 SSL certificates
When using an encrypted transmission, trust is important. The client needs to know that the server the client is communicating with is the server it says it is. A false server can easily react like any other server by simply duplicating responses that are expected, but is actually stealing information that is sent to it from the client. This can be avoided in HTTPS by using Certificates of Authenticity.
A Certificate of Authenticity is a digital certificate that states that the server is who it says that it is. Each certificate is unique, and provides a key to the encryption for SSL transmissions. A genuine certificate for your server must be attained from a digital certificate provider such as VeriSign.
An unconfigured IBM API Management stack uses a self-signed certificate, which means all transmission of data will be encrypted, but the server has not been verified by a trusted domain. To ensure confidence in clients, the API administrator or IT operation personnel must provide a signed certificate to prove that the server is trusted.
5.3 App ID and App Secret
Often, a client or application will perform the communication with an API, digest the information, and present the data in a more easily-readable format to the user. We see many examples of this today on smartphones, tablets, or web applications that provide a front end to a user’s data, often in social media. Although we can authenticate the user using methods such as basic authentication, or OAuth, as seen in the following sections, an important aspect to security is to also authenticate the application itself. IBM API Management follows a paradigm of using an App ID and an App Secret:
•The App ID is a unique identifier for the application, and must be used for each API call. When used in OAuth, it is used for the OAuth Client ID. See 5.4.4, “OAuth protocol” on page 88 for more details.
•An App Secret, in some entitlements (see Chapter 4, “Entitlements” on page 71) is required from the application including the App ID when calling an API. When using OAuth, the App Secret is used as the OAuth Client Secret. See 5.4.4, “OAuth protocol” on page 88 for more details.
When an API Consumer registers an application in the Developer Portal (see Chapter 9, “Developer Portal” on page 189), IBM API Management provides an App ID and an App Secret (Figure 5-2), which will be used to authenticate the application when making calls to the API in future. The App ID can be retrieved at any time from the Developer Portal, but the App Secret can only be verified, not retrieved. This prevents unauthorized users from retrieving the App Secret. Therefore, be sure to note the App Secret and keep it safe for future use.
Figure 5-2 The App ID and App Secret of a registered application
5.4 Authenticating APIs and resources
An API can be configured for the following authentication types:
•No authentication
Does not require users to authenticate themselves to use the API. The application must still authenticate using App ID and App Secret.
•Basic authentication
Requires the user to authenticate for every API call made.
•OAuth
Allows an application full use of an API without needing to know the user’s credentials.
Enabling basic authentication or OAuth requires a method of authenticating users. This can be done with an LDAP user directory, or implementing an Authentication URL which can handle credential checking outside of IBM API Management.
Each resource within an API has its own authentication configuration. When enabling basic authentication or OAuth for an API, each resource within the API must then be configured to require authentication. The default authentication level for a resource is none. To enable authentication for a resource within an API that has authentication enabled, edit the resource by clicking its name in the list of resources in the API under the Resources tab. In the Authentication section (Figure 5-3) of the resource under the Overview tab, click Authenticate to enable authentication, or click Do Not Authenticate if authentication is not required.

Figure 5-3 Enabling authentication for a resource in an authenticated API
5.4.1 Authenticating application users
In addition to an application authenticating by using an App ID, the user of the application must also be authenticated with IBM API Management before consuming APIs. The two methods to provide IBM API Management a way to authenticate users are as follows:
•A directory of users in an LDAP server
•Provide an Authentication URL that validates the users credentials remotely.
LDAP
The Lightweight Directory Access Protocol (LDAP) is an industry standard for distributed directory information. It is a way of storing a large directory of information in a structured manner, often hierarchical, such as a corporate email directory. This functionality is useful in providing a single sign-on experience, where a directory of employees or users can login to multiple locations using the directory as an authentication and authorization mechanism.
Using this mechanism is key to allowing IBM API Management to use the directory as a way to authenticate application users who want to consume APIs. Connecting to an existing LDAP directory already used for authentication immediately allows a many users to start using APIs through IBM API Management, and saves time that might be spent registering users on the system.
Authentication URL
If using an LDAP server is not an option, then the API developers can provide their own authentication mechanism through an Authentication URL. The Authentication URL should point to a web server URL, which validates the users credentials, and report to IBM API Management whether the user is authorized to consume the API.
The Authentication URL does not necessarily have to be located on the Internet, if it is accessible by the IBM API Management stack. This means the URL can be internal, and secure behind the firewall. This way, the web server does not require much configuration in terms of security from outside access, and can be streamlined to minimize impact on development and maintenance. The server is a great way to connect an existing database or repository of users the API Management for authorization of APIs.
This option requires setting up a web server to accept the standard HTTP basic authorization. When a user attempts to call an API, configured to authenticate users with an Authentication URL, IBM API Management calls the Authentication URL, and passes the users credentials through the HTTP Authorization header. The web server then validates the credentials however it chooses (perhaps connecting to a database of user name and passwords). If the user is valid, and authorized to access the API, the web server should return the HTTP code 200 OK, otherwise it should return HTTP code 401 Unauthorized.
5.4.2 Nonauthenticated APIs
Not every API requires authentication, and not every resource within a secure API requires authentication. When you design APIs, the best approach is to consider which information should require authentication, and which do not.
For example, an API that provides non-personal information is more suited to not require authentication, such as weather, traffic, or timetables of public transport. Access to public APIs will still have a level of control through enablement or entitlements (see Chapter 4, “Entitlements” on page 71), which can require approval of applications, and restrict the number of calls that those applications can make to each resource.
Nonauthenticated resources in an API that is configured to require authentication can also be implemented. When authentication is enabled for an API, each resource can require authentication or not require it.
|
Note: The default authentication for a resource is none, so do not forget to enable authentication on a resource when enabling authentication on an API.
|
5.4.3 Basic authentication
More simple than OAuth, basic authentication requires the username and password of the user to be passed with an API call every time, alongside the App ID. Although this ensures security, it is not as convenient as OAuth.
For an application to pass the users credentials for every API call, it usually needs to store them. If an application stores users’ usernames and passwords, it can be vulnerable to being compromised, and those credentials could be stolen. Encryption should be used on the application to provide some level of security when storing passwords, yet this can still be vulnerable to the most determined thieves.
To comply with basic authentication, a HTTP Basic Access Authorization header must be included in the call with the username and password. Because HTTPS is used for all API calls in IBM API Management, these credentials will be encrypted in the call.
In IBM API Management, basic authentication can be enabled for an API on the Entitlements & Authentication tab, and in the Authentication section by clicking BASIC, as shown in Figure 5-4.
Figure 5-4 Configuring basic authentication
|
Do not forget: Enabling authentication on an API does not automatically enable it for all resources within the API. In each resource that you want to be authenticated, you must enable authentication.
|
5.4.4 OAuth protocol
OAuth is an open protocol for secure authorization designed specifically for web, mobile, and desktop applications. It was created with the current state of the web considered, especially social networks. At the time of writing, its specification iteration is version 2.0, which specifically enables a third-party application to obtain limited access to a HTTP service.
OAuth is designed specifically with three main parties in mind:
•Client: The web, mobile or desktop application that wants to access a user’s sensitive data. Each type is configured to a particular grant type.
•Resource server: The API server that provides access to the user’s sensitive data, IBM API Management in this case.
•Resource owner: The user who owns the protected and sensitive data on the resource server.
With OAuth, the client gains temporary access to the resource owner’s information stored on the resource server, without having to see any of the resource owner’s credentials. This is done by forwarding the resource owner to the resource server during the initial attempt to access resource information. The resource owner verifies its credentials, similarly to how a resource owner normally logs in to the resource server, and authorizes the client to access the resource owner’s information. The information and actions on the resource server are shown to the user as a scope, so the user can see the intentions of the application. The resource server then passes back codes and tokens to the client. When the client interacts with the resource server, a session token is used, which proves authentication and authorization of the user.
In OAuth 1.0, which IBM API Management does not support, this example describes a three-legged OAuth flow. In OAuth 2.0, variations of the flow are configured by grant type, of which two are supported by IBM API Management 2.0: Authorization Code and Implicit. For more information about grant types, see 5.5.2, “Create an OAuth profile” on page 94. This flow is a commonly found method on the Internet, especially for social networks, such as Facebook and Twitter.
In IBM API Management, a three-legged OAuth flow works as follows:
1. The user (resource owner) opens the application (client).
2. The application redirects the user to IBM API Management (resource server).
3. The user provides IBM API Management credentials and logs in.
4. IBM API Management asks if the user wants to authorize the application access to the users information.
5. The user allows the application authorization.
6. IBM API Management redirects the user back to the application with an Access Code.
7. The application authenticates with the Access Code and App ID to retrieve a session token.
8. All calls to the API are then made with the session token and App ID to retrieve the users information.
When the resource owner has authenticated with IBM API Management, and allowed the clients to access their information, each call that the client makes uses a session token. That session token is associated solely with that resource owner, but does not explicitly state who that resource owner is. When a client makes a call to IBM API Management with a valid session token, the header IBM-App-User is populated with the name of the user that is authenticated, so that the API can scope the information for that user.
Figure 5-5 shows the flow of the implementation of three-legged OAuth 2.0 in IBM API Management.
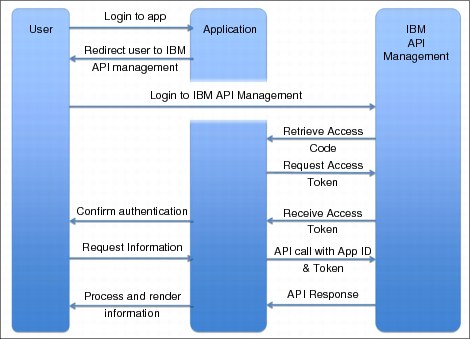
Figure 5-5 Three-legged OAuth 2.0 flow
An application can be a web application, such as a social network aggregator, like TweetDeck; a mobile application, such as the client for a social network, like Facebook for iOS; or a desktop application, which is now less common. It is common for one social network or aggregator to develop a client of each type to cover the broad spectrum of distribution among its users. This is why OAuth is important, and most of all, widely used among the many personal services on the Internet.
5.5 Securing an API in IBM API Management
This section uses varying forms of security on existing APIs created in Chapter 3, “Defining APIs” on page 37. Specifically, the section expands on the passenger API, which exposes information that passengers can use to see or modify their information stored on the JKHLE Airways system using different resources.
In this section, we first create the necessary resources in IBM API Management for security: an LDAP connection and an OAuth profile. These are created and configured in the Authentication section of API Manager and so can be used across multiple APIs.
Part of the new JKHLE system that exposes some of the data we want to extend in IBM API Management is an authentication URL. This simple web service accepts HTTP basic authentication headers and responds with a 200 OK response code if they are authenticated, using the back-end system as a directory of users. We use this as an Authentication URL in IBM API Management.
Next, we configure our profile API to first use basic authentication, and enable authentication on some resources, and test the scenario. Following that, we upgrade the security of the API to OAuth 2.0 and run through sample usage.
5.5.1 Create an LDAP connection
To create a connection to LDAP from IBM API Management, you must first have a running LDAP server that is accessible over the network from the IBM API Management stack. Consult your system administrator for the connection details for the LDAP server, and for details about filtering within the LDAP server if necessary.
IBM API Management is compatible with LDAP version 2 and version 3, and can connect through SSL security or without. All of these options are configurable in the LDAP configuration editor.
To create and manage LDAP connections, select Authentication in the navigation menu, as shown in Figure 5-6 on page 92.
Figure 5-6 Choose Authentication in the navigation menu to manage LDAP connections
Then, click Create, which reveals two options in a drop-down menu: LDAP Configuration and OAuth Profile (Figure 5-7). The second option is used later in this chapter. For now, click LDAP Configuration to create a new LDAP connection.
Figure 5-7 The Create drop down menu for creating LDAP connections
A new LDAP Configuration will be created in IBM API Management. The entry for the new connection is in the list on the left side. It is selected, showing the Details pane (Figure 5-8 on page 93). You can use the Details pane for configuration, testing, and saving LDAP configurations.
On the left side of the LDAP Configuration editor are the connection details: host, port, LDAP server version and a check box for SSL. On the right side is the option to choose one of three LDAP search types. These search types help you narrow the available names in an LDAP directory to the specific tree node you want to use. The information needed for this connection details panel is available in the LDAP server configuration.
The three available search types for LDAP are Compose (UPN), Compose (DN) and Search (DN). To select one of them, click the relevant button on the grey toggle buttons beneath the description field. When you select one, the form changes to reflect your selection.

Figure 5-8 Creating a new LDAP configuration will open the Details pane
By selecting the Use Authorization Group check box, extra fields to filter the directory of users to a smaller group are displayed. Normally an LDAP directory contains all employees in a company, but it is more appropriate to restrict the access of an API to only a small group of people in the directory. The Authorization Group filter allows this to be configured.
After configuring the LDAP connection, the best approach is to test the connection. Click Test Connection (Figure 5-8) in the lower left corner of the LDAP editor. A dialog opens (Figure 5-9). This is for you to try the connection with a username and password stored in the LDAP server to confirm whether the connection is successful.
Figure 5-9 LDAP test connection dialog
If the configuration is complete, and the connection test succeeds, click Save & Apply to save the LDAP Configuration, which can be used across multiple APIs in the future. A confirmation of the configuration being saved is displayed at the bottom of the page.
5.5.2 Create an OAuth profile
When creating an OAuth profile, the API developers must consider how they are enforcing an application to conform to IBM API Management security through a couple of categories, each with options:
•Client Type, which is used for these items:
– Public: Applications provide their App ID
– Confidential: Applications provide App ID and App Secret
•Grant Type:
– Authorization Code, which is used for these items:
• Application server client, often confidential
• Servers that access user information regularly
• Do not show the resource owner the access token
• Dynamic redirect URIs
– Implicit, which is used for these items:
• Web browser client, often public
• No long term access is needed
• Fixed redirect URIs
In IBM API Management, if the OAuth profile has a client type of Confidential, then the grant type can only be Authorization Code. The Public Client Type can allow either any one or both grant types.
Navigate to the Authentication section of the navigation banner to see the Authentication management panel. On the left side is a list of existing OAuth Profiles and LDAP Configurations. Create a new OAuth Profile by clicking the Create button above the list, and then click Oauth Profile from the drop-down menu that opens.
A new item is displayed in the list and the OAuth Profile Details pane opens on the right side, as shown in Figure 5-10 on page 95. You can change the name on the left side. In the main panel, you can set a description of the OAuth Profile, and then select your Client Type and Grant Type options. Click Save & Apply to save changes. The OAuth Profile has been created and saved.

Figure 5-10 Configuration of an OAuth profile
5.5.3 Set up an Authentication URL
The Authentication URL in IBM API Management is simply a link to a web server address. That address must receive an HTTP or HTTPS call, which has an empty body but has the Authorization header set with a HTTP basic authentication username and password. When the call is made, the server must return a 200 OK HTTP response code if the username and password is valid and authorized for use on the API, or any other code if not. It is best to use HTTP response code 401 Unauthorized if the credentials are not authorized to consume the API for consistency.
The JKHLE Airways back-end REST system provides an authentication endpoint. For the purposes of demonstrations and testing, the endpoint will authenticate any username and password, even empty ones. This allows testing of IBM API Management without external systems causing problems that might take time to resolve. The URI is as follows:
http://path.to.server:port/server/rest/authenticate
5.5.4 Securing the passenger profile API
Chapter 3, “Defining APIs” on page 37 takes you through creating an API and resources for passengers to see their profile, booked flights, and baggage, and to update their delivery address. We focus on this API and the resource to see a passenger profile named my/profile.
First, navigate to the list of APIs by clicking APIs in the navigation toolbar, and then click the API (that is created in Chapter 3, “Defining APIs” on page 37) named JKHLE API. All authentication options can be found within the Authentication section, under the Entitlements & Authentication tab. Here is a toggle switch where you can choose no authentication (none), HTTPS basic authentication (basic), or and OAuth 2.0 three-legged authentication (oauth). By default, an API has no authentication selected.
Basic authentication
In this section, we enable HTTPS basic authentication for the JKHLE API and the resource my/profile, and test it.
First, if the API is running, stop it by clicking Stop (to the right of the API name field, next to the version button).
Select HTTPS basic authentication for the API by clicking the BASIC toggle in the Authentication section as shown in Figure 5-11. If you have already created an LDAP connection, select the option Authenticate using an LDAP user directory and then choose the LDAP connection from the drop down menu next to it. To use an external web server as an authentication URL, select the option Authenticate using an Authentication URL and enter the full address of the web server, including http. In this example, we will point to the back-end system authentication URL. Now the API has security applied to it, but none of the resources will be secured just yet.

Figure 5-11 Enabling basic authentication in an API
Click the Resources tab to see the list of resources, and click the name of my/profile to edit it. In the Overview tab, scroll down to see the Authentication section and choose the Authenticate button of the toggle to enable authentication on the resource.
Now return to the API page by clicking its name in the breadcrumb trail just above the resource name field. Start the API by clicking Start, which is to the right of the name field, between the version button and the snapshot button. Basic authentication is now activated on the API and the resource.
|
Note: If an API is running and you want to enable security, stop the API before enabling authentication. When you start the API again, the changes take affect and security will be enabled.
|
To test the authentication of the resource, click the Test tab in the API editor to see the testing options, shown in Figure 5-12. Choose the my/profile resource in the first drop-down menu, and then the Test Application in the second drop down menu, and a username and password that will work for the LDAP or Authentication URL selected in the appropriate fields below the App Secret field, and click the Test button to make the example call.
Figure 5-12 Testing an API with basic authentication
Alternative tools can be used for testing, such as browser-based plug-ins like Poster for Firefox or Dev HTTP Client for Chrome, an application, or command-line tool curl. The curl tool can add an authentication header in a simple manner by using this format for a call:
curl -k -X GET --user username:password https://call.to.api/resource
If the authentication is successful, the call returns with the HTTP response code 200 OK and the correct data. If the response code is 401 Unauthorized, check that the credentials match for the LDAP server or Authentication URL and try again.
OAuth
To configure our API to use OAuth instead of basic authentication, navigate to the Entitlements & Authentication tab of the API editor, and in the authentication section choose OAuth from the toggle, and then select a predefined OAuth profile that you want to use. The list of available OAuth profiles matches the OAuth profiles created in 5.5.2, “Create an OAuth profile” on page 94. Then, like with basic authentication, choose either an existing LDAP server (or create a new one in-line by clicking the Create LDAP Configuration button) or choose an Authentication URL, which we have done in this example. The changes are automatically saved, and the API is now secured.
Notice how when an OAuth profile is selected in the drop-down menu, a box with the information is displayed, as shown in Figure 5-13 on page 98.
|
The selected OAuth profile makes use of Authorization code and Implicit Grant Types. Please make a note of the following Authentication Endpoint URL. It will be required to invoke this API: https://server_address/api/oauth/authorize
|
Figure 5-13 Information that appears when OAuth profile is selected
Applications that use this API and want to conform to the OAuth profile must redirect users to the stated URL to authenticate and retrieve the session token. Application consumers can see this information on the Developer Portal when reading the documentation for the API and its resources (Figure 5-14).
Figure 5-14 Securing an API with OAuth
After the API is configured to use OAuth security, ensure the resource you want to protect has authentication enabled in the Authentication section of the resource editor. If the API is not already stopped, stop it and start it again for all changes to take effect. The resource is now protected by OAuth.
5.5.5 Testing OAuth
Testing an API that is protected by OAuth cannot be done in the test section of an API in IBM API Management, because it requires multiple steps involving an application and a user. Those steps use various ways of communicating with IBM API Management:
1. Direct the user to the OAuth Authorize URL through web browser.
2. The user authenticates with IBM API Management.
3. IBM API Management redirects to the application with an Access Code.
4. The application trades the Access Code for an Access Token at the OAuth Token URL.
5. The application makes a call with the OAuth Token.
This extensive process can be tested through tools such as a web browser plug-in designed for HTTP calls like Poster or Postman, or an application using libraries for OAuth, or writing a script with command-line tool curl.
For this demonstration of testing an OAuth flow, curl is used. The curl tool can be viewed as a simple HTTP client, which can configure an HTTP call with all necessary options in a single command, and the output can be seen in a clear and concise manner, without hiding any metadata. The curl tool is present by default on most Linux operating systems and Mac. For Windows, either download Curl for Windows, use Cygwin, or use alternative tools to achieve similar functionality.
Before you begin, make sure that you have an application that is registered with the Development Portal. Note the App ID, and set the OAuth redirect URL to https://localhost. Normally localhost is not used for an application redirect URL but allows for less complicated manual testing.
|
Important: The redirect URL must match the URL passed to IBM API Management in the oauth/authorize call, otherwise the call will fail. The reason for doing this is so IBM API Management can verify the application, similar to the application App ID and App Secret.
|
Figure 5-15 shows the application we use for testing the OAuth profile.
Figure 5-15 The application we use for testing the OAuth profile
Authenticate the user
The application must authenticate the user through IBM API Management and retrieve the access code. This is done by redirecting the user to the OAuth authorize URL, which is either in the Authentication section of the API editor, or in the API documentation in the Developer Portal.
It always follows this format:
https://path.to.server/api.name/oauth/authorize
However, IBM API Management needs more information so it can understand more about what the application is, and what it wants to do, so the following information must be added to the URL with query parameters:
•client_id: The App ID of the application.
•response_type: For grant type of authorization code, this must be code.
•scope: This must match the API name, with preceding forward slash.
•redirect_uri: The URL to redirect to when the user is authorized.
When made into multiple query strings, the text to append to the authorize URL looks like this example:
?response_type=code&client_id=9b3cd057-dd7b-4b88-af68-f7bb73de094a
&scope=/passengersv1&redirect_uri=https://localhost
The full address should now be as follows:
https://path.to.server/api.name/oauth/authorize?response_type=code
&client_id=9b3cd057-dd7b-4b88-af68-f7bb73de094a&scope=/passengersv1
&redirect_uri=https://localhost
Put this full address into the browser. The browser will request you to log in. Use credentials that are stored in the LDAP server or Authentication URL that the API is connected to. A dialog requests permission (Figure 5-16).
Figure 5-16 Requesting permission for an app to consume user resources
Authorize the application to make calls to the API by clicking Allow Access. The page redirects to https://localhost, which fails to show any content in the window, but the full URL in the address bar contains the access code that we need:
https://localhost/?code=AAJPq1tSHhSLrbNkb%2B1mUXo7oRRsg3ztwq7dRmyFKQa6hLX8roH0PUV7eHcGnqiSc4mICyRKRUT0U2UhRJmfyq32ouap01KZWR1xnF7iwvwoGQazL5kGrO6Vkz7IuOf%2Fd%2Bo
The access code can be found as the value to the query string key code in the URL. Retain this code, because it is used for retrieving the access token.
|
Note: This redirect URL normally redirects to a web server that is expected to process and store the code generated by IBM API Management.
|
If the oauth/authorize endpoint shows a blank page or an error, the URL is incorrect. Check all spelling of the keys and values, and be sure that the redirect_url matches the value specified in the application configuration.
Retrieve the access token
To retrieve the access token, we will use curl. Our OAuth profile was configured with a public client type, so the data we need to send to the oauth/authorize URL will be in the body of the request:
•grant_type: This should be set to Authorization Code.
•code: This is the code retrieved from the previous step.
•client_id: The App ID of the application.
•redirect_uri: The URL to redirect to when the user is authorized.
To put the key/value information into the body of the call in curl, the -d flag is used. The curl command to retrieve the access token is as follows:
curl -k -H 'Host: path.to.host' -d 'grant_type=authorization_code&code= AAJPq1tSHhSLrbNkb%2B1mUXo7oRRsg3ztwq7dRmyFKQa6hLX8roH0PUV7eHcGnqiSc4mICyRKRUT0U2UhRJmfyq32ouap01KZWR1xnF7iwvwoGQazL5kGrO6Vkz7IuOf%2Fd%2Bo&client_id=9b3cd057-dd7b-4b88-af68-f7bb73de094a&redirect_uri=https%3A%2F%2Flocalhost' https://path.to.host/passengersv1/oauth/authorize
Note the following information about this curl command:
•The -k flag tells curl to ignore self-signed certificates.
•The -H flag is followed by a header string, in this case, a Host
•The redirect_uri must be URL-encoded because it is in the body of a call.
|
Note: Using the Host header is useful when the web server is behind a load balancer, or navigating virtual hosts. The preference is for it to be used in all curl calls.
|
After executing the command for curl to connect to the authorize URL, the following text is the result:
{
"token_type":"bearer",
"access_token":"AAEGcC1jb2RlKdQEeZodckCUBI2PxA0cIKjoogTDkN4z6+t/E5TgszCjQ/878lbk1tVwbmO+6dPo6qkFNSqW9MGKoIkRapxe1pxyK52iWxgHxp9XQnEphmM",
"expires_in":3600,
"scope":"/passengersv1"
}
The access token has been retrieved. As you see from the JSON response body of the call, the lifetime is only for 1 hour and is valid only for the scope API passengersv1.
|
Important: The access token retrieved might contain invalid characters for HTTP, such as plus sign (+) and forward slash (/) and must be URL-encoded in the future. Otherwise, the code will not be recognized.
|
If the return body is as follows, the access code has expired, so you must retrieve a new token from the oauth/authorize endpoint through a browser:
{ "error":"invalid_grant" }
This error message also occurs if the code is invalid, perhaps because of invalid characters that should be URL-encoded.
Calling the API
Now that we have the access token, we can make subsequent calls to the API and its resources without having to authenticate the user. So long as we use the code before it expires, our application can make as many calls as the entitlement allows. To make a sample call, we use curl again, as you might do when making calls to an unprotected resource.
To apply our access token to the call, we must insert it into a Bearer authorization header:
curl -k -H 'Host: path.to.server' -H 'Authorization: Bearer AAEGcC1jb2RlKdQEeZodckCUBI2PxA0cIKjoogTDkN4z6%2Bt%2FE5TgszCjQ%2F878lbk1tVwbmO%2B6dPo6qkFNSqW9MGKoIkRapxe1pxyK52iWxgHxp9XQnEphmM' -H 'X-Accept: application/json' 'https://path.to.server/passengersv1/my/profile?appId=9b3cd057-dd7b-4b88-af68-f7bb73de094a'
Do not forget that the call still needs the appId query parameter at the end of the URI. If the call is successful, the body of information is returned.
Because our call has our Bearer session token, and that session token is associated with the user who has been authenticated, IBM API Management will populate the IBM-App-User header with the user name of that user (the user name the user provided with the password). This header is used to retrieve the appropriate content for the user, in this case, the user’s passenger profile. This is done without the application seeing it, and upholds security.
With so many steps and multiple keys and values to use across the whole testing scenario, many chances for faults can occur. Here are some simple troubleshooting steps:
•If a response returns with HTTP code 401 Unauthorized and the header WWW-Authenticate has a value Bearer error="invalid_token" then the access token has expired, and a new code must be retrieved.
•If a response returns with HTTP code 404 not found, the App ID is likely incorrect. Be sure to use the code correctly and try again.
..................Content has been hidden....................
You can't read the all page of ebook, please click here login for view all page.