


Defining APIs
This chapter provides an introduction to API technologies, common practices in defining APIs and creating API definitions using IBM API Management 2.0.
This chapter contains the following topics:
3.1 Understanding API technology
As described in Chapter 1, “API concepts, trends, and overview” on page 1, an API as both a concept and realization is nothing new; software engineers have been creating and using APIs for component interaction for several decades. However, the growth of the API economy has been driven by what is typically described as a web API.
Web APIs are an implementation of a web service that is characterized by the following conventions:
•They are typically implemented to expose an external service interface for developers to write consumer applications.
•Their implementation is based on RESTful principles.
•They do not implement contract-based definitions such as SOAP and web services standards to define the interface.
•They use JSON or XML to encode the payload.
It is important to understand why these conventions have arisen, because they provide context for the design decisions you make when defining web APIs.
3.1.1 Architectural decisions: REST and SOAP
Much of the discourse about web APIs is characterized by a debate of what REST offers compared to SOAP. To help you understand the context of this debate, it is important to state why REST has become the prevalent style for implementing web APIs.
REST (Representational State Transfer) is embodied in the majority of web APIs available for application developers to consume. It was originally proposed by Roy Fielding in his dissertation “Architectural Styles and the Design of Network-based Software Architectures”1 with many elements being subsequently formalized by World Wide Web Consortium (W3C) as part of HTTP/1.1.
The dissertation outlined a framework by which software could be understood in the context of its architecture and the specific relevance of this framework to network-based application architectures (such as the World Wide Web). It introduced REST as an exemplar of this approach.
The REST example described several key principles (described by Fielding as constraints) that aimed to elucidate the software engineering design decisions made in its formulation. It is these principles that characterize most of REST-based APIs in use today:
•Precedence of the client-server relationship
•Requirement for stateless communication
•Implementation of cache constraints to engender efficiencies in network communications
•Use of a uniform interface through standardized data elements such as resources and representations
Other constraints were proposed by Fielding, such as the layered system and code-on-demand, but these principles are acknowledged as comprising the REST architectural style.
The question that you might ask about the rise of the REST paradigm is why has it become the prevalent style for web APIs? Briefly, because much information is already available about this subject, there are several reasons:
•The common perception is that REST offers a lightweight alternative to service-orientated mechanisms such as SOAP. It eschews the protocol-based interfaces that SOAP/WSDL creates and focuses on discrete objects defined using resources (namely URIs) in conjunction with HTTP methods. This is an attractive quality for the original target audience of web APIs (namely other web developers who understood HTTP but not SOAP).
•The growth in the use of REST for web APIs has also been coupled with the growth of mobile apps. Neither Android nor iOS support SOAP natively whereas both support the building blocks to implement REST.
•REST is expressed in terms of the distributed architecture that sets its context, HTTP. For that reason, much of the functionality required to implement CRUD-like semantics is ready to use. This allows the API developer to concentrate on the provision of objects through resources without overloading their interface with the verbiage required to express operations. For example, each of GET, POST, PUT, and DELETE on a customer record would need to be defined as individual operations in a WSDL document when using SOAP, whereas with REST the interface is consistent for each method.
•REST allows for the fine-grained control of objects through the use of resources (expressed as URIs) that also allows for greater efficiency in communications with the server (obviously important when implemented on a mobile device). The consumer of the API has the ability to make a choice to either update all or part of this object. The actual interface does not change, only what they choose to update.
The reasons outlined start to set the context for why design decisions were made in the creation of web APIs that opted for REST, in that REST fulfilled specific requirements that were not pragmatic to approach using existing technologies such as SOAP.
However, REST does not render the use of SOAP redundant. Many web APIs implement SOAP and it will continue to be an important building block for enterprise service integration particularly in organizations that implemented SOA. One of the roles of web APIs and REST in such cases is complementary to the existing services, to allow services to be exposed to external consumers in a manner they can make sense of.
The decision you make should be in the context of the specific requirements you are aiming to address rather than one based on pure technical merit. To help with your decision, see Table 3-1, which lists key characteristics of REST and SOAP.
Table 3-1 Comparison matrix between REST and SOAP
|
Characteristic
|
REST
|
SOAP
|
|
Granularity of interfaces
|
Fine
|
Coarse
|
|
Standardization
|
Non-prescriptive, defined by convention
|
Prescriptive, defined by contract (WSDL)
|
|
Intention
|
Web APIs targeted for external interfaces (although can be used internally)
|
SOA-based enterprise integration
|
|
Note: This section is intended to be a general overview of the relevance of REST from a technology perspective and not as a REST primer or tutorial. Read Fielding’s dissertation for the complete picture of REST.
|
3.1.2 Encoding decisions: XML and JSON
The growth of REST has been complemented by the increasing use of JavaScript Object Notation (JSON) as the mechanism by which resources are represented. As with REST, this has been organic in nature and driven by several factors:
•Mobile apps driving the adoption of web APIs and the need for a compact payloads over constrained communication links
•The consumption of web APIs by a web developer community and the resonance of JSON-encoded data with this audience
However, XML is still a popular choice as a result of several factors:
•The familiarity for some with XML provides a comfort zone.
•JSON Schema has only recently started to formalize as a standard and there are few parsers that implement support to the degree available for XML Schema.
•XML resonates with developers who are from a SOA background and who are likely to be familiar with SOAP payloads encoded with XML.
The use of JSON over XML is not a dichotomy. You will make design decisions where you support one, both, or even other formats dependent on the intended audience. With IBM API Management 2.0, you can work with both XML and JSON in defining an API for your customers, including support for transformation between formats.
3.2 Designing APIs
You might have noted the use of the terms “typically” and “convention” throughout this chapter. This is what characterizes the web API paradigm; Although strict adherence to REST as defined by Fielding is feasible, the developer normally makes design decisions for their web API design based on common sense, practicality, and ease of use for the application developer who is consuming the application.
|
Important: The following sections attempt to describe the characteristics of REST in terms of being pragmatic and strict. However, note that pragmatic and strict REST can overlap and they are not mutually exclusive; you are most likely to implement the majority of what is defined as pragmatic REST and possibly some of what is defined as strict REST depending on your needs.
|
3.2.1 Pragmatic REST
Pragmatic REST is about taking the core concepts of REST and implementing what works for you, bounded by several core conventions that typify the pragmatic approach. The following sections describe each and their relevance to the design decisions you make.
Implementing HTTP conventions
First and foremost, REST is about harnessing the functionality delivered by HTTP. Although REST can be implemented using another protocol in its original form, it is framed in HTTP.
When designing a web API using pragmatic REST conventions, observe the following HTTP/1.1 standards:
•HTTP methods are normative and must be implemented correctly as an accurate description of state. For example, an API Consumer will always expect a GET to be idempotent. Your API should not break these standards.
•HTTP response codes should be implemented to inform an API Consumer of the state of a resource.
Statelessness
Statelessness is one of the key constraints of REST; the client should manage all information regarding application state, with no state-related information held on the server. Be sure the design of your API reflects this constraint by ensuring that all information regarding state is accurately and completely returned to the API Consumer.
Caching
Caching is another key constraint of REST. It uses HTTP directives to allow content to be cached to improve network communication. Although this has obvious benefits (especially in view of the fact that you can implement network components to cache content and thus protect your API) cache control is implemented with less regularity, most likely because of the complex design decision required.
Implement caching if you are confident of the benefits, which is likely to be when API Consumers are frequently and repeatedly performing GET operations against your API. IBM API Management 2.0 includes functionality to help you implement caching.
Identifying resources
Resources are the mechanism by which information is referenced and are universally implemented using URIs. In pragmatic REST terms, several conventions typify identifying resources:
•The first fragment of the URI is the API name. This allows for a specific API to be addressed where many tenants are found at the same host and port:
/myphotoapi
•A pluralized noun indicates a collection or array:
/myphotoapi/photos
•A unique identifier can be applied to a collection to retrieve an individual entry:
/myphotoapi/photos/12
•Query parameters are used to convey optional parameters not incorporated in the payload to facilitate searching a collection:
/myphotoapi/photos?albumName=Sunny%20Days
•REST is resource-centric by design. Verbs that instruct an operation to be performed are not used in the URI because they are encapsulated in HTTP methods.
Be sure to adhere to these conventions in your design, because they will resonate with developers already consuming web APIs. The key is to be consistent in the choices you make, because this will allow ease of use for your audience.
Representing resources
Representing resources is a fundamental aspect of the REST architectural style that consists of both the resource representation itself and a description of the representation. In practical terms this means you will do these tasks:
•Encode the data using the relevant technology, typically in XML and JSON.
•Describe the encoding of the resources implemented in your web API using an appropriate mechanism.
•Allow content negotiation to take place when an API Consumer makes a request for a resource.
Choosing appropriate representations for your resources is a design decision that is likely to be subjective, based on your judgement of what is appropriate for your organization. Consider the following factors:
•Whether your audience favors any specific representations and what engenders ease-of-use (typically XML or JSON).
•The practicality of implementing more than one representation. For example, transposing the contents of an XML-based representation into JSON might be difficult if any sophisticated type constraints are imposed using XML Schema.
•If you are implementing web APIs as a means of exposing your internal SOA-based services, choose a mechanism that allows the most straightforward transposition of content from the back end to the API (possibly by pulling the content of the service directly into the resource).
In pragmatic REST, resource representation is implemented in one of two ways:
•Using an extension in the URI
The API Consumer can request a URI and include an extension in the request that describes the encoding the consumer wants to see in the response, as in the following example:
GET /myphotoapi/photos/1.json
•Using the Accept and Content-Type HTTP header
The API Consumers will declare the encoding they can accept in the Accept header and the API will declare the encoding of the response in the Content-Type header, as in the following example:
GET /myphotoapi/photos/1
Accept: application/json, application/xml
This example might elicit the following response:
Content-Type: application/xml
The design decision taken might also be influenced by the expectations of your API Consumer; either of the methods can be used although arguably using HTTP headers is both more RESTful (as using an extension could intimate another resource) and the mechanism is formally supported by the HTTP/1.1 protocol.
|
Important: Exercise caution in your use of HTTP headers for several reasons:
•Headers might be filtered from the back end by DataPower. Consider where information that is important to your back end should reside: in headers, or be placed in the URI or payload.
•Misuse of HTTP/1.1 headers can cause unexpected results in your infrastructure. If a standard HTTP header cannot be reused in a fully compliant manner, consider implementing a nonstandard header prefixed with the following text:
X-
•REST is not confined to HTTP and can be implemented using other protocols. Consider whether your API might be implemented using alternative transport protocols in the future and whether using HTTP headers will impact the migration path.
|
Versioning
The vast majority of web APIs support a versioning mechanism to allow new functionality to be published to consumers while allowing existing versions to remain available. This mechanism is almost analogous to that used in SOA where an ESB mediates between different service versions dependent on the functionally required. However, the key difference is that an API Consumer makes a conscious choice to consume a version rather than control being delegated to a component in the architecture.
Implementing a versioning strategy forces two decisions to be made in the design of your API:
1. Decide on the number of versions that you will support concurrently. This has implications on the cost of ownership both in terms of software maintenance and sizing of infrastructure. Implement a policy that allows ease-of-the use for the API Consumer, but that does not allow a long line of developers to form on versions of the API that you want to deprecate.
2. Decide how to design the versioning mechanism into the API implementation; the emphasis here is on ease of use for the API Consumer and what will make sense to them. There are three common conventions:
– Declaring the version in the URI
Use a URI fragment to complement each resource with a label that indicates a specific version number, as in the following example:
/myphotoapi/v1/photos
/myphotoapi/1.0/
– Declaring the version in a HTTP header
This can take a variety of forms but typically is implemented in the Accept header, as in the following example:
GET /myapi/photos
Accept: application/myapi.photos-v1+xml
– Using a custom mechanism that makes sense to your consumer base
If a specific mechanism will resonate with the API Consumer, consider this for your implementation.
As with representation the design decision taken may also be influenced by the expectations of your API Consumer. IBM API Management 2.0 includes functionality to help you publish new versions of APIs.
3.2.2 Strict REST
Strict REST is essentially everything that is excluded from Pragmatic REST and means following Fielding’s principles exactly. Two aspects of the core principles typically fall into the scope of Strict REST: HATEOAS and code-on-demand.
HATEOAS
Hypermedia as the Engine of Application State (HATEOAS) forms part of the uniform interface constraint. It defines a mechanism where hypermedia is used to send directives to the client (in the form of links) regarding where resources should be accessed; the resultant architecture allows detailed knowledge of the API resources to be devolved from the client, engendering flexibility.
However, implementing HATEOAS requires a level of sophistication in both design and technology that is a barrier to most entrants and as such is not implemented. The prevalence of JSON in web API design, which in itself is not hypermedia, might have also led to HATEOAS being implemented with less frequency.
Code-on-demand
Code-on-demand complements HATEOAS: its premise is that client functionality can be extended and thus simplified based on code downloaded from the server. This means that a client might potentially have no knowledge of how to interact with the application hosted on the server other than to access the appropriate URL, download the code, and comprehend hypermedia.
Fielding defined this as an optional constraint; excluding this option is a design decision frequently made, given the sophisticated and challenging nature of the implementation required to implement code-on-demand (and possibly because of the security implications involved). One might also argue that frameworks already in use on the World Wide Web have superseded this constraint, and engineering a web API to implement code-on-demand is unwarranted.
3.3 Defining APIs with IBM API Management 2.0
IBM API Management 2.0 allows you to create an API definition to reflect the decisions you made in designing your API, reflecting many of the principles described in 3.2, “Designing APIs” on page 41. You use the API Manager to do this. The following sections introduce the available functionality.
3.3.1 Creating an API definition
The first step in creating an API definition is to create the base definition. To do this, log in to the API Manager with the user name and password supplied by your administrator team.
When authenticated, the Getting Started page opens (Figure 3-1 on page 47). Use these steps to create an API definition:
1. Click Create, which directs you to the APIs page.
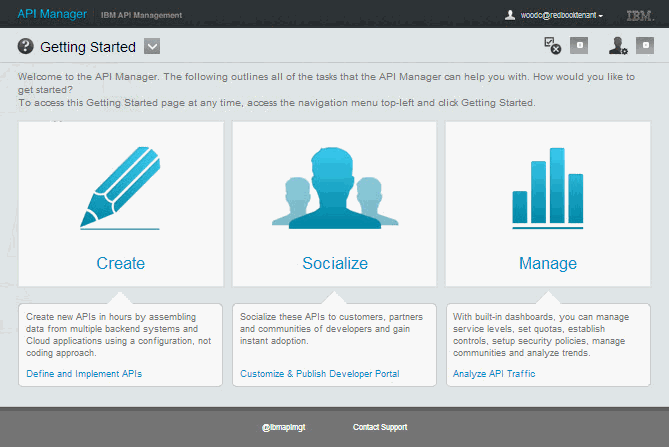
Figure 3-1 API Manager Getting Started page
2. A drop-down menu is included that gives you shortcut access to all areas of the API Manager as shown in Figure 3-2. To start creating an API definition, click Create new API.

Figure 3-2 API Manager APIs page
3. In the Create new API dialog box (Figure 3-3), enter the following information to begin creating the API definition, and then click Create to save the definition:
– API name: A name for the API, used for display and ease of reference.
– context: The root URL for the API definition. This will form the basis of all the resources you publish.
– API description: An optional description of the API.
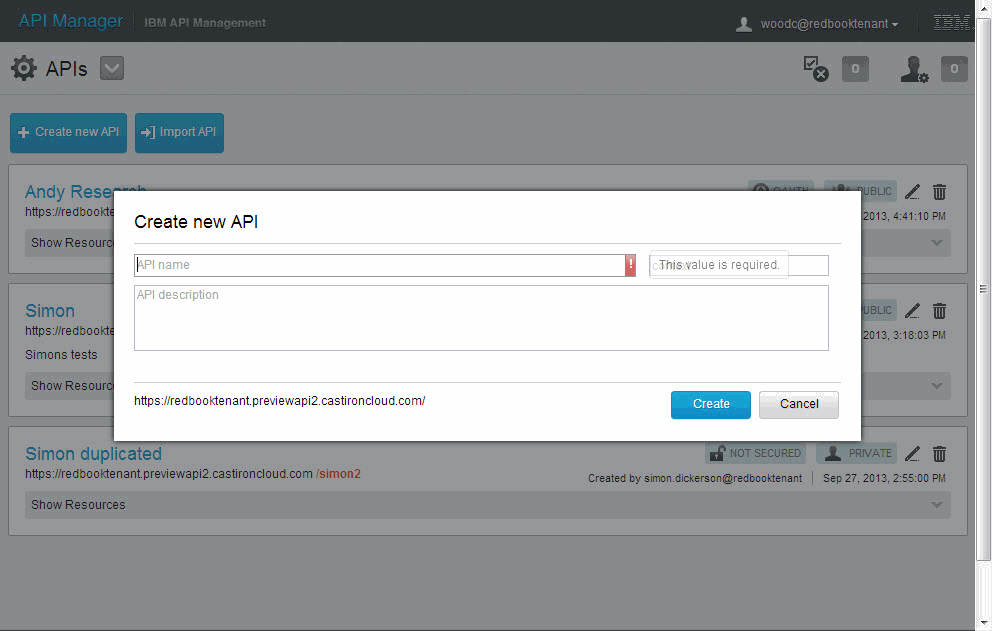
Figure 3-3 Create new API prompt
4. The new API definition is shown in the APIs page. Click the API you created; the Overview page opens (Figure 3-4).

Figure 3-4 API overview
Enter the following information:
– In the Permissions area, the API can be designated as either public (available to all those with an entitlement) or private (available to users of the API Manager only).
– Documentation on the API can be added by clicking Add Additional Documentation.
3.3.2 Adding resources
To expose your services and data using IBM API Management 2.0, create resource definitions:
1. Select the API you created, and then click Add a Resource. You are prompted for details (Figure 3-5). Complete the details of the resource to be created and then click Add to save the resource definition:
– Use the HTTP method drop-down to choose the appropriate verb for the resource.
– Enter the URI in the Resource URI box using placeholders for path and query parameters as appropriate.
– Optionally add a description of the resource you have created.
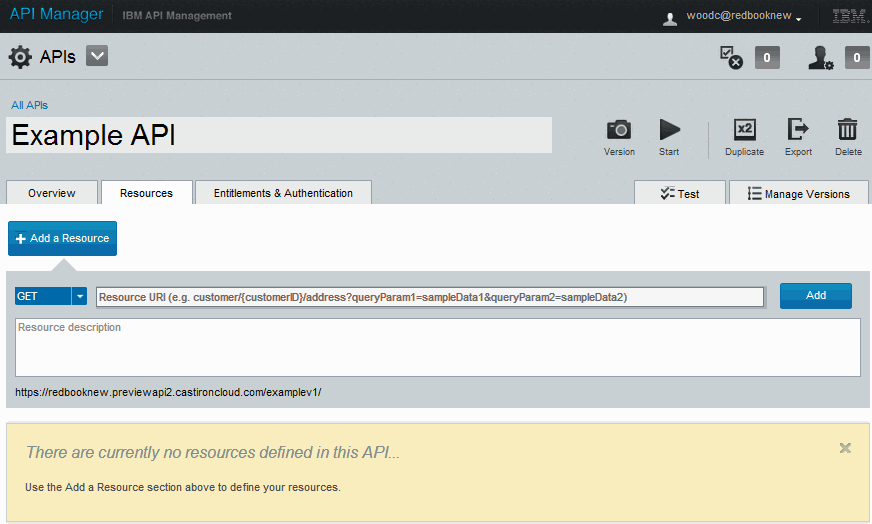
Figure 3-5 Adding a resource
2. The new resource is added to the list of resources for the API below the prompt. Click the hyperlink for the resource you just created. The page shown in Figure 3-6 opens.
3. Click the Overview tab on the new page, define the general attributes of your API, such as the request/response HTTP headers and example of the request/response payloads.
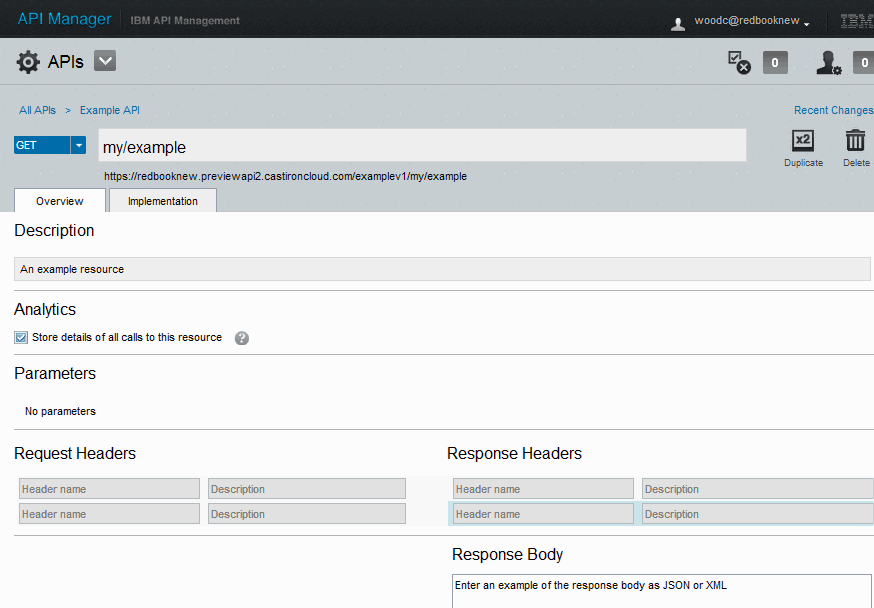
Figure 3-6 Resource overview
4. Click the Implementation tab (Figure 3-7 on page 51), and then define how you will connect to a back-end service or database. This can be implemented either as a proxy (where requests are passed directly to a back-end service with no modification) or an assembly (which allows a complex interaction with one or more back-end services to take place). This functionality is described in 3.4, “Scenario: Defining the JKHLE Airways API” on page 52.
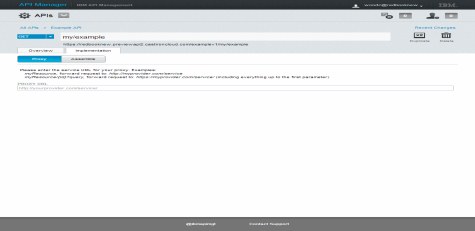
Figure 3-7 Implementation Overview
5. After you add attributes to the resource definition on the Overview and Implementation tabs, you may start the API by clicking Start.
|
Note: For the API definition to start, an entitlement must be attached to it. Entitlements are described in Chapter 4, “Entitlements” on page 71. When you create an API definition, a default entitlement is automatically created for you.
|
3.3.3 Testing the definition
After you have created both API and resource definitions you can test the API by using the Test facility included in the API Manager. Use the APIs drop-down list to select the API you created and click the Test tab (Figure 3-8 on page 52):
•In the Select an API / Resource drop-down list, select the resource you want to test.
•In the Select an Application drop-down list, select an Entitlement with which to test the resource.
•In the App Secret text box, enter a secret associated with an ID, required to use an Entitlement. This subject is described in Chapter 9, “Developer Portal” on page 189.
•If you are testing an operation that requires a payload (such as PUT or POST) a text box is available where so you can create a request payload.

Figure 3-8 Test facility in API Management
3.4 Scenario: Defining the JKHLE Airways API
This section uses the available functionality in IBM API Management to implement the JKHLE API definition.
3.4.1 Creating the API definitions
The JKHLE architecture team has designed the solution for managing and exposing APIs using IBM API Management 2.0. They opt to implement RESTful web services because of the prevalence of REST in the marketplace and that it is well understood by application developers. The team also added a requirement that each resource be represented in JSON, again for reasons of familiarity with the target audience.
Shavon is the JKHLE API Publisher responsible for understanding the architecture team design and creating the API definitions in IBM API Management. She must provide APIs that offer an interface over the existing JKHLE SOAP-based web service and database.
Four resource definitions are needed to deliver the JKHLE API functionality:
•A proxy over a RESTful API that has already been created in the JKHLE back end and provides the profile of a passenger.
•An assembly that gets specific flight information for a passenger.
•An assembly that allows a passenger to check-in.
•An assembly that allows a passenger to register a delivery address when their baggage is delayed.
3.4.2 Creating the proxy definition
A proxy definition is required to create a facade over an existing REST-based web service, created as a proof-of-concept by JKHLE. The architecture team has decided to re-use this service, using IBM API Management to allow authentication and management functionality to be added.
To create the new Proxy definition, log on to API Manager, click Create and then execute the following steps:
1. Click Create new API, enter the following details at the prompt, and then click Create:
– API name: JKHLE API
– context: passengersv1
– API description: The JKHLE API definition
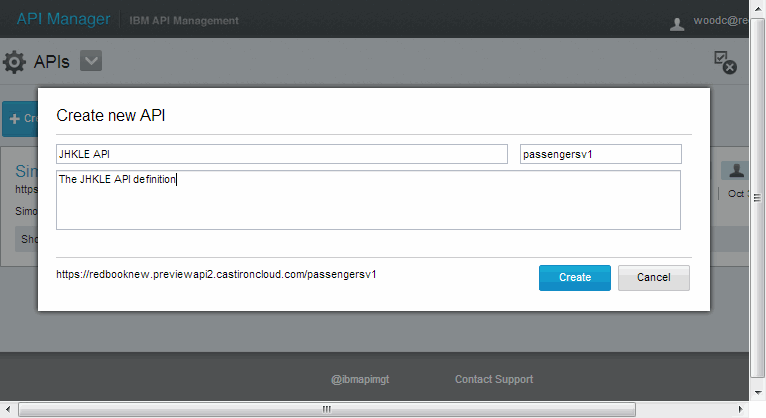
Figure 3-9 Creating the JKHLE API
2. Click JKHLE API → Resources → Add a Resource. Enter the following details at the prompt, and then click Add:
– Resource URI: my/profile
– Resource description: Get passenger profile
|
Note: As you define the API, your amendments are automatically saved.
|
3. The new resource appears below the prompt (Figure 3-10). Click the name of the resource to the properties of the definition.
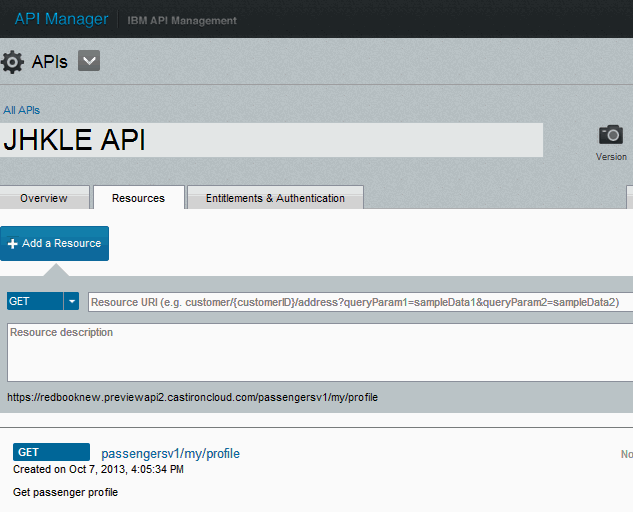
Figure 3-10 Adding a resource
4. The API Overview tab opens (Figure 3-11 on page 56). Add the following properties:
– Request Headers: Add a header IBM-App-User (the purpose of this header is explained in Chapter 5, “API security” on page 81).
– Response Body: Add the JSON document, listed in Example 3-1, to define the structure of the response that will be returned by the API definition.
Example 3-1 Response body
{
"id": 3001,
"firstName": "Alice",
"lastName": "Customer",
"frequentFlyerNum": "1234567890",
"frequentFlyerTier": "GOLD",
"bookedFlights": [
{
"flightNumber": "JOY180",
"numberBags": 2,
"preferredSeatNumber": "3B",
"baggage": {
"status": "IN_FLIGHT",
"carrierFlightNumber": "JOY180",
"address": {
"customerFirstName": "Alice",
"customerLastName": "Customer",
"addressLine1": "Nice Hotel & Spa",
"addressLine2": "100 Woodland Lake Dr",
"addressLine3": "Exampleville",
"zip": "NC 92104",
"country": "United States",
"lastUpdated": 1380804494816
}
}
}
],
"username": "[email protected]"
}

Figure 3-11 Defining API properties
5. Click the Implementation tab. The definition is automatically set to Proxy. Enter the following URL in the PROXY URL textbox (Figure 3-12 on page 57):
http://redbooks.castironcloud.com:9080/AirlineExample/rest/passengers/my

Figure 3-12 Adding a Proxy URL
The Proxy definition is now complete. The URL at which the resource is available is listed. The host that is specific to your environment is displayed.
3.4.3 Creating the Assembly definitions
To create the Assembly definitions, you follow a similar process to that used for a proxy. However, you will transform the response messages from the JKHLE SOAP back end to your JSON representation. Configuration must be added in API Manager to allow the resource definition to connect to the web service.
Adding a connection
To create the connection resource that allows flight check-in, complete the following steps:
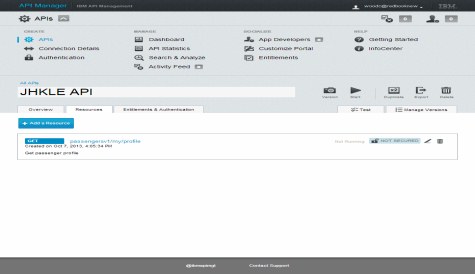
Figure 3-13 Revealing API Manager Connection details
2. Click Add a Connection → Web Service. Enter the name of the connection as JKHLE Web Service and click Select File to add the JKHLE WSDL. Click Test to ensure the WSDL parses and the connection will be saved.
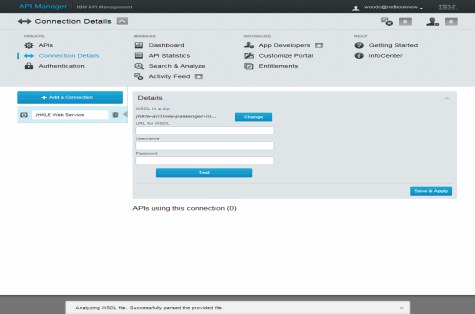
Figure 3-14 Adding a web service connection
|
Important: Your WSDL must contain the correct SOAP address for the service; IBM API Management uses this when making a connection.
|
Adding the Flight Check-in resource
Now that the connection is added, the Assembly definitions can be created. You first create a resource that references the doCheckIn operation at the JKHLE Web Service. The intention of the design is to allow an HTTP PUT to be executed to update the status resource to check in the passenger. Follow these steps to add the Flight Check-in resource:
1. Click Connection Details → APIs → JKHLE API → Resources → Add a Resource. Define the resource with the following details, and click Add:
– Resource URI: my/bookedFlights/{flightNumber}/status
– Resource description: Update passenger status for a flight to allow flight to be checked-in
The resource is added (Figure 3-15 on page 60).
|
Note: A sample of a path parameter is shown in this example. This construct is important because it allows referencing of resources that are dependent on the URI passed by the client. This allows resources that are personal to the client to be addressed.
|

Figure 3-15 Adding a PUT resource
2. Click the newly created resource. Enter the following details as shown in Figure 3-16 on page 61:
– Request Header:
IBM-App-User
– Request Body:
{
"statusCode": "CHECK_IN"
}
– Response Body:
{
"itineraryNumber": 9508436,
"allocatedSeatNumber": "3B",
"boardingPass": "http://redbooks.castironcloud.com:9080/AirlineExample/rest/boardingPass/1380879508436"
}
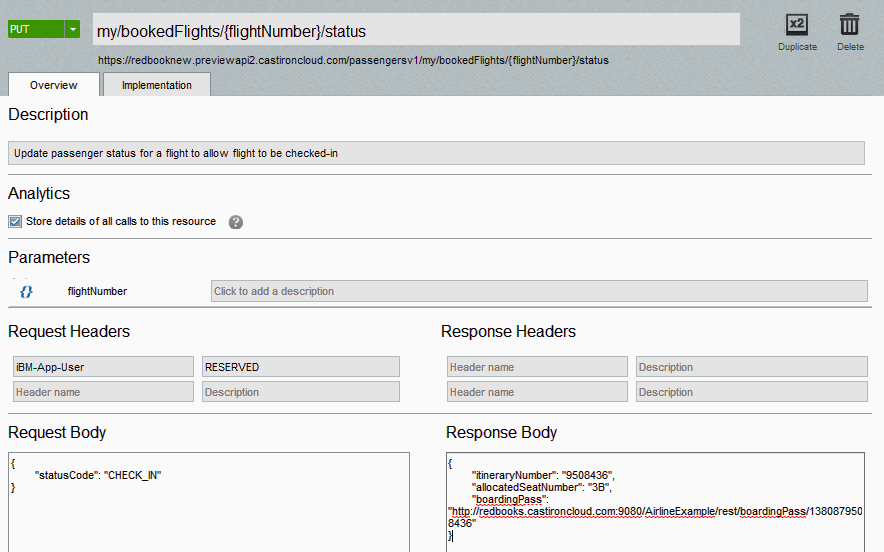
Figure 3-16 Adding resource properties using the Overview tab
3. Click Implementation → Assemble. The content of the Overview tab is saved. Click the plus sign under the Request task and click Web Service Invoke Operation. The dialog (shown in Figure 3-17 on page 62) opens. On the Connect tab, click the Existing Connections drop-down menu and select the connection you created. Click Test.

Figure 3-17 Referencing an existing connection during in Connect
4. Click the Discover tab (Figure 3-18). This tab is where you can select the operation and parameters in the web service request that are relevant to the call you are making. Select the doCheckIn operation, and select the username and flightNumber check boxes.

Figure 3-18 Choosing fields to map in the Discover
5. Click the Configure tab and click Map Values. The Configure tab is where you can map request headers, parameters and body fields to the web service request message. Map the fields as shown in Figure 3-19.

Figure 3-19 Mapping fields during the Configure step
6. You can also add mapping functions to transform the data being mapped. Click the plus sign (+) on the flightNumber connector. The dialog shown in Figure 3-20 on page 64 opens. Click Uppercase to ensure that the flightNumber field is always correctly formatted when sent to the JKHLE Web Service.

Figure 3-20 Using mapping functions in Discover
7. Click the Review tab. Use this tab to add error handling and ensure your configuration is correct. Add the following configuration information and then click Response (Figure 3-21):
– For ALL other cases Return this HTTP Code: 500 Internal Server Error
– and Take this action: Send System Message

Figure 3-21 Adding Error Handling in Review
8. Finally, add the connectors shown in Figure 3-22 to map the fields defined in the JKHLE Web Service response to the fields in the JSON representation that will be received by the API Consumer. When you are done, click JKHLE API; the resource will automatically be saved.

Figure 3-22 Add mappings in the Response
You can now repeat the steps to create the remaining two definitions for the JKHLE API definition, reusing the JKHLE Web Service you have already created.
Adding the Baggage Status resource
To create the resource that represents the status of a passengers baggage, complete the following steps:
1. Click JKHLE API → Add a Resource. Add these details and click Add:
– The HTTP method: GET
– Resource URI: my/bookedFlights/{flightsNumber}/baggage
– Resource description: Get the baggage status for a flight
2. Click the newly created resource. In the Overview tab enter the following details:
– Add a Request Header called IBM-App-User.
– Add the following text to the Response Body:
{
"status": "DELAYED",
"carrierFlightNumber": "JOY180"
}
3. Click Implementation → Assemble. Click the plus sign under Request and Web Service Invoke Operation → Connect to add the JKHLE Web Service using Existing Connections. Click Test to move to Discover.
4. In the Discover pane, select the getPassengerBaggageStatus operation and all the fields under PassengerBaggageStatusRequest. Click Configure → Map Values.
5. In the Configure pane, map the fields as per the check-in example. Click Review.
6. In the Review pane, add Error Handling as per the check-in example. Click Response.
7. In the Response pane, map the fields as shown in Figure 3-23.
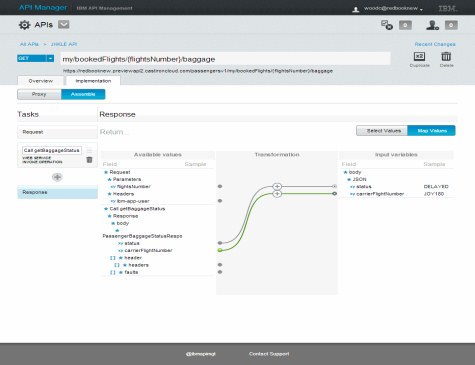
Figure 3-23 Mapping the baggage status response fields
8. Click JKHLE API to complete the resource definition.
Updating the Delivery Address resource
To create the resource that allows the delivery address for baggage to be updated, complete the following steps:
1. Click JKHLE API → Add a Resource. Add the follow details and click Add:
– The HTTP method: PUT
– Resource URI:
my/bookedFlights/{flightsNumber}/baggage/deliveryAddress
– Resource description:
Allows a customer to add a delivery address if baggage is delayed
2. Click the newly created resource. Click the Overview tab and enter the following details:
– Add a Request Header called IBM-App-User.
– Add the following text to the Request Body:
{
"address": {
"customerFirstName": "Alice",
"customerLastName": "Customer",
"addressLine1": "Nice Hotel & Spa",
"addressLine2": "100 Woodland Lake Dr",
"addressLine3": "Exampleville",
"zip": "NC 92104",
"country": "United States"
}
}
– Add the following text to the Response Body:
{
"deliveryPermitted": true
}
3. Click Implementation → Assemble. Click the plus sign (+) under Request and select Web Service Invoke Operation → Connect to add the JKHLE Web Service using Existing Connections. Click Test to move to Discover.
4. In the Discover tab, select the doBaggageDelivery operation and all the fields under BaggageDeliveryRequest. Click Configure → Map Values.
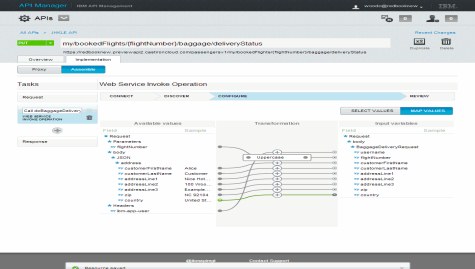
Figure 3-24 Mapping the delivery address request fields
6. In the Review tab, add error handling according to the check-in example. Click the Response tab.
7. In Response, connect the deliveryPermitted field from the BaggageDeliveryResponse to the Response field.
8. Click JKHLE API to complete the resource definition.
3.4.4 Starting and testing the API definitions
Before you can test the API definitions you have created, you must start the API. Complete the following steps:

Figure 3-25 Starting an API definition
2. You can then use the Test facility to test one of the resources you created. Click the Test tab, select a resource to test, enter the parameters, headers, and payload required, and then click Test. Figure 3-26 on page 70 shows an example of an API test.
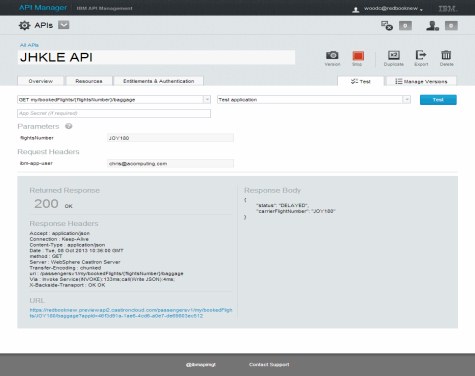
Figure 3-26 Testing an API definition
1 Fielding, Roy Thomas. Architectural Styles and the Design of Network-based Software Architectures. Doctoral dissertation, University of California, Irvine, 2000.
..................Content has been hidden....................
You can't read the all page of ebook, please click here login for view all page.