


Developer Portal
The Developer Portal is the entry to gaining access to your APIs for any developer. The majority of the content in the portal is created from the APIs that have been built and published but the portal needs to be configured with introductory information and graphics. This chapter covers the configuration of the portal and access by an application developer.
This chapter contains the following topics:
9.1 Introduction to API Management Developer Portal
The API Management Developer Portal is a vital link for developers to access APIs that you provide. With the portal, developers can do these tasks:
•Register to consume APIs they are authorized to consume. Developers can sign up on the portal with their name, company, and email address, and establish a password to access the Developer Portal.
•Sign in to the portal. After signing up to access the portal, the developer can then sign in to the portal to perform various functions.
•Register applications to access APIs.
•View usage statistics of APIs.
We cover these features n the later sections of this chapter.
The API consumer uses the portal to register and log in to access the APIs. Depending on the configuration, the consumer selects entitlements to various APIs.
9.2 Configuring the Developer Portal
The set up and configuration of the Developer Portal is handled within the API Manager and is designed to be straightforward.
9.2.1 Accessing the configuration page
After an administrator logs in to the API Management system, the administrator can access the portal configuration page by clicking the pull-down menu next to the Getting Started page and selecting Customize Portal (Figure 9-1 on page 191).
Figure 9-1 Accessing the Developer Portal Configuration page
A page with three tab options opens (Figure 9-2).

Figure 9-2 Tab options for customizing your API Management portal
The tabs provide the following site customization:
•Home page: This is the initial splash screen developers see when they access your portal.
•Sign Up Page: This page opens when developers want to register on your site for access to APIs. Some amount of customization can be done on this page by allowing the insertion of marketing-related information.
•Apps Page: When developers register applications to use your APIs, those applications are listed here.
9.2.2 Customizing the home page
The home pages provides various layout options. The top portion of the page is a fixed format of panels where you can load logos and graphics to personalize the portal.
Page layout
You select the layout of the home page as depicted in Figure 9-3. You can customize the amount and width of the lower panels to further refine the content you want to be displayed on the portal.
Figure 9-3 Configuring the panel layout for the Developer Portal
Theme color and font
You may choose from eight color themes. After selecting one of these color themes, the major titles and box borders reflect the color choice. In this way, you can provide an overall color theme on the home page.
You may also select from four font choices for the text that appears on the home page. The font choices are Arial, Georgia, Veranda, and Tahoma. This is shown in Figure 9-4.

Figure 9-4 Selecting Theme color and font
Customizing a logo
It is possible to upload your own logo and display it on the home page. The logo can be up to 45 pixels in height; the portal will center the logo image.
|
Tip: Because the portal centers the logo image, be sure you crop the image if it is bigger than the alloted height. The Developer Portal does not scale the images to fit.
|
To upload a logo image, click the Upload a Logo Image button as shown in Figure 9-3 on page 192.
Adding a favicon
You may also include a favorite icon (favicon) on your portal, which can be beneficial if you have a branded icon that associates your portal to your brand. The favicon should be 16 by 16 pixels, as shown in Figure 9-5.

Figure 9-5 Adding a favicon
Uploading the main image file
A larger graphic can be uploaded to the portal in the left middle portion of the portal. This can be beneficial if you have a striking graphic or picture that will entice developers to the portal. The graphic file should be 340 pixels in height and is shown in Figure 9-6.
Figure 9-6 Uploading a logo image
Customizing the welcome message and text
To the right of the main image are three options, as shown in Figure 9-6. The first selects a background color, which this is the color of the main banner portion of the portal home page. This sets the color behind the main image and the welcome text. The smaller of the two text boxes sets the title; the larger provides the main body text. The main body text can contain HTML so the formatting can be controlled.
The HTML text in Example 9-1 is placed In the sample page.
Example 9-1 Main body text
Welcome to our portal! Here you can:
<ul>
<li>Register for consumption of our APIs</li>
<li>Register your applications with us and secure credentials</li>
<li>View a catalog of available APIs</li>
<li>Track usage of APIs</li>
</ul>
The result is shown in Figure 9-7.
Figure 9-7 Developer Portal showing finished central layout option
Lower panel options
The lower panels provide various text, feed, and social media options. You can select one, two, or three of these options for customizing your portal:
•Text
With this text option, you can place pertinent information on the home page as either free-form text or enhanced content through HTML.
•Twitter Feeds
You can embed a Twitter Timeline feed into your home page and have Twitter feeds show up in this panel. With this option, you need to paste the code for a Twitter widget. See “Adding the Twitter widget” on page 196.
•Featured Apps
You may list up to six applications that you might want to advertise for various reasons (for example, in demand applications or popular applications that might drive higher demand for your APIs).
•RSS/ATOM feeds:
This allows you to enter a URL for ATOM or RSS feeds.
Adding the Twitter widget
To display a Twitter feed, you must create the widget on the Twitter website:
At this website, enter the Twitter username, for example @ibmapimgt. The Twitter web page will create the code that is to be pasted into the text box in the Developer Portal. The text for the widget for Twitter the @ibmapimgt username are as follows:
<a class="twitter-timeline" href="https://twitter.com/ibmapimgt" data-widget-id="390500789870792704">Tweets by @ibmapimgt</a>
<script>!function(d,s,id){var js,fjs=d.getElementsByTagName(s)[0],p=/^http:/.test(d.location)?'http':'https';if(!d.getElementById(id)){js=d.createElement(s);js.id=id;js.src=p+"://platform.twitter.com/widgets.js";fjs.parentNode.insertBefore(js,fjs);}}(document,"script","twitter-wjs");</script>
The results of the portal setup for text and the Twitter feed are shown in Figure 9-8.

Figure 9-8 Developer Portal setup with Twitter feed showing
Miscellaneous contact information
At the base of the portal, enter contact information such as your company website, a URL for identifying terms and conditions of use, and an email contact for support issues. An example of this portion of the portal is shown in Figure 9-9.
Figure 9-9 Identifying support, terms and conditions and company website information
9.2.3 Configuring the Sign Up Page
You can modify the Sign Up Page that developers see when they register for portal access. In this way, you can update the information associated with registering on the portal. To set up the page, select the Sign Up Page tab from the main portal customization page. See Figure 9-10.

Figure 9-10 Customizing the Sign Up Page
The Apps Page
When developers sign up to use your API, they may register an application to be displayed on your portal. An example of that page is shown in Figure 9-11.
Figure 9-11 The Apps Page of registered applications.
Previewing and updating the portal
Previewing the pending updates to the portal without committing to the updates is possible. This is accomplished by clicking Preview as shown in Figure 9-12.
Figure 9-12 Previewing/Updating changes to the development portal
After the updates are completed, click Update to commit the changes.
|
Tip: When you click Preview, the browser opens another tab with the updates displayed. To return to the portal customization page, either close the tab or click the API Manager tab in the browser.
|
9.3 Registration, sign in, and details
The API consumer will use the portal to register, log in, and gain access to the APIs. Depending on the configuration, the consumer can select entitlements to various API. Some APIs might require an approval process, which will be handled by an administrator of the API Manager who will confirm or deny access.
The Developer Portal is accessed using the following URL:
https://<domainname>/portal
On accessing the portal, the API consumer can review the API documentation without the need for registration. However, to access and test the API, the consumer must register. The registration page (Figure 9-13) can be customized as described in 9.2.3, “Configuring the Sign Up Page” on page 198.

Figure 9-13 Developer Portal Sign Up
|
Note: The login name for the API consumer is formed from the email address and the tenant company name. For example if the email address [email protected] is used for the tenant apitenant, then the login name will be myname@apitenant.
If there is a clash of names, the name is modified with a suffix being added to the name in the email address. For example the login can become myname1@apitenant.
|
On sign up, a pop-up dialog prompts for confirmation of the sign up request. The API consumer is required to confirm the information and activate the account using the link in the email.
This link opens the portal in a web browser and display a dialog confirming activation and verification (Figure 9-14). An email is automatically sent, with login details. The API consumer is then able to sign in.

Figure 9-14 Dialog confirming account verification
9.3.1 Sign In
To sign in to the portal, the API consumer uses the Sign In link on the home page. Within this Sign In dialog, the API consumer can select to have the system remember the consumer’s login details, and use the link to request a user name or password reset, as shown in Figure 9-15.
Figure 9-15 Sign in for the Developer Portal
After you sign in, your login name is displayed at the top of the page. This is a link to access profile settings, the Getting Started page, and to sign out. A home page also opens (Figure 9-16).
Figure 9-16 Getting Started home page
The developer can choose to not show this page again and on next login be presented with the developer’s main home page (Figure 9-17).

Figure 9-17 Sample My Home page
9.3.2 Profile settings
To display the profile menu, click the login name at the top of the page. This displays a menu enabling the developer to manage the developer’s profile. Click Manage Profile to enter the profile details page. The profile settings include two areas that can be expanded for optional information and to change the password.
9.4 API documentation
A link at the top of the page gives access to the API documentation.
An API may be set to Private or Public. Private APIs are available only to users of the API Manager and they may sign into the Developer Portal with their API Manager credentials. Only Public APIs will be shown in the documentation for developers who are not API Manager users.
An API might be in a state where it has not been started. Only APIs that are started are shown in the documentation.
The top level of the API documentation lists the APIs. Within each API are one or more resources; the developer can drill down into each API to view these resources, as shown in Figure 9-18.
The contents, of drilling down, are created automatically from the definition and configuration of the API resource. Additional documentation, in the form of one or more documents, might have been added and these are shown in a separate panel.
Figure 9-18 API documentation
The documentation page also enables the developer to select entitlements to use this API; if this is done, the entitlements page is shown. For more details, see 9.6, “Using entitlements” on page 206 and in 9.9, “Developing the scenario” on page 209.
9.5 Registering an application
To use an API, an application must be registered. The My Applications tab on the developer Homepage as shown in Figure 9-19 is used to register and to view applications.
The application must be given a name; this is the only mandatory field. An image (of maximum size 100 x 100 pixels), description, and URL may also be given. The URL may point to the developer’s website or application download link as needed.
if the application uses an external OAuth, the redirection URL can be specified.

Figure 9-19 Application registration
Click Add to add the application. The “One more thing” dialog opens and contains the app ID and security token (or secret) as shown in Figure 9-20 on page 206. Whether the secret is required to access the APIs will depend upon the API configuration; this should be noted in the API documentation. Application registration is completed from this dialog.

Figure 9-20 The “One more thing” dialog shows the App ID and App Secret
|
Note: As the “One more thing” dialog describes, the secret cannot be retrieved. It can be verified or reset against the application on the My Applications tab.
|
9.6 Using entitlements
Entitlements limit the API usage for the API consumer. Each API will have one or more entitlements that may be used; these define whether the App Secret is required and how many calls per minute/hour/day/week may be made by the calling application. An entitlement might also require that an approval be given. Details about entitlements are in Chapter 4, “Entitlements” on page 71.
9.6.1 Selecting an entitlement
The API consumer selects an entitlement for each API that the consumer wants to use, from the Entitlements tab on the homepage shown in Figure 9-21 on page 207.

Figure 9-21 Entitlements selection
The selected entitlement may be changed at any time. If an entitlement is not selected for an API, then the API consumer is not permitted to call a resource in that API.
An entitlement may require approval to be used. In this instance rather than selecting the entitlement, click Request Approval (Figure 9-22).

Figure 9-22 Request approval to use an API
A dialog box opens and the message may be modified. An information dialog box confirms the request. The request can be cancelled at anytime before a decision is made. When the approval is granted, or rejected, an email confirms the decision. If the request is approved, the selected entitlement is shown. If rejected, the current state is maintained.
9.7 Testing and using APIs
After an application is registered and entitlement is selected, the API resources can be tested from within the portal. To do the test, select any registered application; the app ID for that application will be set automatically. If the secret is required, enter it also.
|
Note: Testing an API counts toward entitlement usage.
|
When you do the test, the API resource is called and the response is returned as shown in Figure 9-23.
Figure 9-23 Test API response
The response shows the headers and the body. The URL that is given is the URL that is to be used when making the call from an external client or application.
The API resources can also be tested outside of the portal in a web browser or a REST client.
9.8 Measuring your API usage: the Dashboard
The API consumers can view the dashboard to obtain information about their API usage. An example is shown in Figure 9-24. The number of calls for each application and how each is called is shown for each API.
Figure 9-24 Dashboard showing example of calls
9.9 Developing the scenario
This section outlines the steps used to develop the use case scenario.
9.9.1 Registration
To register a user to the portal, complete the following steps:
1. Access the portal at <domain name>/portal. For example, in writing this book, the portal was available at the following address:
The example portal is shown in Figure 9-25 on page 210.
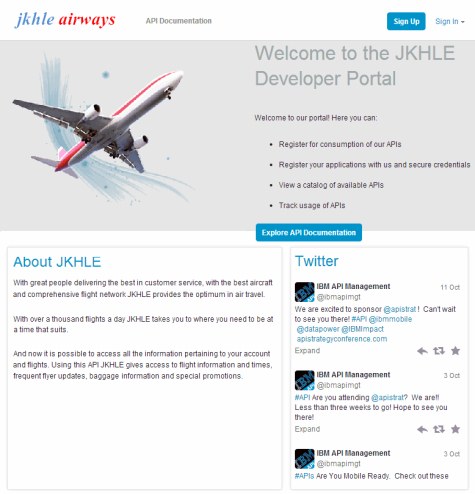
Figure 9-25 Example of a portal home page
2. Click Sign Up.
3. Enter your details and password. Click Sign Up.
4. An information dialog indicates that confirmation email was sent. Click OK.
5. Sign in to your email account. Click the link to confirm registration. A web browser opens and the Account Verification dialog is displayed (Figure 9-26).
Figure 9-26 Account verification dialog
6. Click OK.
You receive another email confirming your user name and the link to the portal. The user name consists of the first part of your email address and the company name in the API system of the APIs you want to access.
7. In a web browser, access the portal and click Sign In to access the login dialog. Sign in to the portal with your user name and password. The Getting Started page or your homepage opens.
9.9.2 Registering an application
To register an application, complete the following steps:
1. Go to your homepage. If you are not at this page, click My Homepage.
2. Click My Applications to access the applications tab.
3. Enter the name of the application. The description, URL, and image are optional.
An example is shown in Figure 9-27.

Figure 9-27 Registering an application
4. Click Add.
5. When the “One more thing” dialog box opens, make a note of the application ID and the secret. You can retrieve the application ID at any time but the secret cannot be accessed again although it can be reset. Some APIs may require the application Id and the secret to be specified. Click Register.
The application will be registered as shown in Figure 9-28.

Figure 9-28 Registered application
9.9.3 Selecting API entitlements
To select API entitlements, complete these steps:
1. On the homepage, click Entitlements to access the entitlements tab. The available APIs are listed.
2. For the API that you want to access, click Select Entitlement. Possible entitlements are listed.
3. Click Select for the entitlement you want to use. If an API entitlement requires approval, click Request Approval. You will receive an email when approval is granted or refused. The Entitlements tab lists your selected entitlements.
You now have access to the API and can use the resources according to the documentation. The selected entitlement will be given for your application as shown in Figure 9-29.
Figure 9-29 API entitlements
9.9.4 Testing an API resource
You can test an API resource from within the Developer Portal:
1. On the Homepage, click Test to open the Test tab.
2. Select the API Resource.
3. Enter the required information for that resource, for example a user name and password and parameters. An example is shown in Figure 9-30 on page 215.

Figure 9-30 Testing an API resource
4. Select an application. The list shows applications that you registered. The test automatically uses the App ID for that application.
5. Click Test. The results are shown, as in Figure 9-30, where you see the returned response headers and body.
Testing the API externally
When the API resource is tested from within the Developer Portal, the results of the test (Figure 9-31) also show the URL that must be called.
Figure 9-31 API test response showing URL that is called
This URL can be used in any external application or pasted into a web browser. Be aware that there might be dependencies on the headers and body and a REST client will be required.
..................Content has been hidden....................
You can't read the all page of ebook, please click here login for view all page.