
Letterforms that honor and elucidate what humans see and say deserve to be honored in their turn. Well-chosen words deserve well-chosen letters; these in their turn deserve to be set with affection, intelligence, knowledge and skill. Typography is a link, and it ought, as a matter of honor, courtesy and pure delight, to be as strong as the others in the chain.
This quote from Bringhurst's master work, The Elements of Typographic Style, Second Edition (Hartley & Marks Publishers, 2002), sums up the essence of type in Flash. The words we put on the stage and subsequently put into motion are usually well chosen. They have to be, because they are the communication messengers, providing the user with access to understanding the message you are trying to relay. In this chapter, we focus on using type to communicate the message your client is delivering.
The introduction of the Adobe CS4 product line puts some powerful typographic tools in your hands—notably, a new rendering technology called CoolType—and with applications like After Effects nudging closer to a confluence point with Flash, the field of motion graphics on the Web is about to move into territory that has yet to be explored. To start that exploration, you need to understand what type is in Flash and what you can do with it to honor the communication messengers of your content.
Here's what we'll cover in this chapter:
Understanding the basics of type
Using static, dynamic, and input text fields
Putting type in motion
Creating, formatting, and using dynamic text
Using ActionScript to create, format, and present text
HTML formatting with ActionScript
Creating hyperlinks
Using the spell checker
The following files are used in this chapter (located in Chapter06/ExerciseFiles_Ch06/Exercise/):
Static1.flaStatic2.flaStatic3.flaHTML.flaStaticTriggerAS.flaDynamicTriggerAS.flaEmbedButton.flaEmbedFontSymbol.flaSpellItOut.txtScrollComponent.flascrollingAS.fla
The source files are available online from either of the following sites:
http://www.FoundationFlashCS4.comhttp://www.friendsofED.com/download.html?isbn=15905910931
Let's begin by getting really clear on one point: type is not that gray stuff that fits around your "whizzy" Flash animations. It is your primary communications tool.
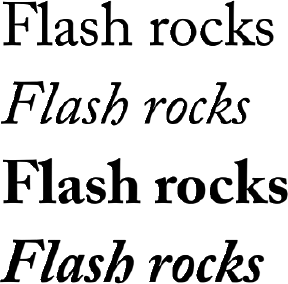
Reading is hard-wired into us. If it were not, you wouldn't be looking at this sentence and assimilating it in your brain. You have a need for information, and the printed word is how you get it. Realize that the choice of font and how you present the text not only affects the message, but it also affects the information. You can see this in Figure 6-1. The phrase "Flash rocks" takes on a different meaning in each instance. Although we use the same Times New Roman typeface, the message changes depending on the style applied (the bold and italic variants).
You can take this to the next level and see that not only variants, but the typeface itself has an effect on the message. Figure 6-2 shows five examples of the same information presented using different typefaces. You can see how the message changes even more dramatically.

When choosing your fonts, you also must be aware of their impact upon readability and legibility. This requires an acute awareness of the qualities and attributes that make type readable: typeface, size, color, and so on.
To illustrate this point, take a look at a small exercise one of the authors uses in his classes. What word is shown in Figure 6-3? Don't be too hasty to say "legibility." What are the sixth, seventh, eighth, and ninth characters? What letters are the first and second letters? Suddenly things become a bit disorienting.
This disorientation is important for you to understand. Our visual clue to legibility and readability is the flow along the tops of the letters, as shown in Figure 6-4. This is why text that consists of all capital letters is so hard to read.
We include this exercise because there is a huge temptation on the part of people new to Flash to prove they're one of the "cool kids" and use font and color combinations that make otherwise legible text impossible to read. A good example of this is Figure 6-5. The word is set in a medium-gray color on a dark-gray background, and the size of the text is 10 pixels. The text is very difficult to read, and yet somehow the "cool kids" think this is some sweet action. Wrong! They just destroyed all access to the information contained in the text. The text in the next figure, Figure 6-6, goes in the opposite direction. There, type is used as a clear communications vehicle for the message.

Even though paying attention to design is critical, from a type perspective, font-rendering technology in Flash was still a huge issue until the introduction of CoolType into Flash CS4.
Flash CS4 contains a rather major change "under the hood," and we suspect that not a lot of people will pay much attention to it. That change is the inclusion of CoolType technology.
Designers are an odd bunch. They can pick out something that doesn't "look quite right" with what seems to be a cursory glance at the page or the screen. For years, designers have noted that type in Flash just didn't "look right" and, as strange as this may seem, they were correct. This was an odd situation, because Adobe has always been in the lead with font technologies, yet one of its flagship applications seemed to be lagging in this important area. So, font rendering and management in Flash have always been a sore point with designers. Flash CS4 may have just put that one to rest with the inclusion of CoolType.
To understand how big a deal CoolType is, you have to go back into the gray mists of time to around 1984 and the introduction of the Macintosh. For many of you, 1984 is a murky year in your childhood. For some of us, especially one of the authors, it was the year that graphic layout started its move from art boards, waxers, and X-Acto knives to the computer screen. Two companies—Apple and Adobe—made this possible. Apple supplied the computer and the LaserWriter printer, while Adobe supplied PostScript.
Up to that point, layout on a computer was interesting, but the problem was that stuff called "type." A letter would show up on the computer screen, but it would be blocky. There was essentially no way to differentiate a capital letter A set in Garamond from its Times counterpart. This was due to the way computers rendered on-screen type. Essentially, the letters were constructed in a grid of pixels, which gave them the rather blocky, pixelated look we have come to call "the jaggies." PostScript, developed by Adobe, somewhat solved this problem by creating a language—PostScript—that, in very simple terms, drew the letter over the pixels and gave designers what they wanted: Garamond A characters that actually looked like Garamond As on the screen. The fact that they looked even crisper when run through the LaserWriter was also a huge factor in moving the graphics industry to computers.
Still, designers spent a lot of time whining about on-screen resolution and font crispness. As the Web took hold and Flash took off, designers continued to notice the fonts they used didn't look quite right. Pixels were still being lit up to create letters, so they were subject to the lingering problems inherent in on-screen text.
As we have stated, the relatively poor readability of on-screen text compared to its paper counterpart has been a significant sticking point with designers almost from the word "Go." The source of the problem is low-resolution computer screens. While the resolution of the typical printer is often 600 dots per inch (dpi) or more, the resolution of the average laptop, PDA device, or desktop screen is only 72 (Macintosh) or 96 (PC) dpi. This means that type that looks crisp and smooth on paper appears coarse and jagged on the screen.
To combat the jaggies, traditional grayscale font anti-aliasing (also called font smoothing) buffs out the corners in text by filling in the edges of bitmapped characters with various shades of gray pixels. This can make text appear blurry at small point sizes. Also, a lot of the designers' work was in color, and adding fuzzy gray pixels around colorful letters wasn't a great solution. Macromedia attempted to address this issue when it introduced a number of anti-aliasing features into Flash in 2004. Though these features provided a huge improvement, Flash designers were not satisfied, because their text still didn't look "quite right." They looked at the introduction of CoolType in Acrobat in 2000 and asked, "Uh, what about us?"
What CoolType does is to create clearer, crisper type using a font-rendering technique Adobe calls color anti-aliasing. This works on digital liquid crystal display (LCD) screens such as those in laptops, handheld devices, and flat-panel desktop monitors. Unlike conventional anti-aliasing, which manipulates only whole pixels, CoolType controls the individual red, green, and blue subpixels on a digital LCD screen. The key word here is subpixels. The hundreds of thousands of squares on the screen, which are the pixels, are actually further subdivided into even more squares. These are the subpixels, which are something like quarks in the realm of the formerly indivisible atom.
According to Adobe, by adjusting the intensity of the subpixels independently, the strokes of a character can be aligned on any subpixel boundary, thus achieving sharper, more precise smoothing along the edges of characters. Using this subpixel technique, CoolType can dramatically increase horizontal resolution for improved readability. The key word in that last sentence is horizontal. We read text across the page, which means the characters are even sharper, which, in turn, makes them even more legible and readable. Figure 6-7, taken from the Adobe CoolType web page, shows how subpixels reinterpret character display.

What is a typeface, and what is a font? Technically speaking, a typeface is an organized collection of glyphs (usually letters, numbers, and punctuation) that shares stylistic consistency. A font is one particular size or variety of a typeface. So Arial 10 and Arial 12 represent two distinct fonts but belong to the same typeface. The same goes for Arial and Arial Bold or the Times variations used in Figure 6-1 (Times, Times Italic, Times Bold, and Times Bold Italic): they are separate fonts that belong to the same font family. In everyday language, for better or worse, most people simply use the word font for all of the preceding.
Flash offers an interesting advantage when it comes to typography: while HTML is capable of displaying only fonts that are installed on the viewer's computer, Flash can display whatever font you like. Want to use some zany dingbat characters or an extravagant cursive font you designed yourself? Have at it. Even input text fields—the sort typed into by the user—can be displayed in whatever font suits your fancy. Flash text fields even support the effects filters discussed in Chapter 3.
Does this sound too good to be true? Well, everything has a price. Fonts can add to a SWF's file size—the more ornate, the greater the penalty. Take a moment to consider what fonts are, and you'll see that this makes sense. Most fonts store a mathematical description of the lines and curves that define each glyph. Simple shapes require less description than complex shapes.
Note
Does that sound oddly familiar? It should, because most fonts today are drawn in a PostScript drawing application. In fact, Illustrator CS4 is rapidly becoming the tool of choice among the type design community.
Flash CS4 supports the following font formats: TrueType, OpenType, PostScript Type 1, bit (Macintosh), and device fonts.
Staying with PostScript, you know that the more complex the shapes—that is, shapes with a lot of points—the larger the file size. Let's try an experiment to prove this:
Head over to
http://www.lipsum.org, a terrific site for generating placeholder text, and copy a paragraph of "Lorem ipsum" (we'll call it lipsum, for fun) to the clipboard.Select the
Texttool. In theProperty inspector, choose a simple sans serif font, like Arial, and confirm that the type of text isStatic Text. Click in the upper-left corner of the stage, and, with the mouse still down, drag to the other side of the stage and release.Paste the lipsum text into this text field.
Test your movie and select
View
Close the SWF and change your text field's font to something more elaborate, such as
Blackadder ITC, Brush Script, or whatever decorative typeface catches your fancy. Test the movie again and compare file sizes. Your mileage will vary, of course, but experiment a bit and see how different fonts carry different weights.
Note
Where did Lorem Ipsum originate? Being a wealth of absolutely useless infor-mation, we are glad to oblige you with an answer. The earliest known example of its use is from an unidentified type specimen produced in the 1500s. A printer jumbled up the text from Cicero's de Finibus Bonorum et Malorum, Liber Primus, sections 1.10.32 and 1.10.33, and used it to show off his typefaces. It stuck and has been used ever since.
By the end of this chapter, you'll know what your options are and will be equipped to make informed choices. For starters, let's look at how to dial back to zero the weight that a font adds to a SWF.
If you want, you certainly can go with fonts that are installed on the user's machine, just as HTML does. The benefit is that your SWF's weight will be completely unaffected by text content. The drawback is that you must count on your audience having the same font(s) installed as you do (not a good idea) or choose among three very generic font categories: _sans (sans serif), _serif, and _typewriter (monospace). These are the device fonts, and they are ideal for use on mobile devices.
In the Property inspector, take another look at your font choices in the font drop-down list. The top three, shown in Figure 6-8, are preceded by an underscore. That's the tip-off. If you select one of these fonts, Flash will choose on your behalf whatever it thinks is the closest fit on the viewer's computer. _sans will probably be Arial or Helvetica, _serif will probably be Times New Roman or Times, and _typewriter will probably be Courier New or Courier—but who knows for sure?
Note
If you have used Flash prior to this release, you may have had the same reaction we did when we saw the font menu: "Whoa!!!" This reorganized font menu was added along with the inclusion of CoolType.

Another place where you can use device fonts is in situations where you choose a font, say Helvetica, and you aren't sure whether the user has the font. As shown in Figure 6-9, you can select Use device fonts in the Anti-alias drop-down menu, and the fonts will be substituted at runtime.

Currently, Flash can't treat device fonts as graphics. Tweening stuff containing a device font is going to be unpredictable.
Note
Future versions of Flash Player 10 may, in fact, be able to display device fonts as if they were embedded. Adobe Senior Product Manager Justin Everett-Church demonstrates some pretty amazing Flash Player 10 text features in a video, which you can see at http://labs.adobe.com/technologies/flashplayer10/demos/videos/text.html.
Also realize that device font is a "weasel" term for the phrase pick the closest approximation. This means you lose all control over the spacing and length of the text on the screen at runtime. Depending on the font chosen by the user's machine, you may wind up having the user view your work through a font that has a bigger x-height than your font. If you need an exact match, device fonts aren't the way to go.
Note
X-height? What's that? It is the height of the lowercase letter x in the font. This proportional characteristic can vary widely in different typefaces of the same size. Tall x-heights are two-thirds the height of a capital letter. Short x-heights are one half the height of a capital letter. Staying with our useless information theme, the trend to the larger x-height in the sans category was sparked by Adrian Frutiger in the last century, when he released Univers 55.
The Property inspector indicates three ways to classify text on the stage: Static Text, Dynamic Text, and Input Text (set in the drop-down list at the top of the panel). This determines whether the selected text field is static, dynamic, or input.
In a sense, dynamic and input are actually the same thing, but that only matters in terms of ActionScript. In relation to the Property inspector, static text fields contain text that won't be edited after the SWF is published, dynamic text fields contain text that will (or can) be edited, and input text fields contain text that is entered by the user. Each classification carries its own characteristics, but many are shared among all three. Let's get to our penmanship!
Static text is the least powerful sort of text in Flash, but don't let its humble nature fool you. If you're into racing, it's also true that horses run slower than cheetahs, but why split hairs?
As with most other tools in the Tools panel, the Property inspector controls the properties of fields created by the Text tool in a big way. As shown in Figure 6-10, text property categories include Position and Size, Character, Paragraph, and Options. Let's take a look at each configurable item, outside the already familiar Position and Size category.

The following properties are in the Character category:
Family: This lets you select from the list of fonts installed on your computer. With static text, in most cases, font outlines are included with the SWF. For that reason, it doesn't matter whether or not your audience has the same font installed. The only exception is when you use the first three device fonts (the ones with the underscores). This setting marks the first of many that may be applied more than once, and in various ways, in the same text field.Style: Most typefaces contain Regular, Bold, Italic, and other variants. To apply a style to the whole text field, choose theSelectiontool, click the text field, and then make your selection. To apply a style to individual words or characters, use theTexttool to select the text field, highlight the desired glyphs, and then select the desired variant. Bold and italic versions of the chosen font must exist on your computer for this styling to occur.Note
The
Styledrop-down menu replaces theBandIbuttons previously used to specify bold or italic variants. It also groups the font families. Prior to this release, each font was its own entry in theFontdrop-down list. If you are a font junkie, this resulted in a font list that seemed to stretch for meters. Now the variations of the font, such as theMedium Condensedshown in Figure 6-10, are in one neat, tidy package.Size: This sets the selected font's size, in points. Multiple font sizes are allowed within the same text field. The scrubber ranges from 8 points to 96 points, but you may type in other values directly, anywhere from 0 (invisible) to 2,500 (jaw-droppingly way huge). This includes noninteger values, such as 12.75. In cases between 1,800 points and 2,000 points, the glyphs of most fonts "jump outside" the bounding box of their text fields, but this doesn't seem to affect text rendering; it merely makes the text field harder to select.Letter Spacing: This determines the uniform distribution of space between glyphs, also known as tracking. The higher the number, the wider apart the characters, and vice versa. If you want, you can even squish letters together by using a negative number. Typographers have a term for this: crashing text. MultipleLetter Spacingsettings may be applied to the same text field.Color: Want fuchsia text? Here's where to make that statement. Multiple colors are allowed within the same text field.Auto kern: This check box toggles auto-kerning. What is kerning? This is in the same ballpark as letter spacing, except kerning refers to individualized spacing between pairs of glyphs. Consider the capital letters A and V: the bottom of the A's right side extends out, which fits neatly under the "pulled-in" bottom of the V. Kerning reduces the space between these and other glyphs that "fit together" in this way, which tends to provide greater visual balance.Anti-Alias: Flash Player 8 introduced a number of new visual effects, and one of those was improved text rendering. This enhancement lives on in Flash Player 10, the Player that corresponds to the default publish settings for Flash CS4. You have five choices for font rendering:Use device fonts: This relies on the user having your chosen font installed. Unlike the three device fonts mentioned earlier (_sans, _serif, and_typewriter), this setting uses exactly the font you specify—provided it is available on the computer playing the SWF file. If not, Flash makes the choice.Bitmap text: This provides no anti-aliasing, which means characters will have jagged edges.Anti-alias for animation: This provides normal text anti-aliasing. Glyphs appear smooth (no jaggies) and may be applied to text fields in older versions of Flash Player.Anti-alias for reading: New since Flash 8, this format improves readability of small- and regular-sized fonts. Text animates smoothly because alignment and anti-aliasing are not applied while the text animates (it is reapplied when animation stops). This advanced anti-aliasing is not supported in Flash Player 7 or earlier SWFs, in skewed or flipped text (rotated is okay), in printed text, or text exported as PNG. Under these circumstances, the normal anti-aliasing (Anti-alias for animation) is applied.Custom anti-alias: Also considered advanced anti-aliasing, this choice brings up aCustom Anti-Aliasingdialog box, which allows you to specify your ownThicknessandSharpnesssettings.
Selectable: Determines whether the text is selectable with the mouse in the published SWF. Even rotated, flipped, and skewed text may be set as selectable.Render Text as HTML: Not available for static text. Note that hyperlinking is still supported (see the "Options properties" section).Show Border Around Text: Not available for static text.Superscript and Subscript: Want to put something in superscript or subscript? Here's the place. This can be applied to text fields as a whole, or to individual glyphs.
To see a static text field in action, start a new Flash document, select the Text tool, and click somewhere on the stage. Type your name. Select the second letter of your name by dragging the mouse from one side of the letter to the other. Change the font. Select the third letter, and change the font again.
Notice that the text field automatically widens as you type. The indicator for this is the little white circle in the upper-right corner of the text field, as you can see in Figure 6-11. If you keep typing, the text field will eventually extend past the stage and off into the wild blue yonder. To set a specific width, which causes text to wrap, hover over that white circle until you see the double-headed arrow cursor. Click and drag to the desired width. The white circle turns into a square. To switch back to auto-widen mode, double-click that square.

Note that the height property is disabled, because the height of static text fields is always determined by the amount of text they contain; that is, when width is taken out of its default auto-widen mode. Setting width in the Property inspector is equivalent to dragging the white circle.
The following properties are in the Paragraph category:
Format: This sets the alignment, and makes practical sense only when applied to fixed-width text fields. In cases where your words wrap, this determines how they do it. Different alignments may be applied to each line of text in a text field. The four buttons work as follows:Align Leftmeans the left edge of your lines of text will be even.Align Centermeans your lines will be centered inside the text field.Align Rightmeans the right edge will be even.Align Justifymeans both the left and right edges will be even.
Spacing: Scrub across the indent value, and you can add space at the start of a line of text within the text box. Scrub across the horizontal space values, and the lines of text will spread out. This is how you can apply leading (the space between lines) to text blocks.Margins: Scrub across these values, and you can add space to the right and the left of a text block.Behavior (Line Type):Not available for static text. Text fields automatically widen as you type, or you can set a text field's width by dragging the white circle in its upper-right corner, as you saw in the previous section. Doing so causes text to wrap, period. Other types of text fields may be set to single-line or multiline text, but static text fields essentially take care of themselves.Orientation:The three choices in this drop-down menu allow you to flip text.
In the Options section, the Link and Target settings allow you to create hyperlinks inside text fields. Either select the whole text or use the mouse to select individual glyphs or words, and then type a URL into the Link field (such as http://www.VisitMe.com/). Entering anything at all into the Link field activates the Target field below it, which gives you the same four choices available to HTML anchor tags (<a>):
_blank: Opens the URL in a new browser window._parent: Opens the URL in the parent frameset of an HTML frameset (this assumes the SWF is embedded in an HTML page that appears in multiple framesets)._self: Opens the URL in the same window or frame as the current HTML document that holds this SWF. This is the default behavior._top: Opens the URL in the topmost window of a frameset, replacing the frameset with the new URL.
Hyperlinks in the Link field do not change the appearance of the text in any way, even though a dashed line appears under hyperlinked text during authoring. This differs from HTML hyperlinks, which are traditionally differentiated by an underline and a change in color. Although the Property inspector supports bold and italic, there is no way to add underlines to text without ActionScript (see the section "HTML formatting" later in this chapter). Flash hyperlinks are primarily meant for loading HTML documents, which may or may not contain additional Flash content. As a general rule, this is not the place to load external SWFs into the current movie, though it is possible to trigger ActionScript with the Link field. More on that in the section "Hyperlinks and Flash text" later on in the chapter.
Now that you know what all of that stuff in the Property inspector does, let's take that knowledge for a test drive.
There is a ton of stuff you can do with static text on the page, and the three exercises in this section will give you an idea of the creative possibilities open to you.
In this first exercise, you will discover how to apply a filter to text and how to tween text to which a filter has been applied.
Open the
Static1.flafile in the Chapter 6Exercisefolder. Select theTexttool or press the T key, select theTextlayer, click the stage, and enter your name. Use a bold sans serif font and a size ranging from 30 to 48 points depending on the typeface chosen.Note
Points? Pixels? Which to choose? They are both the same, so the terms are in-terchangeable. Here's how that came about. Traditionally, 72-point type was actually 72.27 points, which is a hair over 1 inch. When computers took over print production and typesetting in the 1980s, purists using Apple computers who pointed out this discrepancy to Apple were essentially told, "Our screen resolution is 72 pixels per inch. We don't do 0.27 pixels." Thus a standard was born, and over 300 years of typesetting standards were changed.
Switch over to the
Selectiontool or press the V key, and select the text block.Twirl down the
Filtersstrip, click theAdd Filterbutton, and selectDrop Shadowfrom theFilterlist. When theDrop Shadowfilter panel appears, specify these settings:Blur X: 14Blur Y: 14Strength: 100%Quality: High
As you can see in Figure 6-12, you can apply a filter to text.

Figure 6.12. Text, buttons, and movieclips are the only Flash objects to which filters can be applied.
Add a frame in frame 30 of the
Textlayer.Right-click (Ctrl-click) anywhere in the
Textlayer's span of frames and selectCreate Motion Tweenfrom the context menu. The strip turns blue to indicate a motion tween.
In Chapter 3, you learned that filters can be applied to both text and movieclips. If you need to tween a filter effect, you can do it in the Motion Editor panel.
Open the
Motion Editorpanel and twirl down theFiltersstrip.Move the playhead to frame 15 in the
Motion Editorpanel and add keyframes by clicking the diamond in theBur XorBlur YandStrengthproperties. Repeat this for frame 30 as well.Click the back arrow in any one of the three properties to return the playhead to frame 15. Use these values at frame 15 (see Figure 6-13):
Blur X: 0Blur Y: 0Strength: 0
Press the Return (Enter) key, and the drop shadow will fade out and in. You can save the file or close it without saving the changes.

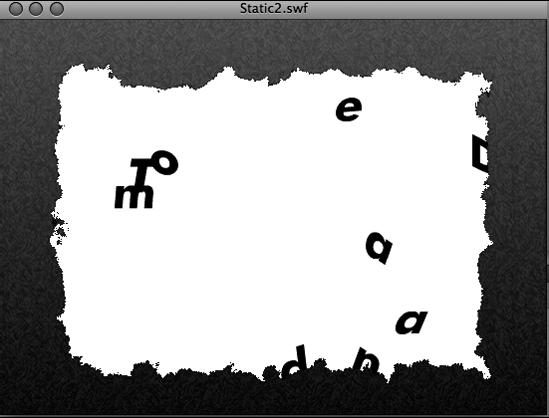
In this next exercise, you will "explode" some text. Along the way, you are going to learn how to convert text to letters and then to art. You are also going to learn a handy way of putting the individual pieces of a grouped object into motion.
Open the
Static2.flafile in your Chapter 6Exercisefolder. In the file, create a new movieclip namedmyName.When the
Symbol Editoropens, add a static text field and enter your name into it. We'll leave the font, style, and size to you. Set the text'sXvalue to88and theYvalue to170in theProperty inspector. This odd positioning is chosen because we want the text to go flying out from the middle of the stage.
One of the themes that percolates through this book is this: let the software do the work. In this case, you have a number of letters that will need to fly off of the screen. Entering each one manually, and then spending time trying to ensure they are perfectly aligned with each other, is both tedious and a waste of billable hours. There is an easier way.
Select the text on the stage and press Ctrl+B (Cmd+B). Each letter is separated into its own piece of text, as shown in Figure 6-14. You could keep pressing those keys until the text looks pixelated. When that happens, the text is changed from text fields to shapes.
The command you just issued by keyboard shortcut—Ctrl+B (Cmd+B)—is Break Apart (Modify

Now that the text has been broken apart into individual letters, let's get each letter into a layer so it can be animated.
Select all of the text on the stage and choose
ModifyDelete the empty layer named Layer 1. Click in frame 30 of the top layer, hold down the Shift key, and click in frame 30 of the bottom layer. This selects frame 30 in every layer.
With all the layers selected, right-click (Ctrl-click) to open the context menu. Add a frame. Now right-click (Ctrl-click) again—because the layers are still selected—and select
Create Motion Tween. You have now prepared each letter to be animated.Select a letter in frame 30, use the
Selectiontool move the letter to a new location, and use theRotation Zand theSkewandScaleproperties in theTransformationstrip to resize, rotate, or otherwise distort the letter. Do this for all of the remaining letters. The changes will be reflected in the graph, and you can scrub the playhead to see the effect, as shown in Figure 6-16.Click the
Scene 1link to return to the main timeline.Select the
Textlayer and drag a copy of themyNamemovieclip to the stage.Select the
Actionslayer, click the keyframe in frame 1 to select it, and press F9 (Option+F9) to open theActionspanel. Enter the following code:stop();


If you didn't add this action, your movie would consist of your name blinking, not exploding, on the stage. The action stops the playhead dead in frame 1 of the main timeline, but allows the movieclip to play. Because your animation is nested inside a movieclip, you can easily reposition the group of exploding letters in one shot.
Close the
Actionspanel, save the movie, and test it. Your name explodes (see Figure 6-17).
So far, you have discovered that static text can be manipulated and can have filters applied. You have also seen how to turn the text into individual graphics and put them in motion. In this next exercise, you are going to explore how text can be manipulated using a Blend mode and how to change its color. These are useful skills to know if you need to tween color changes or have the text interact with the content under it in the Layers panel.
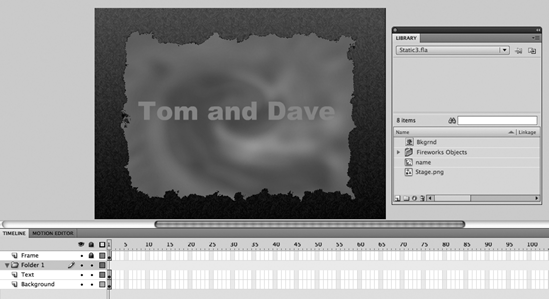
Open the
Static3.flafile in this chapter'sExercisefolder. You will see that we have added a background image to the stage and supplied you with some text in a movieclip, as shown in Figure 6-18.Click the movieclip on the stage. In the
Property inspector, notice that theColor EffectandBlendareas are set toNoneandNormal, respectively.Click the
Styledrop-down list and selectAdvanced. This opens theAdvanced Effectdialog box, as shown in Figure 6-19.

This dialog box allows you to adjust both the tint and the alpha values of the selected object. The controls on the left reduce the tint and alpha values for each of the RGB colors. The controls on the right decrease or increase the color and alpha values by a constant amount. When you change a value, the current color values of the selection are multiplied by the numbers on the left, and then added to the values on the right.
Use the following settings on the right side of the dialog box:
Alpha: 100%Red: 30%Green: 70%Blue: 20%
The text changes color from the neutral gray to green, which is understandable, considering green at 70% is now the predominant color.
Make the following changes on the right side of the dialog box:
x A +: 51x R +: 86x G +: −62x B +: 61
The color changes to a purple because you have increased the red and blue values and reduced the green value.
Note
Remember that even though we are using text in a movieclip, this effect can be applied to any symbol you may make: movieclip, graphic, or button.
Now that you have changed the color, let's make it interact with the color in the image behind it.
Select the movieclip and choose
Hard Lightfrom theBlendingdrop-down menu. The text changes color because this effect mimics the shining of a very bright light through the selection.Change the
Blendingsetting toOverlay. This time, the text interacts with all of the colors behind it (see Figure 6-20).Overlaymultiplies or screens the colors based on the color of the selected object.Close the file without saving the changes.
Note
Yes, you can apply the Blend modes using ActionScript. It's pretty simple, actually. Just give your movieclip an instance name, and then use that instance name to reference the
MovieClip.blendModeproperty. The names of each Blend mode are stored as constants of theBlendModeclass. For example, for a movieclip with the instance name mc, you would set its Blend mode to Multiply like this:mc.blendMode = BlendMode.MULTIPLY;

What makes dynamic text fields different from their static counterparts? From the point of view of the Property inspector, not a whole lot. Change the text type setting to Dynamic Text, and you'll see only three new properties. In addition, three previously disabled properties become available, and three previously available properties are dimmed out. The rest is the same. Here's a rundown of the new, enabled, and disabled properties:
Instance Name: Like an instance name for a movieclip, button, or any other object, a text field's instance name allows it to be "spoken to" by ActionScript. This property appears above the drop-down list that lets you select the text field's type.Character Embedding: This button allows you to specify which glyphs are included in the SWF. This happens automatically for static text fields, unless you choose device fonts. With dynamic text, you get more choices.Var: This setting, while visible for dynamic text fields, is not supported in ActionScript 3.0, so it's disabled.Note
The Var property is a historical throwback to Flash 4, when the way to set the content of a text field was to associate it with a variable. As recently as Flash 8, this approach was still in wide use. In fact, it's still possible in Flash CS4 if you change your publish settings for something earlier than ActionScript 3.0. Generally speaking, though, it's better to separate form from function. Let variables be variables, and use the
TextField.textproperty to set the display content of a dynamic text field.Render Text as HTML: This setting is a godsend for quick-and-simple formatting such as bold and italic, and it's the easiest way to underline text in Flash. HTML formatting is covered in detail in its own section later in this chapter.Show Border Around Text: This toggles a solid black stroke around the text field. Border color can be changed with ActionScript, as long as the border is showing.Behavior (Line Type): You can set the following options for the selected text field:Single line: If you're typing by hand, or cutting and pasting text from another document, this means no line breaks are possible, even if the text field is tall enough to accommodate them.Multiline: In fixed-width text fields, this setting allows text to wrap when it reaches the right side, in addition to breaking along carriage returns.Multiline no wrap: This breaks on carriage returns only.
SuperscriptandSubscript:Not available for dynamic or input text fields.Orientation: Not available for dynamic or input text fields.
Is there more to it than that? There is, and most of it occurs in ActionScript.
While formatting may be applied partially and more than once in a single static text field, the rules are different for dynamic and input text fields. In nonstatic text fields, when the text properties are set in the Property inspector, it's an "all-or-nothing" proposition. Change the color of one letter, and you've changed the color of the whole text field. The same goes for the font, bold and italic variants, and so on. The only way to apply varied formatting within the same dynamic or input text field is to use ActionScript.
Let's work through some examples. First, we'll start with the basics and add text to an existing dynamic text field. Next, we'll add line breaks and formatting. Finally, we'll explain how to create a text field from scratch.
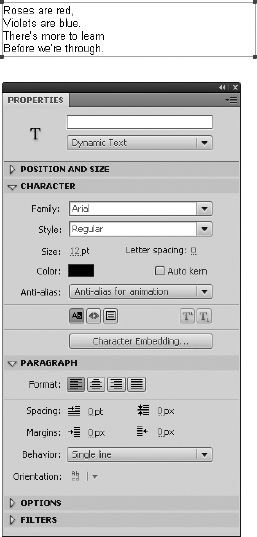
Open a new Flash document. Use the
Texttool to draw a text field approximately 300 pixels wide. In theProperty inspector, set the text field type toDynamic Text. Choose whatever font you like, but keep it small, say, 12 points. Set theLine TypetoSingle line. SelectAnti-alias for animationfrom theAnti-aliasdrop-down menu and deselectAuto kern, as shown in Figure 6-21.Double-click the text field to enter its bounding box. Type in the following heartrending poem, and press Enter (Return) after each line.
Roses are red,Violets are blue.There's more to learnBefore we're through.Test the movie. You'll see that the whole poem is collapsed into a single line, as shown in Figure 6-22. Why? Because the
Line Typeoption is set toSingle line.Change that property to
Multiline, and then test the movie again. This time, the poem appears in all its bardic glory.Change the field to
Multiline no wrap, and test the movie a third time. No difference, right? That's because none of those lines hits the edge of the text field.Double-click the text field to enter it. Hover over the lower right-edge drag handle until the cursor becomes a double-headed arrow. Drag the right edge toward the left until the text starts to wrap.
Still using the
Multiline no wrapsetting, test the movie again. Each line breaks at the carriage return, but it doesn't wrap.Switch to
Multiline, and test the movie to see the effect. Now you understand theBehavior (Line Type)setting.Widen the text field again, and give it the instance name
poetryin theProperty inspector.Enter the text field, select the existing text, and delete it.
Create a new layer in the main timeline and name it
scripts. Click in frame 1 of thescriptslayer, open theActionspanel, and enter the following:poetry.text = "Roses are red,";

Now, remember the discussion of classes from Chapter 4? Dynamic and input text fields are instances of the TextField class, which features a text property. In this line of ActionScript, we're referencing the TextField.text property by way of the poetry instance name. It's a bit like referring to Tom or David, who are instances of Human, by personal name.
Test your movie, and you'll see the first line of the poem, including the comma, as shown in Figure 6-23.
But what about line breaks? You'll see how to add them in the next section.

ActionScript supports a widespread convention of escape sequences, which provide an encoded way to manipulate text or to represent special characters. Escape sequences can also be used to tell ActionScript to accept a character at face value, rather than interpret it as a part of the programming. Here's a practical example.
As you've seen, the TextField.text property accepts a string value. Strings are denoted by a pair of double or single quotes. The quotation mark character (") tells ActionScript when a string begins and when it ends. But what if your string contains quotation marks, such as dialogue? You need to either nest your quotes carefully or escape them. This sentence gets it wrong:
var shortStory:String = "Mary, said Fred. Mary, I'm pregnant.";
Since the preceding is a conversation, Fred's words should actually be in quotes. To accommodate double quotes in this string, you could wrap the whole thing in single quotes, like this:
var shortStory:String = '"Mary," said Fred. "Mary, I'm pregnant."';
But whoops, there's still a problem. Can you spot it? The contraction I'm itself contains a single quote! That means ActionScript considers the string ended immediately after the capital I, which makes the "m pregnant" fragment programmatic gibberish. This type of problem is not rare, and it's easy to overlook. To avoid these situations, we prefer to escape quotation marks rather than to nest them. In the following revision, the string is once again denoted by double quotes, and the interior double quotes are escaped:
var shortStory:String = ""Mary," said Fred. "Mary, I'm pregnant."";
Note that only the double quotes need to be escaped in this example. If the string had been wrapped in single quotes, only the apostrophe in I'm would have to be escaped. How? Just put a slash in front of it.
A handful of characters actually perform a task when you escape them, such as
for a newline and for a tab. Let's take a look at both.
To update the ActionScript used in the previous example to add a line break, you could put everything within one line, like this:
poetry.text = "Roses are red,
Violets are blue.";
Alternatively, you could break the ActionScript over as many lines in the Actions panel as you like, which is often easier on the eyes. In this case, you will want to use the TextField.appendText() method, which appends text to existing content, rather than replacing it.
poetry.text = "Roses are red,
";
poetry.appendText("Violets are blue.
");
poetry.appendText("There's more to learn
");
poetry.appendText("Before we're through.");
You may alternately use the addition assignment operator (+=) to build a string first, and then assign it to the text field's text property:
var poem:String = "Roses are red,
";
poem += "Violets are blue.
";
poem += "There's more to learn
";
poem += "Before we're through.";
poetry.text = poem;
Note
Want to be a rebel? Select the poem text field and change its Line Type property back to Single line. Test your movie. In spite of that "single lines only, please" setting, the
escape sequence succeeds loud and clear.
What about those tabs we mentioned earlier? The following ActionScript pushes each text field line farther to the right:
var poem:String = "Roses are red,
";
poem += "	Violets are blue.
";
poem += "		There's more to learn
";
poem += "			Before we're through.";
poetry.text = poem;
Note that several tabs can be used in succession, which is also true for new lines.
Is it possible to set tab stops? Sure thing. For this, you'll need an instance of the TextFormat class. Set the TextFormat.tabStops property to an array of pixel values, and then apply the formatting object to your text field.
// First, the string
var poem:String = "Roses are red,
";
poem += "	Violets are blue.
";
poem += "		There's more to learn
";
poem += "			Before we're through.";

// Then, the formatting
var format:TextFormat = new TextFormat();
format.tabStops = new Array(20, 40, 60, 80);

// Finally, apply the string and the formatting
// to the text field
poetry.text = poem;
poetry.setTextFormat(format);
That puts four tab stops at 20-pixel intervals. Try something more extreme to prove that it really works (for example, new Array(100, 200, 300, 400), which might even bump some of the lines out of the text field).
While we're on the subject, the TextFormat class provides a whole lot more. For a full list of functionality, we invite you to consult the TextFormat class entry of the ActionScript 3.0 Language and Components Reference, but here are a few common properties you may want to set:
var format:TextFormat = new TextFormat();
format.font = "Verdana";
format.size = "24";
format.color = 0x3355CC;
format.bold = true;
format.italic = true;
existingTextField.text = "Lorem ipsum dolor sit amet.";
existingTextField.setTextFormat(format);
The TextField.setTextFormat() method accepts two optional parameters after the first, and those dictate where to start and stop. Let's say you have an overall style in mind for the whole text field. Aside from that, you want to apply special formatting to two words and another set of formatting to a third word. Let's try it:
Open a new Flash document and add a new dynamic text field with an instance name of
existingTextFieldto the stage.Add a new layer named
Actions, open theActionspanel, and enter the following code:var overallStyle:TextFormat = new TextFormat(); overallStyle.font = "Verdana"; overallStyle.size = 12; var boldBlue:TextFormat = new TextFormat(); boldBlue.color = 0x0000FF; boldBlue.bold = true; var italicRed:TextFormat = new TextFormat(); italicRed.color = 0xFF0000; italicRed.italic = true; existingTextField.text = "Lorem ipsum dolor sit amet."; existingTextField.setTextFormat(overallStyle); existingTextField.setTextFormat(boldBlue, 0, 5); existingTextField.setTextFormat(boldBlue, 12, 17); existingTextField.setTextFormat(italicRed, 22, 26);
What's going on here? Think of the styling as a special brush—actually, three brushes. The first brush gives the text field an overall formatting of 12-point Verdana. Next, you switch to a brush that makes things blue and bold, and then finally red and italic. You set your brush down at position 0, where the first letter starts (see Figure 6-24), pull it across the first word, and then lift up at position 5, which is the beginning of the sixth character (the first space).

Test the movie. When the SWF opens, you will see the text
Loremanddolorcolored blue, andametcolored red.Close the file without saving the changes.
Note
The
TextFieldclass features adefaultTextFormatproperty that works in a similar way. The difference is that this property sets the default format for a text field, even if there isn't text in it yet. Once that format is set, you can keep replacing the text without needing to reapply formatting. BecausedefaultTextFormatis a property instead of a method, its usage works like this:existingTextField.setTextFormat = myFormat;.
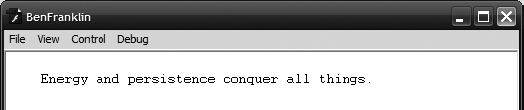
Want to create a text field completely with ActionScript? It's pretty straightforward. The TextField class is instantiated like any other class. In this case, the instance name becomes the variable you use to refer to the instance. As always, consult the TextField class entry of the ActionScript 3.0 Language and Components Reference to see the full set of properties. Here are a few in common use:
autoSize: This property is slightly tricky, because it expects a separate class just to provide its value. The staticTextFieldAutoSize.LEFTproperty instructs the newTextFieldinstance to be left-aligned and widen automatically (toward the right) to accommodate any text it is given. The availableTextFieldAutoSizeproperties areLEFT, RIGHT, CENTER, andNONE. The first three allow the text field to widen as necessary and align the text to the left, right, or centered. The last keeps the text field from widening, in which case a width and height must be specified.selectable: This is equivalent to theProperty inspectorsetting by the same name.x, y: These are interesting because they may not appear in the properties summary of theTextFieldclass entry for you by default. It's fairly easy to guess what they refer to—the position of the text field on the stage—but where do they come from? This is where our ActionScript basics really come into play. Notice the "Inheritance" heading near the top of theTextFieldclass entry? That tells you this class extends theInteractiveObjectclass, which in turn extends theDisplayObjectclass (and it goes further).DisplayObjectis the source of thexandyproperties. Thanks to the principle of inheritance, it is absolutely correct to say that text fields have their own sense ofxandy, it's just that these properties originated elsewhere. To see them in theTextFieldclass entry itself, click theShow Inherited Public Propertieshyperlink beneath thePublic Propertiesheading.text: Ah, you're already familiar with this one.
Let's try adding a text field with ActionScript:
Open a new Flash document and don't add anything to the stage.
Add a new layer named
Actions, open theActionspanel, and enter the following code:var benFranklinQuote:TextField = new TextField(); benFranklinQuote.autoSize = TextFieldAutoSize.LEFT; benFranklinQuote.selectable = false; benFranklinQuote.x = 50; benFranklinQuote.y = 30; benFranklinQuote.text = "Energy and persistence conquer all things."; var format:TextFormat = new TextFormat(); format.font = "Courier"; format.size = 14; benFranklinQuote.setTextFormat(format); addChild(benFranklinQuote);
What's that addChild() business at the end? Until that final line, the previous ActionScript has gone to the effort of creating a TextField instance—and a TextFormat instance to style it—but hasn't actually displayed anything. ActionScript 3.0 introduces the concept of display lists, which gives you much more control over what actually gets displayed to the screen. By adding the benFranklinQuote object (the TextField instance) to the display list, you're effectively "lifting the curtain" to let the show begin.
Test the movie. When the SWF opens, you will see the quote, as shown in Figure 6-25.
Close the document without saving your changes.
Input and dynamic text fields are practically identical. From the point of view of the Property inspector, only four things change. Three properties go away, and a new one appears:
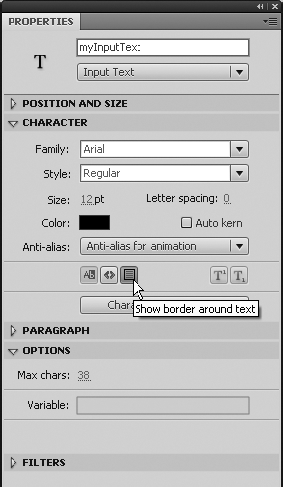
Selectable: This property becomes disabled, which makes good sense. By definition, input text is something the user types into the field. In order for typing to work, the text field must be selectable—so it is, and you can't make it otherwise.Link: This property disappears altogether. You may prepopulate an input text field with text. You can even format it. But you can't give it a hyperlink—without ActionScript. More on this in the section "Hyperlinks and Flash text."Target: Without a hyperlink, there's really no use for theTargetproperty.Max Chars: This is the new one. It lets you specify the maximum number of characters the user may enter in the text field. Prepopulated text may override this setting, but the user will need to delete what's there in order to add new text—at which point the maximum value holds.
Although not required, it makes good sense to use the Show Border Around Text property, as shown in Figure 6-26, for input text fields, so the user can see where to type. If not, you can certainly position prettier artwork of your own behind the text field. To set the color of this border, use ActionScript, as follows:
textFieldInstanceName.borderColor = 0xFFFF00;
The TextField.text property works the same way with input text. If you want to know what the user has typed, check the instance name of that text field and look at its text value.
Although Flash supports only a small subset of the HTML language—and it's a very small subset—the ability to use familiar formatting tags for text is a very cool thing. In addition, most people find it less complicated than the TextFormat class discussed earlier.
HTML formatting is supported only for dynamic and input text fields, and tags must be written and applied with ActionScript. We'll discuss the tags first, and then we'll show you how to use them.
Flash supports the following HTML tags:
Anchor tag (
<a>): If you want to make a hyperlink without using theProperty inspector, this is your tag. This tag supports two attributes:href: An absolute or relative URL, up to 128 characters in length. This attribute corresponds to theLinksetting of theProperty inspectorand is required if you want the hyperlink to actually do something. If you're opening a web document, use thehttp:orhttps:protocol. If you want to trigger ActionScript instead, use theevent:protocol. More on this in the section "Hyperlinks and Flash text."target: One of four values that correspond to theTargetsetting of theProperty inspector:_blank(opens the URL in a new browser window),_parent(opens the URL in the parent frameset of an HTML frameset),_self(opens the URL in the same window or frame as the current HTML document that holds this SWF; this is the default behavior), and_top(opens the URL in the topmost window of a frameset, replacing the frameset with the new URL).
Bold tag (
<b>): Makes text bold, if the current font supports it. Yes, even though HTML jockeys are all using<strong>nowadays, Flash Player doesn't support it. Use the<b>tag.Break tag (
<br>): Represents a line break.Font tag (
<font>): Provides three ways to format the styling of text, by way of the following attributes:color: A hex value representing a color.face:The name of a font.size: The size of the font in pixels. You may also use relative sizes, such as +2 or −1.
Image tag (
<img>): Displays a graphic file, movieclip, or SWF inside a text field. Supported graphic formats are JPG, GIF, and PNG. This tag may be configured by way of quite a few attributes:src: This, the only required attribute, specifies the URL of an external image or SWF, or the linkage class for a movieclip symbol in the library (see the "Symbol essentials" and "Sharing assets" sections of Chapter 3). External files do not appear until they are fully loaded, so depending on your needs, you may want to embed content in the SWF itself. To refer to embedded library content, simply use the linkage class as the value for thesrcattribute—<img src='MyLinkageClass' />—instead of the path to an external file.id: If you want to control the content of your image tag with ActionScript, you'll need to know the instance name of the movieclip that contains that content. This is where you provide that instance name.widthandheight: These specify the width and height of the image, SWF, or movieclip in pixels. If you like, you may scale content along the x axis and y axis by setting these attributes arbitrarily.align: This determines how text will flow around the image, SWF, or movieclip. The default value isleft, and you may also specifyright.hspaceandvspace: Just as with HTML, these values determine how much "padding" appears around the image, SWF, or movieclip. Horizontal space is controlled byhspace, and vertical space is controlled byvspace. The default is 8 pixels. A value of0gets rid of the padding, and negative numbers bring in the edges, pulling in adjacent content with them.checkPolicyFile: This instructs Flash Player to check for a cross-domain policy file on the server associated with the image's or SWF's domain.
Italic tag (
<i>): Makes text italicized, if the current font supports it. Like our note for the<b>tag, use<i>for italics in text field HTML, as opposed to the<em>tag generally preferred by web developers nowadays.List item tag (
<li>): Indents text and precedes it with a round bullet. In the case of normal HTML,<li>tags may be further managed by parent list tags. The bullets of unordered lists (<ul>), for example, may be specified as circle, disk, or square. The bullets of ordered lists (<ol>) may be specified as numbers, roman numerals, or letters. This is not the case in the microcosm of Flash HTML. Lists require neither a<ul>nor an<ol>tag, are unordered only, and feature only round bullets.Paragraph tag (
<p>): Our good, old-fashioned paragraph tag. Paragraphs come with a built-in line break, and you get two attributes with this tag:align:This affects the text alignment. Valid settings areleft, right, center, andjustified—the same alignments available in theProperty inspector.class: Specifies the name of a CSS class selector, which can be used to stylize content.
Span tag (
<span>): This tag doesn't do anything on its own, but it accepts a class attribute that supports CSS, and that attribute isstyling.Text format tag (
<textformat>): In many ways, this is the HTML version of theTextFormatclass. Use the following parameters to stylize text content:blockindent: Determines block indentation.indent:Determines indentation of the first line only and accepts both positive and negative values.leading: Affects line spacing. It accepts both positive and negative values.leftmargin, rightmargin: Determines the left and right margins of the text.tabstops:Specifies tab stops.
Underline tag (
<u>): Makes text underlined. This tag is the easiest way to underline text in Flash (other than through CSS styling).
What? No tables? Yeah, that's been a pretty significant exclusion over the years. Is there a way, then, to easily display tabular data in Flash? There is. It may not seem as straightforward as the more familiar HTML table structure, but it works. In fact, you've already seen an example of it in this chapter. The answer is tab stops. Since we already used the TextFormat class, let's do it again with HTML.
Open the
HTML.flafile in this chapter'sExercisesfolder. You will see that we have already added a dynamic text box and given it the instance name ofoutput.Click the first frame of the
scriptslayer, open theActionspanel, and enter the following code:var htmlContent:String = ""; htmlContent += "<textformat tabstops='50,100,150'><b>One Two
Three</b></textformat><br>"; htmlContent += "<textformat tabstops='50,100,150'>Eins Zwei Drei</textformat><br>"; htmlContent += "<textformat tabstops='50,100,150'>Un DeuxTrois</textformat><br>"; htmlContent += "<textformat tabstops='50,100,150'>UnoDos Tres</textformat>"; output.htmlText = htmlContent;
Note
It looks a bit awkward to use the
Test the movie. The text is all lined up in columns, as shown in Figure 6-27, just like an HTML table.
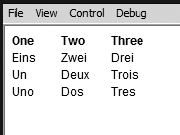
For good measure, check out the html-tags.fla file in the Complete folder for this chapter to see most of the tags and their attributes illustrated in one place.
Every type of text in Flash—static, dynamic, and input—supports hyperlinks. The big difference between static and nonstatic text fields is that, unless ActionScript enters the picture, only static text fields allow for partial hyperlinking (for example, one word linked while the rest of the sentence is unlinked) or for more than one URL to be applied to the same field. All it takes for static text fields is to type in your text, select a few words, and enter the desired URL into the Property inspector, as shown in Figure 6-28. Optionally, you can enter a target as well. If want the whole text field hyperlinked, use the Selection tool to select the text field itself, and then use the Link and Target properties in the same way.
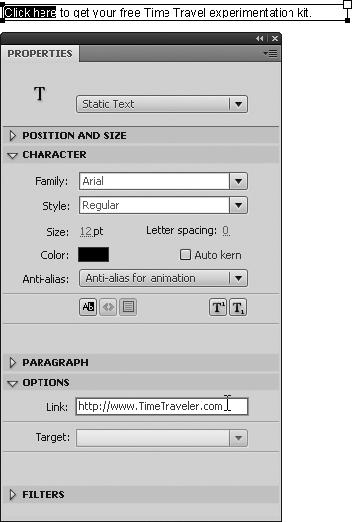
As easy as this approach is, a downside is that nothing in the published SWF gives any indication that a hyperlink exists, unless the user just happens to move the mouse over the right spot. Then the cursor changes from the arrow cursor to the finger cursor. But nothing compels the user to put the mouse over a hyperlink in the first place. Pretty odd omission, if you ask us.
To work around it, take advantage of the non-ActionScripted ability of static text fields to display multiple formatting. After you associate a few words with hyperlinks, change the color of those words as well, or make them bold. Give the user a way to distinguish the hyperlinked text from normal content.
Hyperlinks may be absolute, such as http://www.SuperSite.com/thisPageHere.html, or relative, such as ../thisOtherPage.html. For relative paths, it's important to know that the path will be determined not from the point of view of the SWF, but from the HTML file that contains it. For example, you may choose to keep all your HTML files in the root of your website. Because you're an organized developer, you may choose to put all your image files in their own subfolder of the root, and you may just do the same with your Flash content. From a SWF's point of view, the relative path to all HTML files requires stepping back one folder. So, if a SWF links to one of those pages, you might be tempted to precede the destination's file name with ../, but don't! The HTML file that contains the SWF in question is already in the same folder as the destination page, and it's the containing HTML file's point of view that matters.
The Link setting in the Property inspector works for dynamic text fields, but remember that with nonstatic text, styling and hyperlinks are one-size-fits-all: either the whole text field links somewhere—even if you only apply the URL to one letter—or it doesn't link somewhere. That is the case unless you use HTML tags, which means unless you use ActionScript.
You've already seen how HTML tags can be applied to dynamic and input text fields. All you need to do is use the anchor tag (<a>) with its href attribute, and you're set.
myTextField.htmlText = "<a href='http://www.domain.com/some-page.html'>click me</a>";
Note the single quotes around the href attribute's value. The single quotes keep Flash from getting confused regarding where your string starts and stops. This is the same issue we covered earlier in our escape character discussion. If you prefer to use double quotes around your attribute values, you may—but you'll need to escape them.
Ah, but wait! As with static text hyperlinks, the preceding example still doesn't give the user any indication that a portion of the text is clickable. To mimic the traditional underline that appears in HTML hyperlinks, consider using the underline tag (<u>) to set off the link. Here's an example:
myTextField.htmlText = "<a href='http://www.domain.com/some-page.html'><u>click me</u></a>";
Don't forget the optional target attribute if you want to control the target window of the specified URL. The default value for target is _self, which opens the destination URL in the same window the user is already in. If that window fills the browser window, the new page will also fill the browser window. If that window fills only one frame of an HTML frameset, only that frame will be replaced.
myTextField.htmlText = "<a href='http://www.domain.com/some-page.html'target='_self'><u>click me</u></a>";
To "break out" of a frameset, use the _top target:
myTextField.htmlText = "<a href='http://www.domain.com/some-page.html'target='_top'><u>click me</u></a>";
To open a new window altogether, use _blank:
myTextField.htmlText = "<a href='http://www.domain.com/some-page.html'target='_blank'><u>click me</u></a>";
You may use as many anchor tags in a given text field as you like. Just surround whatever content you like with its own <a> tag, and do your audience a favor by emphasizing the hyperlink with an underline, bold, or italic style.
It's important to realize that hyperlinks are generally used for linking to a new HTML document. This is not the way to load image files or SWFs into the current Flash movie. (Loading is covered in Chapter 14, which touches on optimizing.) Fortunately, it is possible to trigger ActionScript with hyperlinks, so if you want to get fancy, you can use the humble anchor tag to perform whatever programming feat you desire. The trick is knowing how to listen for hyperlink clicks.
In ActionScript 3.0, hyperlinks dispatch a TextEvent.LINK event. (This is different from the ActionScript 2.0 asfunction protocol, which called a custom function directly.) To handle the LINK event in Flash CS4, you need two things. First, get rid of the http: protocol in your href attribute and replace it with event:. This tells ActionScript to forget about the browser and instead trigger a TextEvent.LINK event. Second, write an event handler. The result would look like this:
myTextField.htmlText = "<a href='event:'><u>click me</u></a>";
myTextField.addEventListener(TextEvent.LINK, linkHandler);
function linkHandler(evt:TextEvent):void {
   trace("Someone clicked the hyperlink!");
}
Pretty neat so far, but not especially useful. You might have any number of hyperlinks in the text field or in other text fields currently showing, so you need a way to tell them apart. Here's how: add an arbitrary value after that event: inside the href attribute. This effectively becomes a parameter passed to the function that handles your event in the addEventHandler() method. Here is an example:
myTextField.htmlText = "<a href='event:apples'><u>click me</u></a>";
myTextField.addEventListener(TextEvent.LINK, linkHandler);
function linkHandler(evt:TextEvent):void {
   trace(evt.text);
}
The dispatched LINK event object contains a text property specified by you in the text field HTML. The receiving function references that property in its parameter. In the preceding example, we're naming the incoming event object evt, which makes evt.text the property that gives us back the message sent by the hyperlink.
We've perused quite a bit of theory. Now let's take a few text fields and actually do something with them. We'll look at two ways to use hyperlinks to trigger the ActionScript that will make a frog disappear. Though we are heavily into mystical frogs, you can use what you will learn here to make images, movieclips, and other items on the stage disappear at the click of a mouse.
First, let's use a static text field to hide and show the frog.
Open the
StaticTriggerAS.flafile. You will see the image of a frog on the stage and two empty layers namedTextandActions. If you open the library, you will see the frog is in a movieclip named, well,frog, and if you click the image on the stage, you will see we have given it an instance name as well.Click the
Textlayer and select theTexttool or press the T key.Click the stage and enter
Show the frog, hide the frog. Specify these text settings in theProperty inspector:Type: Static TextFont: ArialSize: 14Color: #000000 (black)
Select the text
Showandhide, and in theProperty inspector, change their color to#0099FF(bright blue).Using the
Texttool, select the textShowand enterevent:showinto theLinkfield of theProperty inspector, as shown in Figure 6-29. The text you entered is theTextEvent:LINKevent you will be using when you write the code.Select the text
hideand enterevent:hideinto theLinkfield of theProperty inspector.Select the first frame in the
Actionslayer, open theActionspanel, and enter the following ActionScript:addEventListener(TextEvent.LINK, linkHandler); function linkHandler(evt:TextEvent):void { if (evt.text == "show") { frog.visible = true; } else { frog.visible = false; } }

The first line of the code creates the listener, and tells Flash what to listen for (textEvent:LINK) and what to do (execute the function named linkHandler()) when it "hears" the event. The function checks to see which of the two hyperlinks was clicked. If it was the word Show and the event's text property is "show", then the frog movieclip has its visible property set to true, which means the frog movieclip appears. The else simply says if it isn't the word Show, then hide the frog movieclip by setting the movieclip's visible property to false.
Save and test the movie.
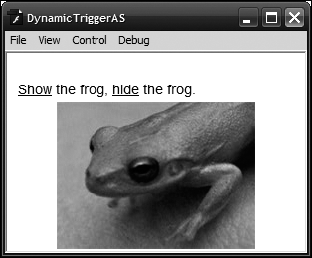
Now that you know how to control events using static text, let's try it out using a dynamic text field.
Open the
DynamicTriggerAS.flafile in this chapter'sExercisefolder. It is the same file as the previous exercise, and all we are going to ask you to do is to write the code.Select the first frame in the
Actionslayer, open theActionspanel, click once in theScriptpane, and enter the following:changeTheFrog.htmlText = "<p><font color='#0099FF'>
<u><a href='event:show'>Show</a></u></font> the frog,<font color='#0099FF'><u><a href='event:hide'>hide</a></u></font> the frog.</p>"; changeTheFrog.addEventListener(TextEvent.LINK, linkHandler); function linkHandler(evt:TextEvent):void { if (evt.text == "show") { frog.visible = true; } else { frog.visible = false; } }
The first line is the major difference between this and the previous example. The text field on the stage already has an instance name of changeTheFrog. The ActionScript line tells Flash to fill that particular text field with HTML text, and uses HTML tags instead of the Property inspector to add the text and enter the URL link.
Save the movie and test it. As you can see in Figure 6-30, the major change is the addition of traditional underlines for the hyperlinks.
You've learned that static text fields automatically embed font outlines as needed. For this reason, static text can easily be rotated, skewed, and otherwise distorted, as well as set to a semitransparent color. Dynamic and input text fields are different. The moment you do anything to the text that isn't perfectly "square," the text in nonstatic text fields simply vanishes. Rotate it even one degree, and poof!
Why? The reason is simple: unless font outlines are included, Flash relies on fonts that exist on the user's computer. They're not in the SWF, so the SWF has no real control over them. But when you embed them in the movie, that's another matter. Keep in mind that adding font information to a movie increases its file size (yet another trade-off to consider).
There are couple ways to embed font outlines. The approach you use will probably depend on the amount of text your movie contains. On the one hand, each individual text field can have its embedding handled separately. Alternatively, you can use font symbols.
If you care to embed font outlines for a few text fields, character embedding might be the quickest approach.
Let's see how character embedding works:
In a new Flash document, use the
Texttool to draw a text field. Make it dynamic and enter a bit of text into it (the standardLorem ipsum dolor sit ametis fine).With the text field selected, click the
Character Embeddingbutton in theProperty inspector. TheCharacter Embeddingdialog box will open, as shown in Figure 6-31.

The choices are pretty clear-cut. As a general rule thumb, we recommend you embed only the characters you're sure to need. There's no reason to use the All choice, for example, if Basic Latin will do.
Note
The Basic Latin character set is generally good for English, but does not include accented characters, so please, no accented résumés.
To see the kind of difference various character sets can make, select
Alland clickOK.Test your movie. In the window that contains the SWF, go to
ViewClose that window, choose
Basic Latin, and test again. Quite a difference!
If this text field requires only lowercase letters, choose the appropriate selection. To select more than one at the same time, hold down Ctrl (Cmd) while you click.
The Auto Fill button in the Character Embedding dialog box is pretty neat: it includes one of each character currently in the text field, without repeats.
If you change your mind and don't want to embed a character, click the Don't Embed button.
What happens if you fail to embed a character the text field ends up needing? That particular character won't show, even while the others do.
Remember the very first topic at the beginning of this chapter, about what actually constitutes a font? Stylistic variations, such as bold and italic, are counted as distinct. Embedding roman (or normal) font outlines for a given character set does not include the corresponding bold or italic fonts, even for the exact same characters. To prove this point, let's use another example.
Open the
EmbedButton.flain this chapter'sExercisefolder and test the movie.
Out of the four existing text fields, only the upper-left field shows any text (see Figure 6-32). Why? Because all four text fields are rotated, but only the upper-left field has its font outlines embedded. Even though the text field below it contains the same letters and features the same font family, the bottom field's particular variant is set to bold, while the upper-left field is set to normal. The fields to the right are interesting, because the one on the bottom is set to italic, so it makes sense that the text in that one doesn't show (no embedded fonts). But the upper-right field is set to normal, so why doesn't its text show? Again, because it doesn't have any embedded fonts. This tells you that it's not enough to have one text field embed font outlines; all text fields that need this feature must be told to use it.
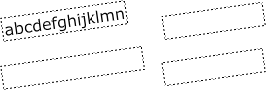
2. Select the bottom-left text field and use the
Character Embeddingbutton to embed lowercase letters. Now both text fields on the left show.
Here's another interesting point. The upper-left text field is set to embed all lowercase letters. Meanwhile, the upper-right text field, which is composed of lowercase letters—just different ones—still doesn't show. Have lowercase font outlines been embedded, or haven't they? They have, but again, each text field that needs these outlines must make use of them.
Test your file and take note of the current SWF file size.
Close the SWF window and use the
Character Embeddingbutton to embed lowercase font outlines for the upper-right text field.Test again. As expected, the upper-right field now shows, yet the SWF file size does not increase. This is good news: Flash isn't embedding the fonts more than once.
Embed lowercase font outlines for the lower-right text field.
Test the movie. This time, the SWF's file size will slightly increase again, because glyphs from three distinct fonts—normal, bold, and italic—have been embedded.
Note
Here's a neat trick. Change the embedding option from lowercase to a single character in the
Include these charactersfield. It can be any character—even a space. Test the movie. You'll see that the upper-right text field still shows! Flash apparently needs to a nudged into "embed mode" for every single text field, but the decision of which characters to embed needs to be made only once.
The other way to embed fonts is to use a font symbol. Open EmbedFontSymbol.fla in the Chapter 6 Exercise folder to see what we mean.
At first glance, this file doesn't seem any different from EmbedButton.fla, but there's a key distinction. Take a look in the library. See that capital A? That's a font symbol. That library asset represents the font outlines for the Verdana font. Its presence does an interesting thing to the Family drop-down list in the Property inspector. A new "font" appears, by the name of VerdanaNormal, followed by an asterisk (see Figure 6-33).
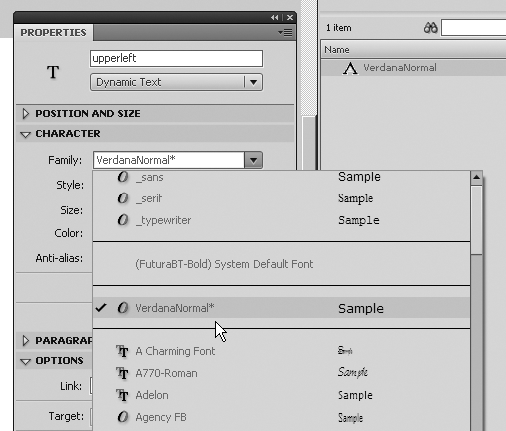
Figure 6.33. A library font symbol adds virtual entries to the Property inspector's Family property.
How did that font symbol get into the library? It's easy enough. Right-click (Ctrl-click) somewhere inside the library that isn't the preview area or an existing asset—or click the upper-right corner under the x—and you'll see a context menu that contains the choice New Font. That's the one you want. It opens the Font Symbol Properties dialog box, which allows you to specify an arbitrary custom name (such as VerdanaNormal), an actual font to embed, optional bold and italic styles, optional bitmap text, and size.
Bitmap text produces text that is not anti-aliased, so it will look jagged. If you choose this option, you must specify the particular font size you're after. If you do not use bitmap text, font size doesn't matter, because the font outlines will be vectors. As explained previously, bold and italic are separate font outlines, so if you want normal text with the occasional italic words for emphasis, you'll need to include two font symbols.
The final step is to export your font symbol for ActionScript. Right-click (Ctrl-click) the font symbol in the library and choose Properties. If the Font Symbol Properties dialog box doesn't show a Linkage area, click the Advanced button. Put a check mark in the Export for ActionScript and Export in First Frame boxes, and you're set. The Class field is automatically filled in for you, based on the font symbol's library name. Its class name might be slightly changed if the library name contains illegal characters, such as spaces or certain punctuation. The base class must be flash.text.Font, which makes sense.
As with EmbedButton.fla, this FLA features four text fields. However, this time, none of them shows text in the authoring tool. If you check the Character Embedding button, you'll see why (no embedding). Interestingly, if you test the SWF, you'll see text in the upper two fields. Have we entered the Twilight Zone yet?
Check the upper two text fields and verify in the Property inspector that they're both set to the VerdanaNormal* "font" (actually a virtual font—the library font symbol). The embedding is happening with ActionScript, by way of the TextField.embedFonts property for each text field instance. As you click each dynamic text field, note that each has an instance name (upperleft, lowerleft, upperright, and lowerright). Open the Actions panel and look at the code in frame 1 of the scripts layer:
upperleft.embedFonts = true;
upperright.embedFonts = true;
lowerleft.embedFonts = true;
upperright.embedFonts = true;
The lower-left and lower-right text fields do not show in the published SWF, because neither bold nor italic variants have been brought as font symbols into the library.
To prove that VerdanaNormal* really is a virtual font, right-click (Cmd-click) the font symbol and choose Properties. Change the Font entry to a visually different font, such as Courier. Test your movie. Even with a name like VerdanaNormal*, the font outlines look like the replacement font.
Let's admit it: If we enter text, we will inevitably use the wrong spelling for a word or two. Flash CS4 contains a tool that checks the spelling of all of the text in a document. You don't have heartless editors peering over your shoulders as we do, so spell checking your work before sending it to the Web is a really good idea. It should therefore not come as too much of a surprise to discover that the spell-checking feature of Flash is quite robust. It allows you to check not only the spelling of the text in your text fields, but also the spelling in your layer names.
If you have never used the spelling features of Flash CS4, you need to set up the spelling checker before you undertake your first spell check. Open a new Flash document and select Text
Note
It is heartening for one of the authors to see a Canadian dictionary and a British English dictionary. Canadian and British English are understandably similar, but writing for publishers based in the United States can be a bit disorienting. For example, the word color, which is used extensively throughout this book, is not correct in the United Kingdom or Canada, where it is spelled colour. Another word used in the American English dictionary is the word check. This important method of payment is spelled cheque in the Queen's English.
Let's bring in some text—with typos—and check the spelling.
Open the
SpellItOut.txtdocument in this chapter'sExercisefolder in a word processor, select the text, and copy it to the clipboard. Large amounts of text are pasted into Flash. For better or worse, there is no ability in the application to import text into the library. Close the word processor.Return to Flash, select the
Texttool, and click the stage. SelectEditSelect
TextWhen you complete your spell check, click the
Closebutton.Note
Although there is no language known as "Adobe," the Flash dictionary is full of terms exclusively used by the Adobe products. A great example of an "Adobian" word is ActionScript. It wouldn't be flagged by the Adobe spelling checker, but will be considered an error by other spelling checkers.

The final two exercises in the chapter deal with one of the more frequently asked questions regarding text: "How do I scroll a large amount of text?" In fact, there are several ways of approaching this one. We'll look at two. The first is to use the UIScrollBar component, which, to quote a friend of ours, is "easy peasy." The second is to "roll your own" scroller using ActionScript.
Before you start, let's get clear on the fact that the text field must be dynamic, and Flash needs to know it is scrollable. This is done in one of three ways:
Hold down the Shift key and double-click the circular handle of the text block. The circle will turn into a black square, as shown in Figure 6-36.
Using the
Selectiontool, click the text block and selectTextWith the text block selected, right-click (Ctrl-click) the text box and select
Scrollablefrom the context menu.
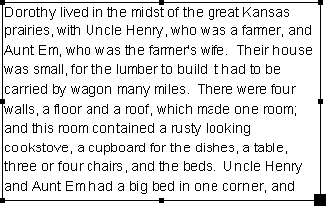
Let's start with the "easy peasy" method: using the UIScrollBar component. We will talk about components in great depth in Chapter 11. For now, just work with us. In this particular case, no ActionScript is involved, which is why we're showing you the UIScrollBar component early. Components usually require a bit of programming.
Open the
ScrollComponent.flafile in the Chapter 6Exercisefolder. You will see we have put some text on the stage in a dynamic text box.Switch to the
Selectiontool, click the text field, and selectTextSelect
WindowDepending on which side of the text field you chose, the component will spring to the closest side of the text field. Switch to the
Selectiontool and move it to the opposite side of the field. Now move it back to the right side of the field and release the mouse.Save and test the movie. You will see that can scroll the text up and down, as shown in Figure 6-38.


In this final exercise of the chapter, we are going to let you wire up a scroller using ActionScript. Just keep in mind there are several hundred ways of doing this, and the method we are using is a very basic example of creating scroll buttons. In this example, we use two very simple button symbols as the scrollers, whereas others may use movieclips. We use opacity to indicate when the scroll button is no longer active. Others may use different colors or even different shapes to indicate the state of the scroll button. This example moves the text up or down a short distance (one line) with each mouse press. Others may have the text move up or down until the mouse is released. Regardless, the text is scrolling, which is the point of this exercise. Let's get busy:
Open the
scrollingAS.flafile in this chapter'sExercisefolder. You will see that we have added the text field and the buttons to the stage. The text field has been given the instance name ofoutput, and the buttons have the instance names ofbtnScrollUpandbtnScrollDown.Select the first frame of the
Actionslayer, open theActionspanel, and you will see we have provided you with the text.Click in line 4 of the
Scriptpane and enter the following code:btnScrollUp.addEventListener(MouseEvent.MOUSE_UP, scrollUp); function scrollUp():void { output.scrollV--; updateButtons(); } btnScrollDown.addEventListener(MouseEvent.MOUSE_UP, scrollDown); function scrollDown():void { output.scrollV++; updateButtons(); }
These two functions are how the text moves. The TextField.scrollV property moves the text up one line—scrollV-—or down one line—scrollV++—depending on which button is clicked. The next step in the process is to add the opacity change when a button is clicked and to make sure the finger cursor no longer shows when the start or the end of the text block is reached. That is the purpose of the updateButtons() function.
Note
This may seem like a lot of effort—and programming often is—but in this case, you're lucky. Text automatically stops scrolling up when the scrollV property is at 1 (the same goes for the bottom end and scrolling down), so you don't actually need to program the text field to stop scrolling when an end is encountered. Flash takes care of that for you. But it is a courtesy to hide the finger cursor by temporarily disabling the relevant button as necessary.
Press Enter (Return) twice and enter the following code:
function updateButtons():void {
 if (output.scrollV == 1) {
   btnScrollUp.alpha = 0.5;
   btnScrollUp.enabled = false;
 } else {
   btnScrollUp.alpha = 1;
   btnScrollUp.enabled = true;
 }
if (output.scrollV == output.maxScrollV) { btnScrollDown.alpha = 0.5; btnScrollDown.enabled = false; } else { btnScrollDown.alpha = 1; btnScrollDown.enabled = true; } } updateButtons();
As step 4 shows, the btnScrollUp and btnScrollDown buttons additionally call this custom function, updateButtons(). This function examines the current value of scrollV against a couple numbers to determine how to manipulate the btnScrollUp and btnScrollDown buttons. When the text is fully scrolled up, its scrollV value is 1. In that case, alpha is reduced to half and enabled is set to false; otherwise, alpha is set to 1 (in ActionScript, alpha values are a number between 0 and 1) and enabled to true. When text is fully scrolled down, scrollV will be the same value as that text field's maxScrollV value. In that case, the same basic procedure is practiced again.
The last line, updateButtons();, actually executes this function immediately after its declaration, in order to update the buttons before they're even pressed.
Close the
Actionspanel and test the movie. Theupbutton is grayed out (actually, its opacity is 50%), as shown in Figure 6-39. This is because it is at the top of the text block and thescrollVvalue is equal to1. Notice how it turns dark when thedownbutton is clicked. This is because thescrollVvalue is now greater than 1.
In this chapter, you learned the following:
How to add text to Flash
The various text-formatting features available to you in Flash CS4
How to choose and work with static, dynamic, and input text fields
How to put text in motion and manipulate many of its properties
The ActionScript necessary to create, format, and provide interactivity through the use of text
When to embed font outlines into a SWF and how to accomplish that task
How to create scrolling text in Flash
We suspect you are more than a little confounded at the possibilities open to you when it comes to using text in Flash. If you are one of those who saw text as the gray stuff hovering around your animations, we hope you have seen the error of your ways. And, if you are one of those who want to get going and turn out really cool motion graphics pieces, we hope you paid close attention to what Bringhurst was saying in the quote that opened this chapter. Regardless of which camp you fall into, we know that you are now aware that adding text to a Flash CS4 animation doesn't stop with a click of the Text tool and the tapping of a few keys on the keyboard.
Now that you know how to work with text and put it in motion, the time has arrived to put objects in motion. Animation in Flash is covered in the next two chapters, and to find out more, turn the page.